
Plastic repair - any tips?
 08-07-2008, 07:30 AM
#1
Honda-Tech Member
Thread Starter
Join Date: Aug 2005
Location: Milwaukee, WI, USA
Posts: 1,167
Likes: 0
Received 0 Likes
on
0 Posts
So I'm finally getting around to sanding out the scratches in my tail and right fairing. I bought the bike after it had been dropped, and just never got around to fixing the plastics.
Basically, there's some deep scratches that I'm going to try to sand down, fill with plastic filler, and then rattle can. I don't expect it to look great - but hope that it's an improvement.
Anyone do this? Tips?
Basically what I'm planning on doing is
- Sand
- Filler
- Wetsand
- 2-3 very thin coats base
- Wetsand
- 2-3 very thin coats base
- Wetsand
- clear
- Wetsand
 08-07-2008, 08:21 AM
#4
Honda-Tech Member
Thread Starter
Join Date: Aug 2005
Location: Milwaukee, WI, USA
Posts: 1,167
Likes: 0
Received 0 Likes
on
0 Posts
<TABLE WIDTH="90%" CELLSPACING=0 CELLPADDING=0 ALIGN=CENTER><TR><TD>Quote, originally posted by danteisme »</TD></TR><TR><TD CLASS="quote">is it just scratches or is it cracks?</TD></TR></TABLE>
Just scratches.
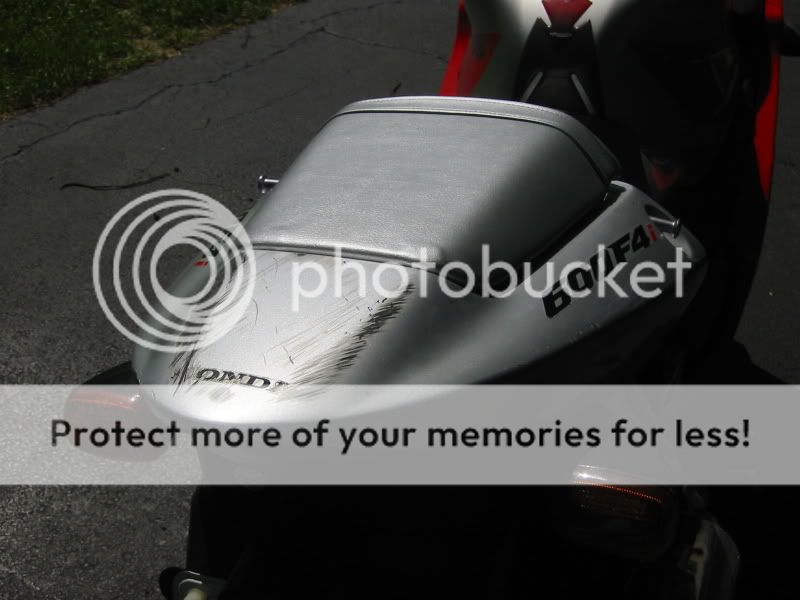
Previous owner dropped it at low speed, it slid into a curb and smacked the tail
Just scratches.
Previous owner dropped it at low speed, it slid into a curb and smacked the tail
08-07-2008, 08:29 AM
#5
Honda-Tech Member

Join Date: Jun 2003
Location: Off THE 60, Between THE 605 and THE 57
Posts: 9,633
Likes: 0
Received 1 Like
on
1 Post
looks pretty easy. plastic filler or bondo will work. as with any DIY paint job, be patient.
make sure you sand over the part being filled with some 400 or 220 grit before filling.
make sure you sand over the part being filled with some 400 or 220 grit before filling.
08-07-2008, 10:09 AM
#6
Honda-Tech Member
You're going to want to sand with 80 grit or less before filling with plastic filler such as bondo (crap IMHO). Let that setup and shape with 80 grit. Prime with a filler primer and paint.
Are you going to rattle can it? I tried rattle can and did not like it and went with automotive urethane. I used an epoxy primer and did not need adhesion promoter on the plastic like you may with a spray can primer.
As for plastic welding, I hear that's the only way to repair ABS plastic.
Are you going to rattle can it? I tried rattle can and did not like it and went with automotive urethane. I used an epoxy primer and did not need adhesion promoter on the plastic like you may with a spray can primer.
As for plastic welding, I hear that's the only way to repair ABS plastic.
Trending Topics
08-07-2008, 12:12 PM
#8
Honda-Tech Member
Join Date: Nov 2005
Location: Wouldnt you like to know
Posts: 1,421
Likes: 0
Received 0 Likes
on
0 Posts
Let me see if I can try to clear up some confusion in here.
Ok, to start if all you have is scratches then sand the area WELL with 80-180 grit. If all you have is light scratches (which it appears) get some evercoat metal glaze. Its a thin filler that will sand super easy. you can get it in small tubes or quarts. I believe the qt is around $20 something with the activator.
If your painting a fresh brand new part, lay adhesion promoter over the well scuffed area. Epoxy primer is nice as well since it is a great adhesion promoter (practically) itself but is not really needed. Once you get the area all filled and what not, sand the filler with 220-320 grit. Scuff the area around it and spray some primer surfacer. These are the high build primers. Follow this up with sanding with 400-600+ wet (I use 600...some co-workers like 400 and 800). Your surface is now ready for paint.
If you need sealer, spray it then spray the base. No sanding needed in between unless you get some dirt etc etc.- Note you only need sealer if your substrate and your base color are way off...i.e. black primer painting the bike white or yellow. This is to aid in basecoat coverage
After that is all taken care of and your ready to shoot the base, spray it in full even strokes. Do not try to get coverage on the first run...nor the second run. You will usually need 3+ coats (some colors take alot more) example dodge pr4 (red) covers suppper quick while saturn red (forget code) does not cover worth ****. There is no need to sand the base coat, again unless you have flaws such as dirt.
Edit: about the flex additive...motorcycle plastics are sturdy they do not really flex as much as a car bumper at all. IMO it is not worth the extra cost. I know someone will disagree with me on this but it has been found that most flex agents only allow the part to flex any degree past normal for 90 days. If its going to flex and crack...it will crack regardless
08-07-2008, 12:24 PM
#10
Honda-Tech Member
Join Date: Nov 2005
Location: Wouldnt you like to know
Posts: 1,421
Likes: 0
Received 0 Likes
on
0 Posts
"orange peel" is exactly what it sounds like. It looks like the textured surface of a orange. You CAN get that effect in the basecoat from laying it on way too heavy but 99.9% of the time that is not the case. But other issues come with that as well, if you lay the base on too heavy on a metallic paint it will look blotchy as the metallics are pooling up in spots.
In the clear is what it is usually referred to, and this comes from alot of things, the gun used, the air pressure, the wrong temp activator used in the clear, going to heavy, going to light etc etc. But all of this can easy be fixed in the clear with wet sanding and buffing.
When I paint, its wet on wet. Spray the sealer, let it flash, spray the base...let it flash, spray the clear. If there are flaws (i.e orange peel, dirt in the clear) then you finally sand and buff
08-07-2008, 04:36 PM
#14
Member
Join Date: Jun 2002
Location: Pine Mountain, GA, USA
Posts: 1,890
Likes: 0
Received 0 Likes
on
0 Posts
<TABLE WIDTH="90%" CELLSPACING=0 CELLPADDING=0 ALIGN=CENTER><TR><TD>Quote, originally posted by MSchu »</TD></TR><TR><TD CLASS="quote">Anyone have experience with plastics welding?  </TD></TR></TABLE>
Yeah, I have a bit, what do you want to know?
</TD></TR></TABLE>Yeah, I have a bit, what do you want to know?
08-07-2008, 05:08 PM
#15
Honda-Tech Member
Thread Starter
Join Date: Aug 2005
Location: Milwaukee, WI, USA
Posts: 1,167
Likes: 0
Received 0 Likes
on
0 Posts
<TABLE WIDTH="90%" CELLSPACING=0 CELLPADDING=0 ALIGN=CENTER><TR><TD>Quote, originally posted by ...rohit »</TD></TR><TR><TD CLASS="quote">Eric, post a step by step when you do this, I wanna try  </TD></TR></TABLE>
Dammit, I knew I should have taken pictures!
I'm doing it right now. So far its going pretty well... I'll post after pictures and how I did it. But I'm pretty much following what swappedcx said
</TD></TR></TABLE>Dammit, I knew I should have taken pictures!
I'm doing it right now. So far its going pretty well... I'll post after pictures and how I did it. But I'm pretty much following what swappedcx said

Thread
Thread Starter
Forum
Replies
Last Post