
View Poll Results: What do you think?


Voters: 146. You may not vote on this poll
FENDER FLARES....take 2....finally SUCCESS!
 10-11-2009, 04:03 PM
#26
Honda-Tech Member
Join Date: Jun 2008
Posts: 87
Likes: 0
Received 0 Likes
on
0 Posts

 10-12-2009, 03:14 AM
#28
Honda-Tech Member
Thread Starter
Join Date: Apr 2008
Location: Toms River, NJ, US
Posts: 163
Likes: 0
Received 0 Likes
on
0 Posts
10-12-2009, 04:00 AM
#29
B*a*n*n*e*d

Join Date: Jul 2008
Location: Manahawkin, NJ, Ocean Country
Posts: 535
Likes: 0
Received 0 Likes
on
0 Posts
12-29-2009, 12:45 PM
#33
Honda-Tech Member
Join Date: Nov 2007
Location: Kitsap, WA, USA
Posts: 682
Likes: 0
Received 0 Likes
on
0 Posts
Just needs more offset. They look like they're supposed to be there.
Wheel spacers, go.
EDIT: Omg prepare for necro flames
Wheel spacers, go.
EDIT: Omg prepare for necro flames
12-29-2009, 12:52 PM
#34
Honda-Tech Member
Thread Starter
Join Date: Apr 2008
Location: Toms River, NJ, US
Posts: 163
Likes: 0
Received 0 Likes
on
0 Posts
12-29-2009, 02:32 PM
#36
Junior Member
Join Date: Dec 2009
Location: 360 ,Washington
Posts: 36
Likes: 0
Received 0 Likes
on
0 Posts
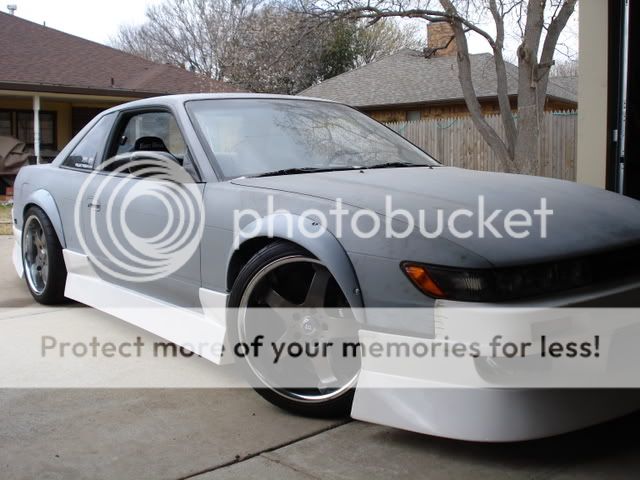
ok so i decided i didnt like my 1st attempt at fabricating flares, just like everyone else so clearly voted in my previous thread...haha...they've been removed...well, replaced actually....see my new flares below and a write up on how to install. Now I just need some low offset wheels and I'm set!
Since these are tech forums I'll gladly tell you how I did it:
* Ordered a set of used 1990 Jetta GLI flares from a guy on a VW forum ($60)....
* Test fit everything and marked off what needed to be trimmed, surprisingly not so much.
* Using a utility knife and about 2 hours of careful trimming I got them to fit flush all around.
* Now it's time to attach them them to the car. This part is actually quite simple but it helps to have a buddy (or tape, like I used) to help hold everything in place while you're working.
* Line everything up, drill a small hole through the lip of the fender flares and into the inner fender lip and also the front/rear bumpers of the car.
* Now, using some #10 U-type Speed Nut Fastners slide them over the holes you just drilled and then use some #10 screws to fasten the flares to the fender lip/bumpers through the speed nuts.
Materials Required:
#10 U-type fastners and #10 screws (3/4" and 1"):

How they attach to the fender lip / bumpers:

Tools Needed:
Utility Knife:

Drill / Screwdriver:

Since these are tech forums I'll gladly tell you how I did it:
* Ordered a set of used 1990 Jetta GLI flares from a guy on a VW forum ($60)....
* Test fit everything and marked off what needed to be trimmed, surprisingly not so much.
* Using a utility knife and about 2 hours of careful trimming I got them to fit flush all around.
* Now it's time to attach them them to the car. This part is actually quite simple but it helps to have a buddy (or tape, like I used) to help hold everything in place while you're working.
* Line everything up, drill a small hole through the lip of the fender flares and into the inner fender lip and also the front/rear bumpers of the car.
* Now, using some #10 U-type Speed Nut Fastners slide them over the holes you just drilled and then use some #10 screws to fasten the flares to the fender lip/bumpers through the speed nuts.
Materials Required:
#10 U-type fastners and #10 screws (3/4" and 1"):
How they attach to the fender lip / bumpers:
Tools Needed:
Utility Knife:
Drill / Screwdriver:
12-29-2009, 02:35 PM
#37
Junior Member
Join Date: Dec 2009
Location: 360 ,Washington
Posts: 36
Likes: 0
Received 0 Likes
on
0 Posts

 12-29-2009, 08:48 PM
#40
Honda-Tech Member
iTrader: (1)
Join Date: Jan 2006
Location: "That one guy with that one car" Kennewick WA
Posts: 2,654
Likes: 0
Received 0 Likes
on
0 Posts
does anybody know where to get #10 U-type fastners shown in the pictures above?
12-30-2009, 12:42 AM
#41
Honda-Tech Member
Join Date: May 2007
Location: Spanish Fork, Utah; El Dorado Hills, CA
Posts: 1,763
Likes: 0
Received 0 Likes
on
0 Posts
 12-30-2009, 05:20 PM
#44
Keyboard Humorist
Join Date: May 2002
Location: Granada Hills, Ca, USA
Posts: 9,814
Likes: 0
Received 9 Likes
on
7 Posts
I can't saw much about the front one as it's not shown well enough in the pic.
The one above the rear wheel looks cool at the top of the wheel well, but then it comes across and makes hideous contact with the line in the door and extends down to engulf the rocker panel. The back of it comes down and crashes into the rear bumper and hangs over everything until it finally comes to an end.
In my opinion it would look much better if you culd leave the top portion and somehow cut it to blend into the body of the car before it hits the line of the door and bumper. It's not a wide body kit... just a fender flare.
I'm thinking something like the old Z cars or Silvia's do...
12-30-2009, 05:35 PM
#45
Who the fack changed my title?!
wagon is pokin out hardcore and has the perfect stance. thats the way a REAL set of fender flares are supposed to look. the rex looks like its for autocross or equivalent but not my cup of tea
12-30-2009, 06:28 PM
#47
Honda-Tech Member
Join Date: Oct 2003
Location: Coming to a Campus Near You!
Posts: 1,299
Likes: 0
Received 0 Likes
on
0 Posts
 12-31-2009, 05:30 AM
#50
Honda-Tech Member
Thread Starter
Join Date: Apr 2008
Location: Toms River, NJ, US
Posts: 163
Likes: 0
Received 0 Likes
on
0 Posts
I can't saw much about the front one as it's not shown well enough in the pic.
The one above the rear wheel looks cool at the top of the wheel well, but then it comes across and makes hideous contact with the line in the door and extends down to engulf the rocker panel. The back of it comes down and crashes into the rear bumper and hangs over everything until it finally comes to an end.
In my opinion it would look much better if you culd leave the top portion and somehow cut it to blend into the body of the car before it hits the line of the door and bumper. It's not a wide body kit... just a fender flare.
I'm thinking something like the old Z cars or Silvia's do...
]
