
DIY: Budget Swaybar install 96-00 Civic
 08-18-2010, 06:04 PM
#1
Technical Hero
Thread Starter
Join Date: May 2002
Location: Charlotte, NC, 28227
Posts: 9,876
Likes: 0
Received 28 Likes
on
20 Posts
My intent in making this thread is for a few reasons. First I have been looking for a good writeup for installing a factory sway bar on a 96-00 and although finding a few aftermarket threads I wanted to show the install of a factory sway bar on a car that wasn't equipped with one from the factory (DX, CX, etc). Also I wanted to help out on what swaps from these models and what doesn't and show the easiest way to put it together for cheap. This write up will be consist of installing a front sway bar on a 96-00 hatchback but will be similar for the 2 and 4 door models as well. You may also instead of using the above EX/HX/LX parts also use the 99-00 Civic Si complete front control arms,front shock forks, sway bar (26MM), end links, frame bushings and brackets but may make the project a bit more pricey. Also I will be doing a rear sway bar install later but I am awaiting some parts to finish it. I'm open to critique so if you have anything to add positively do so freely as we are here to help educate and inform. Also for some awesome helpful sway bar info for ek's try here as well: http://www.ek9.org/forum/suspension/...formation.html. Here we go:
Required parts and tools:
-Front sway bar (22MM), sway bar frame bushings and frame mounts, sway bar endlink bushings, from 96-00 EX/HX/LX(4dr) OR
-Front control arm rear section from 96-00 EX/HX/LX
-Metric socket set
Optional parts and tools
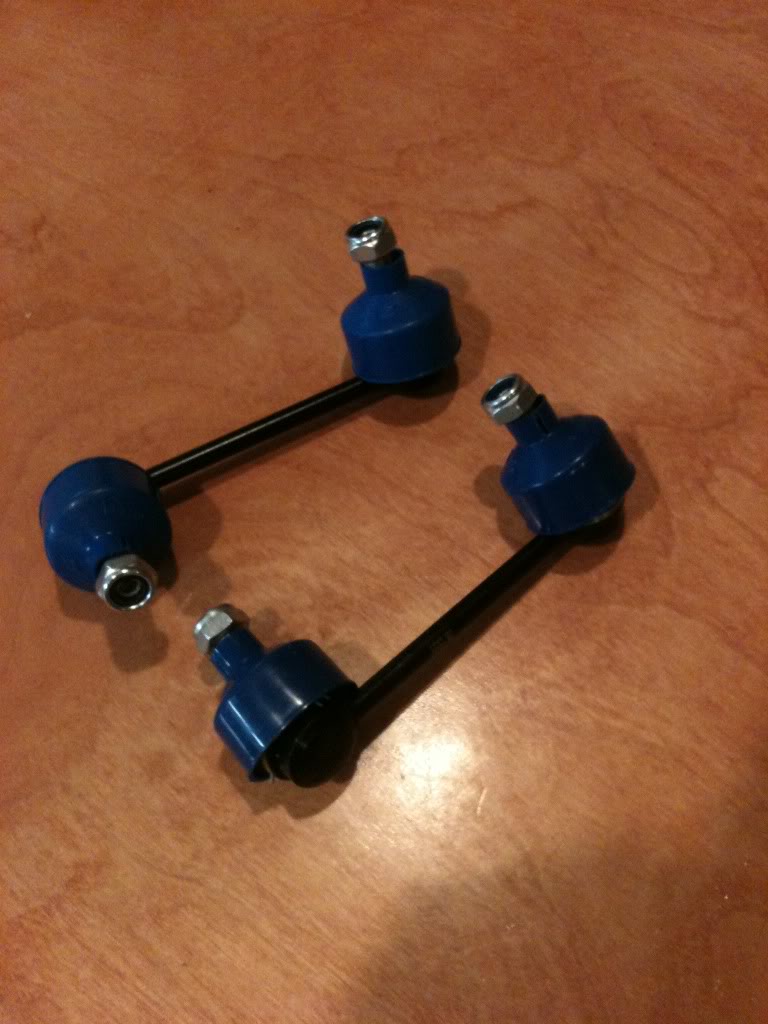
-Polyurethane sway bar frame bushings (22MM) and endlink kit (16.5121G, 16.8104G )
-Torque wrench
-Prybar
-Silicone grease
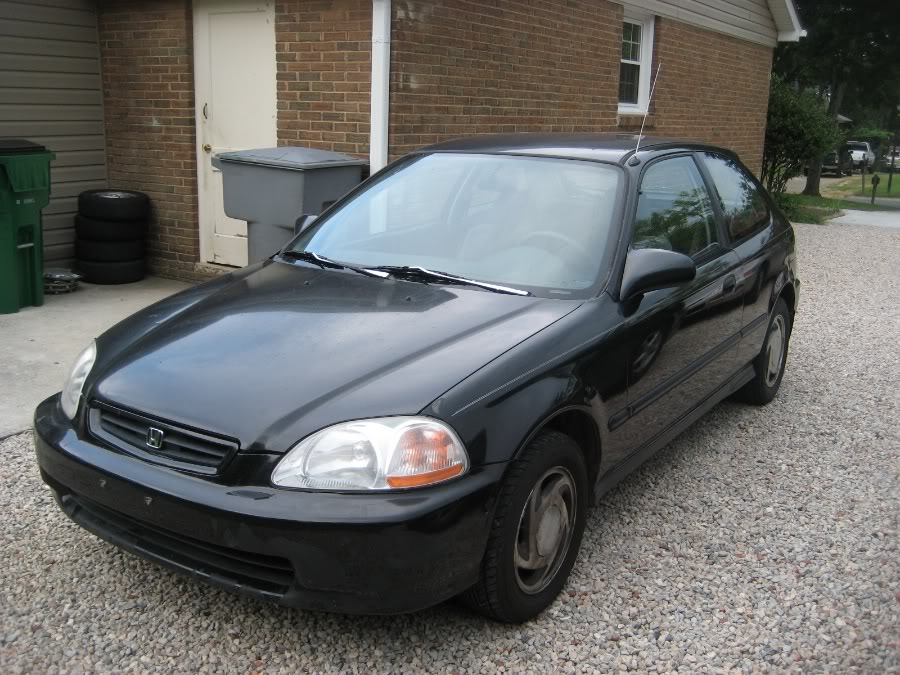
The Beast (96 DX Hatchback), modifications: oil change, factory air filter, new tires, old rims
Step one: Gather your parts, loosen lug nuts, jack the car up, use jack stands, take off wheels, yada yada
New frame bushings ($7.99 Autozone, special order, no delivery costs), reused old fram mounts
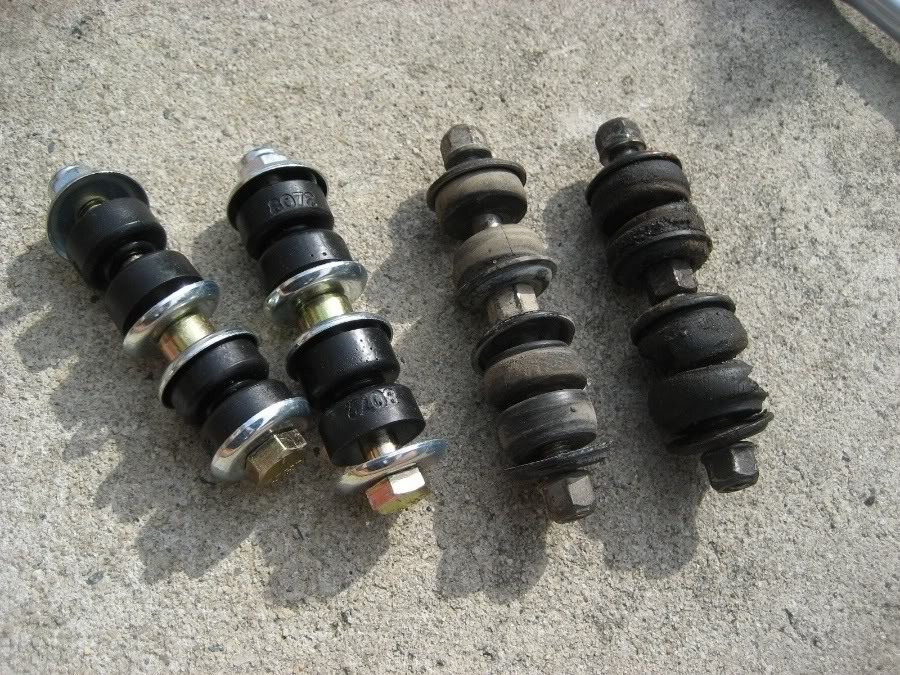
New end link set vs old marshmallow set ($13.99 Autozone, special order no delivery costs)
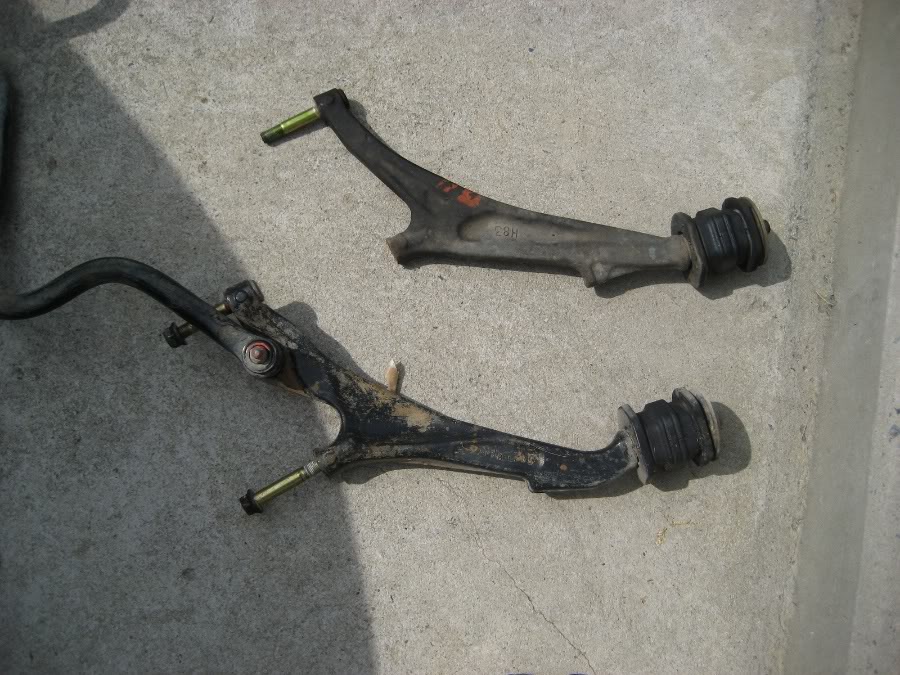
New used sway bar and rear section of lower control arms (you don't need the whole arm just the back section, its cheaper and easier to get off at the junkyard and bolts right up to the DX/CX control arms) $25 dollars at the local pick and pull junkyard

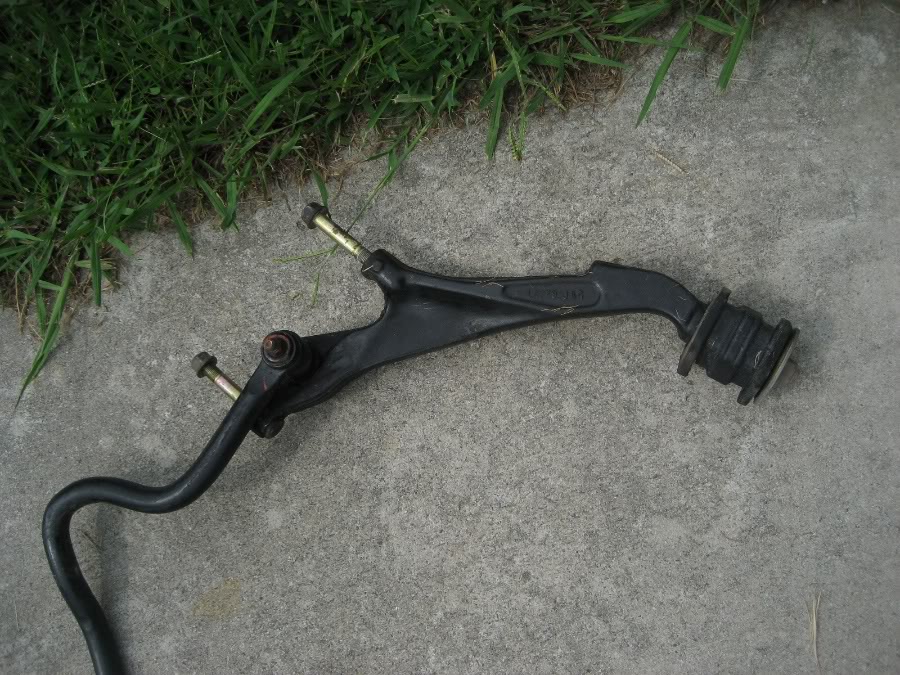
Close up shot of rear section of control arm
Comparison of old and new control arm sections
Step 2: Remove old rear control arm section. You may have have to use the prybar to pry these apart but usually they come apart easily.
Passenger side
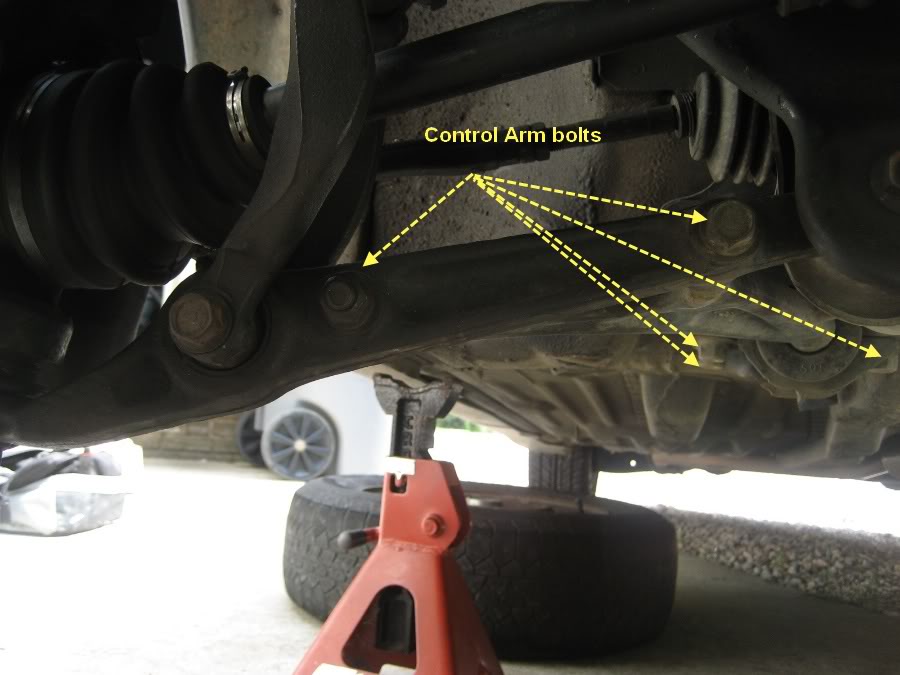
Drivers side
Closer pic of rear three bolts to remove
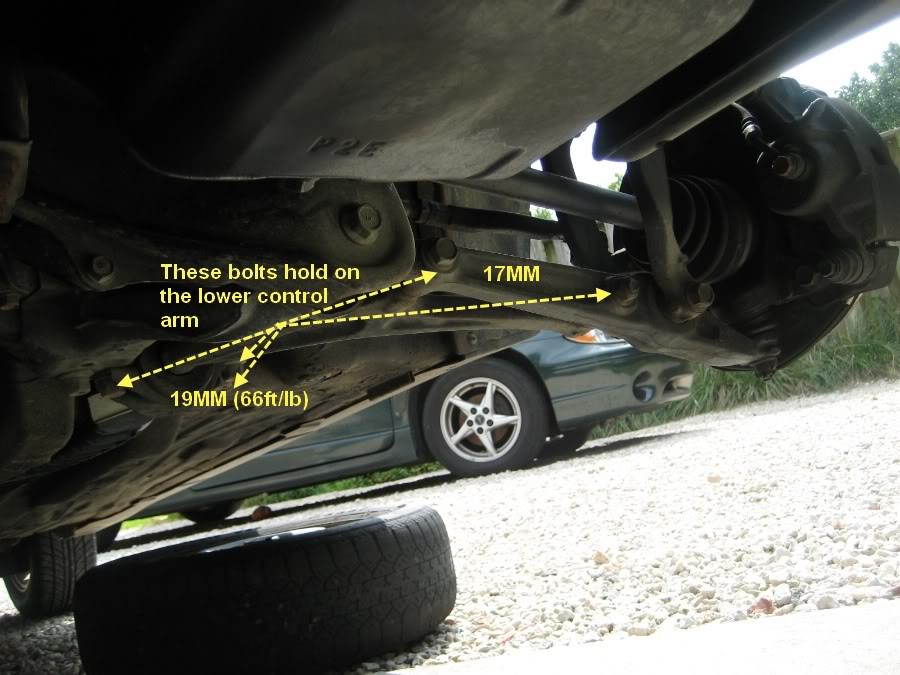
Step 3: Install new control arm section on front control arm by rebolting all 5 bolts using torque specs where shown.
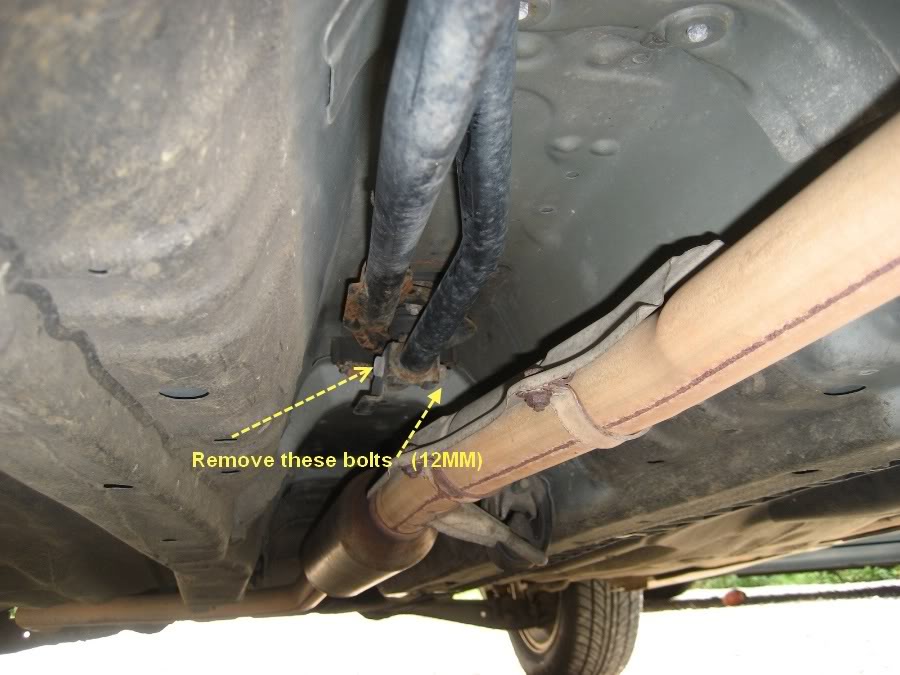
Step 4: Now I know someone can probably play tetris with the bar to get it past the exhaust and two sections of shift linkage but I couldn't so unbolt the front portion of the stabilizer portion of the shift linkage and the rear section of the part that bolts to the shifter itself. Also unbolt the bottom front exhaust portion. Then begin to work the bar above the exhaust down and over the shifter portions making sure the center "hump" of the sway bar points up and the endlink portions of the bar are forward (it'll only bolt up one way anyways).
Exhaust
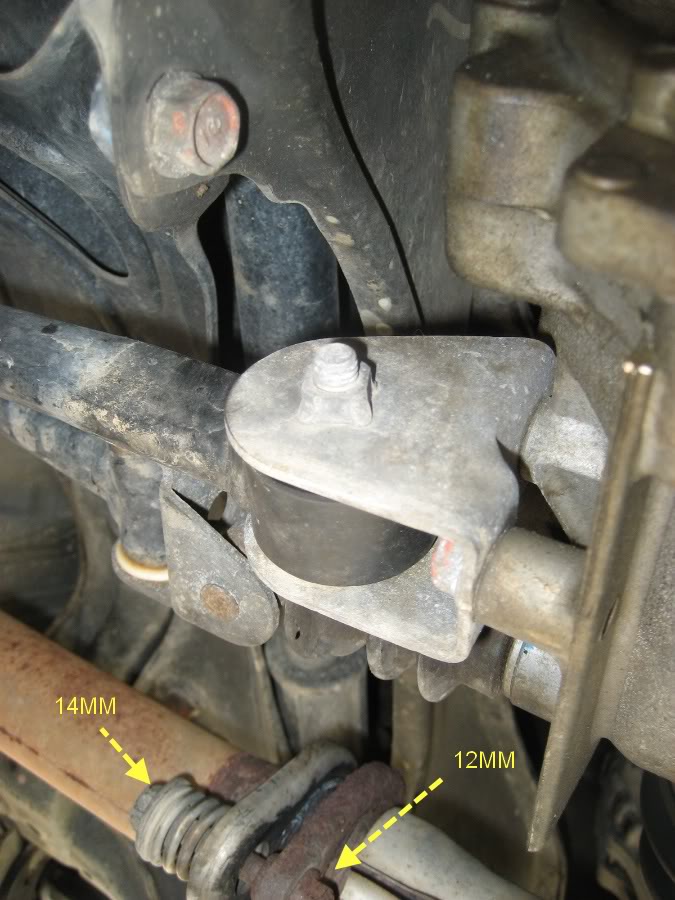
Front stabilizer bolt
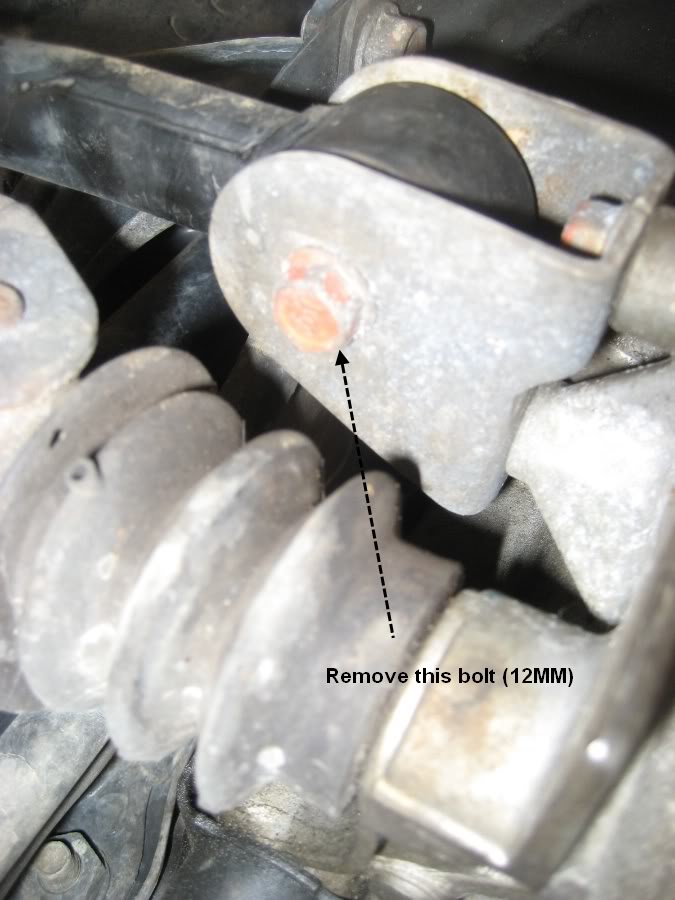
Rear shifter bolt
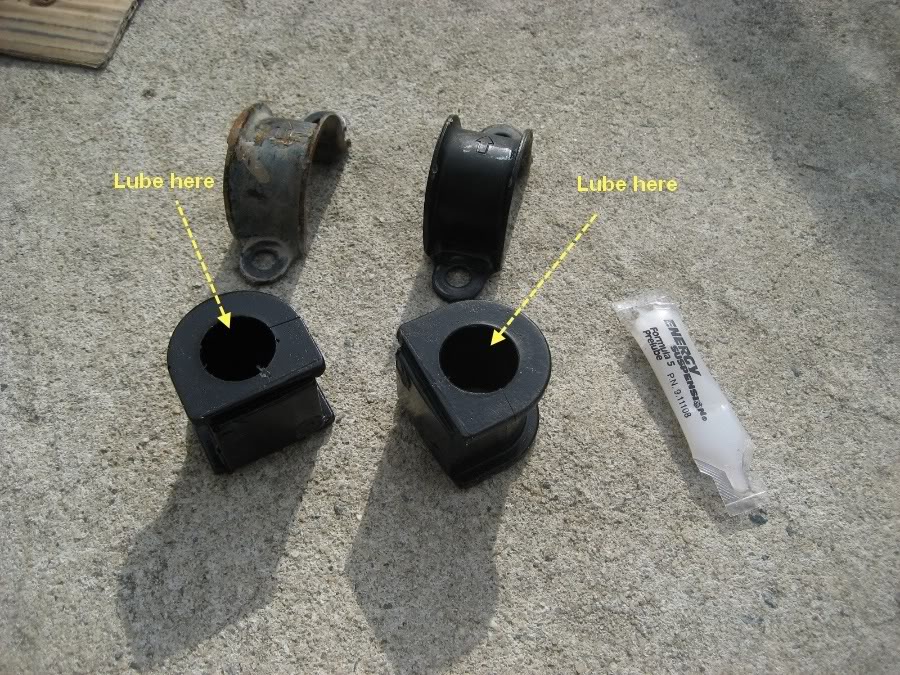
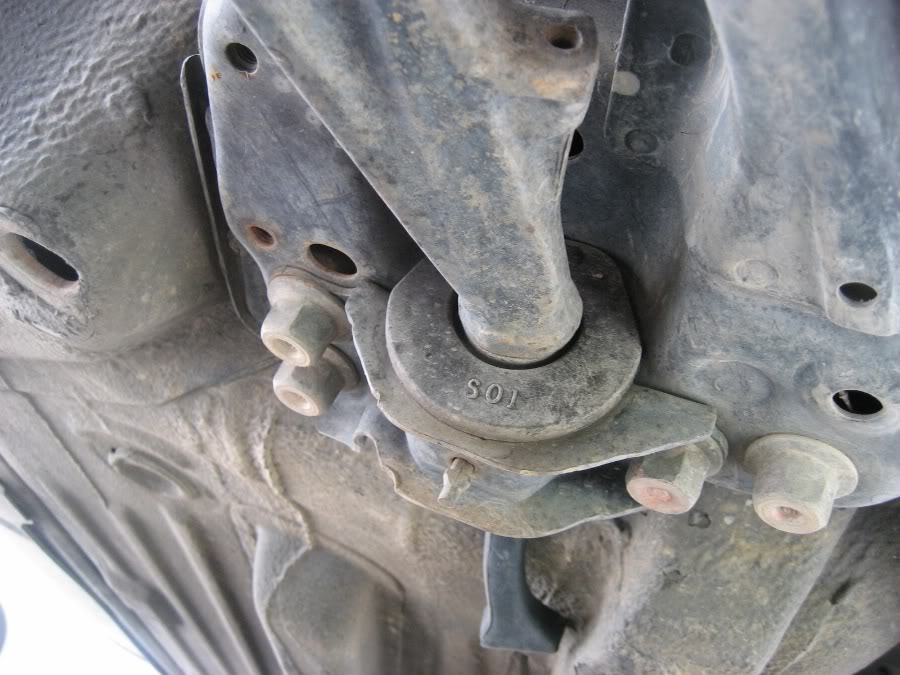
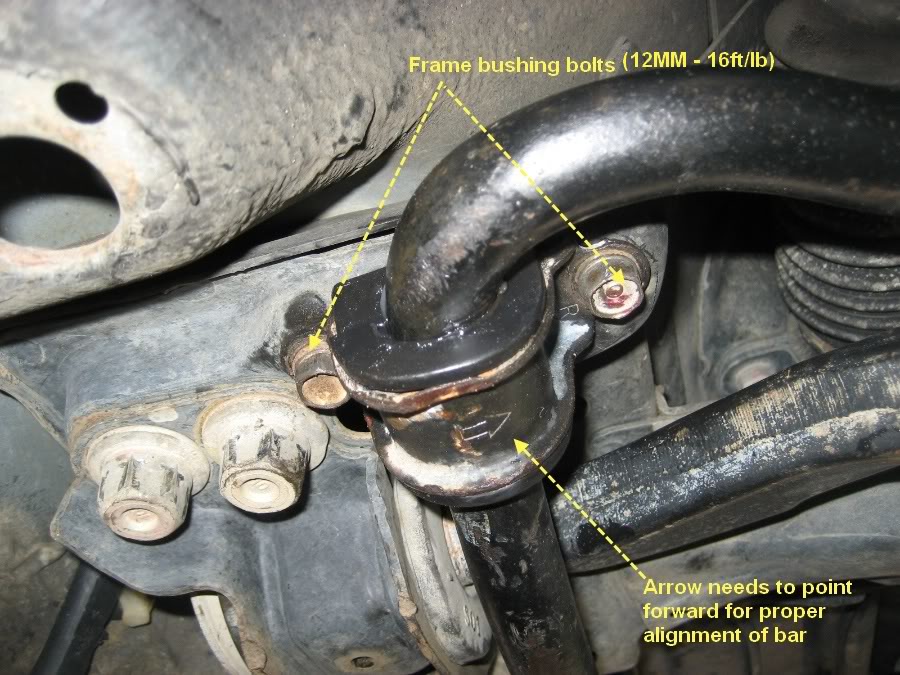
Step 5: Now you want to put your sway bar frame bushing on the bar and lube it up real good with the provided lube on the inside portion (see pic above). Place the frame bushing bracket over the bushing and begin to line up the holes with the threaded holes on your sub-frame (all the models have the threaded holes thank goodness). Make sure the arrow on the bottom of the bracket points toward the front of the car for proper bar alignment. Tighten the bolts to the proper ft/lb.
Step 6: Bolt all your exhaust and shifter portions back up to proper specs.
Step 7: Its good to remember how the configuration goes but heres a quick cheesy sketch (not to scale). Place the end link kit on the bar ends but don't do anything but hand tighten the nuts yet.
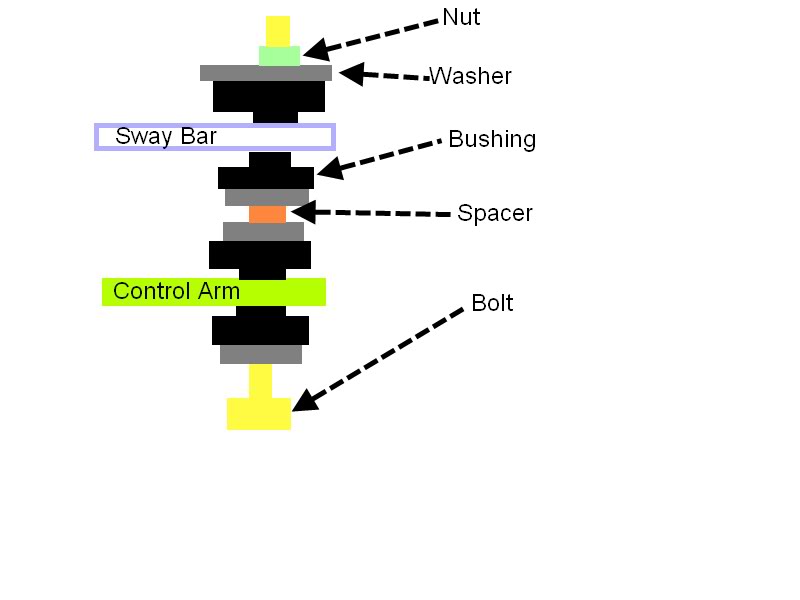
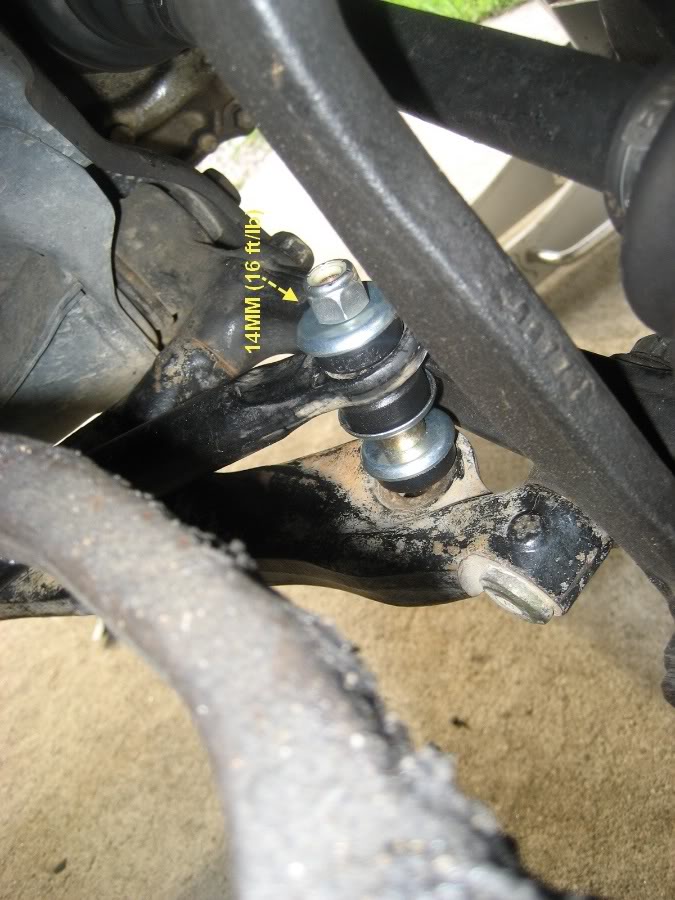
Step 8: Place wheels and lugnuts back on car. Lower car. Torque lugnuts. Now use the torque wrench and torque the bolts down to 16ft/lbs on the end link bolts. Honda recommends putting silicone grease on the factory bushings but energy suspension does not so its up to you. If it squeaks later don't blame me. Enjoy the ride.
My thoughts and feelings about the car before and after. The car never felt bad before but didn't feel that "secure" in most situations. I will speak in simple terms because I don't really know what turn in, understeer, and oversteer mean technically someone can add that if they want. The car feels more firm over all. When I tell it to go left or right it feels like it listens to me faster now. On curves it definitely feels more flat and I don't have as much lean in my seat so it takes a little bit to get used too. Overall I am satisfied. I've done the fast car thing in the past now this is my DD to the extreme meaning. I drive to work and around town. I won't drop it or put a lip on it so don't say it . For 50 bucks and some change I feel accomplished and it was fun. I will update in a few days if my rear endlinks come in and I will install the rear 94-00 Integra bar and do the write up thing. Stay tuned!
Required parts and tools:
-Front sway bar (22MM), sway bar frame bushings and frame mounts, sway bar endlink bushings, from 96-00 EX/HX/LX(4dr) OR
-Front control arm rear section from 96-00 EX/HX/LX
-Metric socket set
Optional parts and tools
-Polyurethane sway bar frame bushings (22MM) and endlink kit (16.5121G, 16.8104G )
-Torque wrench
-Prybar
-Silicone grease
The Beast (96 DX Hatchback), modifications: oil change, factory air filter, new tires, old rims
Step one: Gather your parts, loosen lug nuts, jack the car up, use jack stands, take off wheels, yada yada
New frame bushings ($7.99 Autozone, special order, no delivery costs), reused old fram mounts
New end link set vs old marshmallow set ($13.99 Autozone, special order no delivery costs)
New used sway bar and rear section of lower control arms (you don't need the whole arm just the back section, its cheaper and easier to get off at the junkyard and bolts right up to the DX/CX control arms) $25 dollars at the local pick and pull junkyard
Close up shot of rear section of control arm
Comparison of old and new control arm sections
Step 2: Remove old rear control arm section. You may have have to use the prybar to pry these apart but usually they come apart easily.
Passenger side
Drivers side
Closer pic of rear three bolts to remove
Step 3: Install new control arm section on front control arm by rebolting all 5 bolts using torque specs where shown.
Step 4: Now I know someone can probably play tetris with the bar to get it past the exhaust and two sections of shift linkage but I couldn't so unbolt the front portion of the stabilizer portion of the shift linkage and the rear section of the part that bolts to the shifter itself. Also unbolt the bottom front exhaust portion. Then begin to work the bar above the exhaust down and over the shifter portions making sure the center "hump" of the sway bar points up and the endlink portions of the bar are forward (it'll only bolt up one way anyways).
Exhaust
Front stabilizer bolt
Rear shifter bolt
Step 5: Now you want to put your sway bar frame bushing on the bar and lube it up real good with the provided lube on the inside portion (see pic above). Place the frame bushing bracket over the bushing and begin to line up the holes with the threaded holes on your sub-frame (all the models have the threaded holes thank goodness). Make sure the arrow on the bottom of the bracket points toward the front of the car for proper bar alignment. Tighten the bolts to the proper ft/lb.
Step 6: Bolt all your exhaust and shifter portions back up to proper specs.
Step 7: Its good to remember how the configuration goes but heres a quick cheesy sketch (not to scale). Place the end link kit on the bar ends but don't do anything but hand tighten the nuts yet.
Step 8: Place wheels and lugnuts back on car. Lower car. Torque lugnuts. Now use the torque wrench and torque the bolts down to 16ft/lbs on the end link bolts. Honda recommends putting silicone grease on the factory bushings but energy suspension does not so its up to you. If it squeaks later don't blame me. Enjoy the ride.
My thoughts and feelings about the car before and after. The car never felt bad before but didn't feel that "secure" in most situations. I will speak in simple terms because I don't really know what turn in, understeer, and oversteer mean technically someone can add that if they want. The car feels more firm over all. When I tell it to go left or right it feels like it listens to me faster now. On curves it definitely feels more flat and I don't have as much lean in my seat so it takes a little bit to get used too. Overall I am satisfied. I've done the fast car thing in the past now this is my DD to the extreme meaning. I drive to work and around town. I won't drop it or put a lip on it so don't say it
. For 50 bucks and some change I feel accomplished and it was fun. I will update in a few days if my rear endlinks come in and I will install the rear 94-00 Integra bar and do the write up thing. Stay tuned!
Last edited by HondaPartsHero; 08-19-2010 at 11:46 AM.

The following 2 users liked this post by HondaPartsHero:
08-18-2010, 06:12 PM
#2
Crazy Honda Guy
08-19-2010, 12:11 PM
#5
Technical Hero
Thread Starter
Join Date: May 2002
Location: Charlotte, NC, 28227
Posts: 9,876
Likes: 0
Received 28 Likes
on
20 Posts
Updated part numbers and added link to sway bar page. Also my endlinks came in for the rear so hopefully in a few days I'll be adding the rear Integra bar with write up.
teaser:
teaser:
10-08-2010, 10:34 PM
#7
Looks good, you beat me to it lol 
Also, chads, no i do not belive you do. The only shock forks that are different would be the ones from 99-00 SI/All CTR's.
Also, chads, no i do not belive you do. The only shock forks that are different would be the ones from 99-00 SI/All CTR's.
Trending Topics

 10-09-2010, 10:42 PM
#11
^yep, your correct. I dug around for a little bit, and you are correct, I can personaly confrim they are the same and SI/CTR is diffferent.
The 99-00 SI+CTR shock forks and a little longer and a little bit wider.
The 99-00 SI+CTR shock forks and a little longer and a little bit wider.

 10-10-2010, 04:38 AM
#13
Honda-Tech Member
Join Date: Apr 2009
Location: Newfoundland,Canada
Posts: 198
Likes: 0
Received 0 Likes
on
0 Posts
10-10-2010, 09:53 AM
#16
If you car is like your sig says, they will bolt right onto a Eg, no problem
A 96-00 you can use everything but the rear lca's. And on the front you will need to use all the 96-00 complaince bushing/hardware as the integra is different.
10-14-2010, 06:13 PM
#18
Honda-Tech Member
just installed mine today . definatly worth the time car is alot more stable in corners now for the rear bar!
10-14-2010, 09:18 PM
#20

Thread
Thread Starter
Forum
Replies
Last Post
bradykiller
Honda Civic / Del Sol (1992 - 2000)
15
03-13-2006 11:37 PM