
how do i change master cylinder


 11-25-2005, 09:25 AM
#7
Honda-Tech Member
Join Date: Apr 2005
Location: sleeping in a cactus, AZ, U.S.A
Posts: 2,191
Likes: 0
Received 3 Likes
on
3 Posts
the question was asked,,,,,,,,,,,,is it brake or clutch master?? you got to bleed either one , and since we don;t know what tranny you have, we hope you post it
Trending Topics
11-25-2005, 09:35 AM
#8
Honda-Tech Member
Join Date: Nov 2005
Location: Novi, MI, US
Posts: 24
Likes: 0
Received 0 Likes
on
0 Posts
Here is my story about changing the master brake cylinder on Accord 91. Not everything might work for you.
1. Remove as much of brake fluid as you can from the cylinder reservoir. If you cannot, it is still OK, but prepare something where you can put the old brake cylinder - the fluid will start pouring out. You don't want to have it all over the place and your car - it may damage the paint.
2. Loosen brake line nuts - just loosen but do not disconnect. You don't want the fluid to start dripping on the parts below it. You should be very careful with the nuts - looks like they are made from a softer metal than usual - it is easy to round off the corners of the nut. The best option would be to use a wrench that "grabs" 5 sides and is wide. I didn't have it. I used regular adjustable wrench. I adjusted it right on the brake line nuts and made sure it was very tight and sitting deep in the wrench. Then pushed it. The nut loosened. They wrench that I have has no �play�, so I was sure it will work. Be careful � might not work for you.
3. Unscrew the nuts that hold the cylinder - there is not much space there, so it took me a little more time to remove them.
4. Unscrew the brake line nuts. The brake lines are not very flexible, be careful not to bend them. Remove the cylinder.
5. Prepare your new brake cylinder. It comes with an instruction on how to bench bleed the cylinder. It has to be done the way they describe, otherwise it will be not easy to get rid of the bubbles caught in the brake cylinder. You will have to screw in plastic screws they provide and put the transparent tubes on them. The other end of tubes goes into a container with brake fluid. I simply put them into a bottle I purchased the fluid in. I can tell that these plastic screws surface was not even in the connector to tubes part and I when I was pushing the rod in I saw bubbles going out of the cylinder and then when I was slowly releasing it, I was noticing that it was pulling the air from outside thought the uneven places in plastic screws - between tubes and the screws. Finally I used a thin rope to put around these transparent tubes in the places where they were put on the plastic screw to tighten the connection. Then I was simply pushing the rod in, then folding the tube to prevent the fluid with bubbles from moving back and then releasing the rod. One thing - push the rod slowly, otherwise the bubbles break into very small bubbles and it takes even more time to get rid of them. I was playing with bench bleeding for about 3 hours, which usually should take not more than 20-30 minutes. A dozen of pushes for each connector and I didn�t see any bubbles going out of the cylinder. Then I folded both tubes to prevent the fluid from running out.
6. The repair manual that I have requires the use of some adjustment tool for master brake cylinder replacement. I actually compared the length of the rod and depth of the inner hole of the rod � they were the same. So I supposed that no adjustment was needed.
7. Place the brake cylinder on the pins on brake booster and screw on the nuts on those pins. Tighten them. Still keep the pipes and screws.
8. Connect brake lines. Start with the one that is closer to brake booster � at least it was more convenient for me. Quickly remove the pipe and unscrew the plastic nut and insert the break line. Screw on the brake line nut. The fluid will begin dripping � it is hard to avoid this. Tighten the nut. Do the same with the other brake line.
9. Bleed the brakes. The order is following: rear right, front left, rear left, front right. I tried doing it alone with help of vacuum pump � didn�t work. The pump was pulling air from under the bleeding nut and it was hard to figure out if all bubbles are gone or not. Old fashioned way when one presses and releases the brake pedal and the other opens and closes the bleeding nut worked much better.
Let me know if you need more details. I also hope that all I wrote here makes sense.
There might be more suggestions about how to do things � I just described the way I did it and it worked for me.
11-25-2005, 09:55 AM
#9
H-T Order of Merit
<TABLE WIDTH="90%" CELLSPACING=0 CELLPADDING=0 ALIGN=CENTER><TR><TD>Quote, originally posted by BLUE EH3 »</TD></TR><TR><TD CLASS="quote">whats a fallre wrench</TD></TR></TABLE>
this is a flare nut wrench.
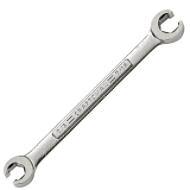
Here's a link to a search I did on Craftsman (Sears) website.
Craftsman Flare Nut Wrench
this is a flare nut wrench.
Here's a link to a search I did on Craftsman (Sears) website.
Craftsman Flare Nut Wrench
 11-26-2005, 03:00 AM
#12
Join Date: Feb 2003
Location: Miami, Florida, usa
Posts: 116
Likes: 0
Received 0 Likes
on
0 Posts
I meant a LINE WRENCH. It is like a box wrench which has a small opening so it will go over the line. This type of wrench gets a good grip on the line nut - much better than a regular open end wrench - so you don't strip the nut.
11-26-2005, 12:30 PM
#13
H-T Order of Merit
<TABLE WIDTH="90%" CELLSPACING=0 CELLPADDING=0 ALIGN=CENTER><TR><TD>Quote, originally posted by georgeda »</TD></TR><TR><TD CLASS="quote">I meant a LINE WRENCH.</TD></TR></TABLE>
Got a picture of that? I've never heard of a line wrench.
Got a picture of that? I've never heard of a line wrench.
11-27-2005, 07:05 PM
#14
<TABLE WIDTH="90%" CELLSPACING=0 CELLPADDING=0 ALIGN=CENTER><TR><TD>Quote, originally posted by TouringAccord »</TD></TR><TR><TD CLASS="quote">Got a picture of that? I've never heard of a line wrench.</TD></TR></TABLE>
sounds like hes describing a flare nut wrench
sounds like hes describing a flare nut wrench
11-27-2005, 07:47 PM
#15
Farts in the shower
Join Date: Jun 2003
Location: Colorado
Posts: 15,559
Likes: 0
Received 0 Likes
on
0 Posts
<TABLE WIDTH="90%" CELLSPACING=0 CELLPADDING=0 ALIGN=CENTER><TR><TD>Quote, originally posted by Honda-Master »</TD></TR><TR><TD CLASS="quote">no offense blue ..but i would spend the money and have a pro do it ,,especially if it is the brake master cylinder ..</TD></TR></TABLE>
Why? This job takes all of an hour and that is without a hydraulic jack and bleeding each wheel by myself.
Do it yourself and save the money.
Should be a 10mm or 9mm flare nut on the brake MC. First I would get a turkey baster and suck out all the brake fluid in the reservoir and then take it out...it makes for a easier clean up .
.
Why? This job takes all of an hour and that is without a hydraulic jack and bleeding each wheel by myself.
Do it yourself and save the money.
Should be a 10mm or 9mm flare nut on the brake MC. First I would get a turkey baster and suck out all the brake fluid in the reservoir and then take it out...it makes for a easier clean up
.
11-27-2005, 07:52 PM
#16
Member
Join Date: Nov 2003
Location: Michigan State University, USA
Posts: 7,240
Likes: 0
Received 1 Like
on
1 Post
just be sure to use a flare nut...seriously...
i had to pay someone to do my clutch slave cylinder because i couldnt get the hard fitting unbolted, and needed the car back ASAP...the hardest part is just bleeding the system, and thats not difficult at all, as long as you have a buddy who likes pushing things
i had to pay someone to do my clutch slave cylinder because i couldnt get the hard fitting unbolted, and needed the car back ASAP...the hardest part is just bleeding the system, and thats not difficult at all, as long as you have a buddy who likes pushing things
11-28-2005, 03:30 AM
#17
H-T Order of Merit
<TABLE WIDTH="90%" CELLSPACING=0 CELLPADDING=0 ALIGN=CENTER><TR><TD>Quote, originally posted by Eddiebx »</TD></TR><TR><TD CLASS="quote">sounds like hes describing a flare nut wrench</TD></TR></TABLE>
Thats the way it sounds but if you look up at his original post up top he says...
<TABLE WIDTH="90%" CELLSPACING=0 CELLPADDING=0 ALIGN=CENTER><TR><TD>Quote, originally posted by georgeda »</TD></TR><TR><TD CLASS="quote">Get a flare wrench to fit the nuts on the lines, otherwise you might round them off.</TD></TR></TABLE>
So it makes me wonder what he's referring to because he said flare nut wrench earlier and then said he meant line wrench and I've never heard of a "line wrench".
11-28-2005, 06:18 PM
#19
Help we my pennies
Thread Starter

Join Date: Jul 2003
Location: 08854, NJ
Posts: 5,411
Likes: 0
Received 0 Likes
on
0 Posts
<TABLE WIDTH="90%" CELLSPACING=0 CELLPADDING=0 ALIGN=CENTER><TR><TD>Quote, originally posted by Honda-Master »</TD></TR><TR><TD CLASS="quote">no offense blue ..but i would spend the money and have a pro do it ,,especially if it is the brake master cylinder ..</TD></TR></TABLE> BRAKE
now he asked me just tyo change the resvior(bottle)
now he asked me just tyo change the resvior(bottle)
11-28-2005, 06:24 PM
#20
Help we my pennies
Thread Starter
Join Date: Jul 2003
Location: 08854, NJ
Posts: 5,411
Likes: 0
Received 0 Likes
on
0 Posts
<TABLE WIDTH="90%" CELLSPACING=0 CELLPADDING=0 ALIGN=CENTER><TR><TD>Quote, originally posted by di3go »</TD></TR><TR><TD CLASS="quote">clutchmaster or brakemaster?</TD></TR></TABLE>brake

Thread
Thread Starter
Forum
Replies
Last Post