off topic - 97 CD5 project
 08-15-2010, 09:18 PM
#976
Honda-Tech Member
Join Date: Jan 2007
Location: SLTX
Posts: 50
Likes: 0
Received 0 Likes
on
0 Posts
 08-15-2010, 09:34 PM
#977
Honda-Tech Member
Gian doing work.
Because of this guy right here I got probably 75 percent of my inspiration and overall 'want' to work on my accord. I have read this thread all the way through I don't know how many times, and no matter how many times I am down about something on my car, I read the thread and get inspired and keep pushing.
Because of this guy right here I got probably 75 percent of my inspiration and overall 'want' to work on my accord. I have read this thread all the way through I don't know how many times, and no matter how many times I am down about something on my car, I read the thread and get inspired and keep pushing.
08-25-2010, 10:15 AM
#978
Honda-Tech Member
Thread Starter
Join Date: Aug 2005
Location: Pompano Beach, FL, USA
Posts: 3,495
Likes: 0
Received 5 Likes
on
4 Posts
Gian doing work.
Because of this guy right here I got probably 75 percent of my inspiration and overall 'want' to work on my accord. I have read this thread all the way through I don't know how many times, and no matter how many times I am down about something on my car, I read the thread and get inspired and keep pushing.
Because of this guy right here I got probably 75 percent of my inspiration and overall 'want' to work on my accord. I have read this thread all the way through I don't know how many times, and no matter how many times I am down about something on my car, I read the thread and get inspired and keep pushing.
Thanks for the support, i appreciate it, accord love is my thing!!
Update to this thread!
HOW TO FIX: Noisy Door Lock Actuators!
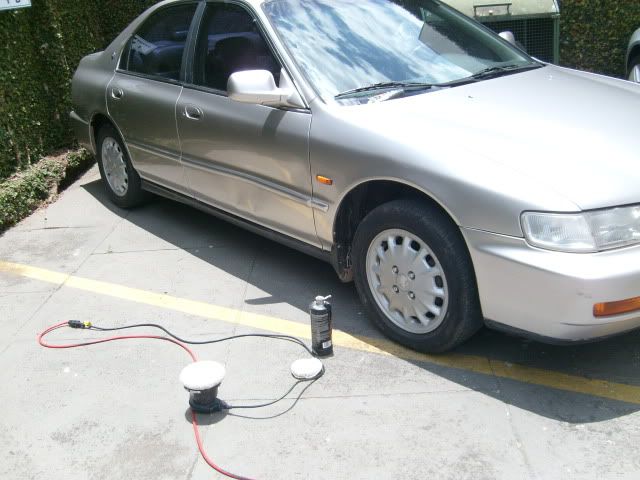
First of all, you need to know which door the noise is coming from. In my case, i found out that for some reason, the previous owner decided to have aftermarket door lock actuators installed, maybe because of the alarm system. Actuators work with very small gears, usually made of plastic, and after some years they wear off, spinning a bit before catching a tooth. This can be common to aftermarket door lock actuators, but not as common to OEM ones. The accord actuators (at least 5th that i know of) have a problem that is easier to take care of, but still requires the assembly to be removed. The rubber that cushions the impact of a moving part attached to a small gear may crack and fall off its place inside the housing, thus making that gear go back and forth a few times until it stops. Sometimes it takes a couple of seconds for the buzzing sound to finally stop, probably not good for the actuator right?! So let's start, in this case, i'm working on a front door for a sedan, although the shape is different, the process is the same for a coupe, and as for the rear doors, it's even easier to get this job done.
In reference to the pic below, the circle "5" is something optional, i'm used to taking off and reinstalling a honda's door panel without having to pop the small little piece.

At the door handle, use something small to flip over this cover which reveals a screw that needs to be removed.

Now, slide the door handle forward (you will feel it once it's loose.
Also, the inner cover for the rear view mirror needs to be removed, pull it out.

Behind the door handle, slide this piece the other way and lift up the rod. Disconnect the wiring behind it also.

The center "pocket" that you use to pull the door close has a small cover inside, you need to flip that over and remove the screw. Take that little pocket out.
Then the door panel should be looking like this, now, from the bottom of the door panel, start pulling it out, and proceed pulling it upwards. Don't lift too far away from the door because you need to disconnect the courtesy light behind the door panel.

Now, reconnect the door handle's wiring (at least the one that controls the window).
Inside the "box", there are 2 circles, they refer to the location of the two 10mm bolts that secure the glass window to the regulator.
The lower circle on the right side is the 10mm bolt that keeps the window channel in place, you will remove it once you take the glass out.
So here's the trick, you're going to put your window all the way up...

...then you're going to remove these 2 bolts.

Be very careful holding the glass, and press the switch and "lower the window" all the way down. The front glass is fairly easy to be removed, you need to "dive" the front inside the door (the glass with be in a vertical position), and next thing you know, you just need to pull it out. Then, remove that bolt that holds the window channel and get the rubber off of it.
Now comes the exterior door handle's rod, use a screw driver and separate the rod from the back of the handle, you may want to use an additional screw driver to support the handle itself as it may brake under "load" when you trying to pop the rod out.

It's time for this little guy, the key lock rod.

Free from the rod, everything is looking very good so far!

Remove the 3 bolts that keep the door latch in place.

After that is done, it's a matter of maneuvering the door latch/actuator out from the door panel, disconnect any wiring on its way and remember where they were! This is important, if you mess with the wiring and put it anyway you want, the window will get stuck on it later on!!!
Here's what the door latch and actuator look like. Let's start by removing the screw circled in this pic.

Then, we're going to remove these 3 small screws, and also, slide this little pin in the direction mentioned as the next pic shows.

Remove the 4 screws and take off the cover of the actuator.
It will expose the mechanism and you will be able to figure out how it works.... or not!
Remove the 2 screws circled in the picture and lift the entire thing from the housing.

Look at the next picture, where on one side there's a rubber stopper still in place, and on the other, the rubber broke and fell out place.

Then here, using the OEM torn bushing as a reference, i custom made a replacement made of poly urethane from some inline skate wheels i had to spare. I heated the tip of a knife till it was glowing orange, and made the hole in the center of the new bushing, to keep in place.

This fixed it!
Put the new rubber in place, and insert the mechanism back into the housing, don't forget the 2 screws, then place the cover on it, put the 4 screws back, attach it to the latch again, slide the pin back in, screw everything back and reinstall the latch in place.
Reattach the rods for the door handle and key lock.
Put the window channel back in, install the rubber in it, make sure it's correct!
Put the front window in a vertical position inside the door, now lift the front in place. Secure it all the way up, and press the switch to lift the regulator all the way up until you feel it pushing the window up even more. Screw the 2 bolts back in, make sure they are nice and tight. And just proceed reinstalling everything else.
I hope you had fun!!! Congratulations fixing one of the most commom problems with the 5th gen honda accord.
More updates coming soon!
") 09-12-2010, 06:42 PM
09-12-2010, 06:42 PM
#981
Honda-Tech Member
Thread Starter
Join Date: Aug 2005
Location: Pompano Beach, FL, USA
Posts: 3,495
Likes: 0
Received 5 Likes
on
4 Posts
Updating the thread!
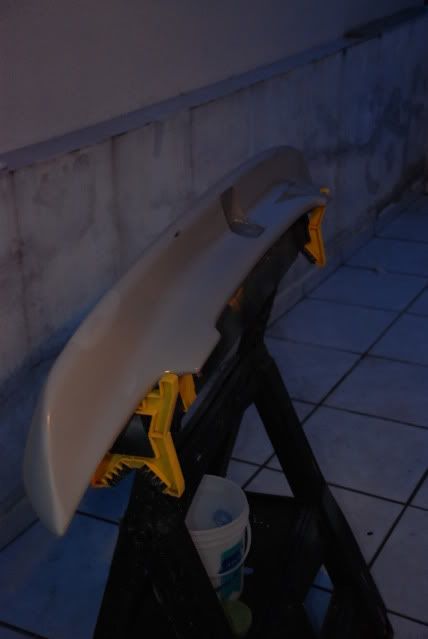
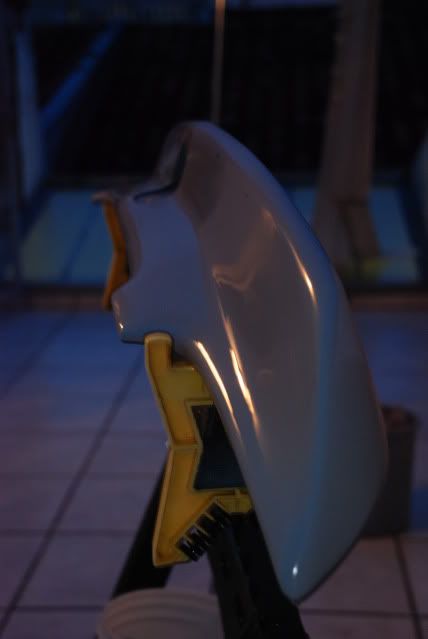
So i'm still working on that spoiler... yeah, long time right?!
I did some extra sanding where the emblem is supposed to sit, got the shape that i wanted.

Here's a picture of the "modded" emblem getting a feeling of its future home.

Here are the products that i bought to use on this spoiler. On the left, a can of plastic sealer, and the other 2 products make up the poly urethane primer and its activator (grey).

Sometimes, i can't get pictures while i'm doing something, in this case... trying to spray the primer using a small compressor at home. I was using a HVLP spray gun with a 1.4 tip which should be ok to spray primer, and i soon noticed how the gun could barely "spit" the primer through. Next thing you know... i remembered how this product should be diluted with a specif reducer... that i forgot to buy. AHH S****TTT, it was already too late! So what's plan B?!... how about a brush?! Yeah, i was that serious about getting it primered that day, even if it meant stroking a brush back and forth to get the primer on the spoiler. Needless to say, the primer without its reducer is thicker, reason why it wouldn't come when i was using the spray gun.
Although the process of putting primer didn't go exactly as smooth as i wished, the results were acceptable since i have to send it to get all the texture even and ready for paint.


See you guys next time!!
Accord love is my thing!!
Peace!
So i'm still working on that spoiler... yeah, long time right?!
I did some extra sanding where the emblem is supposed to sit, got the shape that i wanted.
Here's a picture of the "modded" emblem getting a feeling of its future home.
Here are the products that i bought to use on this spoiler. On the left, a can of plastic sealer, and the other 2 products make up the poly urethane primer and its activator (grey).
Sometimes, i can't get pictures while i'm doing something, in this case... trying to spray the primer using a small compressor at home. I was using a HVLP spray gun with a 1.4 tip which should be ok to spray primer, and i soon noticed how the gun could barely "spit" the primer through. Next thing you know... i remembered how this product should be diluted with a specif reducer... that i forgot to buy. AHH S****TTT, it was already too late! So what's plan B?!... how about a brush?! Yeah, i was that serious about getting it primered that day, even if it meant stroking a brush back and forth to get the primer on the spoiler. Needless to say, the primer without its reducer is thicker, reason why it wouldn't come when i was using the spray gun.
Although the process of putting primer didn't go exactly as smooth as i wished, the results were acceptable since i have to send it to get all the texture even and ready for paint.
See you guys next time!!
Accord love is my thing!!
Peace!
09-12-2010, 07:12 PM
#982
Honda-Tech Member
Look'n Good!
More sanding.............. You always put a lot of love into the prep on your stuff. I'm sure those primer brush strokes, if any, will disappear in no time :thumbsup:
I kind of liked the marbled/calico look before the primer. Like a Swiss Camo
More sanding.............. You always put a lot of love into the prep on your stuff. I'm sure those primer brush strokes, if any, will disappear in no time :thumbsup:
I kind of liked the marbled/calico look before the primer. Like a Swiss Camo
09-13-2010, 08:57 AM
#984
Honda-Tech Member
Thread Starter
Join Date: Aug 2005
Location: Pompano Beach, FL, USA
Posts: 3,495
Likes: 0
Received 5 Likes
on
4 Posts
haha, marble spoiler would increase the down force waaayyy too much.. I've taken care of most of the brush strokes by sanding the spoiler with some 220, pics coming soon.
Balwin, i'm sending you a PM.
Balwin, i'm sending you a PM.
09-23-2010, 01:42 PM
#985
Honda-Tech Member
Thread Starter
Join Date: Aug 2005
Location: Pompano Beach, FL, USA
Posts: 3,495
Likes: 0
Received 5 Likes
on
4 Posts
UPDATE:
Just finished sanding the primer from the spoiler, had to use 180 all over it to make sure there area is clear from signs of a primer job done using a brush...*sigh*
The most difficult thing was sanding the sunk area where the emblem sits, mostly because of the size, too small for everything that i had in hand to sand with. Well, the hard work is over, here are the pics.


Spoiler looks descent, but i plan on giving it a slight coat of primer over it once again just to make sure it covers any putty or body filler. This applies to any job you are doing, because without primer there's no telling what the paint will look like on top of areas with different materials.
Here are a couple pics of a project that i've been working on, it's a tie bar (sub frame reinforcement) to go along with the lower control arms that i've created.
This is only a model, but it shows in this picture about where is going to be located, the brackets aren't pictured.


More updates to come.
Like always.... accord lover!
Just finished sanding the primer from the spoiler, had to use 180 all over it to make sure there area is clear from signs of a primer job done using a brush...*sigh*
The most difficult thing was sanding the sunk area where the emblem sits, mostly because of the size, too small for everything that i had in hand to sand with. Well, the hard work is over, here are the pics.
Spoiler looks descent, but i plan on giving it a slight coat of primer over it once again just to make sure it covers any putty or body filler. This applies to any job you are doing, because without primer there's no telling what the paint will look like on top of areas with different materials.
Here are a couple pics of a project that i've been working on, it's a tie bar (sub frame reinforcement) to go along with the lower control arms that i've created.
This is only a model, but it shows in this picture about where is going to be located, the brackets aren't pictured.
More updates to come.
Like always.... accord lover!
10-05-2010, 07:22 AM
#986
Honda-Tech Member
Thread Starter
Join Date: Aug 2005
Location: Pompano Beach, FL, USA
Posts: 3,495
Likes: 0
Received 5 Likes
on
4 Posts
Sorry for slacking with the updates, have a lot going on lately, i mean... a LOT. I've just called the store and i'm going to pick up the reducer for the PU primer, so this time things should go a lot smoother.
BTW, for those interested in the LCA's, i've got a special price on them from september 28th to october 8th (friday), 50 bucks off if you purchase a set by then, colors available are anodized red and anodized blue.
Thanks.
BTW, for those interested in the LCA's, i've got a special price on them from september 28th to october 8th (friday), 50 bucks off if you purchase a set by then, colors available are anodized red and anodized blue.
Thanks.
10-05-2010, 08:01 AM
#987
Cant wait to see the Tie Bar to go along with the LCA's I got from you! Keep us updated on that for sure. Sorry been working on other things than the suspension but I still need to get at it putting those LCA's on I got from you when I put some bigger wagon brakes on.
People better jump on that deal with the LCA's, they are extremely nice and well worth the money!
People better jump on that deal with the LCA's, they are extremely nice and well worth the money!
11-15-2010, 09:49 AM
#988
Honda-Tech Member
Thread Starter
Join Date: Aug 2005
Location: Pompano Beach, FL, USA
Posts: 3,495
Likes: 0
Received 5 Likes
on
4 Posts
It's been some time, but here i am. Still working on the tie bar, may be able to throw some pictures soon.
Last week, i spent about 2 hours taking my spray guns apart, cleaning them up, letting them soak on thinner and cleaning some more. Today, put everything back together, mixed some primer and used the reducer that i've should have used last time and got the primer looking pretty nice. It shouldn't be easy to sand it down this time to get it ready for painting.
Just 2 pics of it...
11-15-2010, 10:02 AM
#989
Honda-Tech Member
Damn dude, that spoiler is looking flawless.  for a job well done.
PM me details on The LCA`s and a projected price for the tie bar please. I will order all as a set when completed..
for a job well done. PM me details on The LCA`s and a projected price for the tie bar please. I will order all as a set when completed..
 11-26-2010, 06:35 AM
#991
Honda-Tech Member
Thread Starter
Join Date: Aug 2005
Location: Pompano Beach, FL, USA
Posts: 3,495
Likes: 0
Received 5 Likes
on
4 Posts
Updating!!
Ok, so i've got a hit and run on wednesday night. I left the car parked on the street (far left next to the sidewalk) while i was at work, it was rainy and as mentioned, was already night. After i got off work, got inside the car and noticed my passenger side rear view mirror was not the way i left. I wondered who could the dumbass that leaned on my car and touched the mirror... but i just simply fixed to my liking by pressing the switch and drove to my girlfriend's house and then drove back to my parent's house.
It was only then that i understood why the mirror had been messed with, because my doors had a scratch and a dent, my fender and bumper also got scratched, including the mirror. Since it was still rainy, i only worked next day (which was yesterday, thursday).
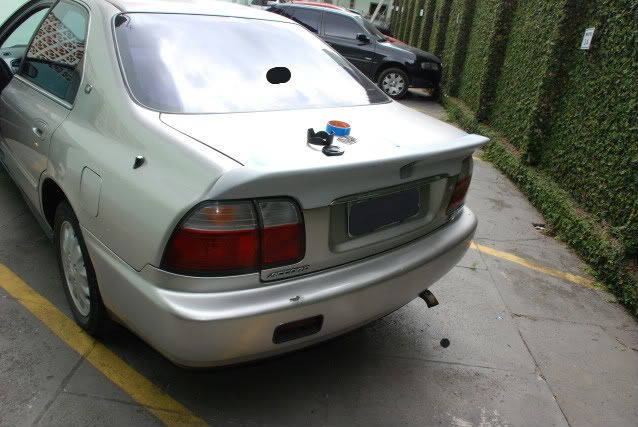
Here are the pics:
Starting point.
The tools that i was going to work with:
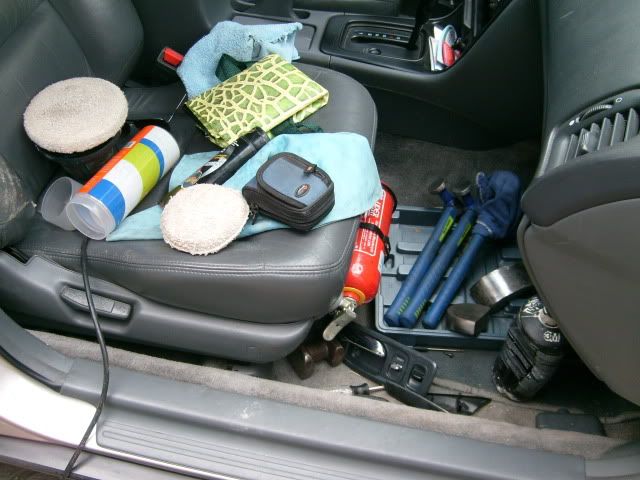
I bought this inexpensive kit that had some hammers and such for bodywork, so i sanded them down with 320 and 600 to make them smooth and keep them from damaging the paint for a bit of PDR (or paintless dent repair).
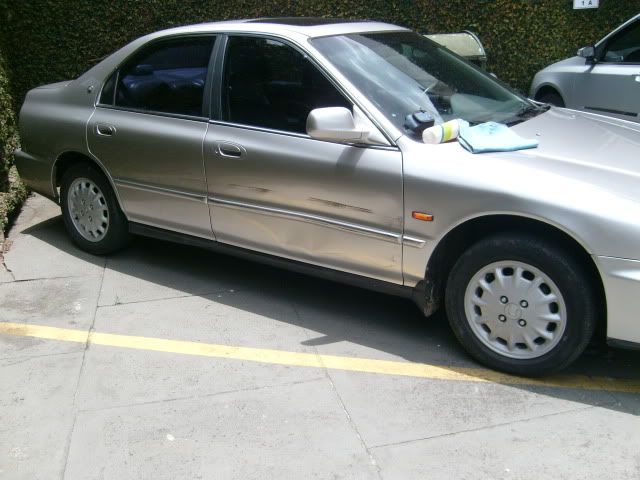
Side view of the damage.
I polished the area first using an orbital buffer and some 3M compound, it got rid of the paint left on my panels. The mouldings and edges of the rear and front door got scratched to the point where you see the etching primer.
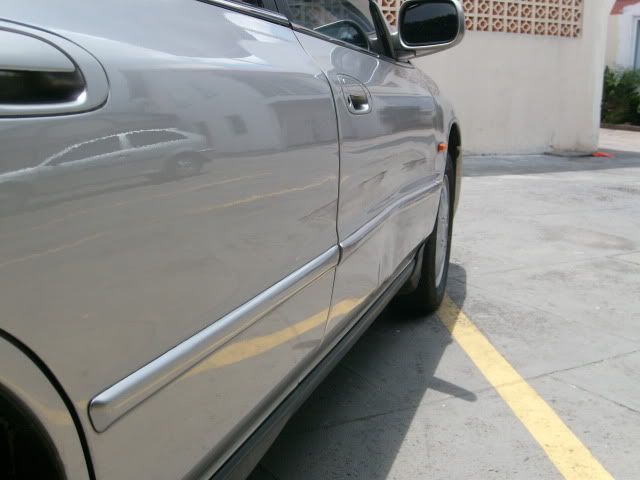
Then, using the hammers, i was able to bring out most of the panel back. It took some patience hitting the small dents to make it even. Spent about 30 minutes hitting the door, and left it like this:

There are 2 marks below the door moulding where i was skeptical about hitting since there's a curve, and there are also some scratches near the fender that i couldn't buff out. The fender needs to be adjusted a bit because the gap between it and the door is now smaller than the spec, although is not touching... still bugs me.
That's it for today!
Accord love has ups and downs!
Ok, so i've got a hit and run on wednesday night. I left the car parked on the street (far left next to the sidewalk) while i was at work, it was rainy and as mentioned, was already night. After i got off work, got inside the car and noticed my passenger side rear view mirror was not the way i left. I wondered who could the dumbass that leaned on my car and touched the mirror... but i just simply fixed to my liking by pressing the switch and drove to my girlfriend's house and then drove back to my parent's house.
It was only then that i understood why the mirror had been messed with, because my doors had a scratch and a dent, my fender and bumper also got scratched, including the mirror. Since it was still rainy, i only worked next day (which was yesterday, thursday).
Here are the pics:
Starting point.
The tools that i was going to work with:
I bought this inexpensive kit that had some hammers and such for bodywork, so i sanded them down with 320 and 600 to make them smooth and keep them from damaging the paint for a bit of PDR (or paintless dent repair).
Side view of the damage.
I polished the area first using an orbital buffer and some 3M compound, it got rid of the paint left on my panels. The mouldings and edges of the rear and front door got scratched to the point where you see the etching primer.
Then, using the hammers, i was able to bring out most of the panel back. It took some patience hitting the small dents to make it even. Spent about 30 minutes hitting the door, and left it like this:
There are 2 marks below the door moulding where i was skeptical about hitting since there's a curve, and there are also some scratches near the fender that i couldn't buff out. The fender needs to be adjusted a bit because the gap between it and the door is now smaller than the spec, although is not touching... still bugs me.
That's it for today!
Accord love has ups and downs!
11-26-2010, 08:25 PM
#992
Honda-Tech Member
^^ Wow. Thats amazing with only 30 mins of work put into it. Good job man.
My driverside lower part of the door got hit as well. Then when I got home, my neighbor and I used a screwdriver handle to massage the dent back out to its original shape. Luckily, there wasn't any serious crease.
My driverside lower part of the door got hit as well. Then when I got home, my neighbor and I used a screwdriver handle to massage the dent back out to its original shape. Luckily, there wasn't any serious crease.
11-28-2010, 08:40 AM
#994
Honda-Tech Member
Thread Starter
Join Date: Aug 2005
Location: Pompano Beach, FL, USA
Posts: 3,495
Likes: 0
Received 5 Likes
on
4 Posts
BTW, i had to remove the door panel to get them out.
12-07-2010, 09:23 AM
#995
Honda-Tech Member
Thread Starter
Join Date: Aug 2005
Location: Pompano Beach, FL, USA
Posts: 3,495
Likes: 0
Received 5 Likes
on
4 Posts
Bought a can of resin for a little something that i've been thinking about doing.
Also, will get on other projects as soon as possible.
Check out my blog mean while... http://kozerauto.blogspot.com
Also, will get on other projects as soon as possible.
Check out my blog mean while... http://kozerauto.blogspot.com

 12-10-2010, 03:32 PM
#998
Honda-Tech Member
Thread Starter
Join Date: Aug 2005
Location: Pompano Beach, FL, USA
Posts: 3,495
Likes: 0
Received 5 Likes
on
4 Posts
Sup foks?!
Just spent a half hour sanding the spoiler with 400 grit, it feels pretty smooth, i still have to finish up the area where the emblem sits. It's the only thing left before it can get painted.
After the spoiler was sanded using sanding blocks, first with a 12" one and then with 4" one, the curved areas were sanded with something that seems to work really good. I use a sponge (the same you use to do the dishes) and wrap the sand paper around it to get the areas that i don't want to dig in the wrong way with something flat.
Rinsed the spoiler and snapped these pics.
I'm happy with the way it looks already...haha
Thanks guys, accord love.... check out the link on my signature before you move on!..haha
Peace!
-Giancarlo