When you click on links to various merchants on this site and make a purchase, this can result in this site earning a commission. Affiliate programs and affiliations include, but are not limited to, the eBay Partner Network.
Grind them back to bare metal and use a rust treatment as a primer or you could use red oxide paint. I chose to use a rust treatment as an added measure of protection to the metal.
Once it's dried, apply paint or some kind of underbody paint (There's lots of ways to paint the underside of a car). I chose to use the Hammerite underseal with added waxoyl - this stuff gives protection from stone chips and won't chip on impact like paint. It also has some amount of 'flex' to it so in theory it shouldn't crack in areas subject to stress/bodyflex.
The added waxoyl has been around for years and is proven to be a good choice. "It works by excluding water and air from bare metal and by slowing the progress of existing surface rust using phosphoric acid rust inhibitors". - Wikipedia
Location: Howcome we park on driveways, and drive on parkways?
Posts: 2,162
Likes: 0
Received 0 Likes
on
0 Posts
re: '96 Spec JDM
You are making awesome progress with this caR.
Keep it up. You are getting a lot done in a short period of time which is awesome. It helps to motivate some of us sometimes!
Spend the couple bucks and get a new valve cover or "cam cover" as you called it. It will make that engine bay look that much better. Every time you open the hood, you will be greeted with the stamp of the R.... The beautiful Red valve cover. Every owners eye goes to that first... Then to the engine block stamp...any beyond!
Which brings me to my next question.....
Why the coloring on the stamp face? Is it a replacement block? I thought the only paint markings on an ITR motor was the green strip on the head/distributor connect point??
Awesome, I have a couple spots the door and hatch I need to take care of after the winter. Was there a process to sanding down the areas, and did you repaint CW or just left the areas after coating with rust preventatives. I've used por15 on the quarters last summer. Was thinking of doing the under body completely with por15 next spring.
Keep it up. You are getting a lot done in a short period of time which is awesome. It helps to motivate some of us sometimes!
Spend the couple bucks and get a new valve cover or "cam cover" as you called it. It will make that engine bay look that much better. Every time you open the hood, you will be greeted with the stamp of the R.... The beautiful Red valve cover. Every owners eye goes to that first... Then to the engine block stamp...any beyond!
Which brings me to my next question.....
Why the coloring on the stamp face? Is it a replacement block? I thought the only paint markings on an ITR motor was the green strip on the head/distributor connect point??
Keep it up! Im going to send you a PM as well.
Cheers!
That's not my engine. So you'll have to ask the owner about the engine number.
Awesome, I have a couple spots the door and hatch I need to take care of after the winter. Was there a process to sanding down the areas, and did you repaint CW or just left the areas after coating with rust preventatives. I've used por15 on the quarters last summer. Was thinking of doing the under body completely with por15 next spring.
First I clean the area I'm going to be working on. First step is to jet wash the area down, then I spray on some engine degreaser and work it in with a paint brush or detailing brush. Then just rinse off with the jet wash.
I used an assortment of wire brush drill attachments on a drill and ground down to smooth, bare metal or as best as I could in those hard to reach places.
I then like to leave the car overnight in a garage to let everything dry out before applying any rust treatment/proofing. Then let that dry overnight then apply your paint of underseal/waxoyl. Obviously for those areas I just posted, like the spot on the door etc, I'll spray them with Championship white. Or if the area is small enough I might be able to use a touch in pen. Obviously all the steps prior to this apply whether you are undercoating the chasis or touhing up areas in the paint work.
Who cares? its function over form, not to mention no one is gonna see these parts unless the car is taken apart anyways. OP great work so far!
+1 The only reason I might have it a lighter colour would be so to make any new rust more visible. The OP is very thorough mind you so any rust that even dares to make an appearance will be nuked from orbit.
Originally Posted by Tom B
Problem areas. These are the next things to tackle on the car.
Mine has started to crack at that roof joint. It's tiny now, but it's there. I've seen it on a few of them. Seems to be a weaker spot in the chassis. Ive squeezed some waxoyl type stuff over the area so hopefully� What I have used more and more is the Bilt Hamber stuff Tom B. I found it a little better, more hard wearing than the waxoyl myself. A few reviews I've read over the years found similar. At this stage my car is more rustkiller and wax than car.
Your Recaros look to be in fantastic condition Tom. Especially for a 96
Originally Posted by DC2-ProdUcTiOnS
Which brings me to my next question.....
Why the coloring on the stamp face? Is it a replacement block? I thought the only paint markings on an ITR motor was the green strip on the head/distributor connect point??
Cheers!
Oops sorry, :s that's my engine bay. The colouring is because my car has a Spoon sports engine. They (usually)marked them that way and put a plate under the manifold/header. Some have the yellow cam cover too.
No extra power or anything, but more blueprinted than the standard and a Spoon head gasket too IIRC?
+1 The only reason I might have it a lighter colour would be so to make any new rust more visible. The OP is very thorough mind you so any rust that even dares to make an appearance will be nuked from orbit.
Mine has started to crack at that roof joint. It's tiny now, but it's there. I've seen it on a few of them. Seems to be a weaker spot in the chassis. Ive squeezed some waxoyl type stuff over the area so hopefully� What I have used more and more is the Bilt Hamber stuff Tom B. I found it a little better, more hard wearing than the waxoyl myself. A few reviews I've read over the years found similar. At this stage my car is more rustkiller and wax than car.
Your Recaros look to be in fantastic condition Tom. Especially for a 96
Oops sorry, :s that's my engine bay. The colouring is because my car has a Spoon sports engine. They (usually)marked them that way and put a plate under the manifold/header. Some have the yellow cam cover too.
No extra power or anything, but more blueprinted than the standard and a Spoon head gasket too IIRC?
Just so you know, the redish-orange coloring on the block stamp just means it was a OEM replacement motor (also known as R DOT).
Nice. I will admit I've been hankering after one myself. They look the bees knees and I gather you can actually feel the addition of it in the twisty roads? There are templates online to allow you cut out your original plastic strut tower covers for the full OEM effect. The original kit came with that and a length of rubber tubing to cover up the cut edges(which you can get similar from any DIY shop). Though a more pressing need for me is to figure out why I still have the makings of a trout pond in my spare wheel well, even though I've replaced the rear light seals. These can be a bloody nightmare for leaks. #firstworldproblems
Originally Posted by Tom B
Pretty cool, but it's making my car looks less interesting haha.
Not even close T*. Your car is the mutts nuts and in amazing nick for a 96. And in my neck of the woods I've seen a fair number of 96 spec Teggies. Just my humble, but yours is by quite a distance one of the best I've ever seen. And after your fettling will remain so. *bows*
Originally Posted by boostn92vx
Just so you know, the redish-orange coloring on the block stamp just means it was a OEM replacement motor (also known as R DOT).
So I believe B, though mine also has the spoon plate under the manifold/header. The only other spoon stuff it had was a thermostat and rad cap. The thermostat was a right PITA TBH. I thought it was broken because it took ages to get up to temperature.
*I'm generally not so enamoured with the "fast and the furious" bolt on stuff TBH. Bit long in the tooth for that. Let's put it this way Tom, I can get mid to high 30's to the gallon, which says all that needs to be said on that. *gets banned from forum, with extreme prejudice* Never mind that all the Spoon engine gives you is a slightly more blueprinted engine over an already blueprinted engine that the R already has/had. More marketing than reality IMHO. Put it another way I'm well happy that it came to me that way and I didn't have to pay for it in the first place.
Nice. I will admit I've been hankering after one myself. They look the bees knees and I gather you can actually feel the addition of it in the twisty roads? There are templates online to allow you cut out your original plastic strut tower covers for the full OEM effect. The original kit came with that and a length of rubber tubing to cover up the cut edges(which you can get similar from any DIY shop). Though a more pressing need for me is to figure out why I still have the makings of a trout pond in my spare wheel well, even though I've replaced the rear light seals. These can be a bloody nightmare for leaks. #firstworldproblems
As far as handling goes, I would say the whole car feels slightly tighter but honestly it could just be my mind playing tricks on me.
The Tegiwa brackets also come with all of what you mention. I think I'll leave the plastics off for now as I have adjustable rebound damping.
Re: Rear Light Gaskets. This is what I did on my CRX and plan to do the same on my Integra. Worked a treat, possibly better than just buying new gaskets and saves some pocket money: "Stopping your boot leak, this is for if you find water in your spare wheel well. This is different to the leak that you get on the back seat.
Firstly you will need to remove the rear light clusters. That's the centre section, and left and right brake lights. There are 6 bolts holding the centre cluster to the chassis, and 4 holding the left and right brake lights on.
You will need to remove the small flap covers that are on the inside of the boot lining (inside the car). Also remove the main centre piece of the boot lining just unbolt the bottom and give it a firm tug upwards (careful not to break the trim clips). You will then need a weapon of your choice, Socket set, spanner or adjustable wrench. However the socket is by far the easiest to use.
When you have found all the bolts then start loosening them, but keep them in a safe place. Some bolts are slightly hidden behind interior trim but unless you smoke crack you should be able to find them easily. If the clusters don't come off with little effort then there is still a bolt holding it on, that you have missed.
Remove the clusters slowly jiggling it away from the chassis. You will notice the culprits for your leaking boot. Slowly peel the black seals away from the back of the lights. Remember which seals went on which light and which way round they went. You will probably notice that the seals are soaking wet and probably hardened around the edges. What you want to do is take them to a sink and give them a good wash in some warm water, clearing al the crap off the seals.
Then after drying the seals (padding on a towel works well, then using a hairdryer to get them bone dry) apply copious amounts of grease (silicone, good old Vaseline or multi-purpose grease) to both side and rub it all in so the seal is very moist with grease. Wipe off any excess and repeat with all the seals.
Whilst doing this clean the exposed chassis, and drain the rear clusters of all water, the best way to do this is to drain it then run a hairdryer at full heat and full blast into the bulb openings.
Place the seals on the light backs, and place the clusters back on the car, tighten up the bolts nice and tight.
Plug the lights back into the holders and refit the interior trim fittings." - CRX-UK
I might do this at the weekend. If I do I'll let you know how I get on.
THANK YOU. Thank you thank you for helping me put 2 and 2 together. I didn't realize how important the tail lamp gaskets are as a leak path.
When I got my car I immediately swapped out the aftermarket tails for the stock ones, and noticed that the aftermarket ones had been sealed at their edges for some reason. The stock ones I reinstalled with the used OEM gaskets.
It's been raining the past few weeks and I have been dealing with an enormous pool of water in my spare tire well. Over the Christmas break it soaked its way into the main cabin carpet, so I had to pull my whole interior and steam clean it. Right now my interior is in the guestroom while I wait to find the leak path before putting the car back together. Now I know.
I have done some searching and I see now that this is a known issue. Time to order new gaskets and I will install them with some additional sealant.
Sealed the tailight gaskets. I had to bin one of them. I used Tiger Seal around the light to seal it up. This is probably better than the gaskets but I will most likely pick one up in the future. The other side I cleaned, dried, greased the heck out of and put it all back together.
After cleaning the body behind the tailights I was very pleased to see that there was not one spec of corrosion.


 12-02-2015, 06:07 AM


 It will make that engine bay look that much better. Every time you open the hood, you will be greeted with the stamp of the R.... The beautiful Red valve cover. Every owners eye goes to that first... Then to the engine block stamp...any beyond!
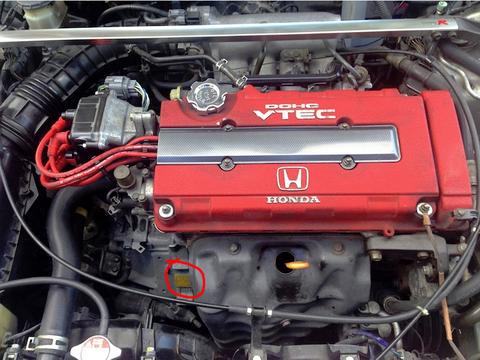


") Not even close T*. Your car is the mutts nuts and in amazing nick for a 96. And in my neck of the woods I've seen a fair number of 96 spec Teggies. Just my humble, but yours is by quite a distance one of the best I've ever seen. And after your fettling will remain so. *bows*
Not even close T*. Your car is the mutts nuts and in amazing nick for a 96. And in my neck of the woods I've seen a fair number of 96 spec Teggies. Just my humble, but yours is by quite a distance one of the best I've ever seen. And after your fettling will remain so. *bows*