
College student TURBO Build!
 07-21-2015, 02:43 PM
#76
Honda-Tech Member
Thread Starter

Had some time over the weekend to get some last minute things installed, it will be nice not having to worry about my car overheating now that i have a quality radiator and fan.
<a data-flickr-embed="true" href="https://www.flickr.com/photos/140717719@N03/25026826129/in/dateposted-public/" title="radfan"><img src="https://farm2.staticflickr.com/1639/25026826129_1340aab69e_z.jpg" width="480" height="640" alt="radfan"></a>
Cant say enough good things about the quality of mishimoto products
<a data-flickr-embed="true" href="https://www.flickr.com/photos/140717719@N03/25368231856/in/dateposted-public/" title="rad"><img src="https://farm2.staticflickr.com/1695/25368231856_ae31301abb_z.jpg" width="480" height="640" alt="rad"></a>
Old rad ripped out
<a data-flickr-embed="true" href="https://www.flickr.com/photos/140717719@N03/24767679923/in/dateposted-public/" title="oldradout"><img src="https://farm2.staticflickr.com/1684/24767679923_4d7d38690d_z.jpg" width="480" height="640" alt="oldradout"></a>
New one installed, peep the t bolt radiator clamps for extra bling and no leakage! They also dont rip up the hoses like the worm gear clamps do.
<a data-flickr-embed="true" href="https://www.flickr.com/photos/140717719@N03/25026818869/in/dateposted-public/" title="new in"><img src="https://farm2.staticflickr.com/1586/25026818869_263857a5ca_z.jpg" width="480" height="640" alt="new in"></a>
Oh and to top it all of my new rubers came in . Picking tires was so difficult since everyone has their own opinion about everything. Decided to go with some Dunlop Direzza star spec z2. They look like they should hook pretty well
<a data-flickr-embed="true" href="https://www.flickr.com/photos/140717719@N03/24763806564/in/dateposted-public/" title="rubber"><img src="https://farm2.staticflickr.com/1687/24763806564_69d5107de0_z.jpg" width="480" height="640" alt="rubber"></a>
Last edited by Tegger93; 03-05-2016 at 08:57 AM.

 09-09-2015, 09:35 AM
#78
Honda-Tech Member
Thread Starter
Got some work done on the integra over summer. Pretty pumped about getting decent at making braided lines. Heres one for the fuel pressure regulator:
<a data-flickr-embed="true" href="https://www.flickr.com/photos/140717719@N03/25026684619/in/dateposted-public/" title="braided"><img src="https://farm2.staticflickr.com/1598/25026684619_6fe2b6ddbd_z.jpg" width="640" height="640" alt="braided"></a>
Also just some other pics of the progress, enjoy
<a data-flickr-embed="true" href="https://www.flickr.com/photos/140717719@N03/25098644400/in/dateposted-public/" title="fuelpress"><img src="https://farm2.staticflickr.com/1453/25098644400_759637e6f3_z.jpg" width="640" height="640" alt="fuelpress"></a>
This picture makes me really happy, its finally happening after all this time! Despite what everyone says, the manifold fit well and i am happy with it.
<a data-flickr-embed="true" href="https://www.flickr.com/photos/140717719@N03/25394418275/in/dateposted-public/" title="turbo"><img src="https://farm2.staticflickr.com/1632/25394418275_9baae7c0d4_z.jpg" width="640" height="640" alt="turbo"></a>
But sadly i need to go back to scchool, so updates will be slow as i only come back home every so often.. shes ll tucked away staying warm.
<a data-flickr-embed="true" href="https://www.flickr.com/photos/140717719@N03/25276119312/in/dateposted-public/" title="tuckedin"><img src="https://farm2.staticflickr.com/1659/25276119312_bef42f760b_z.jpg" width="640" height="640" alt="tuckedin"></a>
Last edited by Tegger93; 03-07-2016 at 11:31 AM.
09-09-2015, 09:36 AM
#79
Honda-Tech Member
Thread Starter
Next on the list is installing the injectors and cutting the crash bar to fit the intercooler where i want it. After that i plan on putting in the last gauges and fuel pump.
09-09-2015, 12:00 PM
#80
Honda-Tech Member
Im running the same BWR manifold as well as their downpipe and dumptube without any issues.
What injectors and pump are you going with?
What injectors and pump are you going with?
09-10-2015, 08:09 AM
#83
Honda-Tech Member
Thread Starter
As far as fuel i have RC 750s and a walbro 255 to go with the Aeromotive regulator. I had to adjust fuel pressure by myself which was quite the task.
09-15-2015, 03:36 PM
#84
Honda-Tech Member
Thread Starter
This weekend i got a little bit done to the car, I removed the manifold and tried to clean up the mating surface a bit as well as the block, seems as though there is a clear coat like finish on the block.. very tough to get off. I got it to where i liked it enough without spending my whole day scrubbing and called it good.
<a data-flickr-embed="true" href="https://www.flickr.com/photos/140717719@N03/24763660184/in/dateposted-public/" title="block"><img src="https://farm2.staticflickr.com/1597/24763660184_ed54856084.jpg" width="500" height="500" alt="block"></a>
Inspected the valves and saw some white build up. Running lean?
<a data-flickr-embed="true" href="https://www.flickr.com/photos/140717719@N03/25368246316/in/dateposted-public/" title="valves"><img src="https://farm2.staticflickr.com/1641/25368246316_58f39d4eb3.jpg" width="500" height="500" alt="valves"></a>
Installed the gasket along with some oem honda nuts.
<a data-flickr-embed="true" href="https://www.flickr.com/photos/140717719@N03/25275984172/in/dateposted-public/" title="gasket"><img src="https://farm2.staticflickr.com/1442/25275984172_65fcdab205.jpg" width="500" height="500" alt="gasket"></a>
<a data-flickr-embed="true" href="https://www.flickr.com/photos/140717719@N03/25368110766/in/dateposted-public/" title="honda"><img src="https://farm2.staticflickr.com/1532/25368110766_e852e8cb99.jpg" width="500" height="500" alt="honda"></a>
Then i bolted everything up and torqued it. Blow off valve is a tight fit under that strut bar but it should fit. we will see if i can wiggle it around a bit more so it doesn't rub. Yes i know there are no clamps on the piping haha
I am very happy with the downpipe and wastegate placement. As far as the intercooler it is not in its final place, i am going to have to cut the bar and move it up and to the left about an inch or so. I was just too excited and wanted to see how it was going to look!
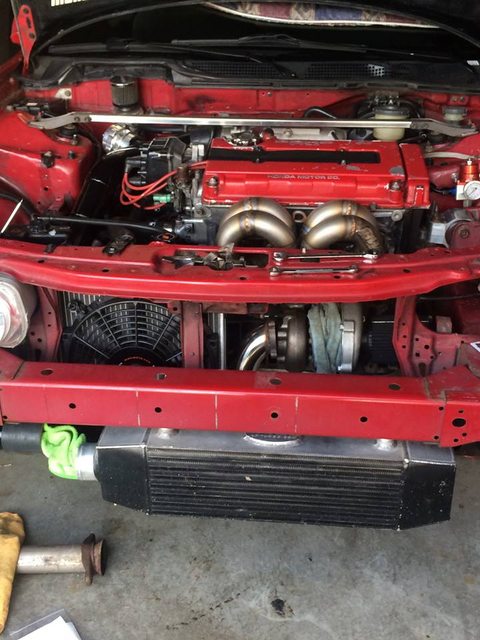
<a data-flickr-embed="true" href="https://www.flickr.com/photos/140717719@N03/25026828089/in/dateposted-public/" title="setup"><img src="https://farm2.staticflickr.com/1663/25026828089_daf2cf22c6.jpg" width="375" height="500" alt="setup"></a>
Thats all for now, my downpipe will have to be re-fabbed.. as of now the flex pipe section hits under the oil pan so that will have to be moved father down a bit. Stay tuned!
<a data-flickr-embed="true" href="https://www.flickr.com/photos/140717719@N03/24763660184/in/dateposted-public/" title="block"><img src="https://farm2.staticflickr.com/1597/24763660184_ed54856084.jpg" width="500" height="500" alt="block"></a>
Inspected the valves and saw some white build up. Running lean?
<a data-flickr-embed="true" href="https://www.flickr.com/photos/140717719@N03/25368246316/in/dateposted-public/" title="valves"><img src="https://farm2.staticflickr.com/1641/25368246316_58f39d4eb3.jpg" width="500" height="500" alt="valves"></a>
Installed the gasket along with some oem honda nuts.
<a data-flickr-embed="true" href="https://www.flickr.com/photos/140717719@N03/25275984172/in/dateposted-public/" title="gasket"><img src="https://farm2.staticflickr.com/1442/25275984172_65fcdab205.jpg" width="500" height="500" alt="gasket"></a>
<a data-flickr-embed="true" href="https://www.flickr.com/photos/140717719@N03/25368110766/in/dateposted-public/" title="honda"><img src="https://farm2.staticflickr.com/1532/25368110766_e852e8cb99.jpg" width="500" height="500" alt="honda"></a>
Then i bolted everything up and torqued it. Blow off valve is a tight fit under that strut bar but it should fit. we will see if i can wiggle it around a bit more so it doesn't rub. Yes i know there are no clamps on the piping haha
I am very happy with the downpipe and wastegate placement.
As far as the intercooler it is not in its final place, i am going to have to cut the bar and move it up and to the left about an inch or so. I was just too excited and wanted to see how it was going to look!<a data-flickr-embed="true" href="https://www.flickr.com/photos/140717719@N03/25026828089/in/dateposted-public/" title="setup"><img src="https://farm2.staticflickr.com/1663/25026828089_daf2cf22c6.jpg" width="375" height="500" alt="setup"></a>
Thats all for now, my downpipe will have to be re-fabbed.. as of now the flex pipe section hits under the oil pan so that will have to be moved father down a bit. Stay tuned!
Last edited by Tegger93; 03-07-2016 at 11:35 AM.
10-06-2015, 12:33 PM
#85
Honda-Tech Member
Thread Starter
Somewhat car related, picked up a new phone case..lol
<a data-flickr-embed="true" href="https://www.flickr.com/photos/140717719@N03/25476864802/in/dateposted-public/" title="phone case"><img src="https://farm2.staticflickr.com/1664/25476864802_c8a0cab244.jpg" width="281" height="500" alt="phone case"></a>
<a data-flickr-embed="true" href="https://www.flickr.com/photos/140717719@N03/25476864802/in/dateposted-public/" title="phone case"><img src="https://farm2.staticflickr.com/1664/25476864802_c8a0cab244.jpg" width="281" height="500" alt="phone case"></a>
Last edited by Tegger93; 03-07-2016 at 11:38 AM.
10-11-2015, 08:07 PM
#87
Honda-Tech Member
Thread Starter
Got the intercooler mounted and map sensor installed this weekend but my phone wasn't working so no pics! 
I know i can look but does anyone know the garret oil return flange bolt size off hand? Thanks
I know i can look but does anyone know the garret oil return flange bolt size off hand? Thanks
10-11-2015, 08:12 PM
#88
Honda-Tech Member
Thread Starter
Found it
Oil return Flange bolt size
8mm x 1.25 [20mm]
Some Garrett uses 3/8-16 threads per inch [20mm]
Guess i will just have to try both.
Oil return Flange bolt size
8mm x 1.25 [20mm]
Some Garrett uses 3/8-16 threads per inch [20mm]
Guess i will just have to try both.
10-22-2015, 11:41 AM
#89
Honda-Tech Member
Thread Starter
I was bored in class so I decided to make a list of what still has to be finished
Here it goes!
1) Get the intercooler in the right spot.
2) Weld downpipe.
3) Plumb oil feed and return lines.
4) Install injectors.
5) Wire gauges/ plug in ecu.
6) Call King Motorsports about BBG
7) Install fuel pump.
8)Put on Type R brakes/ paint spindles.
9) Vacuum lines.
10) double check all bolts.
11) New spark plugs.
12) Wheels on and off jackstands. Test start. Check for leaks.
13) Set up tune date!
14) Have a beer
11-20-2015, 06:19 AM
#92
Honda-Tech Member

LOL, if you think the cold was bad, just wait until you get the 10" of snow coming tonight/tomorrow. If that's your current location that is...
Awesome build though, looking forward to updates. I thought I was going to see some turbo pulls on this last page :-(
Awesome build though, looking forward to updates. I thought I was going to see some turbo pulls on this last page :-(
11-21-2015, 04:30 PM
#93
Honda-Tech Member
Thread Starter
Currently going to school in Platteville, WI but Roscoe is the hometown. & yes we did get the snow. Sadly dyno will most likely be postponed until spring. :/
12-15-2015, 08:29 PM
#95
Honda-Tech Member
Thread Starter
This my friends is why you do your research before attempting anything. The picture below shows the outer rim that holds the wheel bearing snap ring snapped off when i was pressing out the bearing. Luckily no one got hurt when this thing let go
<a data-flickr-embed="true" href="https://www.flickr.com/photos/140717719@N03/25394270395/in/dateposted-public/" title="brokenknuckle"><img src="https://farm2.staticflickr.com/1715/25394270395_cf7db6b07e.jpg" width="375" height="500" alt="brokenknuckle"></a>
Ended up going to the junkyard and getting a new knuckle. Pressed out everything the RIGHT way and got them sanded down. Before and after.
<a data-flickr-embed="true" href="https://www.flickr.com/photos/140717719@N03/25026679519/in/dateposted-public/" title="beforeandafter"><img src="https://farm2.staticflickr.com/1647/25026679519_a9ed3bceee.jpg" width="375" height="500" alt="beforeandafter"></a>
All taped up and ready to spray. Next step is pressing in studs wheel bearings and lower ball joints!
<a data-flickr-embed="true" href="https://www.flickr.com/photos/140717719@N03/25301238161/in/dateposted-public/" title="beforepaint"><img src="https://farm2.staticflickr.com/1455/25301238161_ed98300859.jpg" width="375" height="500" alt="beforepaint"></a>
These knuckles have been a much larger project than i originally anticipated but once they are completed i will be happy!
Last edited by Tegger93; 03-07-2016 at 11:41 AM.
12-17-2015, 11:44 AM
#96
Honda-Tech Member

Join Date: Dec 2015
Posts: 5
Likes: 0
Received 0 Likes
on
0 Posts
I was bored in class so I decided to make a list of what still has to be finished
Here it goes!
1) Get the intercooler in the right spot.
2) Weld downpipe.
3) Plumb oil feed and return lines.
4) Install injectors.
5) Wire gauges/ plug in ecu.
6) Call King Motorsports about BBG
7) Install fuel pump.
8)Put on Type R brakes/ paint spindles.
9) Vacuum lines.
10) double check all bolts.
11) New spark plugs.
12) Wheels on and off jackstands. Test start. Check for leaks.
13) Set up tune date!
14) Have a beer
Here it goes!
1) Get the intercooler in the right spot.
2) Weld downpipe.
3) Plumb oil feed and return lines.
4) Install injectors.
5) Wire gauges/ plug in ecu.
6) Call King Motorsports about BBG
7) Install fuel pump.
8)Put on Type R brakes/ paint spindles.
9) Vacuum lines.
10) double check all bolts.
11) New spark plugs.
12) Wheels on and off jackstands. Test start. Check for leaks.
13) Set up tune date!
14) Have a beer
I love the build! And you will be so glad you did everything yourself! Keep up the good work
12-17-2015, 06:35 PM
#98
Honda-Tech Member
Join Date: Dec 2015
Posts: 5
Likes: 0
Received 0 Likes
on
0 Posts
12-17-2015, 07:46 PM
#99
Honda-Tech Member
Thread Starter
Thanks i have winter break coming up soon so that means more wrenching time!But building it is half the fun
 12-18-2015, 08:06 AM
#100
Honda-Tech Member
Join Date: Dec 2015
Posts: 5
Likes: 0
Received 0 Likes
on
0 Posts
While I agree that I too enjoy working on cars, I also understand it's not for everyone. Also you can, most times, get someone else's used toy for a lot less than building your own toy the same way. Saves on the stress and time too. Just my opinion, and I do envy you doing all the work.