

S2000 city lights!

Thread Starter
Cool Cool Island Breezes. BOY-EE
iTrader: (1)
Joined: Sep 2006
Posts: 11,953
Likes: 9
From: TRILLINOIS....WAY downtown, jerky.
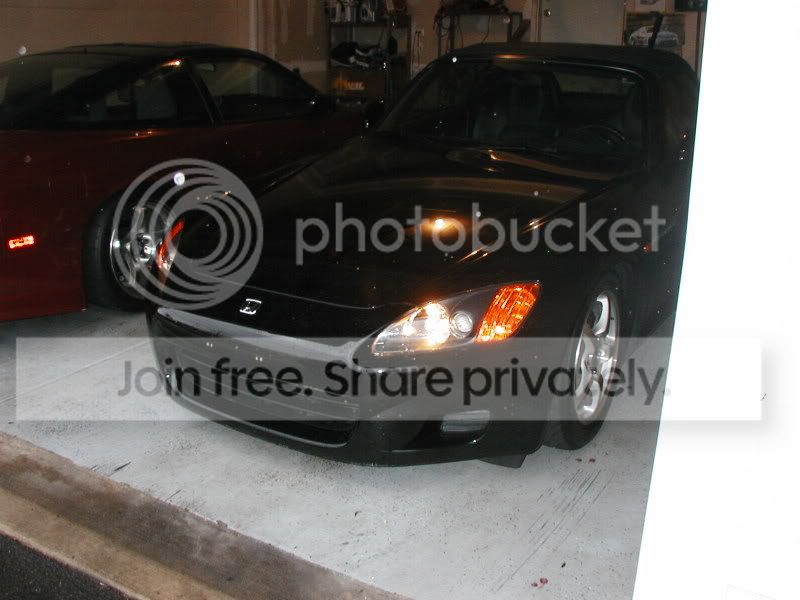
I hadnt really seen anyone do this before, and i figured it would look really awesome, so i figured i'd give it at try. I turned out really liking it, tell me what you think!
UNPLUG YOUR BATTERY for safety.
There's not many tools needed. Just a flat and a phillips screwdriver, and an 8mm and 10 mm socket (use a 1/4 inch drive rachet, because it fits in small tight spaces and you dont need much torque) to take off the bumper cover and headlights. Taking off the bumper requires you to find a few bolts that arent too easy to see. Just remember where they all go. The headlight mounting bolts are all SILVER...atleast in a 00 model year for sure. I used a gamut of drill bits...drill a small pilot hole and then go up in size slowly so you dont chip the housing's reflective coating. I think i ended up with a 1/2'' hole to be able to fit in the grommet. Dont use this as a definate size....i said i THINK!! half inch. Once you have the parts in hand, it wont be hard to see what size you need to end up with. Anyway, you'll also need a Weezer's Blue Album. This is totally nessacary. You can also use Make Believe, or Maldroit....they work equally as well. Finally, you're going to need a few hours and VERY CAREFUL HANDS. These headlights are expensive, so be very careful and go slowly, so you can pay attention to detail since these headlights are EXPENSIVE to replace. Clean often so you can have a nice looking installation. Shavings are you enemy.
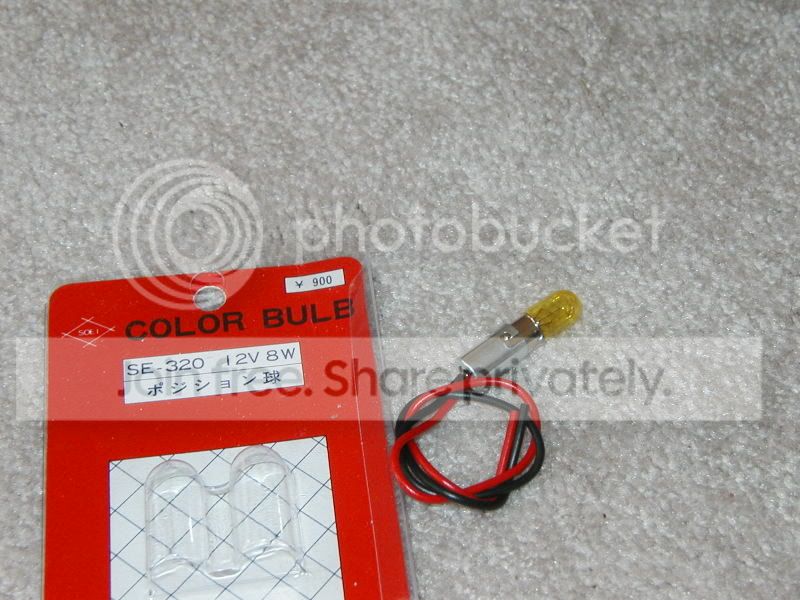
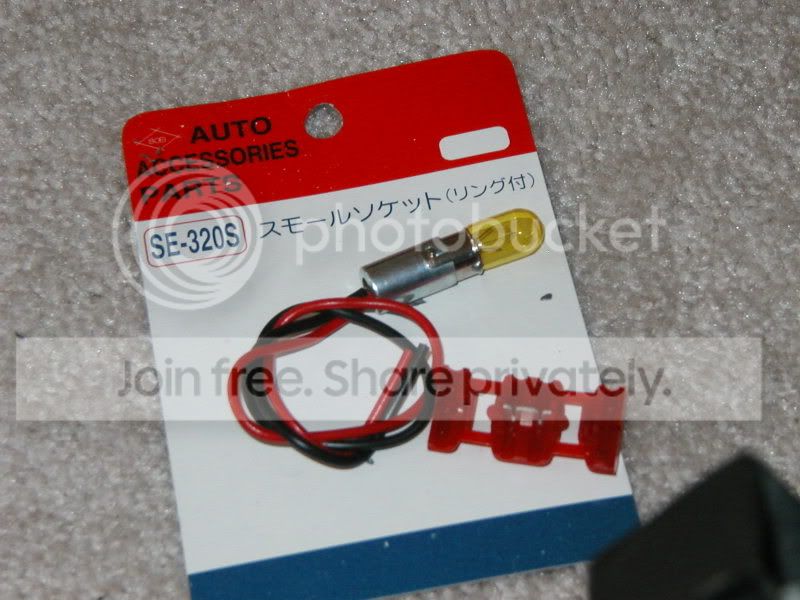
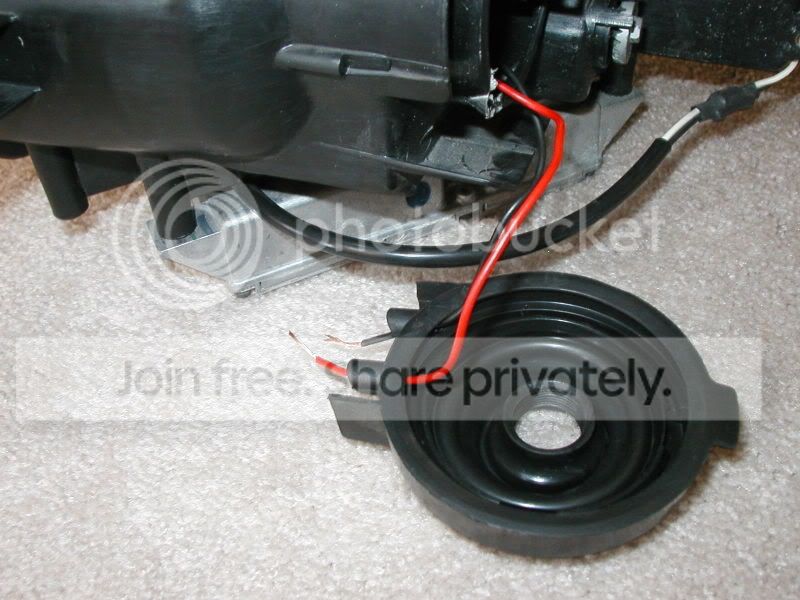
These are the bulbs you're going to need, along with the sockets. I bought them form ONE6 motorsports in Arlington heights, IL for about $25, i think. They come with rubber grommets wich actually hold in the socket and bulb assembly into the headlight.
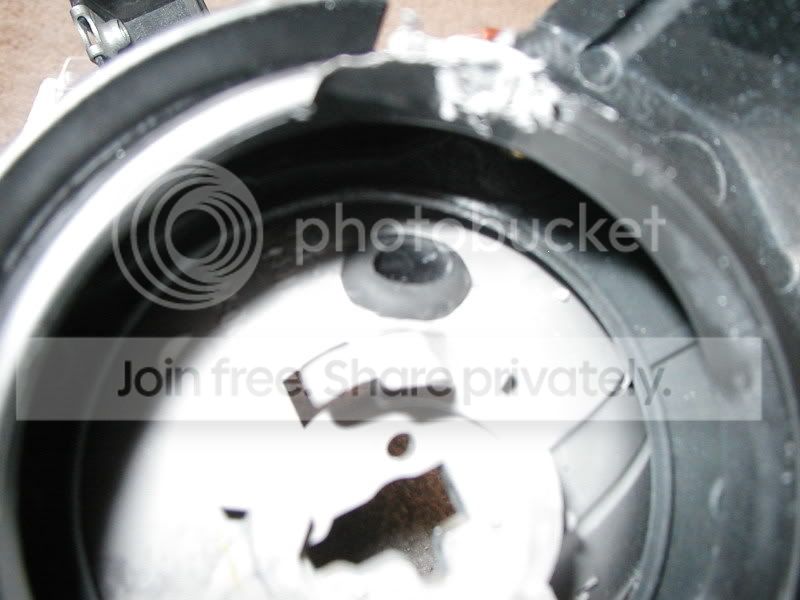
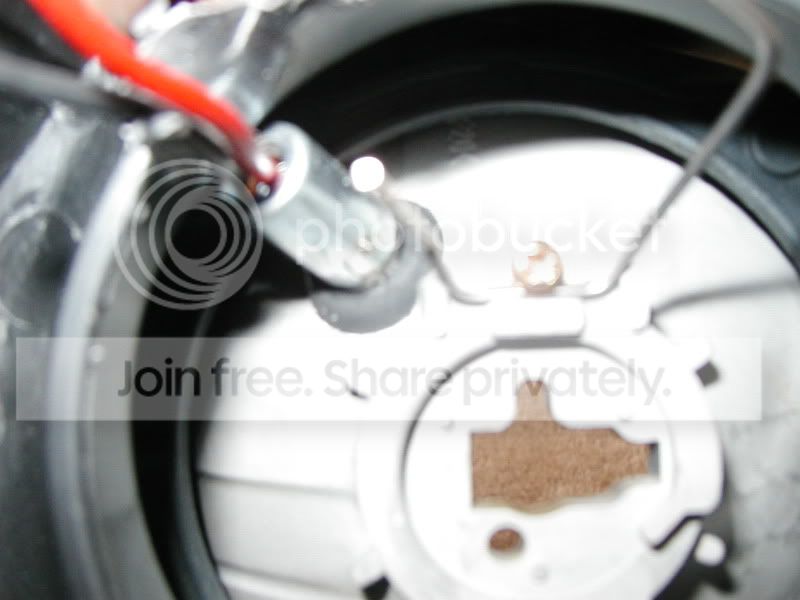
Obviously, the first step is to remove the headlights. This requires removal of the bumper cover as well. Once you have the headlights out, find the BRIGHTS housing and remove the weatherproofing cover. You will see 4 dimples. Use one of these dimples so you can get the bulb in the same position on both headlights.
drill a hole in to the back of the headlight. This is the position i chose to drill them because the bulb itself would be less visible if you were just looking at the headlights unlit. This cuts down on the "rice" factor lol. I forgot to take pics of just the hole that i drilled. So that picture shows the grommet allready installed. Pretty simple, just press it in. Be careful not to drop it in there...but if you do, you can make a hook tool out of a clothes hanger and pull it back out through the hole for the brights bulb. To reduce the amount of shavings that make it into your headlight, hold the headlight, and drill upward so the shavings fall downward, away from the headlight.
Now you can press in the bulb and socket assembly. Wipe down the bulb with rubbing alchohol or something so that you can take off the fingerpring grease. Use a paper towel. Then Lube the assmebly (haha...lube the assembly) with rubbing alchohol (or similiar) so that the bulb will slide thru the grommet easier. Again, the grommet will probably try to fall into the headlight housing, so, as always, make sure there's enough lube on your assembly.
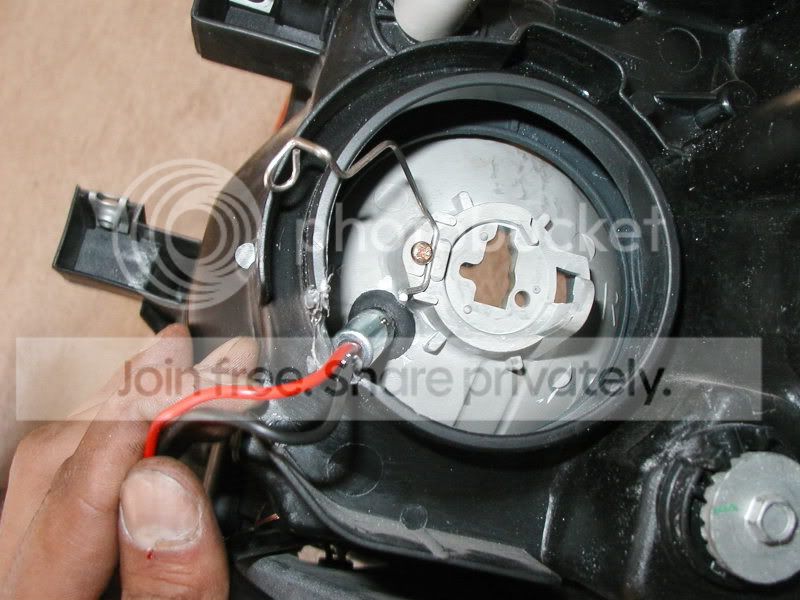
A cool thing about this is you can use the factory weather proof cover...which...um..weatherproofs, and also looks clean. Not like anyone's going to look back there, but i like to keep it clean, yo. You can use the "sweat holes" in the cover to run the wires, too. Later, splice these into the parking light bulb. The parking light bulb is the smaller one that goes into the side of the headlight housing. Dont use the big one....thats the turn signal. It's a good idea to temporarily plug back in the battery and check your connections (after you've taped them up) to make sure they're all good. The black wire on the parking light harness is the ground (duh).
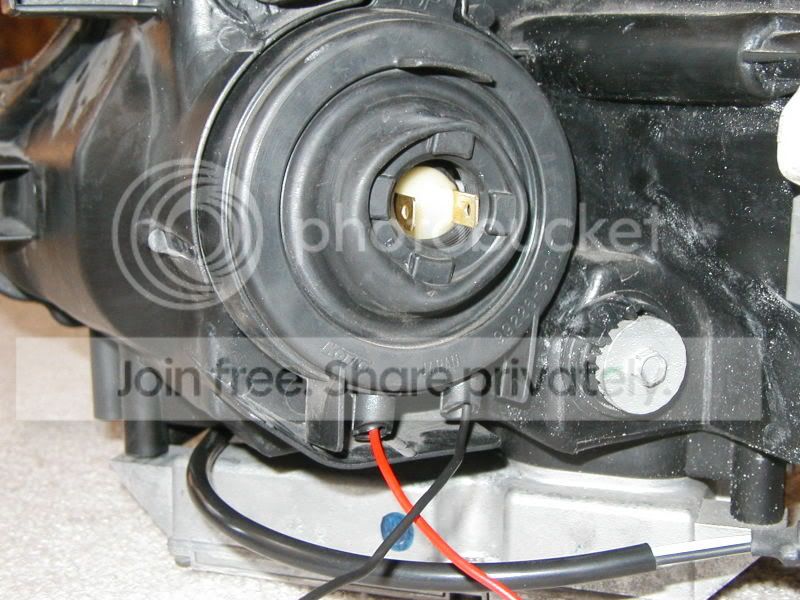
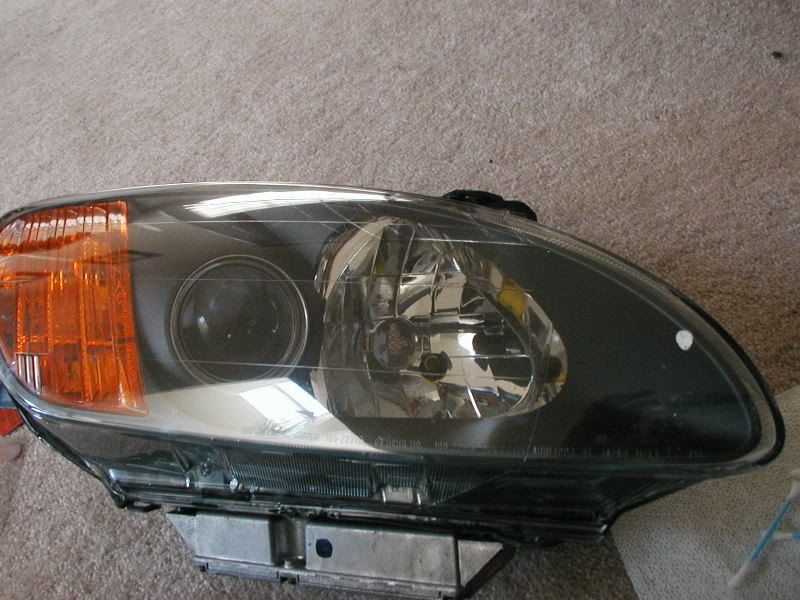
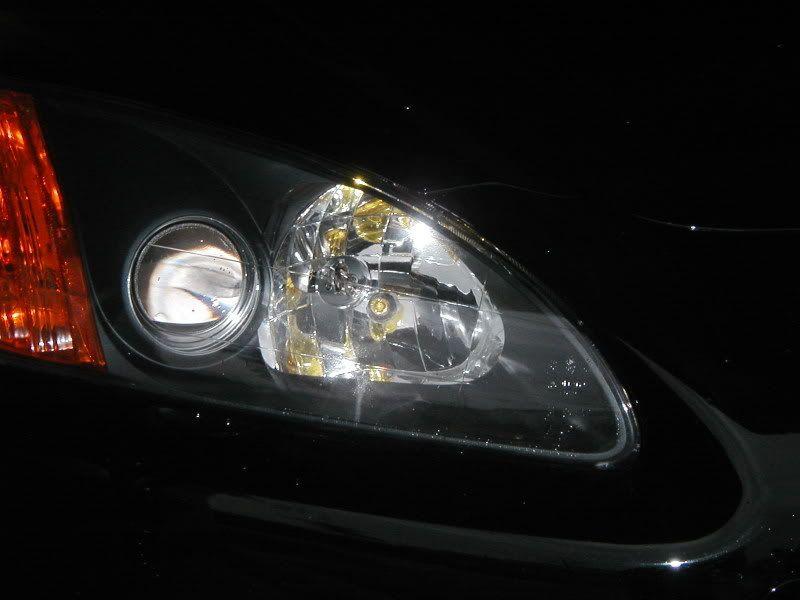
Ok, so this is what your headlight should look like. I was able to clean up the few shavings that fell into the headlight by using a cotton swab and some rubbing alchohol on the passenger side. The driver's side wasnt so fortunate, and i had to bake it in the oven (300 degrees for about 7-10 mins...make sure you place it on a plank of wood so it doesnt melt into to oven grill) and open it up. MAKE SURE YOU CLEAN THE EXCESS GLUE OFF AND SEAL THE HELL OUT OF IT WHEN YOU PUT IT BACK TOGETHER.
Modified by B serious at 1:15 PM 11/29/2006
Modified by B serious at 1:19 PM 11/29/2006
UNPLUG YOUR BATTERY for safety.
There's not many tools needed. Just a flat and a phillips screwdriver, and an 8mm and 10 mm socket (use a 1/4 inch drive rachet, because it fits in small tight spaces and you dont need much torque) to take off the bumper cover and headlights. Taking off the bumper requires you to find a few bolts that arent too easy to see. Just remember where they all go. The headlight mounting bolts are all SILVER...atleast in a 00 model year for sure. I used a gamut of drill bits...drill a small pilot hole and then go up in size slowly so you dont chip the housing's reflective coating. I think i ended up with a 1/2'' hole to be able to fit in the grommet. Dont use this as a definate size....i said i THINK!! half inch. Once you have the parts in hand, it wont be hard to see what size you need to end up with. Anyway, you'll also need a Weezer's Blue Album. This is totally nessacary. You can also use Make Believe, or Maldroit....they work equally as well. Finally, you're going to need a few hours and VERY CAREFUL HANDS. These headlights are expensive, so be very careful and go slowly, so you can pay attention to detail since these headlights are EXPENSIVE to replace. Clean often so you can have a nice looking installation. Shavings are you enemy.
These are the bulbs you're going to need, along with the sockets. I bought them form ONE6 motorsports in Arlington heights, IL for about $25, i think. They come with rubber grommets wich actually hold in the socket and bulb assembly into the headlight.
Obviously, the first step is to remove the headlights. This requires removal of the bumper cover as well. Once you have the headlights out, find the BRIGHTS housing and remove the weatherproofing cover. You will see 4 dimples. Use one of these dimples so you can get the bulb in the same position on both headlights.
drill a hole in to the back of the headlight. This is the position i chose to drill them because the bulb itself would be less visible if you were just looking at the headlights unlit. This cuts down on the "rice" factor lol. I forgot to take pics of just the hole that i drilled. So that picture shows the grommet allready installed. Pretty simple, just press it in. Be careful not to drop it in there...but if you do, you can make a hook tool out of a clothes hanger and pull it back out through the hole for the brights bulb. To reduce the amount of shavings that make it into your headlight, hold the headlight, and drill upward so the shavings fall downward, away from the headlight.
Now you can press in the bulb and socket assembly. Wipe down the bulb with rubbing alchohol or something so that you can take off the fingerpring grease. Use a paper towel. Then Lube the assmebly (haha...lube the assembly) with rubbing alchohol (or similiar) so that the bulb will slide thru the grommet easier. Again, the grommet will probably try to fall into the headlight housing, so, as always, make sure there's enough lube on your assembly.
A cool thing about this is you can use the factory weather proof cover...which...um..weatherproofs, and also looks clean. Not like anyone's going to look back there, but i like to keep it clean, yo. You can use the "sweat holes" in the cover to run the wires, too. Later, splice these into the parking light bulb. The parking light bulb is the smaller one that goes into the side of the headlight housing. Dont use the big one....thats the turn signal. It's a good idea to temporarily plug back in the battery and check your connections (after you've taped them up) to make sure they're all good. The black wire on the parking light harness is the ground (duh).
Ok, so this is what your headlight should look like. I was able to clean up the few shavings that fell into the headlight by using a cotton swab and some rubbing alchohol on the passenger side. The driver's side wasnt so fortunate, and i had to bake it in the oven (300 degrees for about 7-10 mins...make sure you place it on a plank of wood so it doesnt melt into to oven grill) and open it up. MAKE SURE YOU CLEAN THE EXCESS GLUE OFF AND SEAL THE HELL OUT OF IT WHEN YOU PUT IT BACK TOGETHER.
Modified by B serious at 1:15 PM 11/29/2006
Modified by B serious at 1:19 PM 11/29/2006


Member
Joined: Nov 2000
Posts: 4,278
Likes: 0
From: Laguna
nice mod and write up! Is the light too bright or distracting at night? The city lights in cars of Japan appeared to be less bright. I think you might've been better off using LEDs too instead of a standard filament bulb.
Trending Topics
Member
Joined: Jan 2004
Posts: 4,147
Likes: 0
From: Seattle, WA, united states
<TABLE WIDTH="90%" CELLSPACING=0 CELLPADDING=0 ALIGN=CENTER><TR><TD>Quote, originally posted by js2k01 »</TD></TR><TR><TD CLASS="quote">do the 06 an 07 come with city lights. I remember seeing some one have the waht seem to be the high beams on. but they looked city lights.</TD></TR></TABLE>
yep.
yep.
Honda-Tech Member

Joined: Apr 2002
Posts: 5,207
Likes: 0
From: Los Angeles, CA
<TABLE WIDTH="90%" CELLSPACING=0 CELLPADDING=0 ALIGN=CENTER><TR><TD>Quote, originally posted by P Nut »</TD></TR><TR><TD CLASS="quote">Ok, Noob question here. I am still clueless to what these lights do. Are they like DRL? </TD></TR></TABLE>
yeah, same thing just dimmer smaller bulbs
yeah, same thing just dimmer smaller bulbs
Thread Starter
Cool Cool Island Breezes. BOY-EE
iTrader: (1)
Joined: Sep 2006
Posts: 11,953
Likes: 9
From: TRILLINOIS....WAY downtown, jerky.
<TABLE WIDTH="90%" CELLSPACING=0 CELLPADDING=0 ALIGN=CENTER><TR><TD>Quote, originally posted by Francesco »</TD></TR><TR><TD CLASS="quote">post some pics of your 240sx </TD></TR></TABLE>
its actually for sale. email at sbensaheb@yahoo.com if you're interested.
<TABLE WIDTH="90%" CELLSPACING=0 CELLPADDING=0 ALIGN=CENTER><TR><TD>Quote, originally posted by evil vapor »</TD></TR><TR><TD CLASS="quote">nice mod and write up! Is the light too bright or distracting at night? The city lights in cars of Japan appeared to be less bright. I think you might've been better off using LEDs too instead of a standard filament bulb. </TD></TR></TABLE>
thanks...no they're not really that bright. They're just a small bulb...they're only 8 watts. you can barely see them with the HIDs on. They do look really cool in the early evening, though. Barely any light output as far as seeing the road goes. They're about as bright as parking lights.
Joined: May 2003
Posts: 8,884
Likes: 0
From: Intelligence plus character
i think its functional. Its like my daytime running lights on my car. Thank god for canadian models. I always get the same question from other S2k owners: "how did you wire that up?" My reply: "Honda did it from the factory aye"
Honda-Tech Member
Joined: Jan 2003
Posts: 2,742
Likes: 0
From: Providence
Okay, first off...
Drilling an extra hole into the headlight is asking for moisture to get in, grommet or not...
Second off...
The "holes" in the OEM headlight boot are actually little tiny valves that let air in but not moisture... Now you're leaving them totally open allowing whatever moisture that wants in, in...
Third off...
Well, there is no third off, it's just dumb...
But good write up!
Thread Starter
Cool Cool Island Breezes. BOY-EE
iTrader: (1)
Joined: Sep 2006
Posts: 11,953
Likes: 9
From: TRILLINOIS....WAY downtown, jerky.
<TABLE WIDTH="90%" CELLSPACING=0 CELLPADDING=0 ALIGN=CENTER><TR><TD>Quote, originally posted by Hater »</TD></TR><TR><TD CLASS="quote">Okay, first off...
Drilling an extra hole into the headlight is asking for moisture to get in, grommet or not...
Second off...
The "holes" in the OEM headlight boot are actually little tiny valves that let air in but not moisture... Now you're leaving them totally open allowing whatever moisture that wants in, in...
Third off...
Well, there is no third off, it's just dumb...
But good write up!</TD></TR></TABLE>
No, no moisture gets in. The holes that are in the stock boot were allready there...i didnt put them in. They're there so that if any moisture gets in, it can evaporate back out. I havent had any issues though.
<TABLE WIDTH="90%" CELLSPACING=0 CELLPADDING=0 ALIGN=CENTER><TR><TD>Quote, originally posted by LAS2K »</TD></TR><TR><TD CLASS="quote">very nice i might do this with LED's. </TD></TR></TABLE>
Yeah..that would look cool. Do LEDs come in yellow though?
<TABLE WIDTH="90%" CELLSPACING=0 CELLPADDING=0 ALIGN=CENTER><TR><TD>Quote, originally posted by Ed 341 »</TD></TR><TR><TD CLASS="quote">How did you wire it up?</TD></TR></TABLE>
I wired it to the OEM parking lights via soldering iron.
Member
Joined: Nov 2000
Posts: 4,278
Likes: 0
From: Laguna
<TABLE WIDTH="90%" CELLSPACING=0 CELLPADDING=0 ALIGN=CENTER><TR><TD>Quote, originally posted by B serious »</TD></TR><TR><TD CLASS="quote">
Yeah..that would look cool. Do LEDs come in yellow though?
</TD></TR></TABLE>
you can get LED's in any color, make sure the voltage is correct.
Yeah..that would look cool. Do LEDs come in yellow though?
</TD></TR></TABLE>
you can get LED's in any color, make sure the voltage is correct.


Thread
Thread Starter
Forum
Replies
Last Post