

My Ebay "Megan" header install ............ '99 base model Prelude (sorry about the novel)


Thread Starter
Honda-Tech Member
Joined: Apr 2000
Posts: 1,538
Likes: 0
From: Somewhere, MD, In The USA
Well, I had said that I wanted to get the car baselined first, but since funds are tight, and I was jones'n to put the header on, I went ahead and installed it yesterday afternoon.
If you only have jackstands and hand tools and it's 40 degrees out, this can be a challenging install ...... word to the wise.
I have put on a few headers in my day, so I expected this one to go fairly smoothly even though it was the first Prelude I've done. First thing I did was eyeball everything to look to see if it would line-up correctly. Everything looked okay.
Had the usual trouble getting the cat. nuts off, but they were a lot less work than I'm used to. I got them all off with only having to use the impact wrench on one. Which is good since the other two really couldn't be reaced with the one I had.
Getting the 5 bolts that connect the two pieces of the stock manifold had me concerned since you are under the car and I had to use all the extensions I had in my toolbox to reach the nuts. But they came off ok, even having to maneuver around the jack I used to raise from the front of the car. The bracket/clamp holding the lower part of the manifold was fine, and since it was a movable bracket made for easy removal of the stock piece.
That bracket was where all the headache was on the Megan piece ............ it is welded to the unit, so the whole piece must be muscled into place to get it to fit on. If you can, take off the whole cat during the work, it would have made things much easier for maneuvering room, I didn't, so I had to push and shove to get it to work in there, and then only one of the bolts really lined up well, the other was a little off. In retrospect, I'd tell people to dremel/drill out the slots in the bracket a little to make sure there is some flexibilty in the install.
The next total pain in the azz was threading the bolts that connect the two parts of the new header together. Even with all the bolts on the rest of the unit loose to allow some movement, it was really hard to get one of the bolts is. This was because the flanges were REALLY close to the block at one location, and I could not get the socket and bolt into position to thread without worrying about cross-threading it. What I ended up doing was sticking a crowbar down from the top and bracing it so that it pushed the flange away from the block a bit and then went back underneath and threaded the bolt in. Worked fine doing it that way.
I probably could have avoided all that if I had not put the main flange that connects to the head in place. The reason for doing that it so that you don't have to try and man-handle the header in place after everything else is connected. Knowing my usual tactics, I would have broken something doing that ....... ....... so I do it by having all the nuts for the head flange loosely threaded so I have some movement ability.
So after three hours or so from start to finish ...... ugh, should have only been an hour or two ........ I am finally done with the whole install. Start the car up and listen for leaks and check the dash to make sure no CEL codes come up. Pretty quickly the light smoking starts from the header settling in and all that (those who have done installs know what I'm talking about, happens every time, nothing to worry about). Everything looks good. Go for a quick blast around the block, no CEL, and sounds good.
Drove to work this morning, hit VTEC a few times, nothing really remarkable to notice. Butt dyno registers a little more, but hard to tell for sure. 5 hp on a 3,000 lb car isn't going to be THAT noticeable. But it does feel like there is a little more oompth at lower rpms (4,000 range). Has a slight "hiss" under 3/4's and up throttle, but doesn't sound like a leak, must be the intake and header noises working together. I'll keep my ear out to see if there are any other issues. When I got to work, I cracked the hood to look at it to make sure everything is still in place. The unit is "bluing" very evenly, quite surprised!! Means the steel is a good consistant quality.
OVERALL EVALUATION: Very nice unit, especially for the fact I only paid $85 plus shipping for it!!! I could have done a few things differently to have the install go faster, but experience is always a nice thing, next time when I do my SMSP, it will be easier ..... .... I did not put on the EBay test-pipe because I have not ordered my O2 sim. yet. But I will let everyone know how that goes when I get there.
EDIT: spelling owns me this morning .........
Modified by TypeR0207 at 8:59 AM 1/10/2005
If you only have jackstands and hand tools and it's 40 degrees out, this can be a challenging install ...... word to the wise.
I have put on a few headers in my day, so I expected this one to go fairly smoothly even though it was the first Prelude I've done. First thing I did was eyeball everything to look to see if it would line-up correctly. Everything looked okay.
Had the usual trouble getting the cat. nuts off, but they were a lot less work than I'm used to. I got them all off with only having to use the impact wrench on one. Which is good since the other two really couldn't be reaced with the one I had.
Getting the 5 bolts that connect the two pieces of the stock manifold had me concerned since you are under the car and I had to use all the extensions I had in my toolbox to reach the nuts. But they came off ok, even having to maneuver around the jack I used to raise from the front of the car. The bracket/clamp holding the lower part of the manifold was fine, and since it was a movable bracket made for easy removal of the stock piece.
That bracket was where all the headache was on the Megan piece ............ it is welded to the unit, so the whole piece must be muscled into place to get it to fit on. If you can, take off the whole cat during the work, it would have made things much easier for maneuvering room, I didn't, so I had to push and shove to get it to work in there, and then only one of the bolts really lined up well, the other was a little off. In retrospect, I'd tell people to dremel/drill out the slots in the bracket a little to make sure there is some flexibilty in the install.
The next total pain in the azz was threading the bolts that connect the two parts of the new header together. Even with all the bolts on the rest of the unit loose to allow some movement, it was really hard to get one of the bolts is. This was because the flanges were REALLY close to the block at one location, and I could not get the socket and bolt into position to thread without worrying about cross-threading it. What I ended up doing was sticking a crowbar down from the top and bracing it so that it pushed the flange away from the block a bit and then went back underneath and threaded the bolt in. Worked fine doing it that way.
I probably could have avoided all that if I had not put the main flange that connects to the head in place. The reason for doing that it so that you don't have to try and man-handle the header in place after everything else is connected. Knowing my usual tactics, I would have broken something doing that .......
....... so I do it by having all the nuts for the head flange loosely threaded so I have some movement ability.So after three hours or so from start to finish ...... ugh, should have only been an hour or two ........ I am finally done with the whole install. Start the car up and listen for leaks and check the dash to make sure no CEL codes come up. Pretty quickly the light smoking starts from the header settling in and all that (those who have done installs know what I'm talking about, happens every time, nothing to worry about). Everything looks good. Go for a quick blast around the block, no CEL, and sounds good.
Drove to work this morning, hit VTEC a few times, nothing really remarkable to notice. Butt dyno registers a little more, but hard to tell for sure. 5 hp on a 3,000 lb car isn't going to be THAT noticeable.
But it does feel like there is a little more oompth at lower rpms (4,000 range). Has a slight "hiss" under 3/4's and up throttle, but doesn't sound like a leak, must be the intake and header noises working together. I'll keep my ear out to see if there are any other issues. When I got to work, I cracked the hood to look at it to make sure everything is still in place. The unit is "bluing" very evenly, quite surprised!! Means the steel is a good consistant quality. OVERALL EVALUATION: Very nice unit, especially for the fact I only paid $85 plus shipping for it!!! I could have done a few things differently to have the install go faster, but experience is always a nice thing, next time when I do my SMSP, it will be easier .....
.... I did not put on the EBay test-pipe because I have not ordered my O2 sim. yet. But I will let everyone know how that goes when I get there.EDIT: spelling owns me this morning .........
Modified by TypeR0207 at 8:59 AM 1/10/2005
Joined: Dec 2004
Posts: 357
Likes: 0
<TABLE WIDTH="90%" CELLSPACING=0 CELLPADDING=0 ALIGN=CENTER><TR><TD>Quote, originally posted by TypeR0207 »</TD></TR><TR><TD CLASS="quote">
Had the usual trouble getting the cat. nuts off, </TD></TR></TABLE>
yeh ther always rusted, and hard to twist. i had to drill mine.
did you notice any higher db in your exhaust? or mabey it has a diffrent tone?
Had the usual trouble getting the cat. nuts off, </TD></TR></TABLE>
yeh ther always rusted, and hard to twist. i had to drill mine.
did you notice any higher db in your exhaust? or mabey it has a diffrent tone?
Joined: Oct 2003
Posts: 121
Likes: 0
<TABLE WIDTH="90%" CELLSPACING=0 CELLPADDING=0 ALIGN=CENTER><TR><TD>Quote, originally posted by Sticky Tires »</TD></TR><TR><TD CLASS="quote">$85 new, used?
TTIWWOP! </TD></TR></TABLE>
http://stores.ebay.com//Ebstor...QtZkm?
TTIWWOP!
</TD></TR></TABLE>http://stores.ebay.com//Ebstor...QtZkm?
Thread Starter
Honda-Tech Member
Joined: Apr 2000
Posts: 1,538
Likes: 0
From: Somewhere, MD, In The USA
$85 for brand new stainless model.
Nothing really different as I'm still running the stock exhaust and cat. I'm sure when I get the test-pipe on it will be different.
Then when I get the Buddy Club on when the cash is available ........
Nothing really different as I'm still running the stock exhaust and cat. I'm sure when I get the test-pipe on it will be different.
Then when I get the Buddy Club on when the cash is available ........

* B A N N E D *
Joined: Sep 2002
Posts: 3,170
Likes: 4
From: Hamburger Hill, Kills
<TABLE WIDTH="90%" CELLSPACING=0 CELLPADDING=0 ALIGN=CENTER><TR><TD>Quote, originally posted by raser5050 »</TD></TR><TR><TD CLASS="quote">
http://stores.ebay.com//Ebstor...QtZkm?</TD></TR></TABLE>
Thanks.
Damn, that's cheap. How's the quality on those? How long does it last?
Dyno that shhhhhhh!
http://stores.ebay.com//Ebstor...QtZkm?</TD></TR></TABLE>
Thanks.
Damn, that's cheap. How's the quality on those? How long does it last?
Dyno that shhhhhhh!
Trending Topics
Thread Starter
Honda-Tech Member
Joined: Apr 2000
Posts: 1,538
Likes: 0
From: Somewhere, MD, In The USA
Well, as a comparison, I had one of the original Comptech stainless 4-2-1 models that I put on my R, and the welding and design of this one is right up there with it. I was really quite surprised by the quality.
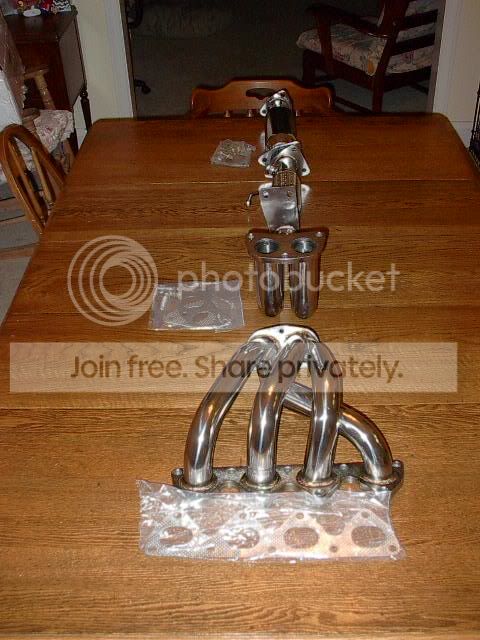
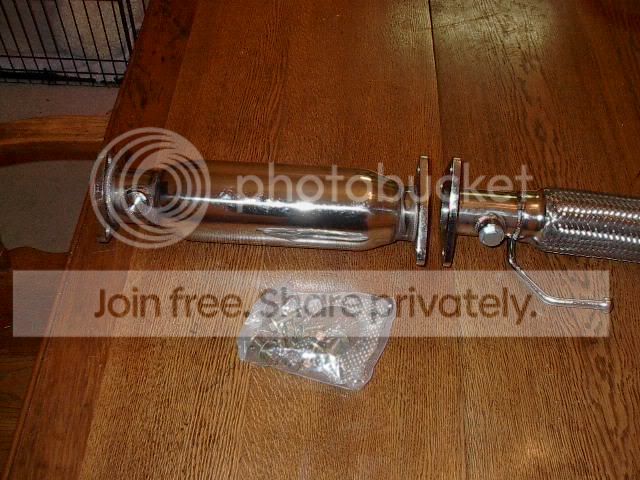
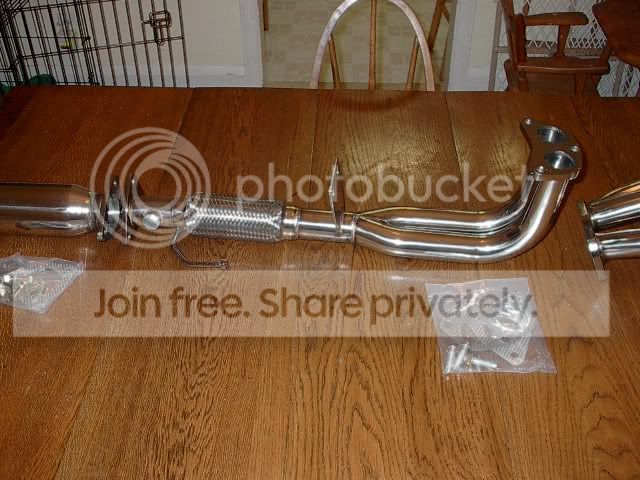
If you do a search on "Megan header" in the Prelude forum, there was a guy who has pics of his. I have some pics from when I pulled it out of the box , but photo hosting owns me ............. e-mail if you want them - rcarter@hcm2.com.
If you do a search on "Megan header" in the Prelude forum, there was a guy who has pics of his. I have some pics from when I pulled it out of the box , but photo hosting owns me ............. e-mail if you want them - rcarter@hcm2.com.
Member
Joined: Mar 2002
Posts: 8,113
Likes: 3
From: East Village, NYC
Why did you attach the bracket to the block? That's a bad idea. They usually crack from engine torque movement. Since it's likely a rip-off of DC sports it probably has the same problem

Thread Starter
Honda-Tech Member
Joined: Apr 2000
Posts: 1,538
Likes: 0
From: Somewhere, MD, In The USA
I'll have to get under the car and dremel it off or something then ......... thanks for the warning on that. I only drive 10 miles each way to work, and because of traffic don't really get a chance to get into the vTEC a lot, so I will take it easy until this weekend when I get a chance to cut it off, or at least unbolt it.
Member
Joined: Mar 2002
Posts: 8,113
Likes: 3
From: East Village, NYC
It has nothing to do with VTEC really,it has to do with the initial engine torque 'lurch' backwards it will do on stock mounts whenever you let off the gas and then step on it again..
why dremel it off...undoing the bolts is fine unless it's hitting..
why dremel it off...undoing the bolts is fine unless it's hitting..
Thread Starter
Honda-Tech Member
Joined: Apr 2000
Posts: 1,538
Likes: 0
From: Somewhere, MD, In The USA
Under the possibility that the plate still hits under load, I think it would be better not to have it on.
I know how much a Honda engine torques based on all the dyno runs I did with the R ........ pretty amazing to watch. Perhaps my E.S. inserts would help that, but it was too late too install them when I did the header, that is another project for another day.
I know how much a Honda engine torques based on all the dyno runs I did with the R ........ pretty amazing to watch. Perhaps my E.S. inserts would help that, but it was too late too install them when I did the header, that is another project for another day.
Joined: Dec 2004
Posts: 357
Likes: 0
here be the pics there hosted by photobucket so i have no clue how long they will stay up.
if they go down click on the links.> http://img.photobucket.com/alb...6.jpg
http://img.photobucket.com/alb...5.jpg
http://img.photobucket.com/alb...3.jpg
http://img.photobucket.com/alb...2.jpg
if they go down click on the links.> http://img.photobucket.com/alb...6.jpg
http://img.photobucket.com/alb...5.jpg
http://img.photobucket.com/alb...3.jpg
http://img.photobucket.com/alb...2.jpg
Thread Starter
Honda-Tech Member
Joined: Apr 2000
Posts: 1,538
Likes: 0
From: Somewhere, MD, In The USA
Thanks for putting them up! 
Those flanges are BEEFY ........ a tick bigger than 3/8" ........
Hopefully I didn't scratch the wife's antique table putting the stuff on it .....
Those flanges are BEEFY ........ a tick bigger than 3/8" ........
Hopefully I didn't scratch the wife's antique table putting the stuff on it .....

Member
Joined: Mar 2002
Posts: 8,113
Likes: 3
From: East Village, NYC
<TABLE WIDTH="90%" CELLSPACING=0 CELLPADDING=0 ALIGN=CENTER><TR><TD>Quote, originally posted by TypeR0207 »</TD></TR><TR><TD CLASS="quote">Under the possibility that the plate still hits under load, I think it would be better not to have it on.
I know how much a Honda engine torques based on all the dyno runs I did with the R ........ pretty amazing to watch. Perhaps my E.S. inserts would help that, but it was too late too install them when I did the header, that is another project for another day.</TD></TR></TABLE>
only install the front mount..it's easy. My engine did not move on the dyno and it pulled 214/167
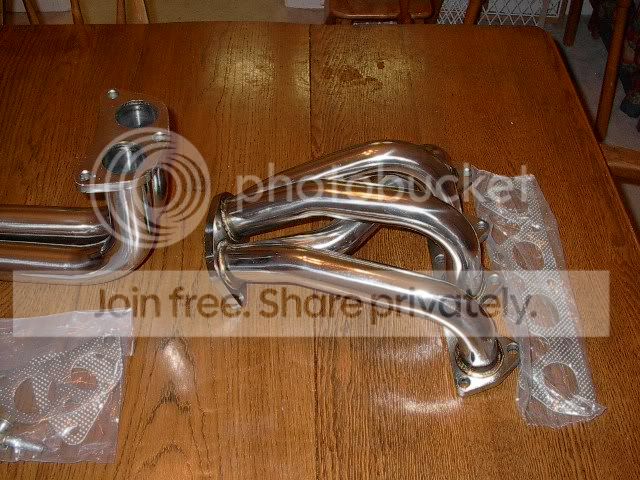
from the pics it just looks like a DC, I'd rather have stock. $85 for nothing is still $85. If you get gains then cool, I am just a little doubtful that it's significant.
I know how much a Honda engine torques based on all the dyno runs I did with the R ........ pretty amazing to watch. Perhaps my E.S. inserts would help that, but it was too late too install them when I did the header, that is another project for another day.
</TD></TR></TABLE>only install the front mount..it's easy. My engine did not move on the dyno and it pulled 214/167
from the pics it just looks like a DC, I'd rather have stock. $85 for nothing is still $85. If you get gains then cool, I am just a little doubtful that it's significant.
Thread Starter
Honda-Tech Member
Joined: Apr 2000
Posts: 1,538
Likes: 0
From: Somewhere, MD, In The USA
I had planned to install at least the front one when I was doing the header, but ran out of daylight ....... I had to use the halogen light as it was to finish the header install ......
As far as heavy goes 5200, it was lighter by about a third or half the weight of the stock mani.
As far as heavy goes 5200, it was lighter by about a third or half the weight of the stock mani.
Member
Joined: Mar 2002
Posts: 8,113
Likes: 3
From: East Village, NYC
This is my ES front mount only in action on the dyno http://satan.higginstribe.com/nov18dyno.mov
Honda-Tech Member
Joined: Jul 2002
Posts: 2,133
Likes: 0
From: Towson, MD, USA
personally I would not buy any megan products, people have bought some of their products into my job and the effectiveness seems to be very questionable.
I have a customer that has a celica GTS '05 and Megan racing was the only company who made a complete strut bar kit for his car (4 peice) front and rear upper and lower. the three pieces that I inspected after installation did nothing but add a few pounds of weight to the car. the rear upper bolted onto the rear seat latches, the rear lower screwed on to the the lower control arms inside bolt and followed the control arms angle (something to look at), and the front upper was at sucha poor angle there was no way it was useful at all, the GTS's hood is so close to the strut mounts that there is no way u can fit an effective strut bar on the car. the front lower, well I dunno how the hell that even went on I didnt bother to check, but im guessing its no more useful than the rest.
I have a customer that has a celica GTS '05 and Megan racing was the only company who made a complete strut bar kit for his car (4 peice) front and rear upper and lower. the three pieces that I inspected after installation did nothing but add a few pounds of weight to the car. the rear upper bolted onto the rear seat latches, the rear lower screwed on to the the lower control arms inside bolt and followed the control arms angle (something to look at), and the front upper was at sucha poor angle there was no way it was useful at all, the GTS's hood is so close to the strut mounts that there is no way u can fit an effective strut bar on the car. the front lower, well I dunno how the hell that even went on I didnt bother to check, but im guessing its no more useful than the rest.
Thread Starter
Honda-Tech Member
Joined: Apr 2000
Posts: 1,538
Likes: 0
From: Somewhere, MD, In The USA
Megan is like OBX I believe ...... they go to the factories in China/Taiwan that make the larger brand name stuff and have them build the exact same unit without the R&D or name pricing jack-up.
I am willing to bet if you held this unit up to the DC Sports model, it would be almost exact specs.
As far as the strut bars go ...... do a search and see the guy who did a pretty extensive test on the Megan strut tower braces and how they performed on a Prelude. If I'm not mistaken, they did pretty well.
I'm going to schedule a dyno session after I get the test-pipe on and my insert(s) in, and tune the ignition timing as part of that. Without a baseline, I will not be able to give a direct before and after, but assuming that most Preludes put down around 160 whp stock on a dynojet, I'm going to use that as a benchmark.

Joined: Dec 2004
Posts: 357
Likes: 0
under da hood pic (photobucket host)
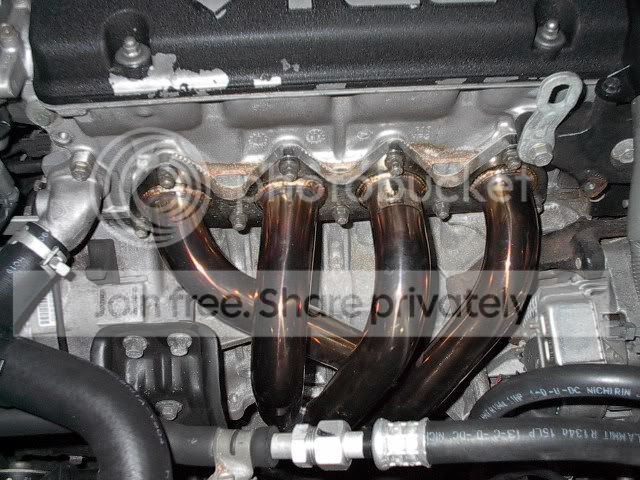
link if it goes down.>> http://img.photobucket.com/alb...2.jpg
link if it goes down.>> http://img.photobucket.com/alb...2.jpg