

Integra AC friendly downpipe help


Thread Starter
Honda-Tech Member
Joined: Feb 2010
Posts: 62
Likes: 0
Hello, I've just started tig welding and I'm trying to design my first ever downpipe. It's going on an acura integra and it needs to be AC friendly so space is an issue.
The precision sc44 turbo outlet takes this flange which I want to keep:
http://vibrantperformance.com/catalo...roducts_id=111
Note the 2.5" hole and the limited space between this and the bolt holes.
Off that flange it needs a sharp turn down to avoid the AC motor.
Should I be building it with 16g or sch10 304ss?
If I can use 16g, I was thinking of trying something like this U-J bend by cutting it into pies so I can start flat on the flange and still make the tight corner:
http://vibrantperformance.com/catalo...roducts_id=572
If I should really use sch10, I was contemplating a tight 90 deg. bend off the flange like this one and then using 90s or 45s as needed.
http://vibrantperformance.com/catalo...roducts_id=529
Once down past the AC motor and heading towards the rest of the exhaust I was thinking of trying this concentric reducer to go from 2.5" to 3"
http://vibrantperformance.com/catalo...oducts_id=1078
and then into this flexpipe:
http://vibrantperformance.com/catalo...oducts_id=1014
Then onto a short section of straight pipe with just enough room for an O2 bung before a v-band style clamp onto the rest of the exhaust.
By the way, would you recommend a saddle O2 bung like this:
http://vibrantperformance.com/catalo...oducts_id=1395
or a normal one like this:
http://vibrantperformance.com/catalo...oducts_id=1246
Any help would be appreciated as this is my first downpipe. I could try taking some pictures and giving more measurements. The biggest challenge seems to be the tight corner off the flange to clear the AC. Especially achieving this while keeping all the flange bolts useable.
As far as price, these seem a bit high but I'm using these parts as examples, unless they offer discounts over the phone when you place an order.
How am I doing so far?
Last edited by overvolting; Aug 26, 2010 at 03:37 PM.
Honda-Tech Member
Joined: Jun 2002
Posts: 6,939
Likes: 2
From: Maryland, USA
16g is what you want. a sch10 downpipe would probably weigh six thousand pounds.
i didnt click on your links but most of the vibrant stuff is not a very tight radius. its expensive, but if you search around on burns stainless website you can find some really tight radius stuff. sometimes buying 1 of their real tight 90 degree bends will save you a ton of time and make it look way nicer than 60 pie cut welds to get the tight radius you need.
if your going to run an egt gauge, put it in the manifold not the downpipe
normal o2 bug is fine
you usually have to modify the flange a bit to get all of the bolt holes to work. that vibrant downpipe flange is .5" thick and kind of a pain to work with, and i have found that it doesnt fit more often than not...as it not all 5 bolt holes line up perfectly with the turbo, so you have to open the holes up a bit. i like the vibrant stuff but i wont use those downpipe flanges anymore. i have one sitting here that i refuse to use, wanna buy it LOL
Thread Starter
Honda-Tech Member
Joined: Feb 2010
Posts: 62
Likes: 0
Thanks, I will move forward with planning using 16g 304ss and also get rid of the EGT bung. Also I will use a tighter 90deg bend like the burns one you mentioned.
As to the T-3 flange, I'd rather use a better design, but the turbo already uses this T-3 flange. It's a very nice turbo with the exhaust side powder coated, I'd rather not mess with it.
I have a flange here that does line up with the turbo very well, the problem with it is I plasma cut it off another downpipe and it's still got 0.3" of material on it from the cut. I could try to belt sand it and use it since i know it is a perfect fit.
just looking at burns site, is there a real advantage to use 321 ss over 304?
Edit: never mind, they don't have 2.5" OD, 90deg bend 321ss.
Last edited by overvolting; Aug 26, 2010 at 03:46 PM.
Honda-Tech Member
Joined: Jun 2002
Posts: 6,939
Likes: 2
From: Maryland, USA
321 is generally for headers not downpipes. 304 is what you want.
you can still use that 5 bolt flange and turbo you have....just use another manufacture for it other than vibrant. like i said i like the vibrant stuff, just not that particular flange. its also half inch thick---which is how thick most head flanges are for manifolds to put it in perspective how over kill it is. thats going to take away atleast another 1/4 inch of space you have to work with when trying to get that downpipe to clear your ac!
you can still use that 5 bolt flange and turbo you have....just use another manufacture for it other than vibrant. like i said i like the vibrant stuff, just not that particular flange. its also half inch thick---which is how thick most head flanges are for manifolds to put it in perspective how over kill it is. thats going to take away atleast another 1/4 inch of space you have to work with when trying to get that downpipe to clear your ac!
Thread Starter
Honda-Tech Member
Joined: Feb 2010
Posts: 62
Likes: 0
321 is generally for headers not downpipes. 304 is what you want.
you can still use that 5 bolt flange and turbo you have....just use another manufacture for it other than vibrant. like i said i like the vibrant stuff, just not that particular flange. its also half inch thick---which is how thick most head flanges are for manifolds to put it in perspective how over kill it is. thats going to take away atleast another 1/4 inch of space you have to work with when trying to get that downpipe to clear your ac!
you can still use that 5 bolt flange and turbo you have....just use another manufacture for it other than vibrant. like i said i like the vibrant stuff, just not that particular flange. its also half inch thick---which is how thick most head flanges are for manifolds to put it in perspective how over kill it is. thats going to take away atleast another 1/4 inch of space you have to work with when trying to get that downpipe to clear your ac!
Let me know if you have any insights on the rest of the design as well if you get a chance. I've never seen a reducer used on a DP or this particular flexpipe and I'm not sure what length flexpipe to go with.
Or maybe there are other glaring mistakes

Thanks again.
Honda-Tech Member
Joined: Jun 2002
Posts: 6,939
Likes: 2
From: Maryland, USA
yes you can make an ac friendly downpipe with a 4 bolt flange as well, its actually a little easier.
original poster....can you post a picture of the turbo and manifold in the car to show what kind of space you have with the compressor? depending on what kind of space you have and how creative you are its usually possible to fit a 3" downpipe with out having to use the reducer. if its not possible if you just put the reducer in the downpipe as soon as you have space it will work just fine. that flex joint you posted up will work just fine as well
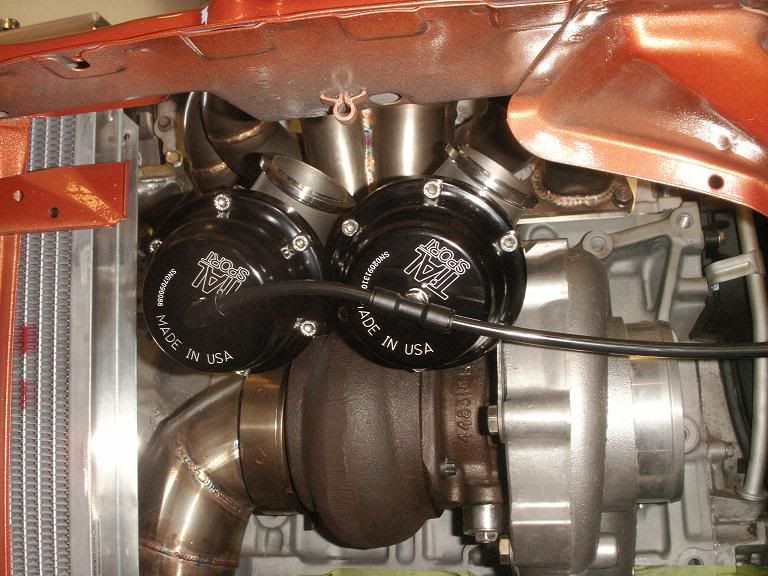
we made this kit. you cant see it in this picture...but this turbo has a 2.5" vband so i had to use a really tight bend directly off the turbo to clear the brake booster and everything, uses a 2.5 to 3" transition as soon as it could psyically fit, and then its 3" from there to the tailpipe at the back of the car. pretty much everything you are dealing with other than it has to clear the master cylinder and not the ac compressor

here's a shot of trying to fit a 3" downpipe where there was not 3" of room thanks to the manifold pretty much not allowing anything to fit. turbo hit block, wastegates hit each other, no room for downpipe, no room for tump tubes. wish i would have just made the manifold rather than buying one. i was pissed.
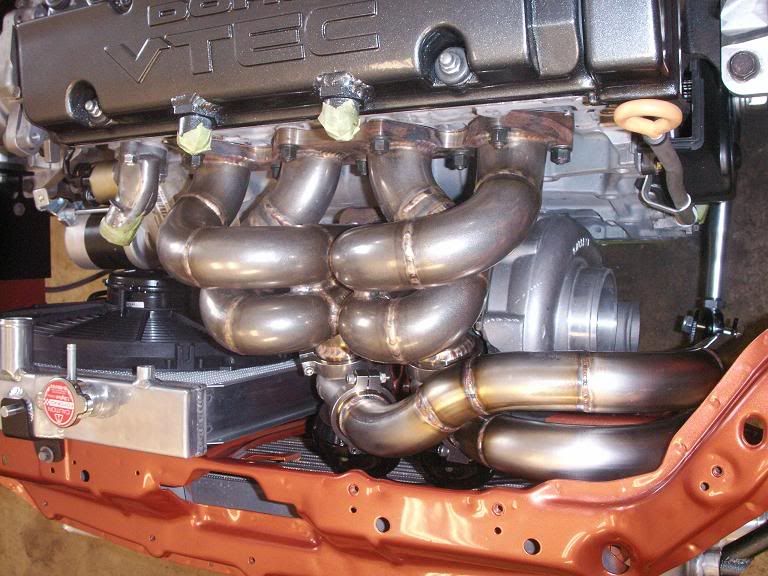
the drivers side downpipe on this was one of the most frustrating things i ever made. it took what felt like forever. you could not get your hand and a marker into the space to even mark it. you had to eyeball it, tack it, try it, repeat. had to remove the engine mount and have it milled...all sorts of stuff. i was really kicking myself in the butt for not using 2.5" downpipes!

hopefully this helps you a bit. more or less just make the tubing fit where it needs to go while flowing as good as it can with the amount of space you have to work with
original poster....can you post a picture of the turbo and manifold in the car to show what kind of space you have with the compressor? depending on what kind of space you have and how creative you are its usually possible to fit a 3" downpipe with out having to use the reducer. if its not possible if you just put the reducer in the downpipe as soon as you have space it will work just fine. that flex joint you posted up will work just fine as well
we made this kit. you cant see it in this picture...but this turbo has a 2.5" vband so i had to use a really tight bend directly off the turbo to clear the brake booster and everything, uses a 2.5 to 3" transition as soon as it could psyically fit, and then its 3" from there to the tailpipe at the back of the car. pretty much everything you are dealing with other than it has to clear the master cylinder and not the ac compressor
here's a shot of trying to fit a 3" downpipe where there was not 3" of room thanks to the manifold pretty much not allowing anything to fit. turbo hit block, wastegates hit each other, no room for downpipe, no room for tump tubes. wish i would have just made the manifold rather than buying one. i was pissed.
the drivers side downpipe on this was one of the most frustrating things i ever made. it took what felt like forever. you could not get your hand and a marker into the space to even mark it. you had to eyeball it, tack it, try it, repeat. had to remove the engine mount and have it milled...all sorts of stuff. i was really kicking myself in the butt for not using 2.5" downpipes!
hopefully this helps you a bit. more or less just make the tubing fit where it needs to go while flowing as good as it can with the amount of space you have to work with
Trending Topics
Thread Starter
Honda-Tech Member
Joined: Feb 2010
Posts: 62
Likes: 0
Thank you!
Actually the log manifold I have with the turbo only leaves about 3.5" of horizontal clearance with the AC. The manifold is not very AC friendly, it actually holds the turbo a little towards the AC motor, if it had been flat it would have given an extra 1/2".
I can post a picture later.
I've done the calculations and even with a 2.5" pipe with a 2.5" CLR 90deg bend it will not fit, so I'm planning on using one of those and doing pie cuts as well... because I need to buy about 1" of clearance.
IE:
I need at least 1/4" for the flange + 2.5" CLR + 2.5/2=1.75" from CLR to outer edge. So i need 4.5" of space
Is this correct?
So if I need 4.5" of space and I have 3.5" of space I'm going to need to use the 2.5CLR 90deg bend and also make pie cuts in it.... is this a reasonable goal? Obviously the AC motor is lower than the turbo outlet so I do have some wiggle room in the turn..
I'm going to have to figure out where to put the reducer.
Thanks again for all the input. The reason I'm doing this rather than selling the manifold and just buying a nice AC compatible ramhorn with downpipe is because I want to have this skill since I think I will enjoy it.
Later on the project is going to be charge piping. I was thinking aluminium...
Thread Starter
Honda-Tech Member
Joined: Feb 2010
Posts: 62
Likes: 0
Here are some pictures.
From the top:

Side:

Bottom:

At the center line coming out of the turbo housing I have 3.5" of space.
A couple of inches lower I only have 3.3" of space.
Can anyone tell me if this is achievable as I am attempting to do it or should I buy or fabricate a more AC friendly manifold first because it can't be fit? :X

Honda-Tech Member
Joined: Feb 2010
Posts: 148
Likes: 0
You will need many pie cut pieces, some masking tape and tack welds when you get them where you want them.
This is what I did for my h23 downpipe.


And it all started out like this


Just start at the d/p flange and work your way down. This took me like 3 hours start to finish.
This is what I did for my h23 downpipe.
And it all started out like this
Just start at the d/p flange and work your way down. This took me like 3 hours start to finish.

Thread
Thread Starter
Forum
Replies
Last Post