

Thermostat housing assembly leak

Thread Starter
Honda-Tech Member
Joined: Nov 2003
Posts: 1,900
Likes: 104
From: Plano, Texas, USA
It seems like a simple problem, but I have done the thermostat 4x so far with no success
First time standard duralast thermostat and gasket, leak at housing
Second time, blue rtv sensor safe material (says cure time 24 hours wtf). Still leaks
Third time, paper gasket made and fast cure rtv. Same result
Fourth time, brand new thermostat housing, OEM style thermostat with gasket. Leak persists
Need to know how to remove entire thermostat housing assembly from vehicle. According to a few diagrams there is a coolant tube connected to the back side.
What is all involved with removing the assembly that connects to the heater hoses. Is a new gasket needed for the coolant tube?
I need to remove the entire housing that the thermostat sits in, the back side of the thermostat assembly.
Much appreciated


Honda-Tech Member
Joined: Feb 2016
Posts: 3,018
Likes: 52
You have to stretch the gasket over the thermostat, putting the flange of the thermostat into the groove on the gasket, so there is rubber on both sides.
Then it should seal right up, unless there is damage or corrosion of the housing.
After removing the heater hoses, etc, take out two bolts holding the lower housing to the block and pull it off of the big back pipe. There is an o-ring sealing the pipe it just pushes in.
Then it should seal right up, unless there is damage or corrosion of the housing.
After removing the heater hoses, etc, take out two bolts holding the lower housing to the block and pull it off of the big back pipe. There is an o-ring sealing the pipe it just pushes in.
Thread Starter
Honda-Tech Member
Joined: Nov 2003
Posts: 1,900
Likes: 104
From: Plano, Texas, USA
You have to stretch the gasket over the thermostat, putting the flange of the thermostat into the groove on the gasket, so there is rubber on both sides.
Then it should seal right up, unless there is damage or corrosion of the housing.
After removing the heater hoses, etc, take out two bolts holding the lower housing to the block and pull it off of the big back pipe. There is an o-ring sealing the pipe it just pushes in.
Then it should seal right up, unless there is damage or corrosion of the housing.
After removing the heater hoses, etc, take out two bolts holding the lower housing to the block and pull it off of the big back pipe. There is an o-ring sealing the pipe it just pushes in.
Thanks, just want to make sure I didn't need to find a new seal for the cross over tube.
Yeah I've done 4 other Hondas and never had this problem on any of them. there is no signs of corrosion but I believe the assembly that holds the thermostat is slightly bent orr warped, So I'm going to remove the assembly and inspect it and cure the rtv off the vehicle to ensure no moisture contacts it in the curing time.

Honda-Tech Member
Joined: Jan 2015
Posts: 959
Likes: 3
Did you use a razor blade or wet-sand paper to clean up all mating surfaces?
This stuff: Felpro Gasket Materials 3030: Advance Auto Parts works good but, not sure for your situation.
This stuff: Felpro Gasket Materials 3030: Advance Auto Parts works good but, not sure for your situation.
Thread Starter
Honda-Tech Member
Joined: Nov 2003
Posts: 1,900
Likes: 104
From: Plano, Texas, USA
Did you use a razor blade or wet-sand paper to clean up all mating surfaces?
This stuff: Felpro Gasket Materials 3030: Advance Auto Parts works good but, not sure for your situation.
This stuff: Felpro Gasket Materials 3030: Advance Auto Parts works good but, not sure for your situation.
Yeah that's how I made the paper gasket. I cleaned and scraped every time, the 4th time I used a new thermostat housing from dorman.
Next up is full removal of entire assembly and inspect all areas and rtv it to death
I am in the car for up to 3 hours a day so this leak hasdforced me to park the civic and daily drive my DSM again. It's a hard commute with congested traffic that I do not like risking my more "hard to replace" cars on. Lots of traffic and lots of construction for a 17 mile commute to work.
I can always find another civic if I'm hit in traffic, but it took me years to find my DSM, and my truck drinks gasoline. Yeah first world problems


Honda-Tech Member
Joined: Oct 2016
Posts: 100
Likes: 0
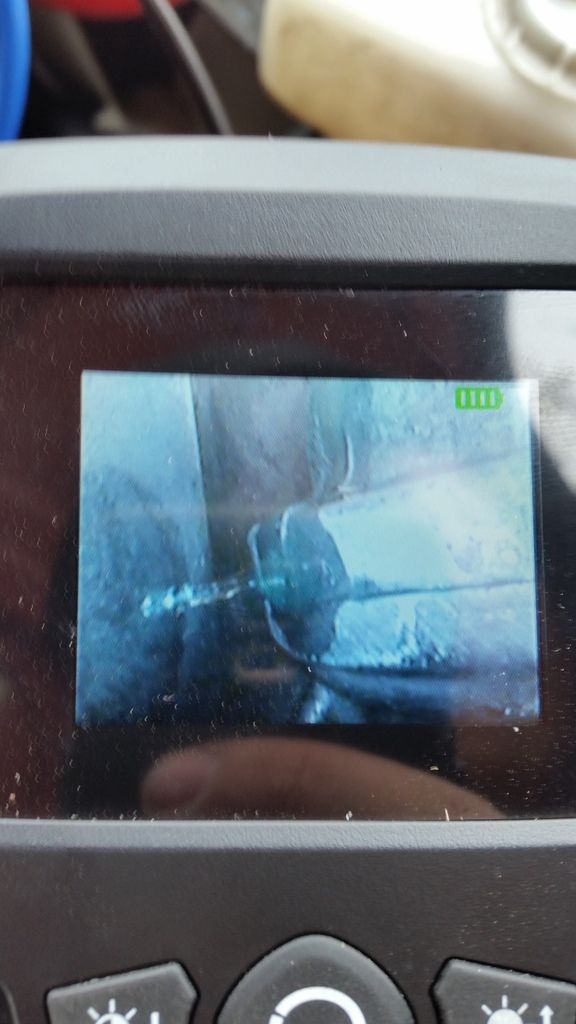
Do you see a leak at the housing or are you deducing that's where it must be coming from?
It's not clear to me what the image is depicting, so it might be the leak from the housing or something else AFAICT.
It's not clear to me what the image is depicting, so it might be the leak from the housing or something else AFAICT.
Thread Starter
Honda-Tech Member
Joined: Nov 2003
Posts: 1,900
Likes: 104
From: Plano, Texas, USA
The first picture at the top of the page is of the bottom of the thermostat housing, where it bolts to the assembly. Using that wire snake camera (loaner tool from autozone) I could visually see the leak only coming from that point. There was a wet spot slightly behind the housing assembly so I need to inspect for hairline cracks
Trending Topics
Thread Starter
Honda-Tech Member
Joined: Nov 2003
Posts: 1,900
Likes: 104
From: Plano, Texas, USA
The inside edge of the housing assembly was trashed with gashes everywhere. Not sure what could have caused this damage besides some one forgetting a bolt and trying to pry it apart with a screw driver


Thread
Thread Starter
Forum
Replies
Last Post
meganagens1234
Honda Accord (1990 - 2002)
2
Aug 17, 2017 06:33 PM
jermie_jrmz
Honda Civic (2001 - 2005)
9
Mar 9, 2015 04:15 PM
nahmanitscool
Honda Civic / Del Sol (1992 - 2000)
5
Apr 11, 2005 11:23 AM