

How To: OBD0 to OBD1

If images are too small: click images, click magnifying glass, click magnifying glass again to view original size.
I did my own OBD0 to OBD1 conversion this weekend and thought I would share it with everyone to hopefully prevent some repeat threads. The whole process is actually very easy and shouldn't take much time at all. If you are prepared, I would say it should take you 1-2 hours depending on your choices and skill.
What you need:
1. OBD1 Distributor for your model of motor (D,B,H, ect) mine was a B16A.
2. A conversion or 'jumper' harness. I bought this one on eBay for $43. 2 Day shipping and every wire was perfect. (I checked the pinouts myself)
3. An OBD1 ECU. I chose the P28. The P30, P72, ect will all work. Note that if you have a VTEC motor and you chose a non-VTEC ECU, it will need additional work for it to work. For this write up I am assuming you already have an ECU that will work with your motor.

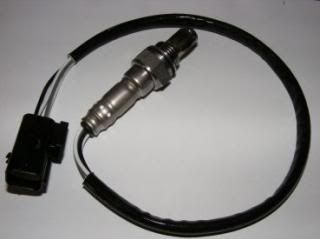
4. A 4-wire oxygen sensor. I had one on my car already.
Now that you have everything, it's time install it.
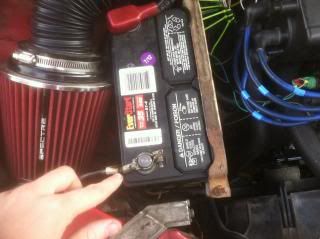
1. First things first, disconnect the negative cable from the battery to prevent injuring yourself or causing damage.
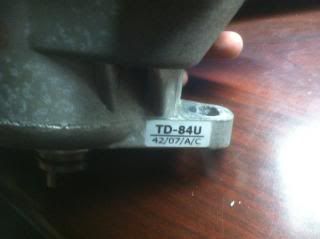
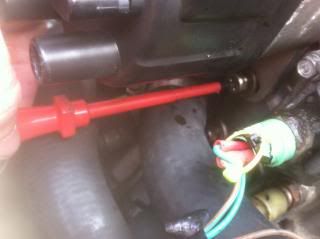
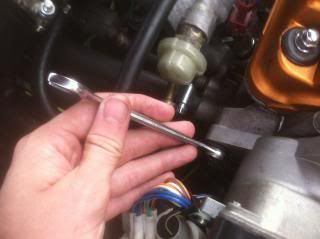
2. Remove your old distributor. You must remove the spark plug wires. Then there are 3 bolts and 2 plugs.

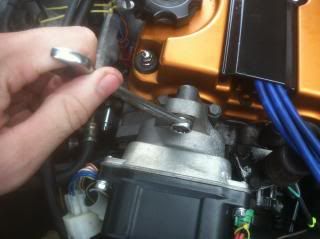
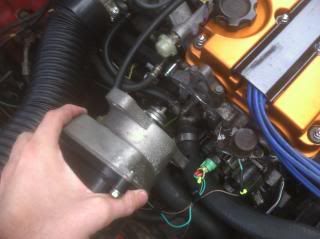
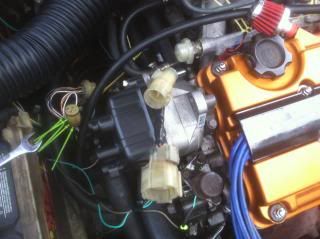
3. Install your new OBD1 distributor. You can see in the photo that I removed the OBD1 plugs on my distributor and soldered on OBD0 plugs so it will plug into my existing motor harness. You can do this, or solder OBD1 plugs on your motor harness. Or you can get a jumper harness for this too.
4. Now onto the interesting stuff. Go inside and unplug your OBD0 ECU.
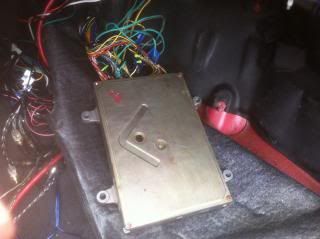
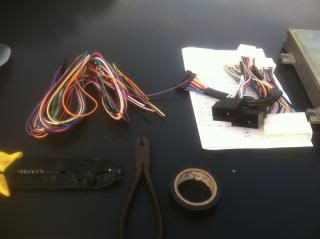
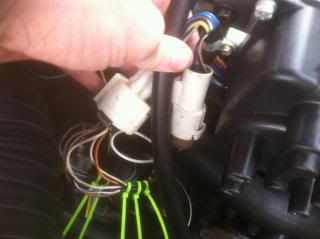
5. Plug in your conversion harness to the existing plugs.
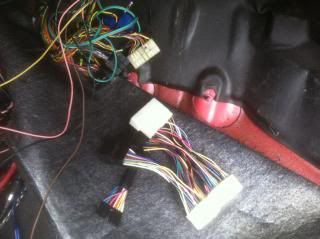
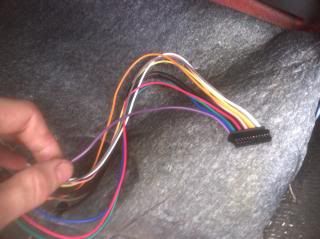
6. You should have a set of wires that plugs into your conversion harness. This subharness is for additional sensors that were not present on OBD0 vehicles.
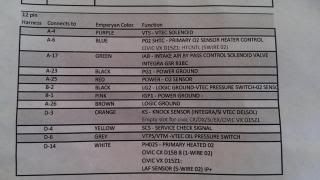
This is the pinouts for the subharness that was included with my conversion harness.
7. No pictures for the next couple of steps. But there should be a wire on the subharness designated for pulling ECU codes. You should wire this to one end of a switch. On the other end of the switch, attach a ground. When you have a check engine light pop up, you can flip the switch and the check engine light will blink in the same manner as the OBD0 ECU LED. You can tuck this switch up somewhere or mount it some where out of the way. You shouldn't have to use it often.
8. Wire your new 4-wire O2 sensor. Two of the wires are for the heater. One is a ground. The last one is the signal wire.
9. Wiring VTEC if your motor has it. One wire will go to the solenoid. Another wire will go to the pressure switch. The other side of the pressure switch will go to a known good ground. I recommend the thermostat housing.
10. If your ECU has a knock board you can wire the knock sensor. If it does not, do not wire the knock sensor. My P28 did not have a knock board so I did not wire my knock sensor to it.
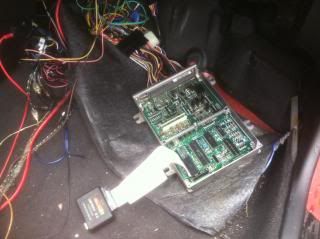
11. Plug in your ECU and connect the subharness to the conversion harness.
You're done! Very simple to do.
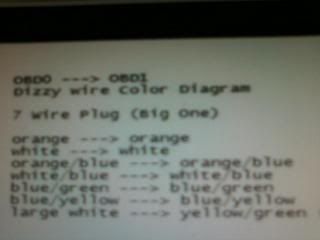
If you have to swap plugs on your distributor or motor harness, it is very easy to do. You color match for the most part. If you swap the plugs on the motor harness, the large white wire on the OBD0 7-pin plug will be a yellow/green wire on the OBD1 7-pin plug. The same goes for swapping the plug on the distributor, but the opposite. This large white wire and yellow/green wire are by themselves on the plug. They do not have another wire above or below them.
Here are the OBD0 pinouts:

Here are the OBD1 pinouts:
Hope this helps. It's been done before but another write up won't hurt when people search for OBD0 to OBD1 conversion.
I did my own OBD0 to OBD1 conversion this weekend and thought I would share it with everyone to hopefully prevent some repeat threads. The whole process is actually very easy and shouldn't take much time at all. If you are prepared, I would say it should take you 1-2 hours depending on your choices and skill.
What you need:
1. OBD1 Distributor for your model of motor (D,B,H, ect) mine was a B16A.

2. A conversion or 'jumper' harness. I bought this one on eBay for $43. 2 Day shipping and every wire was perfect. (I checked the pinouts myself)

3. An OBD1 ECU. I chose the P28. The P30, P72, ect will all work. Note that if you have a VTEC motor and you chose a non-VTEC ECU, it will need additional work for it to work. For this write up I am assuming you already have an ECU that will work with your motor.

4. A 4-wire oxygen sensor. I had one on my car already.

Now that you have everything, it's time install it.
1. First things first, disconnect the negative cable from the battery to prevent injuring yourself or causing damage.

2. Remove your old distributor. You must remove the spark plug wires. Then there are 3 bolts and 2 plugs.


3. Install your new OBD1 distributor. You can see in the photo that I removed the OBD1 plugs on my distributor and soldered on OBD0 plugs so it will plug into my existing motor harness. You can do this, or solder OBD1 plugs on your motor harness. Or you can get a jumper harness for this too.


4. Now onto the interesting stuff. Go inside and unplug your OBD0 ECU.

5. Plug in your conversion harness to the existing plugs.

6. You should have a set of wires that plugs into your conversion harness. This subharness is for additional sensors that were not present on OBD0 vehicles.

This is the pinouts for the subharness that was included with my conversion harness.

7. No pictures for the next couple of steps. But there should be a wire on the subharness designated for pulling ECU codes. You should wire this to one end of a switch. On the other end of the switch, attach a ground. When you have a check engine light pop up, you can flip the switch and the check engine light will blink in the same manner as the OBD0 ECU LED. You can tuck this switch up somewhere or mount it some where out of the way. You shouldn't have to use it often.
8. Wire your new 4-wire O2 sensor. Two of the wires are for the heater. One is a ground. The last one is the signal wire.
9. Wiring VTEC if your motor has it. One wire will go to the solenoid. Another wire will go to the pressure switch. The other side of the pressure switch will go to a known good ground. I recommend the thermostat housing.
10. If your ECU has a knock board you can wire the knock sensor. If it does not, do not wire the knock sensor. My P28 did not have a knock board so I did not wire my knock sensor to it.
11. Plug in your ECU and connect the subharness to the conversion harness.

You're done! Very simple to do.
If you have to swap plugs on your distributor or motor harness, it is very easy to do. You color match for the most part. If you swap the plugs on the motor harness, the large white wire on the OBD0 7-pin plug will be a yellow/green wire on the OBD1 7-pin plug. The same goes for swapping the plug on the distributor, but the opposite. This large white wire and yellow/green wire are by themselves on the plug. They do not have another wire above or below them.

Here are the OBD0 pinouts:

Here are the OBD1 pinouts:

Hope this helps. It's been done before but another write up won't hurt when people search for OBD0 to OBD1 conversion.

Trending Topics
Yup. That's the big issue I have seen. It's really not hard. I just winged it myself most of the way. Kinda knew what had to be done. New ECU, new distributor, jumper harness, go. It's a very easy thing to do. Same with the 94-01 integra console into an EF civic. Very easy, I just took pictures and posted it up as a 'write up' to potentially help someone in the future.


Crazy Honda Guy

Joined: Sep 2003
Posts: 8,025
Likes: 19
From: Calgary, AB, Canada
Honda-Tech Member
Joined: Sep 2006
Posts: 7,709
Likes: 12
From: NoRthERn Cali
Also may help to state that most of the ebay jumpers are set up to only work on factory mpfi or converted vehicles only. So if the car is a dx the jumper will not work until its converted.

Thread
Thread Starter
Forum
Replies
Last Post