

Fefelarue's 3rd gen Honda Prelude


Thread Starter
Honda-Tech Member
Joined: May 2013
Posts: 27
Likes: 0
Hey folks, my name is Felix. I used to drive a peugeot 106 quiksilver which looked like this:


But anyway, onto better things! Here's my new car...
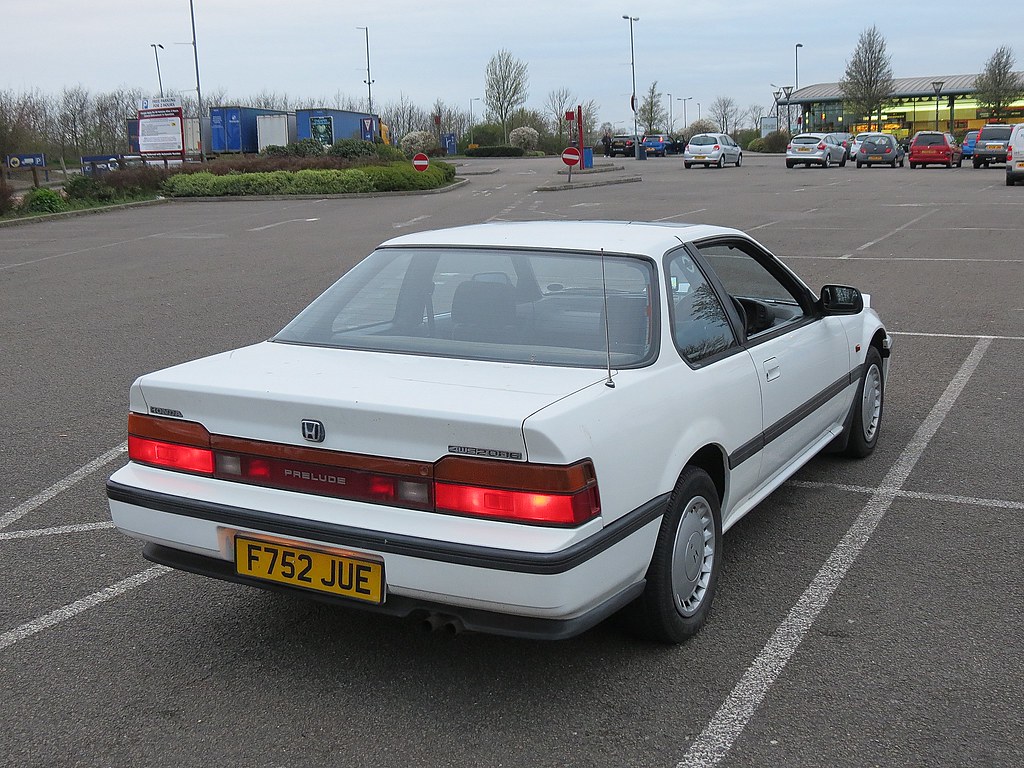
It's a gen 3 1989 Honda Prelude 2.0i 16v 150bhp with 4 wheel steering
It's only got 81k on the clock, and it's pretty much immaculate inside and out.
I got a couple of quick snaps on the long drive back from picking it up:


Then today I finally got some time to give it a clean, and start the free mods
First up was the numberplate. I hated the ugly numberplate mount it had, so did this..
Before:

Mount removed:

Cleaned:

Then re-attached the plate a bit lower down without the surround:

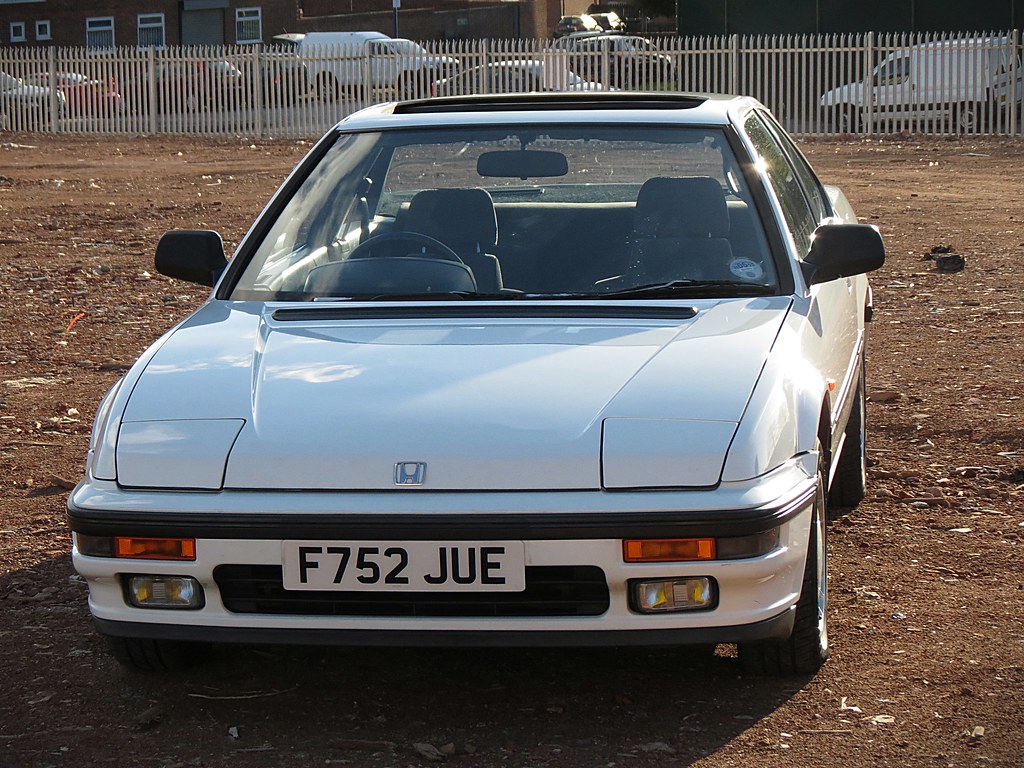
That's all the modding I had time for today, so I found a building site and took some pics:


Let me know what ya think :D
But anyway, onto better things! Here's my new car...
It's a gen 3 1989 Honda Prelude 2.0i 16v 150bhp with 4 wheel steering
It's only got 81k on the clock, and it's pretty much immaculate inside and out.
I got a couple of quick snaps on the long drive back from picking it up:
Then today I finally got some time to give it a clean, and start the free mods
First up was the numberplate. I hated the ugly numberplate mount it had, so did this..
Before:
Mount removed:
Cleaned:
Then re-attached the plate a bit lower down without the surround:
That's all the modding I had time for today, so I found a building site and took some pics:
Let me know what ya think :D
Thread Starter
Honda-Tech Member
Joined: May 2013
Posts: 27
Likes: 0
So today I did some bits on the rear end.
I started on the smoothing
So after painstakingly removing the badges and glue residue, I was left with these rather unsightly holes:

So off to halfords to get the filler, and I filled the **** out of those holes:

160 grit:

800 grit wet:

2000 grit wet:

Then I just used high build primer and a touch up pen. This pic is before flatting and polishing:

MEANWHILE.. I removed the number plate mount again and stuck the plate to the rear bumper..
Before:

Removed:

Final result for the day: I flatted down the brushed on paint and it looks like this:

I didn't get time to do the centre badge today, so that'll have to wait for now...
I'll give it a proper polish and a blend in a couple of days when it's all rock solid, but even now you can't see where the holes were
Also, this is worth a watch. My mate attached his go-pro to the side of my car to get some 4 wheel steering action. And there's some nice exhaust sounds in there too! (this is with a completely standard exhaust):
As always, comments, opinions and suggestions welcome
I started on the smoothing
So after painstakingly removing the badges and glue residue, I was left with these rather unsightly holes:
So off to halfords to get the filler, and I filled the **** out of those holes:
160 grit:
800 grit wet:
2000 grit wet:
Then I just used high build primer and a touch up pen. This pic is before flatting and polishing:
MEANWHILE.. I removed the number plate mount again and stuck the plate to the rear bumper..
Before:
Removed:
Final result for the day: I flatted down the brushed on paint and it looks like this:
I didn't get time to do the centre badge today, so that'll have to wait for now...
I'll give it a proper polish and a blend in a couple of days when it's all rock solid, but even now you can't see where the holes were
Also, this is worth a watch. My mate attached his go-pro to the side of my car to get some 4 wheel steering action. And there's some nice exhaust sounds in there too! (this is with a completely standard exhaust):
As always, comments, opinions and suggestions welcome
Thread Starter
Honda-Tech Member
Joined: May 2013
Posts: 27
Likes: 0
Thread Starter
Honda-Tech Member
Joined: May 2013
Posts: 27
Likes: 0
Hello again!
Got a few bits done today, first off was the rear speakers, as I had some spare ones of the same size lying around from my old car.
Got the old ones out:

Old vs new (that's what ***** speakers look like after 24 years! - They fell apart in my hands)

And the new ones in: (so much better quality, but still planning on amped front comps and a 15/18" sub when I can afford it)

Next up was the exhaust, I got a few bits delivered from t'internet:


Old back box off ready to chop:

And after lots of measuring, fitments and gaffa tape, I finally got it all welded into one hybrid mega japcan beast:

I've attached it temporarily, but i'll be sorting some proper hangers asap and get it nice and tight against the bumper as it's a bit low here:

Thanks for looking! comments welcome
Got a few bits done today, first off was the rear speakers, as I had some spare ones of the same size lying around from my old car.
Got the old ones out:
Old vs new (that's what ***** speakers look like after 24 years! - They fell apart in my hands)
And the new ones in: (so much better quality, but still planning on amped front comps and a 15/18" sub when I can afford it)
Next up was the exhaust, I got a few bits delivered from t'internet:
Old back box off ready to chop:
And after lots of measuring, fitments and gaffa tape, I finally got it all welded into one hybrid mega japcan beast:
I've attached it temporarily, but i'll be sorting some proper hangers asap and get it nice and tight against the bumper as it's a bit low here:
Thanks for looking! comments welcome
Trending Topics

Thread Starter
Honda-Tech Member
Joined: May 2013
Posts: 27
Likes: 0
Little update under the hood.
So here's what it looked like, not exactly clean, but ******* good for a 24 year old car!

I gave it a quick clean with some wd40, and took off the exhaust manifold cover

Then began sanding down the cover

First coat

All done

Gave the bay another clean, and whacked it back on

Sorry it's not the most exciting update, but tomorrow i'm getting powdercoating quotes for the rocker cover, and i've just had a mad silicone hose shopping spree on ebay, so good stuff will be happening soon!
Comments welcome
So here's what it looked like, not exactly clean, but ******* good for a 24 year old car!
I gave it a quick clean with some wd40, and took off the exhaust manifold cover
Then began sanding down the cover
First coat
All done
Gave the bay another clean, and whacked it back on
Sorry it's not the most exciting update, but tomorrow i'm getting powdercoating quotes for the rocker cover, and i've just had a mad silicone hose shopping spree on ebay, so good stuff will be happening soon!
Comments welcome


Thread Starter
Honda-Tech Member
Joined: May 2013
Posts: 27
Likes: 0
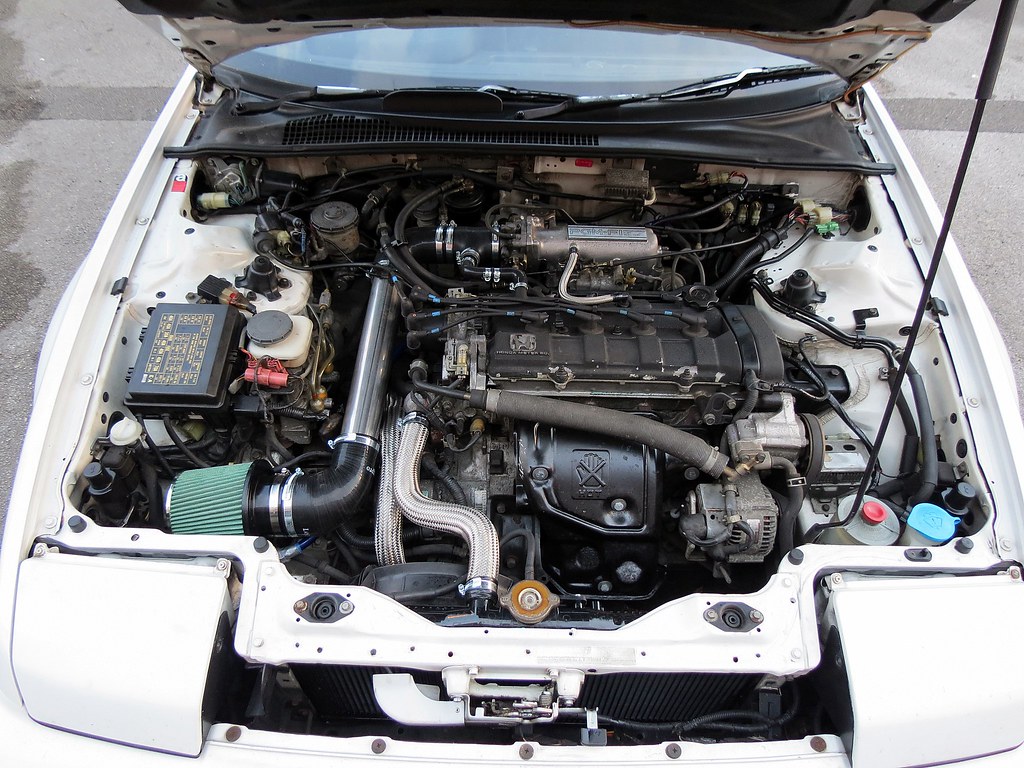
Okay, got bits from the postman today:

Here's the engine bay before:

And after a lot of cuts and burns, I managed to pull this out, the most ridiculous air intake I have ever seen!

And there's still another friggin resonator box under the inlet manifold which I didn't have time to get to today.
Cut all the bits down and test fitted it all:


I know it's a silly place to have the filter, but i'm still waiting on a long bit of pipe to bring it down to the front of the bay..
Thanks for looking!
Here's the engine bay before:
And after a lot of cuts and burns, I managed to pull this out, the most ridiculous air intake I have ever seen!
And there's still another friggin resonator box under the inlet manifold which I didn't have time to get to today.
Cut all the bits down and test fitted it all:
I know it's a silly place to have the filter, but i'm still waiting on a long bit of pipe to bring it down to the front of the bay..
Thanks for looking!
Thread Starter
Honda-Tech Member
Joined: May 2013
Posts: 27
Likes: 0
Hello again.
Got a few more bits done today. Progress isn't that fast as it's a daily driver, but it's getting there bit by bit..
First off, I took off the rusty plug carrier bits in the corner:


And gave them a lick of paint to match the rocker cover:

Then started the wire tuck with the two ugliest bits first; the throttle cable which goes right over the engine for some reason, and these horrible red wires snaking their way around the bay:

Relocated the throttle cable up to the top, and after a bit of hassle, ran the wires round the other way and wrapped them in tape:

Then I swapped this:

For this:

And finally got that bit of pipe to move the air filter down right where the air intake is behind the light

That's all for today
Trying to decide what big thing to do next, I'm thinking a flocked rocker cover :D
Got a few more bits done today. Progress isn't that fast as it's a daily driver, but it's getting there bit by bit..
First off, I took off the rusty plug carrier bits in the corner:
And gave them a lick of paint to match the rocker cover:
Then started the wire tuck with the two ugliest bits first; the throttle cable which goes right over the engine for some reason, and these horrible red wires snaking their way around the bay:
Relocated the throttle cable up to the top, and after a bit of hassle, ran the wires round the other way and wrapped them in tape:
Then I swapped this:
For this:
And finally got that bit of pipe to move the air filter down right where the air intake is behind the light
That's all for today
Trying to decide what big thing to do next, I'm thinking a flocked rocker cover :D
Very nice looking project car there, bud. I'm not a huge fan of the exhaust or trunk lid smoothing methods you used, but if you're happy with them... then more power to ya'. 
Thread Starter
Honda-Tech Member
Joined: May 2013
Posts: 27
Likes: 0
Another tiny update, but every little helps..
New exhaust manifold cover bolts:


My dipstick was looking *****, so I made a new handle for it.
One dipstick and one jewellers screwdriver:

Pulled off the handle and cut the dipstick:

And stuck them back together then taped over:

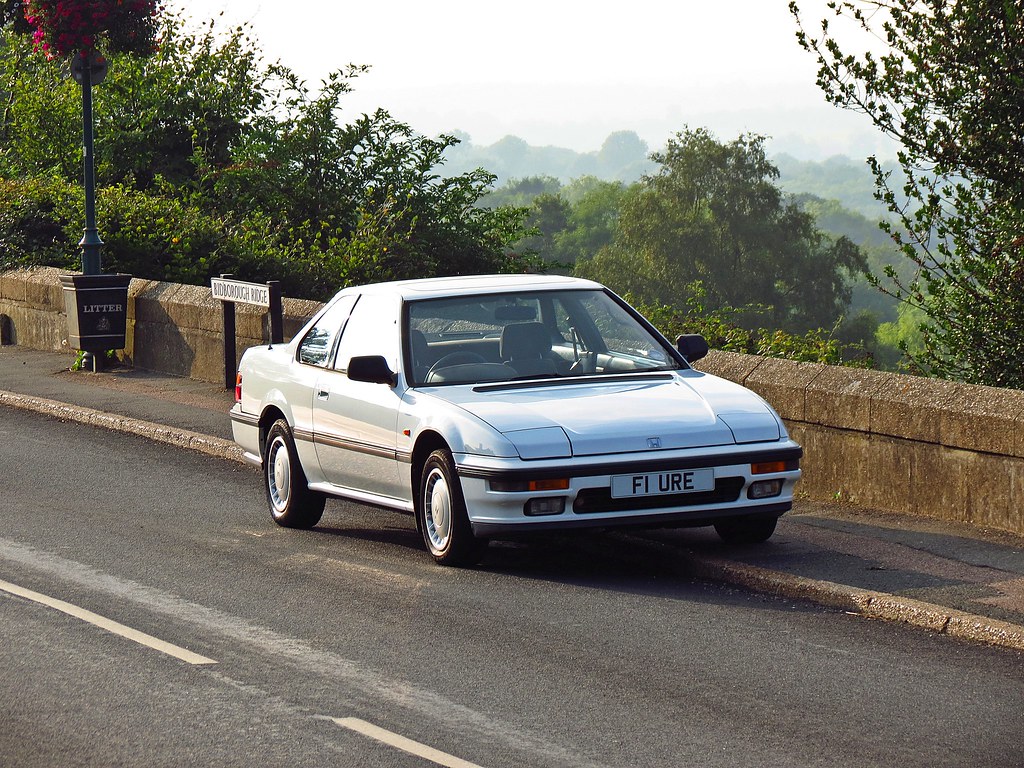
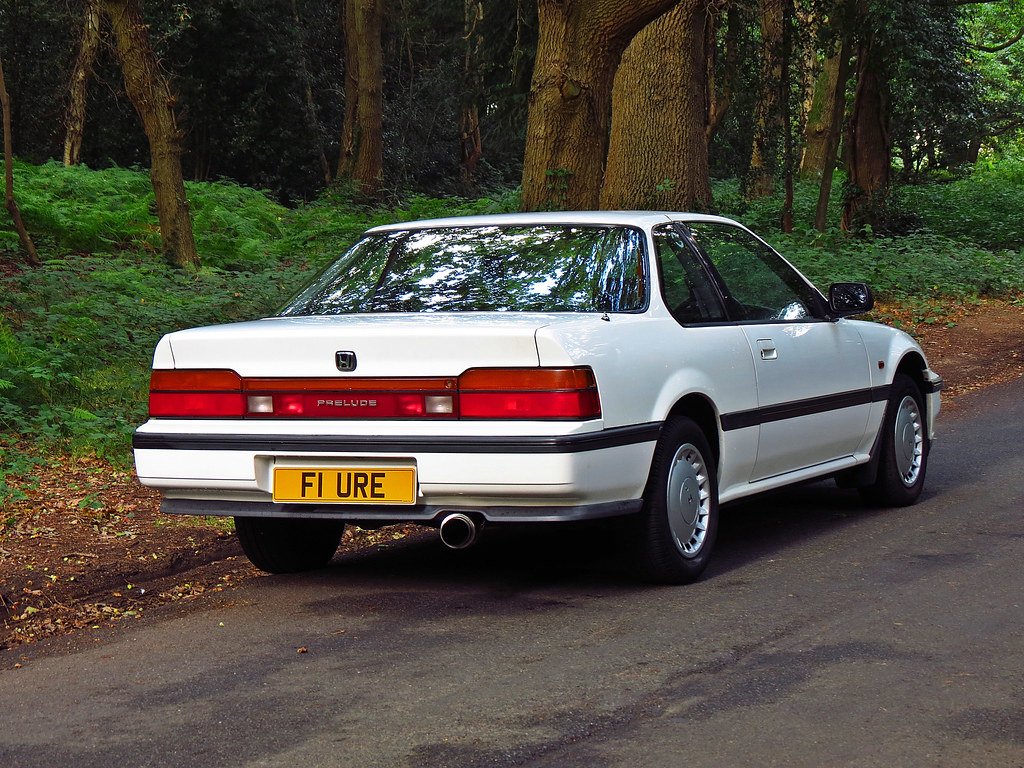
And so after 3 rejection letters from the DVLA, and finally finding out that the previous owner had refunded the tax on the car, I eventually managed to put my private plates on
(my surname is Ure, so they're perfect for me) - oh and also got a new tax disc holder haha.


Cheers
New exhaust manifold cover bolts:
My dipstick was looking *****, so I made a new handle for it.
One dipstick and one jewellers screwdriver:
Pulled off the handle and cut the dipstick:
And stuck them back together then taped over:
And so after 3 rejection letters from the DVLA, and finally finding out that the previous owner had refunded the tax on the car, I eventually managed to put my private plates on
(my surname is Ure, so they're perfect for me) - oh and also got a new tax disc holder haha.
Cheers

Thread Starter
Honda-Tech Member
Joined: May 2013
Posts: 27
Likes: 0
Hey folks,
Apologies for the lack of updates, but i've done a few more small bits to the car:
First up was to relocate the battery to the boot. Bought myself some hench 0 gauge cable and got the seats out.

Took off the induction kit and laid the cable in the right place:

Through the car and into the boot:

Also took out the spare wheel for now for more subwoofer space:

Then that allowed me to get a new piece of hose to relocate the air filter like so:

The battery's just tied in the boot at the moment, but I'm going to get on with a boot build once I get my subwoofer(s)
Then after a few instances of overheating on the hot days when stuck in traffic, I figured I could do with a new radiator. I took the old one out and it's, well, fucked.

Then I ordered a nice shiny new one from Coolex in Nottingham who I highly recommend:

While I had the radiator off, I thought I may as well do something to the hoses, and since I couldn't find any silicone ones, I decided to braid them.
Before:

After:

New radiator in:

Current state of engine bay:
Still very messy..
Then it was finally time to paint the wiper blades.
Here's what they looked like before, very worn:

Painted them up in satin black, complete with flat blades, looks much better I think.


Then I adjusted the exhaust again and got some pics:


Thanks for looking!
Felix
Apologies for the lack of updates, but i've done a few more small bits to the car:
First up was to relocate the battery to the boot. Bought myself some hench 0 gauge cable and got the seats out.
Took off the induction kit and laid the cable in the right place:
Through the car and into the boot:
Also took out the spare wheel for now for more subwoofer space:
Then that allowed me to get a new piece of hose to relocate the air filter like so:
The battery's just tied in the boot at the moment, but I'm going to get on with a boot build once I get my subwoofer(s)
Then after a few instances of overheating on the hot days when stuck in traffic, I figured I could do with a new radiator. I took the old one out and it's, well, fucked.
Then I ordered a nice shiny new one from Coolex in Nottingham who I highly recommend:
While I had the radiator off, I thought I may as well do something to the hoses, and since I couldn't find any silicone ones, I decided to braid them.
Before:
After:
New radiator in:
Current state of engine bay:
Still very messy..
Then it was finally time to paint the wiper blades.
Here's what they looked like before, very worn:
Painted them up in satin black, complete with flat blades, looks much better I think.
Then I adjusted the exhaust again and got some pics:
Thanks for looking!
Felix


Thread Starter
Honda-Tech Member
Joined: May 2013
Posts: 27
Likes: 0
Hello everyone!
Over the weekend I've been painting the rocker cover
Here's the engine bay beforehand:

I took it off, and was happy to see that 25 years and 85000 miles has had no effect, it still looks brand new under there!

I scratched off any loose paint:

Then got the paint stripper on it:

All masked up and sanded ready to go:

Bought myself some paint:

A day and a half later:

Then I sanded back the logo for some nice shiny Honda goodness:

Meanwhile I gave the HT leads a bit of a sprucing up, before:

After:

Engine bay before:
Engine bay after:


Total cost: �10.45
Thanks for looking!
Felix
Over the weekend I've been painting the rocker cover
Here's the engine bay beforehand:
I took it off, and was happy to see that 25 years and 85000 miles has had no effect, it still looks brand new under there!
I scratched off any loose paint:
Then got the paint stripper on it:
All masked up and sanded ready to go:
Bought myself some paint:
A day and a half later:
Then I sanded back the logo for some nice shiny Honda goodness:
Meanwhile I gave the HT leads a bit of a sprucing up, before:
After:
Engine bay before:
Engine bay after:
Total cost: �10.45
Thanks for looking!
Felix