

How To: Shaving/Polishing an RBC Intake Manifold! Professional Results.


Thread Starter
Honda-Tech Member
Joined: Mar 2009
Posts: 107
Likes: 0
From: Trinity, NC, US
Well I searched and searched for a thread on how to polish an RBC Intake manifold and couldn't find one to save my life. So after all of the pain and heartache of trial and error here it is.
Materials List
1. Intake manifold of your choice.
2. Hack saw
3. Angle Grinder, I used one from Harbor Freight, they are like $15.
4. Dremel with attachments (optional but makes life so much easier)
5. DA Sander (Optional but you better get one unless you want to spend 100 hours sanding) Bought an electric one from Harbor Freight for about $15. I did not feel like using my air compressor lol
lol
6. 3M Red Abrasive sand paper, .34 a sheet and comes in packs of 25, 80 grit is a tad more expensive. I got 1 pack of 80 grit, 1 pack of 180 grit, 2 packs of 320 grit.
http://napaonline.com/Catalog/Catalo...116_0006436620
7. 3M Wet sand paper from Wal Mart or any auto supply store. Wal Mart was the best value. I bought 400 grit, 800 grit, 1000 Grit, 1500 Grit, and 2000 Grit. 2000 is't necessary, it just makes polishing that much easier.
8. 1lb of Brown Tripoli, (Jewelers Polishing Rouge from PJ Tool) I chose to buy it off of Amazon because it was a better deal through PJ Tool
http://www.pjtool.com/browntripolibuffingcompound.aspx
9. Polishing/Buffing wheel from Amazon, can get these from PJ Tool as well but I decided to get this one, I just took the guard off of my angle grinder and used it to polish, it works really well. I had to drill out the Arbor Hole a bit for it to fit my grinder.
http://www.amazon.com/Dico-527-27-6-...0&sr=8-1-fkmr0
10. Mothers Mag and Aluminum polish for the finishing touches.
http://shop.advanceautoparts.com/web...T|GRP2074_____
11. A **** ton of free time to complete such a project.
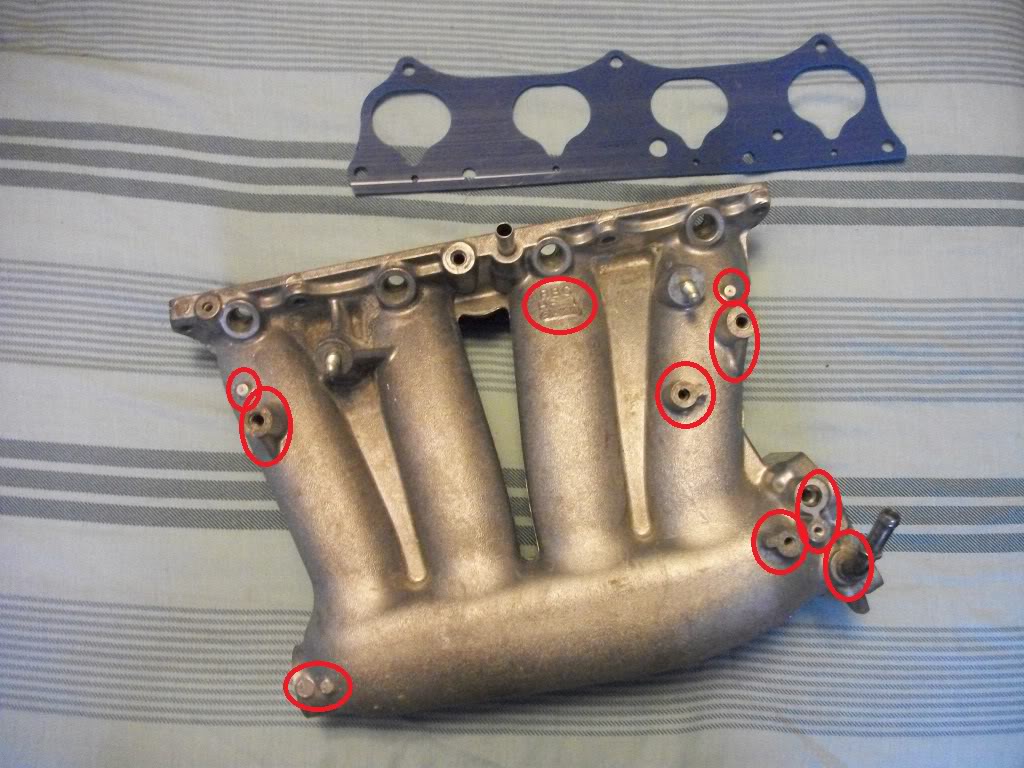
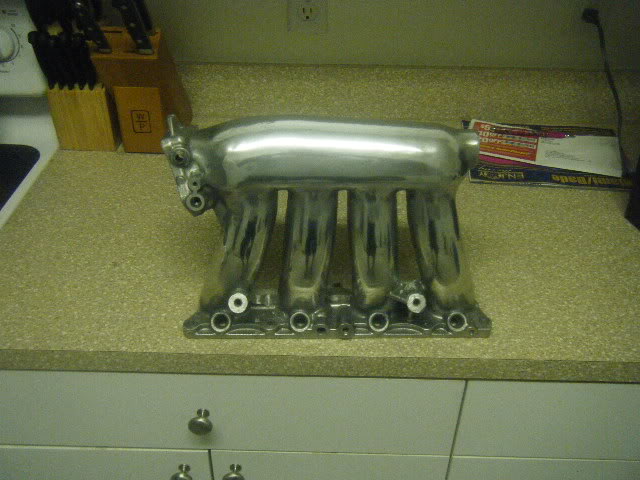
I started out with this.

I used my Snap On hack saw to cut off the intake cover brackets and pictured here. You can not get them perfectly flush with a hack saw, so I left about 1/2" or so to be ground down flat.
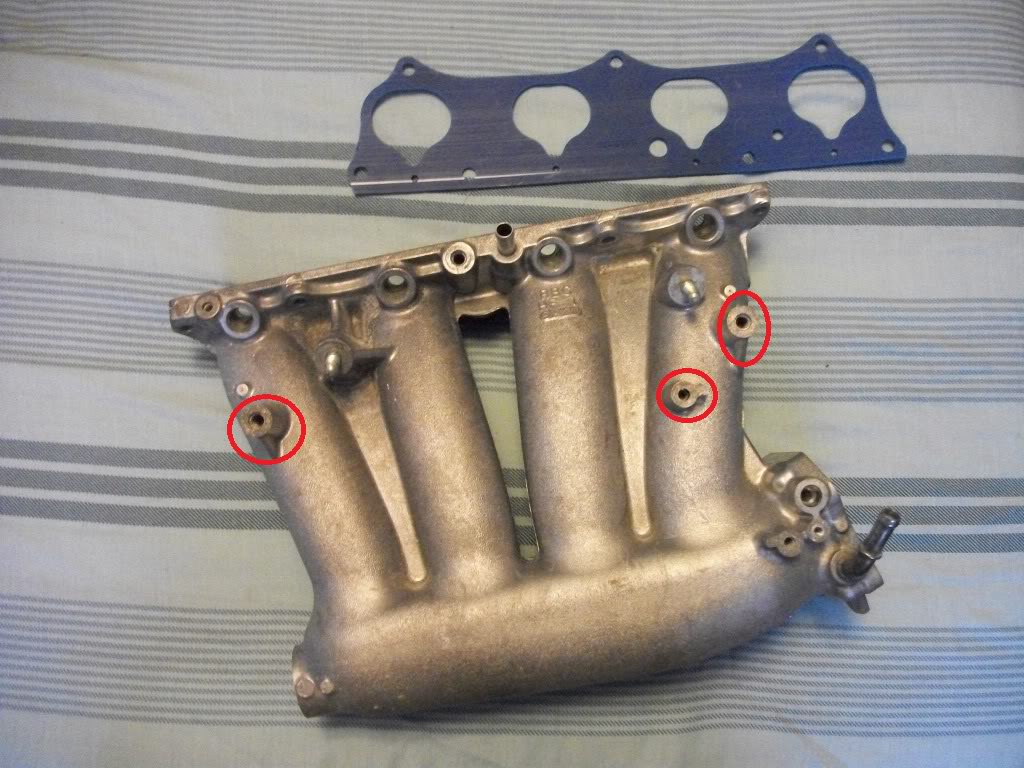
I then proceeded to use a grinder to shape up/smooth out these areas here, the intake cover bolt stud holders, and various casting protrusions. After grinding these areas, I used a Dremel with a grinding stone to smooth and even everything up.
Now here is the time consuming part. After starting out with 180 grit sand paper and sanding for 1.5 hours and hardly getting anywhere I said **** it and bought 80 grit. To save people the same heartache I had here is the sanding steps that I did.
MAKE SURE TO USE PROPER RESPIRATORY PROTECTION WHEN SANDING ALUMINUM. THIS **** WILL **** YOUR LUNGS UP! And also make sure to wear gloves and goggles. Hearing protection is nice as well during the long hours of sanding a DA sander gets pretty loud.
1. DA Sand with 80 grit, you want to cut pretty deep in this step because you will find out later on that there are these little black dots everywhere when you start polishing. You also want to focus on blending the areas where you ground off the studs/casting spots.
2. Hit any spots you can not DA sand by hand with 80 Grit.
3. Before sanding further use a Dremel with a sanding wheel attachment to hit the hard spots. I chose to use the 220grit sanding wheels because they do not **** the aluminum up as much.
4. Sand over the Dremel spots with 80 grit.
5. I then hit a few spots with 100 grit by hand to even everything up.
6. Sand sand sand and sand some more with 180 grit. This is one of the most important steps in getting the big scratches out and shaping everything up.
7. Sand forever with 320 grit. I used so many sheets of 320 to get most of the scratched out and get all of the little black dots out as well as level out everything. I literally sanded probably 10 hours with 320.
Now it gets a **** ton easier.
8. Wet sand by hand with 400 grit
9. Wet sand by hand with 800 grit
10. Wet sand by hand with 1000 grit
11. Wet sand by hand with 1500 grit
12. Wet Sand by Hand with 2000 grit
Now After 20-30 hours or so of sanding you are 90% complete, you do not have to spend this long, I did because I am an overachiever and wanted it absolutely perfect.
Here are the steps to achieve the awesome mirror finish.
Make sure to wear long sleeves/gloves/pants and face protection. The grinder will sling compound and cotton strands everywhere.
1. Attach the polishing/buffing wheel to your grinder.
2. With the grinder on, hold the Buffing wheel on the Brown Tripoli for about 5 or so seconds to get a fair amount of compound on the wheel.
3. Proceed to buff it on the intake manifold by pressing down fairly firm. Not too hard or the wheel will not spin on the grinder. Make sweeping motions from left to right making sure you are always "grinding" on the surface towards you or the grinder will get caught and shoot forward. There will be some black streaks on the intake but don't worry this is normal. Do this for however long you feel necessary, you can get all of the small scratches out in this step. I spent about 1.5 hours on this step to make sure it was perfect.
4. You can use a Dremel with polishing attachments and the Brown Tripoli to get to the hard to reach spots on the intake.
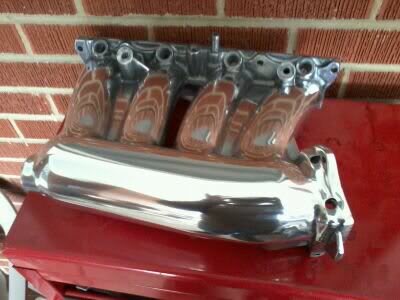
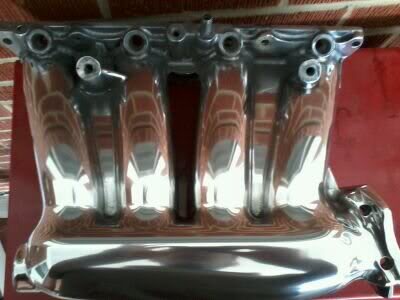
5. The final step is to clean everything up with the Mothers Mag & Aluminum Polish! I chose to use the power cone and a microfiber cloth.
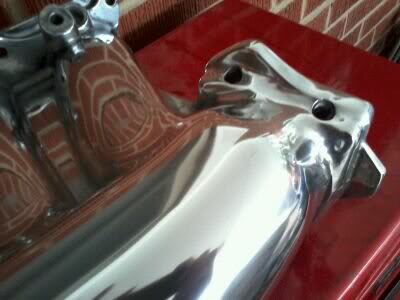
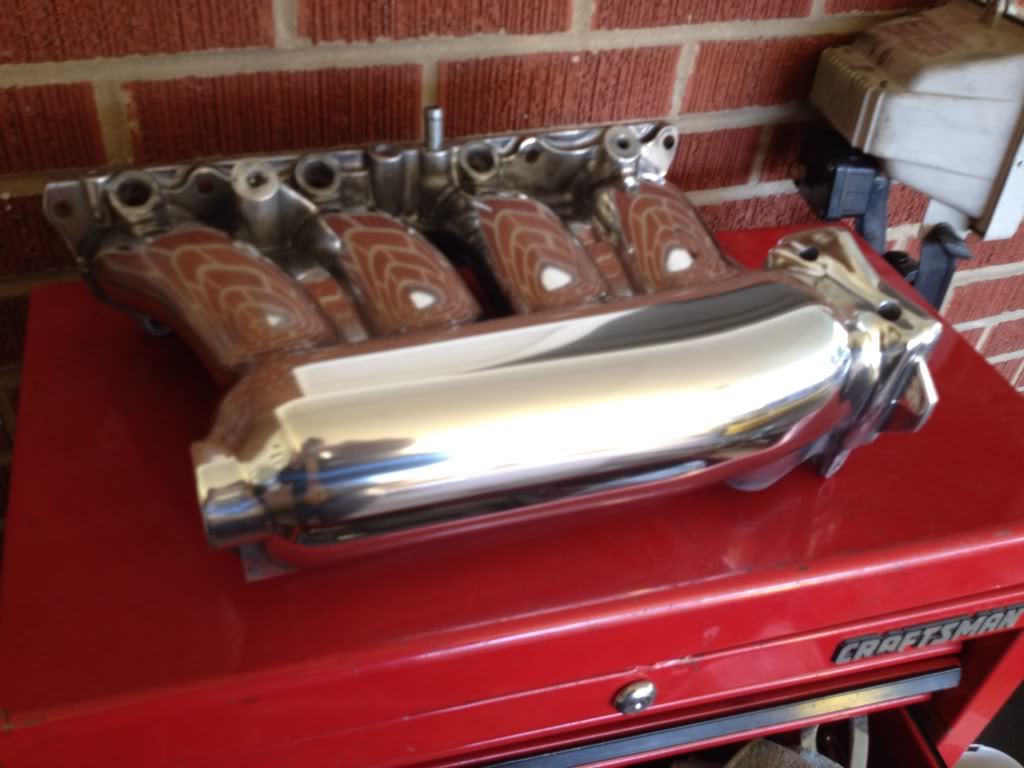
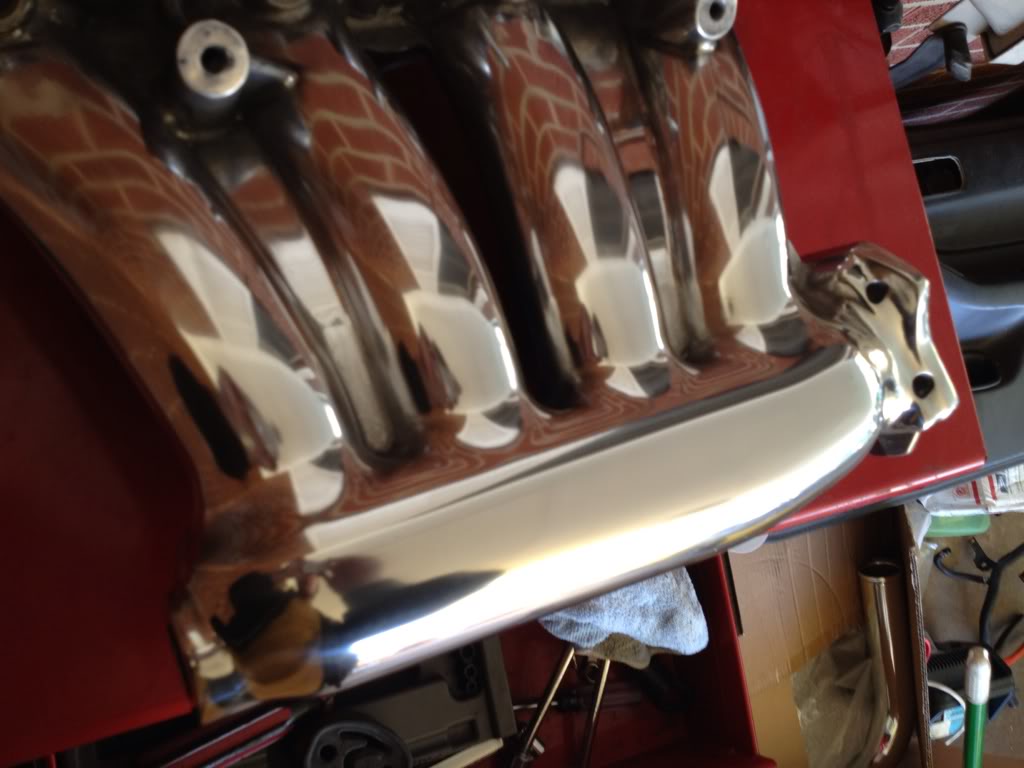
And Finally You have an awesome *** Intake Manifold.

I chose not to polish the "bracket" area because it is hard to sand/polish. I did however polish a few of the easy to reach spots but I am thinking about masking off the plenum and runners and painting the "bracket" area black. I am also tucking the brake booster hose and I am debating on using rubber plugs on the holes for the brake booster and MAP sensor, or I might drill/tap them and use allen head block offs. I was going to get them welded but was unsure if I could grind the welds to be perfectly even.
Enjoy everyone, post comments/suggestions!
HERE ARE THE NEW PICS!!!! Check it out with my iPhone 4s, shows the detail much better!

Materials List
1. Intake manifold of your choice.
2. Hack saw
3. Angle Grinder, I used one from Harbor Freight, they are like $15.
4. Dremel with attachments (optional but makes life so much easier)
5. DA Sander (Optional but you better get one unless you want to spend 100 hours sanding) Bought an electric one from Harbor Freight for about $15. I did not feel like using my air compressor
lol6. 3M Red Abrasive sand paper, .34 a sheet and comes in packs of 25, 80 grit is a tad more expensive. I got 1 pack of 80 grit, 1 pack of 180 grit, 2 packs of 320 grit.
http://napaonline.com/Catalog/Catalo...116_0006436620
7. 3M Wet sand paper from Wal Mart or any auto supply store. Wal Mart was the best value. I bought 400 grit, 800 grit, 1000 Grit, 1500 Grit, and 2000 Grit. 2000 is't necessary, it just makes polishing that much easier.
8. 1lb of Brown Tripoli, (Jewelers Polishing Rouge from PJ Tool) I chose to buy it off of Amazon because it was a better deal through PJ Tool
http://www.pjtool.com/browntripolibuffingcompound.aspx
9. Polishing/Buffing wheel from Amazon, can get these from PJ Tool as well but I decided to get this one, I just took the guard off of my angle grinder and used it to polish, it works really well. I had to drill out the Arbor Hole a bit for it to fit my grinder.
http://www.amazon.com/Dico-527-27-6-...0&sr=8-1-fkmr0
10. Mothers Mag and Aluminum polish for the finishing touches.
http://shop.advanceautoparts.com/web...T|GRP2074_____
11. A **** ton of free time to complete such a project.
I started out with this.
I used my Snap On hack saw to cut off the intake cover brackets and pictured here. You can not get them perfectly flush with a hack saw, so I left about 1/2" or so to be ground down flat.
I then proceeded to use a grinder to shape up/smooth out these areas here, the intake cover bolt stud holders, and various casting protrusions. After grinding these areas, I used a Dremel with a grinding stone to smooth and even everything up.
Now here is the time consuming part. After starting out with 180 grit sand paper and sanding for 1.5 hours and hardly getting anywhere I said **** it and bought 80 grit. To save people the same heartache I had here is the sanding steps that I did.
MAKE SURE TO USE PROPER RESPIRATORY PROTECTION WHEN SANDING ALUMINUM. THIS **** WILL **** YOUR LUNGS UP! And also make sure to wear gloves and goggles. Hearing protection is nice as well during the long hours of sanding a DA sander gets pretty loud.
1. DA Sand with 80 grit, you want to cut pretty deep in this step because you will find out later on that there are these little black dots everywhere when you start polishing. You also want to focus on blending the areas where you ground off the studs/casting spots.
2. Hit any spots you can not DA sand by hand with 80 Grit.
3. Before sanding further use a Dremel with a sanding wheel attachment to hit the hard spots. I chose to use the 220grit sanding wheels because they do not **** the aluminum up as much.
4. Sand over the Dremel spots with 80 grit.
5. I then hit a few spots with 100 grit by hand to even everything up.
6. Sand sand sand and sand some more with 180 grit. This is one of the most important steps in getting the big scratches out and shaping everything up.
7. Sand forever with 320 grit. I used so many sheets of 320 to get most of the scratched out and get all of the little black dots out as well as level out everything. I literally sanded probably 10 hours with 320.
Now it gets a **** ton easier.
8. Wet sand by hand with 400 grit
9. Wet sand by hand with 800 grit
10. Wet sand by hand with 1000 grit
11. Wet sand by hand with 1500 grit
12. Wet Sand by Hand with 2000 grit
Now After 20-30 hours or so of sanding you are 90% complete, you do not have to spend this long, I did because I am an overachiever and wanted it absolutely perfect.
Here are the steps to achieve the awesome mirror finish.
Make sure to wear long sleeves/gloves/pants and face protection. The grinder will sling compound and cotton strands everywhere.
1. Attach the polishing/buffing wheel to your grinder.
2. With the grinder on, hold the Buffing wheel on the Brown Tripoli for about 5 or so seconds to get a fair amount of compound on the wheel.
3. Proceed to buff it on the intake manifold by pressing down fairly firm. Not too hard or the wheel will not spin on the grinder. Make sweeping motions from left to right making sure you are always "grinding" on the surface towards you or the grinder will get caught and shoot forward. There will be some black streaks on the intake but don't worry this is normal. Do this for however long you feel necessary, you can get all of the small scratches out in this step. I spent about 1.5 hours on this step to make sure it was perfect.
4. You can use a Dremel with polishing attachments and the Brown Tripoli to get to the hard to reach spots on the intake.
5. The final step is to clean everything up with the Mothers Mag & Aluminum Polish! I chose to use the power cone and a microfiber cloth.
And Finally You have an awesome *** Intake Manifold.
I chose not to polish the "bracket" area because it is hard to sand/polish. I did however polish a few of the easy to reach spots but I am thinking about masking off the plenum and runners and painting the "bracket" area black. I am also tucking the brake booster hose and I am debating on using rubber plugs on the holes for the brake booster and MAP sensor, or I might drill/tap them and use allen head block offs. I was going to get them welded but was unsure if I could grind the welds to be perfectly even.
Enjoy everyone, post comments/suggestions!
HERE ARE THE NEW PICS!!!! Check it out with my iPhone 4s, shows the detail much better!
Last edited by k24CivicHatch; Mar 9, 2012 at 01:44 PM.


I did mines and also cut the webbing out in between the runners. What a pita! I feel for you my friend, I know what you went through. It looks awesome though!
Thread Starter
Honda-Tech Member
Joined: Mar 2009
Posts: 107
Likes: 0
From: Trinity, NC, US
Nice, I bet that was a pain. And Yeah I applaud anyone who polishes their own intake manifold. Most people I see send them to be chromed or have them polished lol


Honda-Tech Member
Joined: Mar 2006
Posts: 1,512
Likes: 1
From: USA
big  for the work and commitment you did...........but im lazy and would take the lazy way out and get it chromed hahaha
for the work and commitment you did...........but im lazy and would take the lazy way out and get it chromed hahaha
Trending Topics
Thread Starter
Honda-Tech Member
Joined: Mar 2009
Posts: 107
Likes: 0
From: Trinity, NC, US
Thanks! And yeah, a lot of people opt out for chrome plating and I was debating on doing it, but I don't like the idea of having an extra coating that would make the intake manifold operate at higher temperatures due to loss in heat dissipation.

Thread
Thread Starter
Forum
Replies
Last Post
BuiltnotboughT2
Acura Integra
0
Apr 27, 2019 08:33 AM
miguey310
Honda CRX / EF Civic (1988 - 1991)
1
Jun 19, 2010 09:04 PM
DJLikwid
Acura Integra
24
May 8, 2007 03:41 PM