

shock fork pinch bolt wont thread on new coilovers

Thread Starter
Honda-Tech Member
Joined: Aug 2004
Posts: 321
Likes: 0
From: lakewood, WA, United States
installing new H&R Coilovers
Old front strut fork slides fine onto coil over body. when I attempt to install the 14mm pinch bolt on the rear of the fork, its as if the coil over body is too thick in diameter.
It will go through the non threaded side but wont even begin to thread. When I spin the bolt it strips the threads from rubbing on the coil over body.
I have double checked the part # with H&R to be for a 88-91 civic and not 92-00. I have tried 2 sets of EF forks and just in case checked one set of EG forks.
So I am pretty much stuck at this point. My only idea I haven't tried is using a thinner diameter longer bolt and using a nut on the other end to secure the fork to the coil over.
any ideas are greatly appreciated.
Honda-Tech Member

Joined: Apr 2002
Posts: 18,961
Likes: 75
From: I am Tyson
theres supposed to be a divot on the shock to allow the bolt to go thru.
your idea may work. or just chew thru the side the shock area that interferes.
your idea may work. or just chew thru the side the shock area that interferes.
Thread Starter
Honda-Tech Member
Joined: Aug 2004
Posts: 321
Likes: 0
From: lakewood, WA, United States
If I tighten the pinch bolt in the divot, I think the fork will rest way too low.
Unless the divot is just to get the bolt started and then slide the fork all the way up?
I attached some really bad photos to try to explain where I am at
on the right is where the fork is at with the pinch bolt guided through the divot


DO IT ON ALL FOURS
Joined: Sep 2007
Posts: 7,632
Likes: 15
From: IN Your Mind
That is where the fork is supposed to be (the "right" one in picture)... Didn't you look at your old ones? The strut is NOT supposed to go all the way through and sit on top of the fork...
Thread Starter
Honda-Tech Member
Joined: Aug 2004
Posts: 321
Likes: 0
From: lakewood, WA, United States
The correct way just looked like it would be a lot of weight on the pinch bolt.
Ill go try it and see how it goes
Honda-Tech Member
Joined: Apr 2002
Posts: 18,961
Likes: 75
From: I am Tyson
i think the brake line bracket is supposed to take up that space. youre supposed to take it off the oem shock, it might be welded tho. so if you cant, just use zip ties.
i would prefer to put the shock down as far as possible for the most shock travel. so it would be worth it to me to use a slightly slimmer bolt, or grind out enough meat off the shock to make it fit. then just zip tie the brake lines in place.
i would prefer to put the shock down as far as possible for the most shock travel. so it would be worth it to me to use a slightly slimmer bolt, or grind out enough meat off the shock to make it fit. then just zip tie the brake lines in place.
DO IT ON ALL FOURS
Joined: Sep 2007
Posts: 7,632
Likes: 15
From: IN Your Mind
I am very curious how moving the strut up or down in the fork would increase "shock travel". Shock travel is fixed and predesignated by the factory (the rod can only move so much).
Trending Topics
Thread Starter
Honda-Tech Member
Joined: Aug 2004
Posts: 321
Likes: 0
From: lakewood, WA, United States
thanks for all the advice guys. Yeah the brake line brackets are welded on my old struts, I had planned on zip tying them to the strut body.
I obviously am a beginner but wouldn't running the bolt through the dimple on the lower part of the strut body put a lot of stress on it? As opposed the top of the fork resting on the strut body taking all the weight?
I obviously am a beginner but wouldn't running the bolt through the dimple on the lower part of the strut body put a lot of stress on it? As opposed the top of the fork resting on the strut body taking all the weight?
Honda-Tech Member
Joined: Apr 2002
Posts: 18,961
Likes: 75
From: I am Tyson
i wouldnt worry about it. just make sure the bolt is tight, not gorilla tight, just tight.
as for more shock travel, assuming the perch is not threaded at the highest possible point, or that he wants to lower the car any bit, moving the shock body further down (or in other words the fork up) means the perch can be threaded further up the shock body, which gives back lost shock travel from moving the perch down.
its the SAME thing that is accomplished with extended top hats.
caution, you do reach a point where its possible the axle may come in contact with the bottom of the shock that is sticking out. particularly at full bump. LOOK CAREFULLY! do not let this happen, for obvious reasons.
like i said, lots of misinformed ppl out there... its no surprised youre so very curious.
Thread Starter
Honda-Tech Member
Joined: Aug 2004
Posts: 321
Likes: 0
From: lakewood, WA, United States
i wouldnt worry about it. just make sure the bolt is tight, not gorilla tight, just tight.
as for more shock travel, assuming the perch is not threaded at the highest possible point, or that he wants to lower the car any bit, moving the shock body further down (or in other words the fork up) means the perch can be threaded further up the shock body, which gives back lost shock travel from moving the perch down.
its the SAME thing that is accomplished with extended top hats.
caution, you do reach a point where its possible the axle may come in contact with the bottom of the shock that is sticking out. particularly at full bump. LOOK CAREFULLY! do not let this happen, for obvious reasons.
like i said, lots of misinformed ppl out there... its no surprised youre so very curious.
as for more shock travel, assuming the perch is not threaded at the highest possible point, or that he wants to lower the car any bit, moving the shock body further down (or in other words the fork up) means the perch can be threaded further up the shock body, which gives back lost shock travel from moving the perch down.
its the SAME thing that is accomplished with extended top hats.
caution, you do reach a point where its possible the axle may come in contact with the bottom of the shock that is sticking out. particularly at full bump. LOOK CAREFULLY! do not let this happen, for obvious reasons.
like i said, lots of misinformed ppl out there... its no surprised youre so very curious.
I do look forward to heading to Fastenal to find some smaller diameter bolts to try resting the shock on the fork. The area that is exposed below the shock in the photo is not too long so I don't think hitting the axle will be a problem, I will have to take some measurements.
DO IT ON ALL FOURS
Joined: Sep 2007
Posts: 7,632
Likes: 15
From: IN Your Mind
EDIT: I typed a huge long response only to reread it and reread what you typed to find we were saying the same thing just from different perspectives...


OP: moving the forks up the damper body is an old Koni trick. This was the only option to increase bump travel before extended top hats came along. If you don't have extended top hats, and the new shocks bodies are the same length as the original ones, this mod will help maintain ride quality. Just do as Tyson said and check clearance between the shock body and the driveshaft. Here is what I recommend you do:
- Install the shocks in the upper wheel well by the upper mount (don't torque top nuts)
- Get the pinch bolts started in the divot.
- Thread them in a little so the damper forks can still move on the shock body
- Install the lower fork/LCA through-bolts & nuts loosely
- Jack up the LCAs so the fork is pushed up the shock body to the top (as your left shock shows)
- Tighten the pinch bolt
- Jack up the LCA as far as you can and check clearance between driveshaft & shock body
- Now install the wheels and lower the car & torque the lug nuts
- Remove the jack and NOW torque the lower fork/LCA bolt bolt
- Now torque the the damper upper mount nuts in the engine bay
Your are now ready to enjoy your performance suspension. You have good dampers, a low ride height, and still maintain some bump travel before hitting the bump-stops! After a few days of driving, get under the car again and make sure the shock bodies haven't rubbed the driveshafts.
BTW: If your lowering your car for the first time, you may want to loosen all the suspension bolts that go through the center of a bushing. Then just like the through-bolts/nuts, don't torque them till the car is on the ground. This makes sure your rubber bushings aren't twisted once your at your new final ride height. Twisted bushings are the cause of ruined suspension on lowered cars.
DO IT ON ALL FOURS
Joined: Sep 2007
Posts: 7,632
Likes: 15
From: IN Your Mind
By moving the damper fork up the shock body, you increase bump travel by decreasing extension travel. This is the EXACT same as adding extended top hats, except it will also lower the car. Since the new H&R's are coilovers, you can raise the spring perches to keep the desired ride height.
Yeah, I saw you guys already got it covered after I posted. I went back and changed my post, but you already got to it. I'm just slow at double checking my long winded posts. 
Honda-Tech Member
Joined: Apr 2002
Posts: 18,961
Likes: 75
From: I am Tyson
Keyboard Humorist
Joined: May 2002
Posts: 9,814
Likes: 11
From: Granada Hills, Ca, USA

Thread Starter
Honda-Tech Member
Joined: Aug 2004
Posts: 321
Likes: 0
From: lakewood, WA, United States
thanks for all the advice guys I appreciate it.
I had to leave for work so couldn't finish today.
I normally torque all my suspension bolts by using a jack to put pressure on the suspension.
I will have to try it that way.
I had to leave for work so couldn't finish today.
I normally torque all my suspension bolts by using a jack to put pressure on the suspension.
I will have to try it that way.
Honda-Tech Member
Joined: Apr 2002
Posts: 18,961
Likes: 75
From: I am Tyson
i dont totally agree with 94eg's instructions.
i get that he's trying to get you to check for clearance, and make sure its all tightened under load, which is correct, i just wouldnt do it at all that way.
you check for clearance by taking the spring off, then assembling everything else like normal, or loosely, then jack it up to see what binds or hits first.
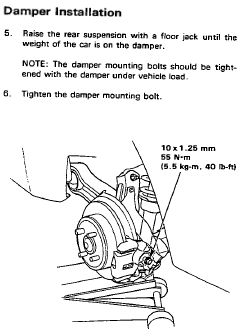
and i dont wait to tighten all the bolts after the wheel is torqued. that seems silly. with the car still on jackstands, put the jack under the control arm and jack it up until its just off the jack stand. the wheel doesnt have to be on. then tighten everything.
this is how its spelled out in the manual.
i get that he's trying to get you to check for clearance, and make sure its all tightened under load, which is correct, i just wouldnt do it at all that way.
you check for clearance by taking the spring off, then assembling everything else like normal, or loosely, then jack it up to see what binds or hits first.
and i dont wait to tighten all the bolts after the wheel is torqued. that seems silly. with the car still on jackstands, put the jack under the control arm and jack it up until its just off the jack stand. the wheel doesnt have to be on. then tighten everything.
this is how its spelled out in the manual.
You will find there is a considerable difference in suspension position when jacking up the LCA vs putting the car on the ground. Especially if you have it on jackstands...
I tighten bolts with the car on the ground. I can get all of them except the UCA bushings.
But yeah, taking the spring off would a better way to check for clearance.
I tighten bolts with the car on the ground. I can get all of them except the UCA bushings.
But yeah, taking the spring off would a better way to check for clearance.
DO IT ON ALL FOURS
Joined: Sep 2007
Posts: 7,632
Likes: 15
From: IN Your Mind
I can always count on you 4drEF to literally make me "laugh out loud".
94eg! speaks of the preferred method. All of my race cars are done this way (including my Hondas) as it does make a difference when you put it on the rack or are fine tuning suspension geometry. Not only that but in a stock setting you will get the longest life out of your bushings. If you have a vehicle scale setup (four conner scales), put a scale under the tire with the car on jackstands (use blocking), then under the tire with the vehicle on the ground... there will be a considerable difference.
94eg! speaks of the preferred method. All of my race cars are done this way (including my Hondas) as it does make a difference when you put it on the rack or are fine tuning suspension geometry. Not only that but in a stock setting you will get the longest life out of your bushings. If you have a vehicle scale setup (four conner scales), put a scale under the tire with the car on jackstands (use blocking), then under the tire with the vehicle on the ground... there will be a considerable difference.
Honda-Tech Member
Joined: Jun 2007
Posts: 224
Likes: 0
From: ND, USA

Thread
Thread Starter
Forum
Replies
Last Post
chris215chris
Acura Integra
24
Aug 17, 2003 08:18 PM