

DIY: 4gp Air Condition removal

Thread Starter
Honda-Tech Member
Joined: Mar 2008
Posts: 132
Likes: 3
From: Katy, TX, US
REMOVING AIR CONDITION:
:talk2hand: :talk2hand: :talk2hand: To start this operation please make sure you go to your local A/C shop to flush the freon out of your system... even though R134 is environmentally safer than the old stuff, doesn't mean it's safe. The gasses are still harmful for the ozone and your health!!:talk2hand: :talk2hand: :talk2hand:
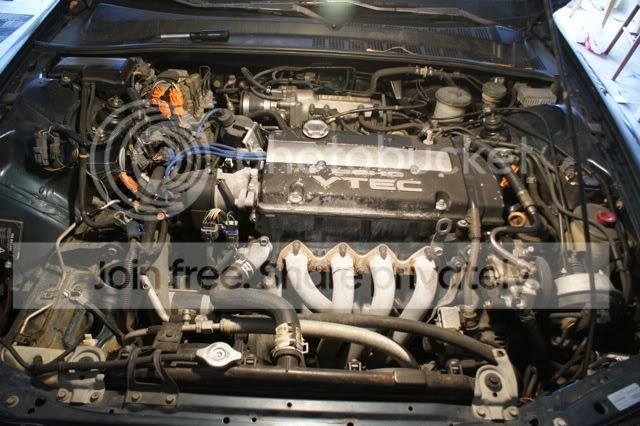
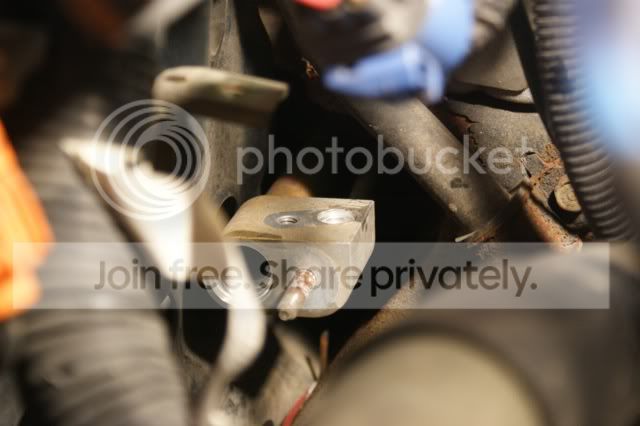
Once the system is flushed of all freon, start the operation off by removing the battery and the front bumper (again this should be easy enough to do without explanation). Once that is done the first bracket you will remove is the bracket that is to the left of the radiator cap that holds one of the AC lines (revert to first picture to see the bracket). you can also unscrew the connector piece on the AC line that the bracket is holding (revert to first picture, just to the right of the bracket)...
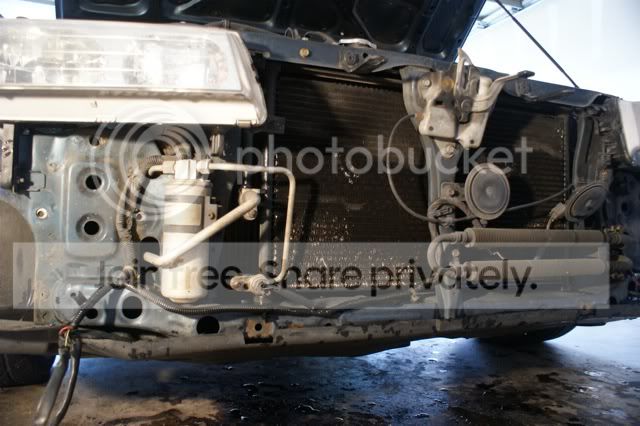
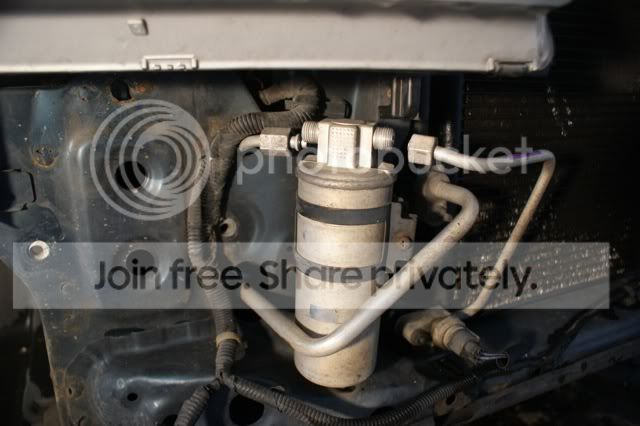
once the bumper is off, the first thing you will see is the dryer (the silver canister in pic above). unscrew the connectors from the lines to the dryer, then unbolt the dryer bracket from the car...
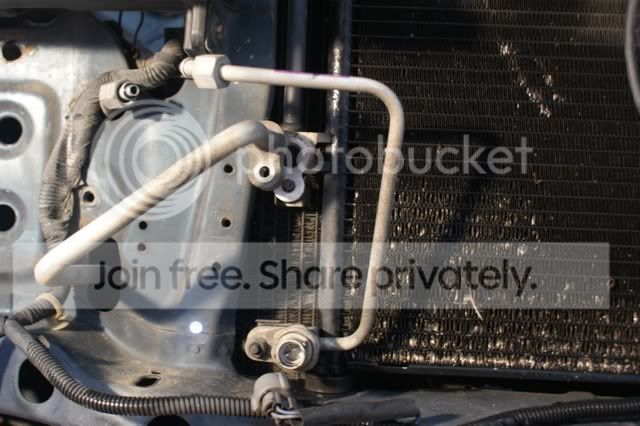
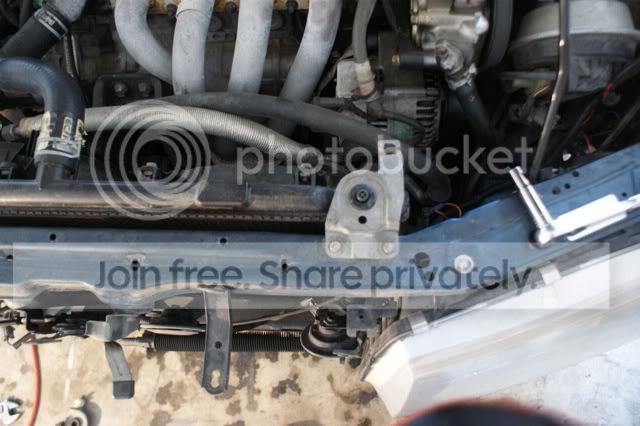
now all you will have are the lines leading to the A/C radiator and also into the engine bay... From this point you can unbolt the line from the A/C radiator as you can see in the picture below. be sure to also remove the electrical plug that is in the bottom of the picture.
Now you have all lines free from the radiator so time to take that out... To remove the A/C radiator, you will have to unbolt only 2 bolts holding the radiator to the support.

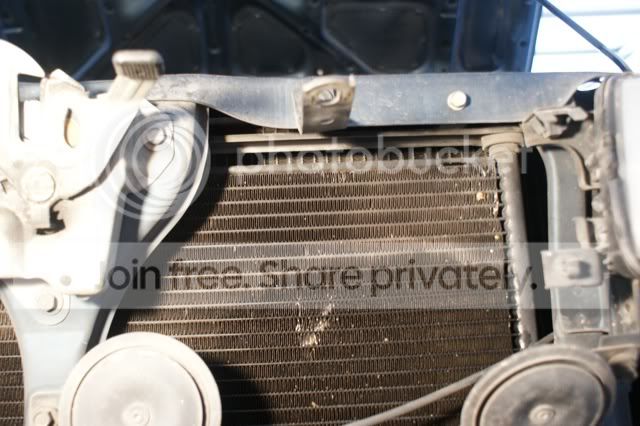
Now the AC radiator is loose but unable to get out... for this you have to free up the actual radiator to make room to remove the AC radiator. Unbolt the upper brackets for the actual radiator so you can push the radiator closer to the engine and pull the AC radiator up and out. You won't need to take off any hoses to the radiator in case you wondering... (only took a pic of one bracket but you can see that there are two brackets for the radiator)
now that the AC radiator is out, you no longer need the AC radiator fan! the AC radiator fan is metal (compared to the plastic radiator fan), and for my 94 prelude, it was on the driver side of the car, closest to the AC compressor... to take this off make sure you unplug the electrical connectors and unbolt the fan from the radiator (2 bolts on top, 1 on bottom)...

If you have been clearing out the lines once they are free, you should have opened up a lot of room already in the engine bay. Now you will need to disconnect the lines from the AC compressor. I had to use a long extension to be able to unbolt the lines.

Now getting back to the right side of the engine bay... next to the battery area, you will see the AC line held down by brackets and screws... just unscrew them and pull the brackets up...
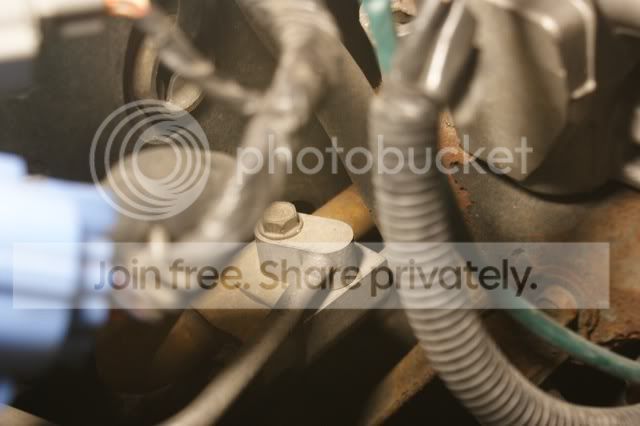
From there, follow the line to the next connection piece... you should know how to unbolt these by now. (the picture below shows the connection piece in the center but is blurred... the second pic is a zoomed in pic of the connector)

once that is unbolted, you can snake the small AC line out of your engine bay with some maneuvering and the bigger insulated line should come out with ease... now you will have something that looks like this.
This leads to the firewall, but right before the firewall there is one last connector piece and a grommet for the firewall. You will need to move your fuse box and temporarily take out the fuse box bracket. If you have ABS, this will be really hard to disconnect but not impossible. I know it took me a while to fit the tools in there. (sorry for the bad pic, used a cell phone for this one)

now that you have all the lines disconnected, time to go in the cabin to the passenger side of the car, where the AC core is hidden under the dash. I made as much room as possible to work with so I removed the passenger seat, center console, glove box, pulled the carpet back a little, and the kick panel for the ECU. If you don't feel like taking all that out, you can get away with just removing the glove box, carpet, and kick panel...
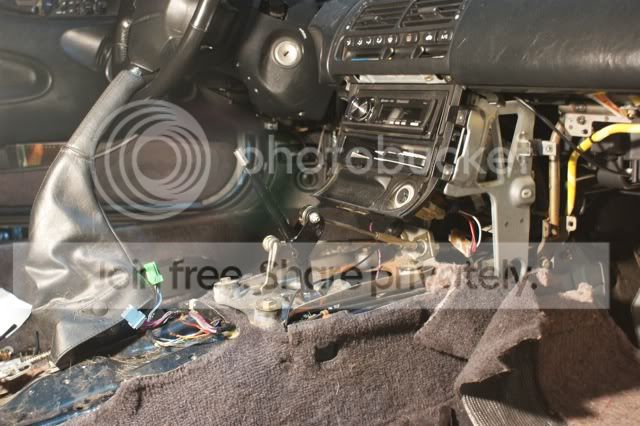
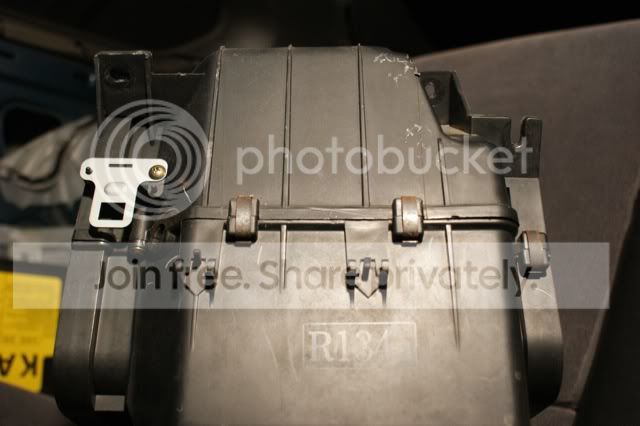
what you are looking for is a black box that is between the heater blower, and heater core. it should say R134 on it.

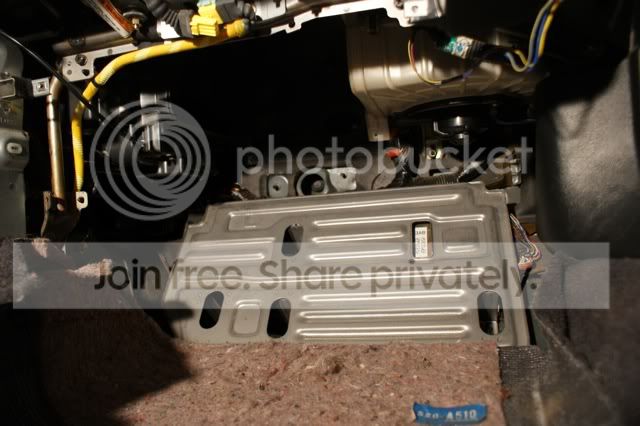
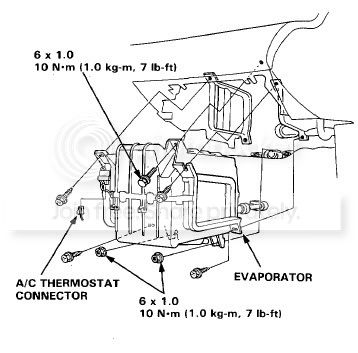
here is a diagram of the box and actual pictures of it... (take note of all bolts and screws used)
the front (3 bolts, 1 screw, 3 clips, 2 nuts are used)
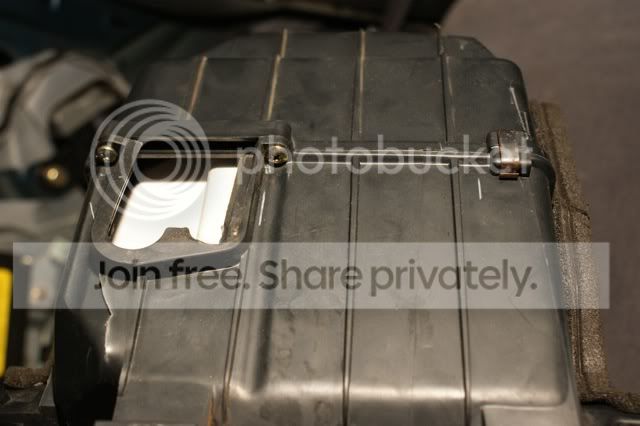
the back (2 screws, 1 clip are used)
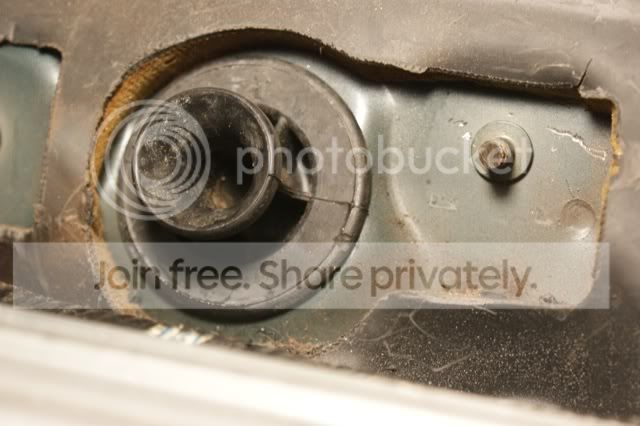
you will also need to take out the drain hose grommet... to do this, push the grommet through the hole from the cabin.
Now you should have the box split in two hopefully, or if you are like me you couldn't get to the screw in the back and you are pissed off lol... if the box is split you should be able to get the bottom half out with ease.
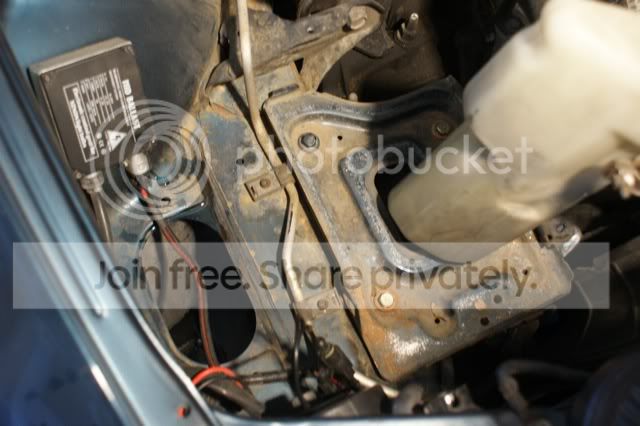
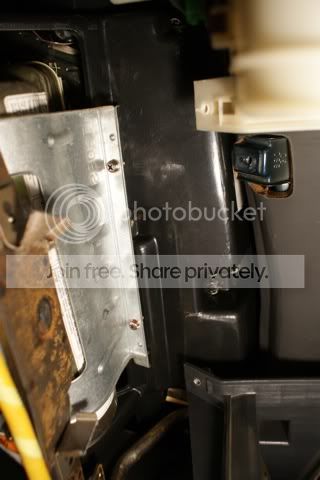
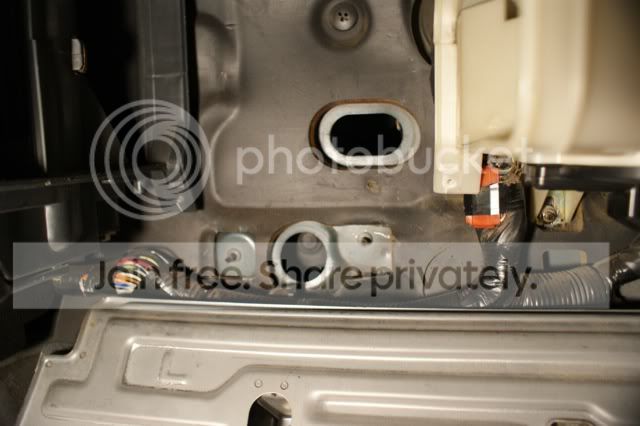
some of you have a passenger air bag and some don't (I did). If you do, you will notice clearance issues when you are trying to take the box out. Behind the air bag is a frame rail with a "]" shaped brace. What I did was just cut the brace out with a hack saw, but if you don't feel comfortable doing that then you can take your dash out... I personally don't see any function for this brace other than impact safety for the airbag, but screw it, you will have an empty box there anyways! (in this pic the rusty looking portion is where the brace was and where i cut it out. notice the tabs sticking out)
Now the top half of the box and core should have the clearance needed to be pulled out... you should be able to snake the remaining AC lines through the firewall, thus leaving an empty whole where the grommet is... I used duck tape to cover that up but you can buy a plug from honda. for the drain hose hole, you will need to put that back in.
Now you have everything out besides the compressor. I've decided to keep the compressor for now until I decide to buy a new belt. an AC delete belt is 37 inches for those wondering...
You will need to reinstall the black box so that your heat can be sent to the core. reinstall your kickpanel, glove box, and carpet and you should be set!! Congrats and enjoy the heat!
:talk2hand: :talk2hand: :talk2hand: To start this operation please make sure you go to your local A/C shop to flush the freon out of your system... even though R134 is environmentally safer than the old stuff, doesn't mean it's safe. The gasses are still harmful for the ozone and your health!!:talk2hand: :talk2hand: :talk2hand:
Once the system is flushed of all freon, start the operation off by removing the battery and the front bumper (again this should be easy enough to do without explanation). Once that is done the first bracket you will remove is the bracket that is to the left of the radiator cap that holds one of the AC lines (revert to first picture to see the bracket). you can also unscrew the connector piece on the AC line that the bracket is holding (revert to first picture, just to the right of the bracket)...
once the bumper is off, the first thing you will see is the dryer (the silver canister in pic above). unscrew the connectors from the lines to the dryer, then unbolt the dryer bracket from the car...
now all you will have are the lines leading to the A/C radiator and also into the engine bay... From this point you can unbolt the line from the A/C radiator as you can see in the picture below. be sure to also remove the electrical plug that is in the bottom of the picture.
Now you have all lines free from the radiator so time to take that out... To remove the A/C radiator, you will have to unbolt only 2 bolts holding the radiator to the support.
Now the AC radiator is loose but unable to get out... for this you have to free up the actual radiator to make room to remove the AC radiator. Unbolt the upper brackets for the actual radiator so you can push the radiator closer to the engine and pull the AC radiator up and out. You won't need to take off any hoses to the radiator in case you wondering... (only took a pic of one bracket but you can see that there are two brackets for the radiator)
now that the AC radiator is out, you no longer need the AC radiator fan! the AC radiator fan is metal (compared to the plastic radiator fan), and for my 94 prelude, it was on the driver side of the car, closest to the AC compressor... to take this off make sure you unplug the electrical connectors and unbolt the fan from the radiator (2 bolts on top, 1 on bottom)...
If you have been clearing out the lines once they are free, you should have opened up a lot of room already in the engine bay. Now you will need to disconnect the lines from the AC compressor. I had to use a long extension to be able to unbolt the lines.
Now getting back to the right side of the engine bay... next to the battery area, you will see the AC line held down by brackets and screws... just unscrew them and pull the brackets up...
From there, follow the line to the next connection piece... you should know how to unbolt these by now. (the picture below shows the connection piece in the center but is blurred... the second pic is a zoomed in pic of the connector)
once that is unbolted, you can snake the small AC line out of your engine bay with some maneuvering and the bigger insulated line should come out with ease... now you will have something that looks like this.
This leads to the firewall, but right before the firewall there is one last connector piece and a grommet for the firewall. You will need to move your fuse box and temporarily take out the fuse box bracket. If you have ABS, this will be really hard to disconnect but not impossible. I know it took me a while to fit the tools in there. (sorry for the bad pic, used a cell phone for this one)
now that you have all the lines disconnected, time to go in the cabin to the passenger side of the car, where the AC core is hidden under the dash. I made as much room as possible to work with so I removed the passenger seat, center console, glove box, pulled the carpet back a little, and the kick panel for the ECU. If you don't feel like taking all that out, you can get away with just removing the glove box, carpet, and kick panel...
what you are looking for is a black box that is between the heater blower, and heater core. it should say R134 on it.
here is a diagram of the box and actual pictures of it... (take note of all bolts and screws used)
the front (3 bolts, 1 screw, 3 clips, 2 nuts are used)
the back (2 screws, 1 clip are used)
you will also need to take out the drain hose grommet... to do this, push the grommet through the hole from the cabin.
Now you should have the box split in two hopefully, or if you are like me you couldn't get to the screw in the back and you are pissed off lol... if the box is split you should be able to get the bottom half out with ease.
some of you have a passenger air bag and some don't (I did). If you do, you will notice clearance issues when you are trying to take the box out. Behind the air bag is a frame rail with a "]" shaped brace. What I did was just cut the brace out with a hack saw, but if you don't feel comfortable doing that then you can take your dash out... I personally don't see any function for this brace other than impact safety for the airbag, but screw it, you will have an empty box there anyways! (in this pic the rusty looking portion is where the brace was and where i cut it out. notice the tabs sticking out)
Now the top half of the box and core should have the clearance needed to be pulled out... you should be able to snake the remaining AC lines through the firewall, thus leaving an empty whole where the grommet is... I used duck tape to cover that up but you can buy a plug from honda. for the drain hose hole, you will need to put that back in.
Now you have everything out besides the compressor. I've decided to keep the compressor for now until I decide to buy a new belt. an AC delete belt is 37 inches for those wondering...
You will need to reinstall the black box so that your heat can be sent to the core. reinstall your kickpanel, glove box, and carpet and you should be set!! Congrats and enjoy the heat!
Thread Starter
Honda-Tech Member
Joined: Mar 2008
Posts: 132
Likes: 3
From: Katy, TX, US
thanks guys... sorry i didn't get into removing the compressor but I don't want to keep buying belts since my next delete will be power steering...
SOMEBODY CORRECT ME IF I'M WRONG ABOUT THE BELT LENGTH... I've heard 36", 37", 37.5", but the most popular answer seems to be 37"....
SOMEBODY CORRECT ME IF I'M WRONG ABOUT THE BELT LENGTH... I've heard 36", 37", 37.5", but the most popular answer seems to be 37"....
Honda-Tech Member
Joined: Oct 2006
Posts: 345
Likes: 0
From: M Radio, ca
thanks guys... sorry i didn't get into removing the compressor but I don't want to keep buying belts since my next delete will be power steering...
SOMEBODY CORRECT ME IF I'M WRONG ABOUT THE BELT LENGTH... I've heard 36", 37", 37.5", but the most popular answer seems to be 37"....
SOMEBODY CORRECT ME IF I'M WRONG ABOUT THE BELT LENGTH... I've heard 36", 37", 37.5", but the most popular answer seems to be 37"....
Thread Starter
Honda-Tech Member
Joined: Mar 2008
Posts: 132
Likes: 3
From: Katy, TX, US
I haven't been on the forums in a long time. I didn't know that photobucket killed off all the pics. If there is interest in this I'll see if I still have the old pics and upload them on a different platform for y'all.
Trending Topics

Premium Member


Joined: May 2007
Posts: 1,968
Likes: 188
From: Maryland.
It would be good to move the pictures over to a better, modern platform like imgur or similar and update the posts. These types of forum write-ups are great to learn from and seem to be becoming rarer as time goes on because nobody can be bothered to do them or they just don't use forums anymore.

Thread
Thread Starter
Forum
Replies
Last Post
White98LS
Acura Integra
6
Aug 6, 2005 10:09 PM
Renegade
Acura Integra Type-R
8
Jan 28, 2005 07:39 AM
NeXtLeVeL_TyPe_R
Acura Integra Type-R
28
Nov 24, 2002 07:47 PM