

What's my next step after removing sealer....?

Okay i'm trying to save money on doing what I can in terms of prep work for my engine bay.
I'm already done with the wire tuck & will be getting a tuck engine harness as well.
The pay will be primer, painted and clear coat (2 coats of each)
What i've done so far is taken a drill with cone wire brush head to remove some mild oxidation, dirt, rust, and sealer along the EF bay.
My question are:
1) how to i remove the remaining sealer in the tight corners?
2) do i need to remove the sealer that's in between metal plates? or just paint over it?
3) what grade sanding paper should I use over it next? do i use sand paper or sanding wheel on dremhel?
4) I'd like apply coat of sealer on there (NOT filler).... is this a decent idea? I like how EG/EK have cleaner sealer finish compared to EF & DA where it's just slapped on with a brush.
a) so what kind to get, where to get it & how much do I need?
a) is it something I could do pretty easy such as squeeze it on and use a spatula to smooth it out & let it dry?
some pictures:
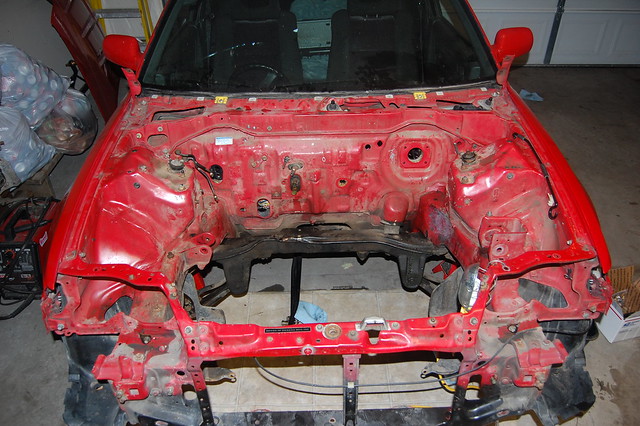
before

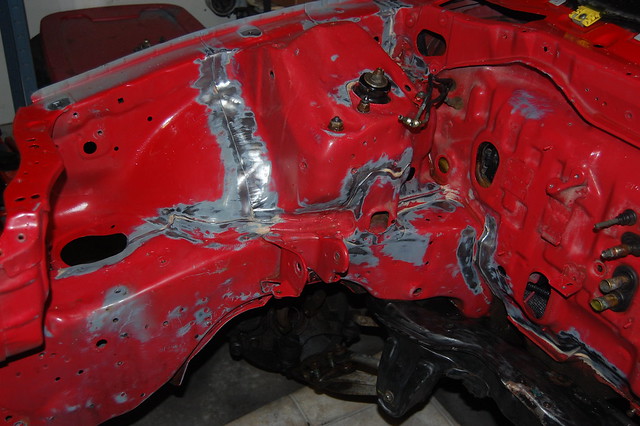
after


LMK what you think I should do next.
It's a learning process & hope I just don't mess it up and cause more harm than good.
I'm already done with the wire tuck & will be getting a tuck engine harness as well.
The pay will be primer, painted and clear coat (2 coats of each)
What i've done so far is taken a drill with cone wire brush head to remove some mild oxidation, dirt, rust, and sealer along the EF bay.
My question are:
1) how to i remove the remaining sealer in the tight corners?
2) do i need to remove the sealer that's in between metal plates? or just paint over it?
3) what grade sanding paper should I use over it next? do i use sand paper or sanding wheel on dremhel?
4) I'd like apply coat of sealer on there (NOT filler).... is this a decent idea? I like how EG/EK have cleaner sealer finish compared to EF & DA where it's just slapped on with a brush.
a) so what kind to get, where to get it & how much do I need?
a) is it something I could do pretty easy such as squeeze it on and use a spatula to smooth it out & let it dry?
some pictures:
before
after
LMK what you think I should do next.
It's a learning process & hope I just don't mess it up and cause more harm than good.
Honda-Tech Member
Joined: May 2008
Posts: 399
Likes: 0
From: Philly, PA, USA
Impatient much? This isn't a fast moving section.
If you definitely want to reapply seam sealer instead of smooth it out, then you need something like this http://www.repaintsupply.com/pd_automix_heavybodied.cfm
Squeeze it on and finish it off like caulk... tool it smooth and make it look however you want. You can even use your finger to make a nice rounded edge. Any seam sealer will work. You shouldn't need to remove much more, but basically just finish how you want. Just think of your final product and what will be visible with all the wires tucked away and put as much work into it as you feel is necessary. The seam sealer will stick like crazy to any clean surface so just apply it and you're finished. Seam sealer is paintable so there's no need to scuff after it's dry.
Personally I'd take a torch and scraper and get rid of all of it that you can't reach with the wire wheel and then stitch weld the whole thing. You can dress the welds and then Duraglas the rest of it. A final skim coat to smooth it all out, then primer and block it and end up with a perfectly shaved engine bay. You could even take a small shortcut and just cleanly seal seal the areas behind the strut towers since you won't see much back there. Honestly that's the way I'd go with it if I was you.. you're already most of the way there. Tearing down the engine bay completely and then stripping old seam sealer is the tough part. The body work is the easiest part besides actually painting it.
I always thought you shouldnt use seam sealer on bare metal because humidity would cause rust under the sealer?I could be wrong but thats what I thought.I wouldnt stitch weld it if I were you thats not something you want to take on yourself if you dont know the answers to the questions you just asked.I am just trying to be helpfull not trying to bash on you.

gonna answer what i can.
replace your seam sealer back where they belong if you're smart. they have sandable seam sealears so you can apply it, let it dry, then sand it smooth. then use bondo (yes bondo) to go over the seam sealer and any other areas you want to look smooth.
to make sure your whole engine bay is prepped for SEALER PRIMER and basecoat and clearcoat. leave your engine bay in about 500-600grit.
so do all your final sanding and prepping in the enginebay to get ready for that step. and off to the painters it goes.

Thread
Thread Starter
Forum
Replies
Last Post