

Oxy/Acetylene Welded a Couple of Aluminum Exhausts

Thread Starter
Honda-Tech Member
Joined: Sep 2006
Posts: 1,235
Likes: 0
From: Mid-Michigan, USA
I recently made myself a full length exhaust for my Neon out of 3" aluminum. Initially I was using too small of a tip for the additional heat transferring ability of the long aluminum tube, so the lack of heat was causing my welds to be extra globby. Although they were totally functional, they were extremely ugly! Here's the basic deal:
This entire system with a 5x8x18" Magnaflow weighs 20#. My previous system that was 3" mild steel down the tunnel and then 2.5" mild for the remainder through a 4x9x18" Magnaflow was 30#. The tubing part of this system from the down pipe to the muffler is 8#. Pretty sweet.
So here is a pic of the entire system:

And here is a pic of the system in progress. The last part you see there is flared at the front end so that I could use a slip fit above the lateral links. It's always a hassle getting the exhaust off, but I didn't think it would be with a removable rear section. Turns out that's true, but this is the one place where I really need a V-band, because there isn't enough twist room to loosen up the slip fit:

Here is a pic that shows through the Magnaflow muffler, and also shows my three-hanger system for the muffler that turned out to be totally un-necessary. I was trying to make this thing functionally perfect, and I kind of over did it in this area I guess. This exhaust is really quite quiet. I expected to have to add another Vibrant Ultra Quiet Resonator up front, but it wasn't necessary:

And I guess it was too dark for this, but I tried to take a pic of it on the car:

Then another guy wanted me to make him a shorter, more aggressive exhaust, so I decided that was a good use of the Vibrant UQR. And since this one was for someone else, I ground down all of the welds to make it look pretty much like a single piece of pipe. This one sounds GOOOD! ! !
Oh, here's one in-progress shot of that sweet Vibrant, and some of my ugly Mig tacks:

Here's some of the finished item:


So obviously I haven't figured out how to consistently make pretty welds yet this way, but it shows that good functional parts can be made this way, and it appears that they are well sealed, without much or maybe any porosity. Should be good for boost pipes and stuff.
Later!
This entire system with a 5x8x18" Magnaflow weighs 20#. My previous system that was 3" mild steel down the tunnel and then 2.5" mild for the remainder through a 4x9x18" Magnaflow was 30#. The tubing part of this system from the down pipe to the muffler is 8#. Pretty sweet.
So here is a pic of the entire system:
And here is a pic of the system in progress. The last part you see there is flared at the front end so that I could use a slip fit above the lateral links. It's always a hassle getting the exhaust off, but I didn't think it would be with a removable rear section. Turns out that's true, but this is the one place where I really need a V-band, because there isn't enough twist room to loosen up the slip fit:
Here is a pic that shows through the Magnaflow muffler, and also shows my three-hanger system for the muffler that turned out to be totally un-necessary. I was trying to make this thing functionally perfect, and I kind of over did it in this area I guess. This exhaust is really quite quiet. I expected to have to add another Vibrant Ultra Quiet Resonator up front, but it wasn't necessary:
And I guess it was too dark for this, but I tried to take a pic of it on the car:
Then another guy wanted me to make him a shorter, more aggressive exhaust, so I decided that was a good use of the Vibrant UQR. And since this one was for someone else, I ground down all of the welds to make it look pretty much like a single piece of pipe. This one sounds GOOOD! ! !
Oh, here's one in-progress shot of that sweet Vibrant, and some of my ugly Mig tacks:
Here's some of the finished item:
So obviously I haven't figured out how to consistently make pretty welds yet this way, but it shows that good functional parts can be made this way, and it appears that they are well sealed, without much or maybe any porosity. Should be good for boost pipes and stuff.
Later!
Honda-Tech Member
Joined: Mar 2008
Posts: 1,044
Likes: 2
From: Brandon, FL, US
NICE!
Every time I tell someone I'm learning to weld with oxy/acetylene they ask how you can weld with a cutting torch. Nice to see people still welding with this, and AL at that. What all did you need to weld it? Just AL rods and alot of flux? Did you need to protect the back side of the weld? Any up close pictures?
Every time I tell someone I'm learning to weld with oxy/acetylene they ask how you can weld with a cutting torch. Nice to see people still welding with this, and AL at that. What all did you need to weld it? Just AL rods and alot of flux? Did you need to protect the back side of the weld? Any up close pictures?
Thread Starter
Honda-Tech Member
Joined: Sep 2006
Posts: 1,235
Likes: 0
From: Mid-Michigan, USA
Yep, just AL rods (4043 at the moment IIRC), and a flux I get from TinManTechnologies, although I've used a Crown flux in the past, and it worked pretty well too.
Oh, I do have to credit the special goggle lens from TinMan with helping this process to work. The lens is a proprietary color (greenish) that really cuts the flare of the flux, and you can really see the aluminum start to change phase. With regular gas welding goggles it's super hard to see the aluminum consistency through that flare, so it's hard to catch it at just the right instant.
The flux takes care of the back of the weld, so there's no need for anything else.
Here are a couple of pictures of some decent welds where I had enough heat and whatnot to make a nice compact weld and move along rather fast. You can see the one on the right got a little proud of the surface, partially because the longer length of tubing was making the weld location a little cold:
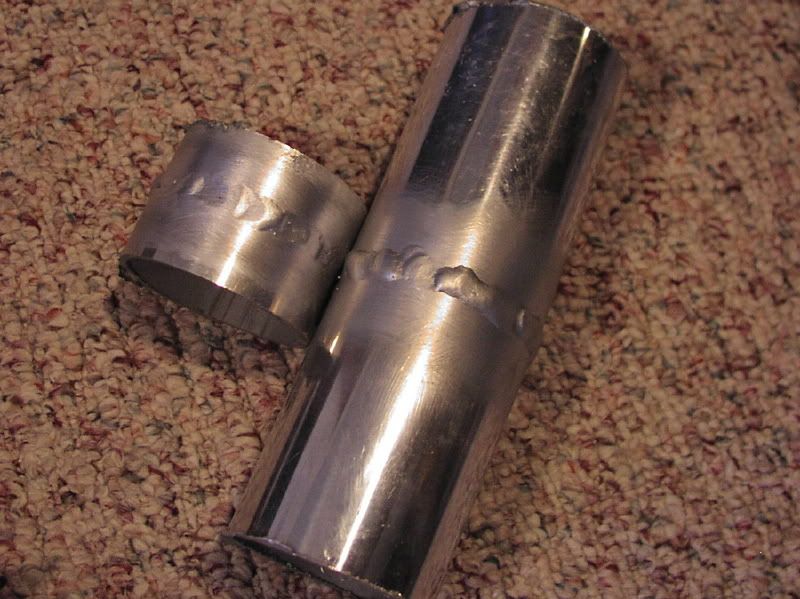
And here is the inside of one opened up:
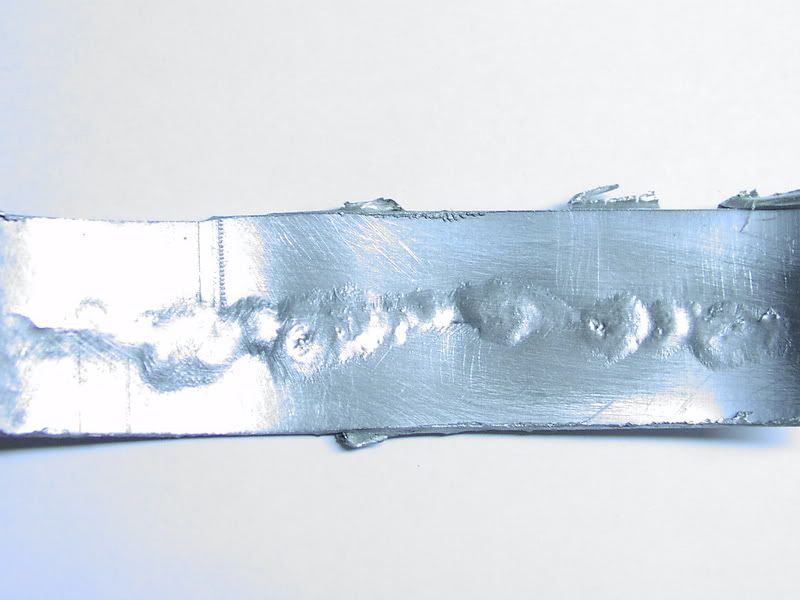
That one has since been cut and inspected by a phenomenal welder, and he was very impressed. He said I "passed" LOL.
And then he said I needed to get a tig welder. . . . Ha ha ha!
Oh, I do have to credit the special goggle lens from TinMan with helping this process to work. The lens is a proprietary color (greenish) that really cuts the flare of the flux, and you can really see the aluminum start to change phase. With regular gas welding goggles it's super hard to see the aluminum consistency through that flare, so it's hard to catch it at just the right instant.
The flux takes care of the back of the weld, so there's no need for anything else.
Here are a couple of pictures of some decent welds where I had enough heat and whatnot to make a nice compact weld and move along rather fast. You can see the one on the right got a little proud of the surface, partially because the longer length of tubing was making the weld location a little cold:
And here is the inside of one opened up:
That one has since been cut and inspected by a phenomenal welder, and he was very impressed. He said I "passed" LOL.
And then he said I needed to get a tig welder. . . .
Ha ha ha!
Thread Starter
Honda-Tech Member
Joined: Sep 2006
Posts: 1,235
Likes: 0
From: Mid-Michigan, USA
Thanks!
I'm hoping to do a better job with it in the future, but so far it's been a challenge. Getting the job done though!
I'm hoping to do a better job with it in the future, but so far it's been a challenge. Getting the job done though!
Honda-Tech Member
Joined: Jun 2004
Posts: 2,617
Likes: 0
From: NoVa, U.S.A.
HA! This is just what I needed to convince myself that this could be done with OA. I bought his torch kit 2 yrs ago and it's been sitting idle all this time.
Project AL CRX exhaust in the works.
Thanks for the inspiration
Project AL CRX exhaust in the works.
Thanks for the inspiration
Honda-Tech Member
Joined: Dec 2003
Posts: 2,336
Likes: 1
From: DFW Area, TX
What wall thickness of tubing are you using? I found that when using slip fits with t-bolt clamps on 3" x 0.065" 6061, the aluminum would get soft and deform causing the clamps to lose all "clamping" (for lack of a better term) on the Al tubing. This was at the end of an exhaust setup for a Honda H22 engine, although we did notice some tubing deformation closer to the header where a hanger was welded to a piece of 304 tubing and t-bolt clamped to the exhaust as well. Because of this and some other small issues, I gave up on the Al exhaust idea. It would be great though, as it was very light. Perhaps a thicker wall (0.083?) would work better?
BTW, this was on a road course car that was driven at WOT for 90% of a 20 to 45 minute track session.
BTW, this was on a road course car that was driven at WOT for 90% of a 20 to 45 minute track session.
Trending Topics

Honda-Tech Member
Joined: Sep 2004
Posts: 1,257
Likes: 0
From: Fargo, ND, US
I love the fact that your giving the AL exhaust a try. so you get 
but i think it would have been a better choice to run a thinner walled steel tubing to save weight and still have strength.
but i think it would have been a better choice to run a thinner walled steel tubing to save weight and still have strength.
Thread Starter
Honda-Tech Member
Joined: Sep 2006
Posts: 1,235
Likes: 0
From: Mid-Michigan, USA
What wall thickness of tubing are you using? I found that when using slip fits with t-bolt clamps on 3" x 0.065" 6061, the aluminum would get soft and deform causing the clamps to lose all "clamping" (for lack of a better term) on the Al tubing. This was at the end of an exhaust setup for a Honda H22 engine, although we did notice some tubing deformation closer to the header where a hanger was welded to a piece of 304 tubing and t-bolt clamped to the exhaust as well. Because of this and some other small issues, I gave up on the Al exhaust idea. It would be great though, as it was very light. Perhaps a thicker wall (0.083?) would work better?
BTW, this was on a road course car that was driven at WOT for 90% of a 20 to 45 minute track session.
BTW, this was on a road course car that was driven at WOT for 90% of a 20 to 45 minute track session.

Since one of the bolts might have been interfering with the movement of the lateral link, I switched to one of these VERY strong buggers:

I think that for aluminum on aluminum slip fits, I won't have a problem from what I'm seeing so far. Where I do think there could potentially be a problem is in the areas of needed structural stiffness from the slip fit of the stainless muffler inlet or outlet over the aluminum tube. On the shorty exhaust above, I specified that an EasySeal needed to be used at the muffler inlet because it would both squeeze down on the slotted end of the muffler, and also hug down on the aluminum tubing. In that configuration they seem pretty solid so far.
For ultimate strength though, I think V-Bands are the only way to go. They're just way to expensive for what I, or this other guy, wanted to spend. In the end, only time will tell how this all works out! So far, so good, as they say. . .
Thanks for the input!
Thread Starter
Honda-Tech Member
Joined: Sep 2006
Posts: 1,235
Likes: 0
From: Mid-Michigan, USA
I had used my Victor Super-Range torch to make that system for my car, and when I used the #2 tip, it worked pretty well. Prior to that, I had been using the #1 tip, which was good for short lengths of cut off tube, but was not good for the long tubing because it carried away too much heat.
Because that torch and the heavy hoses was kind of unwieldy in the hand, I decided maybe I could do a more precise job if I got a Meco Midget and the ultra-light hoses. I got tips 3-6, which go to a bit more heat on the chart than the Victor #2 tip. Overall though, I haven't found the sweet spot yet with the gas pressures and whatnot for the Meco. Even with the #6 tip, I had barely enough heat for that second exhaust system, and the gas pressures seemed kind of "hard" to get that much heat.
To his credit, Kent White (THE Tinman) told me I would probably need an assortment of tips ranging up even higher than the #6. I guess the tip chart isn't all that accurate.
Oh, and I also got the 7" neck for the larger tips too. The site indicates the 10" neck would be needed for tips around that size and bigger, but I didn't find that to be the case when using gloves. . . I dunno.
Honda-Tech Member
Joined: Jun 2004
Posts: 2,617
Likes: 0
From: NoVa, U.S.A.
Yes exactly. I have 3 tips and the lightweight hose kit. You're right about the googles when I welded a small section of aluminum. It was a somewhat thick piece if I remember and I was able to pre-heat with a propane torch that the plumbers used. I remember wondering when the puddle would start lol and read a tip in the tinman site regarding pre-heating. Also, try pointing the flame to the direction of your weld travel.
Thread Starter
Honda-Tech Member
Joined: Sep 2006
Posts: 1,235
Likes: 0
From: Mid-Michigan, USA
Yes exactly. I have 3 tips and the lightweight hose kit. You're right about the googles when I welded a small section of aluminum. It was a somewhat thick piece if I remember and I was able to pre-heat with a propane torch that the plumbers used. I remember wondering when the puddle would start lol and read a tip in the tinman site regarding pre-heating. Also, try pointing the flame to the direction of your weld travel.
Also, your use of the word "puddle" makes me wonder whether you actually had any success with this? The reason I ask is that what I see when I weld like this can hardly be called a puddle. I do understand using that term if it's just for lack of a better term, since I don't know exactly what I'd call it, but it certainly isn't anything like the nice, liquid puddle you get when gas welding steel. It's like as soon as you see the slightest bit of phase shift in the parent metal, it's time to add the filler, and what I found is that you actually seem to stitch the parent pieces together with the filler. It's very strange.
I do agree with tilting the flame toward the direction of travel, but you also have to kind of "fan" the flame ahead, and then you also have to be VERY aware of taking the heat totally off of the material on an instant's notice. Once you get the necessary heat into the material, it is super easy to over heat the material ahead of the weld location. Only a few times have I actually been able to really weld for a long distance in one stretch without having to take away the heat intermittently, and in those cases you move ahead ridiculously fast. Usually when that is happening you get a really nice compact looking weld though that is barely visible.
This is a great discussion! I hope you are able to play with your aluminum gas welding some more soon and post up your observations!
Honda-Tech Member
Joined: Jun 2004
Posts: 2,617
Likes: 0
From: NoVa, U.S.A.
Setup:
Mecho Midget torch with a No. 2 tip (#65, 0.035") Based on what you are using and and Ken's suggestion, I may drill out my No. 3 tip
I was constantly adjusting the pressure as I was working so I was not able to remember the setting that gave me these results. I also tried the No. 1 tip (#70, 0.028") I found it did not have enough heat.
I don't know the alloy. It was a scrap piece. Filler is 1100. Flux is what is supplied with the kit
You're right. Puddle is a misleading term. Al does not become shiny/liquid in appearance like steel to tell you it is time to add filler. It is a very faint change in appearance. I had some luck with no filler but getting the 2 sections to match and flow might be the key.
Here is an old piece I welded somewhat ok.
Thread Starter
Honda-Tech Member
Joined: Sep 2006
Posts: 1,235
Likes: 0
From: Mid-Michigan, USA
Wow, that looks like a real good start (and is as good as some of the stuff I still do! 
 )! I'll have to give some of that 1100 filler wire a shot. It just goes SOOOOO fast when you're using that thin of filler (it's a spool of wire from Kent, right?), that I have been reverting to one of the thicker TIG rods I have batches of in 4043.
I suspect that when you start welding actual lengths of tubing you'll find that you need a LOT more heat than what that #2 Meco tip can provide you--it's a pretty big difference from working on short stubs that can't carry away the heat very well. I'll be very interested in hearing what you find, keep up the good work! ! !
)! I'll have to give some of that 1100 filler wire a shot. It just goes SOOOOO fast when you're using that thin of filler (it's a spool of wire from Kent, right?), that I have been reverting to one of the thicker TIG rods I have batches of in 4043.I suspect that when you start welding actual lengths of tubing you'll find that you need a LOT more heat than what that #2 Meco tip can provide you--it's a pretty big difference from working on short stubs that can't carry away the heat very well. I'll be very interested in hearing what you find, keep up the good work! ! !
Daisy... Daisy...
Joined: Jun 2004
Posts: 16,580
Likes: 4
From: 24601
Honda-Tech Member
Joined: Jun 2004
Posts: 2,617
Likes: 0
From: NoVa, U.S.A.
Checked the website and man prices have climbed since 2004! The torch was $105 when I bought my setup
I looked at the setup this morning and found I had ordered a #4 and a #6 tip that was never used! I didnt get to see if I had any gas left in the bottles. If I have gas mix, I may fire up this bad boy and try to weld w/o filler. From what I remember from HS shop class, this is OA welding basics and if a joint can be made w/o filler, adding filler becomes pie. Regarding in bold below: I think this is why i ordered the larger tips. How useful was the longer extension to you? A tip from the website was to use pliers to hold the torch!
The weld above is the nicest (liberal description) of my attempts! The rest was slag
PM me your address and I'll send you maybe 5-10 ft of the 1100 (from tinmantech/Kent) to try
Wow, that looks like a real good start (and is as good as some of the stuff I still do! )! I'll have to give some of that 1100 filler wire a shot. It just goes SOOOOO fast when you're using that thin of filler (it's a spool of wire from Kent, right?), that I have been reverting to one of the thicker TIG rods I have batches of in 4043.
I suspect that when you start welding actual lengths of tubing you'll find that you need a LOT more heat than what that #2 Meco tip can provide you--it's a pretty big difference from working on short stubs that can't carry away the heat very well. I'll be very interested in hearing what you find, keep up the good work! ! !
)! I'll have to give some of that 1100 filler wire a shot. It just goes SOOOOO fast when you're using that thin of filler (it's a spool of wire from Kent, right?), that I have been reverting to one of the thicker TIG rods I have batches of in 4043.I suspect that when you start welding actual lengths of tubing you'll find that you need a LOT more heat than what that #2 Meco tip can provide you--it's a pretty big difference from working on short stubs that can't carry away the heat very well. I'll be very interested in hearing what you find, keep up the good work! ! !
Honda-Tech Member
Joined: Jun 2004
Posts: 2,617
Likes: 0
From: NoVa, U.S.A.
Now there's an idea! In dealing with the heat absorption and low heat output of my kit that may be the solution. I'll see what the pawnshops have - there's alway a bunch there and they always are negotiable on the price.
NICE!
Every time I tell someone I'm learning to weld with oxy/acetylene they ask how you can weld with a cutting torch. Nice to see people still welding with this, and AL at that. What all did you need to weld it? Just AL rods and alot of flux? Did you need to protect the back side of the weld? Any up close pictures?
Every time I tell someone I'm learning to weld with oxy/acetylene they ask how you can weld with a cutting torch. Nice to see people still welding with this, and AL at that. What all did you need to weld it? Just AL rods and alot of flux? Did you need to protect the back side of the weld? Any up close pictures?
Thread Starter
Honda-Tech Member
Joined: Sep 2006
Posts: 1,235
Likes: 0
From: Mid-Michigan, USA
 Aluminum can be very frustrating.
Regarding in bold below: I think this is why i ordered the larger tips. How useful was the longer extension to you? A tip from the website was to use pliers to hold the torch!
. . .
PM me your address and I'll send you maybe 5-10 ft of the 1100 (from tinmantech/Kent) to try
. . .
PM me your address and I'll send you maybe 5-10 ft of the 1100 (from tinmantech/Kent) to try
As for the longer extension, I was wearing my long arc welding gloves (from Harbor Freight), and I didn't feel any need for the 7" neck. That Kent is crazy, I've seen a picture of him somewhere with him holding a couple pieces of aluminum together with his bare fingers while tacked them! I figured if he said a longer extension was needed, it really was!
However, in that picture or video or whatever it was, I think he was showing how you could flange two pieces of thin sheet aluminum and then melt the flanges together that were butted up to each other. Probably didn't require much heat compared to working on an exhaust.
On the good side, I still had really good control with the 7" neck, and I don't think the 10" neck would cause me any trouble either. But then again, if I'm wearing gloves, I doubt I'd need it. So far at least.
I've been torch welding aluminum in my metal work classes and let me tell you this stuff is TRICKY! Very frustrating and required a lot of practice for me on thin stuff to prevent myself from blowing holes.
Honda-Tech Member
Joined: Jun 2004
Posts: 2,617
Likes: 0
From: NoVa, U.S.A.
Got distracted when ht was down.
On this video, at 0:50 seconds, "flows like Jello" does your puddle form that quickly? I have to sit there for a loO00Oong time before anything happens. No time to weld this past week so nothing new to report back.
http://www.youtube.com/watch?v=BFWxXnJmd9k
On this video, at 0:50 seconds, "flows like Jello" does your puddle form that quickly? I have to sit there for a loO00Oong time before anything happens. No time to weld this past week so nothing new to report back.
http://www.youtube.com/watch?v=BFWxXnJmd9k
Thread Starter
Honda-Tech Member
Joined: Sep 2006
Posts: 1,235
Likes: 0
From: Mid-Michigan, USA
Ummmmmm. . . . NO! Mine does not flow like that in any of my recent attempts. HOWEVER, I have noticed that when I'm working with thin and small pieces, I can get a process going that is quite a bit like that, but that is hard to sustain without over heating the aluminum.
My thought is that the alloy probably has something to do with it (he says 3033 I think?), and that the size of his material allows him to keep a super small, soft flame, that still has enough heat in it to work effectively with that thin, small piece. Also, did you notice that toward the end of that clip of him welding there was an interestingly abrupt cutaway? I suspect that he had to take the heat away there so he wouldn't have the puddle drop out on him.
At any rate, working on bigger stuff like exhaust tube, the closest I have come to results of that type was when I was running my big 'ole Victor torch, with a big tip on it, and running as soft of a flame as I could. That is the only way I've been able to achieve a decently quick and sustainable weld process like you see there.
Now I need to come up with a couple of projects in a hurry so I can do some more aluminum welding! I think I'm going to make an order of some random elbows and tube tomorrow, just so I'll have the materials to make stuff as the inspiration hits me--like next week when I have some time off from work! That video inspired me too, despite the fact that I've never had it working like that. . . .
Honda-Tech Member
Joined: Mar 2000
Posts: 2,859
Likes: 1
From: Toronto, ON, Canada
I've always wondered how long aluminum lasts from daily driving and all the heat cycles/vibration over time...
I've just built an aluminum exhaust for my Camry recently, and the system saved me 32 lbs compared to a mild steel one.. The weight savings are so good, but I have a feeling that the exhaust will just crack over time from daily abuse and winter driving...
I've just built an aluminum exhaust for my Camry recently, and the system saved me 32 lbs compared to a mild steel one.. The weight savings are so good, but I have a feeling that the exhaust will just crack over time from daily abuse and winter driving...