

yellow highbeam bulbs


Thread Starter
Junior Member
Joined: Mar 2009
Posts: 39
Likes: 0
whats up honda-tech!?!?
does anyone have a picture of a s2000 with the yellow highbeam bulbs??
I searched but couldn't come up with any pics
thinking of getting them but i wanted to see how it would look before i waste money and time
does anyone have a picture of a s2000 with the yellow highbeam bulbs??
I searched but couldn't come up with any pics
thinking of getting them but i wanted to see how it would look before i waste money and time
Last edited by trev718; Apr 17, 2009 at 12:55 PM.

Cool Cool Island Breezes. BOY-EE
iTrader: (1)
Joined: Sep 2006
Posts: 11,953
Likes: 9
From: TRILLINOIS....WAY downtown, jerky.
You're going to have to drive around with your high beams on. No matter what, to oncoming traffic it's going to look very bad because you will be blinding them.
At the best, you'll look like an irresponsible ricer.
I did a writeup a while ago on how to put city lights in headlight housings. It's a bulb that sits right next to the brights. How I have it, it looks factory (my craftsmanship is the boss) and you can easily change the bulbs if need be. It also lights up the entire brights housing yellow without blinding anyone. You can still see it clearly with the HID on and everyone seems to love it. If you're interested, I will post a new post with the write up.
here.
Trending Topics
Thread Starter
Junior Member
Joined: Mar 2009
Posts: 39
Likes: 0

Honda-Tech Member
Joined: Aug 2005
Posts: 134
Likes: 0
From: Galena, OH, UNITED STATES
I got a set of yellow bulbs from ebay; both blew out within a month.
And yes.. I made sure I rubbed the bulbs all over with my fingers before installing.
oh yeah... they were the type RRrar ones. lol
So make sure you stay away from ebay yellow bulbs.
And yes.. I made sure I rubbed the bulbs all over with my fingers before installing.
oh yeah... they were the type RRrar ones. lol
So make sure you stay away from ebay yellow bulbs.
Honda-Tech Member
Joined: Apr 2007
Posts: 788
Likes: 0
From: Garden Grove, CA, USA
B serious, are you prefering to DRL? http://alavigne.net/Motorsports/Feat.../DRL/index.jsp Driving running lights
Cool Cool Island Breezes. BOY-EE
iTrader: (1)
Joined: Sep 2006
Posts: 11,953
Likes: 9
From: TRILLINOIS....WAY downtown, jerky.
B serious, are you prefering to DRL? http://alavigne.net/Motorsports/Feat.../DRL/index.jsp Driving running lights
Mine are wired to the parking lights and come on when I put the headlight switch either in the parking lights or the on position.
They are a seperate auxillary bulb.
Honda-Tech Member
Joined: Aug 2005
Posts: 134
Likes: 0
From: Galena, OH, UNITED STATES
They're not really DRLs. DRL stands for daytime running lamps. They have to come on automatically. Canadian S2000s and 06+ USDM S2000s have daytime running lamps attatched to the brights.
Mine are wired to the parking lights and come on when I put the headlight switch either in the parking lights or the on position.
They are a seperate auxillary bulb.
Mine are wired to the parking lights and come on when I put the headlight switch either in the parking lights or the on position.
They are a seperate auxillary bulb.
Cool Cool Island Breezes. BOY-EE
iTrader: (1)
Joined: Sep 2006
Posts: 11,953
Likes: 9
From: TRILLINOIS....WAY downtown, jerky.
Allright, here is the writeup that I promised:
1.) Start out by unplugging the neg. battery terminal. Then jack up the car, put it on stands and remove the front bumper. It's very simple. There are a few hidden bolts in the bumper support area so you'll need to peel back the fender liner to get to them.
2.) Once the bumper is off, you can take the headlights out. Make dry erase or permanent marker marks around the bolts so you can line up the lights easily again. You can take off perm. marker with some goof off or goo gone later. The headlight bolts are all silver. Some are in obscure places. But they're bright *** silver. Unplug the HID connectors. Unplug the brights. Unplug the parking lights. They should come right out after that.
3.) One you have the headlights out, put them face down on a towel or carpet or something that won't scratch them. Remove the weather proof boot that goes over the brights bulb. Remove the brights bulb and put it somewhere safe. If you touched the glass, wipe it off with rubbing alchohol and a lint free towel when you put it back in.
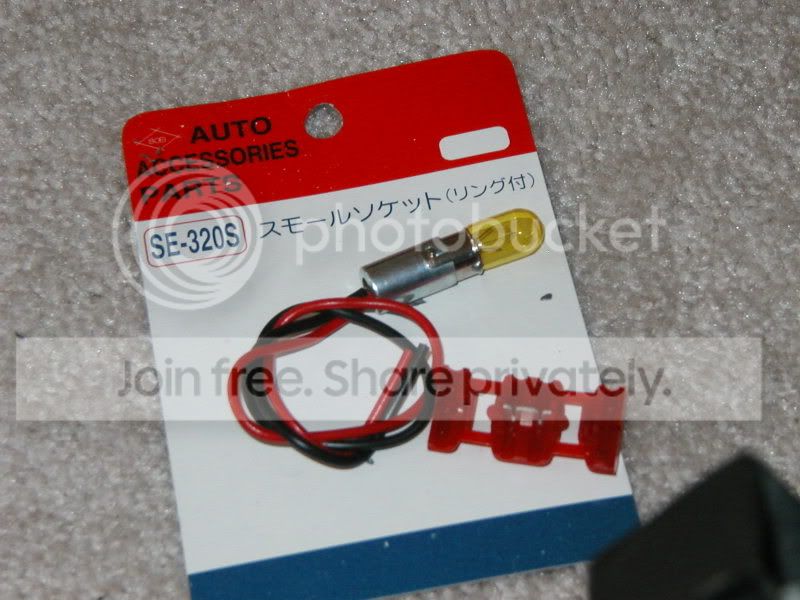
4.) Get all your stuff ready. I bought these bulbs from a shop around here. They are small city light style bulbs that have a yellow coat over them. They come with a rubber grommet. If you can't find any that come with a rubber grommet, you can go to a hardware store and pick up 2 rubber grommets. Make sure the bulbs fit into them very snugly so they don't move around.
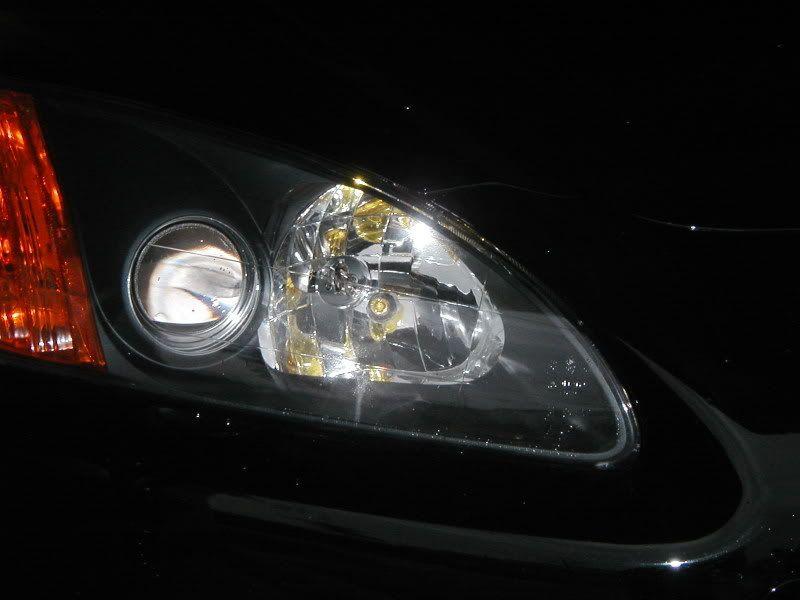
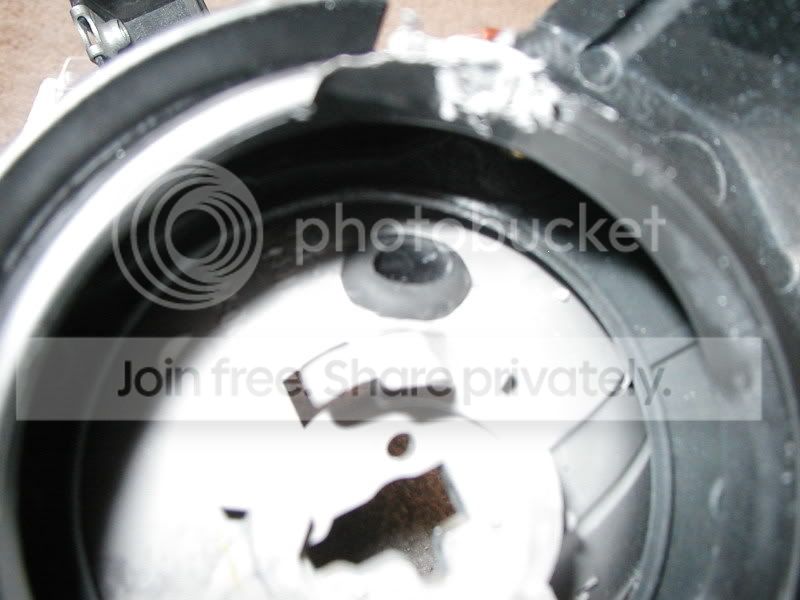
5.) After this comes the really nerve racking part of drilling into your very expensive headilght. So pay close attention and do this very carefully. There are 4 circular indentations surrounding the brights bulb. This is convenient as you can now keep the bulbs symmetrical. I have pointed them out with arrows. Drill the one I have drilled in both headlights or pick one of your own and drill BOTH headlights with the same one. This is surprisingly easy to screw up. So don't screw it up. I found that the one that I have drilled works very well to light up the entire housing and the bulb blends into the housing very nicely. I can also remove the city light bulbs easily, without removing the bumper to change them out.
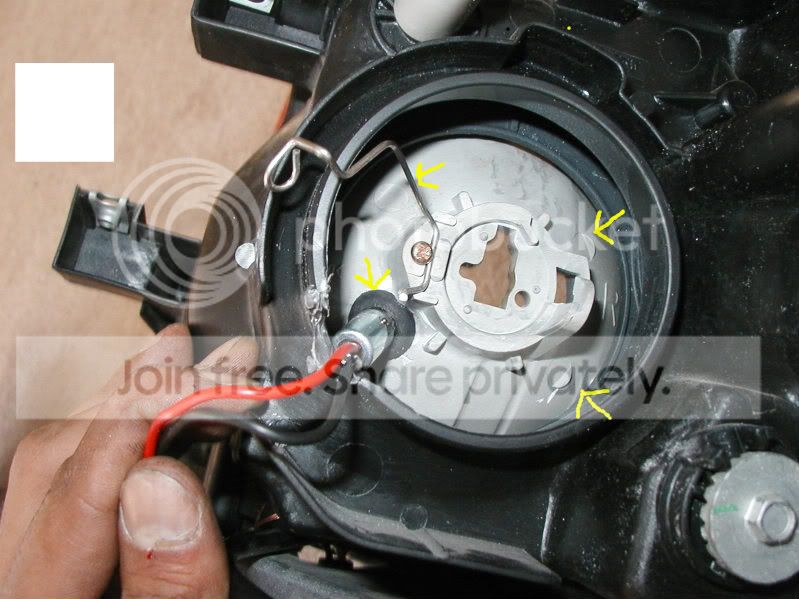
**I guess I should have taken more pics BEFORE drilling...but I didn't. Anyway, to drill, SLOWLY and succesively make the hole bigger so you don't chip the silver reflective lining on the housing. Use a very small bit to center the hole. Then successively go bigger till the grommets fit into the hole. Pay attention!! The inner lip of the grommet is what needs to slide in!! Don't drill so big that the whole grommet falls into the hole. Look below at how the outer lips of the grommet are much larger than the hole itself. The drilled hole is only a little bigger than the hole in the grommet. Drill a little bit, then turn the light upside down and remove the drill dust. The goal is to get as little drill dust as possible in the housing.
I dropped the grommet into the hole trying to install. Don't panic. Get a wire hanger and bend it into a tight hook. Remove the grommet by hooking it and pulling it through the hole for the brights bulb.
6.) Now you can slide the bulb into the grommet. This is a bitch. Lube the bulb with rubbing alchohol.
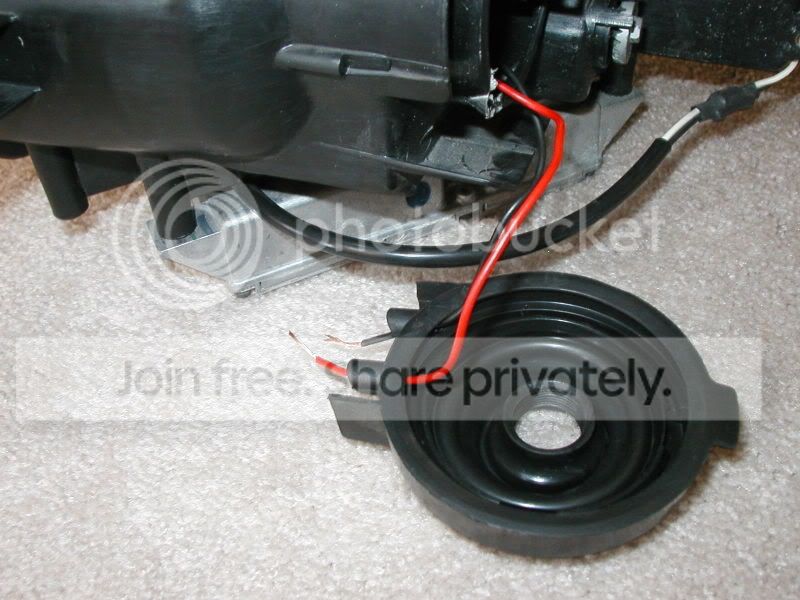
7.) The cool thing is that you can now run the wires from the city lights through the sweat hole in the rubber weather boot. This means you don't have to cut the boot. The wires are also not big enough to plug the sweat holes....so you won't get any extra chance of condensation forming in your headlight. You can now also put the brights bulb back in.
This is how everything should look from the reflector side. Notice that I chipped the reflector a bit. Oh well. You can't tell when it's on the car.
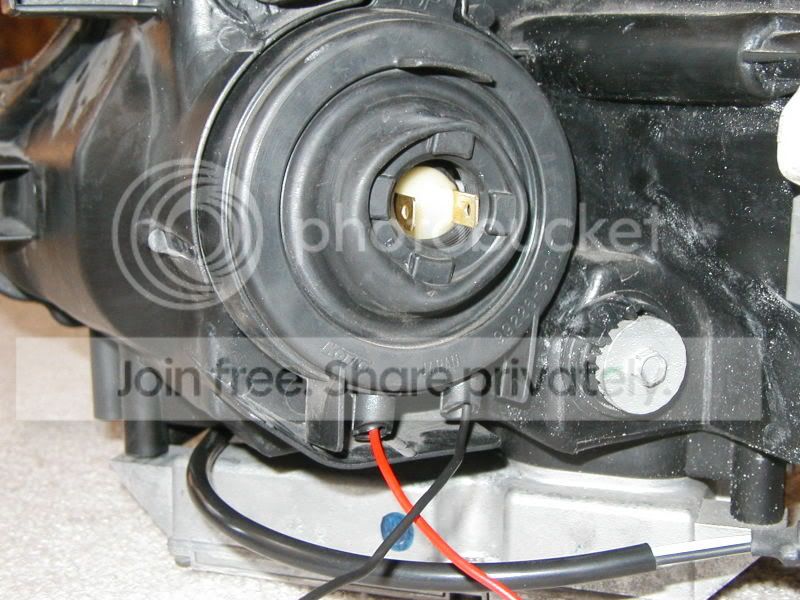
8.) After this is easy street. Bring the headlights over by the car and wire in the city lights. I wired them into my parking lights so that they would come on with the parking lights. Make sure you go to the right bulb. There is a turn signal and a parking light. IIRC, the parking light is the smaller of the two.
9.) Plug all the connectors back in, plug the battery back in and turn the lights on to make sure everything works as it should.
10.) Bolt the headlights back up and make sure the aim is still correct. If you scribed the bolt heads before removing the healights like I said to do...then it should all be good. Then reinstall the bumper.
11.) Enjoy.
** I ended up getting a lot of drill dust into one of the headlights. I had to remove the HID bulb from the projector (Do this carefully. I tore my thumb wide open taking off the safety cover). Then I had to remove the ballast from the housing and I had to put it in my oven to open the headlight and clean it. Put it in the oven on a plank of wood for 10-15 mins at 250F.
Cleaning the old sealant out and resealing it is a bitch. So..like I said before...try not to get drill dust into the housing.
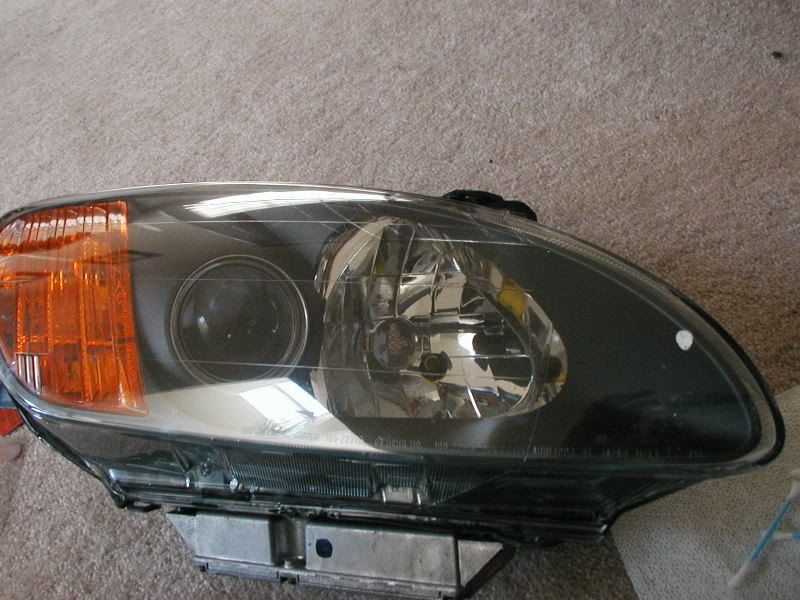
I realize that this all sounds like a huge PITA...and it is. But It's totally worth it. Obviously, I'm not blinding anyone else by leaving my yellow city lights on and I still get the look I wanted. What's the point of trying to make your car look good outwardly if people who look at it are offended that you're blinding them? It defeats the purpose.
1.) Start out by unplugging the neg. battery terminal. Then jack up the car, put it on stands and remove the front bumper. It's very simple. There are a few hidden bolts in the bumper support area so you'll need to peel back the fender liner to get to them.
2.) Once the bumper is off, you can take the headlights out. Make dry erase or permanent marker marks around the bolts so you can line up the lights easily again. You can take off perm. marker with some goof off or goo gone later. The headlight bolts are all silver. Some are in obscure places. But they're bright *** silver. Unplug the HID connectors. Unplug the brights. Unplug the parking lights. They should come right out after that.
3.) One you have the headlights out, put them face down on a towel or carpet or something that won't scratch them. Remove the weather proof boot that goes over the brights bulb. Remove the brights bulb and put it somewhere safe. If you touched the glass, wipe it off with rubbing alchohol and a lint free towel when you put it back in.
4.) Get all your stuff ready. I bought these bulbs from a shop around here. They are small city light style bulbs that have a yellow coat over them. They come with a rubber grommet. If you can't find any that come with a rubber grommet, you can go to a hardware store and pick up 2 rubber grommets. Make sure the bulbs fit into them very snugly so they don't move around.
5.) After this comes the really nerve racking part of drilling into your very expensive headilght. So pay close attention and do this very carefully. There are 4 circular indentations surrounding the brights bulb. This is convenient as you can now keep the bulbs symmetrical. I have pointed them out with arrows. Drill the one I have drilled in both headlights or pick one of your own and drill BOTH headlights with the same one. This is surprisingly easy to screw up. So don't screw it up. I found that the one that I have drilled works very well to light up the entire housing and the bulb blends into the housing very nicely. I can also remove the city light bulbs easily, without removing the bumper to change them out.
**I guess I should have taken more pics BEFORE drilling...but I didn't. Anyway, to drill, SLOWLY and succesively make the hole bigger so you don't chip the silver reflective lining on the housing. Use a very small bit to center the hole. Then successively go bigger till the grommets fit into the hole. Pay attention!! The inner lip of the grommet is what needs to slide in!! Don't drill so big that the whole grommet falls into the hole. Look below at how the outer lips of the grommet are much larger than the hole itself. The drilled hole is only a little bigger than the hole in the grommet. Drill a little bit, then turn the light upside down and remove the drill dust. The goal is to get as little drill dust as possible in the housing.
I dropped the grommet into the hole trying to install. Don't panic. Get a wire hanger and bend it into a tight hook. Remove the grommet by hooking it and pulling it through the hole for the brights bulb.
6.) Now you can slide the bulb into the grommet. This is a bitch. Lube the bulb with rubbing alchohol.
7.) The cool thing is that you can now run the wires from the city lights through the sweat hole in the rubber weather boot. This means you don't have to cut the boot. The wires are also not big enough to plug the sweat holes....so you won't get any extra chance of condensation forming in your headlight. You can now also put the brights bulb back in.
This is how everything should look from the reflector side. Notice that I chipped the reflector a bit. Oh well. You can't tell when it's on the car.
8.) After this is easy street. Bring the headlights over by the car and wire in the city lights. I wired them into my parking lights so that they would come on with the parking lights. Make sure you go to the right bulb. There is a turn signal and a parking light. IIRC, the parking light is the smaller of the two.
9.) Plug all the connectors back in, plug the battery back in and turn the lights on to make sure everything works as it should.
10.) Bolt the headlights back up and make sure the aim is still correct. If you scribed the bolt heads before removing the healights like I said to do...then it should all be good. Then reinstall the bumper.
11.) Enjoy.
** I ended up getting a lot of drill dust into one of the headlights. I had to remove the HID bulb from the projector (Do this carefully. I tore my thumb wide open taking off the safety cover). Then I had to remove the ballast from the housing and I had to put it in my oven to open the headlight and clean it. Put it in the oven on a plank of wood for 10-15 mins at 250F.
Cleaning the old sealant out and resealing it is a bitch. So..like I said before...try not to get drill dust into the housing.
I realize that this all sounds like a huge PITA...and it is. But It's totally worth it. Obviously, I'm not blinding anyone else by leaving my yellow city lights on and I still get the look I wanted. What's the point of trying to make your car look good outwardly if people who look at it are offended that you're blinding them? It defeats the purpose.