

HELP!! integra hatch door replacement.

Thread Starter
Junior Member
Joined: Apr 2008
Posts: 45
Likes: 0
From: calgary, ab, canada
hi guys,
I just had some stupid guy backed up into me and dented my hatch door 95 INTEGRA. I found the replacement door but now i dont know how to remove the old one and put the new hatch door.
I tried searching here and i tried searching in google but no results .. anyways if you guys know how to do it please help.
if you have the guide somewhere or pictures of that process .. please post it or reply.
thanks a lot in advance..
I just had some stupid guy backed up into me and dented my hatch door 95 INTEGRA. I found the replacement door but now i dont know how to remove the old one and put the new hatch door.
I tried searching here and i tried searching in google but no results
.. anyways if you guys know how to do it please help.if you have the guide somewhere or pictures of that process .. please post it or reply.
thanks a lot in advance..
Honda-Tech Member
Joined: Apr 2003
Posts: 1,877
Likes: 1
From: PinaColadaBurgh, Id, USA
Hatch Replacement
NOTE:
An assistant is helpful when removing the hatch.
Take care not to damage the hatch and body.
Take care not to scratch the hatch side trim and hatch trim panel.
Open the hatch.
Remove the high mount brake light.

Remove the hatch side trim on each side.

Remove the hatch trim panel.

NOTE: Detach the clips by sliding the hatch trim panel forward, then remove it.
Remove the spoiler

Disconnect the connectors, then remove the wire harnesses from the hatch.
Remove the rear wiper motor.
Remove the upper anchor bolts from the front and rear seat belts , then remove the upper portion of the quarter pillar trim panel.
Remove the rear roof trim, then pull the rear of the headliner down. NOTE: Take care not to bend the headliner.
Remove the support strut on each side while holding the hatch.
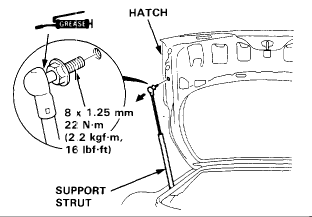
NOTE: Do not raise the hatch too far; the corners of the glass may hit the roof and break.
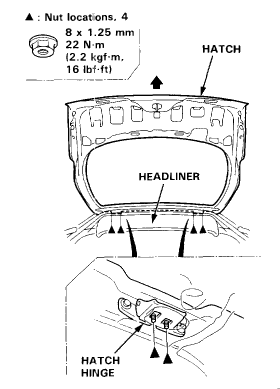
Remove the nuts, then remove the hatch.

NOTE: If necessary, replace the support strut.
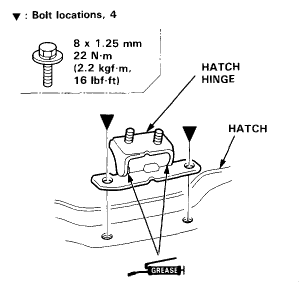
If necessary, remove the hatch hinge.
Installation is the reverse of the removal procedure. NOTE:
If necessary, replace any damaged clips.
Make sure the connectors are connected properly.
Make sure the hatch locks securely.
Make sure the hatch opens properly.
Adjust the hatch alignment.
NOTE:
An assistant is helpful when removing the hatch.
Take care not to damage the hatch and body.
Take care not to scratch the hatch side trim and hatch trim panel.
Open the hatch.
Remove the high mount brake light.
Remove the hatch side trim on each side.
Remove the hatch trim panel.
NOTE: Detach the clips by sliding the hatch trim panel forward, then remove it.
Remove the spoiler
Disconnect the connectors, then remove the wire harnesses from the hatch.
Remove the rear wiper motor.
Remove the upper anchor bolts from the front and rear seat belts , then remove the upper portion of the quarter pillar trim panel.
Remove the rear roof trim, then pull the rear of the headliner down. NOTE: Take care not to bend the headliner.
Remove the support strut on each side while holding the hatch.
NOTE: Do not raise the hatch too far; the corners of the glass may hit the roof and break.
Remove the nuts, then remove the hatch.
NOTE: If necessary, replace the support strut.
If necessary, remove the hatch hinge.
Installation is the reverse of the removal procedure. NOTE:
If necessary, replace any damaged clips.
Make sure the connectors are connected properly.
Make sure the hatch locks securely.
Make sure the hatch opens properly.
Adjust the hatch alignment.
Thread Starter
Junior Member
Joined: Apr 2008
Posts: 45
Likes: 0
From: calgary, ab, canada
I have successfully replaced the hatch. Thanks for your help. If anyone needs any guidence i am more than happy to help. email me at raj_very@hotmail.com
1) we will have to remove part of the headliner. so i removed the front and rear seat belt bolts, driver and passenger side handlebars, coat hanger, and dome light. then i just pulled the rear triangle trim on both sides and pulled the headliner from the rear side.
2) then unbolt the hatch screws under that. now put new hatch and bolt it half way and connect the shocks. than close your hatch to and adjust. while the hatch is closed, tighten the hatch nuts.
3) you will have to unplug the wiring and pull it out from old hatch and pull it inwards for new hatch befor putting the new hatch in.
any questions please let me know.

Thread
Thread Starter
Forum
Replies
Last Post
xJ.SLOTHx
Honda Civic / Del Sol (1992 - 2000)
7
Jan 13, 2004 07:11 PM