

Catch Can: Result

Thread Starter
Honda-Tech Member
Joined: Jul 2007
Posts: 795
Likes: 0
From: Garage, Australia
For those who remember, i installed an oil catch can inline from the pcv valve to the throttle body on my N/A H23A1, approx 1 year ago. In the first 6mths it collected 125mL of pure evil. Then i put a baffle in the can, guided by some helpful HT members. Anyway, i said i would let everyone know the outcome in another 6mths when i emptied the catch can again, which i got around to today. The result was 180mL and obviously thats not counting whats stuck inside to the surface area of the baffle, and i havent got a year to wait for the rest of that to slowly drip out. So thats another 55+ML of pure black f%&king crap it collected, i think that is a good result. So thanks to those who helped, and for those without a catch can i reckon its a good investment and definately buy one with a baffle or one you can put a baffle in.
Thread Starter
Honda-Tech Member
Joined: Jul 2007
Posts: 795
Likes: 0
From: Garage, Australia
crownsk8er: below is a pic showing my oil catch can setup. Basically, the catch can intercepts the hose that usually runs straight from the pcv valve on the top of the vc to the tb. There are a few good how to's, just do a quick search.

vlude99: my catch can is from TWE, i'm happy with it. Its lightweight, holds about 800mL, and doesnt leak. I have also heard good things about MFactory, Greddy and Moroso Cans. Doesnt matter if they dont come with a baffle you can just put in your own. I used stainless steel wool. My sure you get a can with a removable lid so its easy to put the baffle in.
bigz187: i would check your pcv valve is working properly. You should at least have oily residue on the inside of your catch can, otherwise its not hooked up correctly.
Below is a couple of pics of my completed pcv setup including my vc breather which i put on about 2 months ago.
Trending Topics
dont think there's a point to, i mean at 60$ for a MFactory one (was 40 through a GB) .. lol its asking kinda much to be any cheaper. i mean i suppose you could attach 2 lines to an old cookie jar as well and just weld the fittings in.. but thats really going off on the deep end haha
Honda-Tech Member
Joined: Feb 2007
Posts: 1,986
Likes: 0
From: Long Point Beach, ontario, canada
LOL@ cookie jar
....eh wheres all the coookies!!
....MmmmNnummmmMmmmNummmmMmmNnnumMmmmmm me cookie monster
May as well have it look good for a couple extra dollars. I'd invest upwards of 80 or 100 on a catch can. Think of what its saving you in costs of gunked up IM/ sensor ports etc.??
....eh wheres all the coookies!!
....MmmmNnummmmMmmmNummmmMmmNnnumMmmmmm me cookie monster
May as well have it look good for a couple extra dollars. I'd invest upwards of 80 or 100 on a catch can. Think of what its saving you in costs of gunked up IM/ sensor ports etc.??
Thread Starter
Honda-Tech Member
Joined: Jul 2007
Posts: 795
Likes: 0
From: Garage, Australia
I saw a pic of one on a prelude in the uk. The guy made it out of a blue aluminium drink bottle and fittings he bought from an auto shop, actually quite looked good.
B*a*n*n*e*d
Joined: Dec 2008
Posts: 46
Likes: 0
From: South Carolina
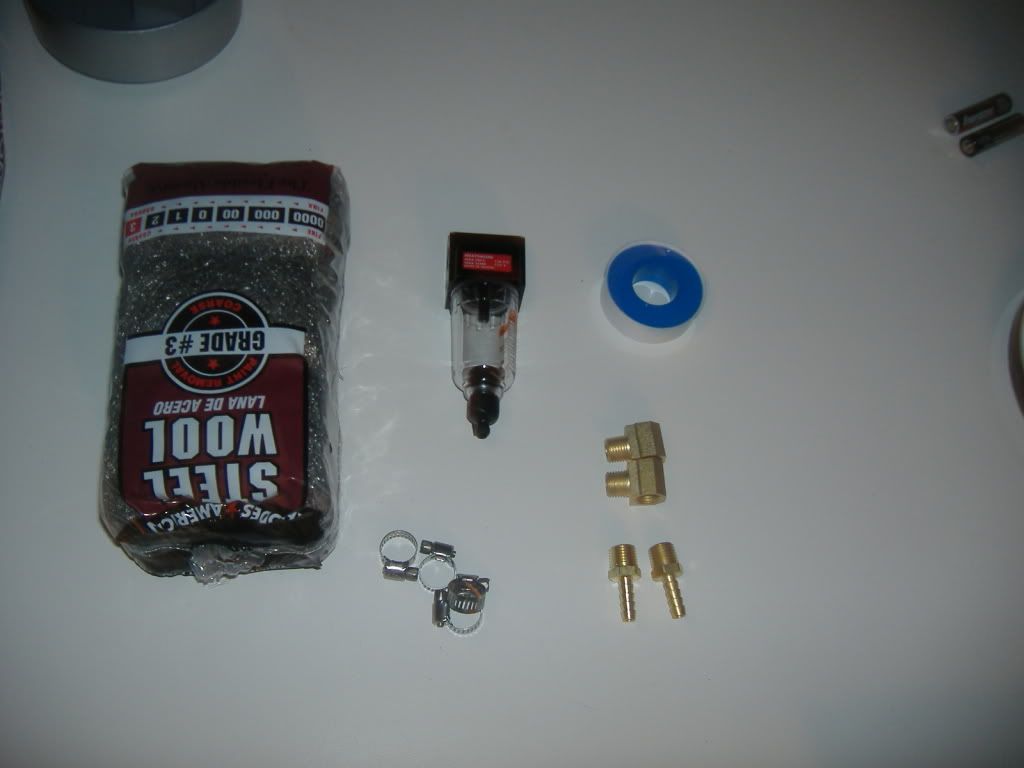
Here is a DIY to do it. I wrote this a couple months ago. If yall have any questions on it just shoot me a pm
-------------------------
I did a DIY PVC Catch Can. Its a great thing to put on. Catches the unwanted oil that manages to get into our intakes. Heres a diagram that explains it well...

You just put steel wool inside of a air/water seperator and the unwanted oil is filtered out and does not get in your intake. You have to replace the steel wool and clean out the Catch Can about once every two weeks.
Heres the materials...
1. Steel wool
2. Air/water seperator
3. (2) 1/4" male barbs
4. (2) 1/4" elbows
5. Teflon Tape
6. Hose Clamps
7. May need tubing based on where you place it
Here is the PVC Catch Can assemlbed...

Take the extra tubing if you need it and place it on the barbs of the catch can. Use the hose clamps to clamp the tubing onto the barbs. If needed use the other two clamps to clamp the tubing to the intake and the tube coming out of the valve cover. If you buy the Husky one like i did, there is a faucet like thing at the bottom. It will leak out the oil it catches like crazy. Seal it up with like JB weld or any other substance similar. And i found placing it such where the IN side is better used as the OUT side. The OUT side of the catch can has a larger opening than the IN side. Since you dont want any chance of steel wool getting into your intake and what not, its best to reverse the catch can.
Heres where i placed mine. I have an auto and placed it where the clutch reseviour would go. Will have to move it one day when i swap to manual though. I used zip ties to hold it in place...

Here is a overall shot when mounted. Looks like it was suppose to be there. Its a great DIY project and would highly recommend doing this one weekend.

Heres a pic of how much unwanted oil the Catch Can caught from going into the intake. (Not my car)...

If you have any questions on this just send me a PM and i will gladly answer any questions about this. The total cost of this project is about 25$-30$ and it is well worth it!
-------------------------
I did a DIY PVC Catch Can. Its a great thing to put on. Catches the unwanted oil that manages to get into our intakes. Heres a diagram that explains it well...
You just put steel wool inside of a air/water seperator and the unwanted oil is filtered out and does not get in your intake. You have to replace the steel wool and clean out the Catch Can about once every two weeks.
Heres the materials...
1. Steel wool
2. Air/water seperator
3. (2) 1/4" male barbs
4. (2) 1/4" elbows
5. Teflon Tape
6. Hose Clamps
7. May need tubing based on where you place it
Here is the PVC Catch Can assemlbed...
Take the extra tubing if you need it and place it on the barbs of the catch can. Use the hose clamps to clamp the tubing onto the barbs. If needed use the other two clamps to clamp the tubing to the intake and the tube coming out of the valve cover. If you buy the Husky one like i did, there is a faucet like thing at the bottom. It will leak out the oil it catches like crazy. Seal it up with like JB weld or any other substance similar. And i found placing it such where the IN side is better used as the OUT side. The OUT side of the catch can has a larger opening than the IN side. Since you dont want any chance of steel wool getting into your intake and what not, its best to reverse the catch can.
Heres where i placed mine. I have an auto and placed it where the clutch reseviour would go. Will have to move it one day when i swap to manual though. I used zip ties to hold it in place...
Here is a overall shot when mounted. Looks like it was suppose to be there. Its a great DIY project and would highly recommend doing this one weekend.
Heres a pic of how much unwanted oil the Catch Can caught from going into the intake. (Not my car)...
If you have any questions on this just send me a PM and i will gladly answer any questions about this. The total cost of this project is about 25$-30$ and it is well worth it!
Honda-Tech Member
Joined: Feb 2002
Posts: 2,072
Likes: 0
From: land of the sheep, home of the hypocrite
Thanks for the follow up! It's good to see this kind of stuff. Was it hard to find stainless steel wool? I've seen some people use those kitchen scrubbie things too.
Honda-Tech Member
Joined: Oct 2006
Posts: 113
Likes: 0
From: Austin, Tx, United States
Junior Member
Joined: Sep 2008
Posts: 76
Likes: 0
From: winnipeg, Manitoba, Canada
On second thought you wouldn't need stainless steel cause the baffle material would be coated in the oil.
Thread Starter
Honda-Tech Member
Joined: Jul 2007
Posts: 795
Likes: 0
From: Garage, Australia
The baffle will be coated in oil but you dont want any risk of rusty metal flakes making their way through the intake manifold. I wouldn't risk it. Stainless wool is cheap anyway.
B*a*n*n*e*d
Joined: Dec 2008
Posts: 46
Likes: 0
From: South Carolina
yeah. thats a good point. ive heard that the pieces will be so small that they will disenagrate once in the engine or w/e. im going w/o the steel wool in mine to see ho much it catches. catches a nice bit even w/o the steel wool

Honda-Tech Member
Joined: Aug 2005
Posts: 1,324
Likes: 0
From: Macon, GA, USA
I have the blue air water separator from Lowes. it was about 20.00, add about 10.00 for random brass fittings from auto parts store and about 5.00 for a few feet of hose . I also had to JB weld the drain at the bottom. I will post pics of it soon. There is a hole on the driver (USDM)side under where the cruise control used to be. This unit fits the hole perfectly. It really looks like it came that way. All for about 35.00. FTW
B*a*n*n*e*d
Joined: Dec 2008
Posts: 46
Likes: 0
From: South Carolina
I have the blue air water separator from Lowes. it was about 20.00, add about 10.00 for random brass fittings from auto parts store and about 5.00 for a few feet of hose . I also had to JB weld the drain at the bottom. I will post pics of it soon. There is a hole on the driver (USDM)side under where the cruise control used to be. This unit fits the hole perfectly. It really looks like it came that way. All for about 35.00. FTW
Junior Member
Joined: Feb 2009
Posts: 96
Likes: 0
From: NY


Thread
Thread Starter
Forum
Replies
Last Post
Count Blah
Honda CRX / EF Civic (1988 - 1991)
32
Aug 10, 2003 12:38 AM
air, breathers, cars, catch, diagram, h23, honda, husky, integra, oil, prelude, seporators, uphondatech, write, writeuphonda