

Kuppa's White DA build

Thread Starter
Junior Member
Joined: Feb 2008
Posts: 475
Likes: 0
From: burien, wa, usa
So i have had my car fora bit and build thread on G2ic.com and now think i should start one here
The day i bought it

the other side and after i polished it up

pulled the fender out and tinted the side windows at work "learning"

Engine bay as i bought it

This is whats really wrong with the door

The interior is in good shape

Then i replaced the door found one that matched really close


Another reason i did a new door and fender pluss it only cost $100

dont forget to tape when pulling or installing new painted panels especially when by your self
did the whole door exchange solo

All off and ready for the new stuff


Taped up for the new door


new door on much better

Fender on and now it looks like a car again

Soooooooooooooo Nice

plug wires

Old shifter bushings out ready for new ES ones


Old shifter out in with the new


all put back together

The day i bought it
the other side and after i polished it up
pulled the fender out and tinted the side windows at work "learning"
Engine bay as i bought it
This is whats really wrong with the door
The interior is in good shape
Then i replaced the door found one that matched really close
Another reason i did a new door and fender pluss it only cost $100
dont forget to tape when pulling or installing new painted panels especially when by your self
did the whole door exchange solo
All off and ready for the new stuff
Taped up for the new door
new door on much better
Fender on and now it looks like a car again
Soooooooooooooo Nice
plug wires

Old shifter bushings out ready for new ES ones


Old shifter out in with the new


all put back together

Thread Starter
Junior Member
Joined: Feb 2008
Posts: 475
Likes: 0
From: burien, wa, usa
Carbon fiber shift ****:inlove:

New exhaust came this was like a week ago

JDM side moldings

Intake i hate this one but thats what i get for buying the cheapest ebay one hahahaha
ill get a better one later

heres a before with the old moldings

the difference between the USDM and JDM

After oh yeah looks so good

well thats all the pics i got for now. im waiting for my rims and i gotta sell my tires cause i got 195-50-15 and got to upgrade to 16" for $20 cause they were out of 15" and were on back order. also im waiting for the rest of my tax money for my coilovers and camber kit. Ill get some pics of the exhaust on and just some general outside pics. I would have more form the SEattle meet but only 2 people showed up so we didnt take any pics
replace my radiator and used gate hoses new thermostat and a new rad cap also changed the earl to synthetic and new filter
new parts

old stuff before i start workin

this is why im replacing it cracked under the jb weld

Rad out kinda a pain

old and the new

new therm in and rear hose on

rad in hoses on and checking everything all done

Gratuitous engine shot

New exhaust came this was like a week ago
JDM side moldings
Intake i hate this one but thats what i get for buying the cheapest ebay one hahahaha
ill get a better one later
heres a before with the old moldings
the difference between the USDM and JDM
After oh yeah looks so good
well thats all the pics i got for now. im waiting for my rims and i gotta sell my tires cause i got 195-50-15 and got to upgrade to 16" for $20 cause they were out of 15" and were on back order. also im waiting for the rest of my tax money for my coilovers and camber kit. Ill get some pics of the exhaust on and just some general outside pics. I would have more form the SEattle meet but only 2 people showed up so we didnt take any pics
replace my radiator and used gate hoses new thermostat and a new rad cap also changed the earl to synthetic and new filter
new parts
old stuff before i start workin
this is why im replacing it cracked under the jb weld
Rad out kinda a pain
old and the new
new therm in and rear hose on
rad in hoses on and checking everything all done
Gratuitous engine shot
Thread Starter
Junior Member
Joined: Feb 2008
Posts: 475
Likes: 0
From: burien, wa, usa
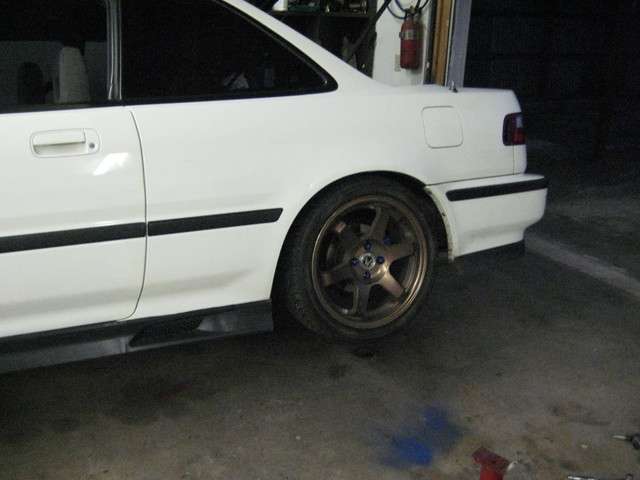
so I lowered my car tonight I put on cheap ebay coil over sleeves untill i get Yonaka full coilovers. I also put in bosche platinum iridium plugs and got my new rims from UPS here are some pice of it all
here are the rims i love em think they will look bad *** on my DA


I coulnt help but take a rim on the car pic evan with out tires

and this is down 2" doesn't seem like much but it's 2 " looks way better no more 4X4 look

Here are some more pics to show how low it and just how much better it looks slammed


here is one to show how much clearance this exhaust has much better than the other Tsudo style


This last one is the almost non existant wheel gap

my tires came in and maybe now i can put on my rims i can get a mount and balance for $40 but i may be alittle to close to strapped hopefully not

so here is a little before and after at this stage of where im at not a whole lot but still good to me
BEFORE
AFTER
Here are some more parts i got in recently they are a msd pro cap, blaster ss coil and DC forks. Also a have some ES poly motor mount inserts


here are the rims i love em think they will look bad *** on my DA
I coulnt help but take a rim on the car pic evan with out tires
and this is down 2" doesn't seem like much but it's 2 " looks way better no more 4X4 look
Here are some more pics to show how low it and just how much better it looks slammed
here is one to show how much clearance this exhaust has much better than the other Tsudo style
This last one is the almost non existant wheel gap
my tires came in and maybe now i can put on my rims i can get a mount and balance for $40 but i may be alittle to close to strapped hopefully not
so here is a little before and after at this stage of where im at not a whole lot but still good to me
BEFORE
AFTER
Here are some more parts i got in recently they are a msd pro cap, blaster ss coil and DC forks. Also a have some ES poly motor mount inserts
Thread Starter
Junior Member
Joined: Feb 2008
Posts: 475
Likes: 0
From: burien, wa, usa
so last night iput on my MSD stuff
here im about to take out the coil and checking thins over

coil out and cutting the wiresto rewire

got the ����� wired up

����� all tightened up

Blaster ss mounted and wired up ready to cut the coil wire to selected length

all put together and every thing works

and one more for fun yeah 3 wheel or well two in a DA
lol

So I was hoping to have my rims back but they have been too busy at Acura so hopefully i will get them soon. I think im gonna just take some all around pics and some more before and after hope you guys are still watching
so which center cap do you guys think i should use I really like this one its kinda old school
1

the other two are ok this ones my second fav
2


so i finally got my rims from my Acura tech buddy they were hella busy man it was worth the wai the look so sick:vomit: :D :cloud9: so here yeah go


here im about to take out the coil and checking thins over
coil out and cutting the wiresto rewire
got the ����� wired up
����� all tightened up
Blaster ss mounted and wired up ready to cut the coil wire to selected length
all put together and every thing works
and one more for fun yeah 3 wheel or well two in a DA
lol
So I was hoping to have my rims back but they have been too busy at Acura so hopefully i will get them soon. I think im gonna just take some all around pics and some more before and after hope you guys are still watching
so which center cap do you guys think i should use I really like this one its kinda old school
1
the other two are ok this ones my second fav
2
so i finally got my rims from my Acura tech buddy they were hella busy man it was worth the wai the look so sick:vomit: :D
:cloud9: so here yeah go
Thread Starter
Junior Member
Joined: Feb 2008
Posts: 475
Likes: 0
From: burien, wa, usa
last night i took out my IAC valve and cleaned it and took some outside pics in the day and a new engine pic


I used both of these to clean out my IAC

where you want to spray to clean


I used both of these to clean out my IAC
where you want to spray to clean
Thread Starter
Junior Member
Joined: Feb 2008
Posts: 475
Likes: 0
From: burien, wa, usa
just got some fog covers today thanks redda9 probably gonna put them in tonight not sure yet though

Rewired my fogs and put in the yellow cover
<FONT SIZE=""2"">BEFORE</FONT>

<FONT SIZE=""2"">AFTER</FONT>

so after replacing the tps sensor my hesitation seemed to get a little worse. I think im gonna have one of the acura techs i know take a look at it sick of running down the list and replacing stuff. So i got a couple of new parts a blox test pipe and new intake that actually fits and go's where its supposed to.
new test pipe

OLD CAT

INSTALLED

OLD INTAKE

NEW INTAKE
 much better
Rewired my fogs and put in the yellow cover
<FONT SIZE=""2"">BEFORE</FONT>
<FONT SIZE=""2"">AFTER</FONT>
so after replacing the tps sensor my hesitation seemed to get a little worse. I think im gonna have one of the acura techs i know take a look at it sick of running down the list and replacing stuff. So i got a couple of new parts a blox test pipe and new intake that actually fits and go's where its supposed to.
new test pipe
OLD CAT
INSTALLED
OLD INTAKE
NEW INTAKE
much better
Thread Starter
Junior Member
Joined: Feb 2008
Posts: 475
Likes: 0
From: burien, wa, usa
got these on the way cant wait and then coilovers after i get my stimulous check


<FONT SIZE=""5"">LIVIN THE G2 LIFE</FONT>

So i got the sway bar today man it is gybungis

Here is the stock one in its place about to get ripped out

the difference between the two is insane

now its out and exhaust is out of the way

all out and had to remove this bracket tried to remount but said f@ck it

transfered bushings into new bar

drilled two pilot holes

all holes drilled and sized washers to spread the load

made an access hole to get in behind the sway bar mounts in the sub frame

used double backed foan tape so i could get up into subframe

holds the nut like this

reach up in the subframe

now i can mount the d brackets

all together looks good ill see how it handles tomorrow

more washers to space and spread the load

just to show the before
AFTER
<FONT SIZE=""5"">LIVIN THE G2 LIFE</FONT>
So i got the sway bar today man it is gybungis
Here is the stock one in its place about to get ripped out
the difference between the two is insane
now its out and exhaust is out of the way
all out and had to remove this bracket tried to remount but said f@ck it
transfered bushings into new bar
drilled two pilot holes
all holes drilled and sized washers to spread the load
made an access hole to get in behind the sway bar mounts in the sub frame
used double backed foan tape so i could get up into subframe
holds the nut like this
reach up in the subframe
now i can mount the d brackets
all together looks good ill see how it handles tomorrow
more washers to space and spread the load
just to show the before
AFTER
Trending Topics
Thread Starter
Junior Member
Joined: Feb 2008
Posts: 475
Likes: 0
From: burien, wa, usa
So i got in a little fender bendera month ago or so. Now i decided to take off my rear filler panel and shave the key hole along with replacing my front fender

so here is the rust around the key hole i did sand it a bit

now to cut it out


made a templet for patch panel

patch panel ready to size up and fit in

heres the piece i made the patch panel out of

almost fits just a little bit more grindingdo some more at work

got more work done yesterday and today on my filler panel. Got the patch fited in then welded up ground it down and started with filler. After all the filler was done decided to take care of some more little dents and did more filler. Then after 4 coats of primer i found out i used the wrong primer it never dryed and set up DAMN:worry: but it was all good fixed it. Got some more of the right primer on and then sanded it out now i got a new fender again and that to shoot with color. Here are some pics of the work


Got it painted today now just gotta let it dry a bit wet sand buff it out and fit to the car. Here are the parts all sprayed up

rear with no key hole

Pic of filler on

and fender

so here is the rust around the key hole i did sand it a bit
now to cut it out
made a templet for patch panel
patch panel ready to size up and fit in
heres the piece i made the patch panel out of
almost fits just a little bit more grindingdo some more at work
got more work done yesterday and today on my filler panel. Got the patch fited in then welded up ground it down and started with filler. After all the filler was done decided to take care of some more little dents and did more filler. Then after 4 coats of primer i found out i used the wrong primer it never dryed and set up DAMN:worry:
but it was all good fixed it. Got some more of the right primer on and then sanded it out now i got a new fender again and that to shoot with color. Here are some pics of the workGot it painted today now just gotta let it dry a bit wet sand buff it out and fit to the car. Here are the parts all sprayed up
rear with no key hole
Pic of filler on
and fender
Thread Starter
Junior Member
Joined: Feb 2008
Posts: 475
Likes: 0
From: burien, wa, usa
just a little before and after
BEFORE

AFTER
Alright so her we go with the light install
before

take screws and bolts out


side marker mount out

need a long extension to reach the saftey bolt

took almost all the extensions i have

dont forget this bolt

All out

fog housing i want to put my fog covers in hope they fit

nope dont fit but they will drill 2 holes in front of the screws

Now with the bulb holder out i can grind the hole more round i used a bur bit at slow speed like 50psi

Now the cover fits in nice

put it back together all fits good sweet

how it looks fron the outside

covered the hols i drilled with 3M paint protection for a good water proof seal

one in one to go

damn they look so good

Next

one of the reasons i replaced the lights

all you need for these lights to use the fog covers is the glass none of the other stuff

ah so much better

another shot

Now for the
BEFORE
AFTER
BEFORE
AFTER
Alright so her we go with the light install
before
take screws and bolts out
side marker mount out
need a long extension to reach the saftey bolt
took almost all the extensions i have
dont forget this bolt
All out
fog housing i want to put my fog covers in hope they fit
nope dont fit but they will drill 2 holes in front of the screws
Now with the bulb holder out i can grind the hole more round i used a bur bit at slow speed like 50psi
Now the cover fits in nice
put it back together all fits good sweet
how it looks fron the outside
covered the hols i drilled with 3M paint protection for a good water proof seal
one in one to go
damn they look so good
Next
one of the reasons i replaced the lights
all you need for these lights to use the fog covers is the glass none of the other stuff
ah so much better
another shot
Now for the
BEFORE
AFTER
Thread Starter
Junior Member
Joined: Feb 2008
Posts: 475
Likes: 0
From: burien, wa, usa
just a couple of more pics

this one was at work

So yesterday I did a rear wiper delete looks really good and today i did a 9004 to 9007 mod better lighting and i also fixed one side of windshield molding. Plus I removed the little bulb covers in my turn signals and repainted my side mirror mounts all and all a good day just making sure my car looks good for thet meet in canada. The crappy thing is i cracked my pass mirror maybe i can find one before i go.
Here are pics of wiper delete


Did some mre work last night getting it all nice and perty for the meet in Canada. So i have had these 96-99 civic 4 door side skirts and have wanted to put them on something so i did. Had to do some cutting and shaving to make them fit but got em on. Then after that i decided to make a front lip to go with the sides so i could keep them on here are the pics this is after i was done


 ]
]
So yesterday I did a rear wiper delete looks really good and today i did a 9004 to 9007 mod better lighting and i also fixed one side of windshield molding. Plus I removed the little bulb covers in my turn signals and repainted my side mirror mounts all and all a good day just making sure my car looks good for thet meet in canada. The crappy thing is i cracked my pass mirror maybe i can find one before i go.
Here are pics of wiper delete
last night i finished up painting my calipers and took off my muffler cleaned and polished it. today im just gonna vacuum it our wipe it down before the 604/WA meet im getting pretty stoked
Fronts before gotta scrub em down with a wire brush and solvent

after they were clean layed down 3 coats of caliper paint by duplicolor

I took of the mount bracket so i could get good coverage

The fronts must be newer cause they were cleaner than the back and not at all rusty

taped off what i didnt need to paint and took off the same bracket

And the front dry and back together

both done and on

now with the whell on

I also put in 2 amps and new mids and my sub the other amp isnt in this pic didnt have it in yet

this one was at work
So yesterday I did a rear wiper delete looks really good and today i did a 9004 to 9007 mod better lighting and i also fixed one side of windshield molding. Plus I removed the little bulb covers in my turn signals and repainted my side mirror mounts all and all a good day just making sure my car looks good for thet meet in canada. The crappy thing is i cracked my pass mirror maybe i can find one before i go.
Here are pics of wiper delete
Did some mre work last night getting it all nice and perty for the meet in Canada. So i have had these 96-99 civic 4 door side skirts and have wanted to put them on something so i did. Had to do some cutting and shaving to make them fit but got em on. Then after that i decided to make a front lip to go with the sides so i could keep them on here are the pics this is after i was done
]So yesterday I did a rear wiper delete looks really good and today i did a 9004 to 9007 mod better lighting and i also fixed one side of windshield molding. Plus I removed the little bulb covers in my turn signals and repainted my side mirror mounts all and all a good day just making sure my car looks good for thet meet in canada. The crappy thing is i cracked my pass mirror maybe i can find one before i go.
Here are pics of wiper delete
last night i finished up painting my calipers and took off my muffler cleaned and polished it. today im just gonna vacuum it our wipe it down before the 604/WA meet im getting pretty stoked
Fronts before gotta scrub em down with a wire brush and solvent
after they were clean layed down 3 coats of caliper paint by duplicolor
I took of the mount bracket so i could get good coverage
The fronts must be newer cause they were cleaner than the back and not at all rusty
taped off what i didnt need to paint and took off the same bracket
And the front dry and back together
both done and on
now with the whell on
I also put in 2 amps and new mids and my sub the other amp isnt in this pic didnt have it in yet
Thread Starter
Junior Member
Joined: Feb 2008
Posts: 475
Likes: 0
From: burien, wa, usa
Did a little shoot of my car before i go to canada on how it is now another before shot

and now


the sexy photos


[IMG]http://i108.photobucket.com/albums/n24/Stevo_025/604meetCan026.jpg
So they finally came the first look they look like good quality man im i soo glad they're finally here. I also got a hat and shirt cool but not worth the wait for a hat and shirt but im happy now. here are the pics of what i got


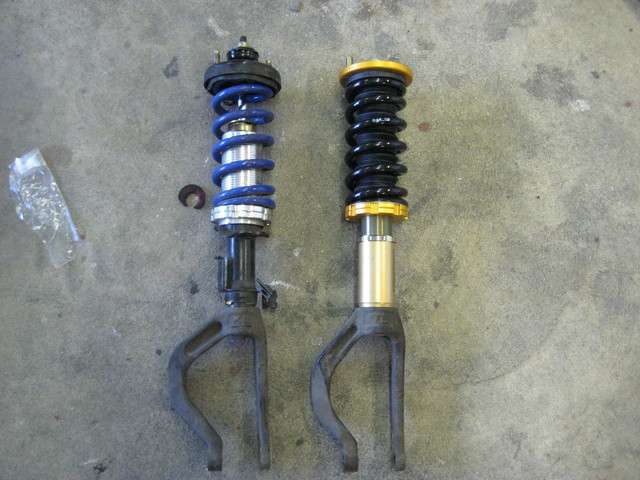
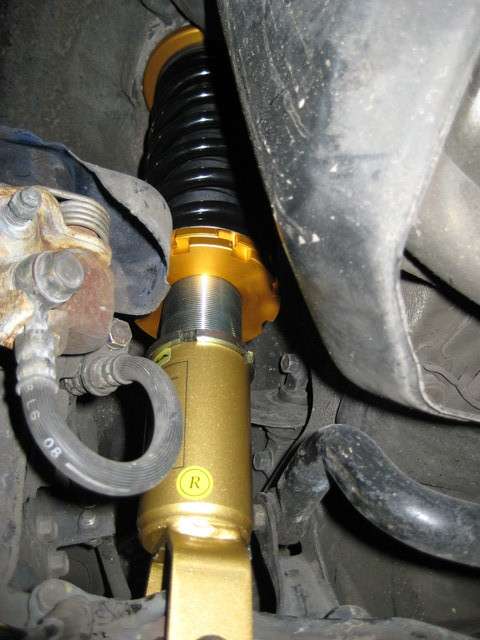
So i got them in I did have to do a little modification but i kinda expected that since there For EG/DC. The only gripe i have right know is the front is all the way down. I took out all the preload and lowered the perches almost all the way down to get my car where i wanted. The back could go down alot more but dont need to. I also went for a test drive and loved them it felt firm but still smooth and pretty comfortable. You can feel the road but its not like really harsh it feel nice I havent really thrown it through some corners yet but what i have felt very good. The spring rates and valving are matched perfect i was a little wierded out when i read that they were 12k front and 6k rear. But like i said they felt well balanced
I also have been hearing a loosness or clunking in the front for a few days and found this when i took off my wheel
the bolts came out of the sliders on the caliper i didnt tighten up good enough


now for the install
old and new
had to grind clearence for the axles so they dont rub and it worked great no rubbing at all
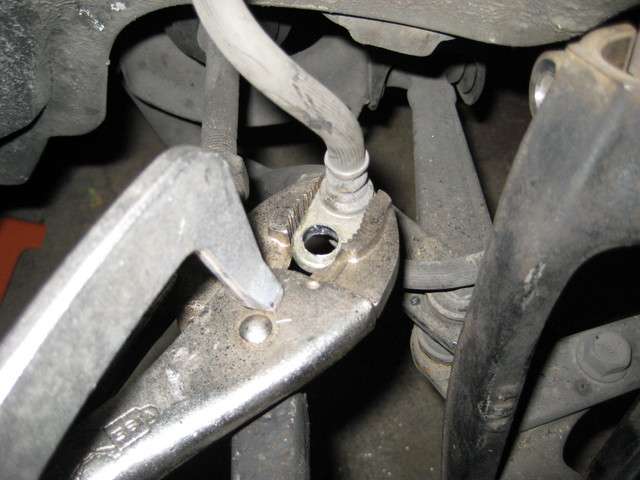
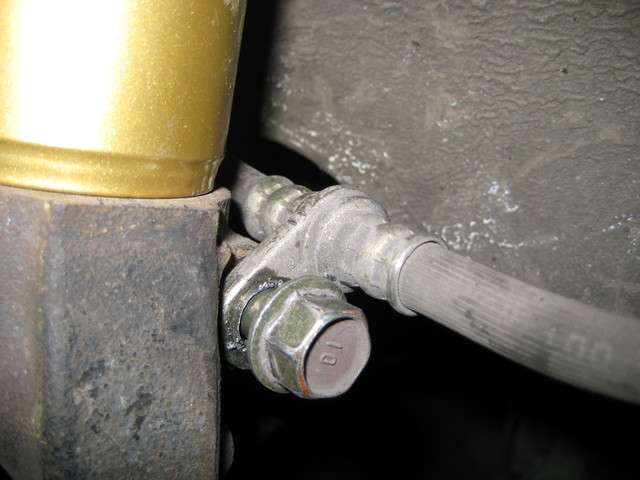
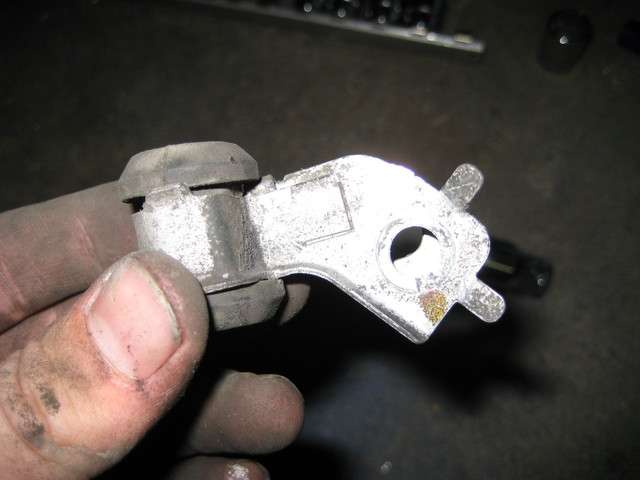
Also no brak line brakets so i drille this out to mount it on the fork bolt

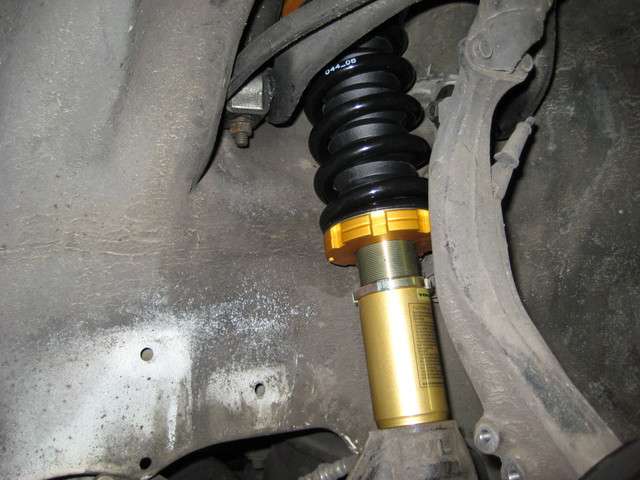
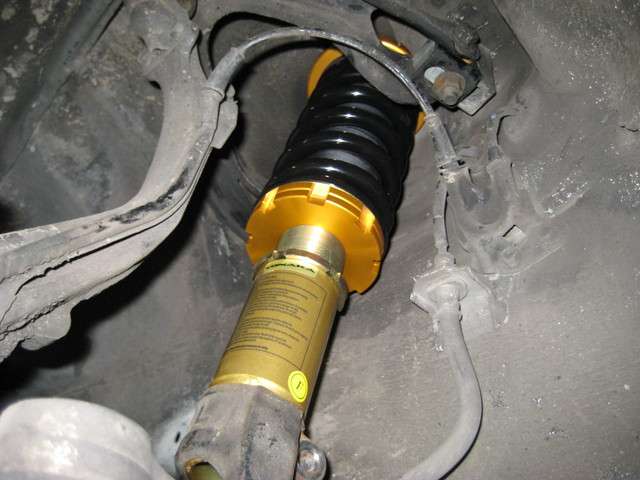
took off this one dont need it anymore
back is in
this is how far the back goes down now when its in the air
and all done with this side on to the other one

here are some pice of me and my car at the Honda-Tech meet
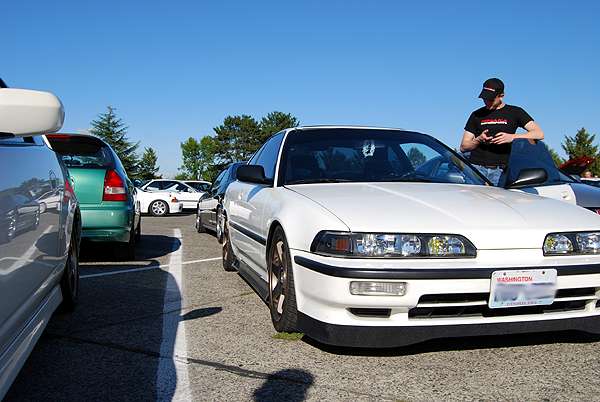
and one of me and the kids in the crowd

and now
the sexy photos
[IMG]http://i108.photobucket.com/albums/n24/Stevo_025/604meetCan026.jpg
So they finally came the first look they look like good quality man im i soo glad they're finally here. I also got a hat and shirt cool but not worth the wait for a hat and shirt but im happy now. here are the pics of what i got
So i got them in I did have to do a little modification but i kinda expected that since there For EG/DC. The only gripe i have right know is the front is all the way down. I took out all the preload and lowered the perches almost all the way down to get my car where i wanted. The back could go down alot more but dont need to. I also went for a test drive and loved them it felt firm but still smooth and pretty comfortable. You can feel the road but its not like really harsh it feel nice I havent really thrown it through some corners yet but what i have felt very good. The spring rates and valving are matched perfect i was a little wierded out when i read that they were 12k front and 6k rear. But like i said they felt well balanced
I also have been hearing a loosness or clunking in the front for a few days and found this when i took off my wheel
the bolts came out of the sliders on the caliper i didnt tighten up good enough
now for the install
old and new
had to grind clearence for the axles so they dont rub and it worked great no rubbing at all
Also no brak line brakets so i drille this out to mount it on the fork bolt
took off this one dont need it anymore
back is in
this is how far the back goes down now when its in the air
and all done with this side on to the other one
here are some pice of me and my car at the Honda-Tech meet
and one of me and the kids in the crowd
Lookin much better than when you got it 
Not too crazy about the headlights, but to each his own. I'm diggin the wheels and coil over though.
Not too crazy about the headlights, but to each his own. I'm diggin the wheels and coil over though.
Honda-Tech Member
Joined: Apr 2008
Posts: 8,958
Likes: 0
From: In The Sticks, PA, America
awesome job so far man. only 2 things i dont like....not big on the side skirts, and DEF. change your plugs....bosche is the worst thing to run in honda engines!! go get yourself some good ngk plugs. your motor will love you for it. my friend and i have bought so many hondas that came with bosche plugs and idled rough when we got them, changed to ngk's right away, and purred like a kitten. just some advice for you. other than that, keep up the good work
Honda-Tech Member
Joined: Apr 2008
Posts: 8,958
Likes: 0
From: In The Sticks, PA, America
E3 plugs....i have not tried them...not sure what they are. i was however thinking about trying those pulsestar plugs (i think thats the name). heard they are supposed to really good but they aren't cheap. supposed to add like 15 hp or something like that if i recall correctly. i'd like to get some actual evidence of that though.

Thread Starter
Junior Member
Joined: Feb 2008
Posts: 475
Likes: 0
From: burien, wa, usa
so i got a b18/b20 valve cover the other day from a Crunk and got started. I had to get some more of the black off and used a scotchbrite disc to prep the rest. Also i removed the honda motor emblem and am going with the brushed look on the top.

say buy buy

how the brushed look looks

all gone no more letters


all preped and ready for primer

say buy buy
how the brushed look looks
all gone no more letters
all preped and ready for primer