

Installing Special projects MS Trailing arm sphericals! (Here's how)

Thread Starter
Honda-Tech Member
Joined: Aug 2001
Posts: 4,596
Likes: 0
From: Between Willow, and Button Willow, CA, USA
I've been meaning to post this for awhile.
Here's a quick and easy install guide to follow for the Special Projects Motorsports Trailing arm spherical bearing kit!
Let me start off by saying this is a very nice upgrade, and an excellently designed kit! Everything will go very smooth during the install if you follow this guide.
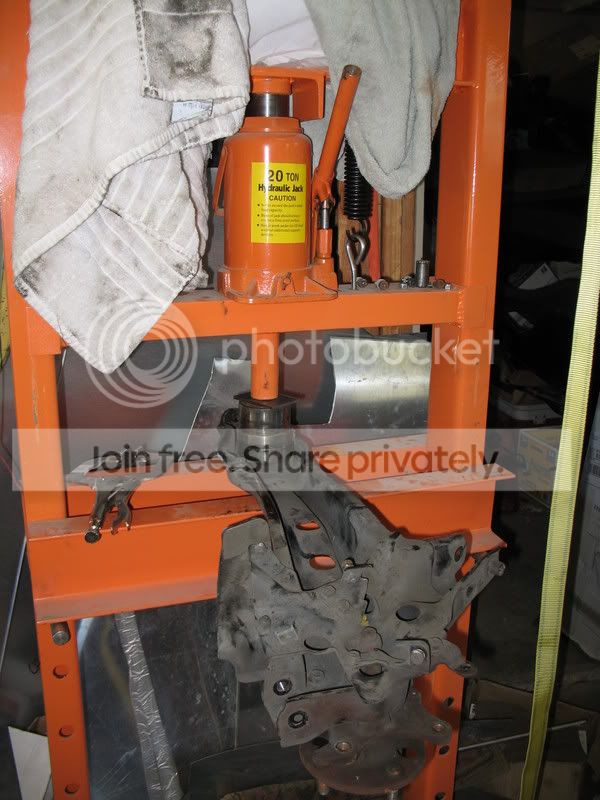
First thing to do is get the trailing arms off the car. That should be pretty self explanatory!
Once off the car, press the stock bushing out from this side!
Then put it in the press and press it out.
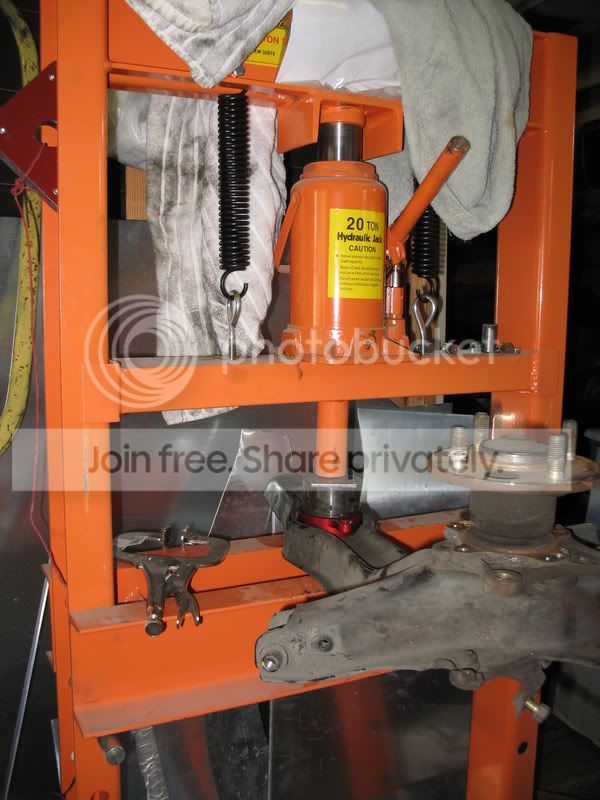
Once it's out, clean up the hole with a little emory cloth, and then press the new one in from the outside of the trailing arm like this!
Make sure that you don't start to press in the new part at an angle. It will mess things up! Just make sure it's straight.
Now they are both in, so you can take your 1/4" drill bit and drill the holes through the two spots.
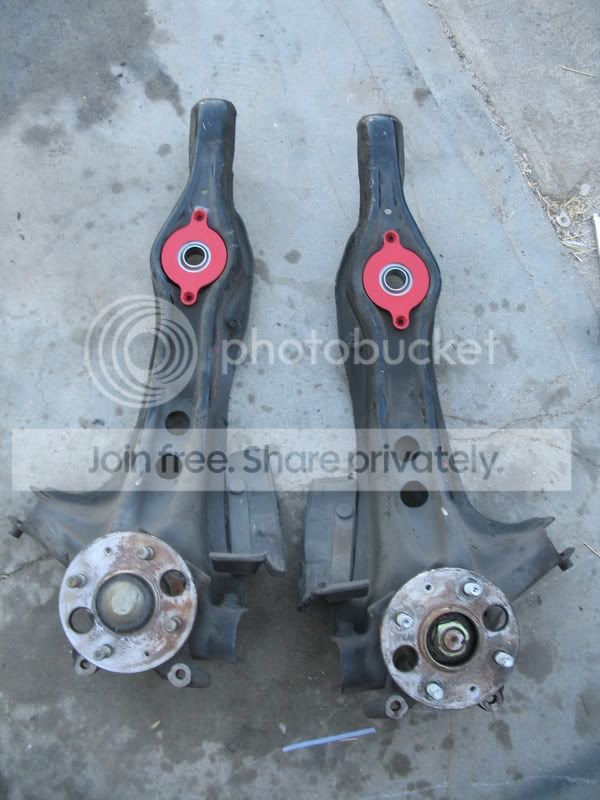
Put the supplied bolts through the hole and tighten down the lock nut!
Now, just use some of the grease that came in the kit on the sliding brass bushing and slide it in!

Now get them back on the car and enjoy the improved feel on turn-in!
Special thanks to Kiwi at Special Projects motorsports.
I should mention that I'm not a representative of SPMS, nor am I trying to advertise!
This is just a friendly post to let all you other HT'ers out there know how easy it is to install this awesome product!
The new kit is even easier to put in with no press or drill required! I'll put up a how to on those when I install a set in the next coming month.
If you guys/gals want to pick a set up, just get a-hold of Kiwi! He runs SPMS!
http://www.specialprojectsms.com
Here's a quick and easy install guide to follow for the Special Projects Motorsports Trailing arm spherical bearing kit!
Let me start off by saying this is a very nice upgrade, and an excellently designed kit! Everything will go very smooth during the install if you follow this guide.
First thing to do is get the trailing arms off the car. That should be pretty self explanatory!
Once off the car, press the stock bushing out from this side!
Then put it in the press and press it out.
Once it's out, clean up the hole with a little emory cloth, and then press the new one in from the outside of the trailing arm like this!
Make sure that you don't start to press in the new part at an angle. It will mess things up! Just make sure it's straight.
Now they are both in, so you can take your 1/4" drill bit and drill the holes through the two spots.
Put the supplied bolts through the hole and tighten down the lock nut!
Now, just use some of the grease that came in the kit on the sliding brass bushing and slide it in!
Now get them back on the car and enjoy the improved feel on turn-in!
Special thanks to Kiwi at Special Projects motorsports.
I should mention that I'm not a representative of SPMS, nor am I trying to advertise!
This is just a friendly post to let all you other HT'ers out there know how easy it is to install this awesome product!
The new kit is even easier to put in with no press or drill required! I'll put up a how to on those when I install a set in the next coming month.
If you guys/gals want to pick a set up, just get a-hold of Kiwi! He runs SPMS!
http://www.specialprojectsms.com
Honda-Tech Member
Joined: Sep 2002
Posts: 12,758
Likes: 0
From: Orange County, CA, USA
Iv been meanin to get the new redesigned PCI rta bushings for a while now but never got around to doing it. Brian makes some great quality stuff. 
Honda-Tech Member
Joined: Aug 2003
Posts: 1,014
Likes: 0
From: 8 blocks from George Bush, DC
Jeremy, I recently installed the redesigned PCI bushing and o\like you said, it's so much easier that the older ones that you show the installation for.
No need for a press, no need to remove trailing arm, and no drilling. It's pretty much plug and play. Basically, it's:
1) remove wheel
2) remove toe link to allow the trailing arm to droop
3) a BFH to the side of the bushing and it'll pop out
4) bolt in the PCI bushing (no drilling needed!)
5) reinstall toe link
5) mount the wheel and torque it down.
Modified by Another Drew at 10:19 AM 8/3/2008
Honda-Tech Member
Joined: Feb 2002
Posts: 1,642
Likes: 0
From: Orange, CALIFORNIA, USA
Thanks for the great step by step install Jeremy.
As Drew said, The new redesigned PCi Spherical Trailing Arm Bearings are even easier to install. No press required, no drilling, no need to remove the Trailing arm!
Thanks to Brian - PCI.
They say that imitation is the sincerest form of flattery-
As with all things in this industry, It did not take long after the introduction and huge success of the PCi product for another manufacturer to produce an "EXACT Copy" of the PCI Bearings
However thanks to Brian's ongoing determination to produce the best quality, and best engineered products, we were able to redesign the PCi Bearings to eliminate much of the hard work previously required to install these parts.
The new design works exactly the same as before, but with a fraction of the installation time required.
At this time <U>Genuine PCI Trailing Arm Bearings </U>are only available from -
PCI, Special Projects Motor Sports and Password JDM
Beware of imitations-
Kiwi
Honda-Tech Member
Joined: Nov 2002
Posts: 9,131
Likes: 1
From: Tampa
I know this is a little OT, but when I put in my mugen trailing arm bushings one of the old bushings was almost seized in there and it took alot of effort to get it out. The bushing extractor actually unfolded the trailing arm a bit. Merely cosmetic but something for the people using the TA bushing extractor to be careful of.
Trending Topics
Solbros Owns Me
Joined: Jun 2002
Posts: 14,462
Likes: 6
From: Vancouver, WA, USA

Honda-Tech Member
Joined: Dec 2003
Posts: 353
Likes: 0
<TABLE WIDTH="90%" CELLSPACING=0 CELLPADDING=0 ALIGN=CENTER><TR><TD>Quote, originally posted by KIWI »</TD></TR><TR><TD CLASS="quote">[QUOTE=Evs-One]this is how you get RTA's out /QUOTE]
 Exactly!
Kiwi</TD></TR></TABLE>
I didnt think they came out that way, thought you had to knock/press them out from the inside
/QUOTE] Exactly! Kiwi</TD></TR></TABLE>
I didnt think they came out that way, thought you had to knock/press them out from the inside
Solbros Owns Me
Joined: Jun 2002
Posts: 14,462
Likes: 6
From: Vancouver, WA, USA
<TABLE WIDTH="90%" CELLSPACING=0 CELLPADDING=0 ALIGN=CENTER><TR><TD>Quote, originally posted by Weel »</TD></TR><TR><TD CLASS="quote">
I didnt think they came out that way, thought you had to knock/press them out from the inside</TD></TR></TABLE>
I've done trailers on at least 50-60 cars....they go out either way- but going from the outside is how you are supposed to drive them. The bolt mount is shorter on the outside than the inside
Honda-Tech Member
Joined: Nov 2007
Posts: 1,312
Likes: 0
From: Lake Elsinore, CA, USA
The TA arm pocket is tapered(for a reason), you can/should only remove and install the direction Jeremy did. I got mine out with a sledge like the video clip, but from the back side.
The TA arm is tapered this way because if it were not the bushing would press itself out when the car corners and loads the bushing. Being tapered the way it is actually presses itself into the smaller portion of the cone.
Modified by JW racing at 9:00 AM 8/4/2008
The TA arm is tapered this way because if it were not the bushing would press itself out when the car corners and loads the bushing. Being tapered the way it is actually presses itself into the smaller portion of the cone.
Modified by JW racing at 9:00 AM 8/4/2008
Honda-Tech Member
Joined: Jun 2003
Posts: 197
Likes: 0
From: Chesapeake, VA
<TABLE WIDTH="90%" CELLSPACING=0 CELLPADDING=0 ALIGN=CENTER><TR><TD>Quote, originally posted by Evs-One »</TD></TR><TR><TD CLASS="quote">Then why would the Honda Special Tool be designed to press from the outside?? That's how Honda's Tech Line designed it, that's how I'll use it </TD></TR></TABLE>
Since when does any manufacturer's Tech/support know everything. Ask Nissan how they're "Special Nissan Battery tester/charger" that you are technically required to use, works when doing an ecm reprogram. Just don't ask how many ecm's have burned up due to a voltage drop during the reprogram because the charger can't keep up.
Back on topic these Bushings are money, had them out on track for the first time this past weekend. Must say i've never felt the rear end feel that planted under braking and turn in. Awesome To Jeff, all the guys at SPMS, and PCI.
</TD></TR></TABLE>Since when does any manufacturer's Tech/support know everything. Ask Nissan how they're "Special Nissan Battery tester/charger" that you are technically required to use, works when doing an ecm reprogram. Just don't ask how many ecm's have burned up due to a voltage drop during the reprogram because the charger can't keep up.
Back on topic these Bushings are money, had them out on track for the first time this past weekend. Must say i've never felt the rear end feel that planted under braking and turn in. Awesome
To Jeff, all the guys at SPMS, and PCI.
Solbros Owns Me
Joined: Jun 2002
Posts: 14,462
Likes: 6
From: Vancouver, WA, USA
<TABLE WIDTH="90%" CELLSPACING=0 CELLPADDING=0 ALIGN=CENTER><TR><TD>Quote, originally posted by JW racing »</TD></TR><TR><TD CLASS="quote">Measure the outside of the bushing pocket, then measure the inside and tell me the diameters.</TD></TR></TABLE>
Of course it tapers in, how else will it securely hold the RTB?
Are you aware that the OEM bushing is slightly tapered as well??
I still do what Honda says
Of course it tapers in, how else will it securely hold the RTB?
Are you aware that the OEM bushing is slightly tapered as well??
I still do what Honda says
Solbros Owns Me
Joined: Jun 2002
Posts: 14,462
Likes: 6
From: Vancouver, WA, USA
<TABLE WIDTH="90%" CELLSPACING=0 CELLPADDING=0 ALIGN=CENTER><TR><TD>Quote, originally posted by Justin3 »</TD></TR><TR><TD CLASS="quote">
Since when does any manufacturer's Tech/support know everything. Ask Nissan how they're "Special Nissan Battery tester/charger" that you are technically required to use, works when doing an ecm reprogram. Just don't ask how many ecm's have burned up due to a voltage drop during the reprogram because the charger can't keep up. </TD></TR></TABLE>
once you mentioned Nissan, it lost all clout
I'm not saying they know everything- but I am saying that the repair procedure originally laid out by Honda, has been used by me MANY MANY times over the years with no ill side effects.
Since when does any manufacturer's Tech/support know everything. Ask Nissan how they're "Special Nissan Battery tester/charger" that you are technically required to use, works when doing an ecm reprogram. Just don't ask how many ecm's have burned up due to a voltage drop during the reprogram because the charger can't keep up.
</TD></TR></TABLE>once you mentioned Nissan, it lost all clout
I'm not saying they know everything- but I am saying that the repair procedure originally laid out by Honda, has been used by me MANY MANY times over the years with no ill side effects.
Solbros Owns Me
Joined: Jun 2002
Posts: 14,462
Likes: 6
From: Vancouver, WA, USA
<TABLE WIDTH="90%" CELLSPACING=0 CELLPADDING=0 ALIGN=CENTER><TR><TD>Quote, originally posted by KOALA YUMMIES »</TD></TR><TR><TD CLASS="quote">
Whats the thing he put over the bushing to knock it out the last few taps?</TD></TR></TABLE>
that's me and my homemade RTAB driver
Used the bushing tool from the extractor kit, and welded on a handle. When I was working at the dealerships, it wasn't rare to do a few sets a day
Whats the thing he put over the bushing to knock it out the last few taps?</TD></TR></TABLE>
that's me and my homemade RTAB driver
Used the bushing tool from the extractor kit, and welded on a handle. When I was working at the dealerships, it wasn't rare to do a few sets a day

Honda-Tech Member
Joined: Aug 2004
Posts: 1,026
Likes: 0
From: 161822, ca, L.A.
<TABLE WIDTH="90%" CELLSPACING=0 CELLPADDING=0 ALIGN=CENTER><TR><TD>Quote, originally posted by Evs-One »</TD></TR><TR><TD CLASS="quote">Then why would the Honda Special Tool be designed to press from the outside?? That's how Honda's Tech Line designed it, that's how I'll use it </TD></TR></TABLE>
The trailing arm pocket is tapered, but it is designed to be pressed in the way you are refferring too. In the service bulletin on replacing these it says that says that the bushings are designed to be pressed in from the outside and doing otherwise will damage the trailing arm. Just because you can do it doesnt make it right.
</TD></TR></TABLE>The trailing arm pocket is tapered, but it is designed to be pressed in the way you are refferring too. In the service bulletin on replacing these it says that says that the bushings are designed to be pressed in from the outside and doing otherwise will damage the trailing arm. Just because you can do it doesnt make it right.
Honda-Tech Member
Joined: Jan 2004
Posts: 2,350
Likes: 1
From: Cerritos, CA, USA
<TABLE WIDTH="90%" CELLSPACING=0 CELLPADDING=0 ALIGN=CENTER><TR><TD>Quote, originally posted by The sweed »</TD></TR><TR><TD CLASS="quote">Does the trailing arm have the ability to move so you still get toe in under brakeing?</TD></TR></TABLE>
No, the PCI resists fore-aft motion and there is no longer any toe-in under braking - at least not from TAB deflection.
No, the PCI resists fore-aft motion and there is no longer any toe-in under braking - at least not from TAB deflection.
Junior Member
Joined: May 2004
Posts: 163
Likes: 0
From: Irvine Ca.
[QUOTE=Evs-One]this is how you get RTA's out
http://s263.photobucket.com/al...8.flv[/QUOT]
OMG!! I can't believe you got the bushing out in that direction. It takes a few very light hits going in the opposite direction, the bushings are tapered and should not be removed in this direction. Its possible to slightly bend the TA arm if removing in the way showed in the video because of the amount of force required to removed in this direction. I have built a fixture for the TA's and noticed that they can easily be bent.
I'm sure the mechanic knows what he's doing, But I wouldn't recommend this
method.
Brian, PCI
Honda-Tech Member
Joined: May 2003
Posts: 1,915
Likes: 0
From: www.SavOnTrafficSchool.com, usa
Its not his car so the mechanic doesnt care if the arm gets bent or whatnot.
Edo
<TABLE WIDTH="90%" CELLSPACING=0 CELLPADDING=0 ALIGN=CENTER><TR><TD>Quote, originally posted by eg6vtec1 »</TD></TR><TR><TD CLASS="quote">[QUOTE=Evs-One]this is how you get RTA's out
http://s263.photobucket.com/al...8.flv[/QUOT]
OMG!! I can't believe you got the bushing out in that direction. It takes a few very light hits going in the opposite direction, the bushings are tapered and should not be removed in this direction. Its possible to slightly bend the TA arm if removing in the way showed in the video because of the amount of force required to removed in this direction. I have built a fixture for the TA's and noticed that they can easily be bent.
I'm sure the mechanic knows what he's doing, But I wouldn't recommend this
method.
Brian, PCI
</TD></TR></TABLE>
Solbros Owns Me
Joined: Jun 2002
Posts: 14,462
Likes: 6
From: Vancouver, WA, USA
<TABLE WIDTH="90%" CELLSPACING=0 CELLPADDING=0 ALIGN=CENTER><TR><TD>Quote, originally posted by eg6vtec1 »</TD></TR><TR><TD CLASS="quote">[QUOTE=Evs-One]this is how you get RTA's out
http://s263.photobucket.com/al...8.flv[/QUOT]
OMG!! I can't believe you got the bushing out in that direction. It takes a few very light hits going in the opposite direction, the bushings are tapered and should not be removed in this direction. Its possible to slightly bend the TA arm if removing in the way showed in the video because of the amount of force required to removed in this direction. I have built a fixture for the TA's and noticed that they can easily be bent.
I'm sure the mechanic knows what he's doing, But I wouldn't recommend this
method.
Brian, PCI
</TD></TR></TABLE>
Actually, the arm does not get distorted in ANY way, shape or form. Marking the front toe adjuster before RTAB removal and re-installing at the mark- the toe is SPOT on 95% of the time in the rear. Sometimes you need to re adjust rear toe- but it needs to be done either way.
I'm sure you know this, being a suspension expert and having a top of the line alignment machine also, right?
<TABLE WIDTH="90%" CELLSPACING=0 CELLPADDING=0 ALIGN=CENTER><TR><TD>Quote, originally posted by EdoMoto »</TD></TR><TR><TD CLASS="quote">Its not his car so the mechanic doesnt care if the arm gets bent or whatnot.
Edo
</TD></TR></TABLE>
Riiiight. I do the same procedure on my own cars and haven't had ANY issues the past 6 years doing so this way- on customer cars, my cars, and even race cars.
I forgot how everyone on HT is a master tech