My 96 Civic DX Hatch Build (56k warning)

Thread Starter
Honda-Tech Member
Joined: Jul 2007
Posts: 208
Likes: 0
From: Vernon, CT, USA
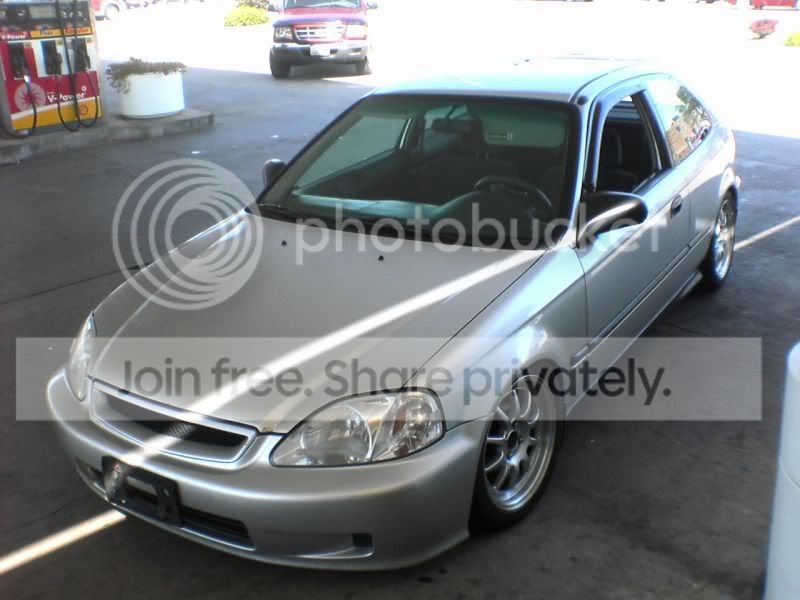
Here is my new project
96 DX Hatch 160,XXX miles
Family owned for 10 years = beat up
Water in trunk
MOLD
scratches and dents
rust
Plans:
Type R front lip
Type R rear lip
Thin side moldings (painted)
factory sideskirts (painted)
Spoon style spoiler
Spoon style mirrors
99-00 tails
Clear headlights
Engine swap and mods (looking for around 180-200 at the wheels)
minor tuck
complete respray (same color)
16s - silver w/ polished lip
brake upgrade up front
rear disk conversion

Just for fun - my daily

Gross parts from trunk

Mold

Rust from sitting water


Stockness

Rusty mount and alarm

Alarm is out. Some of the worst wiring work I have EVER seen. It is scary to think someone felt as though it was safe

Under the rear seat (YUMMY)

Yes that is a chicken wing found inside the ebrake housing

Leak near tail light

Just a little bit of an upgrade HAHAHA. The old unit had an install date written on it 1995!

Pinstripe must die!
Many Many hours later and a lot of automotive goo gone

All of the interior pieces have been removed except the dash and headliner. All the mold has been scrubbed out. (It smells much better) Every interior panel was cleaned labeled and hardware was bagged. New head unit is wired and installed. Front bumper and headlights are off. I think I might do a little DIY on the headlights and if I don't like the way they come out I will buy some. I started taking the grinder to the surface rust in the engine and it seams to be cleaning up nice.
Turns out someone pulled part of the door seals off and never put them back in the track so that explains some of the mold. I think the rest is from loose tail lights. New carpet, mats and trunk carpet has been ordered.
Modified by ct96ek at 4:17 PM 3/20/2008
Modified by ct96ek at 6:08 PM 3/31/2008
Modified by ct96ek at 2:34 PM 6/5/2008
Modified by ct96ek at 8:31 AM 10/6/2008
96 DX Hatch 160,XXX miles
Family owned for 10 years = beat up
Water in trunk
MOLD
scratches and dents
rust
Plans:
Type R front lip
Type R rear lip
Thin side moldings (painted)
factory sideskirts (painted)
Spoon style spoiler
Spoon style mirrors
99-00 tails
Clear headlights
Engine swap and mods (looking for around 180-200 at the wheels)
minor tuck
complete respray (same color)
16s - silver w/ polished lip
brake upgrade up front
rear disk conversion
Just for fun - my daily
Gross parts from trunk
Mold
Rust from sitting water
Stockness
Rusty mount and alarm
Alarm is out. Some of the worst wiring work I have EVER seen. It is scary to think someone felt as though it was safe
Under the rear seat (YUMMY)
Yes that is a chicken wing found inside the ebrake housing
Leak near tail light
Just a little bit of an upgrade HAHAHA. The old unit had an install date written on it 1995!
Pinstripe must die!
Many Many hours later and a lot of automotive goo gone
All of the interior pieces have been removed except the dash and headliner. All the mold has been scrubbed out. (It smells much better) Every interior panel was cleaned labeled and hardware was bagged. New head unit is wired and installed. Front bumper and headlights are off. I think I might do a little DIY on the headlights and if I don't like the way they come out I will buy some. I started taking the grinder to the surface rust in the engine and it seams to be cleaning up nice.
Turns out someone pulled part of the door seals off and never put them back in the track so that explains some of the mold. I think the rest is from loose tail lights. New carpet, mats and trunk carpet has been ordered.
Modified by ct96ek at 4:17 PM 3/20/2008
Modified by ct96ek at 6:08 PM 3/31/2008
Modified by ct96ek at 2:34 PM 6/5/2008
Modified by ct96ek at 8:31 AM 10/6/2008

Trending Topics
Thread Starter
Honda-Tech Member
Joined: Jul 2007
Posts: 208
Likes: 0
From: Vernon, CT, USA
Most of us eat in our cars every now and then. But who eats wings in their car? come on! I also took some crayon of the interior and found a who bunch of little girls hair clips hahaha. This car will have a very different life now that it is mine!
Modified by ct96ek at 6:09 PM 3/31/2008
Modified by ct96ek at 6:09 PM 3/31/2008
<TABLE WIDTH="90%" CELLSPACING=0 CELLPADDING=0 ALIGN=CENTER><TR><TD>Quote, originally posted by ct96ek »</TD></TR><TR><TD CLASS="quote">I already have the VTEC bug from my first car which was a J30A1 accord coupe so going B18B might suck</TD></TR></TABLE>
Go b18b, not H22. VTEC isn't a kick-in-the-back type of power increase. Turbo is. Ask anybody on here and they will tell you its easier to boost an LS than a 2-2.
LS has a very strong block and can handle lots of pressure on a small turbo and decent pressure on a bigger turbo. 250whp is easily attainable with a stock LS block.
And if you really feel the need to brag to your friends saying "BRO, I got VTEC! Listen to this" then you are sadly mistaken. The sound of boost will conquer the sound of vtec...
And if you STILL feel the need to have vtec, you could just throw on a GSR or SiR (Si for the Americans) head and have an LS-VTEC-turbo
Be smart about your motor. Don't throw on an H22 because you read somewhere that it's "Honda's big block".
Thread Starter
Honda-Tech Member
Joined: Jul 2007
Posts: 208
Likes: 0
From: Vernon, CT, USA
So it seams to be reasonable to say I could source a B18B complete swap for around $2,000 and get a t3/t4 turbo kit with a nice staniless manifold for around $2,500 minus management and tuning?
andoxviii - Ya I know VTEC is not AMAZING. I need to ride in a boosted civic to see where in the powerband the hp and tq is noticable.
andoxviii - Ya I know VTEC is not AMAZING. I need to ride in a boosted civic to see where in the powerband the hp and tq is noticable.
Thread Starter
Honda-Tech Member
Joined: Jul 2007
Posts: 208
Likes: 0
From: Vernon, CT, USA
How it is looking now

Trying a little DIY

I didn't like how this was working so I stopped and now plan to buy some headlights
Interior shot

My paint booth

Had to put something on the car instead of just ripping stuff off. These look much nicer! Plus I wanted to see if new tail light seals tightened down would solve some leaking issues

Rust pit after a little dremel and a small spray paint shot to seal it

I HATE broken hardware

Lifted tar from water damage

Everyone knows how much it SUCKS to take an ebrake handle off this car

I just moved in so my garage is still a pit

Old seat I have laying around. The quality isnt that great and I am buying a new red set so this will probaly end up in my roomates Eclipse project car

Modified by ct96ek at 7:54 PM 8/7/2007
Trying a little DIY
I didn't like how this was working so I stopped and now plan to buy some headlights
Interior shot
My paint booth
Had to put something on the car instead of just ripping stuff off. These look much nicer! Plus I wanted to see if new tail light seals tightened down would solve some leaking issues
Rust pit after a little dremel and a small spray paint shot to seal it
I HATE broken hardware
Lifted tar from water damage
Everyone knows how much it SUCKS to take an ebrake handle off this car
I just moved in so my garage is still a pit
Old seat I have laying around. The quality isnt that great and I am buying a new red set so this will probaly end up in my roomates Eclipse project car
Modified by ct96ek at 7:54 PM 8/7/2007
Honda-Tech Member
Joined: Nov 2006
Posts: 496
Likes: 0
<TABLE WIDTH="90%" CELLSPACING=0 CELLPADDING=0 ALIGN=CENTER><TR><TD>Quote, originally posted by andoxviii »</TD></TR><TR><TD CLASS="quote">Keep it going bud.
Best mod you did was chicken bone weight-reduction </TD></TR></TABLE>
x2 lol
Best mod you did was chicken bone weight-reduction
</TD></TR></TABLE>x2 lol
Thread Starter
Honda-Tech Member
Joined: Jul 2007
Posts: 208
Likes: 0
From: Vernon, CT, USA
If anyone is looking to find a great way to purchase OEM Honda parts online check out
http://www.manchestermotorsports.com
This dealership is extremely nice and their parts department is great. Some of the guys there know a ton. They also have a few nice JDM parts
I am headed there today after work to order some replacements for damaged interior parts and probably will end up buying way more than I should
Thread Starter
Honda-Tech Member
Joined: Jul 2007
Posts: 208
Likes: 0
From: Vernon, CT, USA
I thought I would start adding some DIY info to my build up. It might be stupid easy stuff for most but some people might find it helpful.
Last nights trip to Manchester Motorsports cost me $531
Parts Purchased
-OEM JDM thin side moldings
-OEM antenna
-OEM ITR Shift Boot
-OEM sun visor and clip
-Depo chrome housing headlights -amber
Honda goodness
Antenna Replacement
My whole interior is pretty much ripped apart so I didn't have to remove the panel below the column. I think this is just 3 or 4 screws and pull to remove. Here you can see where the antenna cable connects to the extension wire coming off the back of the head unit.
Unplug this cable at the junction

Next take some thin rope and attach it to the line going up to the antenna. You can see I wrapped everything up so it was smooth and nothing would catch.

Unscrew the 2 screws on the top of the antenna then pull it right out. Don't go to fast because if something catches you want to be able to back it up and try again.

See the difference

Now attach the rope to the new antenna the same way and pull the rope back through. Plug the new antenna in and screw it down.
Enjoy tunes!
ITR Shift Boot
Manchester Motorsports was out of OEM CTR boots so I just got an ITR one. The guy at the parts department said it would work and showed me how. These guys are great!

Just 2 screws to remove the boot
You can see they are slightly different sizes. The ITR is more narrow and the tabs don't bend. You can either bend the tabs or swap the frames for a perfect fit. I chose frames.

Simply flip it over and pull the material off the tabs

Attach the ITR boot to the DX frame and screw it back into the console

Next
Sun Visor Replacement
I don't know how this was ripped apart but whatever.

One of my clips was broken so that has to be replaced also. Just turn it 90 degrees and pull down to remove

Double wrapped for extra protection

Screwing this in isn't all that easy because gravity is working against you and the visor is always in the way. Much Better!

Last nights trip to Manchester Motorsports cost me $531
Parts Purchased
-OEM JDM thin side moldings
-OEM antenna
-OEM ITR Shift Boot
-OEM sun visor and clip
-Depo chrome housing headlights -amber
Honda goodness
Antenna Replacement
My whole interior is pretty much ripped apart so I didn't have to remove the panel below the column. I think this is just 3 or 4 screws and pull to remove. Here you can see where the antenna cable connects to the extension wire coming off the back of the head unit.
Unplug this cable at the junction
Next take some thin rope and attach it to the line going up to the antenna. You can see I wrapped everything up so it was smooth and nothing would catch.
Unscrew the 2 screws on the top of the antenna then pull it right out. Don't go to fast because if something catches you want to be able to back it up and try again.
See the difference
Now attach the rope to the new antenna the same way and pull the rope back through. Plug the new antenna in and screw it down.
Enjoy tunes!
ITR Shift Boot
Manchester Motorsports was out of OEM CTR boots so I just got an ITR one. The guy at the parts department said it would work and showed me how. These guys are great!
Just 2 screws to remove the boot
You can see they are slightly different sizes. The ITR is more narrow and the tabs don't bend. You can either bend the tabs or swap the frames for a perfect fit. I chose frames.
Simply flip it over and pull the material off the tabs
Attach the ITR boot to the DX frame and screw it back into the console
Next
Sun Visor Replacement
I don't know how this was ripped apart but whatever.
One of my clips was broken so that has to be replaced also. Just turn it 90 degrees and pull down to remove
Double wrapped for extra protection
Screwing this in isn't all that easy because gravity is working against you and the visor is always in the way. Much Better!