

Write-up for my awanabe JDM foggies.

Thread Starter
Honda-Tech Member
Joined: Mar 2004
Posts: 319
Likes: 0
From: San Diego CA, USA
This was a pretty fun project. My first fabrication (well at least on a scale car).
Items and tools used
-1 set of round foglight from Pepboys (Navigators)
-1 Pilot 4-pin relay
-1 Early 90's Volvo foglight switch (you can use any switch you wish)
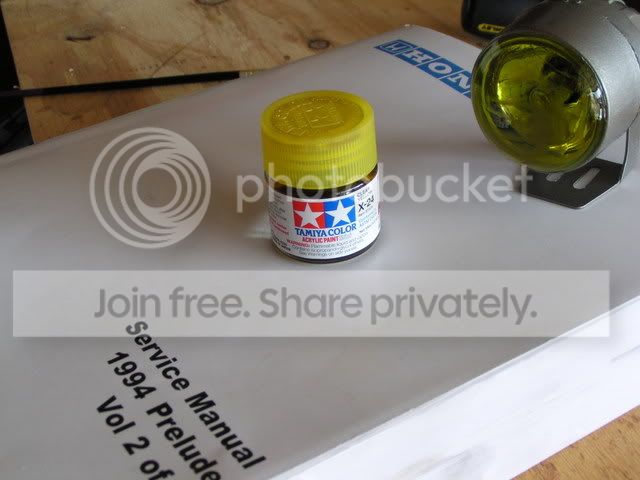
- Transparent yellow Tamaya model paint (if you want yellow lenses)
- 22 guage audio wire from Radioshack (3-colors suggested)
- 22 gu. butt connectors
- 22 gu. flat female connectors
- 22 gu. round female connectors
- electrical tape
- Rotory tool (dremel)
- cutting disk for dremel
- drill bit kit
- sanding wheel for dremel
- phillips and flat head screw drivers
- socket set
- center punch or something pointy and sharp
- silver paint pen or anything that shows up on black plastic
- ruler
Okay there are a few ways to wire this number up. I chose to tap into the OEM harness for this one, and wanted a factory
looking switch, couldn't find a honda one, so i went with a Volvo, you'll see why later. You can just as easily go with
the wires and switch provided with the lights. I'll cover the light install first, switch and wiring second.
First remove the front bumper. I didn't take pictures of that, but here is the factory routine for it ->
http://www.hondaautomotivepart....html
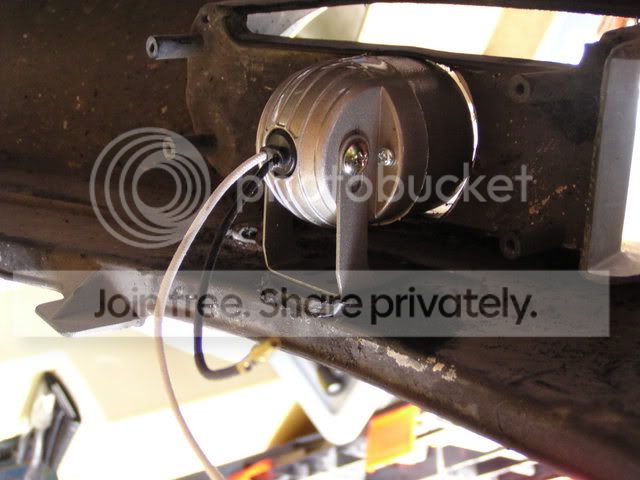
Once the front bumper is off, set it on your work bench so that you are behide it. Take one of the fog lights apart (remove
the hanger then unscrew the two main parts, there's only 2 screws, you can't miss em'). Keep the Lense part handy... you
will need it in a second.
Now time to make your measurements. I started on the left side.
measure 1 1/4 inch off of the innermost oem screw-hole. This is approximatly where they'll end up.
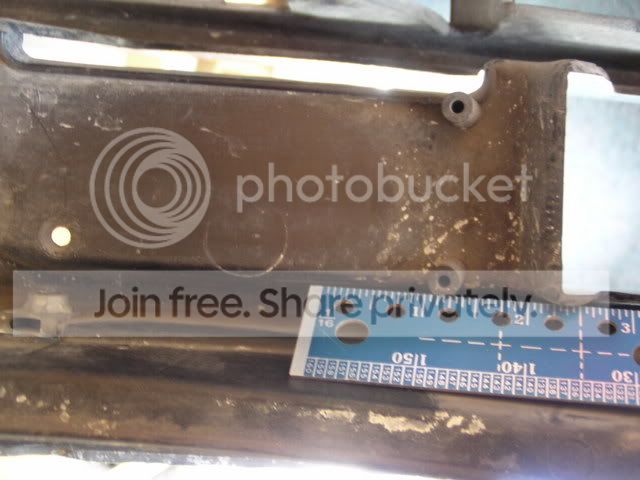
Set the light in place, with your center punch, or something sharp, leave a little nick, on the surface to cut, where the top,
sides and bottom would be.
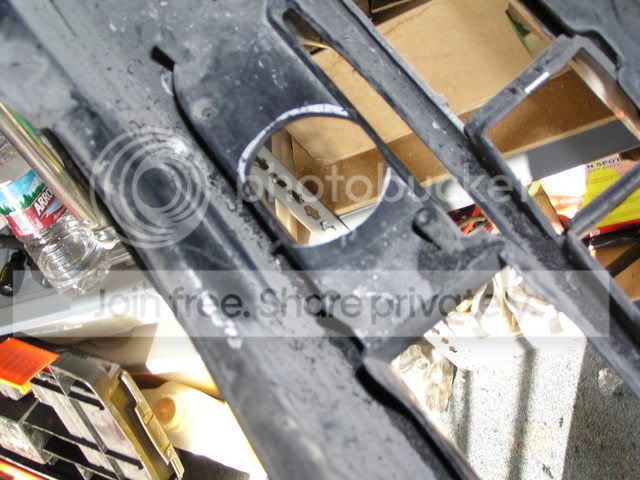
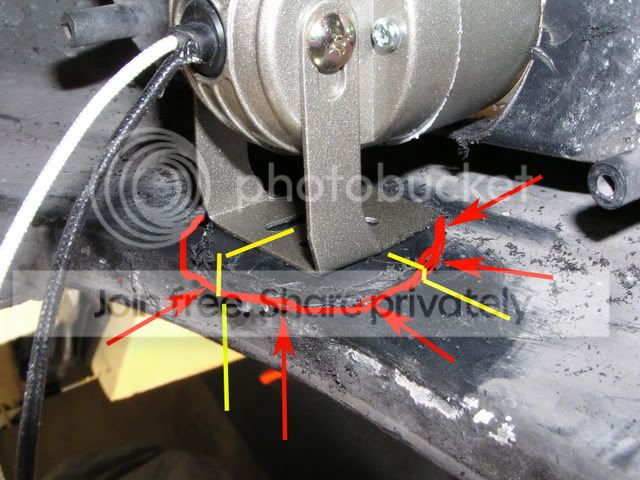
Now take the lense half of the light and traces it onto the surface to be cut using your marks as guides.
For the cutting proceedure I used a standard drill bit (what ever fit into my dremel) and cut the circle out with it, then
finished it off with the sanding wheel to smooth it out. Save the part you cut out, you'll need it for the next step.
That peice that you cut out, you will need it to help elivate the light. Unfortunatly it wont be enough, so you will need to
improvise with other materials. I plan on pouring some resin into a throw away tupperware to make a flat plastic sheet, but a
small peice of metal or scrap plasic will suffice. Pictured is only the cut-out left over... but you get the idea.
Set the light on top of the elivated plastic trace around it, mark it, do what ever you have to so that you can set
everything back in the same spot.
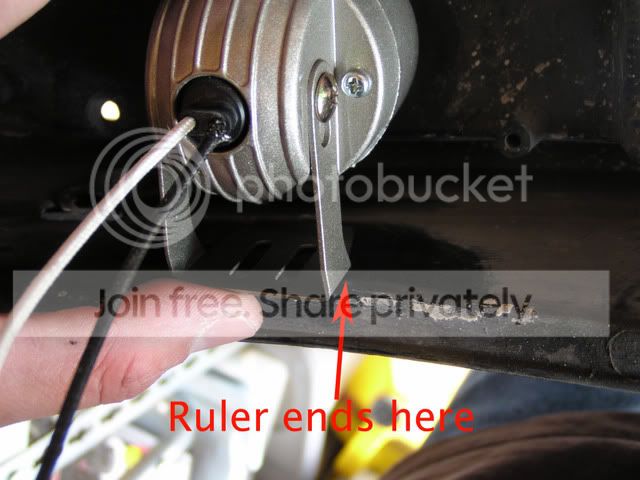
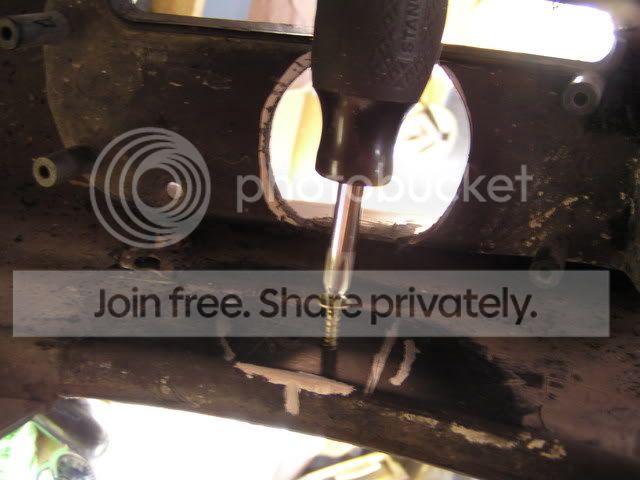
Once you've done this, remove the light from the hanger, and mark where the screws will go on your elevating material,
then with a drill bit smaller than the width of the screw (minus the threads) drill two holes, set the elivator back on
the bumper and use the center punch to mark thier place. ***HINT*** On the bumper there is a big + mark that shows you
where 'straight ahead' is. Once you have marked where the holes will go, and varified that they are straight/even, punch all the
way through the bumper plastic, and then use the screws to tap the holes.
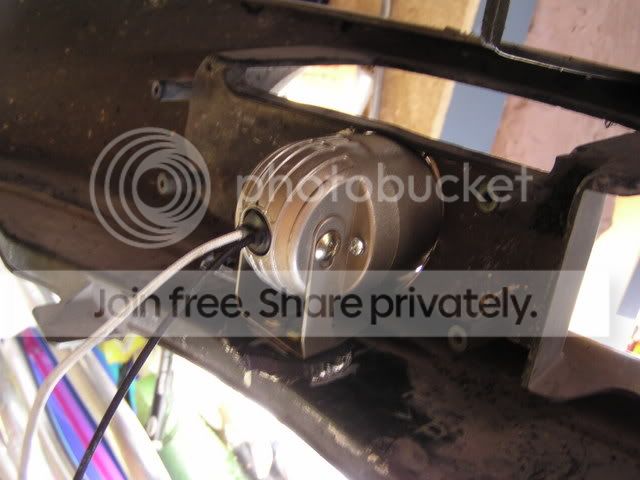
Then screw it all together.
***NOTE***
On the right side you will have to remove that L-shaped peice of plastic, screw driver wont fit. There are 3 bolts holding it on, 2 at the top, one at
the bottom.
Well now you are Done with that part
I will post the wiring, and switch part tomorrow.
Stephen
PART TWO: OEM wiring and switch.
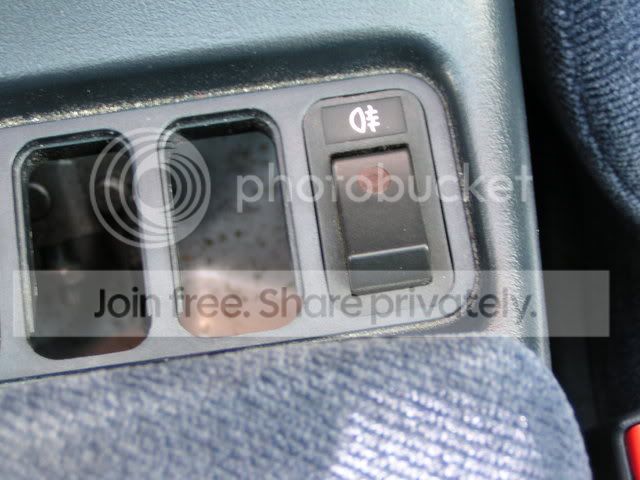
So after seeing that POS switch they provided I decided to go with a different one. After a short lived quest for the priced stock switch I decided to look for something else. So while at the junk yard with a friend, I peered into a tons of car looking for one, and found a decent Volvo switch.
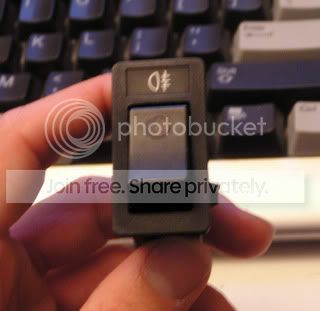
The Volvo one is the perfect width, but too long to fit in the slots on the center console. so I cut down the ends, and rounded off the corners with the dremel. Made sure I left enough material so that it would 'pop' in and stick.
The even better part was the bottom had the standard 3 prong set-up.
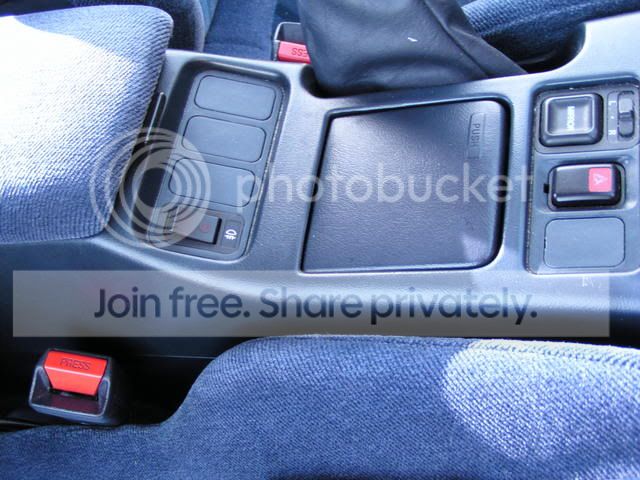
So I made a quick mini harness with 22 gauge speaker wire, cut the stock white connector off the console harness, and used butt-connectors to connect the orange wire to the black wire, red/green to the red wire, and red/yellow to the green wire.
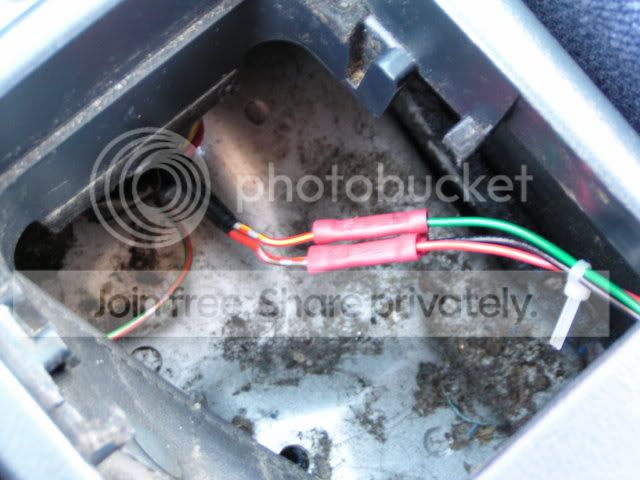
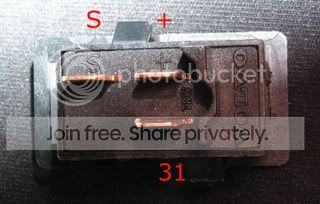
At the other end of the mini harness I put a female flat connector on each wire, ran it up through one of the larger pop-out slots on my console, and plugged it into the switch (green to +, red to 31, black to S)
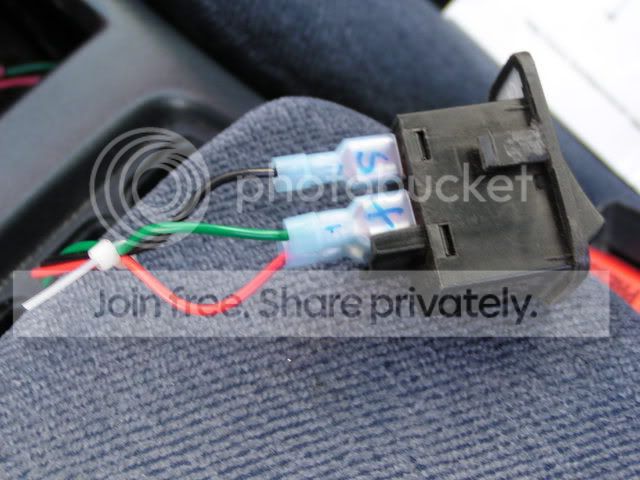
Then dropped the switch in.
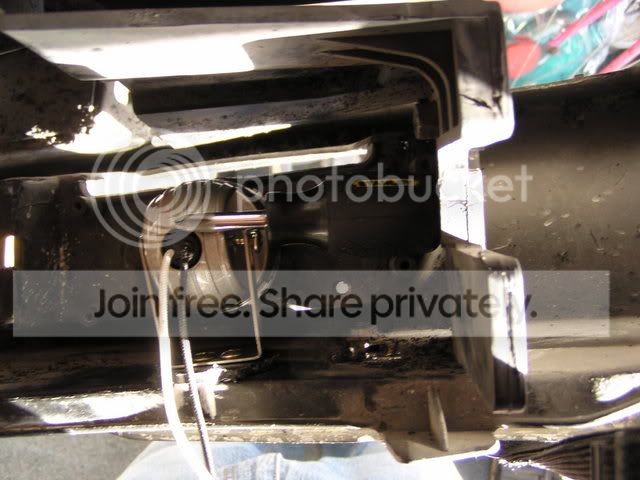
Then I plugged the four pin relay into the brown harness found under the dash, in front of the brake pedal sensor, blue-taped to another harness.
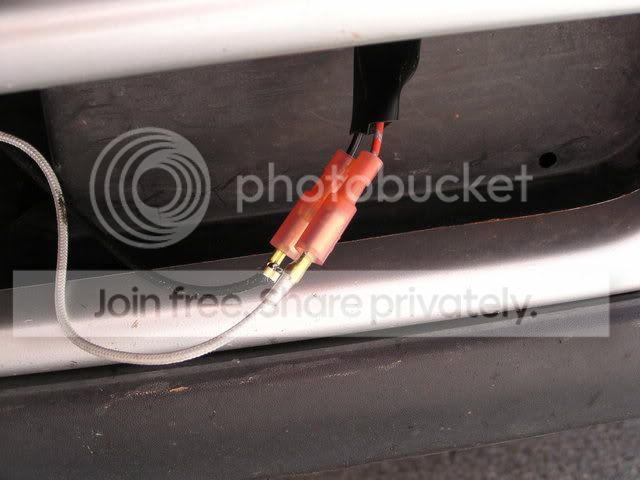
Now go to the front of the car and cut the stock connectorss off the front (leave enough wire on the connector so that you can reconnect them if you ever get JDMs). Then attach a round female connector to each wire and plug in the lights.
You're done, it should all work.
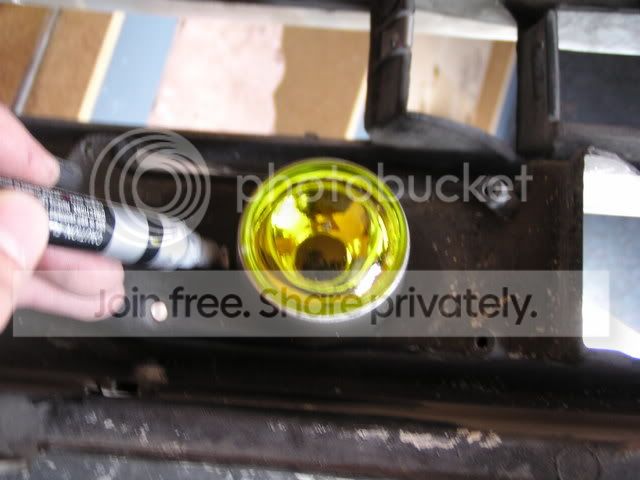
This is what I used to paint the lenses yellow, the tacky blue lenses just looked cheezy to me, I really dig the yellow.
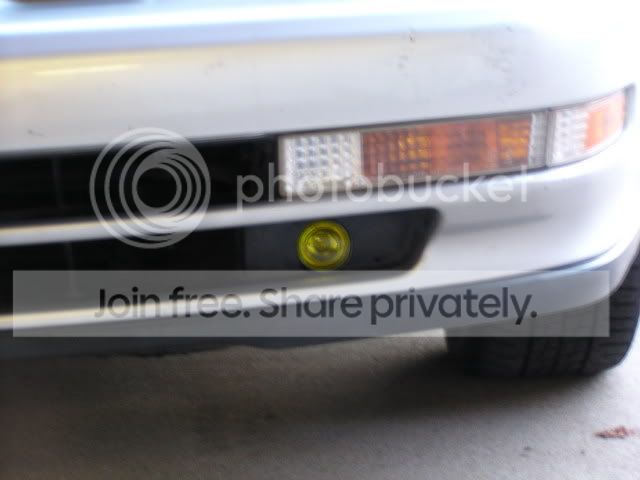
This is why the need to elivate the lights more... they aim up just a bit, totally missing the ground, a key eliment in the funtion of a fog light

Modified by mojo_stevo at 1:31 AM 11/29/2006
Modified by mojo_stevo at 2:04 AM 11/29/2006
Modified by mojo_stevo at 2:34 AM 12/21/2006
Items and tools used
-1 set of round foglight from Pepboys (Navigators)
-1 Pilot 4-pin relay
-1 Early 90's Volvo foglight switch (you can use any switch you wish)
- Transparent yellow Tamaya model paint (if you want yellow lenses)
- 22 guage audio wire from Radioshack (3-colors suggested)
- 22 gu. butt connectors
- 22 gu. flat female connectors
- 22 gu. round female connectors
- electrical tape
- Rotory tool (dremel)
- cutting disk for dremel
- drill bit kit
- sanding wheel for dremel
- phillips and flat head screw drivers
- socket set
- center punch or something pointy and sharp
- silver paint pen or anything that shows up on black plastic
- ruler
Okay there are a few ways to wire this number up. I chose to tap into the OEM harness for this one, and wanted a factory
looking switch, couldn't find a honda one, so i went with a Volvo, you'll see why later. You can just as easily go with
the wires and switch provided with the lights. I'll cover the light install first, switch and wiring second.
First remove the front bumper. I didn't take pictures of that, but here is the factory routine for it ->
http://www.hondaautomotivepart....html
Once the front bumper is off, set it on your work bench so that you are behide it. Take one of the fog lights apart (remove
the hanger then unscrew the two main parts, there's only 2 screws, you can't miss em'). Keep the Lense part handy... you
will need it in a second.
Now time to make your measurements. I started on the left side.
measure 1 1/4 inch off of the innermost oem screw-hole. This is approximatly where they'll end up.
Set the light in place, with your center punch, or something sharp, leave a little nick, on the surface to cut, where the top,
sides and bottom would be.
Now take the lense half of the light and traces it onto the surface to be cut using your marks as guides.
For the cutting proceedure I used a standard drill bit (what ever fit into my dremel) and cut the circle out with it, then
finished it off with the sanding wheel to smooth it out. Save the part you cut out, you'll need it for the next step.
That peice that you cut out, you will need it to help elivate the light. Unfortunatly it wont be enough, so you will need to
improvise with other materials. I plan on pouring some resin into a throw away tupperware to make a flat plastic sheet, but a
small peice of metal or scrap plasic will suffice. Pictured is only the cut-out left over... but you get the idea.
Set the light on top of the elivated plastic trace around it, mark it, do what ever you have to so that you can set
everything back in the same spot.
Once you've done this, remove the light from the hanger, and mark where the screws will go on your elevating material,
then with a drill bit smaller than the width of the screw (minus the threads) drill two holes, set the elivator back on
the bumper and use the center punch to mark thier place. ***HINT*** On the bumper there is a big + mark that shows you
where 'straight ahead' is. Once you have marked where the holes will go, and varified that they are straight/even, punch all the
way through the bumper plastic, and then use the screws to tap the holes.
Then screw it all together.
***NOTE***
On the right side you will have to remove that L-shaped peice of plastic, screw driver wont fit. There are 3 bolts holding it on, 2 at the top, one at
the bottom.
Well now you are Done with that part
I will post the wiring, and switch part tomorrow.
Stephen
PART TWO: OEM wiring and switch.
So after seeing that POS switch they provided I decided to go with a different one. After a short lived quest for the priced stock switch I decided to look for something else. So while at the junk yard with a friend, I peered into a tons of car looking for one, and found a decent Volvo switch.
The Volvo one is the perfect width, but too long to fit in the slots on the center console. so I cut down the ends, and rounded off the corners with the dremel. Made sure I left enough material so that it would 'pop' in and stick.
The even better part was the bottom had the standard 3 prong set-up.
So I made a quick mini harness with 22 gauge speaker wire, cut the stock white connector off the console harness, and used butt-connectors to connect the orange wire to the black wire, red/green to the red wire, and red/yellow to the green wire.
At the other end of the mini harness I put a female flat connector on each wire, ran it up through one of the larger pop-out slots on my console, and plugged it into the switch (green to +, red to 31, black to S)
Then dropped the switch in.
Then I plugged the four pin relay into the brown harness found under the dash, in front of the brake pedal sensor, blue-taped to another harness.
Now go to the front of the car and cut the stock connectorss off the front (leave enough wire on the connector so that you can reconnect them if you ever get JDMs). Then attach a round female connector to each wire and plug in the lights.
You're done, it should all work.
This is what I used to paint the lenses yellow, the tacky blue lenses just looked cheezy to me, I really dig the yellow.
This is why the need to elivate the lights more... they aim up just a bit, totally missing the ground, a key eliment in the funtion of a fog light
Modified by mojo_stevo at 1:31 AM 11/29/2006
Modified by mojo_stevo at 2:04 AM 11/29/2006
Modified by mojo_stevo at 2:34 AM 12/21/2006

Thread
Thread Starter
Forum
Replies
Last Post
acmoc
Honda CRX / EF Civic (1988 - 1991)
5
Feb 15, 2012 04:05 PM
shotgun2224
Honda Civic / Del Sol (1992 - 2000)
7
Jul 31, 2007 11:09 PM
Simple
Honda Civic / Del Sol (1992 - 2000)
13
Jan 10, 2004 07:57 AM