

H22 Manual Tensioner Conversion How Too


Honda-Tech Member
Joined: Feb 2002
Posts: 2,072
Likes: 0
From: land of the sheep, home of the hypocrite
I don't think that bracket goes where you have the blue dots. Is that what you are trying to say? I don't think there is any problem with leaving it off btw...
Honda-Tech Member
Joined: Feb 2002
Posts: 2,072
Likes: 0
From: land of the sheep, home of the hypocrite
This picture is in the H-T FAQ thread you mention. You are talking about the part with three holes, right?
Guest
Posts: n/a
First off here is a link to the detailed how to with parts list and all. Use my writeup below as a modification.
http://candk.collectiveracing....c=9.0
And this is the Mod. This will allow use of the tripod and bracket on the manual tensioner that was otherwise omited.
Here we go. Now I know alot of people are going to say that the tripod piece is not necessary and whatever, but IMO it takes alot of stress off of the bolt that the tensioner rides on, and it gives me that added little bit of security.
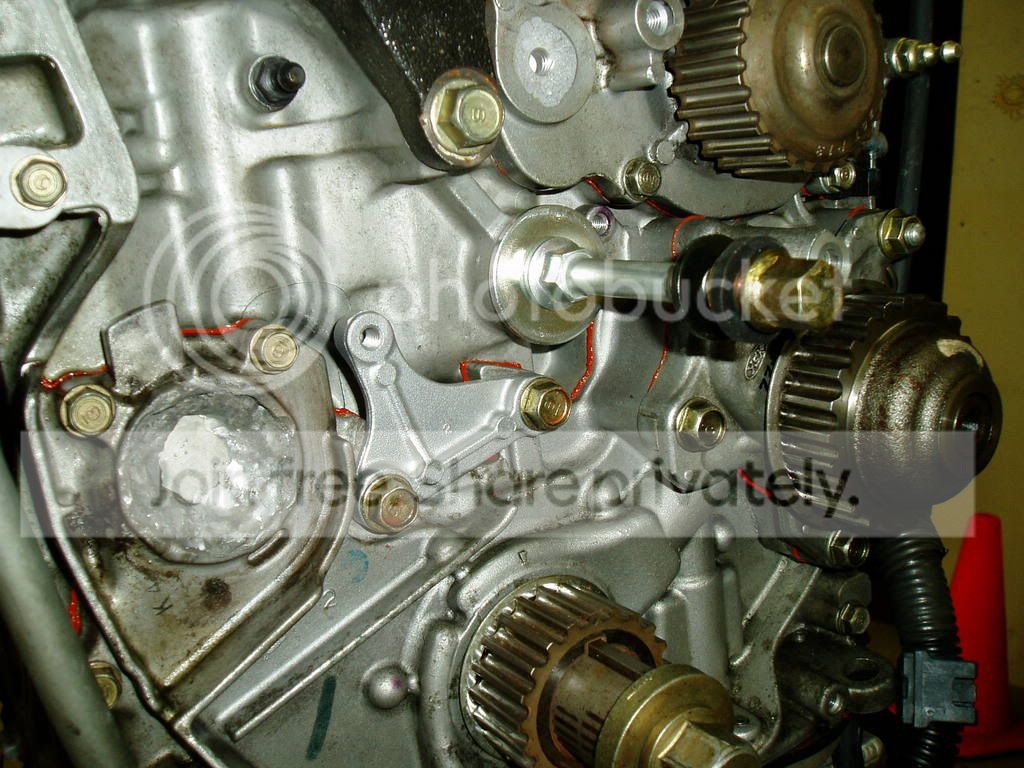
This First Pic shows the culprit bolt. I have circled it in yellow for you. When you put on the manual tensioner pulley you will see that it is only allowed to loosen the belt until the pulley hits the bolt. If you try and put the belt on like this it will be too tight.

The next 2 pics are going to show you the area of the bracket that needs to be shaved down to allow full movement of the tensioner. I used a dremel and it only took about 5 min. I found removing about .06 - .09 was sufficient. Again the area I shaved is highlighted in yellow. Again you don't shave the pulley itself only the bracket.


Modified by MadCityLude at 6:31 PM 9/1/2006
http://candk.collectiveracing....c=9.0
And this is the Mod. This will allow use of the tripod and bracket on the manual tensioner that was otherwise omited.
Here we go. Now I know alot of people are going to say that the tripod piece is not necessary and whatever, but IMO it takes alot of stress off of the bolt that the tensioner rides on, and it gives me that added little bit of security.
This First Pic shows the culprit bolt. I have circled it in yellow for you. When you put on the manual tensioner pulley you will see that it is only allowed to loosen the belt until the pulley hits the bolt. If you try and put the belt on like this it will be too tight.
The next 2 pics are going to show you the area of the bracket that needs to be shaved down to allow full movement of the tensioner. I used a dremel and it only took about 5 min. I found removing about .06 - .09 was sufficient. Again the area I shaved is highlighted in yellow. Again you don't shave the pulley itself only the bracket.
Modified by MadCityLude at 6:31 PM 9/1/2006
Trending Topics
Guest
Posts: n/a
^^ then why did honda put it there? I think maybe it works without it, but It is there for a reason.
I really think people have just been omitting it for the last couple years because they found the belt to be to tight with it. This is an easy process that you can do if you would like.
I am not saying you have to use it, but now if anyone else wants to they know how it can be done.
I really think people have just been omitting it for the last couple years because they found the belt to be to tight with it. This is an easy process that you can do if you would like.
I am not saying you have to use it, but now if anyone else wants to they know how it can be done.
Guest
Posts: n/a
^^ No Problem!
Now I am not saying everyone should go out and do this to there tensioners right now, but during your next timing belt, water pump change why not? Or if you are doing the coversion, Why Not?
Also here is the link for info on the honda parts kit. https://honda-tech.com/zerothread?id=545446
Parts list:
13404-PT0-004 - ADJUSTER COMP., BALANCER BELT
13415-PT0-000 - BRACKET, BALANCER BELT ADJUSTER
14510-PT0-004 - ADJUSTER COMP., TIMING BELT
14516-PT2-000 - SPRING COMP., TIMING BELT ADJUSTER
14521-P14-A00 - PLATE, ADJUSTER
90014-P14-A00 - BOLT, TIMING BELT ADJUSTER BASE
90015-PT0-000 - BOLT, TIMING BELT ADJUSTER SPRING
90016-PT0-000 - BOLT, TIMING BELT ADJUSTER
90140-P14-A00 - WASHER, PLAIN (11MM)
And a link to a parts list at Majestic Honda, I order all my parts from them (way cheaper than my local honda dealership) http://www.hondaautomotivepart...82%29
And here is a link to Sl Honda Parts again cheaper than local dealership http://www.slhondaparts.com/
If your eliminating the balance belt you may want to consider this instead of all those washers, I just measured out how much space there was and made a spacer
Desc: Aluminum Unthreaded Round Spacer
Size: 1" Od, 1" Length, 1/2" Screw Size
Fits perfect, but could have went with 1 1/4'' OD

Modified by MadCityLude at 3:41 PM 8/24/2006
Now I am not saying everyone should go out and do this to there tensioners right now, but during your next timing belt, water pump change why not? Or if you are doing the coversion, Why Not?
Also here is the link for info on the honda parts kit. https://honda-tech.com/zerothread?id=545446
Parts list:
13404-PT0-004 - ADJUSTER COMP., BALANCER BELT
13415-PT0-000 - BRACKET, BALANCER BELT ADJUSTER
14510-PT0-004 - ADJUSTER COMP., TIMING BELT
14516-PT2-000 - SPRING COMP., TIMING BELT ADJUSTER
14521-P14-A00 - PLATE, ADJUSTER
90014-P14-A00 - BOLT, TIMING BELT ADJUSTER BASE
90015-PT0-000 - BOLT, TIMING BELT ADJUSTER SPRING
90016-PT0-000 - BOLT, TIMING BELT ADJUSTER
90140-P14-A00 - WASHER, PLAIN (11MM)
And a link to a parts list at Majestic Honda, I order all my parts from them (way cheaper than my local honda dealership) http://www.hondaautomotivepart...82%29
And here is a link to Sl Honda Parts again cheaper than local dealership http://www.slhondaparts.com/
If your eliminating the balance belt you may want to consider this instead of all those washers, I just measured out how much space there was and made a spacer
Desc: Aluminum Unthreaded Round Spacer
Size: 1" Od, 1" Length, 1/2" Screw Size
Fits perfect, but could have went with 1 1/4'' OD
Modified by MadCityLude at 3:41 PM 8/24/2006
Honda-Tech Member


Joined: Mar 2004
Posts: 4,822
Likes: 37
From: Looking for SloMofo....
<TABLE WIDTH="90%" CELLSPACING=0 CELLPADDING=0 ALIGN=CENTER><TR><TD>Quote, originally posted by MadCityLude »</TD></TR><TR><TD CLASS="quote">^^ then why did honda put it there? I think maybe it works without it, but It is there for a reason.
I really think people have just been omitting it for the last couple years because they found the belt to be to tight with it. This is an easy process that you can do if you would like.
I am not saying you have to use it, but now if anyone else wants to they know how it can be done.</TD></TR></TABLE>
It's only there to hold the tension while installing the t-belt. other wise there's no use for it.

Guest
Posts: n/a
I am not sure why, but myself and many others have had this problem. The reason I know this is cause when I ran into the issue and started searching I found a ton posts on the topic. But none of them had a real solution, so I developed my own.

Thread
Thread Starter
Forum
Replies
Last Post
90140p14a00, belt, candkcom, conversion, h22, honda, installing, kit, manual, prelude, size, tech, tensioner, timing, washer