

FAQ: Replace / Remove Radius Rod. Solution for crank pulley rubbing inside

Thread Starter
Honda-Tech Member
iTrader: (1)
Joined: Jan 2004
Posts: 4,914
Likes: 1
From: SD, CA, USA
So, because of the combination of:
1.) Larger motor than stock (I'm running a USDM B18C1 with the Arizona Race & Machine motor mounts.)
2.) Low ride height
my crank pulley was sitting directly above the radius rod. It was only about 1/2" above it to be more exact. This led to rubbing/scraping over big dips, and/or hard right hand corners where the weight would shift and compress the driver's side suspension enough to let the two pieces make contact.
The solution? Wes Vann ("Wes V" on this site) designed a custom set of radius rods for me. I got this in the mail shortly after talking to Wes about this problem:

Attached to cardboard and test fitting the design:

This past weekend, when I was in town to see Wes, he surprised me with a finished product. Here you can see it next to the original:


Now, how to remove and replace your radius rod. First start by jacking the car up and placing it on jackstands.
Next, remove this 17mm nut on the front crossmember. (a ratcheting wrench works wonders here if you can't get to it with a regular socket.)


Now, remove the 17mm nut and bolt from the bottom of the shock fork:

After that, you can remove the 14mm bolt from the top of the shock fork, and remove the shock fork:


Now, remove the two 17mm bolts that hold the radius rod to the lower control arm:
(again, a ratcheting wrench works great here)

Your radius rod is now able to be removed. Install in the reverse order of removal and remember to tighten the lower shock fork with the suspension at normal ride height, in order to preserve the bushings in the lower control arm.

The new clearance I gained from Wes's custom radius rod:


Enjoy!
EDIT: I know some of you will probably bring up the idea that you believe this could potentially be unsafe, but anyone who has seen these new rods in person can tell you that they are beefy! Wes has also made them dimensionally identical to the OEM rods (aside from the bend, of course). And before you ask, No, we do not produce these in any sort of quantity. I just wanted to show some fellow EF owners a solution that Wes designed and I have installed on my CRX.
Modified by Mr_CRX at 9:22 AM 3/25/2006
1.) Larger motor than stock (I'm running a USDM B18C1 with the Arizona Race & Machine motor mounts.)
2.) Low ride height
my crank pulley was sitting directly above the radius rod. It was only about 1/2" above it to be more exact. This led to rubbing/scraping over big dips, and/or hard right hand corners where the weight would shift and compress the driver's side suspension enough to let the two pieces make contact.
The solution? Wes Vann ("Wes V" on this site) designed a custom set of radius rods for me. I got this in the mail shortly after talking to Wes about this problem:
Attached to cardboard and test fitting the design:
This past weekend, when I was in town to see Wes, he surprised me with a finished product. Here you can see it next to the original:
Now, how to remove and replace your radius rod. First start by jacking the car up and placing it on jackstands.
Next, remove this 17mm nut on the front crossmember. (a ratcheting wrench works wonders here if you can't get to it with a regular socket.)
Now, remove the 17mm nut and bolt from the bottom of the shock fork:
After that, you can remove the 14mm bolt from the top of the shock fork, and remove the shock fork:
Now, remove the two 17mm bolts that hold the radius rod to the lower control arm:
(again, a ratcheting wrench works great here)
Your radius rod is now able to be removed. Install in the reverse order of removal and remember to tighten the lower shock fork with the suspension at normal ride height, in order to preserve the bushings in the lower control arm.
The new clearance I gained from Wes's custom radius rod:
Enjoy!
EDIT: I know some of you will probably bring up the idea that you believe this could potentially be unsafe, but anyone who has seen these new rods in person can tell you that they are beefy! Wes has also made them dimensionally identical to the OEM rods (aside from the bend, of course). And before you ask, No, we do not produce these in any sort of quantity. I just wanted to show some fellow EF owners a solution that Wes designed and I have installed on my CRX.
Modified by Mr_CRX at 9:22 AM 3/25/2006

Honda-Tech Member
Joined: Jan 2005
Posts: 246
Likes: 0
From: Behind you
Thats awesome, It would be cool if you did make these, but i know your not. But just for future reference if you can scan that desing blue print so other people who are intrested will follow what you did (ofcource at their own risk).
But great and neat idea!
But great and neat idea!
Member
Joined: Oct 2002
Posts: 2,351
Likes: 1
From: Winnetka, Calif, USA
The feed-back on this should be interesting!!!
I figure that 50% will be ragging and the other 50% asking for a set.
Here is a photo of the jig that I made up from the original arm;
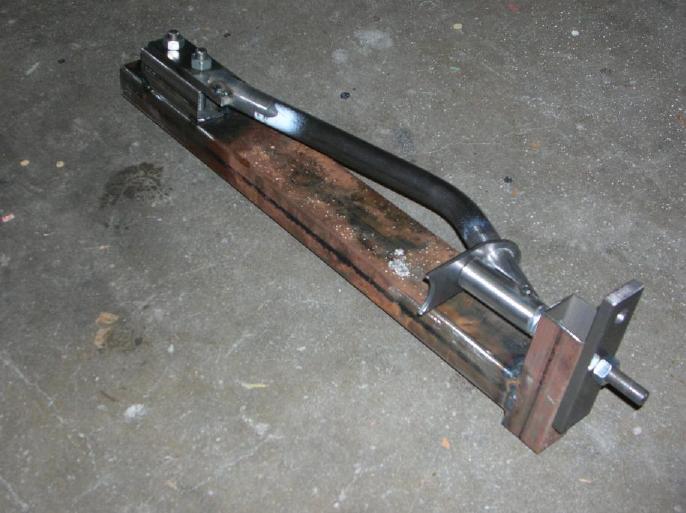
What should also be noted is the four washers that go between the end of the arm and the factory bushing washers. The reason is that by removing or adding additional washers, there is a limited amount of caster adjustment possible.
At a latter date, I'll do a write-up on my site.
As for scanning the "blueprint"; I don't have too. I did the drawing using Autocad and then plotted it full scale on the plotter that I have. (I'm an Architectural Engineer)
Wes V
I figure that 50% will be ragging and the other 50% asking for a set.
Here is a photo of the jig that I made up from the original arm;
What should also be noted is the four washers that go between the end of the arm and the factory bushing washers. The reason is that by removing or adding additional washers, there is a limited amount of caster adjustment possible.
At a latter date, I'll do a write-up on my site.
As for scanning the "blueprint"; I don't have too. I did the drawing using Autocad and then plotted it full scale on the plotter that I have. (I'm an Architectural Engineer)
Wes V
Trending Topics
Thread Starter
Honda-Tech Member
iTrader: (1)
Joined: Jan 2004
Posts: 4,914
Likes: 1
From: SD, CA, USA
<TABLE WIDTH="90%" CELLSPACING=0 CELLPADDING=0 ALIGN=CENTER><TR><TD>Quote, originally posted by lightcrx »</TD></TR><TR><TD CLASS="quote">why not just make some traction bars?
just a question
-joseph</TD></TR></TABLE>
Wes and I didn't do this to create clearance for a downpipe or a huge header, or to stop wheelhop. (The two main reasons people purchase a traction bar setup.) We made this in order that the crank pulley would not to come into contact with the original radius rod under hard cornering, or big dips in the road. (Mainly the 405 freeway in SoCal )
)
All of the traction bar setups I've seen still utilize the stock lower control arm, and don't do anything to move the radius rod out of the way of a larger engine. This fixes that problem.
just a question
-joseph</TD></TR></TABLE>
Wes and I didn't do this to create clearance for a downpipe or a huge header, or to stop wheelhop. (The two main reasons people purchase a traction bar setup.) We made this in order that the crank pulley would not to come into contact with the original radius rod under hard cornering, or big dips in the road. (Mainly the 405 freeway in SoCal
)All of the traction bar setups I've seen still utilize the stock lower control arm, and don't do anything to move the radius rod out of the way of a larger engine. This fixes that problem.
Member
Joined: Oct 2002
Posts: 2,351
Likes: 1
From: Winnetka, Calif, USA
Building some traction bars in it's self wouldn't solve the specific problem!
If you wanted to use straight arms, you would have to move the attachment points outward and that changes the suspension geometry! That's something that I wouldn't want to do without runnning some form of suspension design program. You could end up with a significant "dynamic" change.
Keep in mind that it's easy to get the wheels pointing in the correct direction when only conserned with a static position, it's the dynamic stuff that gets difficult!!
When Adam told me that it rides exactly the same after installing the arms, I knew we didn't do anything "wrong". Just got rid of the hitting the pulley.
And as an added note; If you already have traction arms that have an assembled length close to the stock ones, you could have the arms without the threaded section installed and just tapped for a heim joint. It would be hard to do with the ones Adam has due to my threading it for 12x1.5 threaded rod (the stock size). A metric heim may be hard to find.
Wes
Honda-Tech Member
Joined: Apr 2004
Posts: 287
Likes: 0
i had a similar problem...
i was using this fluidampr race crank pulley in an EF

with our custom motor mounts (2 OEM ED, 1 OEM DA driver's + 1 HCP/ES urethane front mount.. 4 mounts & vibration free ... ).. similar placement as OEM EF8/9... note to Wes: we were a bit inspired by your custom Jaguar IRS bushing mounts and came up with these ;-).. they work QUITE well... a lot better than the HASport's i currently have in my new car.... 4 mounts and no buzzing is much better than the cheap crappy 3 HASport urethane....
so anyways ... crank pulley was rubbing the radius rod due to the massive size of the Fluidampr...
so, after a little brainstorming we came up with this prototype

so.... here you will see the stock ED radius rod...and the new rod next to it...
the curved rod is from a 92ish Accord....
first you have to slightly elongate one of the bolt holes on the LCA end... (the spacing is a little different than the ED)...
but then you are left with the problem of overall length which is not the same... this is where the machine shop really comes in handy... as you need to extend the threads father down the shaft after you machine down the outer area farther so that it matches the ED...

we also had the machine shop machine the RR down another 1/8" past stock on both rods (the accord one and a spare stock ED one).... to increase caster
here's a side view of the finished piece...

for the 'prototype' version..we just used a table grinder and "machined" ( ;-) ) down the area in question..... but since it didnt have enough threads...we had to use a collar on the end of it to act as a spacer between the washer plate that goes on the outside of the bushing and the nut on the end of the radius rod... that was just fine and dandy but required a slight dimple to be added to the stock-replacement "CSF" brand ED radiator for clearance (brass? end tanks..not sure if OEM is plastic end tanks? so may pose a problem)... but anyways this wasnt really an option once a Fluidampr radiator was in use.... hence the upgraded machine shop version...
so this mod is doable on both a 'hacker' (grind, spacer, dimple) spec and on a pro level (machine shop)... ;-) using an OEM part...
i do have to save i love your custom fabbed radius rod... but thought i'd throw this up as another option.. since it's a fair bit easier route to go with the OEM piece...
oh...btw ground clearance is not a problem with this piece even when slammed...
Modified by alexdog69 at 9:45 PM 3/26/2006
i was using this fluidampr race crank pulley in an EF
with our custom motor mounts (2 OEM ED, 1 OEM DA driver's + 1 HCP/ES urethane front mount.. 4 mounts & vibration free
... ).. similar placement as OEM EF8/9... note to Wes: we were a bit inspired by your custom Jaguar IRS bushing mounts and came up with these ;-).. they work QUITE well... a lot better than the HASport's i currently have in my new car.... 4 mounts and no buzzing is much better than the cheap crappy 3 HASport urethane....so anyways ... crank pulley was rubbing the radius rod due to the massive size of the Fluidampr...
so, after a little brainstorming we came up with this prototype
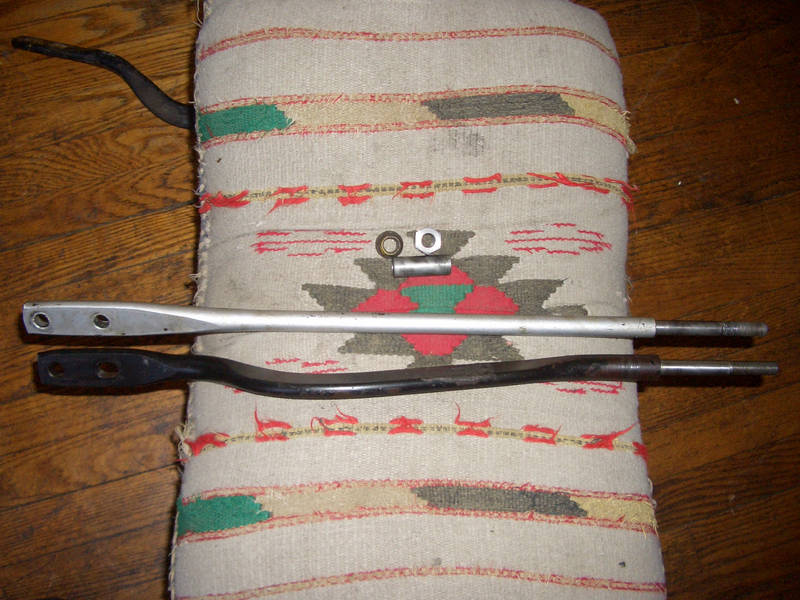
so.... here you will see the stock ED radius rod...and the new rod next to it...
the curved rod is from a 92ish Accord....
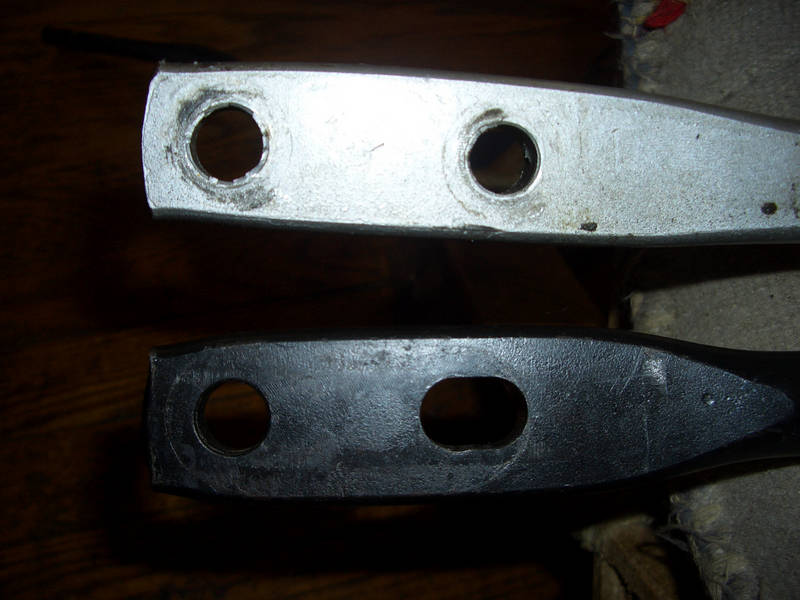
first you have to slightly elongate one of the bolt holes on the LCA end... (the spacing is a little different than the ED)...
but then you are left with the problem of overall length which is not the same... this is where the machine shop really comes in handy... as you need to extend the threads father down the shaft after you machine down the outer area farther so that it matches the ED...
we also had the machine shop machine the RR down another 1/8" past stock on both rods (the accord one and a spare stock ED one).... to increase caster
here's a side view of the finished piece...
for the 'prototype' version..we just used a table grinder and "machined" ( ;-) ) down the area in question..... but since it didnt have enough threads...we had to use a collar on the end of it to act as a spacer between the washer plate that goes on the outside of the bushing and the nut on the end of the radius rod... that was just fine and dandy but required a slight dimple to be added to the stock-replacement "CSF" brand ED radiator for clearance (brass? end tanks..not sure if OEM is plastic end tanks? so may pose a problem)... but anyways this wasnt really an option once a Fluidampr radiator was in use.... hence the upgraded machine shop version...
so this mod is doable on both a 'hacker' (grind, spacer, dimple) spec and on a pro level (machine shop)... ;-) using an OEM part...
i do have to save i love your custom fabbed radius rod... but thought i'd throw this up as another option.. since it's a fair bit easier route to go with the OEM piece...
oh...btw ground clearance is not a problem with this piece even when slammed...
Modified by alexdog69 at 9:45 PM 3/26/2006

Honda-Tech Member
Joined: Nov 2002
Posts: 6,725
Likes: 0
From: GA
Heh, I'm chuckling at the "how-to" removal of a radius rod.
I'm jealous of everyone's custom-abilities. Can't wait to have my own place one day.
I'm jealous of everyone's custom-abilities. Can't wait to have my own place one day.
Member
Joined: Oct 2002
Posts: 2,351
Likes: 1
From: Winnetka, Calif, USA
Alexdog69;
Good solution!
Here is an idea for when you do it again (LOL).
Just cut off the end with the threaded section. Then take a 1 1/2" round section of steel and drill one end to slide over what is left of the arm (by about 1"). On the other end of the round section, drill and tap it for 12x1.5 threaded rod. Weld around the end of the added section to the arm. (I got the threaded rod from Mc Mastercarr)
Your comment about caster change was interesting. That's why I built the arms I did with the "four" washers. It allows you to add or remove some as desired.
Wes
Honda-Tech Member
Joined: Oct 2004
Posts: 4,915
Likes: 1
From: jimmysville VT,, NY, USA
I see your car is only running the alternator, why not just get a CTR crank pulley? and not need the custom rods.
Member
Joined: Oct 2002
Posts: 2,351
Likes: 1
From: Winnetka, Calif, USA
As I understand it; the CTR pulley is a solid piece and doesn't have any form of "harmonic balancer". There are stories out there that it's usage can lead to early bearing failure.
Wes
Wes


Member
Joined: Aug 2002
Posts: 3,864
Likes: 1
From: Wilmington, De, USA
<TABLE WIDTH="90%" CELLSPACING=0 CELLPADDING=0 ALIGN=CENTER><TR><TD>Quote, originally posted by Mr_CRX »</TD></TR><TR><TD CLASS="quote">
All of the traction bar setups I've seen still utilize the stock lower control arm, and don't do anything to move the radius rod out of the way of a larger engine. This fixes that problem. </TD></TR></TABLE>
Wes can do some awesome fabwork and that is pretty creative.
FWIW, I don't have any problems with the crank pulley hitting hte radius rods on my full-race bars. I have hasport mounts though, so I don't know how much of a difference it makes. The full race arms are not stock arms and they are completely adjustable. Just exactly how low is your car if you are hitting the radius rods? When I initially installed the full-race bars I was afraid it was going to hit but once the car was on the ground I had plenty of room. Maybe if I were super super super slammed I might be worried.
You guys should fab up a few more and sell-em.
Thread Starter
Honda-Tech Member
iTrader: (1)
Joined: Jan 2004
Posts: 4,914
Likes: 1
From: SD, CA, USA
<TABLE WIDTH="90%" CELLSPACING=0 CELLPADDING=0 ALIGN=CENTER><TR><TD>Quote, originally posted by 88 rex »</TD></TR><TR><TD CLASS="quote"> The full race arms are not stock arms and they are completely adjustable.</TD></TR></TABLE>
What I meant to say was that since the full race arms are straight, and still bolt to the original LCA, the angle is not changed to create any difference in clearance. I was under the impression that they were just adjustable for caster?
<TABLE WIDTH="90%" CELLSPACING=0 CELLPADDING=0 ALIGN=CENTER><TR><TD>Quote, originally posted by 88 rex »</TD></TR><TR><TD CLASS="quote"> Just exactly how low is your car if you are hitting the radius rods? </TD></TR></TABLE>
I have Koni "Yellows" and H&R Race Springs. This is the only decent picture I can show of how low it sits as of recently.
Member
Joined: Aug 2002
Posts: 3,864
Likes: 1
From: Wilmington, De, USA
<TABLE WIDTH="90%" CELLSPACING=0 CELLPADDING=0 ALIGN=CENTER><TR><TD>Quote, originally posted by Mr_CRX »</TD></TR><TR><TD CLASS="quote">
What I meant to say was that since the full race arms are straight, and still bolt to the original LCA, the angle is not changed to create any difference in clearance. I was under the impression that they were just adjustable for caster?
I have Koni "Yellows" and H&R Race Springs. This is the only decent picture I can show of how low it sits as of recently.
</TD></TR></TABLE>
Yea, you are correct. Caster is only adjustable But you can adjust with a simple turn while they are still mounted on the car.
I have koni yellows and neuspeed sports and I'm about as low as you. The full-race arms I believe are slightly lower than the stock one. I could be wrong. But for some reason, I have no issues at all and the full-race arms are thicker than stock. Maybe it's your mounts?

Front gap (like the wheels )
What I meant to say was that since the full race arms are straight, and still bolt to the original LCA, the angle is not changed to create any difference in clearance. I was under the impression that they were just adjustable for caster?
I have Koni "Yellows" and H&R Race Springs. This is the only decent picture I can show of how low it sits as of recently.
</TD></TR></TABLE>Yea, you are correct. Caster is only adjustable
But you can adjust with a simple turn while they are still mounted on the car.I have koni yellows and neuspeed sports and I'm about as low as you. The full-race arms I believe are slightly lower than the stock one. I could be wrong. But for some reason, I have no issues at all and the full-race arms are thicker than stock. Maybe it's your mounts?
Front gap (like the wheels
)