

rusty GSR blades / swirlies DIY polished to a bling bling

Thread Starter
Joined: Jun 2005
Posts: 169
Likes: 0
From: LI, ny, take a guess
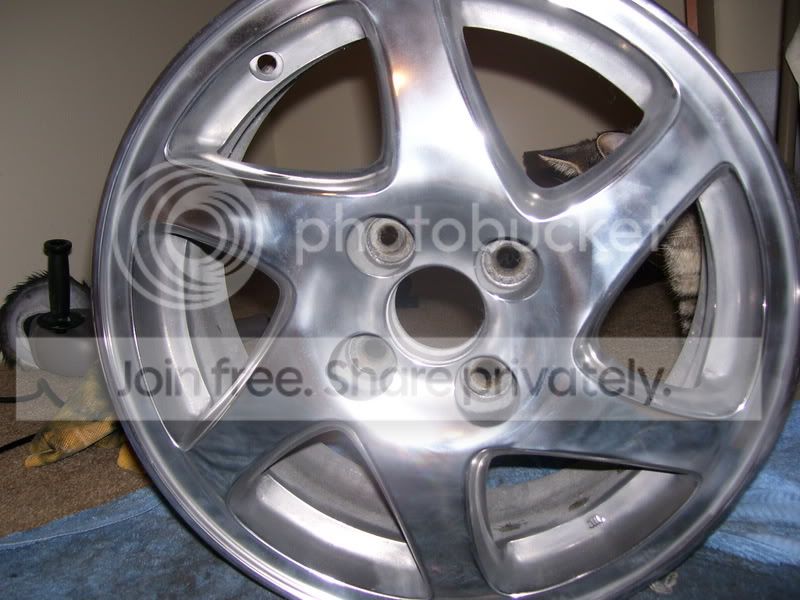
well i was looking at my rims the other day.. n im like damn this one rim BLOWS! so i had to do somthing about it .. i was about to go wit some slips but changed my mind and figured polishing would b a good learning experience and theres nuttin wrong wit some blinging blades...
as u can c ... this one rim is horrible!!!! rusty rusty rusty!!!


did some searchs and figured out what to do. things you need...
1. aircraft remover... thing works magic .. it eats everything (even your skin) follow the instructions on the can ...
2. metal bucket and brush to put the aircraft in.
3. I bought a trangle metal scraper.. i figured it would help a lot wit the rust. and it did!!!
4. sandpaper... grit sizes.. 220, 320, 400, 600, 800, 1500
5. GLOVES!!! or black hands for a month and burns from the aircraft
6. anything that can spray or squirt water. I used a 50 cent juice bottle.
7. Mothers aluminium and mag polish
8. box of cut up white Tee's to use for polishing unless u have a buffer.
9. steel wool
10. LOTS AND when i say LOTS its cause i mean it... LOTS OF TIME!!!!
(this was on the cheap side... 30-40$ any one can do this.. wit out no xpensive machines)
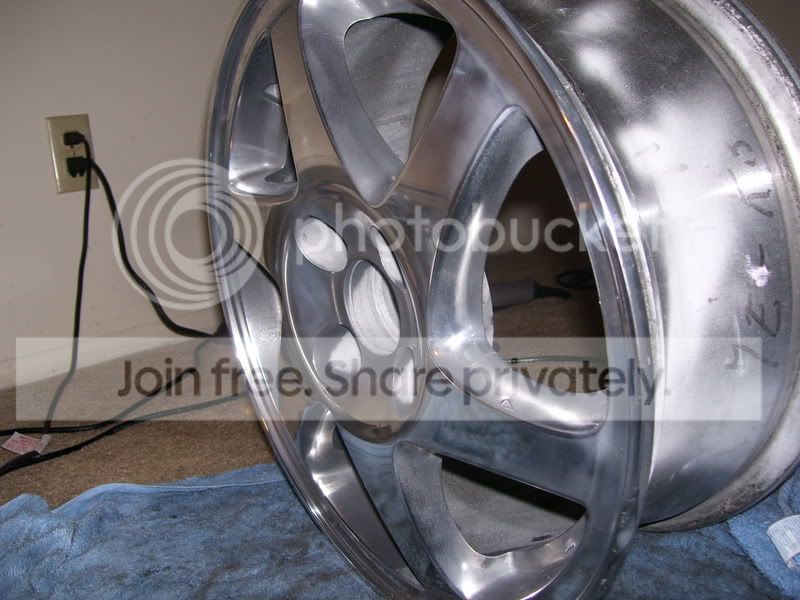
so this is what you do ...
1. brush some aicraft on the whole rim, put a decent amount on and make sure its warm or else this stuff wont work as good. let it stand for a bit.. go eat or somthing.
2. afer like 20-30min u should see the clearcoat all chappy and anything else on the rim that ins't metal all bubbly or just liquified. (the rust turns real dark)
3. use the steel wool to take all the guck off.
4. FOR THE RUST... i used the scraper.. useing the point of it to sorda chip away at the rust... keeping hiting it and you'll see the thing come off in chunks. If its a thick layer then chip what you can and then apply some more aircraft remover on it and move on to the next section of the rim and go back to it later.
5. start sanding... 220 grit is dry sanding ... take your time .. this will take the longest and will make u wanna shoot your self too.
6. wet sand with every other grit, using lots and lots of water and patients. clean between changing grits with water and paper towel.
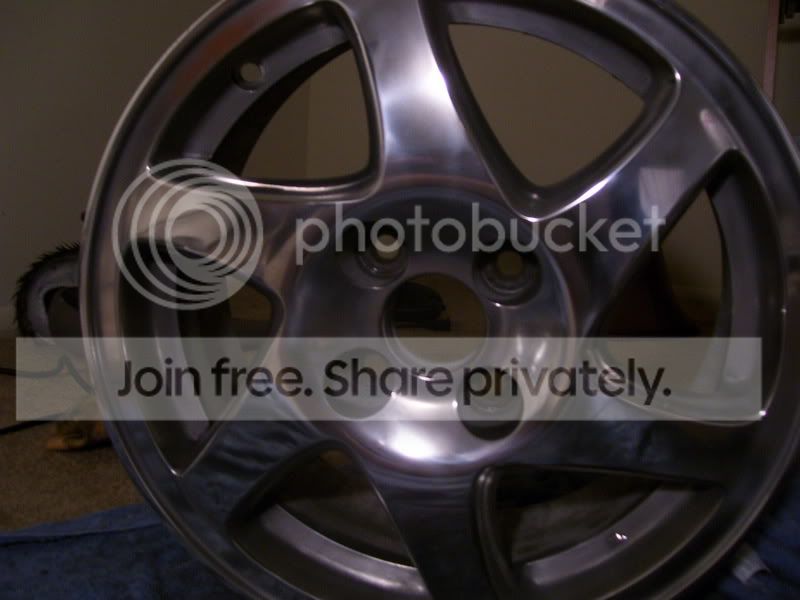
7. when your done with the sanding and the rim is very smooth and very dull and even, then your ready to polish.
8. take out the what ever it is that your using to polish and apply some mothers to it... buff it in and keep buffing till you see the black residue.. (takes like 10 seconds) then take a clean cloth or w.e your using n buff it off.. and it's like magic ... finish the rest of the rim off..
9. the time and effort you put in to it should pay off once u look at the rim and see your reflection of you and everything behind you.
enjoy... quest.. comments..


That ones a lil blurry : (
***note i didnt really work hard on the inside part of the rim, mainly the face.
***and yes im doing all 4.. not just one rim
edit...

using the scraper to chip away at it.
By the way dont bother cleaning your rim... the aircraft takes out everything.
Modified by LSDC-4 at 8:01 PM 3/23/2006
as u can c ... this one rim is horrible!!!! rusty rusty rusty!!!
did some searchs and figured out what to do. things you need...
1. aircraft remover... thing works magic .. it eats everything (even your skin) follow the instructions on the can ...
2. metal bucket and brush to put the aircraft in.
3. I bought a trangle metal scraper.. i figured it would help a lot wit the rust. and it did!!!
4. sandpaper... grit sizes.. 220, 320, 400, 600, 800, 1500
5. GLOVES!!! or black hands for a month and burns from the aircraft
6. anything that can spray or squirt water. I used a 50 cent juice bottle.
7. Mothers aluminium and mag polish
8. box of cut up white Tee's to use for polishing unless u have a buffer.
9. steel wool
10. LOTS AND when i say LOTS its cause i mean it... LOTS OF TIME!!!!
(this was on the cheap side... 30-40$ any one can do this.. wit out no xpensive machines)
so this is what you do ...
1. brush some aicraft on the whole rim, put a decent amount on and make sure its warm or else this stuff wont work as good. let it stand for a bit.. go eat or somthing.
2. afer like 20-30min u should see the clearcoat all chappy and anything else on the rim that ins't metal all bubbly or just liquified. (the rust turns real dark)
3. use the steel wool to take all the guck off.
4. FOR THE RUST... i used the scraper.. useing the point of it to sorda chip away at the rust... keeping hiting it and you'll see the thing come off in chunks. If its a thick layer then chip what you can and then apply some more aircraft remover on it and move on to the next section of the rim and go back to it later.
5. start sanding... 220 grit is dry sanding ... take your time .. this will take the longest and will make u wanna shoot your self too.
6. wet sand with every other grit, using lots and lots of water and patients. clean between changing grits with water and paper towel.
7. when your done with the sanding and the rim is very smooth and very dull and even, then your ready to polish.
8. take out the what ever it is that your using to polish and apply some mothers to it... buff it in and keep buffing till you see the black residue.. (takes like 10 seconds) then take a clean cloth or w.e your using n buff it off.. and it's like magic ... finish the rest of the rim off..
9. the time and effort you put in to it should pay off once u look at the rim and see your reflection of you and everything behind you.
enjoy... quest.. comments..
That ones a lil blurry : (
***note i didnt really work hard on the inside part of the rim, mainly the face.
***and yes im doing all 4.. not just one rim
edit...
using the scraper to chip away at it.
By the way dont bother cleaning your rim... the aircraft takes out everything.
Modified by LSDC-4 at 8:01 PM 3/23/2006

Thread Starter
Joined: Jun 2005
Posts: 169
Likes: 0
From: LI, ny, take a guess
<TABLE WIDTH="90%" CELLSPACING=0 CELLPADDING=0 ALIGN=CENTER><TR><TD>Quote, originally posted by EK k kay »</TD></TR><TR><TD CLASS="quote">Looks good. I've been thinking about doing the same to my set of blades, but it seems like it would take forever.</TD></TR></TABLE>
it doesn't take all that long. this one rim did for me .. the rust added prob another hour. but if u dedicate like 3 hrs a night.. you'll do one rim in twodays.. isnt so bad. trust me its worth it.
it doesn't take all that long. this one rim did for me .. the rust added prob another hour. but if u dedicate like 3 hrs a night.. you'll do one rim in twodays.. isnt so bad. trust me its worth it.
Thread Starter
Joined: Jun 2005
Posts: 169
Likes: 0
From: LI, ny, take a guess
<TABLE WIDTH="90%" CELLSPACING=0 CELLPADDING=0 ALIGN=CENTER><TR><TD>Quote, originally posted by MIdoriEK »</TD></TR><TR><TD CLASS="quote">I would have just glass beaded them and called it a day. But you gat an A for effort. Looks clean. </TD></TR></TABLE>
thanks.. too bad not to many people have access to a glass beater. Be carefull too it can leave groves, but you would prob do all four rims in about the same time it takes to do just one rim by sanding it.
thanks.. too bad not to many people have access to a glass beater. Be carefull too it can leave groves, but you would prob do all four rims in about the same time it takes to do just one rim by sanding it.
Thread Starter
Joined: Jun 2005
Posts: 169
Likes: 0
From: LI, ny, take a guess
<TABLE WIDTH="90%" CELLSPACING=0 CELLPADDING=0 ALIGN=CENTER><TR><TD>Quote, originally posted by DavidR »</TD></TR><TR><TD CLASS="quote">Unless those were crome plated, that is not rust, it is brake dust. </TD></TR></TABLE>
actually i had a sticky caliper and it chewed up my rotor. it rained out here for like a week striaght somtime during oct or november... n my rotor would juss spit out rust.... i didn't notice to about a few days later that the rust fell onto the rim and dryed up there. trust me ... its rust!
actually i had a sticky caliper and it chewed up my rotor. it rained out here for like a week striaght somtime during oct or november... n my rotor would juss spit out rust.... i didn't notice to about a few days later that the rust fell onto the rim and dryed up there. trust me ... its rust!
Trending Topics
Thread Starter
Joined: Jun 2005
Posts: 169
Likes: 0
From: LI, ny, take a guess
<TABLE WIDTH="90%" CELLSPACING=0 CELLPADDING=0 ALIGN=CENTER><TR><TD>Quote, originally posted by pengster »</TD></TR><TR><TD CLASS="quote">who owned that wheel before?
did that wheel happen to do that while you owned it?
did you polish it prior?
i think all the rust built up because you, or whoever stripped the paint and clearcoat off of the space between the spokes, didnt bother to paint it. whoever doesnt paint in between the spokes is forgetting one very important thing...
oh, and you forgot to mention to paint in between the spokes after stripping the paint. </TD></TR></TABLE>
actually the clear coat was chiping off as you can see in the pics.. the rims have seen there fair of salt n snow . so no it wasn't polished before. I don't have to paint in between the spokes. Juss put polish on them....
did that wheel happen to do that while you owned it?
did you polish it prior?
i think all the rust built up because you, or whoever stripped the paint and clearcoat off of the space between the spokes, didnt bother to paint it. whoever doesnt paint in between the spokes is forgetting one very important thing...
oh, and you forgot to mention to paint in between the spokes after stripping the paint.
</TD></TR></TABLE>actually the clear coat was chiping off as you can see in the pics.. the rims have seen there fair of salt n snow
. so no it wasn't polished before. I don't have to paint in between the spokes. Juss put polish on them....
Cogent Argument Enthusiast

Joined: Apr 2005
Posts: 8,029
Likes: 0
From: Solving riddles, Gotham
Bump for an arduous project I have commenced. I just started today, and since I have a bead blaster at work I just used that; it took like 45 minutes to sand the curb rash and blast them. Then on to the boring part... drysanding the first wheel with 350, which took an hour to finish thoroughly  I have about seven different grit paper, and I am finishing up with 2000 grit; hopefully I will be done sometime this month
After blasting:
After 350:
I have about seven different grit paper, and I am finishing up with 2000 grit; hopefully I will be done sometime this month After blasting:
After 350:
official honda whore
Joined: Nov 2002
Posts: 8,454
Likes: 0
From: not tellin you where, pa, usa
i really need to do this to mine, and if i ever sell them it will add to the resale value... has anyone cleared the rims after polishing them so that they dont need to be constantly polished every other week?
Cogent Argument Enthusiast
Joined: Apr 2005
Posts: 8,029
Likes: 0
From: Solving riddles, Gotham
Well I had off both jobs today, so I decided to completely do one rim. I finished the first one this week but was disappointed; that is probably attributable to the fact that I did not use a power sander to start that one, and instead started at 350. With this current rim, I started at 240 with a power sander, and worked my way up to 2000, while half-assing the sides of the spokes. I've seen worse, and have seen better, and I'm sorry for the shitty camera + taking the pic inside because it's dark:
Damn, nevermind; imageshack is being a bitch and won't let me link any pics
Damn, nevermind; imageshack is being a bitch and won't let me link any pics


Thread
Thread Starter
Forum
Replies
Last Post
khaledbuiltEF
Florida (Sales)
3
Oct 21, 2012 11:54 PM
4DooRGiSzer
Honda / Acura
2
Mar 30, 2003 09:18 PM