

TOE problem?

Honda-Tech Member

Joined: Apr 2002
Posts: 18,961
Likes: 76
From: I am Tyson


Thread Starter
Joined: Sep 2004
Posts: 133
Likes: 0
From: Kennewick, WA, US
im talking about the front or the car the tie rods are rusted shut and i cant adjust my toe i got new tires and the toe was so off that it fuked up my tires so before i get it allined i want to fix it a little(i plan to buy new outer tie rods
Trending Topics
Honda-Tech Member
Joined: Apr 2002
Posts: 18,961
Likes: 76
From: I am Tyson
after taking the cotter pin out and loosening the castle nut (dont remove all the way, keep it loosely threaded), you need to pop off the balljoint (its not a bushing).
there are many ways and tools to pop it off. ive used them all. ive found that a 3-4lbs sledge hammer is best. just start whacking at the edge of the knuckle sidways. do not hit the threads, do not try to hammer the joint UP. just hit the side of the knuckle where its sticking out. it helps to have one hand pulling up on the tie rod to provide some vertical force. just wail on it wit hthe hammer... it WILL come out.
then you just need a 22mm wrench to take off the lock nut, and a 19mm to hold the tie rod in place. put the balljoint back in to help. once that is loose, just twist it off and replace.
get an alignment after youve eyeballed the alignment of the wheel. take a test drive and readjust. but get a professional alignment immediately. if youre doing both, work on one side at a time.
Honda-Tech Member
Joined: Sep 2004
Posts: 1,390
Likes: 1
From: downshifting into 5th,, nyc, usa
<TABLE WIDTH="90%" CELLSPACING=0 CELLPADDING=0 ALIGN=CENTER><TR><TD>Quote, originally posted by Tyson »</TD></TR><TR><TD CLASS="quote">after taking the cotter pin out and loosening the castle nut (dont remove all the way, keep it loosely threaded), you need to pop off the balljoint (its not a bushing).
there are many ways and tools to pop it off. ive used them all. ive found that a 3-4lbs sledge hammer is best. just start whacking at the edge of the knuckle sidways. do not hit the threads, do not try to hammer the joint UP. just hit the side of the knuckle where its sticking out. it helps to have one hand pulling up on the tie rod to provide some vertical force. just wail on it wit hthe hammer... it WILL come out.
then you just need a 22mm wrench to take off the lock nut, and a 19mm to hold the tie rod in place. put the balljoint back in to help. once that is loose, just twist it off and replace.
get an alignment after youve eyeballed the alignment of the wheel. take a test drive and readjust. but get a professional alignment immediately. if youre doing both, work on one side at a time.</TD></TR></TABLE>
i'd like to add that a jack with something (whatever makes it work) on top can help with the vertical force, and often keeps the whacking to a minimum. i don't like ruining the nice new paint on my control arms.

Honda-Tech Member
Joined: Apr 2002
Posts: 18,961
Likes: 76
From: I am Tyson
yeah, those are a bitch. theyre lock washers that prevent the tie rod from coming off. i just did them the other night on a steering rack i had to ship out.
ill tell you this much, its MUCH MUCH MUCH easier to take them out when the rack is off the car.
youre SUPPOSED to stick a small screwdriver in there and UNBEND the tabs on both sides. what sucks is that when its installed in the car, the angles can almost be inaccessible. it helped a lot that i had a really small snap-on pick and pry bar to help pry it away. then i used a vice grip to completely flatten the piece. once its flat on both sides, you can unscrew the tie rod from the rack using a 19mm and 22mm wrench, respectively.
HOWEVER, this is my ghetto way of doing it. just get an adjustable wrench in there, dont worry about unbending the tabs. and wrench the damn thing off. if you can get a good grip on it, you can overcome the lock washer and it will just break. then just buy another one for $2. its worth the trouble.
good luck, i know theyre a pain.
btw, are you doing the passenger side? or both sides? if youre doing the passenger side, now is a GREAT time to replace that steering rack end bushing.
the rack end bushing is an OEM part. just get it from the dealer or something. if you look inside the passenger side of the steering rack, its the white plastic thingy. and it only comes out with the tie rod off.
heres more info.
https://honda-tech.com/zerothread?id=1117870
hopefully youve figured all this out by now.
this is the rack end bushing. looking from the passenger side.

here it is completely out.
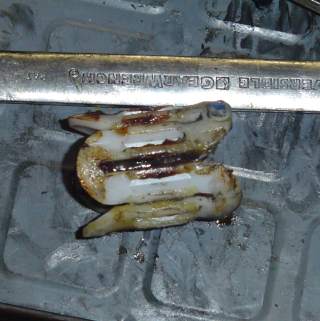
now this is what we're talking about. the lcok washer. see how the tabs are bent.

here they are flattened. i used the vice grip to flatten it completely.

this is the tool i had available that made it a bit easier. i also used a small, sharp screw driver. first i used the pick side of the pry tool to punch the tab open a bit. then used the small screwdriver to open it up a little. then further opened it with the pry bar side of the pick. then finished it off with the vice grip.
like i said, much easier when its out of the car. its nearly impossible to do under the car. of course it helps if you drop the 4 bolts of the steering rack to get more wiggle room too. but its still crowded under there. having done this both ways now, i can say its worth the time to take the rack out completely.
ill tell you this much, its MUCH MUCH MUCH easier to take them out when the rack is off the car.
youre SUPPOSED to stick a small screwdriver in there and UNBEND the tabs on both sides. what sucks is that when its installed in the car, the angles can almost be inaccessible. it helped a lot that i had a really small snap-on pick and pry bar to help pry it away. then i used a vice grip to completely flatten the piece. once its flat on both sides, you can unscrew the tie rod from the rack using a 19mm and 22mm wrench, respectively.
HOWEVER, this is my ghetto way of doing it. just get an adjustable wrench in there, dont worry about unbending the tabs. and wrench the damn thing off. if you can get a good grip on it, you can overcome the lock washer and it will just break. then just buy another one for $2. its worth the trouble.
good luck, i know theyre a pain.
btw, are you doing the passenger side? or both sides? if youre doing the passenger side, now is a GREAT time to replace that steering rack end bushing.
the rack end bushing is an OEM part. just get it from the dealer or something. if you look inside the passenger side of the steering rack, its the white plastic thingy. and it only comes out with the tie rod off.
heres more info.
https://honda-tech.com/zerothread?id=1117870
hopefully youve figured all this out by now.
this is the rack end bushing. looking from the passenger side.
here it is completely out.
now this is what we're talking about. the lcok washer. see how the tabs are bent.
here they are flattened. i used the vice grip to flatten it completely.
this is the tool i had available that made it a bit easier. i also used a small, sharp screw driver. first i used the pick side of the pry tool to punch the tab open a bit. then used the small screwdriver to open it up a little. then further opened it with the pry bar side of the pick. then finished it off with the vice grip.
like i said, much easier when its out of the car. its nearly impossible to do under the car. of course it helps if you drop the 4 bolts of the steering rack to get more wiggle room too. but its still crowded under there. having done this both ways now, i can say its worth the time to take the rack out completely.
Honda-Tech Member
Joined: Apr 2002
Posts: 18,961
Likes: 76
From: I am Tyson
take off the steering column cover and loosen the 10mm bolt at the bottom.
http://media.honda.co.uk/car/o...5.pdf
http://media.honda.co.uk/car/o...5.pdf

Joined: Jan 2006
Posts: 842
Likes: 0
From: Chicago, IL
<TABLE WIDTH="90%" CELLSPACING=0 CELLPADDING=0 ALIGN=CENTER><TR><TD>Quote, originally posted by Tyson »</TD></TR><TR><TD CLASS="quote">after taking the cotter pin out and loosening the castle nut (dont remove all the way, keep it loosely threaded), you need to pop off the balljoint (its not a bushing).
there are many ways and tools to pop it off. ive used them all. ive found that a 3-4lbs sledge hammer is best. just start whacking at the edge of the knuckle sidways. do not hit the threads, do not try to hammer the joint UP. just hit the side of the knuckle where its sticking out. it helps to have one hand pulling up on the tie rod to provide some vertical force. just wail on it wit hthe hammer... it WILL come out.
then you just need a 22mm wrench to take off the lock nut, and a 19mm to hold the tie rod in place. put the balljoint back in to help. once that is loose, just twist it off and replace.
get an alignment after youve eyeballed the alignment of the wheel. take a test drive and readjust. but get a professional alignment immediately. if youre doing both, work on one side at a time.</TD></TR></TABLE>
Tyson I think ive read these words from your mouth about 8 diff. times on other posts lol. Yea with all the other civics you can just unbolt the steering rack basically, but in the crx you have to do alot more ****, correct?
Honda-Tech Member
Joined: Apr 2002
Posts: 18,961
Likes: 76
From: I am Tyson
no i dont think civics are any different. on EGs, the inner rack is a bit different from what ive seen but still the same balljoint and tie rod design, and they use a 19mm locknut, instead of the abnormally huge 22mm. i think the outer tie rods are the same part number. but its all the same in practice as far as i know.
Honda-Tech Member
Joined: Apr 2002
Posts: 18,961
Likes: 76
From: I am Tyson
you mean the pinion.
try loosening the big adjustment nut and take the spring and retainer out. then you can push the bearing and pinion straight out. youll probably need a new bearing and seal.
try loosening the big adjustment nut and take the spring and retainer out. then you can push the bearing and pinion straight out. youll probably need a new bearing and seal.
Honda-Tech Member
Joined: Apr 2002
Posts: 18,961
Likes: 76
From: I am Tyson
look up at my pics. its got yellow paint on it.
use a channel lock wrench, its the only wrench available that will open up big enough to open that big *** lock nut. i had to use some sockets and extensions on the handles to get enough torque on it.
use a channel lock wrench, its the only wrench available that will open up big enough to open that big *** lock nut. i had to use some sockets and extensions on the handles to get enough torque on it.
Honda-Tech Member
Joined: Sep 2004
Posts: 1,390
Likes: 1
From: downshifting into 5th,, nyc, usa
<TABLE WIDTH="90%" CELLSPACING=0 CELLPADDING=0 ALIGN=CENTER><TR><TD>Quote, originally posted by Tyson »</TD></TR><TR><TD CLASS="quote">look up at my pics. its got yellow paint on it.
use a channel lock wrench, its the only wrench available that will open up big enough to open that big *** lock nut. i had to use some sockets and extensions on the handles to get enough torque on it. </TD></TR></TABLE>
you do mean the only wrench available in your toolbox, right?
use a channel lock wrench, its the only wrench available that will open up big enough to open that big *** lock nut. i had to use some sockets and extensions on the handles to get enough torque on it. </TD></TR></TABLE>
you do mean the only wrench available in your toolbox, right?

Thread
Thread Starter
Forum
Replies
Last Post
h22_crx
Honda Civic / Del Sol (1992 - 2000)
6
Nov 12, 2007 10:11 PM
Boosted Chemist
Honda CRX / EF Civic (1988 - 1991)
3
Jun 14, 2004 03:19 AM