

Lookie at what I made...

Thread Starter
Honda-Tech Member
Joined: Mar 2002
Posts: 4,341
Likes: 0
From: Bay Area, CA, United States
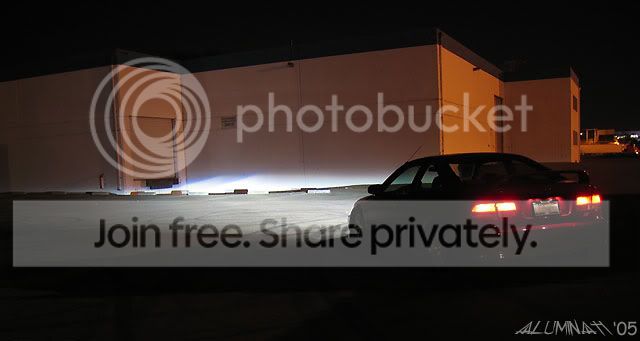
UPDATE: beam pics are uploaded! scroll down! now!! 

e46 HID projectors retrofitted into 99-00 Civic headlghts i bought an extra set of headlights and spent all weekend doing this lol. these should be on the car on friday and i'll have pics of the beam pattern then
parts i used:
'99 headlights
e46 projectors (off Audi TT, 3-series Bimmers, made by Bosch)
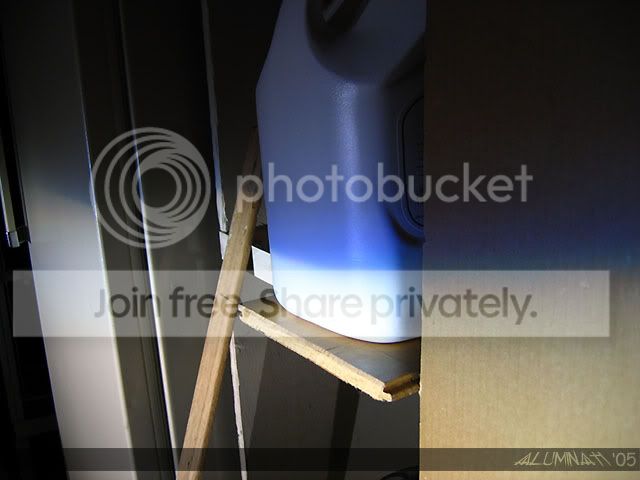
15oz cans for a shroud
#8-32 type screws, nuts and washers
aluminum tape
paint for housing and stock headlight reflector
i used the oven method to open and paint the housings and retroed the projectors in
prior to the actual retro i prepped the projector but cutting up a 15oz can to use as a shroud, used jb weld to secure it and the trim piece in place and used aluminum tape to cover it all up.
i like the industrial look of it.


uses d2s bulbs

and yea i had to drill out holes on the back due to clearance issues, but those will be covered up
and its going onto this:
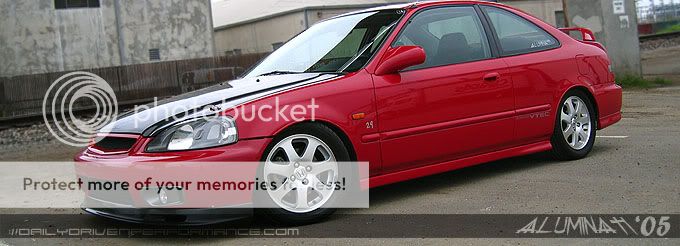
i cant wait!
UPDATE: tha beam pattern PICS!!


Modified by THE PLAYER at 10:01 PM 10/12/2005
e46 HID projectors retrofitted into 99-00 Civic headlghts
i bought an extra set of headlights and spent all weekend doing this lol. these should be on the car on friday and i'll have pics of the beam pattern then parts i used:
'99 headlights
e46 projectors (off Audi TT, 3-series Bimmers, made by Bosch)
15oz cans for a shroud
#8-32 type screws, nuts and washers
aluminum tape
paint for housing and stock headlight reflector
i used the oven method to open and paint the housings and retroed the projectors in
prior to the actual retro i prepped the projector but cutting up a 15oz can to use as a shroud, used jb weld to secure it and the trim piece in place and used aluminum tape to cover it all up.
i like the industrial look of it.
uses d2s bulbs
and yea i had to drill out holes on the back due to clearance issues, but those will be covered up
and its going onto this:
i cant wait!
UPDATE: tha beam pattern PICS!!
Modified by THE PLAYER at 10:01 PM 10/12/2005

Trending Topics

Thread Starter
Honda-Tech Member
Joined: Mar 2002
Posts: 4,341
Likes: 0
From: Bay Area, CA, United States
thanks for the comments. i gotta a few PM's about putting on a shroud. I did put a shroud, but it's not covering the whole projector obviously. I just made it to just cover the light, I wanted to keep it simple. I like the way it looks
Junior Member
Joined: Mar 2004
Posts: 330
Likes: 0
From: Bay Area, Ca
Looks pretty good! Although, I do think it would look a little better with a shroud covering the projectors. But, you said your happy with the look so . Did you seal them up yet? You should re-seal them after aligning your cut-offs when mounted on the car. I had to re-open mine due to an inaccurate cut-off.
. Did you seal them up yet? You should re-seal them after aligning your cut-offs when mounted on the car. I had to re-open mine due to an inaccurate cut-off.

Honda-Tech Member
Joined: Oct 2003
Posts: 4,056
Likes: 0
From: NY to GA, USA
<TABLE WIDTH="90%" CELLSPACING=0 CELLPADDING=0 ALIGN=CENTER><TR><TD>Quote, originally posted by kleanlscivic »</TD></TR><TR><TD CLASS="quote">looks good nice looking coupe also </TD></TR></TABLE>
</TD></TR></TABLE>
Thread Starter
Honda-Tech Member
Joined: Mar 2002
Posts: 4,341
Likes: 0
From: Bay Area, CA, United States
<TABLE WIDTH="90%" CELLSPACING=0 CELLPADDING=0 ALIGN=CENTER><TR><TD>Quote, originally posted by robbieshonda »</TD></TR><TR><TD CLASS="quote">The can looks alil AhEm...Industrial. But it should look pretty sharp on the car</TD></TR></TABLE>
haha as long as it works
haha
as long as it works
Thread Starter
Honda-Tech Member
Joined: Mar 2002
Posts: 4,341
Likes: 0
From: Bay Area, CA, United States
<TABLE WIDTH="90%" CELLSPACING=0 CELLPADDING=0 ALIGN=CENTER><TR><TD>Quote, originally posted by ECAhatch »</TD></TR><TR><TD CLASS="quote">post up the DIY i want to made one so bad </TD></TR></TABLE>
<TABLE WIDTH="90%" CELLSPACING=0 CELLPADDING=0 ALIGN=CENTER><TR><TD>Quote, originally posted by RacerXI »</TD></TR><TR><TD CLASS="quote">Mind sharing "how" you mounted the projector to the headlight/halogen housing?</TD></TR></TABLE>
well I didn't take any pictures of the process. but it was simple really.
open up the headlights, i used the oven method. that info should be easily available through here
take out the stock headlight reflector via the adjustment screws, there are three of them, takes forever, esp. that bottom third one
once the reflector is out, take your projector measure it on the reflector. mark down where you want to drill and make sure it is level and secure. now i used some #8-32 screws (1 1/2in. long), nuts and washers to secure it on. you can prolly go a lil shorter with the screws. anyways, i put a few washers on both sides and secured it to the reflector housing. be careful and do not torque it too much as it might crack the reflector, torque it just enough. *now this works for the e46 projectors that i used since they are smaller (single xenon). other projectors vary in size and this method might not exactly work for you.
now you might have some clearance issues when putting the reflector back on, i had to drill out some holes in the back to make room. using a shorter screw can remedy this issue, but make sure it's long enough to go through the reflector.
now i painted the stock reflector a flat silver. a darker color probably would have been better to prevent light scatter, but i didnt think it would look good during the day. hopefully the shroud will block all the light scatter. and yup, i painted the housings gunmetal while i was at it
****, now i might just put these on today
i want to made one so bad </TD></TR></TABLE><TABLE WIDTH="90%" CELLSPACING=0 CELLPADDING=0 ALIGN=CENTER><TR><TD>Quote, originally posted by RacerXI »</TD></TR><TR><TD CLASS="quote">Mind sharing "how" you mounted the projector to the headlight/halogen housing?</TD></TR></TABLE>
well I didn't take any pictures of the process. but it was simple really.
open up the headlights, i used the oven method. that info should be easily available through here
take out the stock headlight reflector via the adjustment screws, there are three of them, takes forever, esp. that bottom third one
once the reflector is out, take your projector measure it on the reflector. mark down where you want to drill and make sure it is level and secure. now i used some #8-32 screws (1 1/2in. long), nuts and washers to secure it on. you can prolly go a lil shorter with the screws. anyways, i put a few washers on both sides and secured it to the reflector housing. be careful and do not torque it too much as it might crack the reflector, torque it just enough. *now this works for the e46 projectors that i used since they are smaller (single xenon). other projectors vary in size and this method might not exactly work for you.
now you might have some clearance issues when putting the reflector back on, i had to drill out some holes in the back to make room. using a shorter screw can remedy this issue, but make sure it's long enough to go through the reflector.
now i painted the stock reflector a flat silver. a darker color probably would have been better to prevent light scatter, but i didnt think it would look good during the day. hopefully the shroud will block all the light scatter. and yup, i painted the housings gunmetal while i was at it
****, now i might just put these on today
Honda-Tech Member
Joined: Oct 2004
Posts: 3,260
Likes: 1
From: The Real O.C. Oakland Chinatown, California, USA
i've seen this car on 880 north a couple times, i'll see how i like the beam pattern , dont blind me please.
, dont blind me please.