

DuckmanEG 2000 S2000 build

Thread Starter
Sexy Cheese Cake
Joined: Feb 2004
Posts: 2,444
Likes: 0
From: Ill INoise, U.S. of A
After a couple years of trying to get out of the game. Not trying so hard though as i bought a 8th gen Si a couple years ago. went to mod it and broke the firewall thanks to the Omnipower CMC and decided i cant have my daily as a track car and here we are years later. Still have the 8th gen Si but now also have a 1998 Ford Ranger.
Just making this thread so i can keep a little bit of a document and show others my build. This will be a slow build most likely. Just save up and gather parts.
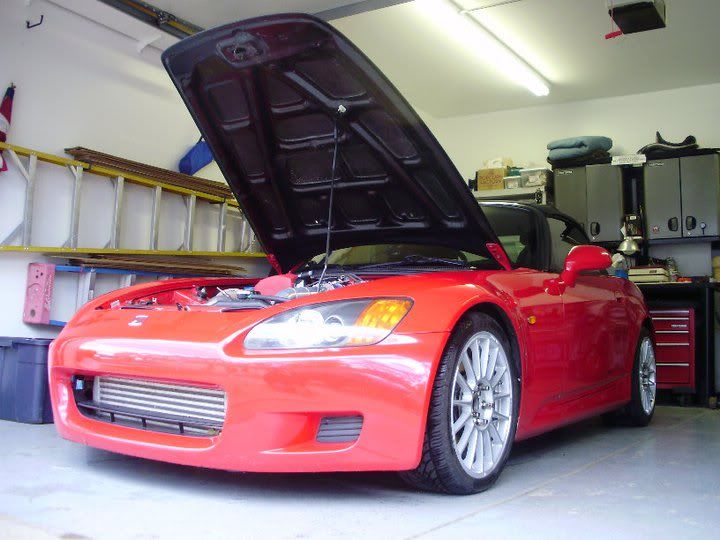
Bought the car in September (2013). New Formula Red 2000 S2000. Salvage title. Trying to bring it back to life. This will be my track car. It will see the street but that will be rare but i am still going to get it retitled and road worthy.
Got the car in rough shape. No name racing seats, with home made hacked up rails. Missing S2000 steering Wheel and air bag. Missing interior pieces. Missing soft top.
Missing seatbelts and buckles. Missing ballast and bulbs. Also missing the hardware to hold the bulbs in place. Had a A pillar gauge pod, no gauges. Hazard and roof button relocated to radio control area. Chipped windshield.
Some good. Carbon Fiber hood. Forbidden Mugen style hardtop. Has
wheels but they are some Motgei, ill just use to to move the car around.
Brand New OEM Honda parts
Left quarter panel
Right quarter panel
Trunk lid
Ap2 front bumper
AP2 rear bumper
Bumper plugs
Grille
Bumper to hood seal
Hubs
Bearings
All Suspension mounting hardware
Lot of little nuts and bolts IE fender, bumper, seat belt, visor.
Seeing as the interior was missing or had broken parts i needed to replace. Here is a list of things i have gotten
AP1 seats and rails
Seatbelts
Door panels
Steering wheel with airbag
New Radio control section
Crusie control button
Center consle
A pillar plastic
Tonneau cover
Rear center console
Ballast
New Phillips bulbs
Energy Suspension Bushings
Roca Racing Upper ball joints front and rear
Moog OE Honda Accord ball joints for the lower rear
BuddyClub adjustable lower ball joints for the front
Urge Racings AP Racing BBK
Wasp Composite brake ducting kit for the Urge Racing kit
Volk CE28 17x10 +44 Mercury Silver
Moog Sway bar end links with zerk fittings
Arp Extended wheel studs
Track-studs M12 HD lug nuts
Nitto NT01 255/40-15 square
Mint used catback. Going to do the UK mod
AP2 exhaust tips
Enjoy Racing Hardtop bracket for the front
The day i got the car
http://www.flickr.com/photos/30417679@N04/9998094053/http://www.flickr.com/photos/30417679@N04/9998094053/ by http://www.flickr.com/people/30417679@N04/, on Flickr
My fleet as of now. 1998 Ford Ranger XLT. 2006 Honda Civic Si. 2000 Honda S2000
http://www.flickr.com/photos/30417679@N04/9997991926/http://www.flickr.com/photos/30417679@N04/9997991926/ by http://www.flickr.com/people/30417679@N04/, on Flickr
The damage. Quarter was already pulled by the previous owner. Trunk and rear bumper also replaced by previous owner. The part that sucks is he has no receipts for the parts he replaced. In order to pass inspection for a new title i need receipts for the parts replaced. So i need to buy a new rear bumper and trunk.
http://www.flickr.com/photos/30417679@N04/9997949964/http://www.flickr.com/photos/30417679@N04/9997949964/ by http://www.flickr.com/people/30417679@N04/, on Flickr
http://www.flickr.com/photos/30417679@N04/9997952854/http://www.flickr.com/photos/30417679@N04/9997952854/ by http://www.flickr.com/people/30417679@N04/, on Flickr
The interior how i got it
http://www.flickr.com/photos/30417679@N04/9992460316/http://www.flickr.com/photos/30417679@N04/9992460316/ by http://www.flickr.com/people/30417679@N04/, on Flickr
Replaced these
http://www.flickr.com/photos/30417679@N04/9998025536/http://www.flickr.com/photos/30417679@N04/9998025536/ by http://www.flickr.com/people/30417679@N04/, on Flickr
with this
http://www.flickr.com/photos/30417679@N04/9997932094/http://www.flickr.com/photos/30417679@N04/9997932094/ by http://www.flickr.com/people/30417679@N04/, on Flickr
When i pulled the rear end apart. I notice the rear panel was a little more damaged then i like.
http://www.flickr.com/photos/30417679@N04/9997727574/http://www.flickr.com/photos/30417679@N04/9997727574/ by http://www.flickr.com/people/30417679@N04/, on Flickr
http://www.flickr.com/photos/30417679@N04/9997721995/http://www.flickr.com/photos/30417679@N04/9997721995/ by http://www.flickr.com/people/30417679@N04/, on Flickr
http://www.flickr.com/photos/30417679@N04/9997851933/http://www.flickr.com/photos/30417679@N04/9997851933/ by http://www.flickr.com/people/30417679@N04/, on Flickr
http://www.flickr.com/photos/30417679@N04/9997850043/http://www.flickr.com/photos/30417679@N04/9997850043/ by http://www.flickr.com/people/30417679@N04/, on Flickr
This spot was a little bit of a pain. These are not spot welds. The frame rail areas look like they are welded a little heavier
http://www.flickr.com/photos/30417679@N04/9997847273/http://www.flickr.com/photos/30417679@N04/9997847273/ by http://www.flickr.com/people/30417679@N04/, on Flickr
The trunk rusted and both sides of the bumper tabs
http://www.flickr.com/photos/30417679@N04/9997711325/http://www.flickr.com/photos/30417679@N04/9997711325/ by http://www.flickr.com/people/30417679@N04/, on Flickr
http://www.flickr.com/photos/30417679@N04/9997709295/http://www.flickr.com/photos/30417679@N04/9997709295/ by http://www.flickr.com/people/30417679@N04/, on Flickr
Mostly out. I need to get the rest around the driver side that was welded in some after they pulled the quarter
http://www.flickr.com/photos/30417679@N04/9997765976/http://www.flickr.com/photos/30417679@N04/9997765976/ by http://www.flickr.com/people/30417679@N04/, on Flickr
http://www.flickr.com/photos/30417679@N04/9997708974/http://www.flickr.com/photos/30417679@N04/9997708974/ by http://www.flickr.com/people/30417679@N04/, on Flickr
Just bolted in for now
http://www.flickr.com/photos/30417679@N04/9997837153/http://www.flickr.com/photos/30417679@N04/9997837153/ by http://www.flickr.com/people/30417679@N04/, on Flickr
http://www.flickr.com/photos/30417679@N04/9997835853/http://www.flickr.com/photos/30417679@N04/9997835853/ by http://www.flickr.com/people/30417679@N04/, on Flickr
http://www.flickr.com/photos/30417679@N04/9997833693/http://www.flickr.com/photos/30417679@N04/9997833693/ by http://www.flickr.com/people/30417679@N04/, on Flickr
When i finally get the panel secure. I have this waiting for it.
http://www.flickr.com/photos/30417679@N04/9997975446/http://www.flickr.com/photos/30417679@N04/9997975446/ by http://www.flickr.com/people/30417679@N04/, on Flickr
Just making this thread so i can keep a little bit of a document and show others my build. This will be a slow build most likely. Just save up and gather parts.
Bought the car in September (2013). New Formula Red 2000 S2000. Salvage title. Trying to bring it back to life. This will be my track car. It will see the street but that will be rare but i am still going to get it retitled and road worthy.
Got the car in rough shape. No name racing seats, with home made hacked up rails. Missing S2000 steering Wheel and air bag. Missing interior pieces. Missing soft top.
Missing seatbelts and buckles. Missing ballast and bulbs. Also missing the hardware to hold the bulbs in place. Had a A pillar gauge pod, no gauges. Hazard and roof button relocated to radio control area. Chipped windshield.
Some good. Carbon Fiber hood. Forbidden Mugen style hardtop. Has
wheels but they are some Motgei, ill just use to to move the car around.
Brand New OEM Honda parts
Left quarter panel
Right quarter panel
Trunk lid
Ap2 front bumper
AP2 rear bumper
Bumper plugs
Grille
Bumper to hood seal
Hubs
Bearings
All Suspension mounting hardware
Lot of little nuts and bolts IE fender, bumper, seat belt, visor.
Seeing as the interior was missing or had broken parts i needed to replace. Here is a list of things i have gotten
AP1 seats and rails
Seatbelts
Door panels
Steering wheel with airbag
New Radio control section
Crusie control button
Center consle
A pillar plastic
Tonneau cover
Rear center console
Ballast
New Phillips bulbs
Energy Suspension Bushings
Roca Racing Upper ball joints front and rear
Moog OE Honda Accord ball joints for the lower rear
BuddyClub adjustable lower ball joints for the front
Urge Racings AP Racing BBK
Wasp Composite brake ducting kit for the Urge Racing kit
Volk CE28 17x10 +44 Mercury Silver
Moog Sway bar end links with zerk fittings
Arp Extended wheel studs
Track-studs M12 HD lug nuts
Nitto NT01 255/40-15 square
Mint used catback. Going to do the UK mod
AP2 exhaust tips
Enjoy Racing Hardtop bracket for the front
The day i got the car
http://www.flickr.com/photos/30417679@N04/9998094053/http://www.flickr.com/photos/30417679@N04/9998094053/ by http://www.flickr.com/people/30417679@N04/, on Flickr
My fleet as of now. 1998 Ford Ranger XLT. 2006 Honda Civic Si. 2000 Honda S2000
http://www.flickr.com/photos/30417679@N04/9997991926/http://www.flickr.com/photos/30417679@N04/9997991926/ by http://www.flickr.com/people/30417679@N04/, on Flickr
The damage. Quarter was already pulled by the previous owner. Trunk and rear bumper also replaced by previous owner. The part that sucks is he has no receipts for the parts he replaced. In order to pass inspection for a new title i need receipts for the parts replaced. So i need to buy a new rear bumper and trunk.
http://www.flickr.com/photos/30417679@N04/9997949964/http://www.flickr.com/photos/30417679@N04/9997949964/ by http://www.flickr.com/people/30417679@N04/, on Flickr
http://www.flickr.com/photos/30417679@N04/9997952854/http://www.flickr.com/photos/30417679@N04/9997952854/ by http://www.flickr.com/people/30417679@N04/, on Flickr
The interior how i got it
http://www.flickr.com/photos/30417679@N04/9992460316/http://www.flickr.com/photos/30417679@N04/9992460316/ by http://www.flickr.com/people/30417679@N04/, on Flickr
Replaced these
http://www.flickr.com/photos/30417679@N04/9998025536/http://www.flickr.com/photos/30417679@N04/9998025536/ by http://www.flickr.com/people/30417679@N04/, on Flickr
with this
http://www.flickr.com/photos/30417679@N04/9997932094/http://www.flickr.com/photos/30417679@N04/9997932094/ by http://www.flickr.com/people/30417679@N04/, on Flickr
When i pulled the rear end apart. I notice the rear panel was a little more damaged then i like.
http://www.flickr.com/photos/30417679@N04/9997727574/http://www.flickr.com/photos/30417679@N04/9997727574/ by http://www.flickr.com/people/30417679@N04/, on Flickr
http://www.flickr.com/photos/30417679@N04/9997721995/http://www.flickr.com/photos/30417679@N04/9997721995/ by http://www.flickr.com/people/30417679@N04/, on Flickr
http://www.flickr.com/photos/30417679@N04/9997851933/http://www.flickr.com/photos/30417679@N04/9997851933/ by http://www.flickr.com/people/30417679@N04/, on Flickr
http://www.flickr.com/photos/30417679@N04/9997850043/http://www.flickr.com/photos/30417679@N04/9997850043/ by http://www.flickr.com/people/30417679@N04/, on Flickr
This spot was a little bit of a pain. These are not spot welds. The frame rail areas look like they are welded a little heavier
http://www.flickr.com/photos/30417679@N04/9997847273/http://www.flickr.com/photos/30417679@N04/9997847273/ by http://www.flickr.com/people/30417679@N04/, on Flickr
The trunk rusted and both sides of the bumper tabs
http://www.flickr.com/photos/30417679@N04/9997711325/http://www.flickr.com/photos/30417679@N04/9997711325/ by http://www.flickr.com/people/30417679@N04/, on Flickr
http://www.flickr.com/photos/30417679@N04/9997709295/http://www.flickr.com/photos/30417679@N04/9997709295/ by http://www.flickr.com/people/30417679@N04/, on Flickr
Mostly out. I need to get the rest around the driver side that was welded in some after they pulled the quarter
http://www.flickr.com/photos/30417679@N04/9997765976/http://www.flickr.com/photos/30417679@N04/9997765976/ by http://www.flickr.com/people/30417679@N04/, on Flickr
http://www.flickr.com/photos/30417679@N04/9997708974/http://www.flickr.com/photos/30417679@N04/9997708974/ by http://www.flickr.com/people/30417679@N04/, on Flickr
Just bolted in for now
http://www.flickr.com/photos/30417679@N04/9997837153/http://www.flickr.com/photos/30417679@N04/9997837153/ by http://www.flickr.com/people/30417679@N04/, on Flickr
http://www.flickr.com/photos/30417679@N04/9997835853/http://www.flickr.com/photos/30417679@N04/9997835853/ by http://www.flickr.com/people/30417679@N04/, on Flickr
http://www.flickr.com/photos/30417679@N04/9997833693/http://www.flickr.com/photos/30417679@N04/9997833693/ by http://www.flickr.com/people/30417679@N04/, on Flickr
When i finally get the panel secure. I have this waiting for it.
http://www.flickr.com/photos/30417679@N04/9997975446/http://www.flickr.com/photos/30417679@N04/9997975446/ by http://www.flickr.com/people/30417679@N04/, on Flickr


Thread Starter
Sexy Cheese Cake
Joined: Feb 2004
Posts: 2,444
Likes: 0
From: Ill INoise, U.S. of A
More pictures.
My mint Ap1 exhaust that i will UK mod and put AP2 tips on

Burning out my bushings for the Energy Suspension bushings

New upper ball joints all around

All my suspension bits ready to be powder coated

powder coating

All done


New hubs with ARP extended wheel studs


What the car came with to some really nice Enjoy Racing brackets

Some nuts, bolts and odd little ends

Some more nuts and bolts


Urge Racing AP Racing BBK. Volk Racing 17x10 +44


Nitto NT01 255/40-17

My mint Ap1 exhaust that i will UK mod and put AP2 tips on
Burning out my bushings for the Energy Suspension bushings
New upper ball joints all around
All my suspension bits ready to be powder coated
powder coating
All done
New hubs with ARP extended wheel studs
What the car came with to some really nice Enjoy Racing brackets
Some nuts, bolts and odd little ends
Some more nuts and bolts
Urge Racing AP Racing BBK. Volk Racing 17x10 +44
Nitto NT01 255/40-17
Last edited by duckmanEG; Apr 2, 2014 at 02:01 PM.
Thread Starter
Sexy Cheese Cake
Joined: Feb 2004
Posts: 2,444
Likes: 0
From: Ill INoise, U.S. of A
My custom two row dual pass radiator. End tanks formed from .125 5052 aluminum


Then i gave it to the man, the myth... TallKyle. He welded everything. Inlet/Outlet -16AN. Fan switch bung, Used an o2 bung for the drain plug, and an 1/8 npt bung for a aftermarket water temp.

Then i gave it to the man, the myth... TallKyle. He welded everything. Inlet/Outlet -16AN. Fan switch bung, Used an o2 bung for the drain plug, and an 1/8 npt bung for a aftermarket water temp.
Last edited by duckmanEG; Apr 2, 2014 at 02:46 PM.
Trending Topics


Thread Starter
Sexy Cheese Cake
Joined: Feb 2004
Posts: 2,444
Likes: 0
From: Ill INoise, U.S. of A
Thread Starter
Sexy Cheese Cake
Joined: Feb 2004
Posts: 2,444
Likes: 0
From: Ill INoise, U.S. of A
Yes. Got it out of Michigan City. It's a good and bad thing. I have spent so much money i could have gotten a clean title one but I am happy I am bringing one back to life. It will mainly be a track car so I don't want to ruin a perfectly good car. But maybe one day I'll pick up an AP2 or a CR to just cruise.


Honda-Tech Member
Joined: Nov 2005
Posts: 202
Likes: 0
From: Albuquerque, NM, USA
Thread Starter
Sexy Cheese Cake
Joined: Feb 2004
Posts: 2,444
Likes: 0
From: Ill INoise, U.S. of A
Got a couple new things in.
AP racing brake fluid
Wicked Tuning rear bump steer kit
Wicked Tuning front outer tie rods
 Untitled by DuckmanEG, on Flickr
 Untitled by DuckmanEG, on Flickr
 Untitled by DuckmanEG, on Flickr
 Untitled by DuckmanEG, on Flickr
Also got most of the rear suspension back on. That went a lot nicer than the front stuff is going
 Untitled by DuckmanEG, on Flickr
Now onto the fun part. My hellaflush stanced s2000
 Untitled by DuckmanEG, on Flickr
The front has been a PITA. Latest bent item my sub-frame. Got a new (junkyard) one to see if that helps. Well it did. But in the process of removing the old one. I snap a bolt in the frame and my passenger motor mount fall out. Got the new one bolted in place to test and everything seems to line up nicer. Before my passenger side end link was hitting my shock body. Now the both sides seem to fit better.
 Untitled by DuckmanEG, on Flickr
 Untitled by DuckmanEG, on Flickr
AP racing brake fluid
Wicked Tuning rear bump steer kit
Wicked Tuning front outer tie rods
Untitled by DuckmanEG, on FlickrUntitled by DuckmanEG, on FlickrUntitled by DuckmanEG, on FlickrUntitled by DuckmanEG, on FlickrAlso got most of the rear suspension back on. That went a lot nicer than the front stuff is going
Untitled by DuckmanEG, on FlickrNow onto the fun part. My hellaflush stanced s2000
Untitled by DuckmanEG, on FlickrThe front has been a PITA. Latest bent item my sub-frame. Got a new (junkyard) one to see if that helps. Well it did. But in the process of removing the old one. I snap a bolt in the frame and my passenger motor mount fall out. Got the new one bolted in place to test and everything seems to line up nicer. Before my passenger side end link was hitting my shock body. Now the both sides seem to fit better.
Untitled by DuckmanEG, on FlickrUntitled by DuckmanEG, on Flickr
Thread Starter
Sexy Cheese Cake
Joined: Feb 2004
Posts: 2,444
Likes: 0
From: Ill INoise, U.S. of A
Well I guess bent is a bad word. More like twisted. The front passenger side lower was also bent. I replaced that first. When it still didn't work I replaced the sub frame. The mounts on the subframe are nothing more than just sheet metal and I can see it being twisted very easily. But that of course having to touch these several areas I'll make them better and that will be the next update. Hopefully by the weekend I'll post those things up.


Thread Starter
Sexy Cheese Cake
Joined: Feb 2004
Posts: 2,444
Likes: 0
From: Ill INoise, U.S. of A
That is one of the things getting addressed. I will be welding the full subframe. No boxing it out at the moment. I didnt find anything my in my searching. All i seen was that ASM and J's offer a reinforced sub-frame and thats all they seem to do per the pictures.