

off topic - 97 CD5 project

Thread Starter
Honda-Tech Member
Joined: Aug 2005
Posts: 3,495
Likes: 5
From: Pompano Beach, FL, USA
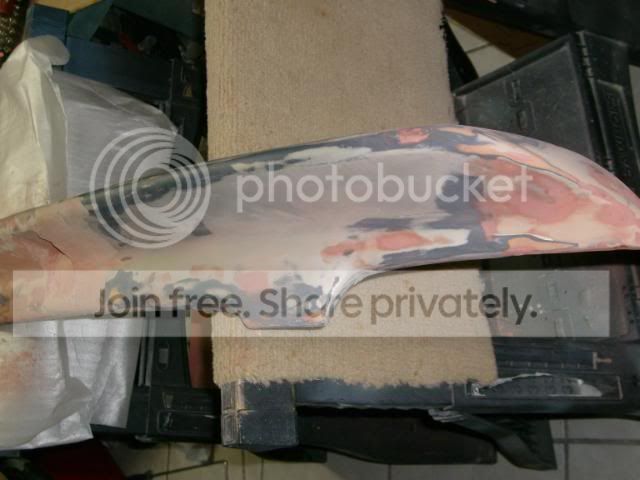
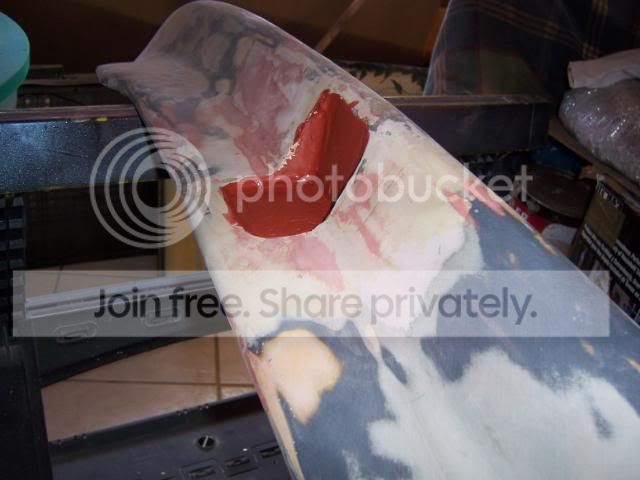
Ok, so i spent some time doing a bit more sanding on the spoiler, i need to spent at least a couple of hours on it until is ready for paint.
The back side of the spoiler is almost done, just need to finish sanding the corners which flush with the 1/4 panels of the car.
The center (where it was broken) part of the spoiler, on the back is ready to sit flush on the car, i don't plan on making that part look much better since it won't be seen once the spoiler is instaled.
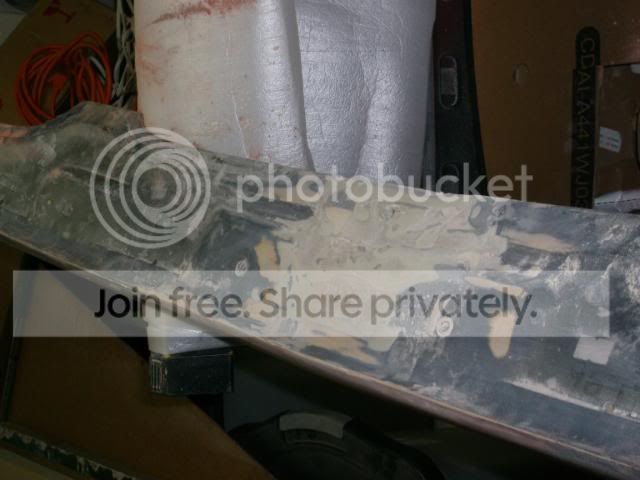
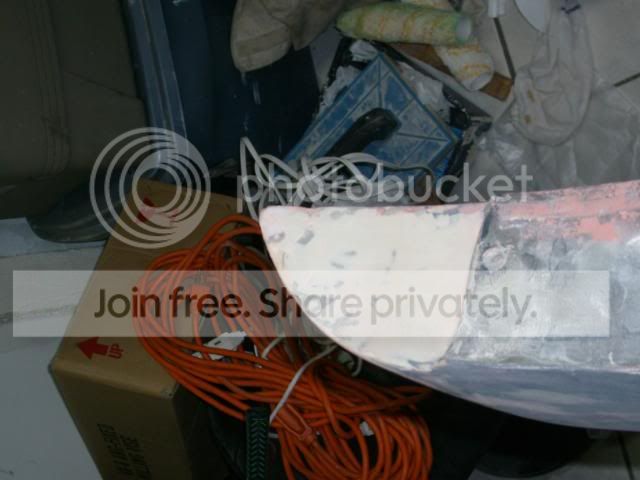
There's a good amount of work yet to be done to where the emblem will sit. Overall, the red areas of the spoiler is putty that i used to cover scratches and pin holes, this putty is ok (there's no hardner involved) as long as you let it sit for a few hours before sanding. The weather here has been humid and cold for the last few weeks, and it ain't gonna get any better for at least a couple of months.
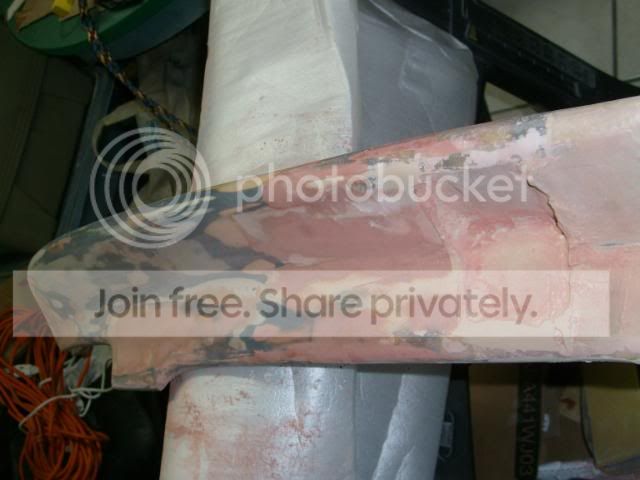
All the sanding is being done with 180 grit so far, once i finish with all this, i'm going to see if i can get a 2k primer, and 2k primer ONLY for me (wouldn't put straight-out-of-the-can primer on something like this).
More updates on this will come soon.
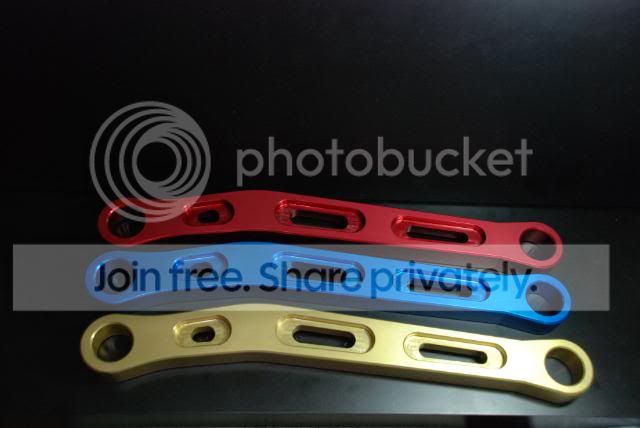
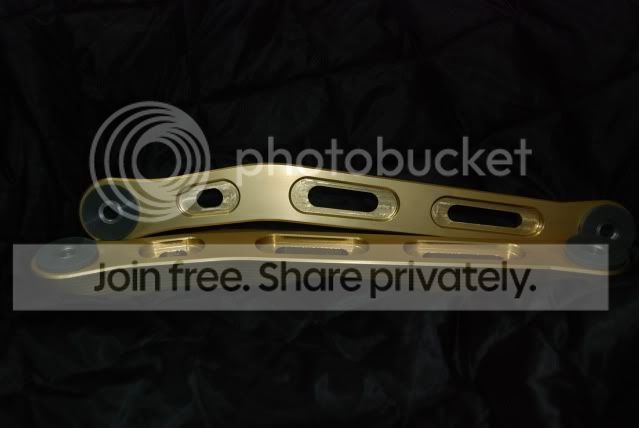
Someone had asked about the LCA that i've made, and i just wanted to share this pic with you guys, showing 3 different finishes that i've got, these are anodized, not painted.
If you have been following this thread, or at least if you have seen the last few pages, there are some pics of an accord meet that took place in daytona. I posted a pic of one accord and i promised more "news" about it later on, and i find late enough, so i'm going to post about the work that was done to this CD5.
One thing about the work done to this car was that, we used products from auto parts store, things such as: prep cloths, panel degreaser, body filler, spreaders, putty, a can of etch primer and a can of sandable primer. The hood and the bumper were purchased new from keystone in south florida. I could have bought both parts from work and get a nice discount, but my manager at the time wanted to get "paid" if i ordered the parts through the job. Me and my friend decided not to contribute to his wallet, and he ended up buying the parts directly from keystone.
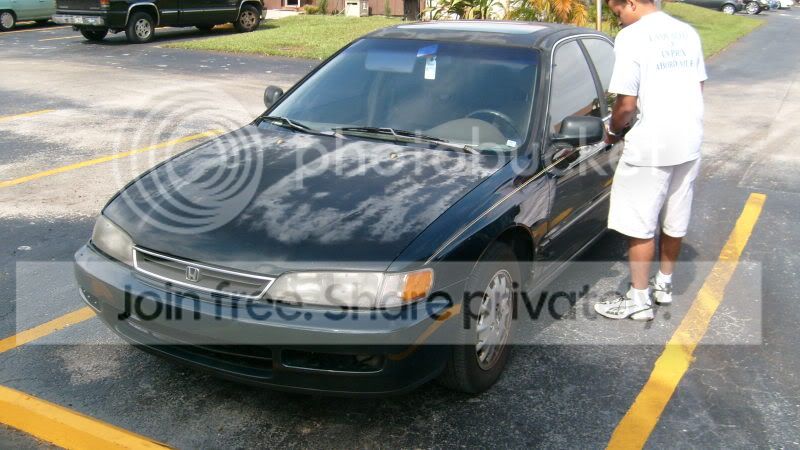
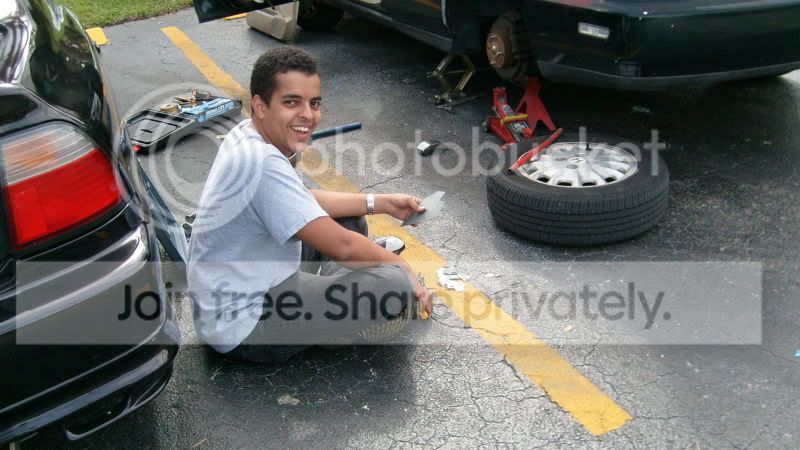
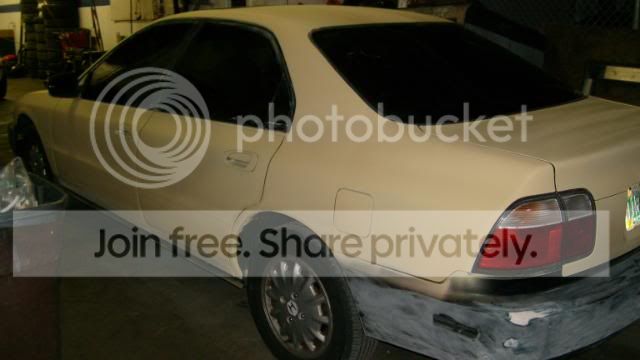
Here's the before, on august 2008, of this 96 Accord EX sedan. Car belongs to a good friend of mine in florida, he goes by JD, his initials are actually JDM.

He told me he wanted the car to look nice, shaved side mouldings, get rid of the rear spoiler and fill the holes, fix every dent and every ding around the car.
First thing done was removing the pin stripe on the car. I tried the old trick of the razor blade on it, but the paint and the pin stripe weren't helping it. I put a sanding disk on my cordless driller and went for it. This isn't recommended actually because it will dig on the paint, it creates more work sometimes, but since i didn't have a rubber wheel.... oh well.

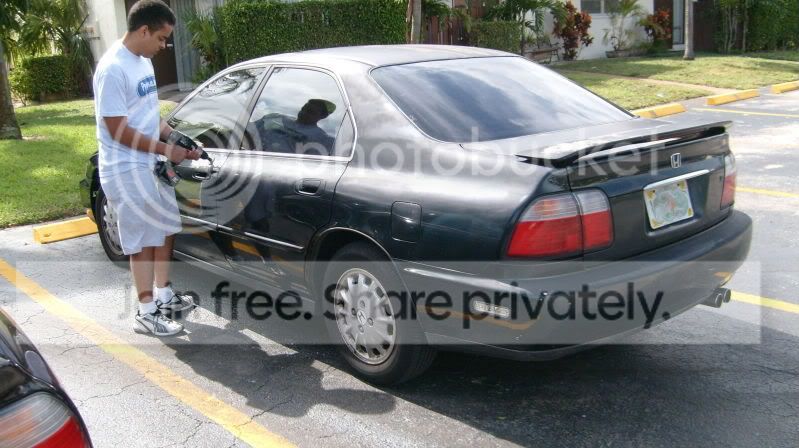
I don't know if you can notice or not, but there's a big dent on the rear door and the 1/4 panel has some damage too.

There's JD learning with hands on the job.
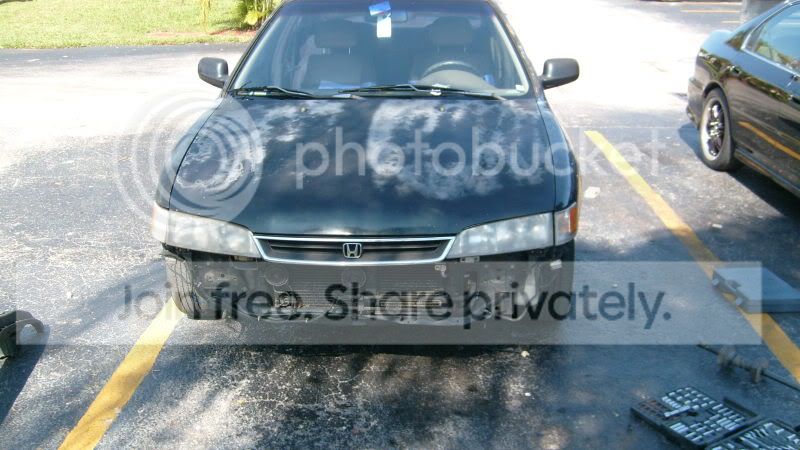
The front end looked promising for some frame damage, but it was only the bumper being crooked. The bad thing about it was that it had marks and crests all over it, not worthy fixing when a new bumper costs so little (aftermarket of course).


So, i took the long sanding block and went along with a couple of panels of the car, whatever was left shinny meant it that it had a dent. Removed the side mouldings of the doors and fenders. Sorry, no pictures of that being done.
It appears that the 94/95 sedan (95 wagon may be the same) accord has less holes on the doors to fit the side mouldings. Appears to be 3 holes on rear doors and 5 on front doors. While the 96/97 has 5 holes on rear doors and 7 holes on front doors, then 2 holes for the feners.
I needed 28 pieces of metal to patch over the holes, so that means, 28 little squares of about 1in by 1in. I've found an used door shell laying at work that was perfect for the job, gotta use metal scissors for this, gets them out fast, flat and without the risk of things flying around.
To patch the doors, each square piece of metal had a bit of 3M panel adhesive on it, and it was secured with a piece of tape on the inside of the door to stay in place. One important thing to do is to sand the back of the door skin where the patch is going, exposing the metal scratched with 40 grit or 80 grit is great for the adhesive to hold on to. Then, 24 hours later you can sand any excess glue that may have drip on the outside.

Sanded the outside of doors and fenders with 40grit sand paper where the mouldings were located, and applied a coat of body filler.


Used a slide hammer with a "U" shaped hook to pull the 1/4 panel back in shape, took a few hits to bring it back out.


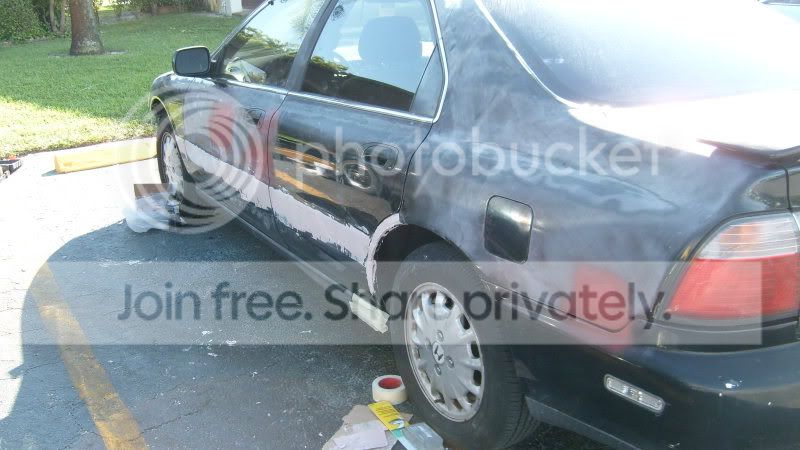
Here's a pic showing it already with body filler.
Jd was having a blast cutting up the 28 pieces of metal.
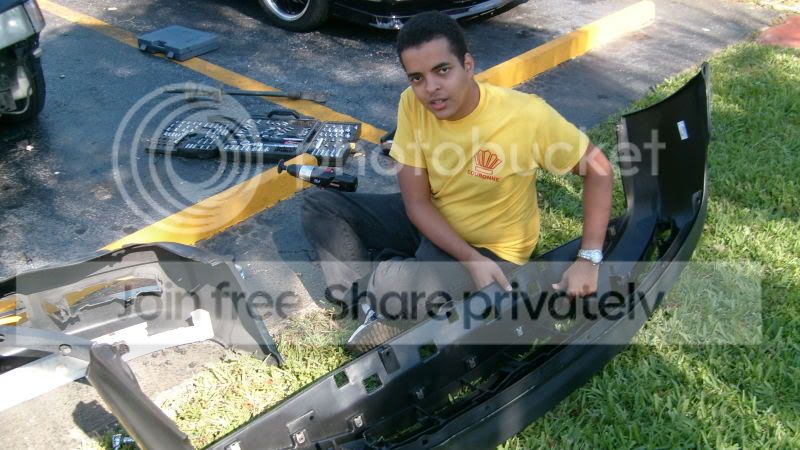
JD brought the new bumper in.

Being worked on...


This car had lots of dings everywhere. Sanding block made sure i found everysingle one of them.


JD complained about the car having leaks by the rear window. That was due to an old repair done on that area, that had cracked and water found it's way through... rusting the sheet metal and finally leaking inside the car.
To get that fixed, i had to sand away the previous body filler there, and sand the metal of that area until it was clean (no rust).
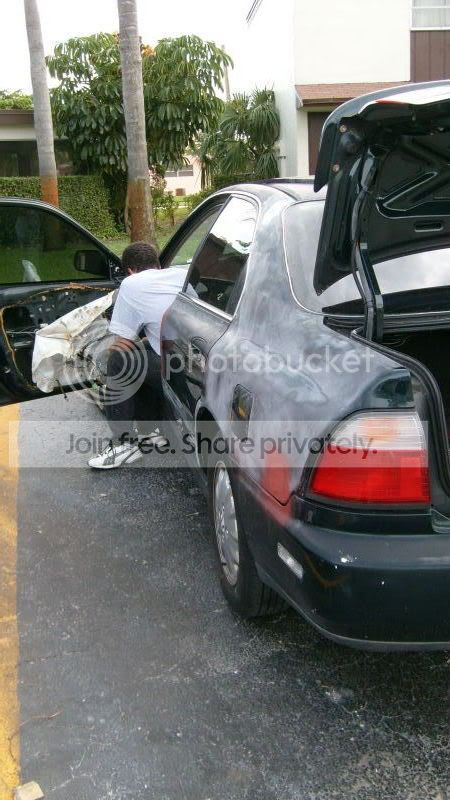
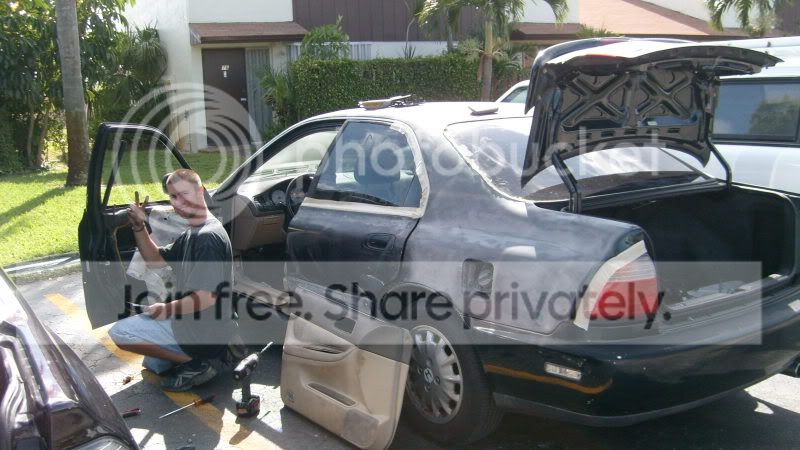
There's me showing some tender loving care for this CD5. I removed all door panels to get the gaskets around the door handles and key locks out, so there wouldn't be overspray on them. Also removed the chrome mouldings on the windows and the chrome mouldings around the doors.
...to be continued...
The back side of the spoiler is almost done, just need to finish sanding the corners which flush with the 1/4 panels of the car.
The center (where it was broken) part of the spoiler, on the back is ready to sit flush on the car, i don't plan on making that part look much better since it won't be seen once the spoiler is instaled.
There's a good amount of work yet to be done to where the emblem will sit. Overall, the red areas of the spoiler is putty that i used to cover scratches and pin holes, this putty is ok (there's no hardner involved) as long as you let it sit for a few hours before sanding. The weather here has been humid and cold for the last few weeks, and it ain't gonna get any better for at least a couple of months.
All the sanding is being done with 180 grit so far, once i finish with all this, i'm going to see if i can get a 2k primer, and 2k primer ONLY for me (wouldn't put straight-out-of-the-can primer on something like this).
More updates on this will come soon.
Someone had asked about the LCA that i've made, and i just wanted to share this pic with you guys, showing 3 different finishes that i've got, these are anodized, not painted.
If you have been following this thread, or at least if you have seen the last few pages, there are some pics of an accord meet that took place in daytona. I posted a pic of one accord and i promised more "news" about it later on, and i find late enough, so i'm going to post about the work that was done to this CD5.
One thing about the work done to this car was that, we used products from auto parts store, things such as: prep cloths, panel degreaser, body filler, spreaders, putty, a can of etch primer and a can of sandable primer. The hood and the bumper were purchased new from keystone in south florida. I could have bought both parts from work and get a nice discount, but my manager at the time wanted to get "paid" if i ordered the parts through the job. Me and my friend decided not to contribute to his wallet, and he ended up buying the parts directly from keystone.
Here's the before, on august 2008, of this 96 Accord EX sedan. Car belongs to a good friend of mine in florida, he goes by JD, his initials are actually JDM.
He told me he wanted the car to look nice, shaved side mouldings, get rid of the rear spoiler and fill the holes, fix every dent and every ding around the car.
First thing done was removing the pin stripe on the car. I tried the old trick of the razor blade on it, but the paint and the pin stripe weren't helping it. I put a sanding disk on my cordless driller and went for it. This isn't recommended actually because it will dig on the paint, it creates more work sometimes, but since i didn't have a rubber wheel.... oh well.
I don't know if you can notice or not, but there's a big dent on the rear door and the 1/4 panel has some damage too.
There's JD learning with hands on the job.
The front end looked promising for some frame damage, but it was only the bumper being crooked. The bad thing about it was that it had marks and crests all over it, not worthy fixing when a new bumper costs so little (aftermarket of course).
So, i took the long sanding block and went along with a couple of panels of the car, whatever was left shinny meant it that it had a dent. Removed the side mouldings of the doors and fenders. Sorry, no pictures of that being done.
It appears that the 94/95 sedan (95 wagon may be the same) accord has less holes on the doors to fit the side mouldings. Appears to be 3 holes on rear doors and 5 on front doors. While the 96/97 has 5 holes on rear doors and 7 holes on front doors, then 2 holes for the feners.
I needed 28 pieces of metal to patch over the holes, so that means, 28 little squares of about 1in by 1in. I've found an used door shell laying at work that was perfect for the job, gotta use metal scissors for this, gets them out fast, flat and without the risk of things flying around.
To patch the doors, each square piece of metal had a bit of 3M panel adhesive on it, and it was secured with a piece of tape on the inside of the door to stay in place. One important thing to do is to sand the back of the door skin where the patch is going, exposing the metal scratched with 40 grit or 80 grit is great for the adhesive to hold on to. Then, 24 hours later you can sand any excess glue that may have drip on the outside.
Sanded the outside of doors and fenders with 40grit sand paper where the mouldings were located, and applied a coat of body filler.
Used a slide hammer with a "U" shaped hook to pull the 1/4 panel back in shape, took a few hits to bring it back out.
Here's a pic showing it already with body filler.
Jd was having a blast cutting up the 28 pieces of metal.
JD brought the new bumper in.
Being worked on...
This car had lots of dings everywhere. Sanding block made sure i found everysingle one of them.
JD complained about the car having leaks by the rear window. That was due to an old repair done on that area, that had cracked and water found it's way through... rusting the sheet metal and finally leaking inside the car.
To get that fixed, i had to sand away the previous body filler there, and sand the metal of that area until it was clean (no rust).
There's me showing some tender loving care for this CD5. I removed all door panels to get the gaskets around the door handles and key locks out, so there wouldn't be overspray on them. Also removed the chrome mouldings on the windows and the chrome mouldings around the doors.
...to be continued...
Thread Starter
Honda-Tech Member
Joined: Aug 2005
Posts: 3,495
Likes: 5
From: Pompano Beach, FL, USA
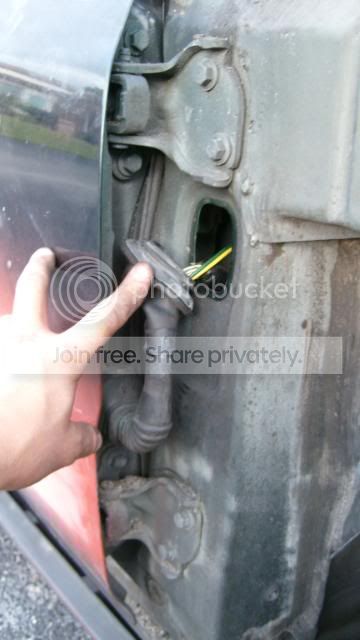
I also did the wiring for his japanese folding mirrors. I find it better to remove the fenders and run the wiring inside the rubbers that feed electrical components for the doors. Keeps it neater and safer than leaving the wires outside of the rubber.

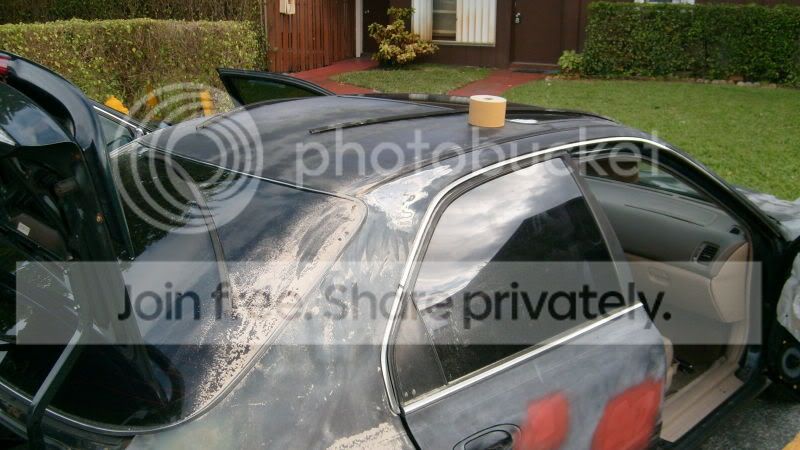
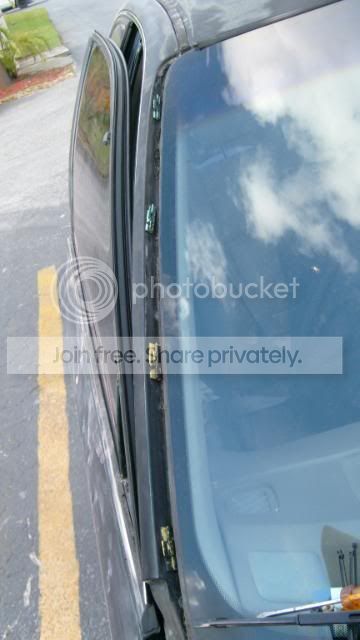
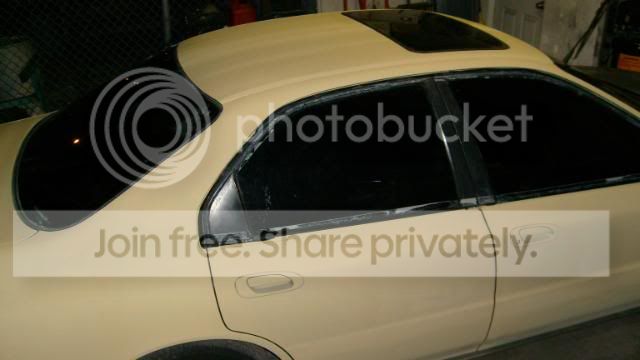
On the front window, these mouldings are the only ones that are supposed to come off without getting the window removed. The upper moulding, between glass and roof is not supposed to come off. If you remove it (like i've seen people doing before), you damaged it, and it's installed on the glass when you are glueing the window to the car.
Removed the spoiler, and patched the holes using the same process of metal squares and 3M panel bond adhesive.


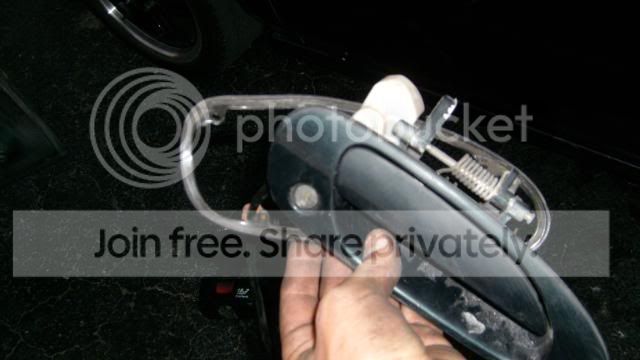
Getting the door handles out. You must get the rod that comes from the latch to pop out from the door handle. I bought a special tool for this, but i didn't work 100%, i ended up going back to my 2 flat head screw drivers method.
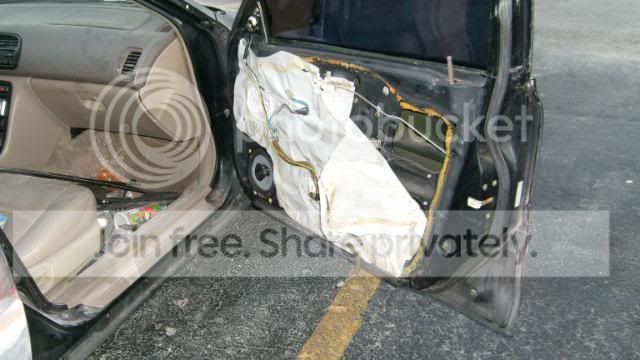

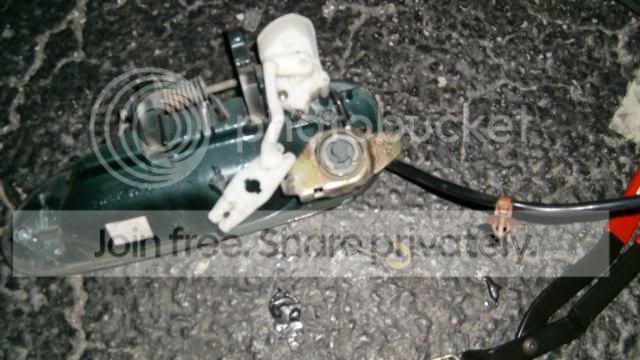
Once you have the door handle out, you're going to realise that the gasket won't come out because of a pin with a spring around it. So what do you do?! Get yourself a razor blade and cut the gasket right where the spring is. That way, when you reinstall everything, the gasket can't move around or fall off.
Undoing the key lock to get the little gasket out too. Small details like that is what i like to take care of.
After those days, there aren't many pics though. JD went on a trip out of state and i had the car with me to continue working on it. The idea was to have it painted in 7 days, so that when JD came back, he would see his car looking brand new!
Now here's the story: i couldn't get my manager to let me bring the car at the shop to get primered (using dupont's 2 part primer), he wanted to get paid, but he sure as hell didn't want to help mask the car or do anything... just wanted to get paid, for no reason. Funny uh?!
One week went by, and i didn't find a place to spray the car, every body shop that i went to said that couldn't do it because of warranty issues and blah blah blah.
So, i was able to get the primer, but needed a place to spray the car. That's when good ol' Claude comes in. Claude's friend had a shop/garage where he worked on cars, he had an air compressor and allowed me to use his shop to spray JD's car in exchange of a 6 pack of heineken.... hahhahaha, good times!!
JD was already back from his trip, and we got there at 8pm (when the owner of the garage was about to go home), and we were working hard to finish sanding the car with 320 grit. When we finally finished, we started to mask the car and tape everything up, removed the lights, mirrors and stuff... and then i was ready to spray primer.


The air compressor wasn't enough to keep up with me spraying, and what was supposed to be a 15-20 minutes job, turned out to be a 2 HOURS job. Boy.... talk about patience.
We left the shop around 5am (an entire night working).

Next day, JD drove to my house once again, and we started to sand the car with 320 grit. The car was 95% done as far as body work, i still had a couple of things to do that became more visible once we had sanded the primer. That was fixed shortly, and now we had the body work 100% done, but had a couple of spots to spray primer on (including the left rear door's jamb). So, i'm not sure how, but JD found a place in Hialeah to rent a spray booth, and he agreed to the price and set a day to use the spray booth. Couple of days later, comes the saturday that he could use the spray booth. That shop was a mess, not to mention that it was in a bad area.
I sprayed the primer shortly after we arrived at that bodyshop. Couple of hours later we were both sanding the car once again with 400 grit, laying some putty on little things like rock chips and scratches. Then, we sanded the entire car with 600 grit, all this using sanding blocks, and it was already getting dark. I wanted to leave and come back another day to finally paint the car, but JD insisted in staying, specially because he had already paid for renting the spray booth.
We cleaned the car, degreased it and rolled it inside the booth for me to spray the sealer. The spray booth was in bad shape, the doors didn't close completelly, and mosquitos were flying in and out like a motherf***er...lol
The sealer job wasn't too bad, the car had that egg-shell grey finish to it, you could see how the bodywork was nice and flat, i was really happy that i couldn't see any waves or anything.
While the sealer was drying, i was outside the booth, and here comes one of the guys that work at shop, he had a gun on his waist (a glock), telling us (me and JD) to be careful as the place had been robbed a few times, and how just a couple of days earlier, one customer's car was left sitting on bricks as the thieves stole his 24"s.
I went back in the booth, spraying the dark green base coat, and noticed that the base coat purchased by JD was really transparent. It took 4 coats to cover most of the car, but i ran out of paint before i could make the entire car look nice and dark, i was forced to leave the lower parts of the car looking a much lighter shade of green. Sometimes, going cheap on products will definetelly have a downside, in this case, the coverage of the paint.
I sprayed the clear coat, and i was done for the night. Another employee comes at the shop, walking back and forth, really letting us know that the area is prone to something bad to happen at any giving moment. One time the owner was robbed and had the living s*** beaten out of him, while inside the shop at night!! Yeah, Hialeah isn't one of the nicest places to live when you're retired... keep that in mind.
Not 40 minutes after i had sprayed clear coat, JD and i were going home already, it was passed midnight!
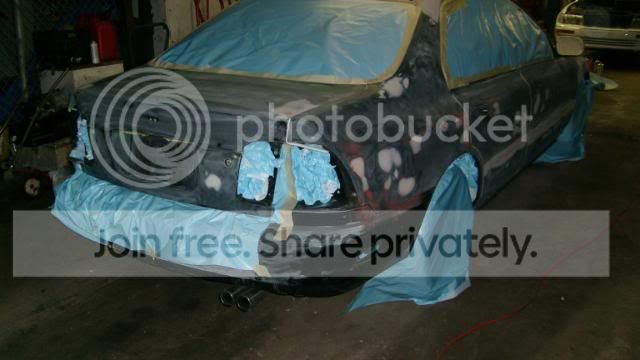
The only picture that i have once the car was painted was at a small accord owners gathering we had near my house, JD drove his car there and this is how the car looked at the end.

And the rest... is history my friends!!!
Cheers!
Accord love!!
On the front window, these mouldings are the only ones that are supposed to come off without getting the window removed. The upper moulding, between glass and roof is not supposed to come off. If you remove it (like i've seen people doing before), you damaged it, and it's installed on the glass when you are glueing the window to the car.
Removed the spoiler, and patched the holes using the same process of metal squares and 3M panel bond adhesive.
Getting the door handles out. You must get the rod that comes from the latch to pop out from the door handle. I bought a special tool for this, but i didn't work 100%, i ended up going back to my 2 flat head screw drivers method.
Once you have the door handle out, you're going to realise that the gasket won't come out because of a pin with a spring around it. So what do you do?! Get yourself a razor blade and cut the gasket right where the spring is. That way, when you reinstall everything, the gasket can't move around or fall off.
Undoing the key lock to get the little gasket out too. Small details like that is what i like to take care of.
After those days, there aren't many pics though. JD went on a trip out of state and i had the car with me to continue working on it. The idea was to have it painted in 7 days, so that when JD came back, he would see his car looking brand new!
Now here's the story: i couldn't get my manager to let me bring the car at the shop to get primered (using dupont's 2 part primer), he wanted to get paid, but he sure as hell didn't want to help mask the car or do anything... just wanted to get paid, for no reason. Funny uh?!
One week went by, and i didn't find a place to spray the car, every body shop that i went to said that couldn't do it because of warranty issues and blah blah blah.
So, i was able to get the primer, but needed a place to spray the car. That's when good ol' Claude comes in. Claude's friend had a shop/garage where he worked on cars, he had an air compressor and allowed me to use his shop to spray JD's car in exchange of a 6 pack of heineken.... hahhahaha, good times!!
JD was already back from his trip, and we got there at 8pm (when the owner of the garage was about to go home), and we were working hard to finish sanding the car with 320 grit. When we finally finished, we started to mask the car and tape everything up, removed the lights, mirrors and stuff... and then i was ready to spray primer.
The air compressor wasn't enough to keep up with me spraying, and what was supposed to be a 15-20 minutes job, turned out to be a 2 HOURS job. Boy.... talk about patience.
We left the shop around 5am (an entire night working).
Next day, JD drove to my house once again, and we started to sand the car with 320 grit. The car was 95% done as far as body work, i still had a couple of things to do that became more visible once we had sanded the primer. That was fixed shortly, and now we had the body work 100% done, but had a couple of spots to spray primer on (including the left rear door's jamb). So, i'm not sure how, but JD found a place in Hialeah to rent a spray booth, and he agreed to the price and set a day to use the spray booth. Couple of days later, comes the saturday that he could use the spray booth. That shop was a mess, not to mention that it was in a bad area.
I sprayed the primer shortly after we arrived at that bodyshop. Couple of hours later we were both sanding the car once again with 400 grit, laying some putty on little things like rock chips and scratches. Then, we sanded the entire car with 600 grit, all this using sanding blocks, and it was already getting dark. I wanted to leave and come back another day to finally paint the car, but JD insisted in staying, specially because he had already paid for renting the spray booth.
We cleaned the car, degreased it and rolled it inside the booth for me to spray the sealer. The spray booth was in bad shape, the doors didn't close completelly, and mosquitos were flying in and out like a motherf***er...lol
The sealer job wasn't too bad, the car had that egg-shell grey finish to it, you could see how the bodywork was nice and flat, i was really happy that i couldn't see any waves or anything.
While the sealer was drying, i was outside the booth, and here comes one of the guys that work at shop, he had a gun on his waist (a glock), telling us (me and JD) to be careful as the place had been robbed a few times, and how just a couple of days earlier, one customer's car was left sitting on bricks as the thieves stole his 24"s.
I went back in the booth, spraying the dark green base coat, and noticed that the base coat purchased by JD was really transparent. It took 4 coats to cover most of the car, but i ran out of paint before i could make the entire car look nice and dark, i was forced to leave the lower parts of the car looking a much lighter shade of green. Sometimes, going cheap on products will definetelly have a downside, in this case, the coverage of the paint.
I sprayed the clear coat, and i was done for the night. Another employee comes at the shop, walking back and forth, really letting us know that the area is prone to something bad to happen at any giving moment. One time the owner was robbed and had the living s*** beaten out of him, while inside the shop at night!! Yeah, Hialeah isn't one of the nicest places to live when you're retired... keep that in mind.
Not 40 minutes after i had sprayed clear coat, JD and i were going home already, it was passed midnight!
The only picture that i have once the car was painted was at a small accord owners gathering we had near my house, JD drove his car there and this is how the car looked at the end.
And the rest... is history my friends!!!
Cheers!
Accord love!!
Honda-Tech Member
Joined: Jun 2002
Posts: 5,551
Likes: 1
From: USA
WOOT, just got set of the LCA's myself from gianinline... that seemed like it was super fast getting to me.
Anyways, amazing work on these... they look great and you did a great job. Cant wait to get them on the car. Would post pictures but my camera is dead and you can see them above.
Thanks for bringing some sets of these to the Accord community!
Anyways, amazing work on these... they look great and you did a great job. Cant wait to get them on the car. Would post pictures but my camera is dead and you can see them above.
Thanks for bringing some sets of these to the Accord community!
Thread Starter
Honda-Tech Member
Joined: Aug 2005
Posts: 3,495
Likes: 5
From: Pompano Beach, FL, USA
Hey guys!
I was having an annoying problem with the car (it happened for almost 2 weeks) and it was getting in my nerves. I'm also having an issue with the current camera, these rechargeable batteries are a load of crap aren't they?! I'm switching back to the old school batteries to be able to take pics while i'm working with the car and car related items, i hate to put the DSLR near the car while i'm working.... go figure...haha
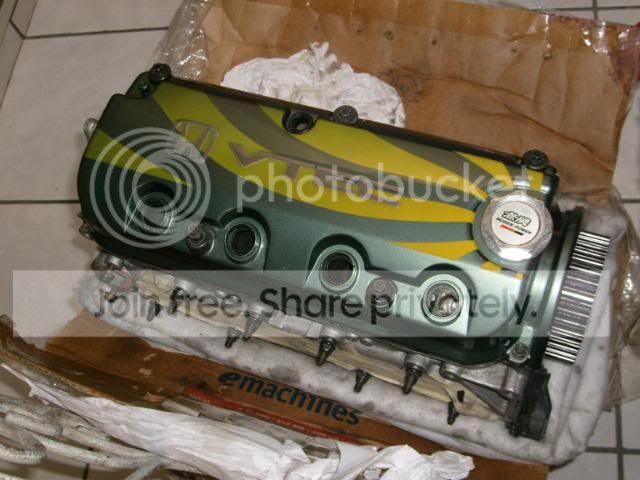
I decided it was time to throw this one of a kind valve cover into the current accord.
Back to the subject, i had switched the injectors from my old f22b1 (stock ones) and also replaced the fuel filter (2.5 hours to do this job!!!), and still, the idle wasn't right, the engine kept missing, didn't answer right off the line, and passed 2.5k to 3k rpms, it would turn normal again, so it sounded like i had an electrical problem to solve.
I measured the resistance of the coil inside the distributor, and i also measured the resistance of the wires, everything inside the specs. I checked the spark plugs and the gap was right (i had gapped them about 2 or 3 months ago). So, in doubt of the condition of the distributor cap, i decided to put the msd modified cap and coil 2 blast back to work!!
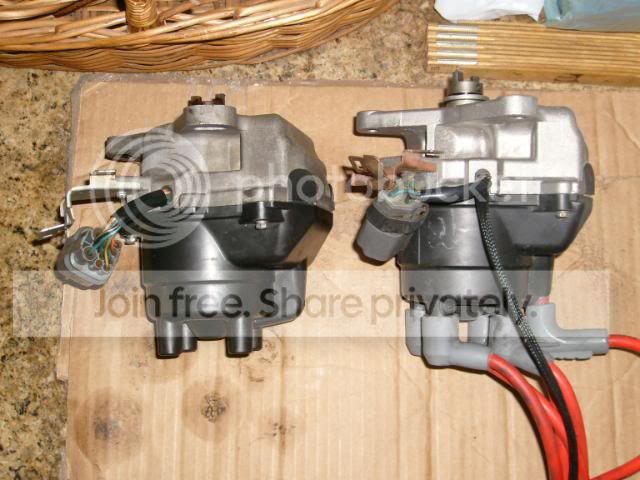
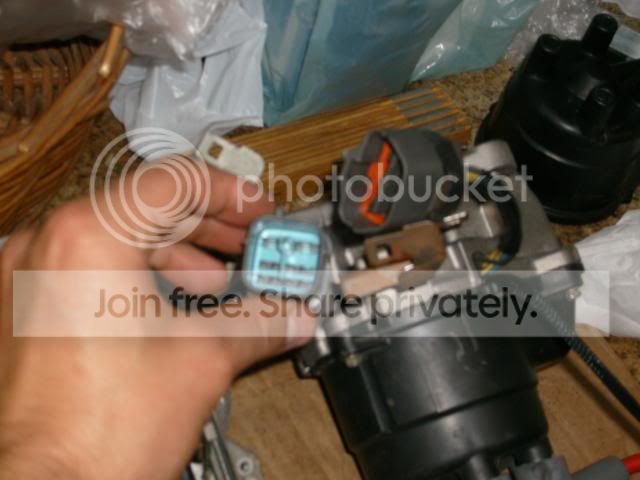
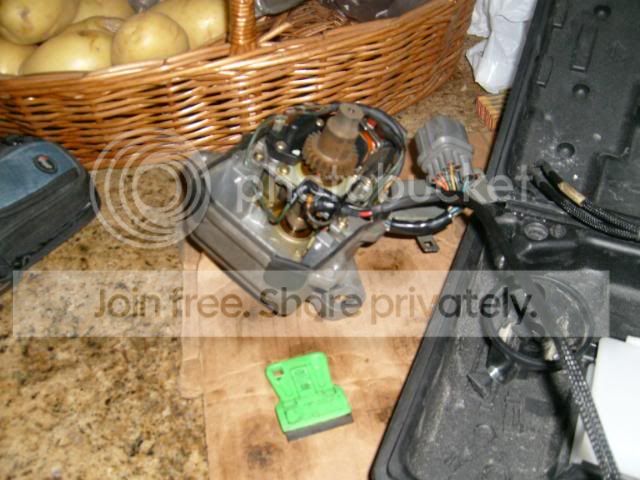
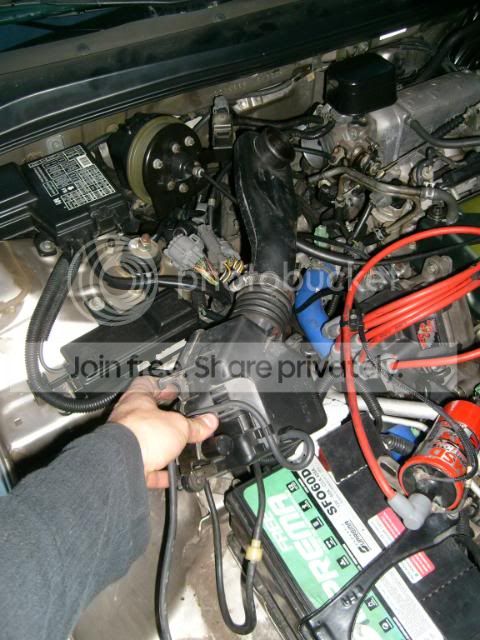
My current accord (equiped with a F23a5 stock) has a slightly different distributor when compared to the f22b1's one. Notice the difference between the cavities on the outside of them, differences also found on the type of connector and number of wires to it.
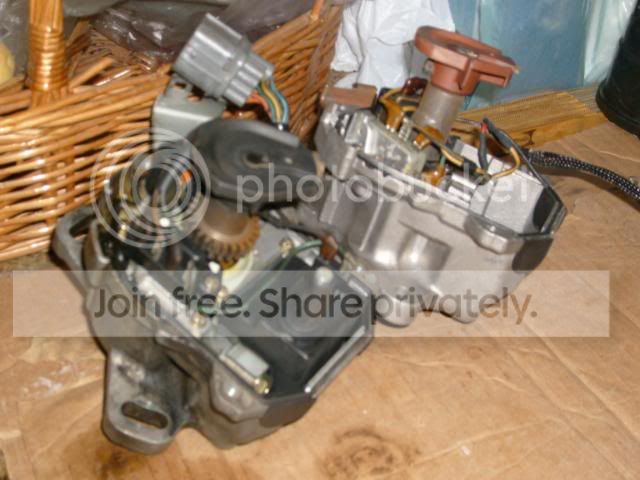
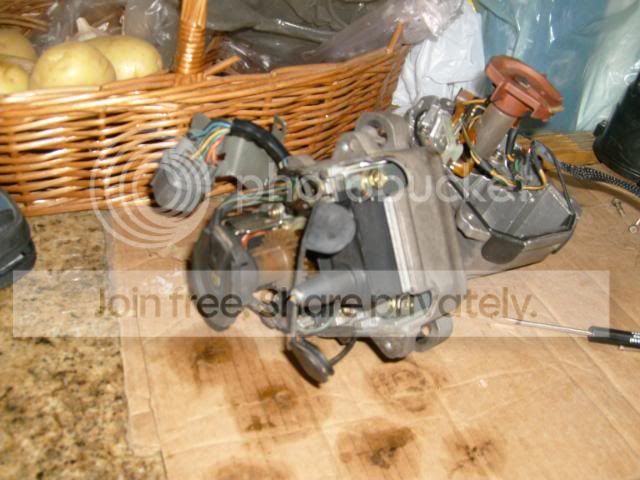
When the cap is off, you can clearly see differences between the two. The internal coil is definetelly the same for both, but the igniter on the f23a5's distributor is much smaller (about 1/4 of the size of the f22b1's igniter). There are more components found on the f23 dizzy than on the f22 one. One good thing was that the rotor is compatible with either one.
Time to convert the internal coil to the aftermarket external coil2blast from msd.
Start with removing the gasket which reveals "2" 10mm bolts that hold the coil to the distributor housing.
The coil will have 2 wires attached to it, one is the negative and one is the positive which comes from the igniter. I used 2 male type connectors to simply plug into the stock wiring of the distributor (the stock f23 dizzy), and soldered the male connectors to a wiring that i had made already that feeds the coil2blast (pics of it a couple of pages back).

Finished result (sorry, camera and batteries kept me from taking descent pics) of the wiring done to the distributor.
Installing the distributor is easy, but you must make sure it is absolutelly the same way it was when you removed (to which cylinder was the rotor facing).
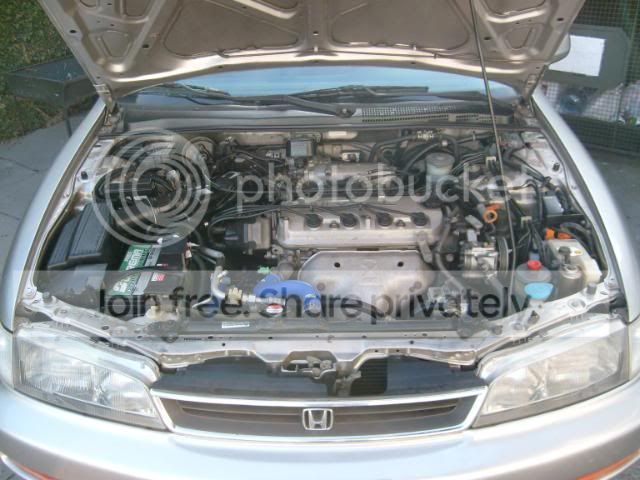
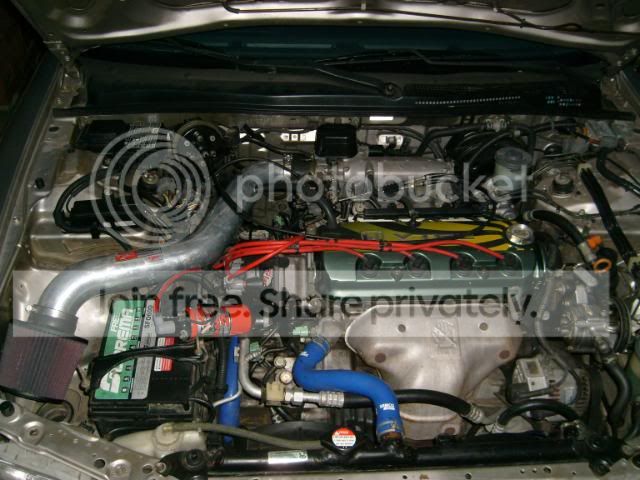
Then, time to upgrade how this accord inhales its precious air.
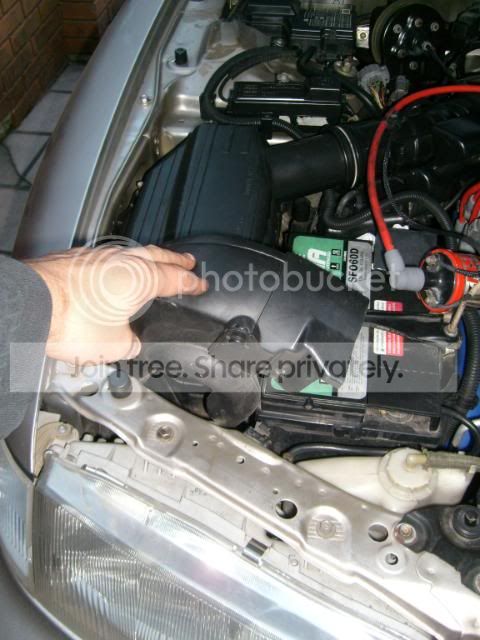
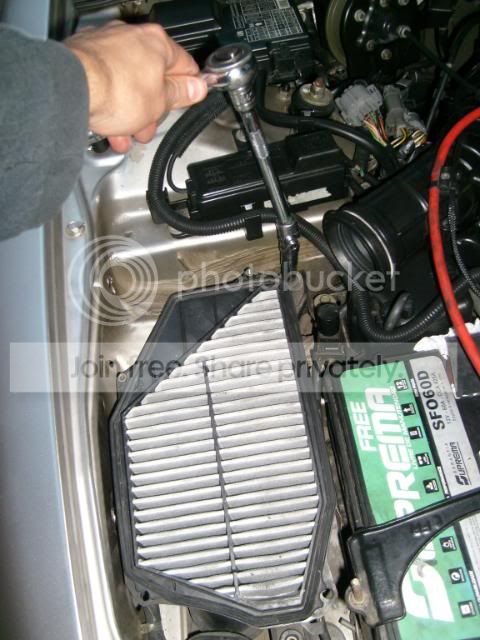
Start by lifting up this plastic piece.
And loosening these 4 bolts. Then lift up the cover of the air filter like so.
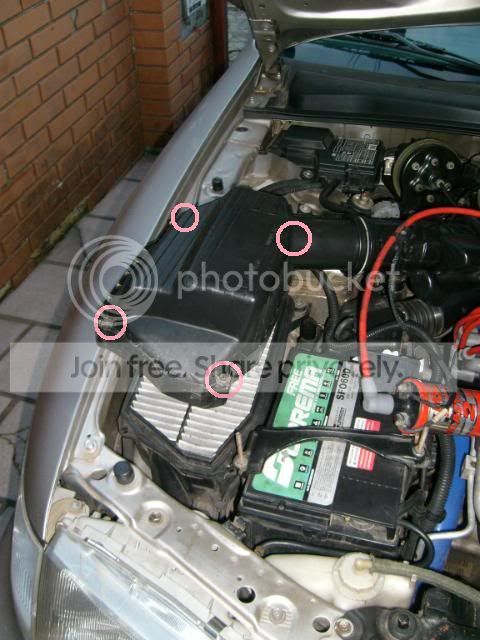
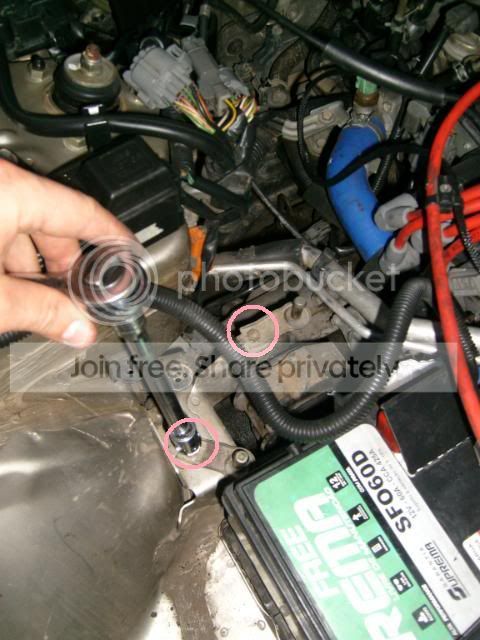
The remove the 10mm bolt that secures the air filter box in its place and take off the box from there. There's another 10mm bolt next to it that secures a plastic chamber (part of the air filter/induction system).
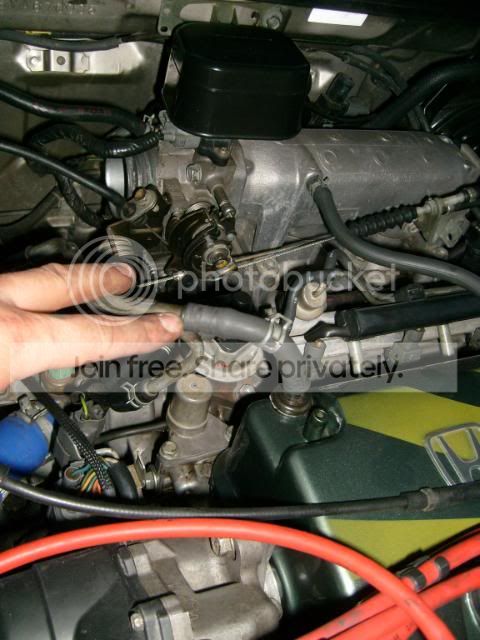
Follow these vacuum line all the way to the fire wall...
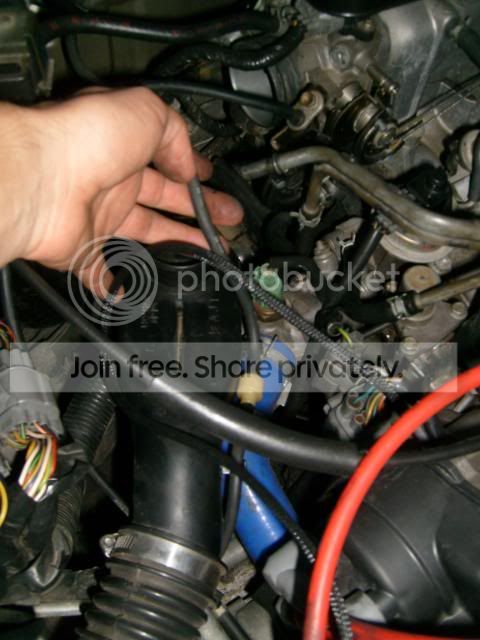
... and remove the line right about there! If your aftermarket intake kit didn't come with a vacuum plug then you should get one.
Remove the rest of the pipe and all other gadgets related to the stock air filter.
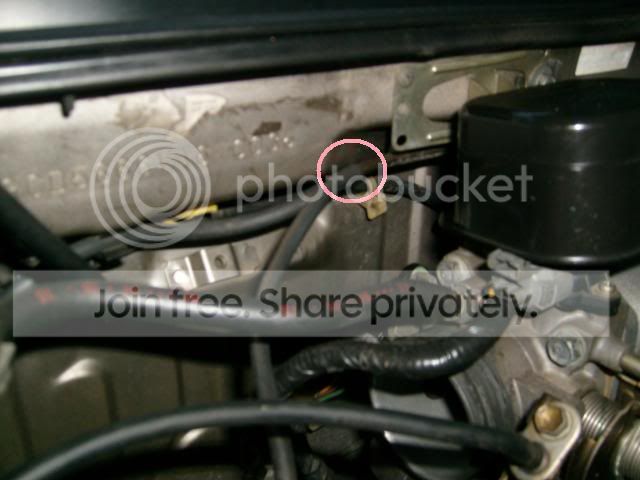
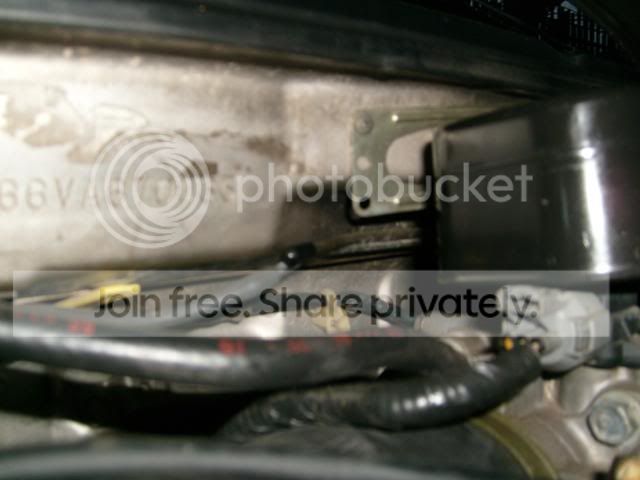
Using a 10mm socket, remove the 2 brackets located in the picture below.
The hose that came from the OEM air pipe to the valve cover will no longer work out, you gotta remove it.
If your intake kit came with a little bracket to hold the intake in place, place it there (these are the little details that cheap aftermarket products won't come with).
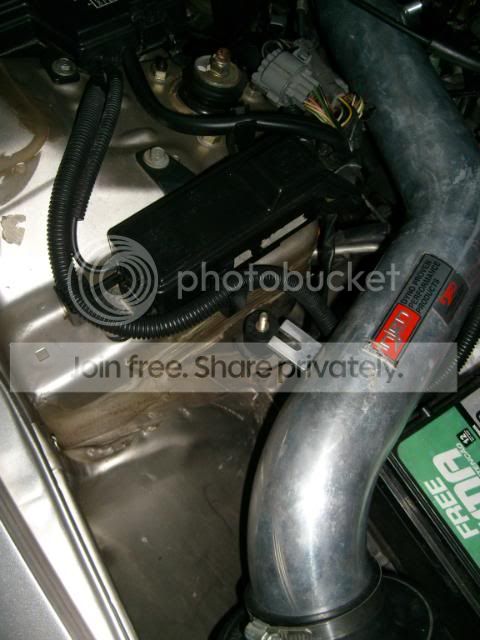
Put the cap on the vacuum line just like that.
Finish the job by tightening the clamps; adding the nut to the bracket that secures the intake; and add the new rubber hose from the intake pipe to the valve cover.

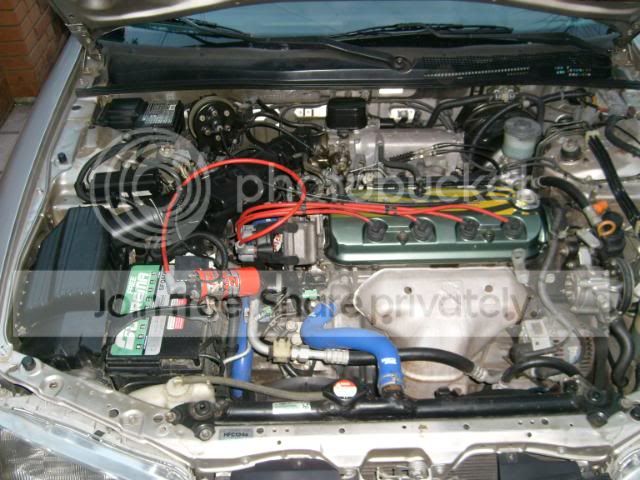
Now that's more like what i want!!
More updates coming soon!
I was having an annoying problem with the car (it happened for almost 2 weeks) and it was getting in my nerves. I'm also having an issue with the current camera, these rechargeable batteries are a load of crap aren't they?! I'm switching back to the old school batteries to be able to take pics while i'm working with the car and car related items, i hate to put the DSLR near the car while i'm working.... go figure...haha
I decided it was time to throw this one of a kind valve cover into the current accord.
Back to the subject, i had switched the injectors from my old f22b1 (stock ones) and also replaced the fuel filter (2.5 hours to do this job!!!), and still, the idle wasn't right, the engine kept missing, didn't answer right off the line, and passed 2.5k to 3k rpms, it would turn normal again, so it sounded like i had an electrical problem to solve.
I measured the resistance of the coil inside the distributor, and i also measured the resistance of the wires, everything inside the specs. I checked the spark plugs and the gap was right (i had gapped them about 2 or 3 months ago). So, in doubt of the condition of the distributor cap, i decided to put the msd modified cap and coil 2 blast back to work!!
My current accord (equiped with a F23a5 stock) has a slightly different distributor when compared to the f22b1's one. Notice the difference between the cavities on the outside of them, differences also found on the type of connector and number of wires to it.
When the cap is off, you can clearly see differences between the two. The internal coil is definetelly the same for both, but the igniter on the f23a5's distributor is much smaller (about 1/4 of the size of the f22b1's igniter). There are more components found on the f23 dizzy than on the f22 one. One good thing was that the rotor is compatible with either one.
Time to convert the internal coil to the aftermarket external coil2blast from msd.
Start with removing the gasket which reveals "2" 10mm bolts that hold the coil to the distributor housing.
The coil will have 2 wires attached to it, one is the negative and one is the positive which comes from the igniter. I used 2 male type connectors to simply plug into the stock wiring of the distributor (the stock f23 dizzy), and soldered the male connectors to a wiring that i had made already that feeds the coil2blast (pics of it a couple of pages back).
Finished result (sorry, camera and batteries kept me from taking descent pics) of the wiring done to the distributor.
Installing the distributor is easy, but you must make sure it is absolutelly the same way it was when you removed (to which cylinder was the rotor facing).
Then, time to upgrade how this accord inhales its precious air.
Start by lifting up this plastic piece.
And loosening these 4 bolts. Then lift up the cover of the air filter like so.
The remove the 10mm bolt that secures the air filter box in its place and take off the box from there. There's another 10mm bolt next to it that secures a plastic chamber (part of the air filter/induction system).
Follow these vacuum line all the way to the fire wall...
... and remove the line right about there! If your aftermarket intake kit didn't come with a vacuum plug then you should get one.
Remove the rest of the pipe and all other gadgets related to the stock air filter.
Using a 10mm socket, remove the 2 brackets located in the picture below.
The hose that came from the OEM air pipe to the valve cover will no longer work out, you gotta remove it.
If your intake kit came with a little bracket to hold the intake in place, place it there (these are the little details that cheap aftermarket products won't come with).
Put the cap on the vacuum line just like that.
Finish the job by tightening the clamps; adding the nut to the bracket that secures the intake; and add the new rubber hose from the intake pipe to the valve cover.
Now that's more like what i want!!
More updates coming soon!
Thread Starter
Honda-Tech Member
Joined: Aug 2005
Posts: 3,495
Likes: 5
From: Pompano Beach, FL, USA
I had spent too many hours shaving and sanding that valve cover, plus the time painting, masking, and extra sanding... ....it was a keeper.
Tomorrow i'm planning on upgrading this accord some more.
Peace!
Accord love!
Tomorrow i'm planning on upgrading this accord some more.
Peace!
Accord love!
Thread Starter
Honda-Tech Member
Joined: Aug 2005
Posts: 3,495
Likes: 5
From: Pompano Beach, FL, USA
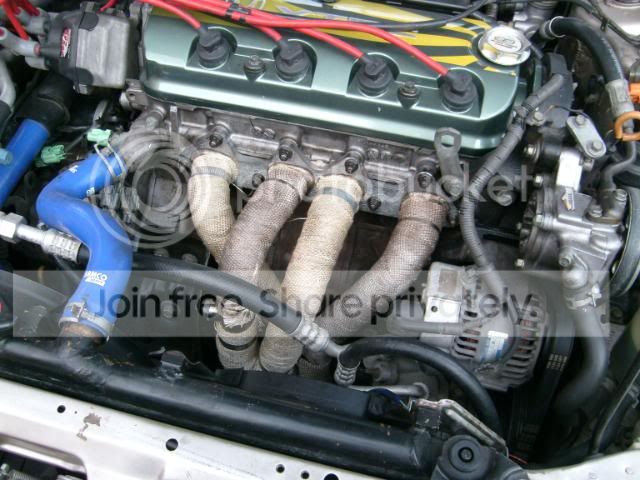
Recent work: wrapping the header!
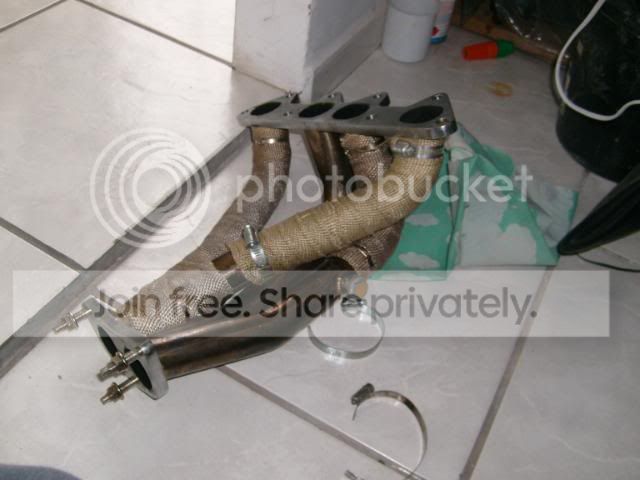
I had a nice 4-1 (1 piece) header on my other accord that ended up getting 2 pipes badly bent from being hit while driving. I ended up getting the good ol' 4-2-1 (2 piece) style header to better the flow of the engine, but i didn't buy enough header wrap ties to finish the job. This is where the header was left at....
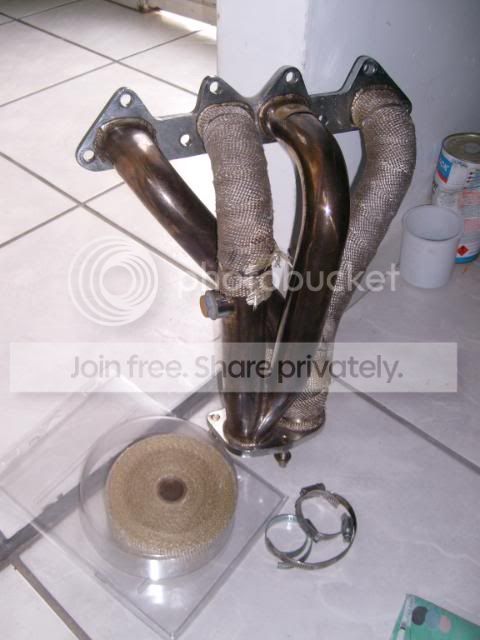
...and i decided that it's time for it to get wrapped up so i can put this thing to work.
On the picture above, there's the header, the wrap and a few clamps mostly used for radiator hoses (but will work for this situation as well).
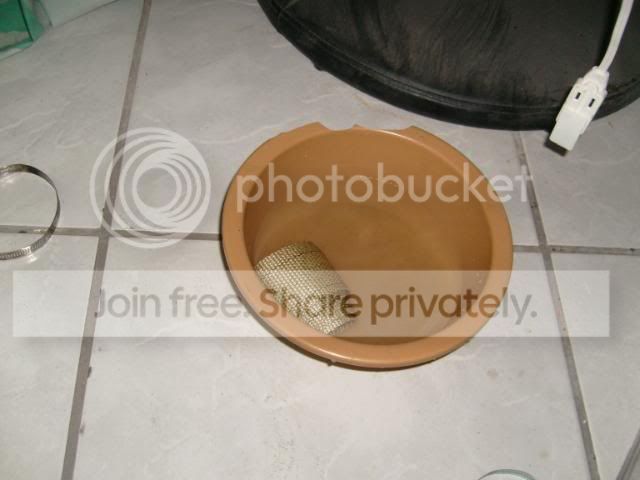
So, first step to wrap a header properly is to get it wet. Measure the piping, do the math calculating the width of the wrap, the thickness of the pipe and if there are any curves or not. You may want to add 4 or 5 inches just in case you didn't do well in math class back in the day.... I suggest using gloves when handling this (a mask and goggles are a must too, if possible, wear something with long sleeves to keep your arms free from contacting the material), the header wrap has fiber glass, which will leave airborne particles that can get sucked into your lungs as you breath.
Ok, so... get that piece of wrap wet, squeeze the excess water and get to work.
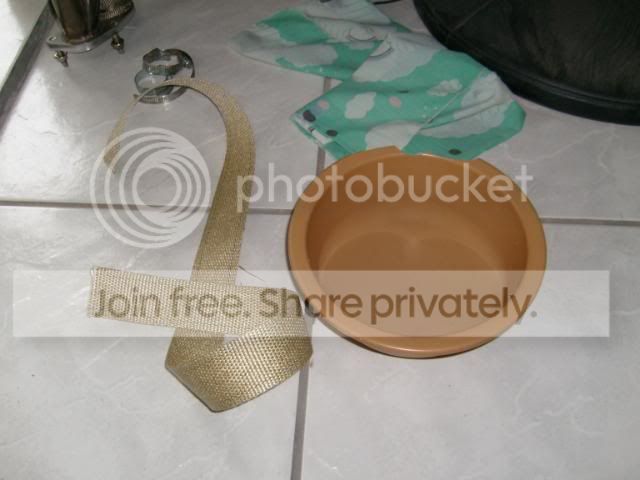
Unfortunatelly, i couldn't wrap the header and take pics at the same time. You can start wrapping it, and secure one end with a clamp or a tie (ties made of steel!!!!), and continue wrapping. Here's one end secured already.
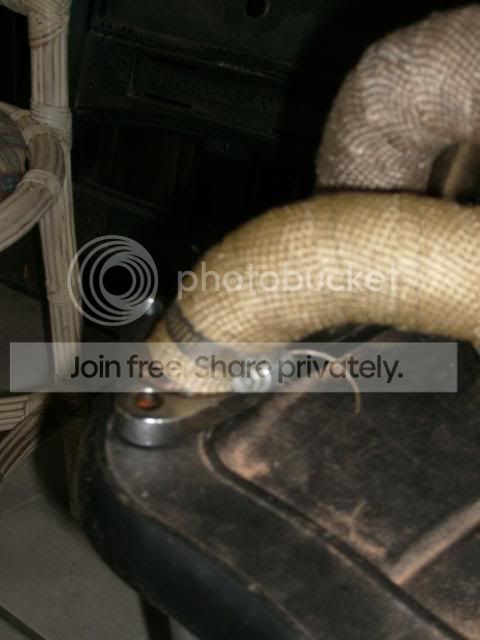
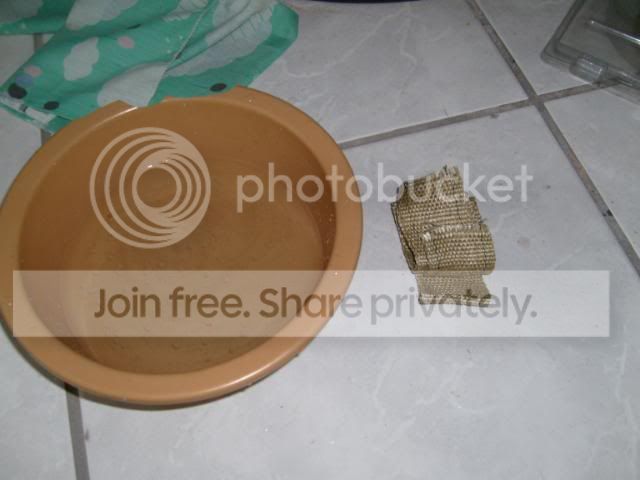
Finished one part.
Then got the second piece of wrap soaking wet. Measure twice, cut only once.
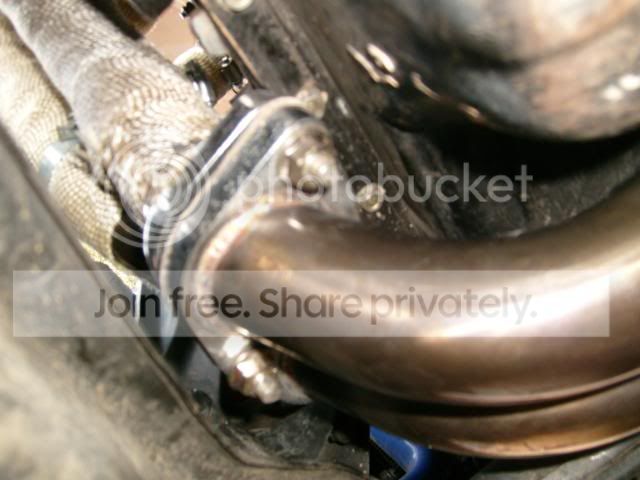
Finished the other part as well, here's the completed look. I used hose clamps to secure the wrap in place, and then just trimmed the pieces that were sticking out too much.
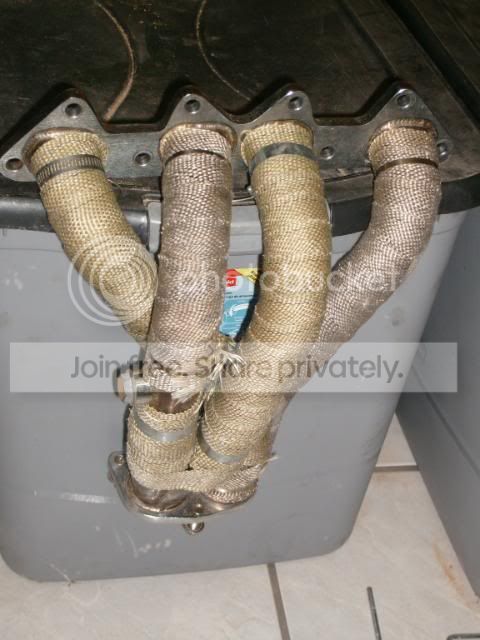
Once you install a header like this, no matter if it's wet or not, there will be a fume given off by it, a distinct smell as well (not a nice one), which will go away after you drive a few miles, may take a couple of days.
Will upload more pics and update some more soon.
Accord love.
I had a nice 4-1 (1 piece) header on my other accord that ended up getting 2 pipes badly bent from being hit while driving. I ended up getting the good ol' 4-2-1 (2 piece) style header to better the flow of the engine, but i didn't buy enough header wrap ties to finish the job. This is where the header was left at....
...and i decided that it's time for it to get wrapped up so i can put this thing to work.
On the picture above, there's the header, the wrap and a few clamps mostly used for radiator hoses (but will work for this situation as well).
So, first step to wrap a header properly is to get it wet. Measure the piping, do the math calculating the width of the wrap, the thickness of the pipe and if there are any curves or not. You may want to add 4 or 5 inches just in case you didn't do well in math class back in the day.... I suggest using gloves when handling this (a mask and goggles are a must too, if possible, wear something with long sleeves to keep your arms free from contacting the material), the header wrap has fiber glass, which will leave airborne particles that can get sucked into your lungs as you breath.
Ok, so... get that piece of wrap wet, squeeze the excess water and get to work.
Unfortunatelly, i couldn't wrap the header and take pics at the same time. You can start wrapping it, and secure one end with a clamp or a tie (ties made of steel!!!!), and continue wrapping. Here's one end secured already.
Finished one part.
Then got the second piece of wrap soaking wet. Measure twice, cut only once.
Finished the other part as well, here's the completed look. I used hose clamps to secure the wrap in place, and then just trimmed the pieces that were sticking out too much.
Once you install a header like this, no matter if it's wet or not, there will be a fume given off by it, a distinct smell as well (not a nice one), which will go away after you drive a few miles, may take a couple of days.
Will upload more pics and update some more soon.
Accord love.
Honda-Tech Member
Joined: Feb 2010
Posts: 149
Likes: 0
From: GA
Awsome thread, I've been reading through it for over an hour and a half. I still can't believe you parted out the first accord, that was so much work into it. But keep up the good work man...
Thread Starter
Honda-Tech Member
Joined: Aug 2005
Posts: 3,495
Likes: 5
From: Pompano Beach, FL, USA
I honestly have a hard time believing it when i look at the pictures of the car when i was working on it, i mean... it's gone!... but, like i mentioned before... the idea remains alive and kicking, and so... that's enough motive for me to create another one.
If you fall down 1000 times, then you need to get up 1001 times.
I try to look on the bright side of the story, which are the most important parts being with me. Life is going to be 10% of things you can't do s*** about it, and the other 90% is how you deal with the "10%". I'm in no hurry, but i can't wait to turn this accord into the bad *** CD5 that i have in mind!!!
Accord Love!!
Thread Starter
Honda-Tech Member
Joined: Aug 2005
Posts: 3,495
Likes: 5
From: Pompano Beach, FL, USA
Upgrading 1 on 1!! Installing an aftermarket header on a F-series!
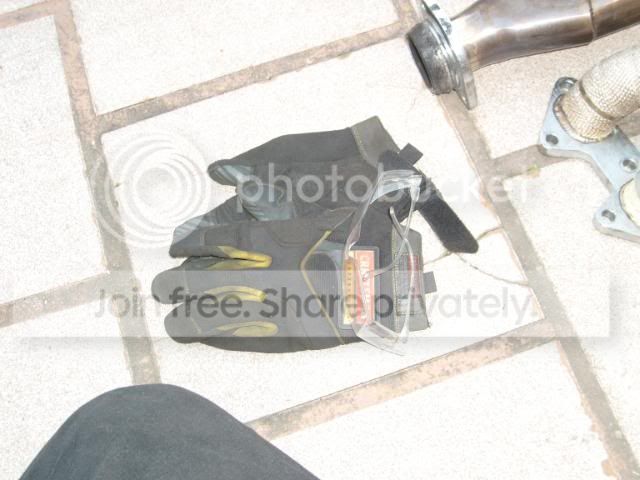
First of all, for your own sake: eye protection; and don't underestimate a good pair of gloves, they work best when you wear them.
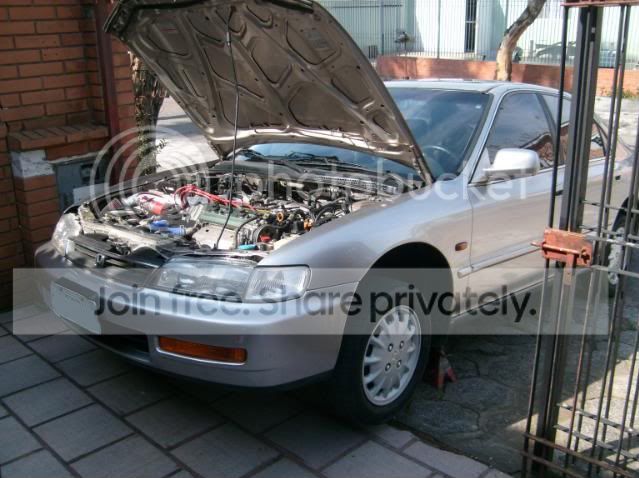
So, to do this job, pop your hood open and lift the car. Secure the rear wheels (pull up your hand brake and if possible, add something under the tires to make sure the car won't move (specially if you're working on a slope). Don't just leave the car jacked (messes up with the seals of its cylinders after some time), ALWAYS place stands under the vehicle.
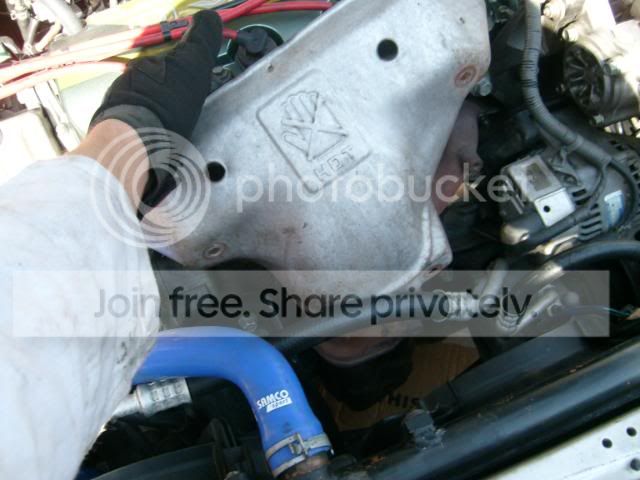
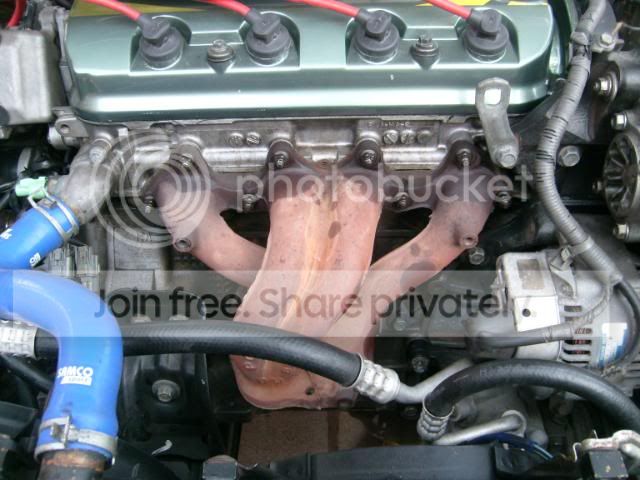
It's best to do this while the engine is cold. Start removing the 3 12mm bolts that attach the heat shield to the exhaust manifold. These are normally going to be very rusty, it's normal for them to just simply brake the head off, leaving the threaded bolt behind.
I'm lucky that all 3 came out without a problem, then just remove the shield out of there...
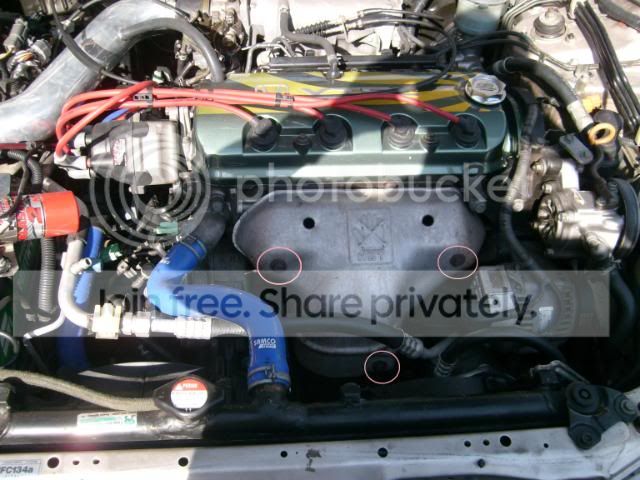
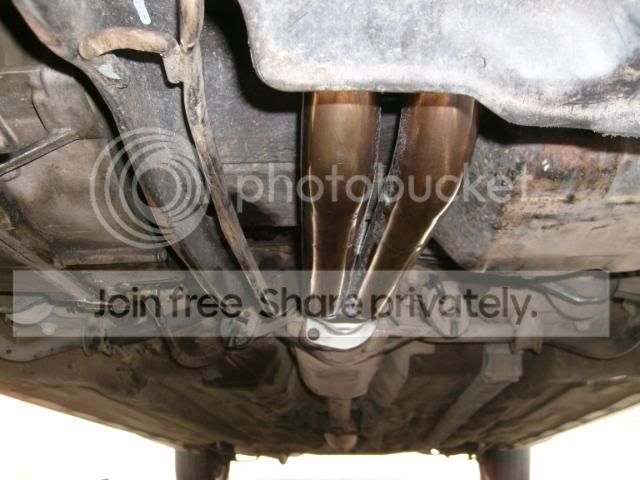
...now you see the stock exhaust manifold.
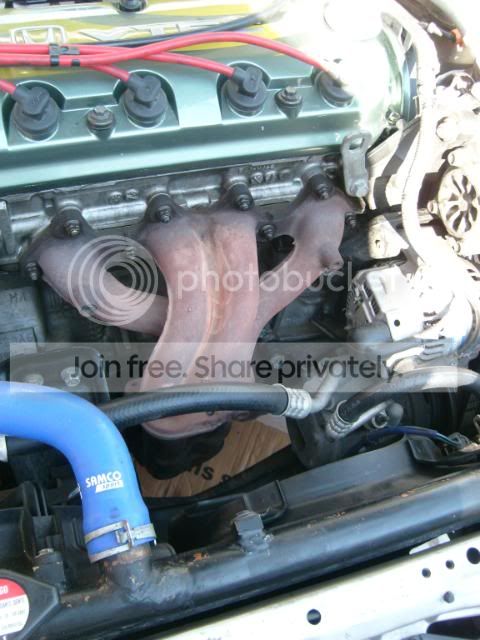
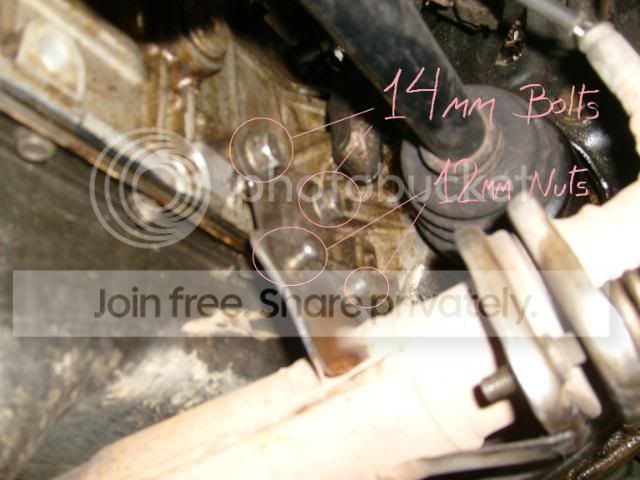
Get under the car, and now there are 3 14mm nuts that need to be removed. They hold the upper part of the exhaust manifold to the head pipe.
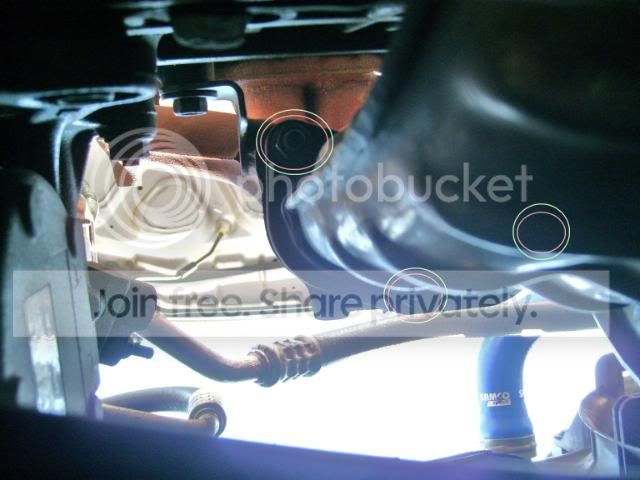
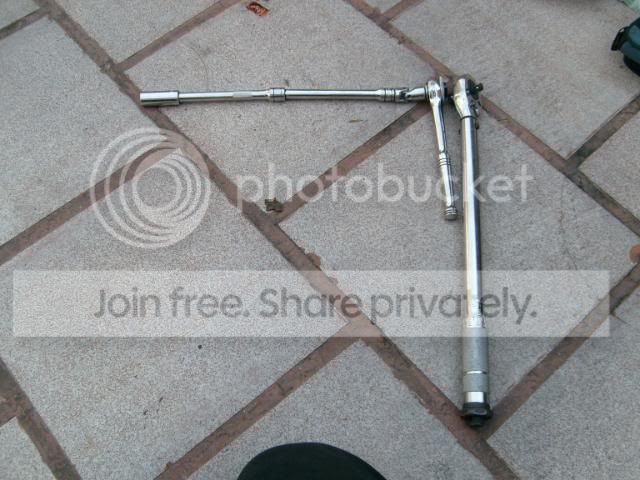
These nuts may be very hard to remove, there's rust and heat involved, chances that they could strip the bolts or break are high, this will pretty much depend on how good of a boy you've been this year. I used two 6" extensions to reach them.
You will also have to remove 2 12mm nuts shown on the picture below (this is the back of the engine), also remove the 2 14mm screws holding this bracket that keeps the head pipe in place.
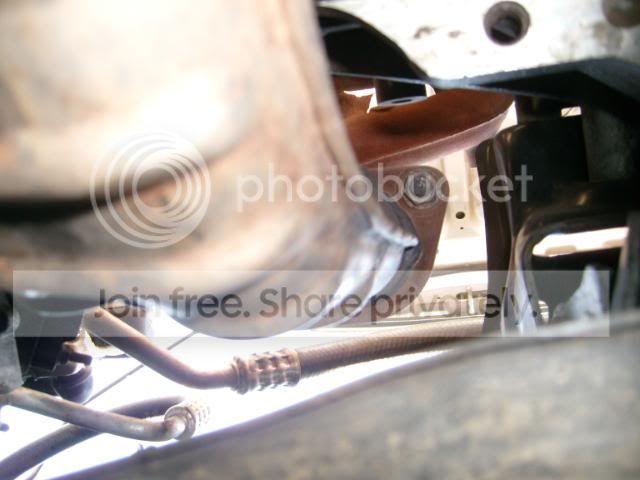
Then, we need to remove the oxygen sensor and also remove the tensioned bolts. I couldn't disconect the o2 sensor from the harness, so for me, removing the o2 sensor on the spot was a must. I've sprayed some wd40 to help, but used a flat head screwdriver to scrape all the rust from around the sensor first.
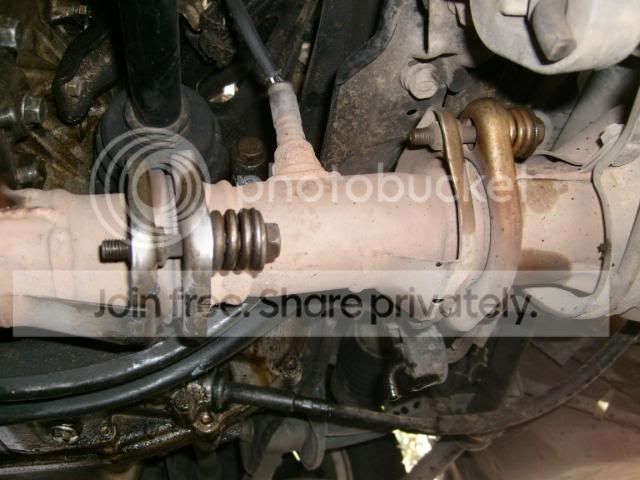
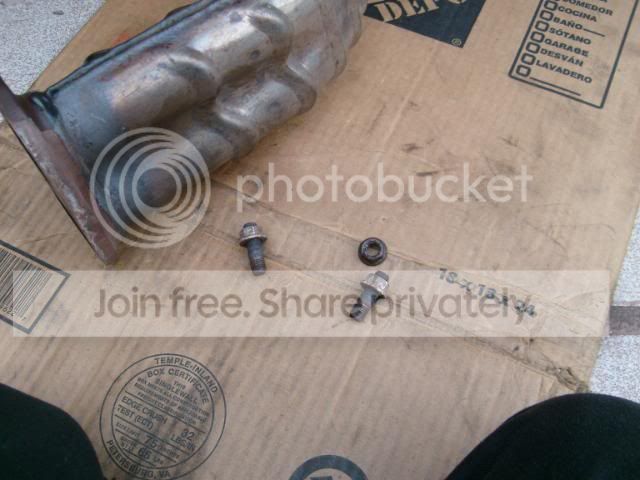
To remove the oxygen sensor, the tool that i was using made the wrench be on the opposite side. So, i had to turn the wrench counter-clock wise to remove the o2 sensor, understand?! The tensioned bolts will be 14mm on one side, 12mm on the other. Proceed removing the head pipe once all that is complete.

I haven't been a good guy lately, so the accord gods awarded me with a stripped nut and bolt, making me work hard to be able to separate the exhaust manifold from the head pipe. I remember with my second accord (cd5, back when it was burgundy), 2 bolts got stripped while attached. I had spent about a hour trying to get it off with no luck. Solution for it?!... Cut-off wheel from home depot, and about 2 hours later (so much noise and sparks... holy f***!!!) i had finished cutting the exhaust manifold in half.
This o2 sensor removal tool works great for this aplication.
Now, remove the 8 12mm nuts that hold the manifold to the cylinder head, and also a bolt attached to the side of the manifold (facing the driver's side).
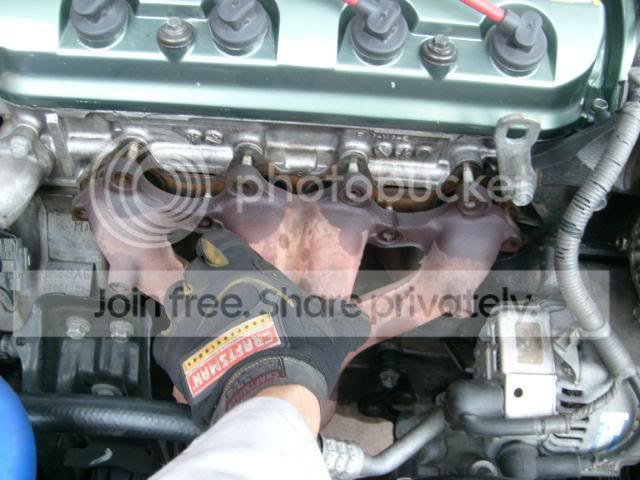
I just removed the bracket of this bolt out, and installed the bolt back in.
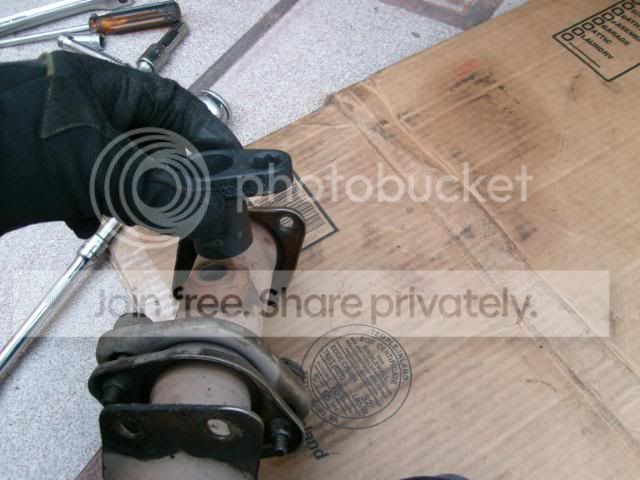
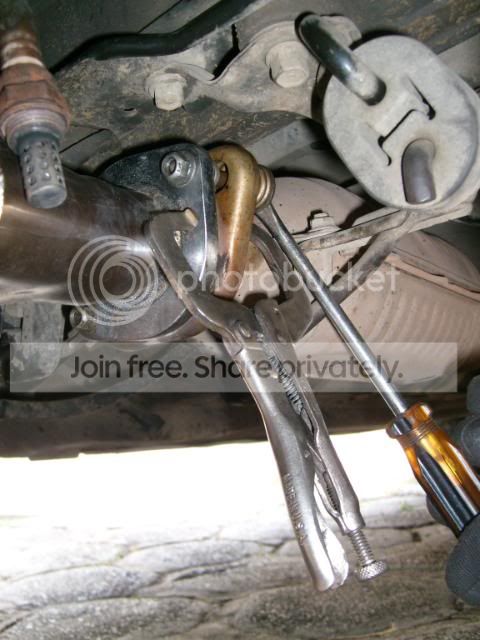
Time to install the new header. Start by placing the upper part of the header to the head of the engine. Then attach its lower part (head pipe), don't start tightening every thing just yet. If you leave the bolts loose like i said, you will be able to twist and turn the head pipe as needed when re installing the bolts with springs. The word here is leverage. I used a pair of pliers and a screwdriver to overcome the tension of the springs to force the bolt through the flange of the header, leaving enough room and thread to hand tighten the nut.
Do that, then install the o2 sensor back. Tighten it using the o2 sensor removal tool, turn the wrench clockwise. Now, we can proceed tightening the head pipe to the upper part of the new header, make sure if you have a gasket in there already!!!
Be sure to add a gasket between the cylinder head and the header, then tighten the 8 12mm nuts.
Looking fresh!
Installing a header shouldn't throw any codes or give you any problems, you'll definetelly notice a stronger response when stepping on the gas pedal. It's power when you need!
I had heard of people saying that an intake or header could decrease your gas mileage. So let me just say this here... back when my other accord had a stock engine (mods were I/H/E) i was getting 33mpg on the highway, and a good 20 to 23mpg in the city. It will really come down to how you drive it, not so much on the parts...
First of all, for your own sake: eye protection; and don't underestimate a good pair of gloves, they work best when you wear them.
So, to do this job, pop your hood open and lift the car. Secure the rear wheels (pull up your hand brake and if possible, add something under the tires to make sure the car won't move (specially if you're working on a slope). Don't just leave the car jacked (messes up with the seals of its cylinders after some time), ALWAYS place stands under the vehicle.
It's best to do this while the engine is cold. Start removing the 3 12mm bolts that attach the heat shield to the exhaust manifold. These are normally going to be very rusty, it's normal for them to just simply brake the head off, leaving the threaded bolt behind.
I'm lucky that all 3 came out without a problem, then just remove the shield out of there...
...now you see the stock exhaust manifold.
Get under the car, and now there are 3 14mm nuts that need to be removed. They hold the upper part of the exhaust manifold to the head pipe.
These nuts may be very hard to remove, there's rust and heat involved, chances that they could strip the bolts or break are high, this will pretty much depend on how good of a boy you've been this year. I used two 6" extensions to reach them.
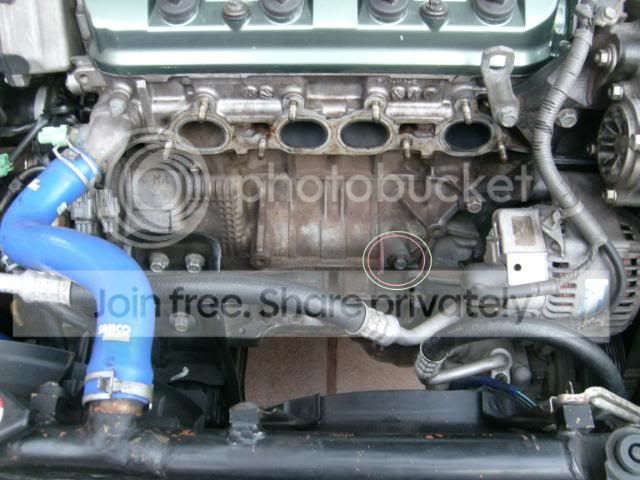
You will also have to remove 2 12mm nuts shown on the picture below (this is the back of the engine), also remove the 2 14mm screws holding this bracket that keeps the head pipe in place.
Then, we need to remove the oxygen sensor and also remove the tensioned bolts. I couldn't disconect the o2 sensor from the harness, so for me, removing the o2 sensor on the spot was a must. I've sprayed some wd40 to help, but used a flat head screwdriver to scrape all the rust from around the sensor first.
To remove the oxygen sensor, the tool that i was using made the wrench be on the opposite side. So, i had to turn the wrench counter-clock wise to remove the o2 sensor, understand?! The tensioned bolts will be 14mm on one side, 12mm on the other. Proceed removing the head pipe once all that is complete.
I haven't been a good guy lately, so the accord gods awarded me with a stripped nut and bolt, making me work hard to be able to separate the exhaust manifold from the head pipe. I remember with my second accord (cd5, back when it was burgundy), 2 bolts got stripped while attached. I had spent about a hour trying to get it off with no luck. Solution for it?!... Cut-off wheel from home depot, and about 2 hours later (so much noise and sparks... holy f***!!!) i had finished cutting the exhaust manifold in half.
This o2 sensor removal tool works great for this aplication.
Now, remove the 8 12mm nuts that hold the manifold to the cylinder head, and also a bolt attached to the side of the manifold (facing the driver's side).
I just removed the bracket of this bolt out, and installed the bolt back in.
Time to install the new header. Start by placing the upper part of the header to the head of the engine. Then attach its lower part (head pipe), don't start tightening every thing just yet. If you leave the bolts loose like i said, you will be able to twist and turn the head pipe as needed when re installing the bolts with springs. The word here is leverage. I used a pair of pliers and a screwdriver to overcome the tension of the springs to force the bolt through the flange of the header, leaving enough room and thread to hand tighten the nut.
Do that, then install the o2 sensor back. Tighten it using the o2 sensor removal tool, turn the wrench clockwise. Now, we can proceed tightening the head pipe to the upper part of the new header, make sure if you have a gasket in there already!!!
Be sure to add a gasket between the cylinder head and the header, then tighten the 8 12mm nuts.
Looking fresh!
Installing a header shouldn't throw any codes or give you any problems, you'll definetelly notice a stronger response when stepping on the gas pedal. It's power when you need!
I had heard of people saying that an intake or header could decrease your gas mileage. So let me just say this here... back when my other accord had a stock engine (mods were I/H/E) i was getting 33mpg on the highway, and a good 20 to 23mpg in the city. It will really come down to how you drive it, not so much on the parts...
Thread Starter
Honda-Tech Member
Joined: Aug 2005
Posts: 3,495
Likes: 5
From: Pompano Beach, FL, USA
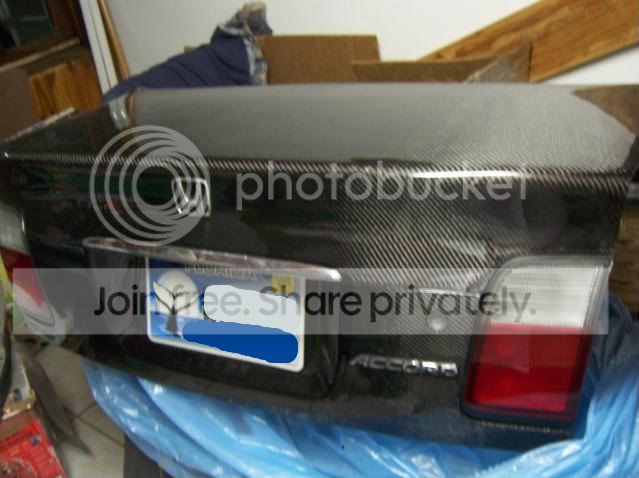
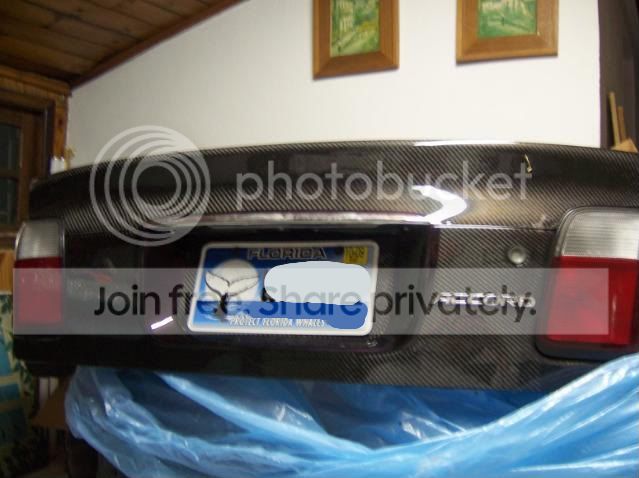
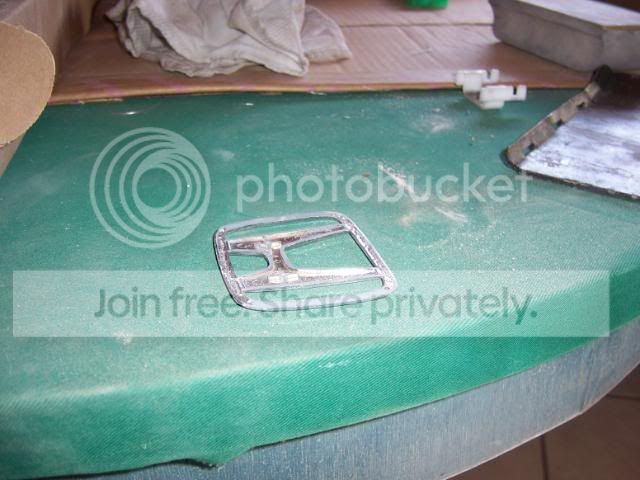
Update! Did a bit more work to the spoiler. The original emblem was missing, and i was told that a honda civic has the emblem to fit perfectly on the spoiler, but... considering the amount of money it may cost me, plus... finding a civic on a junkyard.. not worth it at this point.
So i remembered that i had the carbon fiber trunk, with an emblem on it, the "H" from the original trunk.
I used double side tape to keep the emblem in place, and removing it... wasn't too dificult.
Test fitting: a bit bigger...
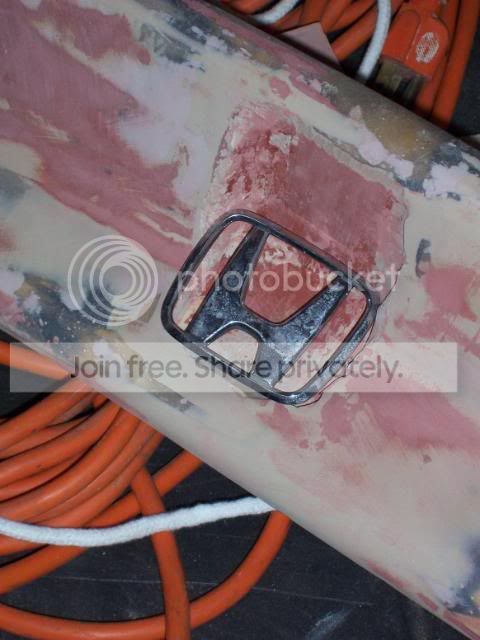
A dremel tool is a synonim to great fitment. I had to enlarge the area where the emblem sits... but the size of it is good to go already.
The "H" emblem that i'm using is slightly curved in the back, so i'm thinking about what i'm going to do to make it sit flush.... it's either "dig" on the spoiler or flatten the back of the emblem, we'll see whichever gets done better.
Accord love yo!
So i remembered that i had the carbon fiber trunk, with an emblem on it, the "H" from the original trunk.
I used double side tape to keep the emblem in place, and removing it... wasn't too dificult.
Test fitting: a bit bigger...
A dremel tool is a synonim to great fitment. I had to enlarge the area where the emblem sits... but the size of it is good to go already.
The "H" emblem that i'm using is slightly curved in the back, so i'm thinking about what i'm going to do to make it sit flush.... it's either "dig" on the spoiler or flatten the back of the emblem, we'll see whichever gets done better.
Accord love yo!
Thread Starter
Honda-Tech Member
Joined: Aug 2005
Posts: 3,495
Likes: 5
From: Pompano Beach, FL, USA
Update!
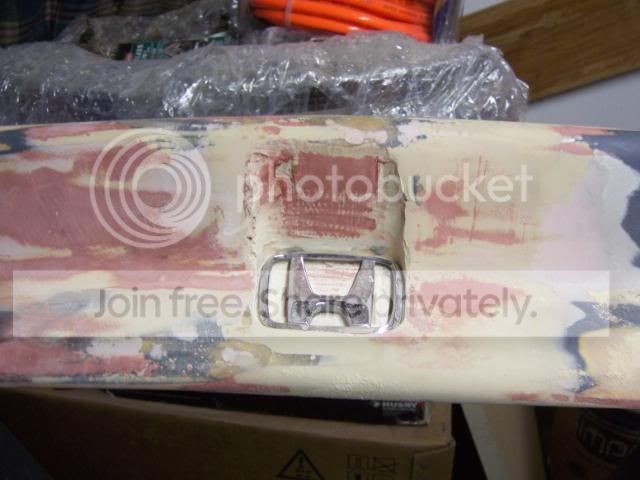
I decided to modify the "H" emblem to sit flush on the spoiler. Here's a pic of the round profile of the emblem before i did any work to it.

Using a sanding block with 180 sand paper, i slid this emblem back and forth counteless times to get rid of the round profile and bring a flat surface to its back.
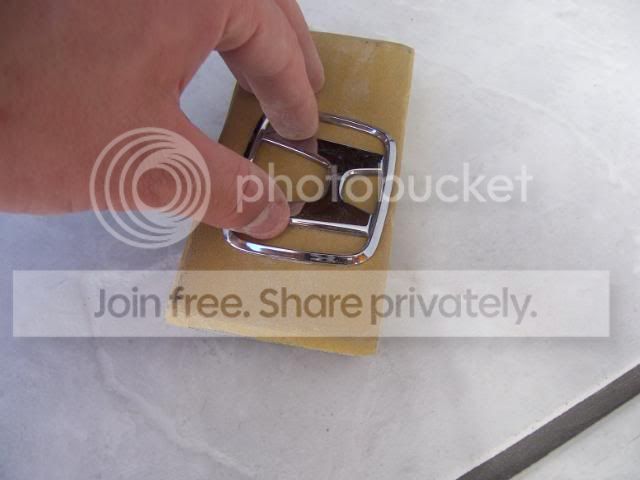
This pic shows the discolored chrome behind the emblem, this is where the emblem has become flat.
And i'm still working on the spoiler.... custom additional work for the win... NOT!!!
Accord love anytime!
I decided to modify the "H" emblem to sit flush on the spoiler. Here's a pic of the round profile of the emblem before i did any work to it.
Using a sanding block with 180 sand paper, i slid this emblem back and forth counteless times to get rid of the round profile and bring a flat surface to its back.
This pic shows the discolored chrome behind the emblem, this is where the emblem has become flat.
And i'm still working on the spoiler.... custom additional work for the win... NOT!!!
Accord love anytime!
Thread Starter
Honda-Tech Member
Joined: Aug 2005
Posts: 3,495
Likes: 5
From: Pompano Beach, FL, USA
PART 1
Another update to this thread, this time i bring a guide on how to install the recently available Lower Control Arms that i've made.
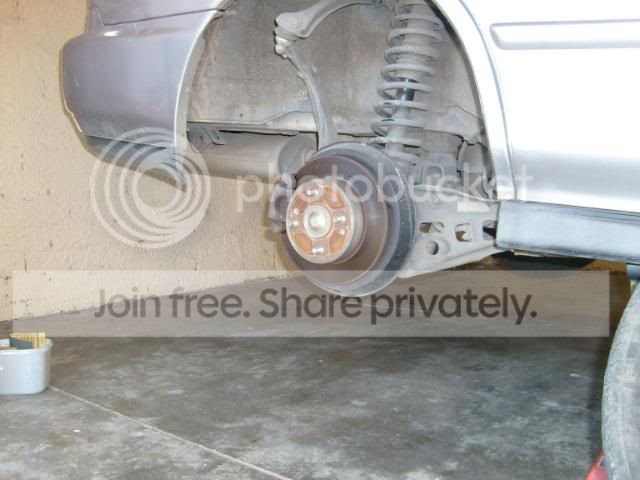
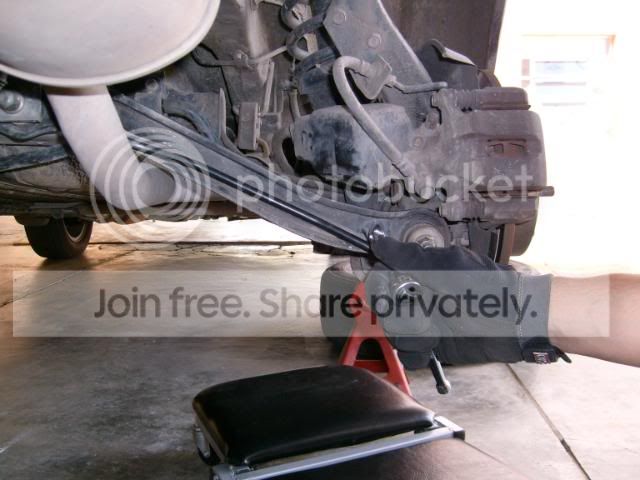
So, first things first, you need to pull up your handbrake, secure your front tires and lose the lug nuts on the rear wheels. Then you jack the car up and put some stands under it, only then you proceed removing the rear wheels, and that's where i'm starting to post pics.
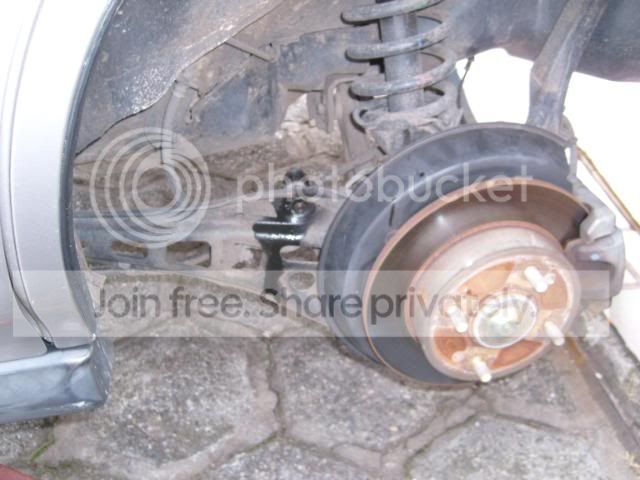
It won't matter if you have disc brakes or drums, ABS or not, the procedure is the same, except that if you don't have ABS brakes, there will be no wire to re-route.
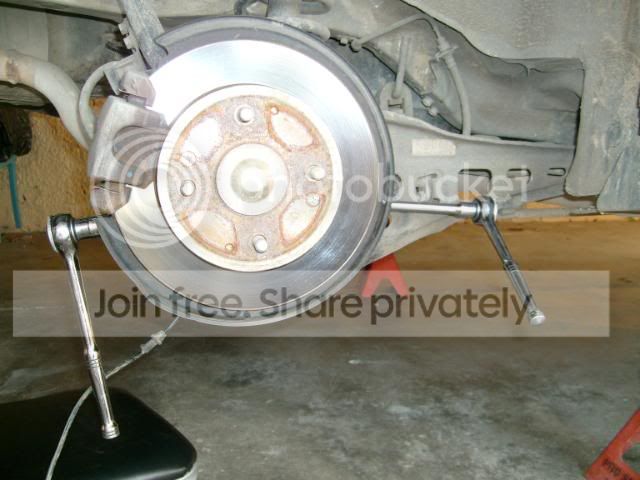
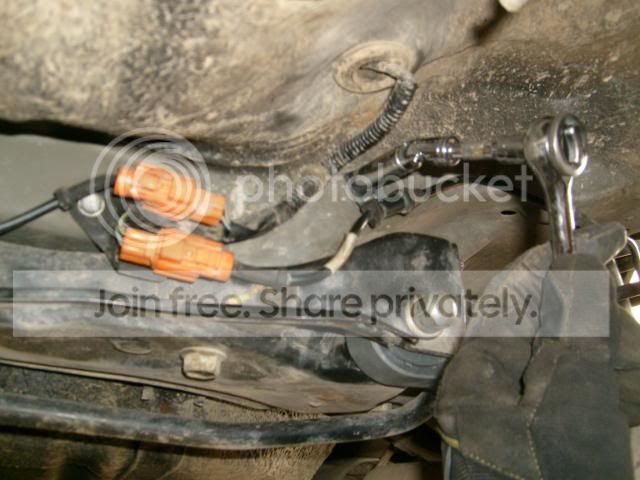
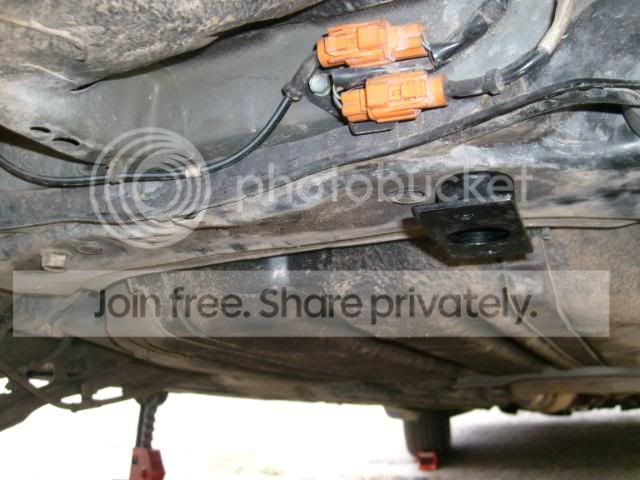
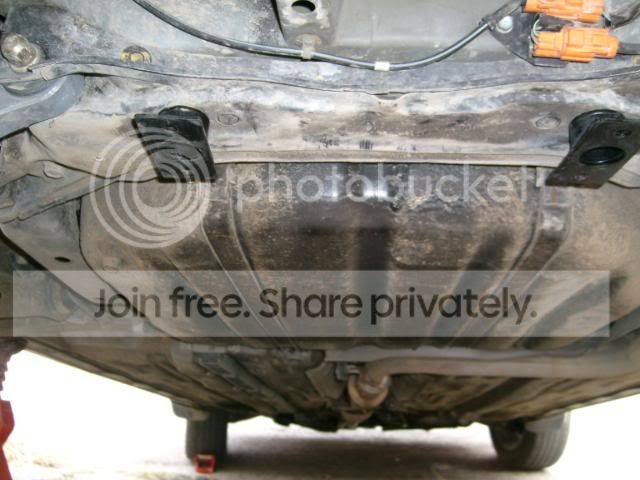
This is the starting point:
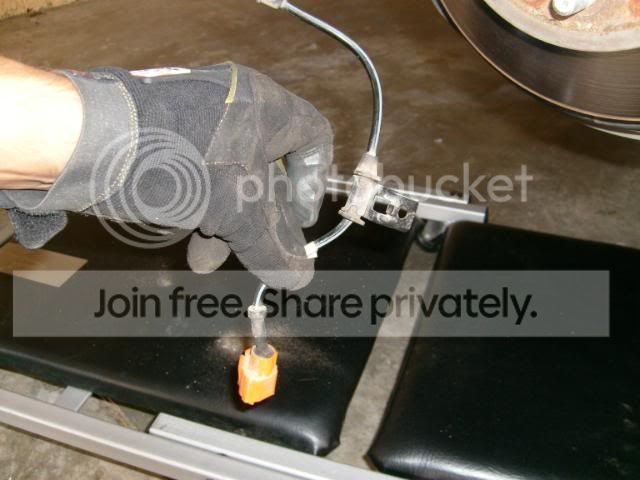
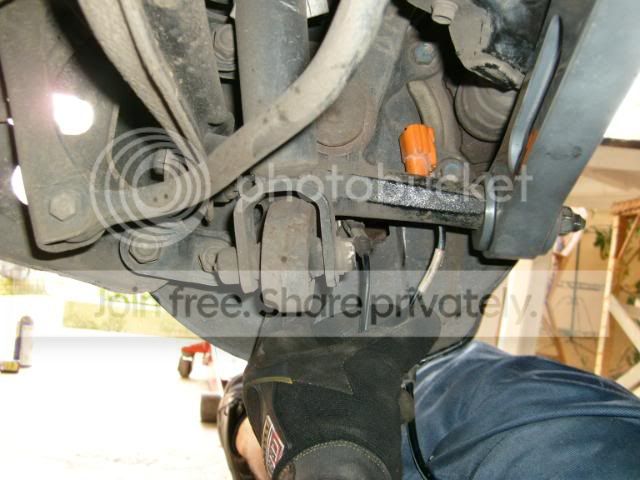
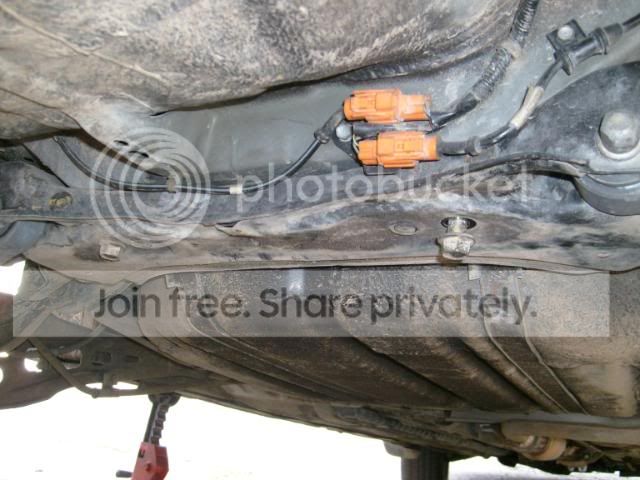
Then, looking towards the front of the vehicle (for vehicles equiped with ABS), you will unplug the orange connectors, and remove the 3 10mm bolts (refer to pic below) that hold the bracket and wiring.
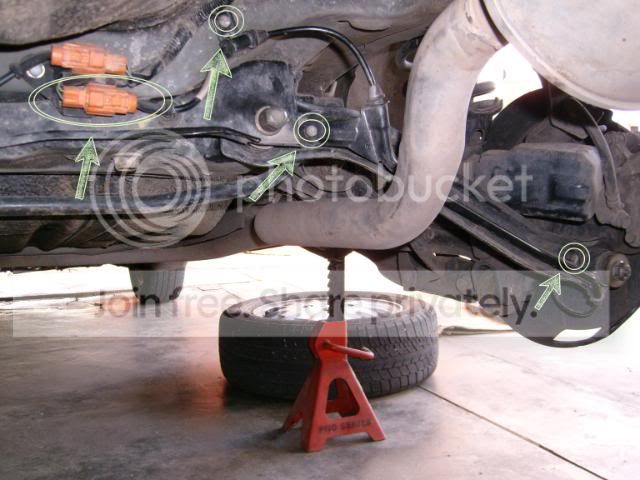
Remove the bracket that is attached to the OEM lower control arm.
The following picture shows just how you can open the tabs away from the bracket freeing the wiring within. Be careful not to damage the wiring itself.
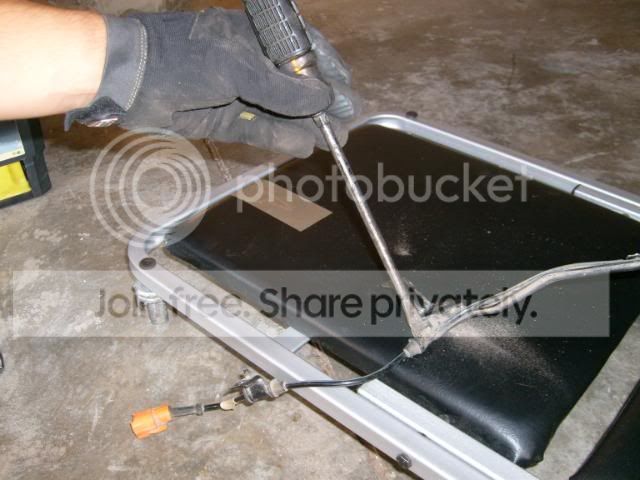
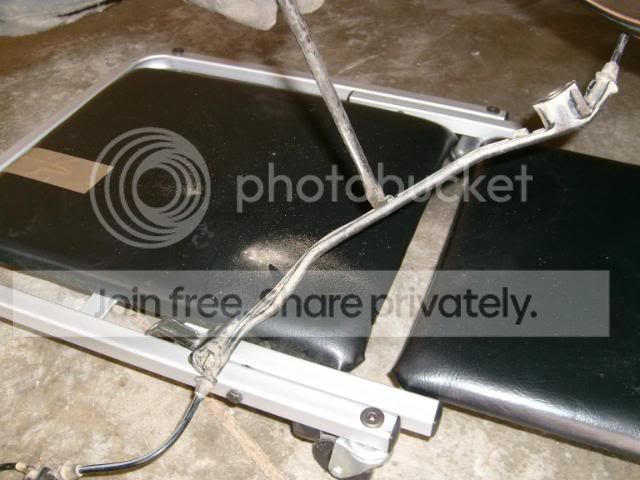
This particular bracket needs to be left to reattach the wiring under the vehicle once again.
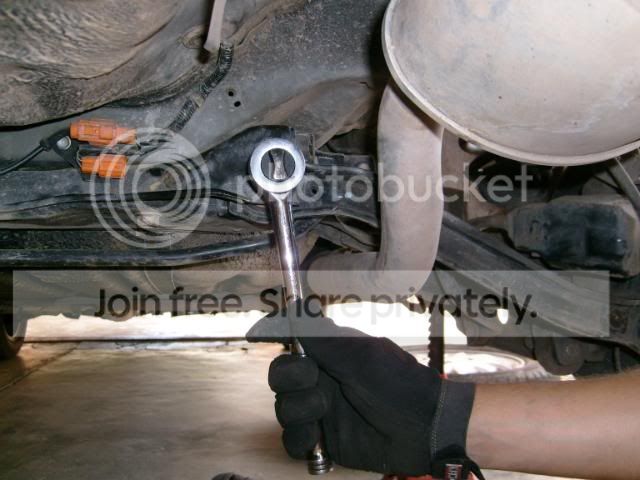
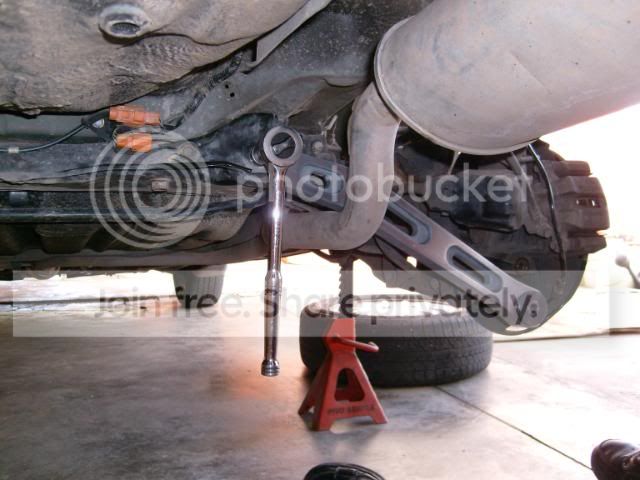
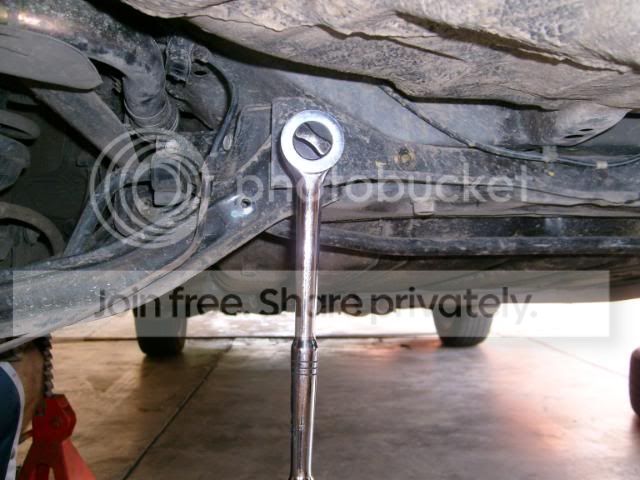
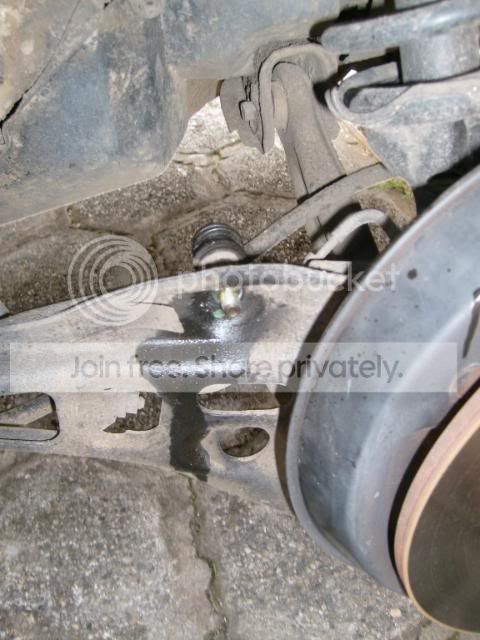
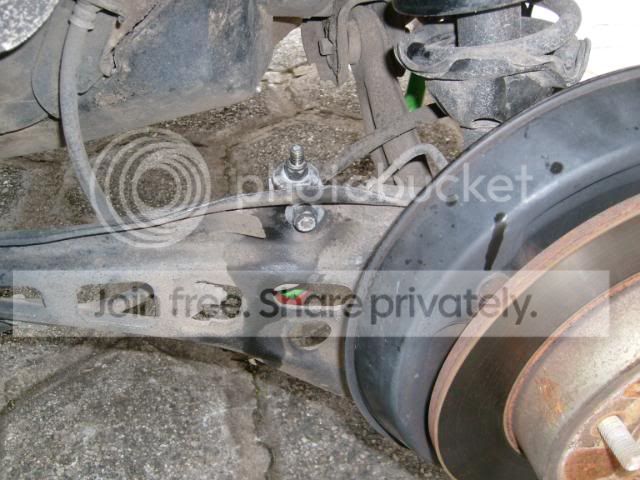
There's a very long bolt that runs through the rear spindle, it secures the lower control arms in place. You will need a pair of wrenches or ratchets to lose the nut from the bolt. Once the nut is off, the bolt may feel like it's stuck in there. You may want to use a rubber hammer to slide the bolt back in the spindle, but there's no need to remove it.
Remove the bolt that holds the other end of the OEM lca to the subframe.
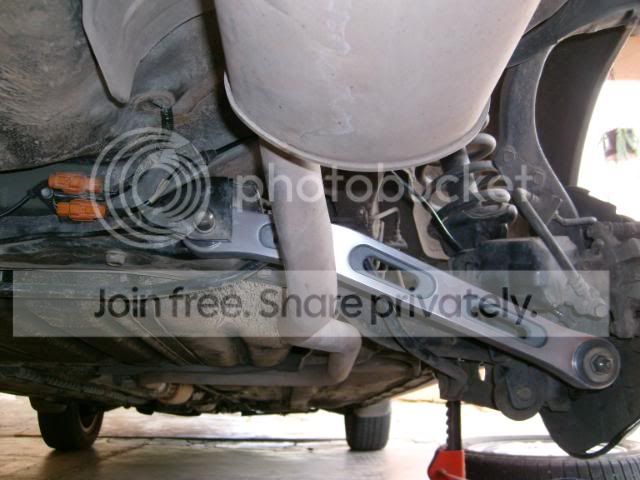
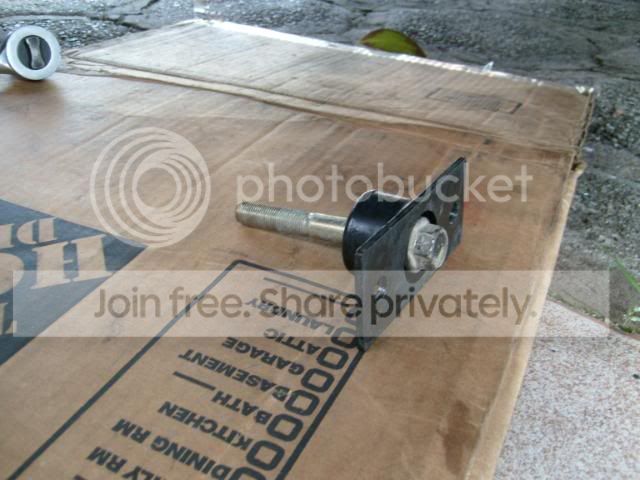
Refer to the following picture for the order in which components need to be installed. There's a washer provided with every kit that needs to be placed between the rear spindle and the new lower control arm.
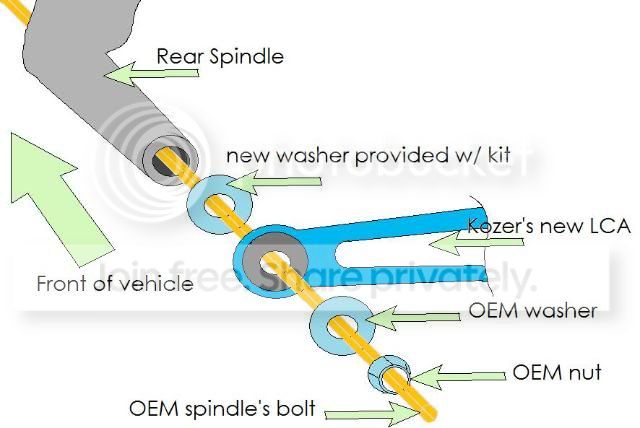
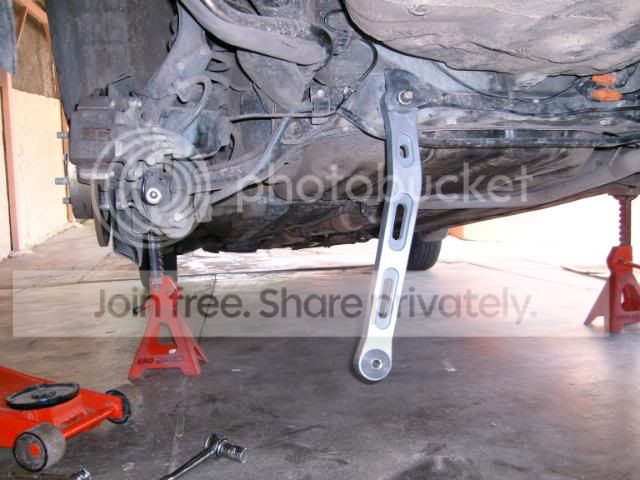
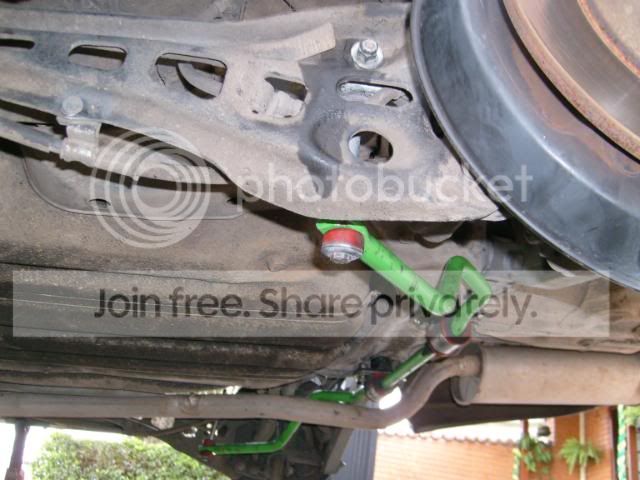
Proceed installing the new LCA, install one end to the subframe first, then the other end to the spindle. These LCA's are designed to clear the exhaust piping of the vehicle with oem suspension parts and aftermarket. It is a matter of clearance from the piping to the LCA to allow the part to be installed upwards or downwards. In other words, lowered vehicles have more clearance, thus allowing the arm to face down.
After the other end of the LCA has been installed and you installed the washers and nut as described in the picture, you will re-route the ABS wiring (if equiped) so that it away from view, but most importantly, to keep it from making contact with the exhaust piping.
The wiring will now pass behind the spindle...
...and over the hand brake cable. (picture below is viewed from above the rear brake)
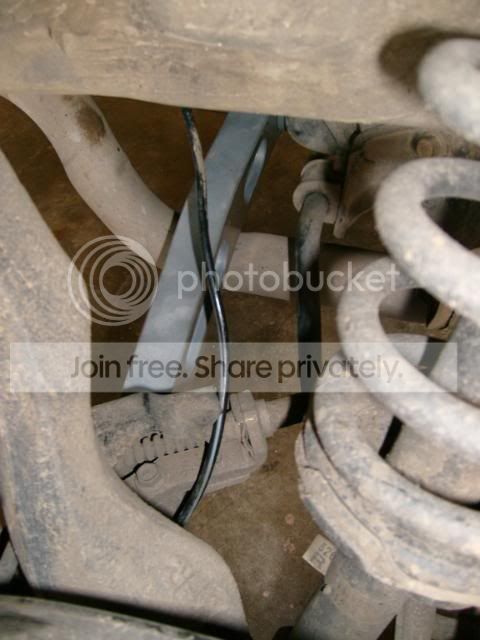
Now, you can plug the connector back in and reinstall the small bracket back using the 10mm screw.
You're supposed to only tighten the subframe bolt and the bolt/nut at the spindle once the car is back on the ground, at least that's the way that you should do.
Another update to this thread, this time i bring a guide on how to install the recently available Lower Control Arms that i've made.
So, first things first, you need to pull up your handbrake, secure your front tires and lose the lug nuts on the rear wheels. Then you jack the car up and put some stands under it, only then you proceed removing the rear wheels, and that's where i'm starting to post pics.
It won't matter if you have disc brakes or drums, ABS or not, the procedure is the same, except that if you don't have ABS brakes, there will be no wire to re-route.
This is the starting point:
Then, looking towards the front of the vehicle (for vehicles equiped with ABS), you will unplug the orange connectors, and remove the 3 10mm bolts (refer to pic below) that hold the bracket and wiring.
Remove the bracket that is attached to the OEM lower control arm.
The following picture shows just how you can open the tabs away from the bracket freeing the wiring within. Be careful not to damage the wiring itself.
This particular bracket needs to be left to reattach the wiring under the vehicle once again.
There's a very long bolt that runs through the rear spindle, it secures the lower control arms in place. You will need a pair of wrenches or ratchets to lose the nut from the bolt. Once the nut is off, the bolt may feel like it's stuck in there. You may want to use a rubber hammer to slide the bolt back in the spindle, but there's no need to remove it.
Remove the bolt that holds the other end of the OEM lca to the subframe.
Refer to the following picture for the order in which components need to be installed. There's a washer provided with every kit that needs to be placed between the rear spindle and the new lower control arm.
Proceed installing the new LCA, install one end to the subframe first, then the other end to the spindle. These LCA's are designed to clear the exhaust piping of the vehicle with oem suspension parts and aftermarket. It is a matter of clearance from the piping to the LCA to allow the part to be installed upwards or downwards. In other words, lowered vehicles have more clearance, thus allowing the arm to face down.
After the other end of the LCA has been installed and you installed the washers and nut as described in the picture, you will re-route the ABS wiring (if equiped) so that it away from view, but most importantly, to keep it from making contact with the exhaust piping.
The wiring will now pass behind the spindle...
...and over the hand brake cable. (picture below is viewed from above the rear brake)
Now, you can plug the connector back in and reinstall the small bracket back using the 10mm screw.
You're supposed to only tighten the subframe bolt and the bolt/nut at the spindle once the car is back on the ground, at least that's the way that you should do.
Thread Starter
Honda-Tech Member
Joined: Aug 2005
Posts: 3,495
Likes: 5
From: Pompano Beach, FL, USA
PART 2
Proceed to the left side lower control arm, and refer to the arrows on the picture below to remove the 3 10mm screws that keep the abs wiring and bracket in place.
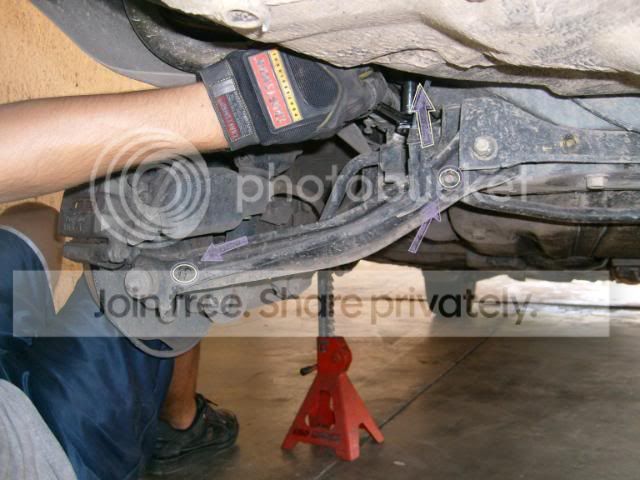
Use a screw driver to pry open the tabs of the bracket.
Remove the bolt from the subframe, and remove the nut from the bolt of the spindle.
For the left side, you have the option to leave the wiring alone or re-route it. Just in case, i will provide the information to re-route this side as well.
The ABS wiring for the left wheel is longer, and between the bracket and the connector, the wiring is attached to the vehicle by plastic clips. Unplug the connector and use a small prying tool to remove the wiring in order to re-route it. Avoid damaging the plastic clips as you will re attach them all once the wiring is routed.
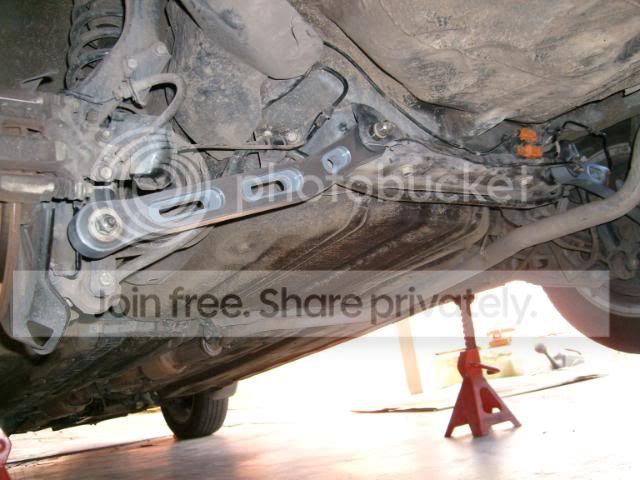
Start installing the new LCA to the subframe first, and then to the rear spindle. Refer once again to the picture showing the order in which washers, arm and nut are to be installed.
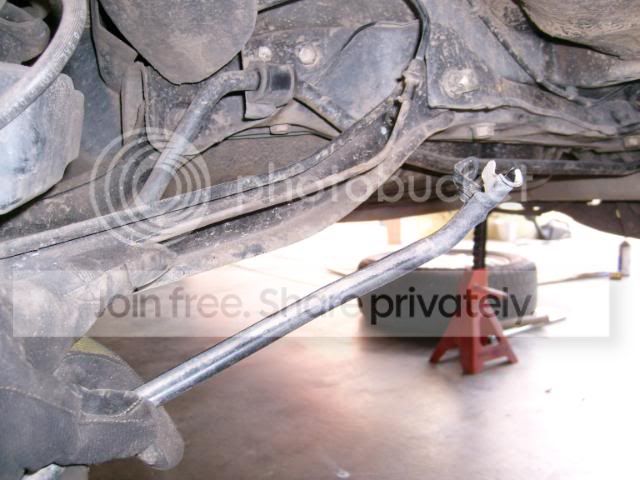
Here's a look before tightening everything (bolts of the subframe and nut/bolt in the rear spindles.
Final look (if my accord had been lowered, i'd be able to clear the right arm facing down, but for now, this is how it is).

More stuff coming soon!!
Proceed to the left side lower control arm, and refer to the arrows on the picture below to remove the 3 10mm screws that keep the abs wiring and bracket in place.
Use a screw driver to pry open the tabs of the bracket.
Remove the bolt from the subframe, and remove the nut from the bolt of the spindle.
For the left side, you have the option to leave the wiring alone or re-route it. Just in case, i will provide the information to re-route this side as well.
The ABS wiring for the left wheel is longer, and between the bracket and the connector, the wiring is attached to the vehicle by plastic clips. Unplug the connector and use a small prying tool to remove the wiring in order to re-route it. Avoid damaging the plastic clips as you will re attach them all once the wiring is routed.
Start installing the new LCA to the subframe first, and then to the rear spindle. Refer once again to the picture showing the order in which washers, arm and nut are to be installed.
Here's a look before tightening everything (bolts of the subframe and nut/bolt in the rear spindles.
Final look (if my accord had been lowered, i'd be able to clear the right arm facing down, but for now, this is how it is).
More stuff coming soon!!

 :p
:p
Thread Starter
Honda-Tech Member
Joined: Aug 2005
Posts: 3,495
Likes: 5
From: Pompano Beach, FL, USA
Thread Starter
Honda-Tech Member
Joined: Aug 2005
Posts: 3,495
Likes: 5
From: Pompano Beach, FL, USA
Thread Starter
Honda-Tech Member
Joined: Aug 2005
Posts: 3,495
Likes: 5
From: Pompano Beach, FL, USA
More updates coming soon, waiting for weather to get a little warmer and drier. Should have a post talking about loud door locks in a day or two, it took care of the problem i had in my car for sure.
Thread Starter
Honda-Tech Member
Joined: Aug 2005
Posts: 3,495
Likes: 5
From: Pompano Beach, FL, USA
Thanks man. BTW, if wasn't for your DIY on the door locks, i probably would have spent hours trying to figure out why i had noisy actuators.
While i'm here, i recently took pics of these control arms anodized in gold, thought i'd share with you guys these.

Update to the project: Installing the rear anti sway bar from suspension tekniques. Their kit comes with bushings, i had installed this kit before (pics are a few pages back) but didn't provide a proper "how-to", which should be pretty similar as to installing the progress rear anti sway bar. Starting point was this:
So loose the lug nuts of the rear wheels, jack the car up, put some stands underneath it.
I sprayed wd-40 on the nuts and bolts prior to doing all this just to help things come off easier. You can start removing the nut on the outer side of the trailing arm.
Like so. I didn't want to undo the entire moving part of the stock rear anti sway bar, so after removing the nut, i pushed the bolt inwards. Do the same to the other side trailing arm.
Behind and left from the subframe, above the control arm there will be a bolt that holds the bracket and bushing of the sway bar, remove it.

Behind and right from the subframe, above control arm is the other bracket and bushing.

Should be a matter of steering the bar away from the exhaust and off the vehicle.
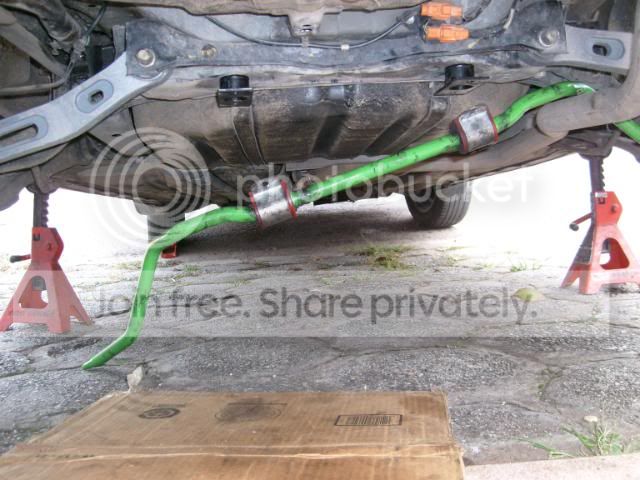
Next picture shows the subframe without the sway bar (LX cars would look like this from start), notice how i had started loosening the right side bolt off the subframe (do it one at a time to be safe).
Slide the bolt through the bracket for the new sway bar, and tighten the bolt back up.
Both adaptor brackets already installed.
Now it's time to put the new sway bar in its new home. The bushing assembly on the ends of the bar will require the use of a bracket provided, install it in a position like this "L" for left wheel and "_|" for right wheel.
Install the bushings to the end of the bar, add the "L" bracket and bolt it to the trailing arm, do the same to the other side.
Be sure to get the order of the bushings right. From the bottom to the top, washer, bushing, rear sway bar, bushings, washer, metal sleeve, washer, bushing, "L" bracket, bushing, washer and of cousre, the provided bolt going through all of this with a nut on the other end.
There's a plate that needs to be installed between the bushings brace and the bracket (like a sandwich). Then you have 4 screws to secure it all, each screw needs a washer before it goes through it all, on the other end, provided with the kit is a washer and the nut to tighten it.

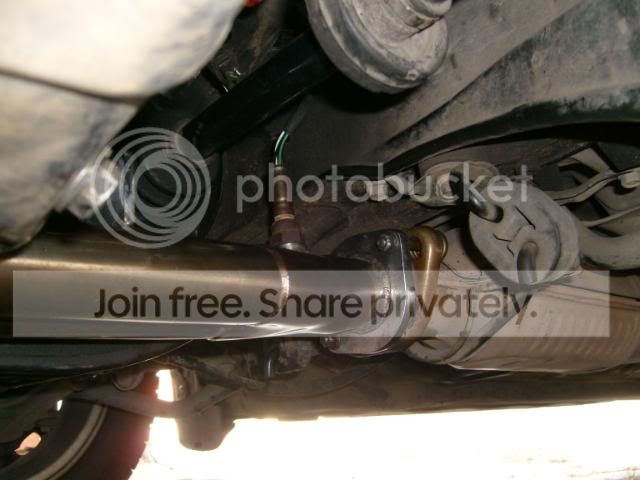
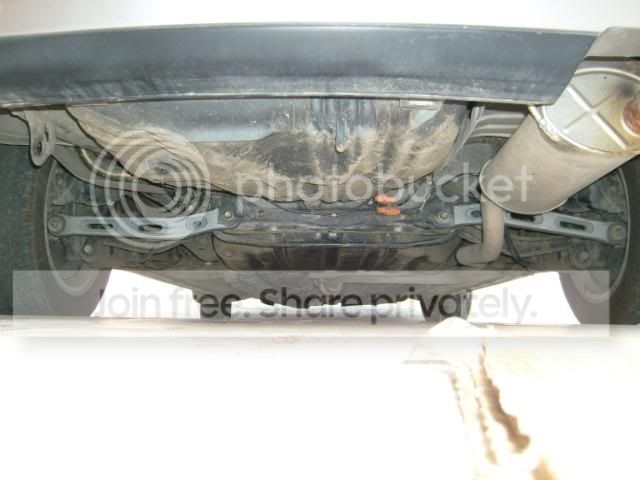
And that was it, here's a shot once the car was back on the ground.

This being the second accord that i have this sway bar installed, and one problem in common with both cars is that the bar touches the exhaust. On my other CD5 (purple one) that bar touched the tanabe exhaust and i tought it was a problem of 2 aftermarket parts not complying with each other. Now, with my current accord, with stock exhaust piping, the bar is once again touching it, this time, causing a very annoying sound that every now and then requires me to do something. I've wrapped some header wrap where the 2 touch, but slowly... the wrap gets cut and the bar hits it again. I think this will require the exhaust to be lowered about a half inch from muffler till about the mid pipe.
More on that will come soon.
Accord love is no surprise.
While i'm here, i recently took pics of these control arms anodized in gold, thought i'd share with you guys these.
Update to the project: Installing the rear anti sway bar from suspension tekniques. Their kit comes with bushings, i had installed this kit before (pics are a few pages back) but didn't provide a proper "how-to", which should be pretty similar as to installing the progress rear anti sway bar. Starting point was this:
So loose the lug nuts of the rear wheels, jack the car up, put some stands underneath it.
I sprayed wd-40 on the nuts and bolts prior to doing all this just to help things come off easier. You can start removing the nut on the outer side of the trailing arm.
Like so. I didn't want to undo the entire moving part of the stock rear anti sway bar, so after removing the nut, i pushed the bolt inwards. Do the same to the other side trailing arm.
Behind and left from the subframe, above the control arm there will be a bolt that holds the bracket and bushing of the sway bar, remove it.
Behind and right from the subframe, above control arm is the other bracket and bushing.
Should be a matter of steering the bar away from the exhaust and off the vehicle.
Next picture shows the subframe without the sway bar (LX cars would look like this from start), notice how i had started loosening the right side bolt off the subframe (do it one at a time to be safe).
Slide the bolt through the bracket for the new sway bar, and tighten the bolt back up.
Both adaptor brackets already installed.
Now it's time to put the new sway bar in its new home. The bushing assembly on the ends of the bar will require the use of a bracket provided, install it in a position like this "L" for left wheel and "_|" for right wheel.
Install the bushings to the end of the bar, add the "L" bracket and bolt it to the trailing arm, do the same to the other side.
Be sure to get the order of the bushings right. From the bottom to the top, washer, bushing, rear sway bar, bushings, washer, metal sleeve, washer, bushing, "L" bracket, bushing, washer and of cousre, the provided bolt going through all of this with a nut on the other end.
There's a plate that needs to be installed between the bushings brace and the bracket (like a sandwich). Then you have 4 screws to secure it all, each screw needs a washer before it goes through it all, on the other end, provided with the kit is a washer and the nut to tighten it.
And that was it, here's a shot once the car was back on the ground.
This being the second accord that i have this sway bar installed, and one problem in common with both cars is that the bar touches the exhaust. On my other CD5 (purple one) that bar touched the tanabe exhaust and i tought it was a problem of 2 aftermarket parts not complying with each other. Now, with my current accord, with stock exhaust piping, the bar is once again touching it, this time, causing a very annoying sound that every now and then requires me to do something. I've wrapped some header wrap where the 2 touch, but slowly... the wrap gets cut and the bar hits it again. I think this will require the exhaust to be lowered about a half inch from muffler till about the mid pipe.
More on that will come soon.
Accord love is no surprise.
Thread Starter
Honda-Tech Member
Joined: Aug 2005
Posts: 3,495
Likes: 5
From: Pompano Beach, FL, USA
To support the installation above, here's a couple of pictures that i've just made showing the order which the bushings are supposed to be installed.


Last edited by gianinline; Aug 9, 2010 at 07:22 AM. Reason: Added new pic