
DIY: "Boat look" Remedy for Accords on Eibach Lowering Springs
 02-26-2008, 03:21 PM
#1
Honda-Tech Member
Thread Starter
I've used Eibach Pro-kit springs on my Accord for a very long time now, and just recently switched to Eibach Sportline springs. Both springs are notorious for giving some model Accords the "boat look" where the front sits higher than the rear. This is because Eibach lowering springs lower the car the same both front and rear, which sets the car unevenly front to back. There are a handful of theories about why our cars sit this way, but I won't go into all that.
This weekend I became tired enough of this look, that I became so motivated as to pull my suspension apart and see what could be done. Now some people say to just install some aftermarket struts (which sometimes included a lower spring perch) to solve the issue, but as we all know, Pro-kit springs work wonderfully with stock struts, so why spend the extra money when you were just going for a little lower stance while maintaining ride quality?!
I've figured out a way (NON-destructive to the spring or shock) to lower the front of our accords just slightly, to correct the boat look, so often achieved with lowering springs, more specifically Eibach springs.
So on to the DIY...
<FONT SIZE="2">Tools Required:</FONT>
- (1) 12mm Socket
- (1) 14mm Socket
- (2) 17mm Sockets, preferably one deep socket
- (2) Ratchets
- (1) Die Grinder (straight type, like a large dremel tool. A high-speed drill can also be used)
- (1) Friend who is willing to help you for a total of maybe five minutes.
- (1+) Metal grinding/shaping bits (the more the merrier. mine didn't wear down, but they broke loose from the shaft)
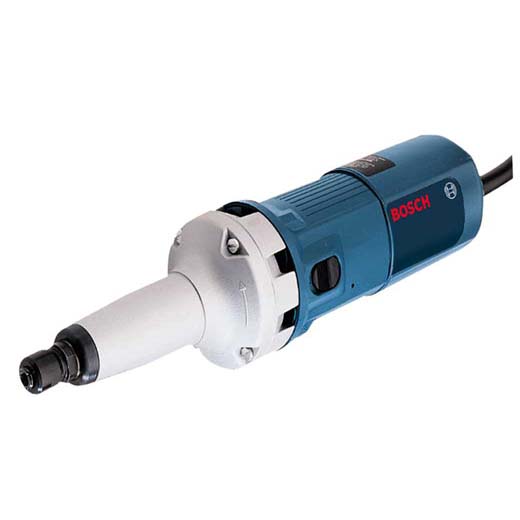
Note: All sockets can be substituted with wrenches of the same size, though it requires more elbow grease. The grinder needs to be a straight type, not angled. Pic for reference. These can be had for $30 at Harbor Freight Tools. The bits I used were about 1.5" in diameter, and 1/4" thick.

<FONT SIZE="2">Parts Required:</FONT>
- (1) None
<FONT SIZE="2">Process:</FONT>
1. Loosen the lugs on the front wheels and jack the front of the car up. You can either do one side at a time or both sides at the same time if you can lift the entire front up. Remember to be safe. Rest the car on jack stands and chock the back wheels.
2. Lift the hood, and remove two of the three 14mm nuts from the top of each front strut perch.
3. Loosen the the one remaining 14mm nut on each perch so that it will allow the strut to move freely in the next steps. Be sure it is still threaded enough to hold the strut/spring from falling out of place later.
4. Remove the two remaining 12mm nuts from the perch.
5. Remove the front wheel(s) from the car.
6. Remove the bolt at the bottom of the strut fork using one 17mm socket on the bolt head, and a deep socket 17mm or wrench on the nut side. Pushing down on the suspension while twisting the bold makes it easier to pull out once you have unthreaded it completely.
7. Remove the bolt on the back side of the strut that holds the fork to the strut using a 14mm socket.
8. At this point, as your friend to put their foot on the lugs, and step down on them, while you work the strut out of the fork.
9. Once the fork has been separated from the strut and the lower control arm, you can maneuver it off of the car. The fun begins here!
The goal is to bore the fork's opening out enough to fit over the main tube of the strut, and up against the 'perch'.

Looking at the top of the fork here, you're going to use the grinder to effectively 'bore' the strut opening out about 1/8" all around, 1/4" total diameter. You are only doing this down about 1/2" from the top.

I started like so... beginning about 1/4" down and work the bit toward the top once I'd reached the 1/8" depth seemed to be the easiest way to get a consistent grind.

Be sure to wear the proper eye protection when grinding...

Once you've 'bored' out the hole, you can fit the fork back over the control arm. Have your friend assist you once more by pushing the suspension down so you can fit the strut back into the newly bored fork.
A little elbow grease helps to get the fork back into position with the 17mm bolt lined up.

Once it's all back in place, and both the 17mm and 14mm bolts are reinstalled, the fork should be fitted nicely over the tube on the strut, and up against the perch.

I believe with the bolts tightened, the weight of the car is still dispersed onto the lower cap of the strut, and I think it is a perfectly reasonable and safe modification. Plus, it does NOT modify the strut or the spring! I'm there will be those who find fault in this method and call it ghetto, but they can kiss my ***.
Some "after" pictures. There are stock struts with Sportline springs.
Front:

Rear:


If this helps just one person to correct the look of their car, then it was all worth it to me. Have fun!
Modified by AFAccord at 7:36 PM 2/27/2008
This weekend I became tired enough of this look, that I became so motivated as to pull my suspension apart and see what could be done.
Now some people say to just install some aftermarket struts (which sometimes included a lower spring perch) to solve the issue, but as we all know, Pro-kit springs work wonderfully with stock struts, so why spend the extra money when you were just going for a little lower stance while maintaining ride quality?! I've figured out a way (NON-destructive to the spring or shock) to lower the front of our accords just slightly, to correct the boat look, so often achieved with lowering springs, more specifically Eibach springs.
So on to the DIY...
<FONT SIZE="2">Tools Required:</FONT>
- (1) 12mm Socket
- (1) 14mm Socket
- (2) 17mm Sockets, preferably one deep socket
- (2) Ratchets
- (1) Die Grinder (straight type, like a large dremel tool. A high-speed drill can also be used)
- (1) Friend who is willing to help you for a total of maybe five minutes.
- (1+) Metal grinding/shaping bits (the more the merrier. mine didn't wear down, but they broke loose from the shaft)
Note: All sockets can be substituted with wrenches of the same size, though it requires more elbow grease. The grinder needs to be a straight type, not angled. Pic for reference. These can be had for $30 at Harbor Freight Tools. The bits I used were about 1.5" in diameter, and 1/4" thick.
<FONT SIZE="2">Parts Required:</FONT>
- (1) None
<FONT SIZE="2">Process:</FONT>
1. Loosen the lugs on the front wheels and jack the front of the car up. You can either do one side at a time or both sides at the same time if you can lift the entire front up. Remember to be safe. Rest the car on jack stands and chock the back wheels.
2. Lift the hood, and remove two of the three 14mm nuts from the top of each front strut perch.
3. Loosen the the one remaining 14mm nut on each perch so that it will allow the strut to move freely in the next steps. Be sure it is still threaded enough to hold the strut/spring from falling out of place later.
4. Remove the two remaining 12mm nuts from the perch.
5. Remove the front wheel(s) from the car.
6. Remove the bolt at the bottom of the strut fork using one 17mm socket on the bolt head, and a deep socket 17mm or wrench on the nut side. Pushing down on the suspension while twisting the bold makes it easier to pull out once you have unthreaded it completely.
7. Remove the bolt on the back side of the strut that holds the fork to the strut using a 14mm socket.
8. At this point, as your friend to put their foot on the lugs, and step down on them, while you work the strut out of the fork.
9. Once the fork has been separated from the strut and the lower control arm, you can maneuver it off of the car. The fun begins here!
The goal is to bore the fork's opening out enough to fit over the main tube of the strut, and up against the 'perch'.
Looking at the top of the fork here, you're going to use the grinder to effectively 'bore' the strut opening out about 1/8" all around, 1/4" total diameter. You are only doing this down about 1/2" from the top.
I started like so... beginning about 1/4" down and work the bit toward the top once I'd reached the 1/8" depth seemed to be the easiest way to get a consistent grind.
Be sure to wear the proper eye protection when grinding...
Once you've 'bored' out the hole, you can fit the fork back over the control arm. Have your friend assist you once more by pushing the suspension down so you can fit the strut back into the newly bored fork.
A little elbow grease helps to get the fork back into position with the 17mm bolt lined up.
Once it's all back in place, and both the 17mm and 14mm bolts are reinstalled, the fork should be fitted nicely over the tube on the strut, and up against the perch.
I believe with the bolts tightened, the weight of the car is still dispersed onto the lower cap of the strut, and I think it is a perfectly reasonable and safe modification. Plus, it does NOT modify the strut or the spring! I'm there will be those who find fault in this method and call it ghetto, but they can kiss my ***.
Some "after" pictures. There are stock struts with Sportline springs.
Front:
Rear:
If this helps just one person to correct the look of their car, then it was all worth it to me. Have fun!
Modified by AFAccord at 7:36 PM 2/27/2008
 02-26-2008, 03:35 PM
#2
Honda-Tech Member
I guess I'm up for it. It doesn't do with anything about cutting springs or heating up the springs is it?
02-26-2008, 03:49 PM
#3
Honda-Tech Member
Thread Starter
Absolutely NO modifying the spring or shock. I'm sure many others like myself paid good money for aftermarket struts and springs, and do NOT want to risk damaging them through modification.
The process is NOT labor intensive, though it does take about 30-45 minutes per side. It is also not detrimental to the integrity of any parts, and not visible when the suspension is reassembled.
The process is NOT labor intensive, though it does take about 30-45 minutes per side. It is also not detrimental to the integrity of any parts, and not visible when the suspension is reassembled.
 02-26-2008, 07:09 PM
#7
Honda-Tech Member
<TABLE WIDTH="90%" CELLSPACING=0 CELLPADDING=0 ALIGN=CENTER><TR><TD>Quote, originally posted by TouringAccord »</TD></TR><TR><TD CLASS="quote">why not just post the how-to?</TD></TR></TABLE>
cause this whole thing is more then likly
cause this whole thing is more then likly
Trending Topics
02-26-2008, 07:16 PM
#8
Honda-Tech Member
Join Date: Jul 2005
Location: douglas, ak, usa
Posts: 306
Likes: 0
Received 0 Likes
on
0 Posts
ill give afa credit
when he posts up this DIY
come on now hurry up and post this im geting the blue ***** feeling
when he posts up this DIY
come on now hurry up and post this im geting the blue ***** feeling
02-26-2008, 08:20 PM
#9
Honda-Tech Member
HMMMMM!!!! does this involve getting a very wide and large person somewhere in the 1000lbs range sitting at either end of the car? or sandbags? JK JK!
02-26-2008, 10:37 PM
#10
Honda-Tech Member
Join Date: Jun 2003
Location: montreal, qc, canada
Posts: 358
Likes: 0
Received 0 Likes
on
0 Posts
Probably by cutting/grinding off a part of the tab on the shock, the one that sits on the suspension fork.
BTW, i'm riding on H&R sport and koni yellow. No boatride look at all, well maby a little reversed boatride effect; the rear is higher than the front lol.
BTW, i'm riding on H&R sport and koni yellow. No boatride look at all, well maby a little reversed boatride effect; the rear is higher than the front lol.
02-27-2008, 03:27 AM
#11
H-T Order of Merit
<TABLE WIDTH="90%" CELLSPACING=0 CELLPADDING=0 ALIGN=CENTER><TR><TD>Quote, originally posted by JDM_DC4_Fanatic »</TD></TR><TR><TD CLASS="quote">cause this whole thing is more then likly </TD></TR></TABLE>
na, I don't believe he's ever been the type to bs. So I will assume he is telling the truth.
</TD></TR></TABLE>na, I don't believe he's ever been the type to bs. So I will assume he is telling the truth.
02-27-2008, 05:32 AM
#12
Honda-Tech Member
Thread Starter
<TABLE WIDTH="90%" CELLSPACING=0 CELLPADDING=0 ALIGN=CENTER><TR><TD>Quote, originally posted by TouringAccord »</TD></TR><TR><TD CLASS="quote">na, I don't believe he's ever been the type to bs. So I will assume he is telling the truth.</TD></TR></TABLE>
Thank you for the kind words. First post has been edited to reflect the DIY.
Thank you for the kind words. First post has been edited to reflect the DIY.
02-27-2008, 06:30 AM
#13

Man, you have us going crazy with anticipation of this remedy that you speak of. I just posted a tread a few days ago asking about using Sportlines in the front and Prokit in the rear as a remedy as well, but I would love to be able to solve this issue using only my sportlines. I was thinking of using some sort of spacer between the strut and the sprints to raise my rear a little bit to level it out. Or maybe even a spacer in the top hat. What do you guys think? I tow with my car as well, so I may need the extra height in the rear as opposed to lowering the front more though.
Yes... we are anticipating this DIY
Yes... we are anticipating this DIY
02-27-2008, 09:52 AM
#14
Honda-Tech Member
Thread Starter
I used sportlines in the front with pro-kits in the back for a few days to see how it worked myself. I'm expletiveed on a project at work right now or else I'd finish it now. Promise I'll get it finished with pictures tonight when I'm home.
02-27-2008, 03:34 PM
#15
Honda-Tech Member
ahhhh ok ok. That's cool. Pretty smart. But how big is that gap? 1 inch or something???
Also when you slide that whole shock assembly down, will it hit the axle?
Also when you slide that whole shock assembly down, will it hit the axle?
02-27-2008, 03:44 PM
#16
Honda-Tech Member
Thread Starter
<TABLE WIDTH="90%" CELLSPACING=0 CELLPADDING=0 ALIGN=CENTER><TR><TD>Quote, originally posted by The-Kid »</TD></TR><TR><TD CLASS="quote">ahhhh ok ok. That's cool. Pretty smart. But how big is that gap? 1 inch or something???
Also when you slide that whole shock assembly down, will it hit the axle?</TD></TR></TABLE>
It's a tad more than half an inch.
When looking at this picture, I can see why you would ask that, but I assure you there is more clearance there than it looks. In this pic, the suspension is completely extended down, moving the axle as far up as it will ever travel. I want to say that after the modification was complete and the suspension was fully extended, there was about 1" clearance between the axle and strut. Also, with the geometry of the suspension, the more it is compressed, the farther the axle moves from that bottom of the strut.
<FONT SIZE="3">EDIT:</FONT> After I look through the pictures again, I recall that the above picture was taken after I removed the lower 17mm bolt. In which case the suspension was hanging freely, and of course is higher than if that bolt were in place holding it down. Sorry for the confusion.
Also when you slide that whole shock assembly down, will it hit the axle?</TD></TR></TABLE>
It's a tad more than half an inch.
When looking at this picture, I can see why you would ask that, but I assure you there is more clearance there than it looks. In this pic, the suspension is completely extended down, moving the axle as far up as it will ever travel. I want to say that after the modification was complete and the suspension was fully extended, there was about 1" clearance between the axle and strut. Also, with the geometry of the suspension, the more it is compressed, the farther the axle moves from that bottom of the strut.
<FONT SIZE="3">EDIT:</FONT> After I look through the pictures again, I recall that the above picture was taken after I removed the lower 17mm bolt. In which case the suspension was hanging freely, and of course is higher than if that bolt were in place holding it down.
Sorry for the confusion.
 02-28-2008, 05:52 AM
#19
Honda-Tech Member
Thread Starter
I'll try to get some photos of the axle clearance posted up today. 
02-28-2008, 08:35 PM
#21
Member
Join Date: Dec 2006
Location: Lynchburg, Va, US
Posts: 1,327
Likes: 0
Received 0 Likes
on
0 Posts
<TABLE WIDTH="90%" CELLSPACING=0 CELLPADDING=0 ALIGN=CENTER><TR><TD>Quote, originally posted by h22a_black »</TD></TR><TR><TD CLASS="quote">would this also apply to 5th gens?</TD></TR></TABLE>
Yes
Yes
02-29-2008, 04:43 AM
#22
Honda-Tech Member
Thread Starter
<TABLE WIDTH="90%" CELLSPACING=0 CELLPADDING=0 ALIGN=CENTER><TR><TD>Quote, originally posted by oodie »</TD></TR><TR><TD CLASS="quote">Looks like the old fork trick to me this is old news to me
</TD></TR></TABLE>
Fork Trick
Looks like a hell of a lot more work than what I did... apples to oranges IMO.
</TD></TR></TABLE>
Fork Trick
Looks like a hell of a lot more work than what I did... apples to oranges IMO.
03-09-2008, 01:32 PM
#23
Honda-Tech Member
Thread Starter
<TABLE WIDTH="90%" CELLSPACING=0 CELLPADDING=0 ALIGN=CENTER><TR><TD>Quote, originally posted by AFAccord »</TD></TR><TR><TD CLASS="quote">I'll try to get some photos of the axle clearance posted up today. </TD></TR></TABLE>
Took these looking between the bumper and the tire with the car resting on the ground as it would be driven.
Passenger's side axle.

Driver's side axle .

</TD></TR></TABLE>Took these looking between the bumper and the tire with the car resting on the ground as it would be driven.
Passenger's side axle.
Driver's side axle .
03-12-2008, 04:10 PM
#24
Honda-Tech Member
Join Date: Jul 2006
Posts: 84
Likes: 0
Received 0 Likes
on
0 Posts
Can I just ask something? IF the shock is supposed to sit like that in the first place, then why didnt it come from the factory like that? Im getting some koni yellows and I want to try this out with some spare forks I have, but I dont wanna damage anything know what I mean?
03-12-2008, 05:16 PM
#25
Honda-Tech Member
Thread Starter
<TABLE WIDTH="90%" CELLSPACING=0 CELLPADDING=0 ALIGN=CENTER><TR><TD>Quote, originally posted by h22a_black »</TD></TR><TR><TD CLASS="quote">Can I just ask something? IF the shock is supposed to sit like that in the first place, then why didnt it come from the factory like that?</TD></TR></TABLE>
I'm not sure it is supposed to sit that way.
<TABLE WIDTH="90%" CELLSPACING=0 CELLPADDING=0 ALIGN=CENTER><TR><TD>Quote, originally posted by h22a_black »</TD></TR><TR><TD CLASS="quote"> Im getting some koni yellows and I want to try this out with some spare forks I have, but I dont wanna damage anything know what I mean?</TD></TR></TABLE>
First, Koni Yellows have an adjustable perch, so you really don't need this if you're going that route. Secondly, you're not damaging or even modifying the strut or spring. Furthermore, I would imagine that this could be considered 'reversible' since you could always NOT slide the strut so far down into the fork. I'm just not sure whether the 14mm bolt, fastening the fork around the strut would hold it in place under the car's weight.