
[FAQ] Disc swap problem - nut stuck in subframe
 05-07-2006, 01:09 PM
#1
Honda-Tech Member
Thread Starter
Pictures back up as per request of another member. Hopefully this will help out a few more people 
Well after having several headaches already with a rear disk conversion on my EJ1 ive now run into the worst by far this afternoon...while removing the drivers side trailing arm, the bolt holding the forward-most pivot arm was seized to the bushing and would not come out. After cutting out the bolt and removing the trailing arm, the nut on the inside of the body fell and is now stuck inside the body, with no way for us to reposition it in the proper place.
This is very hard to explain so here are pictures with my professional paint editing skills
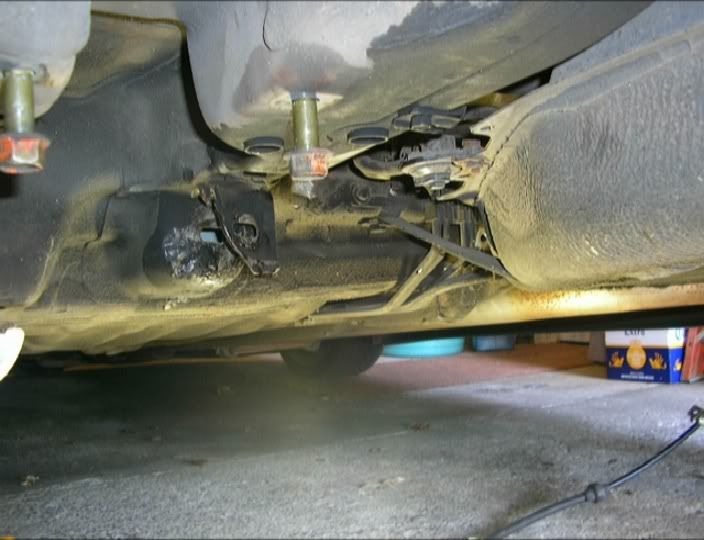
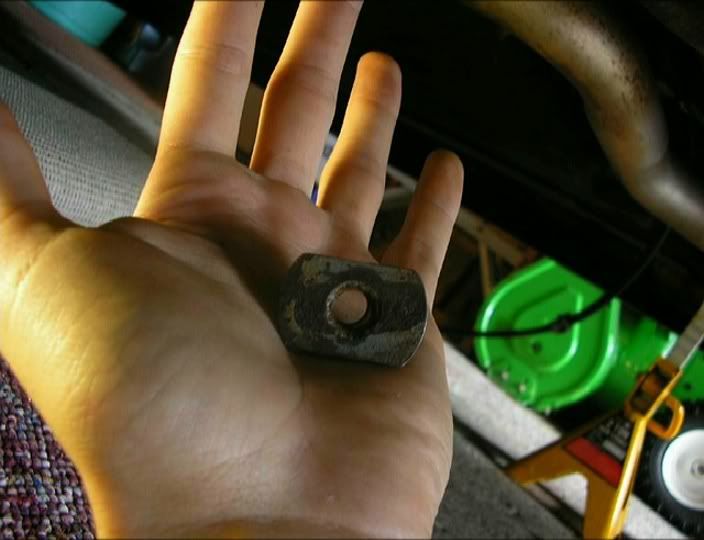
This is the general area of the problem, for those who havent seen it before:
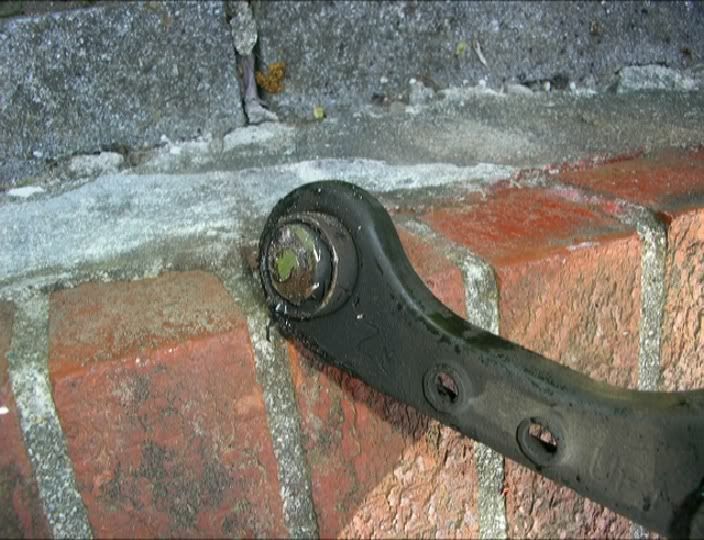
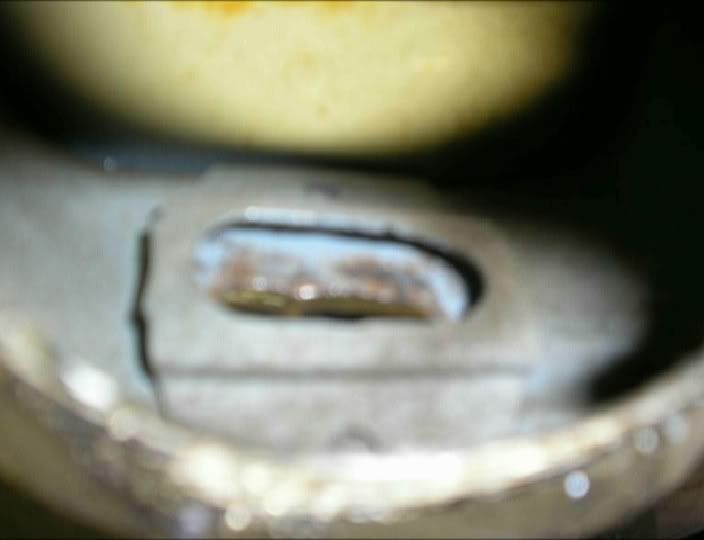
Here are pictures of the bolt itself as well as the bolt/bushing seized inside the arm I mentioned:

Heres a closer view of the area of the body. The larger hole is where the plate/nut is supposed to be, and it slides back and forth to allow for alignment. The smaller hole on the bottom is the only other hole in the structure:

And here are my paint skills. This is where the plate/nut is currently sitting in the structure, circled in red:

And here is a picture showing where the plate needs to go:

You can see in the above picture that there is a second piece of sheet metal inside the structure meant to hold the nut in place. Im assuming it fell down through the bottom. The only idea weve come up with so far is to cut a hole in the bottom of the structure big enough to fit a couple fingers inside and try and work the piece back where its supposed to be, then having it welded back up after its all together. Before we go drilling, lets see if the H-T experts can give us any advice.
Pictures back up...except for the ones edited in MS Paint, but im sure youll do fine without them.
Modified by 93allmotorcoupe at 7:34 PM 7/17/2008
Modified by 93allmotorcoupe at 7:38 PM 7/17/2008
Well after having several headaches already with a rear disk conversion on my EJ1 ive now run into the worst by far this afternoon...while removing the drivers side trailing arm, the bolt holding the forward-most pivot arm was seized to the bushing and would not come out. After cutting out the bolt and removing the trailing arm, the nut on the inside of the body fell and is now stuck inside the body, with no way for us to reposition it in the proper place.
This is very hard to explain so here are pictures with my professional paint editing skills
This is the general area of the problem, for those who havent seen it before:
Here are pictures of the bolt itself as well as the bolt/bushing seized inside the arm I mentioned:
Heres a closer view of the area of the body. The larger hole is where the plate/nut is supposed to be, and it slides back and forth to allow for alignment. The smaller hole on the bottom is the only other hole in the structure:
And here are my paint skills. This is where the plate/nut is currently sitting in the structure, circled in red:
And here is a picture showing where the plate needs to go:
You can see in the above picture that there is a second piece of sheet metal inside the structure meant to hold the nut in place. Im assuming it fell down through the bottom. The only idea weve come up with so far is to cut a hole in the bottom of the structure big enough to fit a couple fingers inside and try and work the piece back where its supposed to be, then having it welded back up after its all together. Before we go drilling, lets see if the H-T experts can give us any advice.
Pictures back up...except for the ones edited in MS Paint, but im sure youll do fine without them.
Modified by 93allmotorcoupe at 7:34 PM 7/17/2008
Modified by 93allmotorcoupe at 7:38 PM 7/17/2008
 05-07-2006, 02:43 PM
#2
Honda-Tech Member
Join Date: Aug 2005
Location: abbotsford, bc, canada
Posts: 969
Likes: 0
Received 0 Likes
on
0 Posts
i think i heard someone cutting from the inside to get at that nut.
im not 100% sure though
im not 100% sure though
05-07-2006, 03:30 PM
#3
Honda-Tech Member
Thread Starter
Cutting from the inside is out, its the cut would have to be at least 6" deep and we would still have difficulty getting to the nut.
05-07-2006, 09:56 PM
#4
Honda-Tech Member
Join Date: Apr 2005
Location: CA, US
Posts: 503
Likes: 0
Received 0 Likes
on
0 Posts
I know what happen!!! where did your car come from?? a few years ago I had bought a Del Sol. And all the bolts were rusted solid onto the metal sleeve in the bushing. I then did a CARFAX and it came from where it snows alot. And then I figured out that the salt from the street rusted up all the hardware on the underside of the car. I then looked for rust everywhere and all the hardware was rusted up. So i changed the bushing and sold the car. That looks EXACTLY like what happen to me.
Do you know where your car came from??
Do you know where your car came from??
05-07-2006, 09:59 PM
#5
Honda-Tech Member
Thread Starter
Im from the east coast. The car came from the east coast. I know it has spots that are rusty. A lot of the bolts are seized because they havent been touched in 13 years. Theres no way im getting rid of the car. Any other suggestions?
05-08-2006, 09:13 AM
#6
Honda-Tech Member
Join Date: Apr 2005
Location: CA, US
Posts: 503
Likes: 0
Received 0 Likes
on
0 Posts
100 percent its because of the salt on the street. On my car all the suspention bolts was rusted 'all the way' through all the bushing sleeves. If were you, Id get a poly bushing kit and just go through and get all the old stuff pressed out and the poly stuff pressed in. I WOULDNT TRY PRESSING OUT AND IN THE BUSHINGS YOUR SELF.. Just pay some mechine shop to do it. save yourself the pain. and remember the bolts are rusted all the way through the sleeves so WD40 wont do you any good.
good luck, and i do really feel for you.
good luck, and i do really feel for you.
05-08-2006, 09:57 AM
#7
Honda-Tech Member
Join Date: Oct 2002
Location: chicago burbs, Il, USA
Posts: 5,150
Likes: 0
Received 23 Likes
on
23 Posts
I had the exact same issue with my EG.
if you have access to a welder you can do this in an hour max.
cut a I shapped "window" type opening. Baseically cut a vertical slot like | then two horizontal slots to make a I pattern. 'open' the window to peak inside and un-f-up your floating nut and put it where it belongs.
treat the area and the nut with some copper anti-seize then close the "window" and weld it closed again.
Cover the welded area with some primer and undercoating to protect it.
If you need a replacement floating arm let me know, I have one sitting here.
Trending Topics
05-08-2006, 10:38 AM
#8
Honda-Tech Member
Thread Starter
Thank you for the insight Relic1, youve been the most helpful so far. I was just planning on drilling a large circular hole in the bottom, but your window idea seems much better. And about that floating arm, I am in need of a new one. What condition are the bushings in?
05-08-2006, 10:44 AM
#9
FYI: floating arm is actually called a "compensator arm"... 
The window idea sounds good to me too. Make sure to take the time to fix the slots that flange nut is supposed to sit in. Usually the slots that hold it in place get dented or chipped, and that's why the nut falls in the first place...
The window idea sounds good to me too. Make sure to take the time to fix the slots that flange nut is supposed to sit in. Usually the slots that hold it in place get dented or chipped, and that's why the nut falls in the first place...
05-08-2006, 11:05 AM
#10
Honda-Tech Member
Thread Starter
Thanks for the tip...floating arm, pivot arm, compensator arm...ive heard tons of names for them...haha...but Im now aware the proper name is compensator arm, thank you.
And about those slots, Im not really sure how theyre supposed to look, but Ill be sure to repair them the best I can to prevent this from happening again. And it will all be welded back together by a professional welder (good friend of mine) so Ill possibly have him fabricate something to keep the nut where its supposed to be and still have it be able to slide back and forth for alignment purposes.
We will most likely be cutting it open today, maybe ill take some pics of what it looks like in there.
05-08-2006, 11:24 AM
#11
<TABLE WIDTH="90%" CELLSPACING=0 CELLPADDING=0 ALIGN=CENTER><TR><TD>Quote, originally posted by 93allmotorcoupe »</TD></TR><TR><TD CLASS="quote">We will most likely be cutting it open today, maybe ill take some pics of what it looks like in there. </TD></TR></TABLE>
That would be awesome. This topic has been covered a couple times, but never in this forum, and not with good pictures of an effective repair process...
</TD></TR></TABLE>That would be awesome. This topic has been covered a couple times, but never in this forum, and not with good pictures of an effective repair process...
05-08-2006, 12:53 PM
#12
Honda-Tech Member
Join Date: Aug 2004
Posts: 1,038
Likes: 0
Received 0 Likes
on
0 Posts
i just had this problem last week when i installed my rear disk swap. i did not cut a hole or have to weld anything. what i did was i used those antenna magnet things and some tape.
first i flipped the nut so that the side where the bolts screws in is facing up and the other side is sitting right on that hole on the bottom u mentioned. i did this with the magnet pulling the nut more and more till u can flip it a small metal hook. after that i bent a small piece of metal into a almost 90 degree shape. i wrapped the tip with tape till i made it thick enought to hold the nut where the bolt goes in. than i just messed with it till i saw it and sat it in place. than i put everything back and it bolted right up.
I already had the trailing arm bolted up to the chassie so thats what i recommend, leave this bolt til the end.
hope it helps
05-08-2006, 01:05 PM
#13
Honda-Tech Member
Join Date: Oct 2002
Location: chicago burbs, Il, USA
Posts: 5,150
Likes: 0
Received 23 Likes
on
23 Posts
<TABLE WIDTH="90%" CELLSPACING=0 CELLPADDING=0 ALIGN=CENTER><TR><TD>Quote, originally posted by 93allmotorcoupe »</TD></TR><TR><TD CLASS="quote">What condition are the bushings in?</TD></TR></TABLE>
It's in great shape if I remember correctly, it's been a while since I looked at it. I'll take some pics of it for you tonight.
It's in great shape if I remember correctly, it's been a while since I looked at it. I'll take some pics of it for you tonight.
05-08-2006, 01:21 PM
#14
Honda-Tech Member
Thread Starter
Thanks everyone...and rather than try and finagle it back into place, id rather cut it open and make sure its seated properly and permanently to avoid this from ever happening again. Thanks for all the input
05-09-2006, 07:27 AM
#15
Member
i actaully did something very similar to myself doing a clitch swap...a lil hammer tap thru the front subframe to attach the flca...broke the nut of iside the subframe....w/ a lil finagling and a huge magnet (friends dad has all kinds of weird **** from workin at xerox) we got it close enuff to thread the bolt thru...and the surface resistance let me tighten it back up
05-14-2006, 09:41 AM
#16
Honda-Tech Member
Thread Starter
Well as promised here is my short How-To on how to fix this problem. There are probably a number of ways you can go about this, however after a few days of thinking about it we decided that this would be best for our situation. Our idea was to drill a circular hole through the bottom of the subframe. Other good suggestions which you might want to consider were to:
1. Use a powerful magnet to get the nut back in its original location.
-We thought this wouldve been way too tedios and time consuming
2. Cut a small notch towards the front just large enough to hold up a wrench with a new nut.
-This was a good idea, however the old nut would still be inside the subframe.
3. Cut an I shape in the bottom and bend the tabs down to open it up.
-Also a good idea, however this required more advanced cutting. The position of the car made this hard to do, and we also werent crazy about bending and rebending the soft sheetmetal of the subframe.
Now that we're through that, Ill show you what we did. We used a 2" hole saw bit to drill a hole up through the bottom of the subframe. This would allow us to make one very simple cut, allow us enough room to fix the problem, and also provide a very simple way to weld the are back shut. If youre doing this on your own, remember to wear safety goggles and some type of MechanxWear style gloves (which is why my hands are so clean in the pics ).
Sorry, no photos during the drilling but here are a few shots of the hole after the cut was made:
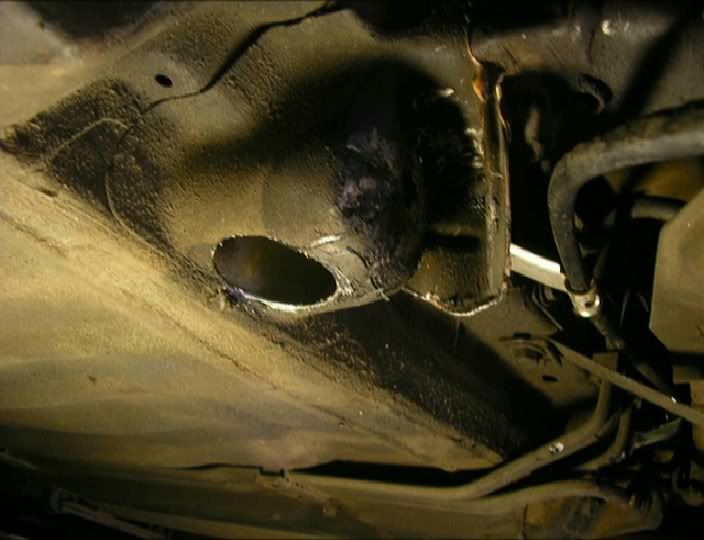

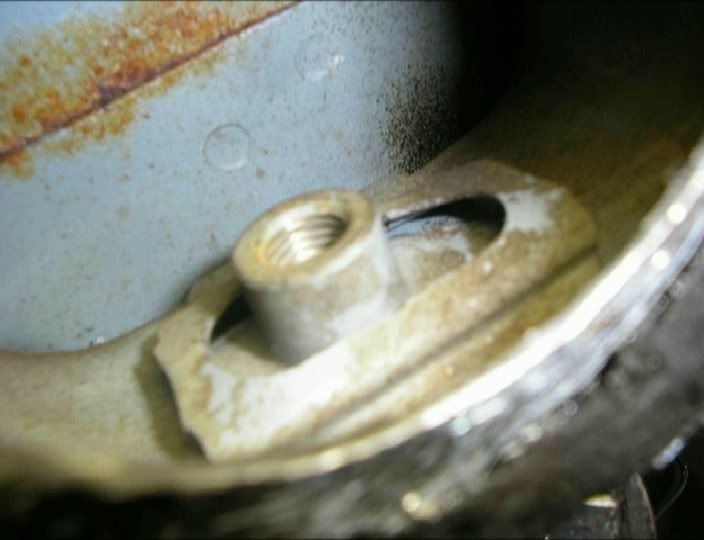
The hole you just made will have small,sharp shards of metal everywhere. You may want to smooth it out with a grinder before sticking your fingers through it. This is also why I mentioned to wear gloves. After cutting, the nut will fall out the bottom through the hole you just made, find it immediately! Here's what mine looked like:
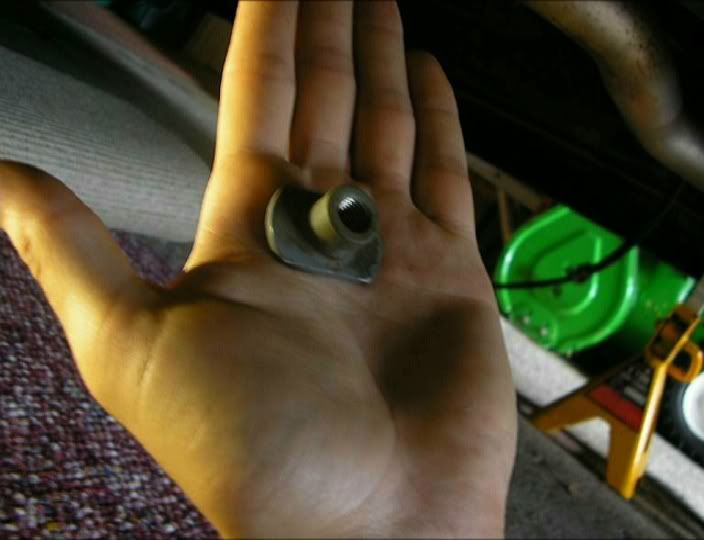
You can see there is a flange with a threaded nut on the other side. When re-installing, the flange faces towards the back of the car and the nut faces towards the front. Or, in other words (and if youre working on a different area of the car with the same problem) the bolt goes through the flange first, and then gets threaded into the nut.
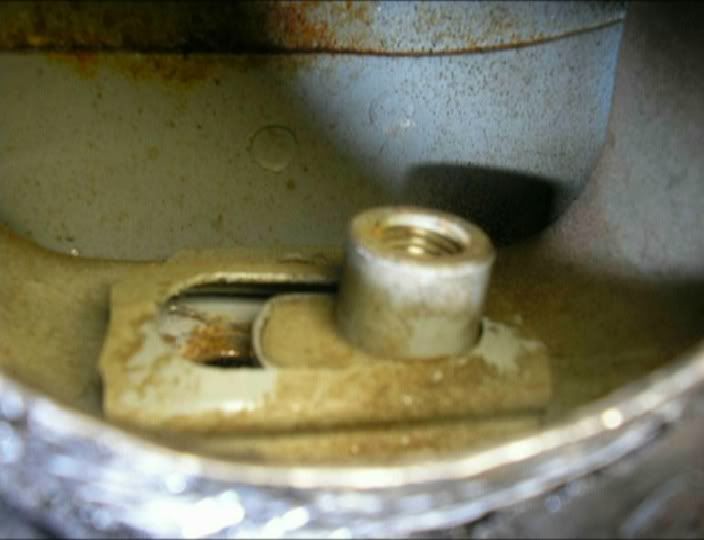
Now that youve seen the nut, Ill show you where it goes inside the subframe. Here are a few shots through the hole we made. They are very blurry, but you still get the idea.
You can see above the small slot that is supposed to hold this nut in place. Mine did not appear to be bent or in any way out of shape. The slot is big enough for the nut to go back through it easily, which obviously means that its big enough for it to fall out very easily. In my opinion, its a pretty bad design flaw, but back on topic...
Grab the nut with a couple of fingers, and again with the flange side going in first, reach it up through the hole and back into the slot where it belongs. It may take some time and finesse, but you'll get it in there. Once its in, be sure to slide it back and forth as if you were doing it with the arms on adjusting the Toe. Make sure there are no high spots or low spots, and if there are you may want to bend those back to normal. Mine seemed to be straight, so we didnt need to make any changes with it.
Here are photos of the nut back in the slot:
Once we are finished bolting everything back together and the car is driveable, we are taking it to a friend of mine's shop to get welded back shut. We dont have any welding experience or we would do it ourselves But please, DO NOT cut a hole like this if you are not planing on welding it once youre done. Water will get in there and your subframe will start to rust and corrode from the inside out. It is also a structural region of the car that needs to be supported properly. With a gaping hole in it, its not going to be as strong as it should be. Also be sure to cover the area with a good undercoating. With that said, I hope this is of help to some people, and if there are any questions or comments feel free to reply in here or shoot me a PM
Also, if anyone can get in touch with a Moderator to have the title changed that would be great...maybe something like Disk Swap Problem: Nut stuck inside subframe or something to that effect for anyone searching for this
Pictures back up
Modified by 93allmotorcoupe at 7:36 PM 7/17/2008
1. Use a powerful magnet to get the nut back in its original location.
-We thought this wouldve been way too tedios and time consuming
2. Cut a small notch towards the front just large enough to hold up a wrench with a new nut.
-This was a good idea, however the old nut would still be inside the subframe.
3. Cut an I shape in the bottom and bend the tabs down to open it up.
-Also a good idea, however this required more advanced cutting. The position of the car made this hard to do, and we also werent crazy about bending and rebending the soft sheetmetal of the subframe.
Now that we're through that, Ill show you what we did. We used a 2" hole saw bit to drill a hole up through the bottom of the subframe. This would allow us to make one very simple cut, allow us enough room to fix the problem, and also provide a very simple way to weld the are back shut. If youre doing this on your own, remember to wear safety goggles and some type of MechanxWear style gloves (which is why my hands are so clean in the pics
). Sorry, no photos during the drilling but here are a few shots of the hole after the cut was made:
The hole you just made will have small,sharp shards of metal everywhere. You may want to smooth it out with a grinder before sticking your fingers through it. This is also why I mentioned to wear gloves. After cutting, the nut will fall out the bottom through the hole you just made, find it immediately! Here's what mine looked like:
You can see there is a flange with a threaded nut on the other side. When re-installing, the flange faces towards the back of the car and the nut faces towards the front. Or, in other words (and if youre working on a different area of the car with the same problem) the bolt goes through the flange first, and then gets threaded into the nut.
Now that youve seen the nut, Ill show you where it goes inside the subframe. Here are a few shots through the hole we made. They are very blurry, but you still get the idea.
You can see above the small slot that is supposed to hold this nut in place. Mine did not appear to be bent or in any way out of shape. The slot is big enough for the nut to go back through it easily, which obviously means that its big enough for it to fall out very easily. In my opinion, its a pretty bad design flaw, but back on topic...
Grab the nut with a couple of fingers, and again with the flange side going in first, reach it up through the hole and back into the slot where it belongs. It may take some time and finesse, but you'll get it in there. Once its in, be sure to slide it back and forth as if you were doing it with the arms on adjusting the Toe. Make sure there are no high spots or low spots, and if there are you may want to bend those back to normal. Mine seemed to be straight, so we didnt need to make any changes with it.
Here are photos of the nut back in the slot:
Once we are finished bolting everything back together and the car is driveable, we are taking it to a friend of mine's shop to get welded back shut. We dont have any welding experience or we would do it ourselves
But please, DO NOT cut a hole like this if you are not planing on welding it once youre done. Water will get in there and your subframe will start to rust and corrode from the inside out. It is also a structural region of the car that needs to be supported properly. With a gaping hole in it, its not going to be as strong as it should be. Also be sure to cover the area with a good undercoating. With that said, I hope this is of help to some people, and if there are any questions or comments feel free to reply in here or shoot me a PM Also, if anyone can get in touch with a Moderator to have the title changed that would be great...maybe something like Disk Swap Problem: Nut stuck inside subframe or something to that effect for anyone searching for this
Pictures back up
Modified by 93allmotorcoupe at 7:36 PM 7/17/2008
The following users liked this post:
05-14-2006, 10:29 AM
#17
Member
<TABLE WIDTH="90%" CELLSPACING=0 CELLPADDING=0 ALIGN=CENTER><TR><TD>Quote, originally posted by 93allmotorcoupe »</TD></TR><TR><TD CLASS="quote">Well as promised here is my short How-To on how to fix this problem. There are probably a number of ways you can go about this, however after a few days of thinking about it we decided that this would be best for our situation. Our idea was to drill a circular hole through the bottom of the subframe. Other good suggestions which you might want to consider were to:
1. Use a powerful magnet to get the nut back in its original location.
-We thought this wouldve been way too tedios and time consuming
</TD></TR></TABLE>
youd be surprised...me and a buddy did it in all of about 2 min...after me literally tearin my garage apart because i was bs
1. Use a powerful magnet to get the nut back in its original location.
-We thought this wouldve been way too tedios and time consuming
</TD></TR></TABLE>
youd be surprised...me and a buddy did it in all of about 2 min...after me literally tearin my garage apart because i was bs

 11-15-2007, 04:50 PM
#19
Honda-Tech Member
<TABLE WIDTH="90%" CELLSPACING=0 CELLPADDING=0 ALIGN=CENTER><TR><TD>Quote, originally posted by 93allmotorcoupe »</TD></TR><TR><TD CLASS="quote">
You can see above the small slot that is supposed to hold this nut in place. Mine did not appear to be bent or in any way out of shape. The slot is big enough for the nut to go back through it easily, which obviously means that its big enough for it to fall out very easily. In my opinion, its a pretty bad design flaw, </TD></TR></TABLE>
wonderful pics! thanks for sharing.
interesting to see the reason why it falls out so easily.
01-30-2008, 04:23 PM
#22
Honda-Tech Member
Join Date: Jun 2007
Location: Richmond, VA, USA
Posts: 62
Likes: 0
Received 0 Likes
on
0 Posts
didn't mean to bring this thread back up, sorry!
Oh god this happened to me when a friend and I were swapping my rear Trailing Arm. I used a coat hanger and patiently moved the nut up to the hole...held it there, then super glued it in place, and very gently reassembled it.
Oh god this happened to me when a friend and I were swapping my rear Trailing Arm. I used a coat hanger and patiently moved the nut up to the hole...held it there, then super glued it in place, and very gently reassembled it.
04-13-2008, 02:56 PM
#23
Junior Member
Join Date: Apr 2008
Location: West Bend, WI, 53090
Posts: 23
Likes: 0
Received 0 Likes
on
0 Posts
The pictures are not there anymore..?
Never mind, they just load very slowly. If you don't mind I could put up a mirror for those pics for you?
Also, I was very lucky to not have the nut fall down! It got stuck so it didnt fall.
Also for whoever didn't know. Us DSMer's have a trick to installing our prothane bushings. We don't press out the old, we burn the rubber and then take a hacksaw to the metal piece of the bushing and cut all the way through it, we then hit it with a hammer.
Modified by Morpherex at 4:22 PM 4/13/2008
Never mind, they just load very slowly. If you don't mind I could put up a mirror for those pics for you?
Also, I was very lucky to not have the nut fall down!
It got stuck so it didnt fall.Also for whoever didn't know. Us DSMer's have a trick to installing our prothane bushings. We don't press out the old, we burn the rubber and then take a hacksaw to the metal piece of the bushing and cut all the way through it, we then hit it with a hammer.
Modified by Morpherex at 4:22 PM 4/13/2008
04-13-2008, 07:00 PM
#24
Honda-Tech Member
I literally did this same thing today. What a huge pain!
Oh well, it's all done now and hopefully tomorrow night I'm gonna get the hole welded shut (given it was about half the size of the one in this thread). THinking about it, I don't think this arm would take much stress, since the frame that holds it is such thin metal, but it's also something I don't want to keep a hole cut in forever.
Oh well, it's all done now and hopefully tomorrow night I'm gonna get the hole welded shut (given it was about half the size of the one in this thread). THinking about it, I don't think this arm would take much stress, since the frame that holds it is such thin metal, but it's also something I don't want to keep a hole cut in forever.