Honda Civic: How to Test and Replace Ignition Control Module
Is the engine in your Honda Civic sputtering and failing to start? If so and you've ruled out all possible causes, try testing the ignition control module (ICM). It's easy to do and just as easy to replace.
This article applies to the Honda Civic (1992-2000).
The battery is charged as well as properly connected, the spark plugs are firing, and the fuel line is intact. However, your car still won't start, and the engine continues to sputter when you flip the ignition. If you've taken all the diagnostic procedures but none of them have solved the problem, try testing and replacing the ignition control module (ICM). This unit relays the signal from the distributor to the spark plugs, and often times, bad grounds, water entering the distributor, or excessive heat may cause the ICM to become faulty. Continue reading to test and replace the ICM in your Honda Civic.

Materials Needed
- Philips screwdriver
- Multimeter
Step 1 – Remove the distributor covers
- With a Phillips screwdriver, remove three mounting screws on the distributor cap.
- Pull off the cap from the distributor housing, and make sure not to unplug the ignition wires.
- With the Phillips screwdriver, remove one rotor retaining screw underneath the rotor.
- Then, remove the rotor and set it aside.
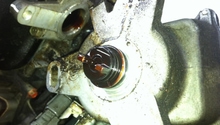
- Gently pull off the dust shield/inner cover of the distributor housing to access the ICM.

Figure 1. Location of three Phillips screws. 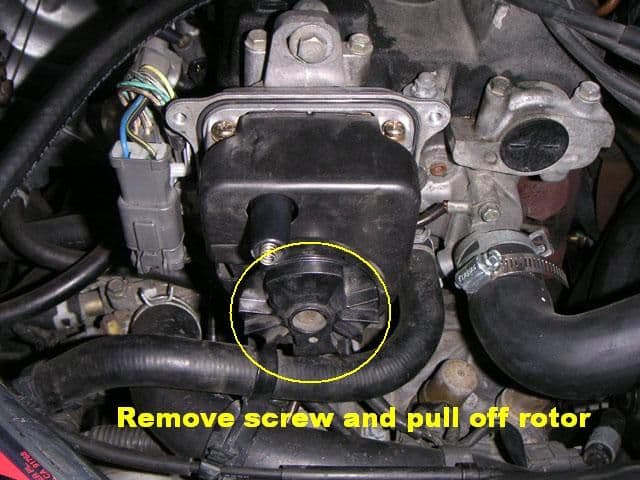
Figure 2. Phillips screw is located underneath the rotor. 
Figure 3. The dust shield can be pulled off.
Step 2 – Test the ICM
- Disconnect the black/yellow, white/blue, and yellow/green wires from the ICM.
- Turn on the ignition.
- Attach one lead of the multimeter to the black/yellow wire, and ground the other lead to a nearby piece of metal. The multimeter should give a reading of about 12 volts.
- If the voltage of this wire is correct, test the white/blue and yellow/green wires. They should give off about 12 volts as well.
- Lastly, check for continuity between the blue wire of the ICM and the distributor housing.
- Simply connect one lead of the multimeter to the blue wire, and the other lead to the housing slot.
- If all connectors are giving off proper readings, the ICM itself is most likely the faulty component.

Step 3 – Replace the ICM
- Remove two Phillips screws underneath the ICM to replace it.
- Simply install the new ICM with the same screws.
- Reattach the wires connecting the ICM to the distributor housing.
- Reattach the inner cover and rotor.
- Secure the rotor with the Phillips screw.
- Reattach and secure the distributor cap.
Related Discussions, and Site
- How to Replace and Test ICM - Honda-Tech.com
- Symptoms of a Bad Distributor - Honda-Tech.com
- Replacing Ignition Control Module - Honda-Tech.com
- Igniter Off-Car Testing - Tegger.com