
[FAQ] Blox/Skunk2 Camber Kit Install (DIY) Step-by-Step w/Pictures
 09-16-2007, 03:33 PM
#1
Honda-Tech Member
Thread Starter
Join Date: Jul 2006
Location: VA
Posts: 860
Likes: 0
Received 0 Likes
on
0 Posts
This is the first DIY guide I am doing so bear with me on it. If I miss anything, let me know, I am trying to make the install as easy and clear as possible. This thread pretty much details everything you need to do for a successful Blox or Skunk2 Camber Kit install. The install itself really isn't hard at all, but if you were thinking of paying someone to put it on instead, hopefully this will save you a few bucks. 
My install is on a 1994 Integra GSR (2 door). I installed my Tein SS Coilovers 2 days ago and didn't even think about putting the camber kits in when the assemblies were all out and not in the way. So the guide details how to do the camber kit install while working around the struts and not removing them. I'm sure there are many other ways of doing this too, this is just the one that I found easiest and quickest. It may be easier not to damage your spring/strut assembly if they are completely removed from the car. If it is removed just ignore steps 6-9 as hopefully the rest of the guide can still help you.
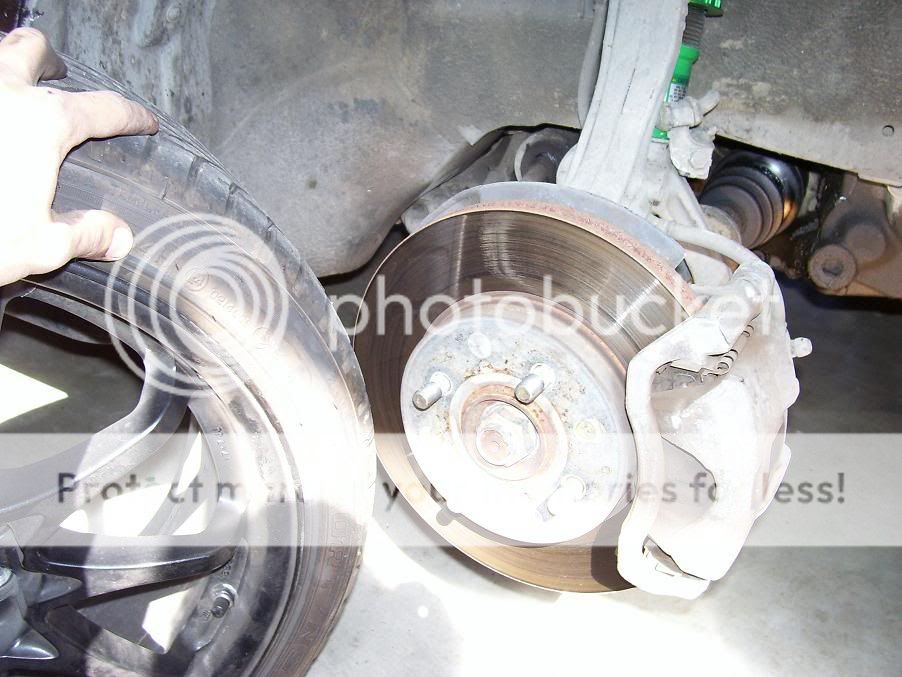
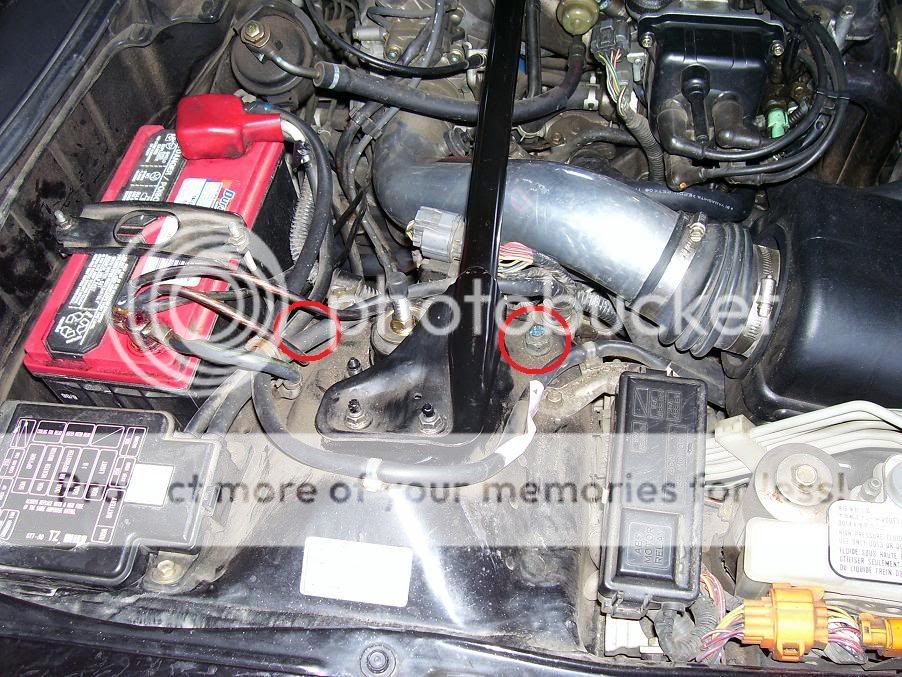
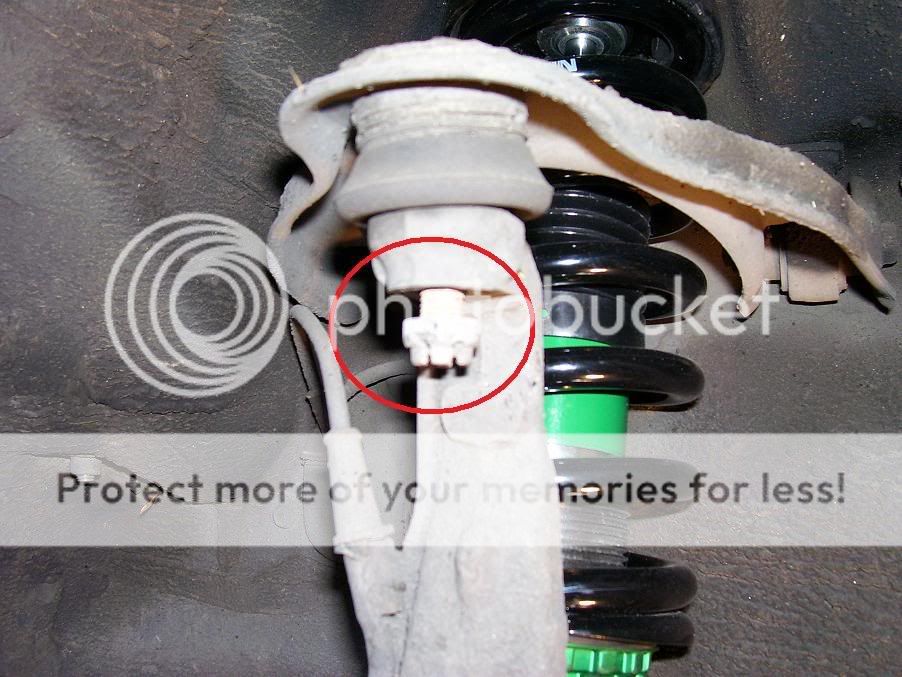
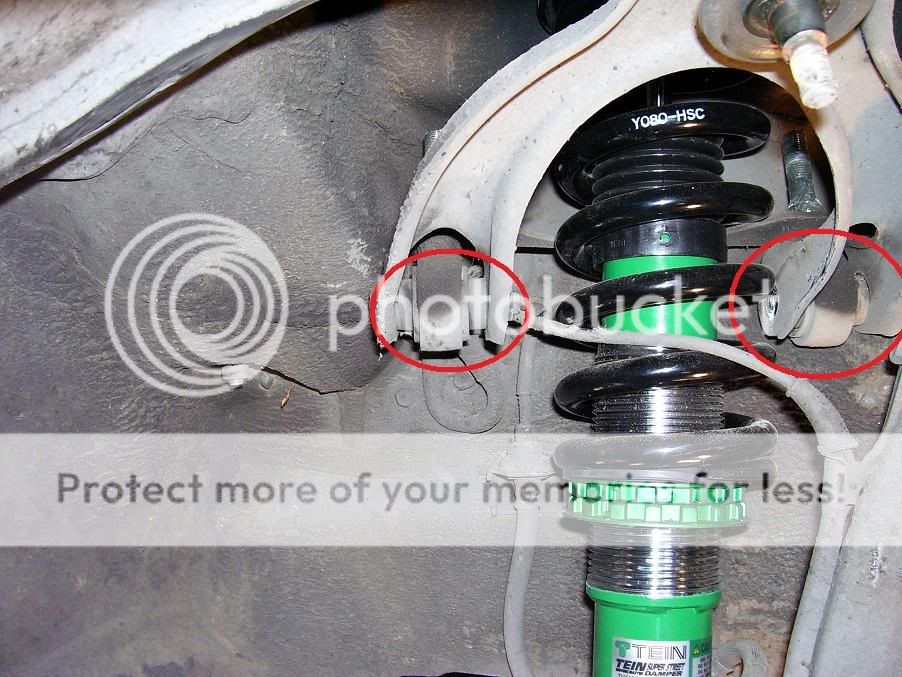
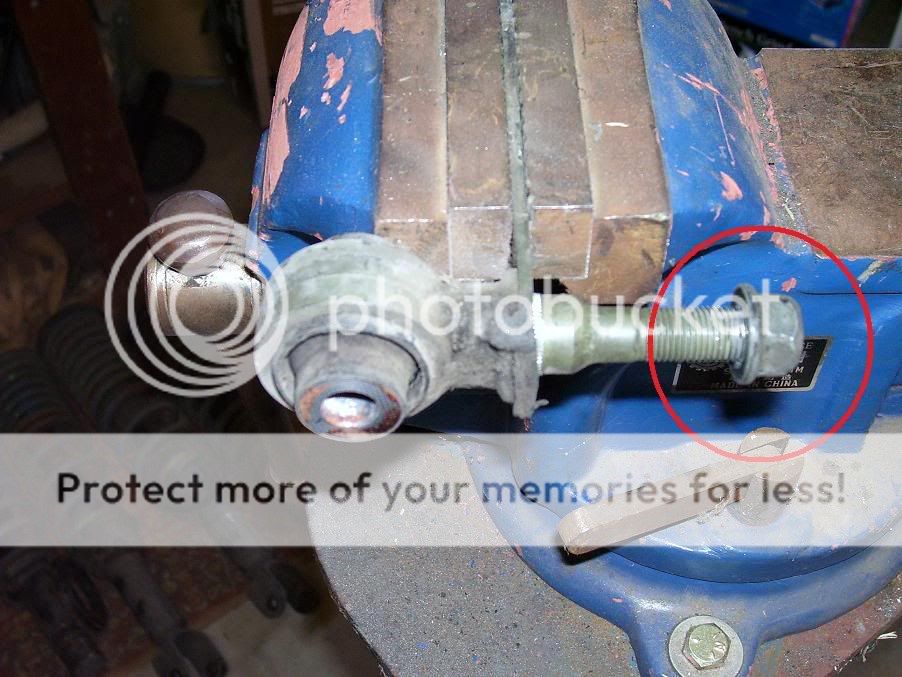
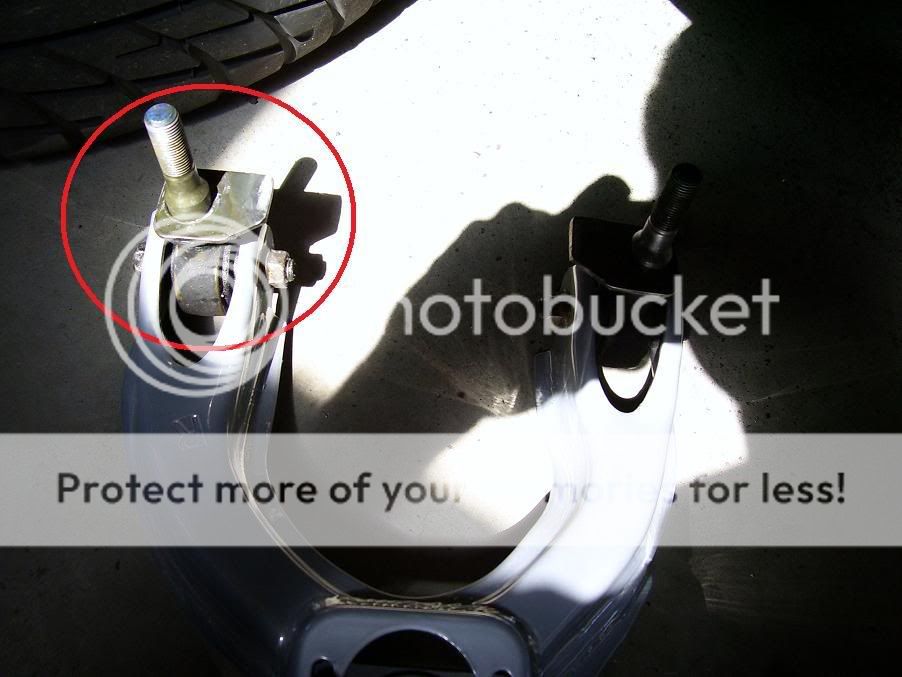
Step 1: You'll want to start by jacking up the front end and use some sort of jack stands to make sure it stays in the air. Start by removing the wheel and locate the 2 17mm nuts in the engine compartment that will be removed and the 17mm castle nut that will be removed down below. I have circled both in the pictures.

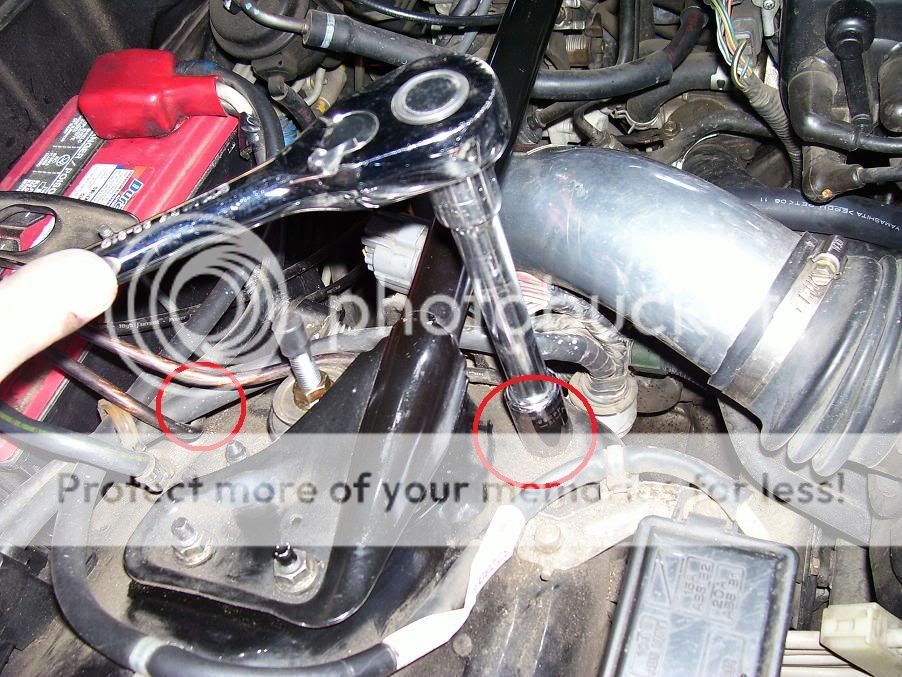
Step 2: Next go ahead and remove the top nuts in the engine bay and then take a pair of dykes (wire cutters and I'm not sure if that was the correct way to spell it or not) and bend the cotter pin back into shape that goes through the castle nut. Once the ends of the pin are straightened, use the head of the dykes and tap it out to where you can grab the looped end with the dykes and pull it straight out.
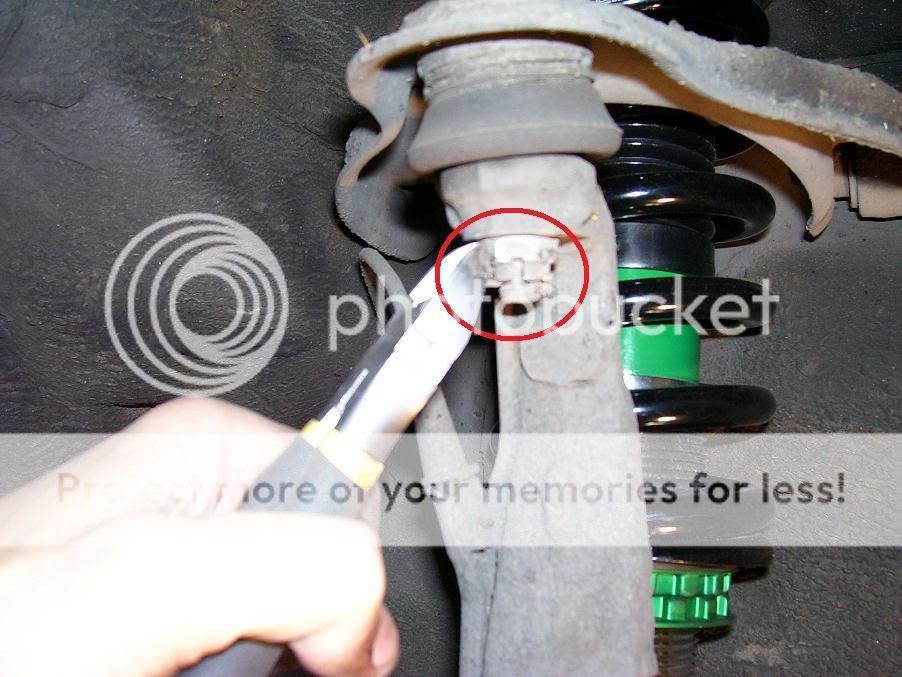
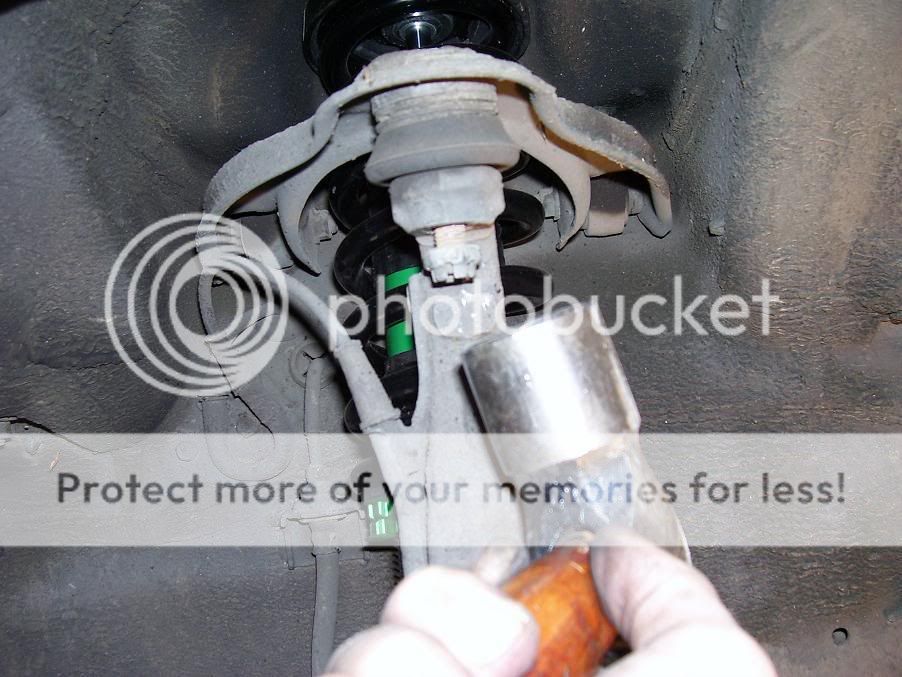
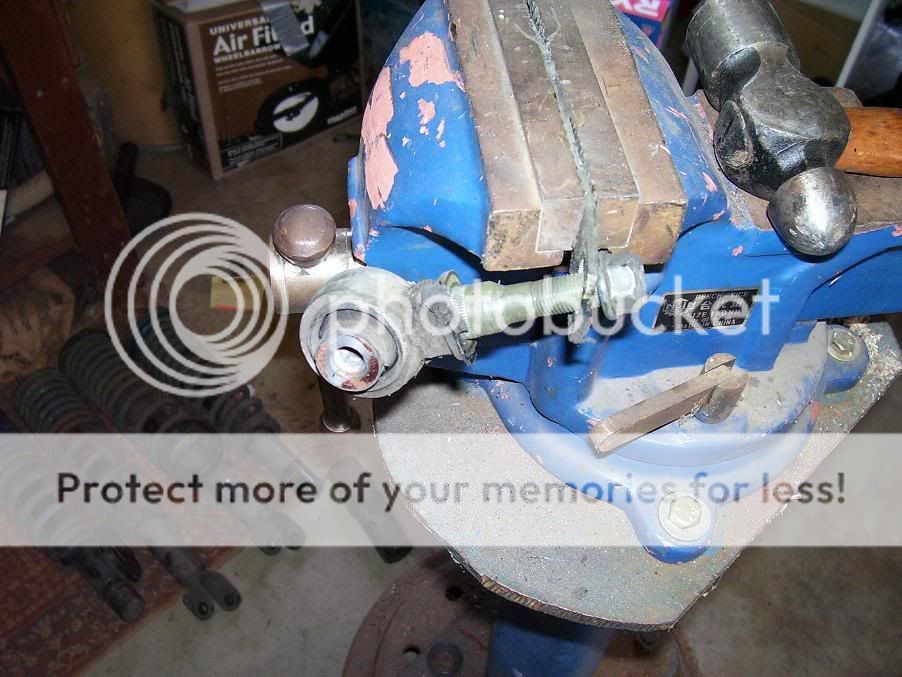
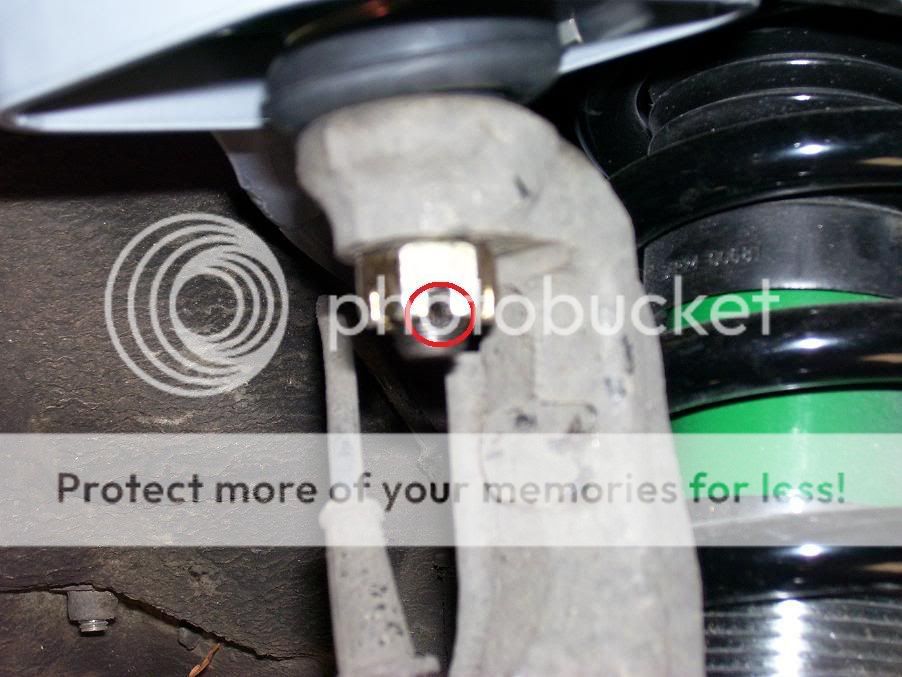
Step 3: Use a closed-ended 17mm wrench on the castle nut and loosen it up, but don't take it all the way off.

Step 4: The reason you want to keep a few threads attached is because you are going to need to tap the bottom up it out with a hammer. This will save the threads on the joint in case you ever want to take your new camber kits out. It takes a couple of good hits to break it loose. (There is a tool made to remove ball joints that looks sort of like a crowbar with a split end. I never use them though because I almost always tear the boots with them. The hammer just seems to work easier.) Also, when you take the castle nut off, as Patrick stated below, it's a good idea to tie the knuckle assembly back with either zip ties or a bungie cord so it doesn't put any stress on your axle.
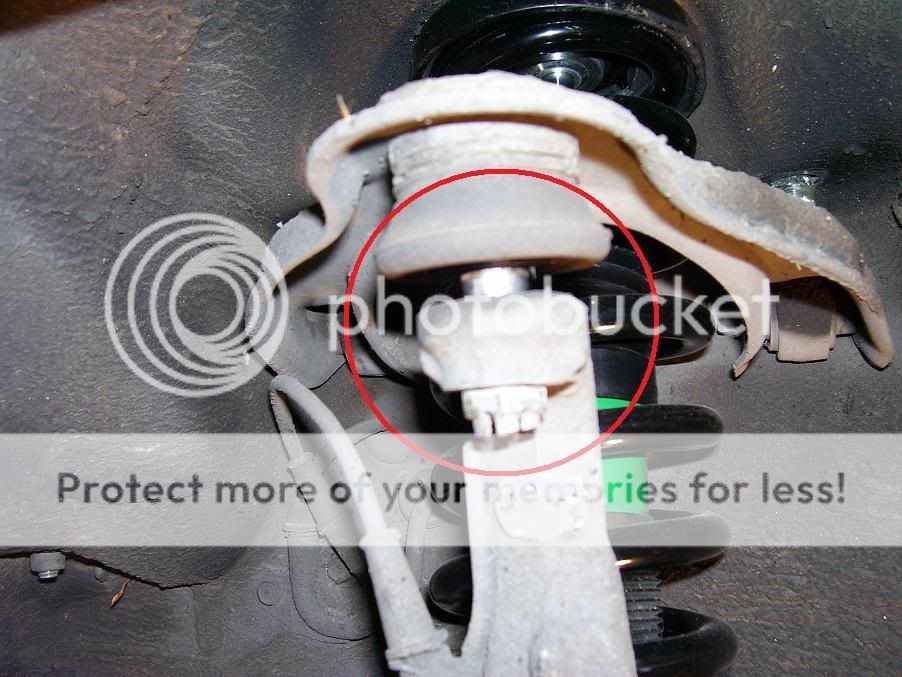
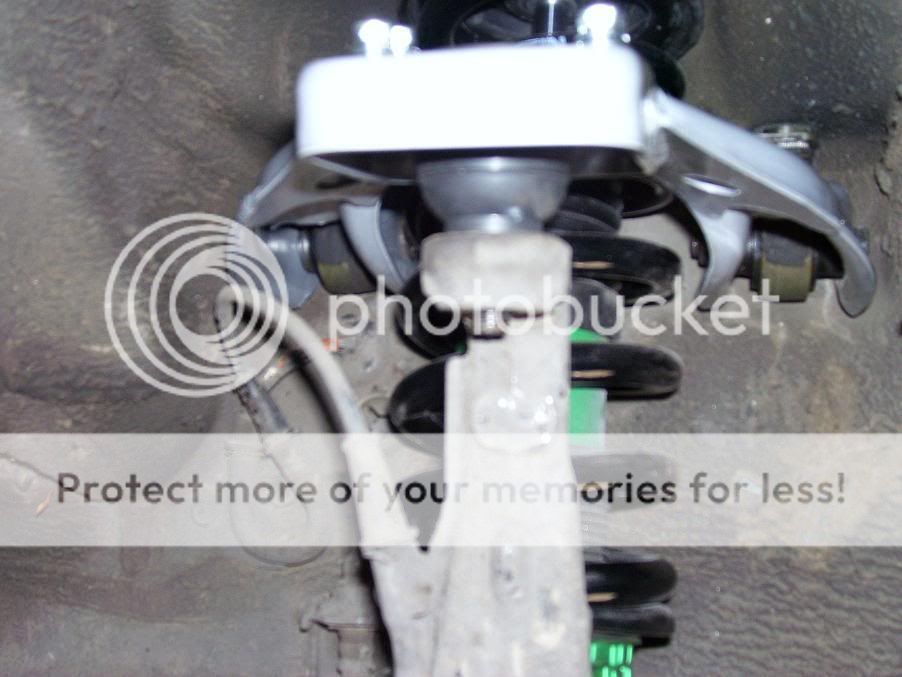
Step 5: The next 2 steps are probably the most tricky. It's kind of tough to manuver the upper control arm around the coilover set up. However, if you can tweak it just right, (hopefully without scratching your brand new suspension) you can get a 14mm closed-ended wrench and a 3/8" drive 14mm ratchet and socket on the bolts that hold the mounting plates/bushings to the control arm. Once you have the first side done, go ahead and do the second. Also, when you are moving the control arm assembly around in there, be careful not to bend any lines going to or from the brake calipers. Once both 14mm bolts/nuts are undone, go ahead and drop down the main part of the assembly.

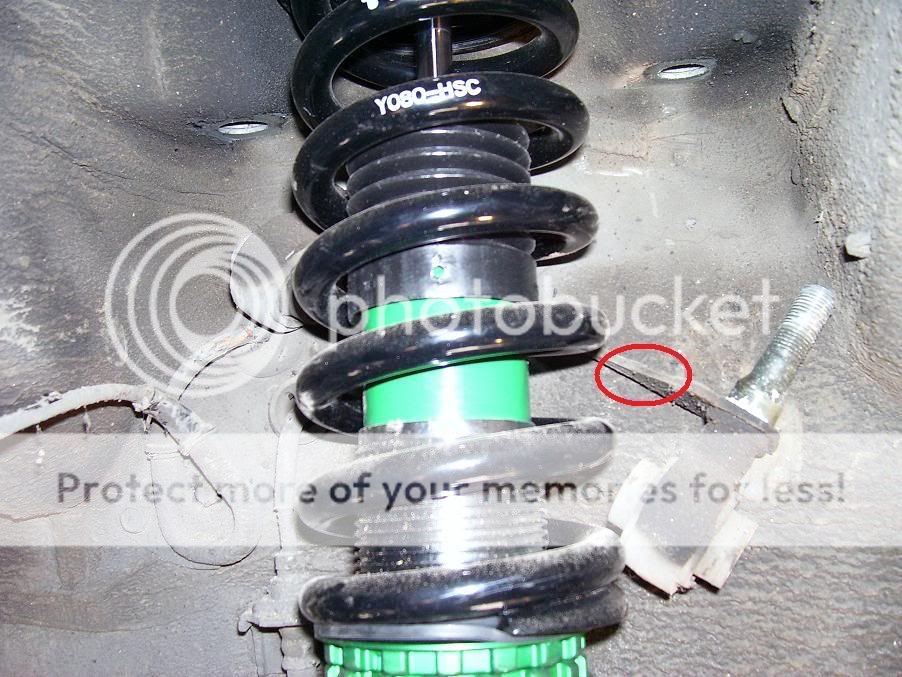
Step 6: This part is probably the hardest to be careful with. I used my dremel with a small cut off wheel to cut the bracket the ties the two mounting plates together. I tried for a long time to try and move them around in wierd positions hoping to be able to pull them out from behind the suspension and avoid cutting anything but they wouldn't fit. I would assume it is the same thing on similar model cars, but not sure. Also, one of my friends recommended that I just take a flat head screw driver and a hammer to the tie bracket since they just slide over the mounting plate. I also tried this for a while with no success since they have small splines that they slide into. Regardless, I ended up using my dremel to cut one end off and the two pieces come right out. Try not to destroy the little tie brace when you are cutting it. You will be using it when remounting the new camber kit, but in smaller pieces as a shim or washer. You'll see what I mean. Also, the wheel that is on the dremel is not the one I ended up using, I didn't realize I had such a soft one on it until I started cutting. I would get the really thin ones. They seem to work well for metal.

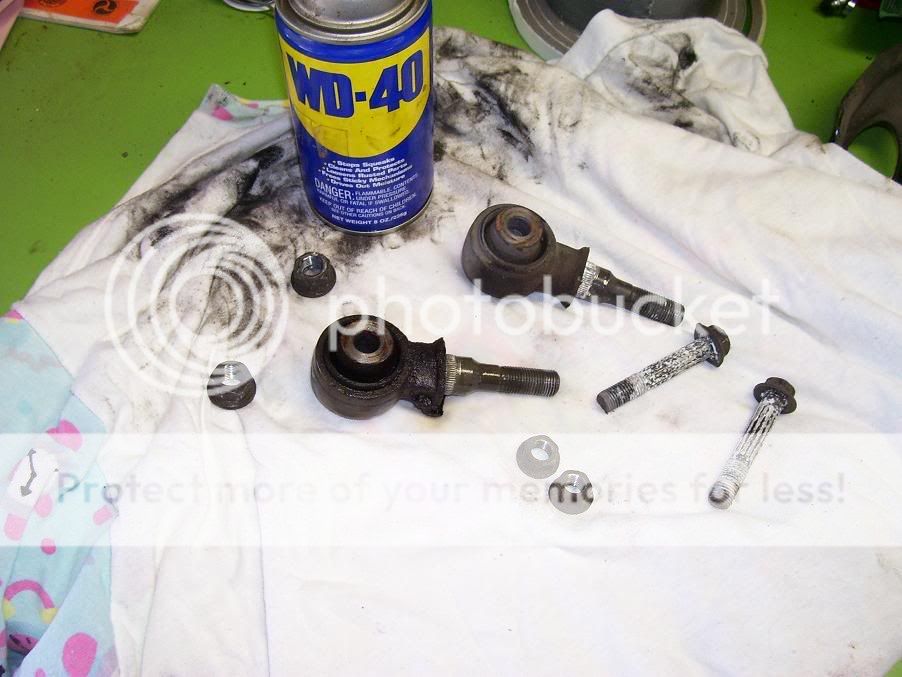
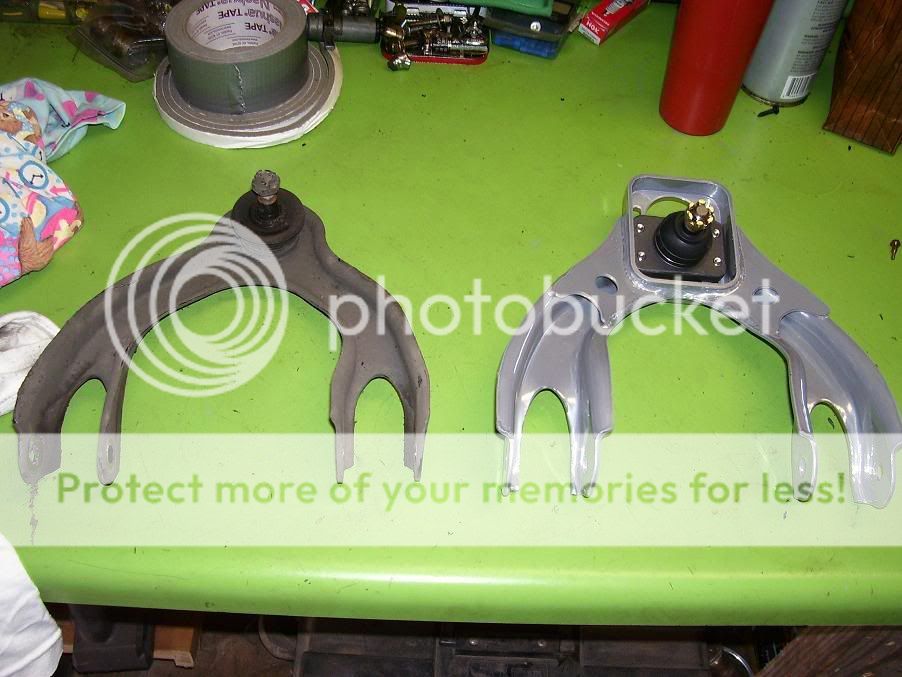
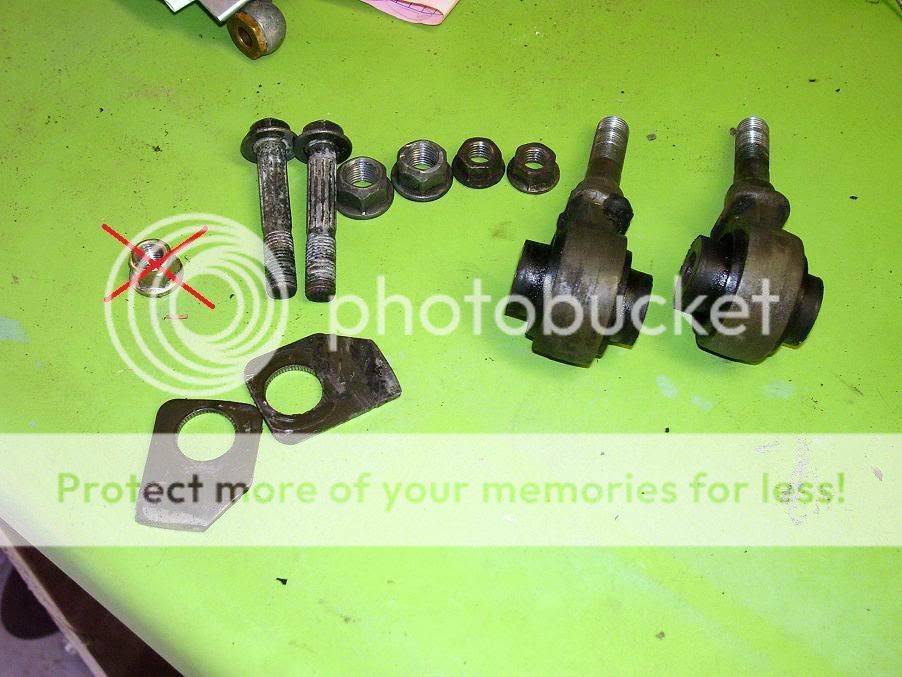
Step 7: The next thing I did, which by any means isn't necessary, is soak the old bolts and mounts w/bushings down in WD40 to clean all the road tar and grease off them. They will have a few min to soak in it since there are a couple of other things to do before the new camber kit is ready to go in. Here is also a side by side comparison of the old and the new. You can see the Blox unit is much more of a heavy duty piece.

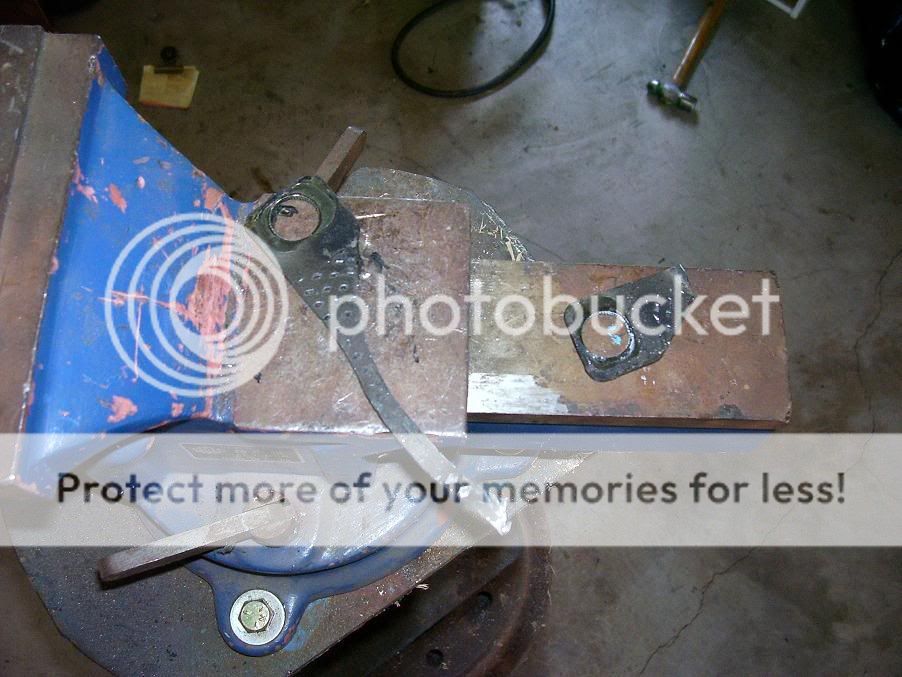
Step 8: Alright, so we have the mounting assemblies out now and put in a vice with the tie strap deal still attached. Put one of the 17mm nuts back on the bolt side of the bushing and take a few whacks at it with a hammer to pop it out of the strap. You will notice the splines I was talking about earlier. That's why they are so hard to knock loose while the things still in the car. Once again, don't destroy the tie straps pieces if possible as they are used in the next step.
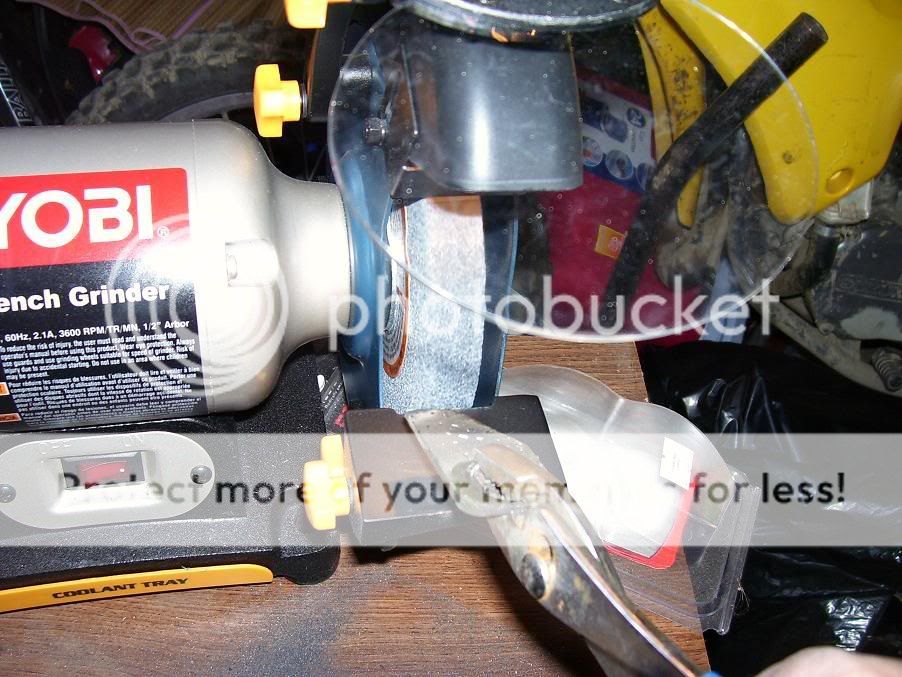
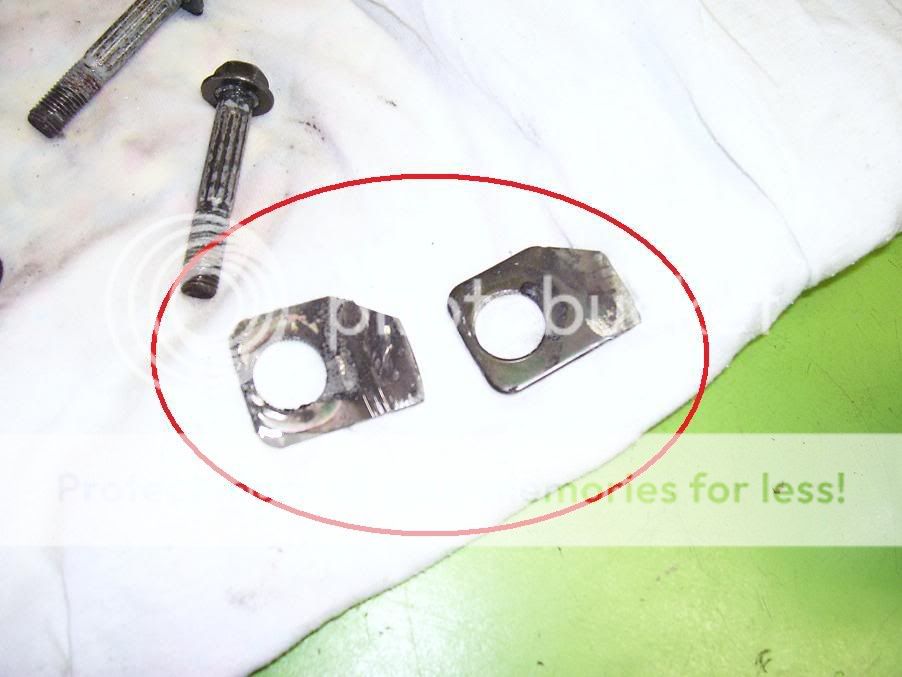
Step 9: So you should now have both pieces of the tie strap sitting out. We need to cut both of those down to a similar size to what I have shown here. Use the dremel or a bench grinder, or whatever else you can think of.
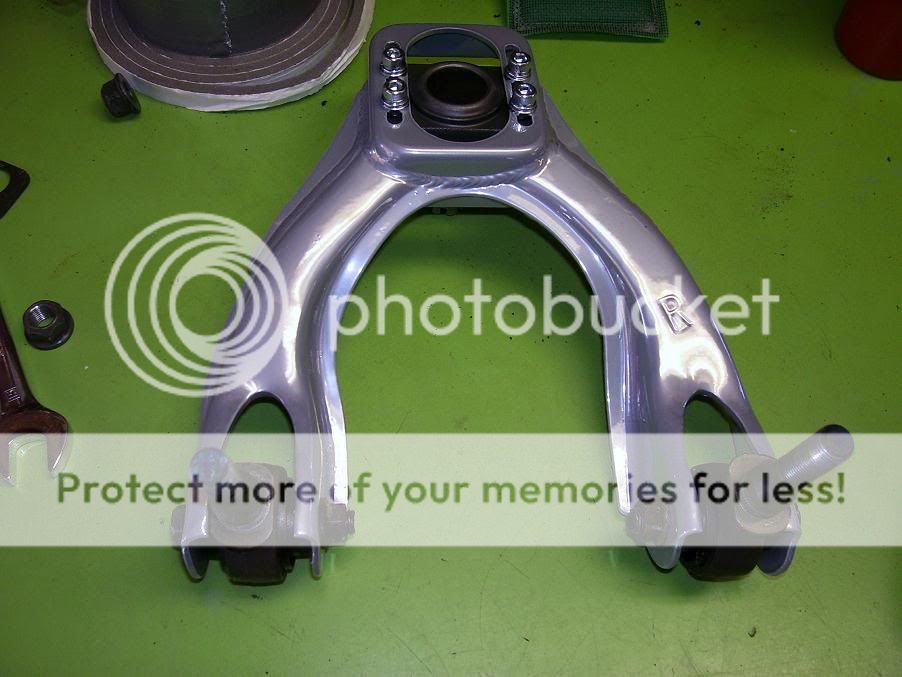
Step 10: All of the parts are ready to be wiped down now and put back together. Go ahead and position the upper mounts in the new camber kit and put the 14mm bolts through from the outside and the nuts on the inside. Go ahead and tighten them down as well but when they start getting snug you'll obviously want to position the mounts facing up as they are hard to move when the bolts are tight.
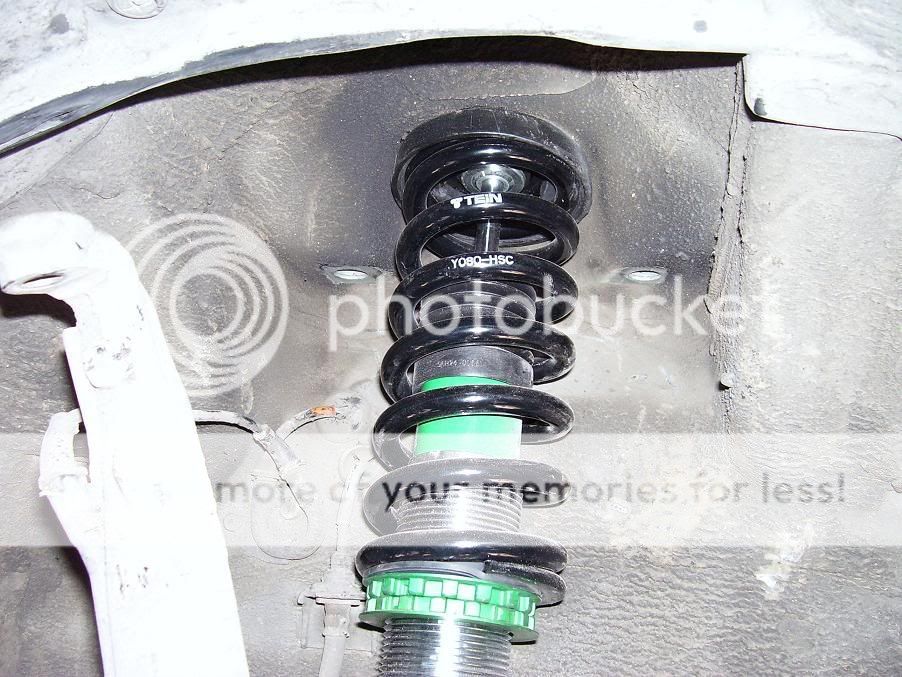
Step 11: Its kind of hard to see in this picture but put the shims that we cut down from the tie brace back on the mounts. Then put the camber kit assembly back into position and thread on the 17mm nuts in the engine bay and tighten them down. Put the knuckle assembly back on the camber kit as well.
Step 12: You can thread the new castle nut onto the camber kit bolt that comes down from the adjustable joint. Get is tight the closed-ended 17mm wrench and make sure one of the openings lines up with the hole so you can place a new cotter pin through it. Go ahead and put the cotter pin back through it and bend one side of it up and one down to make sure the nut doesn't go anywhere. (I didn't put a picture of that because it was way too blurry to even see. Sorry the pics haven't been the best, my hands were all greasy and I was fumbling the camera most of the time.)
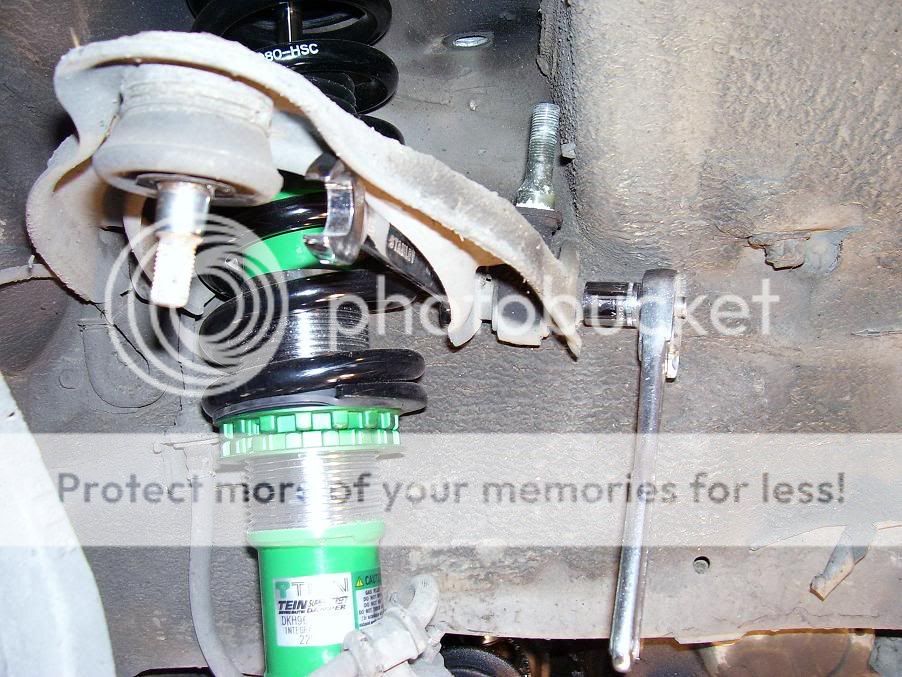
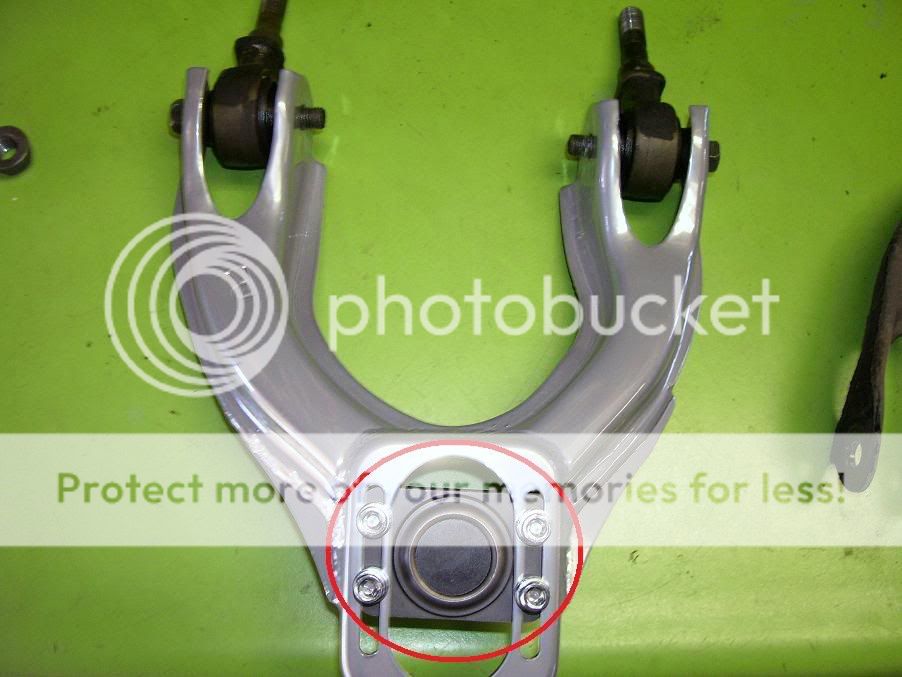
Step 13: I didn't take a picture of the adjustment process on the new camber kit but it's really easy. In fact, it can be done with the wheel still on the car as long is it jacked up. It required a size #5 metric allen wrench in the four spots I have show in the picture. Make sure you tighten them up good when you have the adjustment you need.
I know this isn't a very complicated install but I hope it helped. If anyone has any questions or anything to add let me know.
-Rob
Modified by gsrob at 8:08 AM 9/17/2007
Modified by gsrob at 9:34 AM 9/17/2007
My install is on a 1994 Integra GSR (2 door). I installed my Tein SS Coilovers 2 days ago and didn't even think about putting the camber kits in when the assemblies were all out and not in the way. So the guide details how to do the camber kit install while working around the struts and not removing them. I'm sure there are many other ways of doing this too, this is just the one that I found easiest and quickest. It may be easier not to damage your spring/strut assembly if they are completely removed from the car. If it is removed just ignore steps 6-9 as hopefully the rest of the guide can still help you.
Step 1: You'll want to start by jacking up the front end and use some sort of jack stands to make sure it stays in the air. Start by removing the wheel and locate the 2 17mm nuts in the engine compartment that will be removed and the 17mm castle nut that will be removed down below. I have circled both in the pictures.
Step 2: Next go ahead and remove the top nuts in the engine bay and then take a pair of dykes (wire cutters and I'm not sure if that was the correct way to spell it or not) and bend the cotter pin back into shape that goes through the castle nut. Once the ends of the pin are straightened, use the head of the dykes and tap it out to where you can grab the looped end with the dykes and pull it straight out.
Step 3: Use a closed-ended 17mm wrench on the castle nut and loosen it up, but don't take it all the way off.
Step 4: The reason you want to keep a few threads attached is because you are going to need to tap the bottom up it out with a hammer. This will save the threads on the joint in case you ever want to take your new camber kits out. It takes a couple of good hits to break it loose. (There is a tool made to remove ball joints that looks sort of like a crowbar with a split end. I never use them though because I almost always tear the boots with them. The hammer just seems to work easier.) Also, when you take the castle nut off, as Patrick stated below, it's a good idea to tie the knuckle assembly back with either zip ties or a bungie cord so it doesn't put any stress on your axle.
Step 5: The next 2 steps are probably the most tricky. It's kind of tough to manuver the upper control arm around the coilover set up. However, if you can tweak it just right, (hopefully without scratching your brand new suspension) you can get a 14mm closed-ended wrench and a 3/8" drive 14mm ratchet and socket on the bolts that hold the mounting plates/bushings to the control arm. Once you have the first side done, go ahead and do the second. Also, when you are moving the control arm assembly around in there, be careful not to bend any lines going to or from the brake calipers. Once both 14mm bolts/nuts are undone, go ahead and drop down the main part of the assembly.
Step 6: This part is probably the hardest to be careful with. I used my dremel with a small cut off wheel to cut the bracket the ties the two mounting plates together. I tried for a long time to try and move them around in wierd positions hoping to be able to pull them out from behind the suspension and avoid cutting anything but they wouldn't fit. I would assume it is the same thing on similar model cars, but not sure. Also, one of my friends recommended that I just take a flat head screw driver and a hammer to the tie bracket since they just slide over the mounting plate. I also tried this for a while with no success since they have small splines that they slide into. Regardless, I ended up using my dremel to cut one end off and the two pieces come right out. Try not to destroy the little tie brace when you are cutting it. You will be using it when remounting the new camber kit, but in smaller pieces as a shim or washer. You'll see what I mean. Also, the wheel that is on the dremel is not the one I ended up using, I didn't realize I had such a soft one on it until I started cutting. I would get the really thin ones. They seem to work well for metal.
Step 7: The next thing I did, which by any means isn't necessary, is soak the old bolts and mounts w/bushings down in WD40 to clean all the road tar and grease off them. They will have a few min to soak in it since there are a couple of other things to do before the new camber kit is ready to go in. Here is also a side by side comparison of the old and the new. You can see the Blox unit is much more of a heavy duty piece.
Step 8: Alright, so we have the mounting assemblies out now and put in a vice with the tie strap deal still attached. Put one of the 17mm nuts back on the bolt side of the bushing and take a few whacks at it with a hammer to pop it out of the strap. You will notice the splines I was talking about earlier. That's why they are so hard to knock loose while the things still in the car. Once again, don't destroy the tie straps pieces if possible as they are used in the next step.
Step 9: So you should now have both pieces of the tie strap sitting out. We need to cut both of those down to a similar size to what I have shown here. Use the dremel or a bench grinder, or whatever else you can think of.
Step 10: All of the parts are ready to be wiped down now and put back together. Go ahead and position the upper mounts in the new camber kit and put the 14mm bolts through from the outside and the nuts on the inside. Go ahead and tighten them down as well but when they start getting snug you'll obviously want to position the mounts facing up as they are hard to move when the bolts are tight.
Step 11: Its kind of hard to see in this picture but put the shims that we cut down from the tie brace back on the mounts. Then put the camber kit assembly back into position and thread on the 17mm nuts in the engine bay and tighten them down. Put the knuckle assembly back on the camber kit as well.
Step 12: You can thread the new castle nut onto the camber kit bolt that comes down from the adjustable joint. Get is tight the closed-ended 17mm wrench and make sure one of the openings lines up with the hole so you can place a new cotter pin through it. Go ahead and put the cotter pin back through it and bend one side of it up and one down to make sure the nut doesn't go anywhere. (I didn't put a picture of that because it was way too blurry to even see. Sorry the pics haven't been the best, my hands were all greasy and I was fumbling the camera most of the time.)
Step 13: I didn't take a picture of the adjustment process on the new camber kit but it's really easy. In fact, it can be done with the wheel still on the car as long is it jacked up. It required a size #5 metric allen wrench in the four spots I have show in the picture. Make sure you tighten them up good when you have the adjustment you need.
I know this isn't a very complicated install but I hope it helped. If anyone has any questions or anything to add let me know.
-Rob
Modified by gsrob at 8:08 AM 9/17/2007
Modified by gsrob at 9:34 AM 9/17/2007
 09-17-2007, 05:20 AM
#5
Honda-Tech Member
iTrader: (1)
Join Date: Jan 2002
Location: Nowhere and Everywhere
Posts: 29,530
Likes: 0
Received 52 Likes
on
46 Posts
Pretty good write-up, but I'm scratching my head as to why you went through all the trouble of cutting that brace, and then using little pieces of it, when you could have just dropped the front damper assemblies out in like 5 minutes per side? Those braces might actually be helpful at keeping the shock tower sheet metal from flexing between the UCA mount bolts during hard cornering.
Also, by removing the damper assemblies, there would be much less chance of damage to the dampers when trying to maneuver the UCA's out from under the shock tower.
Oh yeah, how did you support the knuckle while the upper ball joint was unbolted? I typically put several zip-ties together and tie the knuckle around some part of the chassis.
I ask these questions because I swapped out my upper control arms w/ OEM replacements three times in the past few months, and I found that by far the easiest solution is to unbolt and remove the spring/shock assemblies. I'm to the point now where I can swap out an upper control arm in about 45 minutes per side, assuming that the upper ball joint doesn't give me too much trouble.
09-17-2007, 06:40 AM
#6
Honda-Tech Member
Thread Starter
Join Date: Jul 2006
Location: VA
Posts: 860
Likes: 0
Received 0 Likes
on
0 Posts
<TABLE WIDTH="90%" CELLSPACING=0 CELLPADDING=0 ALIGN=CENTER><TR><TD>Quote, originally posted by PatrickGSR94 »</TD></TR><TR><TD CLASS="quote">I'm scratching my head as to why you went through all the trouble of cutting that brace, and then using little pieces of it, when you could have just dropped the front damper assemblies out in like 5 minutes per side?</TD></TR></TABLE>
The reason I kept them is that the first time I was messing with the driver side I noticed there was a small gap on either side of the where that 17mm bolt/bushing comes through the shock tower. It kind of bothered me so I wanted to put some sort of washer there to so I wasn't worried about it later. It probably wasn't necessary at all and it took a lot more time than was required, but I would have kept wondering about it. So basically I guess it was just personal preference.
<TABLE WIDTH="90%" CELLSPACING=0 CELLPADDING=0 ALIGN=CENTER><TR><TD>Quote, originally posted by PatrickGSR94 »</TD></TR><TR><TD CLASS="quote">
Also, by removing the damper assemblies, there would be much less chance of damage to the dampers when trying to maneuver the UCA's out from under the shock tower.</TD></TR></TABLE>
Yeah, I think I typed that in there somewhere, or at least said recommended being careful, especially on the dremel step. If not, I will go back in and mention that it is safer to remove the spring/shock. With my new teins I was just trying to be very careful.
<TABLE WIDTH="90%" CELLSPACING=0 CELLPADDING=0 ALIGN=CENTER><TR><TD>Quote, originally posted by PatrickGSR94 »</TD></TR><TR><TD CLASS="quote">
Oh yeah, how did you support the knuckle while the upper ball joint was unbolted?</TD></TR></TABLE>
Believe it or not I actually didn't have to use any support for the knuckle was I had the upper ball joint unbolted. Mine just kind of sat there. I was looking around for anything it may have been putting stress on, but it wasn't pulling away from the car much.
Also, this was my first time doing the camber kit install myself so if there are anymore things that can be changed/ommitted, I am always open to suggestion.
09-17-2007, 07:30 AM
#7
Honda-Tech Member
iTrader: (1)
Join Date: Jan 2002
Location: Nowhere and Everywhere
Posts: 29,530
Likes: 0
Received 52 Likes
on
46 Posts
I was always afraid that the weight of the brake rotor/caliper would make the knuckle tilt away and pull the inner CV boot out of socket. That is NEVER fun when that happens (I've dealt with that on a couple of different cars).
Trending Topics
09-17-2007, 07:55 AM
#8
Honda-Tech Member
Thread Starter
Join Date: Jul 2006
Location: VA
Posts: 860
Likes: 0
Received 0 Likes
on
0 Posts
Yeah it would probably be a lot safer to tie it back with something. I did notice, and it can be seen in a few of the pics, that my boot had torn on the inner cv on the side closest to the half shaft not too long before I did the install. There was grease everywhere. Luckily I am in the process of rebuilding the motor and tranny so I will have a chance to fix all that at one time.
Edit: Patrick, I went ahead and added that in one of the steps. Definately a good thing to make people aware of.
Modified by gsrob at 9:35 AM 9/17/2007
Edit: Patrick, I went ahead and added that in one of the steps. Definately a good thing to make people aware of.
Modified by gsrob at 9:35 AM 9/17/2007
09-18-2007, 06:43 PM
#10
Honda-Tech Member
Thread Starter
Join Date: Jul 2006
Location: VA
Posts: 860
Likes: 0
Received 0 Likes
on
0 Posts
<TABLE WIDTH="90%" CELLSPACING=0 CELLPADDING=0 ALIGN=CENTER><TR><TD>Quote, originally posted by slammed_93_hatch »</TD></TR><TR><TD CLASS="quote">honestly it is about 100 times easier just to undo the two nuts that hold the coilover assembly to the chassis.</TD></TR></TABLE>
If you just undo the 2 nuts at the top of the strut you will probably be undoing the 17mm nut and bolt below on the wishbone too so that the strut can sit further down. Regardless, here is what I put in the write up when I posted it...
<TABLE WIDTH="90%" CELLSPACING=0 CELLPADDING=0 ALIGN=CENTER><TR><TD>Quote, originally posted by gsrob »</TD></TR><TR><TD CLASS="quote">I'm sure there are many other ways of doing this too, this is just the one that I found easiest and quickest. It may be easier not to damage your spring/strut assembly if they are completely removed from the car. If it is removed just ignore steps 6-9 as hopefully the rest of the guide can still help you.</TD></TR></TABLE>
09-23-2007, 05:39 PM
#12
Honda-Tech Member
Thread Starter
Join Date: Jul 2006
Location: VA
Posts: 860
Likes: 0
Received 0 Likes
on
0 Posts
I actually just replied to your other post as well. I haven't noticed any unusual marks or anything on the shock tower nor have I heard anything while driving. I just had the wheels off two days ago as well. I will check again tomorrow morning but as far as I know there has been no problem at all. My car is pretty low, I have the coilovers about a 1-1/4" raised from the lowest setting. The tires are just higher than being tucked in the fender. Sounds to be about the same height as your car (from what I read in the other post).
09-28-2007, 01:49 AM
#15
Honda-Tech Member
Thread Starter
Join Date: Jul 2006
Location: VA
Posts: 860
Likes: 0
Received 0 Likes
on
0 Posts
You only have to get that little tie brace thing off it you aren't taking the strut assembly out. It can be knocked off with a hammer or cut in half, which I found easier. Also, there was some concern that it may help with support of the shock tower. I was able to literally bend it in half with on hand so I highly doubt it is very critical, especially with a new, stronger upper control arm. The new control arm can probably be installed without the pieces, I just felt more comfortable having a "washer" or whatever on top to so it made contact with more of the shocktower.
09-28-2007, 08:16 AM
#16
Honda-Tech Member
Join Date: Nov 2005
Location: San Francisco,, ca, USA
Posts: 1,531
Likes: 0
Received 0 Likes
on
0 Posts
ok...just wondering since i didnt' know what it was for. i may just take the coilover out since its so easy to get to. and reinstall that tie piece the way it came out.
10-02-2007, 09:12 AM
#17
Banned

Join Date: Apr 2002
Location: Going Back 2 Cali
Posts: 889
Likes: 0
Received 0 Likes
on
0 Posts
That was a good write up
Only suggestion, which has been pointed out in prior replys, would be to remove the front coilovers. This will keep you from cutting the brace... Another time saving option would be to run the Skunk2 Pro Series Plus Camber Kit. See pictures below.
Skunk2 offers 3 versions: Classic/ Tuner Series (most similar to the Blox unit used), Pro Series, and Pro Series Plus.
The "Classic" or "Tuner Series" front camber kits are very similar to the Blox item pictured above & below... the only real difference other then the obvious color difference would be an improvement we made to the washers under the bolts that hold the ball-joint in place.
You can see here that the Blox version uses little round washers to apply pressure to the Upper Control Arm...
The Skunk2 unit uses a rectangle washer that destributes pressure and eliminated the chance of the bolts and washers getting pulled through the arm under heavy abuse.

The "Pro Series" Camber Kits use the same arm as the "Classic" but incorporates a NEW ball-joint design that makes it easier to adjust the the ball-joint position, improves clearence (slightly), and is much stronger due to a full top plate.


The "Pro Series Plus" Camber Kits are esentailly the same as the Pro Series but with one very thoughtful addition... new shock tower anchors and brackets using Skunk2 Low Deflection Urathane Bushings, making it the most complete camber kit on the market.

Again, great write up and I hope this helps all you DIY guys!
Only suggestion, which has been pointed out in prior replys, would be to remove the front coilovers. This will keep you from cutting the brace... Another time saving option would be to run the Skunk2 Pro Series Plus Camber Kit. See pictures below.
Skunk2 offers 3 versions: Classic/ Tuner Series (most similar to the Blox unit used), Pro Series, and Pro Series Plus.
The "Classic" or "Tuner Series" front camber kits are very similar to the Blox item pictured above & below... the only real difference other then the obvious color difference would be an improvement we made to the washers under the bolts that hold the ball-joint in place.
You can see here that the Blox version uses little round washers to apply pressure to the Upper Control Arm...
The Skunk2 unit uses a rectangle washer that destributes pressure and eliminated the chance of the bolts and washers getting pulled through the arm under heavy abuse.
The "Pro Series" Camber Kits use the same arm as the "Classic" but incorporates a NEW ball-joint design that makes it easier to adjust the the ball-joint position, improves clearence (slightly), and is much stronger due to a full top plate.
The "Pro Series Plus" Camber Kits are esentailly the same as the Pro Series but with one very thoughtful addition... new shock tower anchors and brackets using Skunk2 Low Deflection Urathane Bushings, making it the most complete camber kit on the market.
Again, great write up and I hope this helps all you DIY guys!
10-02-2007, 07:56 PM
#18
Honda-Tech Member
Thread Starter
Join Date: Jul 2006
Location: VA
Posts: 860
Likes: 0
Received 0 Likes
on
0 Posts
I appreciate the feedback and the differences ya pointed out on the camber kits! Thanks for the info man.
10-07-2007, 08:39 PM
#19
Honda-Tech Member
Join Date: Oct 2004
Location: NWKC, Wa, United States
Posts: 808
Likes: 0
Received 0 Likes
on
0 Posts
question about the pro series plus...
how do you get the tower anchors and brackets around the coilover/suspension??
is the bracket removable?
unscrew one side of the control arm and work around it? or take off the suspension as well.
how do you get the tower anchors and brackets around the coilover/suspension??
is the bracket removable?
unscrew one side of the control arm and work around it? or take off the suspension as well.
10-10-2007, 12:01 AM
#20
Honda-Tech Member
Join Date: Nov 2005
Location: San Francisco,, ca, USA
Posts: 1,531
Likes: 0
Received 0 Likes
on
0 Posts
i think the easiest way is to take off the suspension/coilover. its not that hard esp if u have coilovers that are low...just unbolt the fork and the shock tower and move it out the way.
10-13-2007, 08:23 PM
#21
Honda-Tech Member
nice write up. i glanced at this thread briefly before i tackled mine. i needed upper ball joints to pass safety, but it was cheaper for me to upgrade to a set of s2 pros than get oem replacements.
+ whatever for removing the shock and fork.
the ball joint separator makes it a lot easier. there's not much room under to get enough momentum going to bang away at the castle nut. sure it can ruin the ball joint, but it's junk anyway.
instead of tying the knuckle up with zip ties or a bungee cord, putting a jack under the lca works great.
the 14mm bolts on the bushings that connect the A arm to the shock tower. is there a factory torque spec on it? is the top of the ball joint plate supposed to be parallel with the top of the bushings, or does it not matter because they'll move a little bit when the car sits?
and who makes replacement bushings for the A arm?
10-19-2007, 05:15 PM
#22
Honda-Tech Member
Join Date: Nov 2005
Location: San Francisco,, ca, USA
Posts: 1,531
Likes: 0
Received 0 Likes
on
0 Posts
just got mine in today....very easy install. i just took off the coilovers since it was so easy to take off. it made taking the upper arm very easy and putting the bracket in was no problem. as of now it didnt seem like it would hit the shock tower but i have to see some more....i got my alignment done too and the best i could do was -1.4 and i made it even on both sides.....so yea.
11-27-2007, 06:45 AM
#25
Honda-Tech Member
iTrader: (1)
Join Date: Jan 2002
Location: Nowhere and Everywhere
Posts: 29,530
Likes: 0
Received 52 Likes
on
46 Posts
<TABLE WIDTH="90%" CELLSPACING=0 CELLPADDING=0 ALIGN=CENTER><TR><TD>Quote, originally posted by dc24me »</TD></TR><TR><TD CLASS="quote">instead of tying the knuckle up with zip ties or a bungee cord, putting a jack under the lca works great.
</TD></TR></TABLE>
the purpose of tying off the knuckle is to keep it from tilting away from the car and pulling the CV axle with it, thus dislodging the inner CV joint (HUGE pain in the rear to get back in place with the axle still on the car, I know from personal experience).
Putting a jack under the LCA won't do anything to keep the knuckle from tilting away while the upper ball joint is unbolted and not holding the top of the knuckle in place.