
Five years and counting: my low budget Integra build
 09-04-2012, 09:56 AM
#1
Honda-Tech Member
Thread Starter
The Green Penny Build.
First I think I have to explain the title of this build. No, the car is not and will not be green. Secondly, it didn’t cost me a penny.
Ask anyone that’s tried to restore an old car – even a newer aged Honda – and they’ll tell you stories about the many green pennies they found stuck in odd places inside the car. I must have pulled out enough for a trip to the Coinstar machine with this one. Pennies, nickels, dimes, even the odd quarter (or fifteen).
My green pennies came from a donated 1999 Integra GSR shell from Steve (bysek) for doing some work on his car. It wasn’t how I pictured it, but it was a clean-titled rust free Integra shell – exactly what I was looking for. All those green pennies were evidence of its life as just another daily commuter. That was all about to change for this car. Hopefully in this build I’ll spend less time on the common stuff everyone already knows and more time detailing the small things. I want to showcase the little custom things that set apart one build from another and not just show everyone a carefully laid out assortment of Earl’s Fittings boxes or Honda clips and bolts.
Five years ago when I as planning and buying for this car a lot of the ideas hadn’t yet been tried. Now that everything has progressed so much within the K series world and Hondas in general I don’t know if this car will be able to hold anyone’s attention. This might just fall into the general “Eh, whatever” category and that’s fine with me. I’m building this car for me and that’s it. So going forward PLEASE note: this is not a race car. It will never be a race car. I don’t own race cars, I don’t drive race cars. I build and drive street cars that sometimes have some go-fast parts on them. I’ve had my hand in building race cars for friends and I know I can’t afford to build, break, and rebuild. But I digress. . . on with the show now that there's some real progress to discuss!
When it arrived on the tow truck I knew I was in for more than I bargained for.
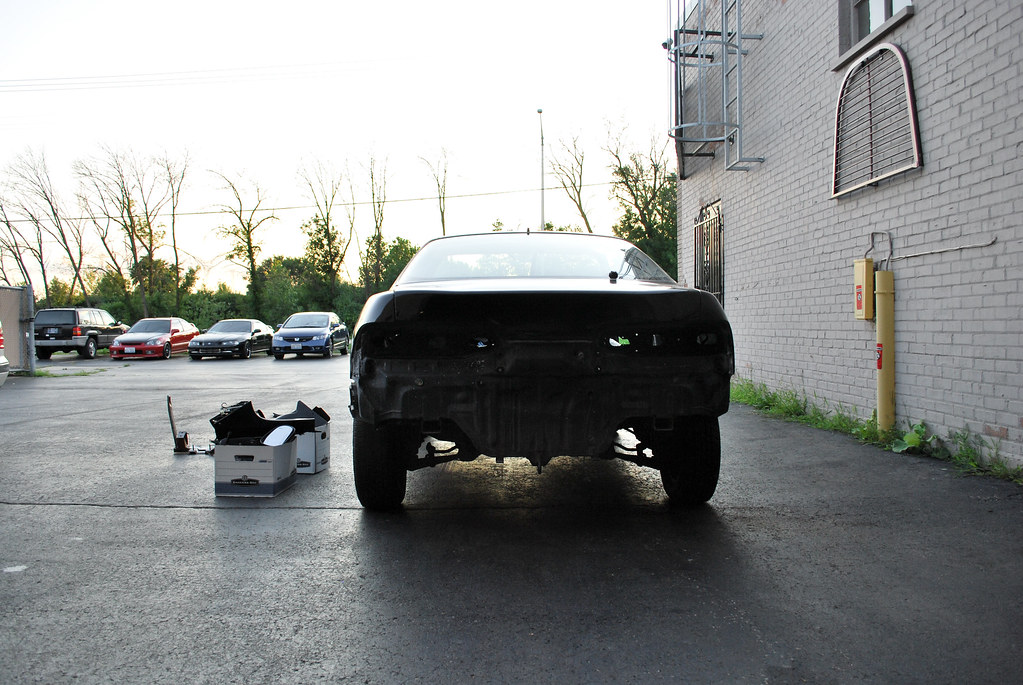

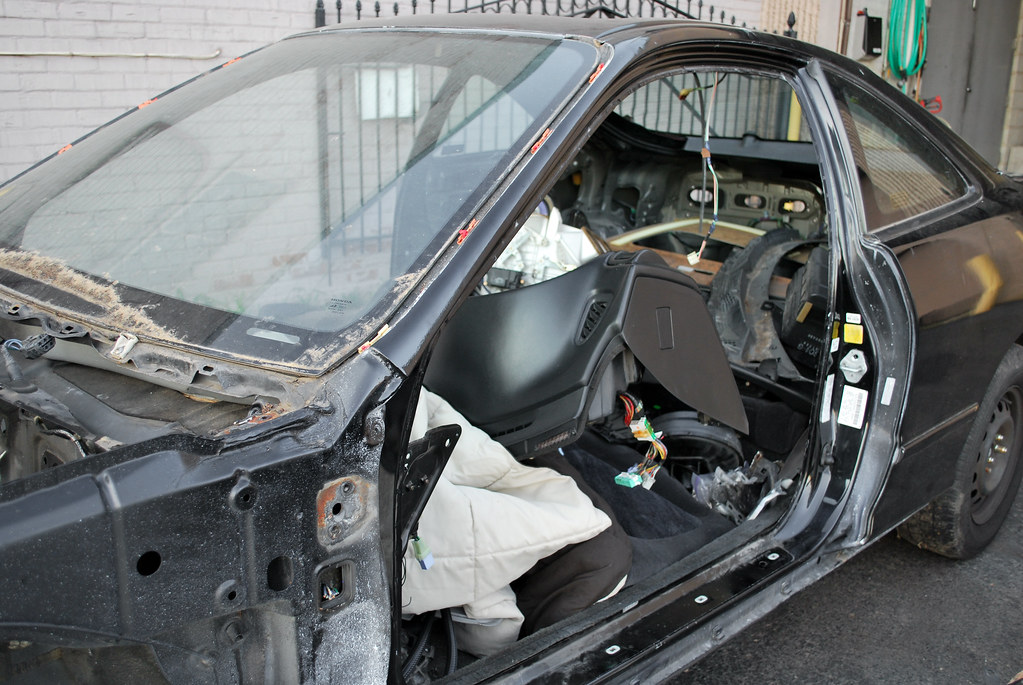
Shell was an apt description and I assured Steve that was all I was looking for. Aside from the boxes of miscellaneous parts I received most of the interior but not as I expected it.
Although it may look clean from the outside I could easily tell the front had been hit and the core support was tweaked. No never mind, I assured Steve I was going with a JDM front anyway. He was scared up until this point I would be disappointed.
I wasn’t even worried about the chopped harnesses throughout the car. I told him I had a complete DC2 harness from an OBD1 donor I never got to work on.
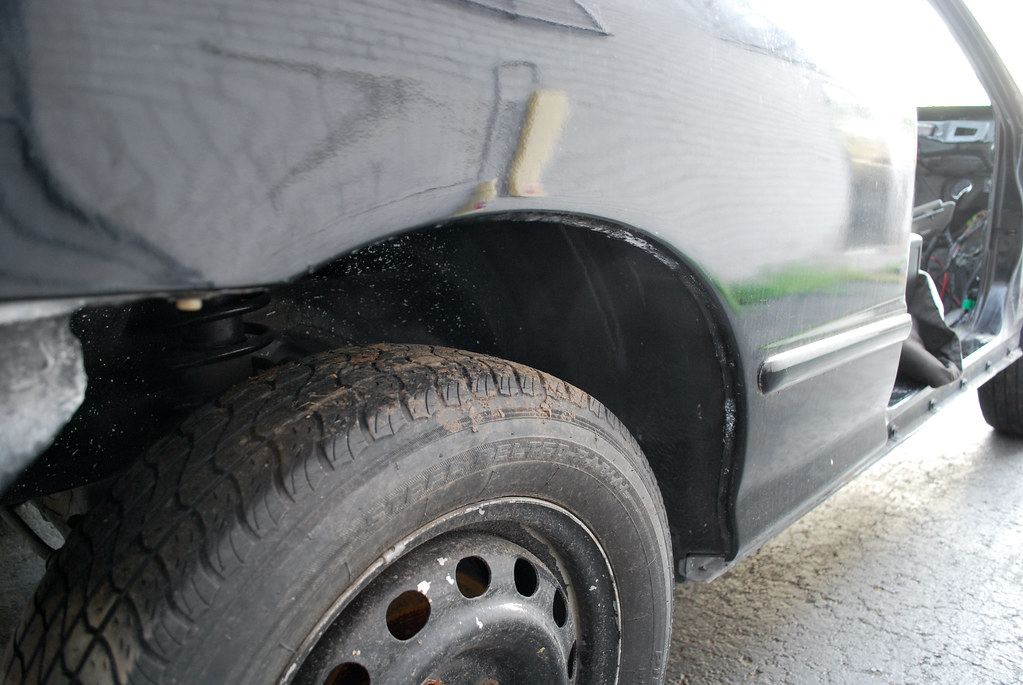
The important aspects to me were a clean title and clean shell. That’s what I got. The quarters were stock and never rotted. I had to deal with that before on my EG project and didn’t want to deal with it again. It’s not a pain but I’m not a body man and would have had to pay to have that repaired.

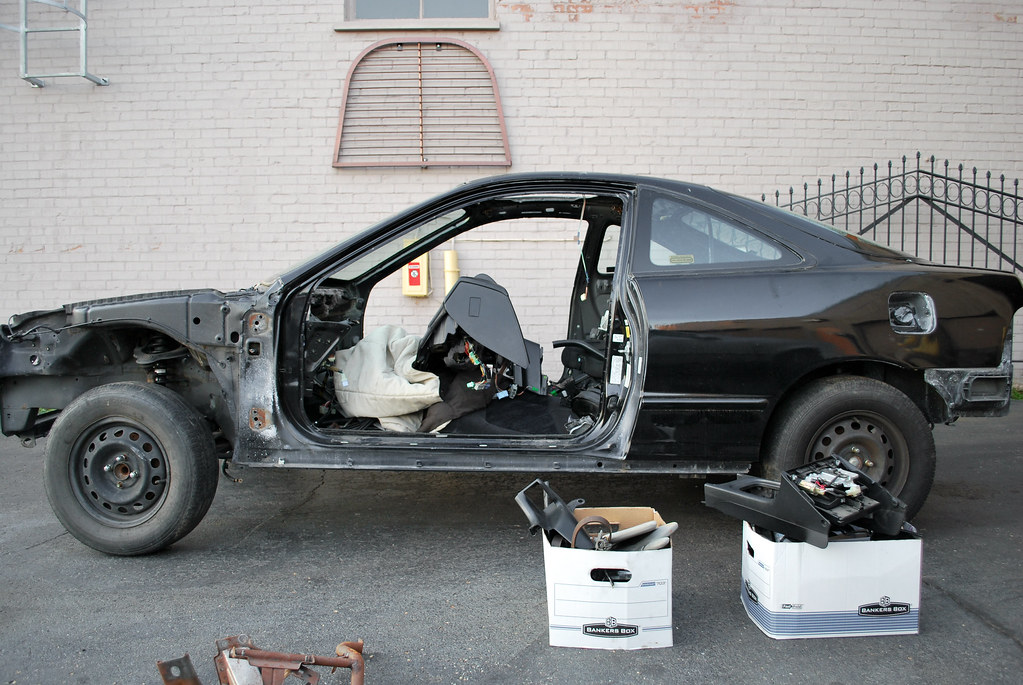
I sure hope everything is in here. I planned to keep heat and A/C so having a complete interior was a must. When I saw pictures of the car it was completely intact. As it arrived I was a little concerned about missing parts. Only time will tell if I got everything!
First I think I have to explain the title of this build. No, the car is not and will not be green. Secondly, it didn’t cost me a penny.
Ask anyone that’s tried to restore an old car – even a newer aged Honda – and they’ll tell you stories about the many green pennies they found stuck in odd places inside the car. I must have pulled out enough for a trip to the Coinstar machine with this one. Pennies, nickels, dimes, even the odd quarter (or fifteen).
My green pennies came from a donated 1999 Integra GSR shell from Steve (bysek) for doing some work on his car. It wasn’t how I pictured it, but it was a clean-titled rust free Integra shell – exactly what I was looking for. All those green pennies were evidence of its life as just another daily commuter. That was all about to change for this car. Hopefully in this build I’ll spend less time on the common stuff everyone already knows and more time detailing the small things. I want to showcase the little custom things that set apart one build from another and not just show everyone a carefully laid out assortment of Earl’s Fittings boxes or Honda clips and bolts.
Five years ago when I as planning and buying for this car a lot of the ideas hadn’t yet been tried. Now that everything has progressed so much within the K series world and Hondas in general I don’t know if this car will be able to hold anyone’s attention. This might just fall into the general “Eh, whatever” category and that’s fine with me. I’m building this car for me and that’s it. So going forward PLEASE note: this is not a race car. It will never be a race car. I don’t own race cars, I don’t drive race cars. I build and drive street cars that sometimes have some go-fast parts on them. I’ve had my hand in building race cars for friends and I know I can’t afford to build, break, and rebuild. But I digress. . . on with the show now that there's some real progress to discuss!
When it arrived on the tow truck I knew I was in for more than I bargained for.
Shell was an apt description and I assured Steve that was all I was looking for. Aside from the boxes of miscellaneous parts I received most of the interior but not as I expected it.
Although it may look clean from the outside I could easily tell the front had been hit and the core support was tweaked. No never mind, I assured Steve I was going with a JDM front anyway. He was scared up until this point I would be disappointed.
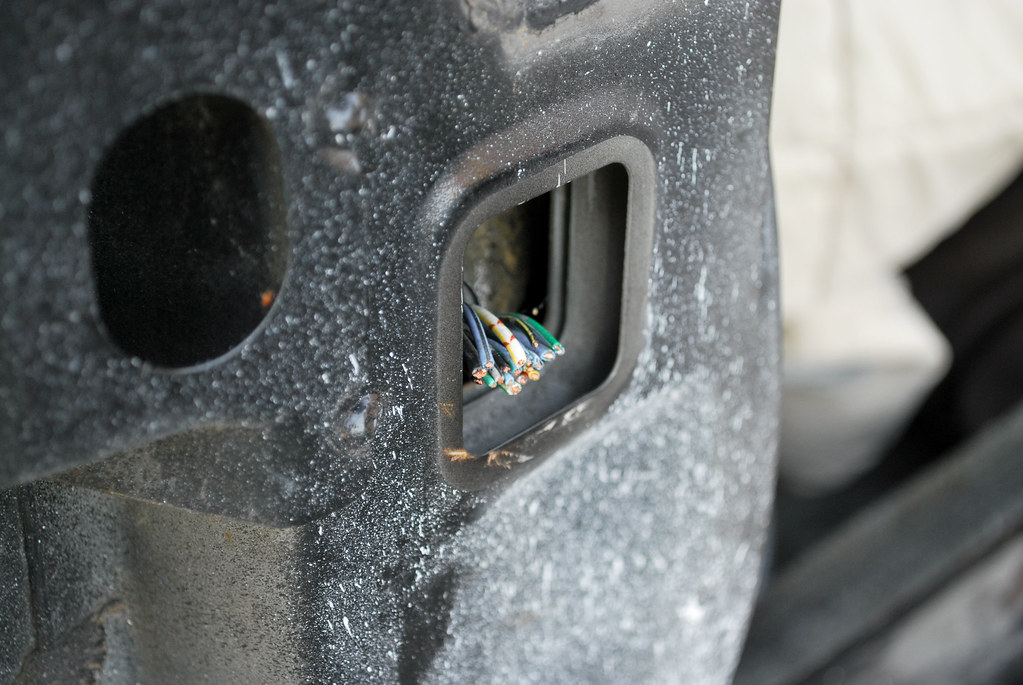
I wasn’t even worried about the chopped harnesses throughout the car. I told him I had a complete DC2 harness from an OBD1 donor I never got to work on.
The important aspects to me were a clean title and clean shell. That’s what I got. The quarters were stock and never rotted. I had to deal with that before on my EG project and didn’t want to deal with it again. It’s not a pain but I’m not a body man and would have had to pay to have that repaired.
I sure hope everything is in here. I planned to keep heat and A/C so having a complete interior was a must. When I saw pictures of the car it was completely intact. As it arrived I was a little concerned about missing parts. Only time will tell if I got everything!
 09-04-2012, 10:54 AM
#2
Honda-Tech Member
Thread Starter
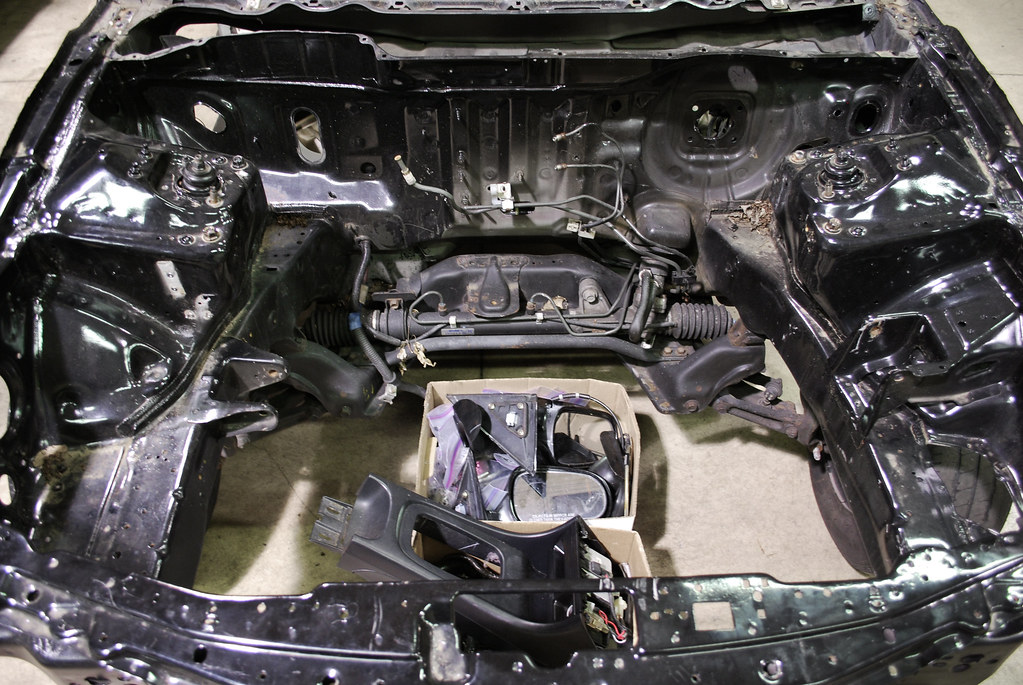
After receiving the shell off the truck I moved it to its new home for what was sure to be months. The guys at Suja 1 were nice enough to give me the best parking spot with ability (and room) to work on all sides of the car at once with the doors open if need be.
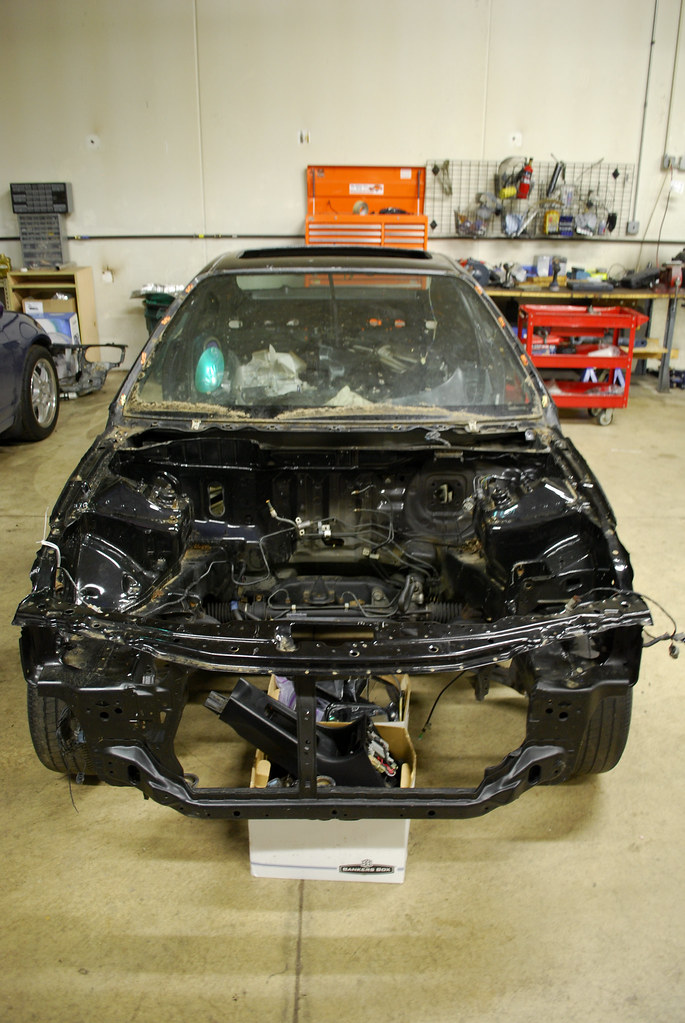
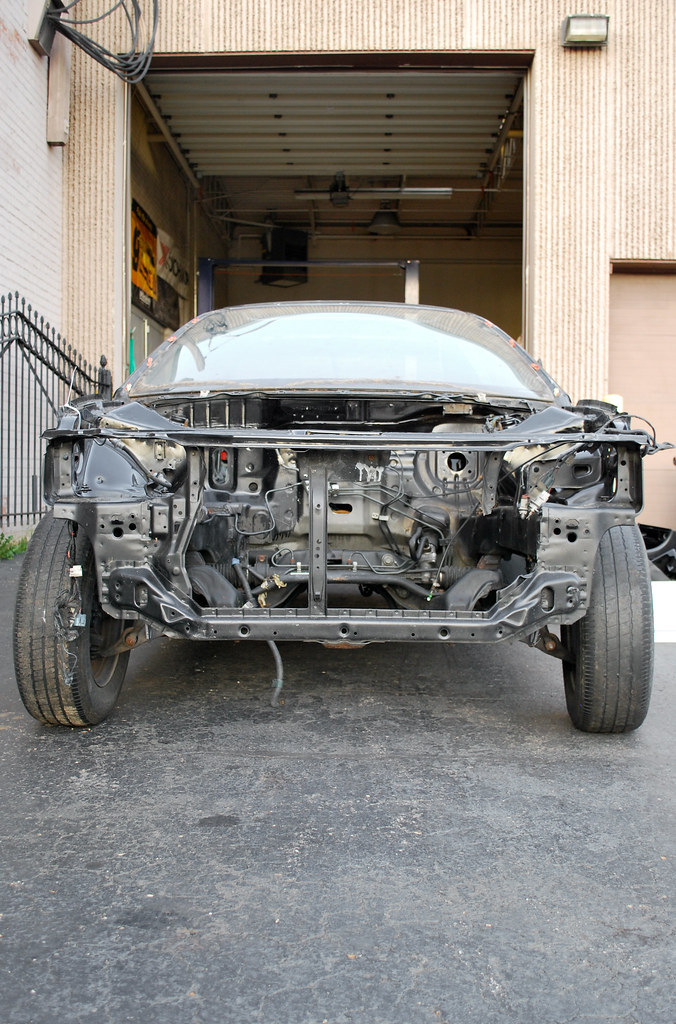
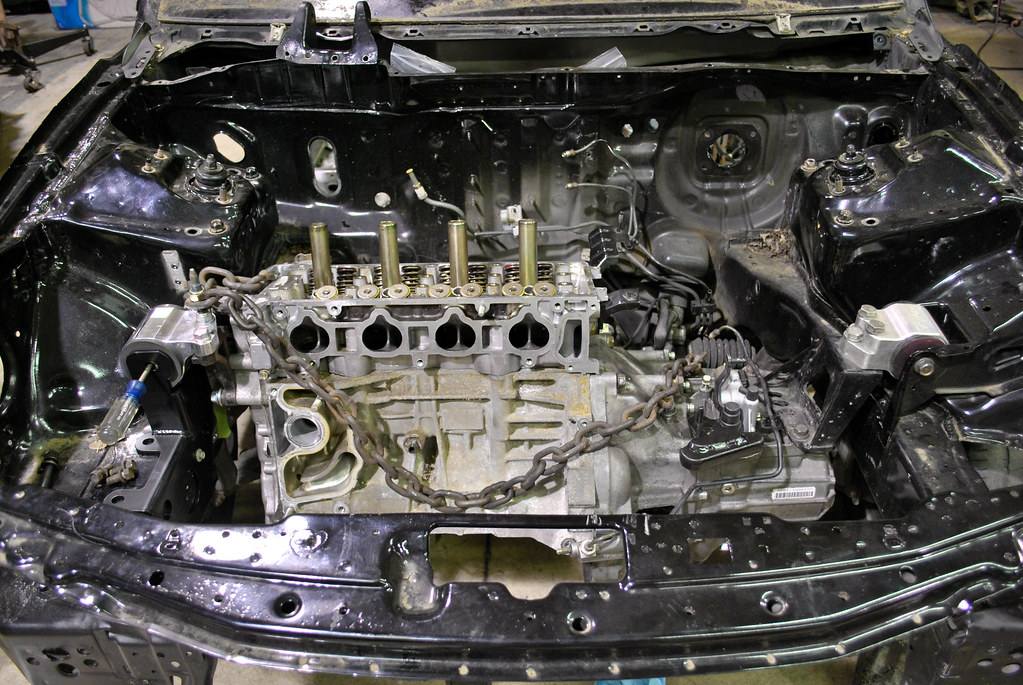
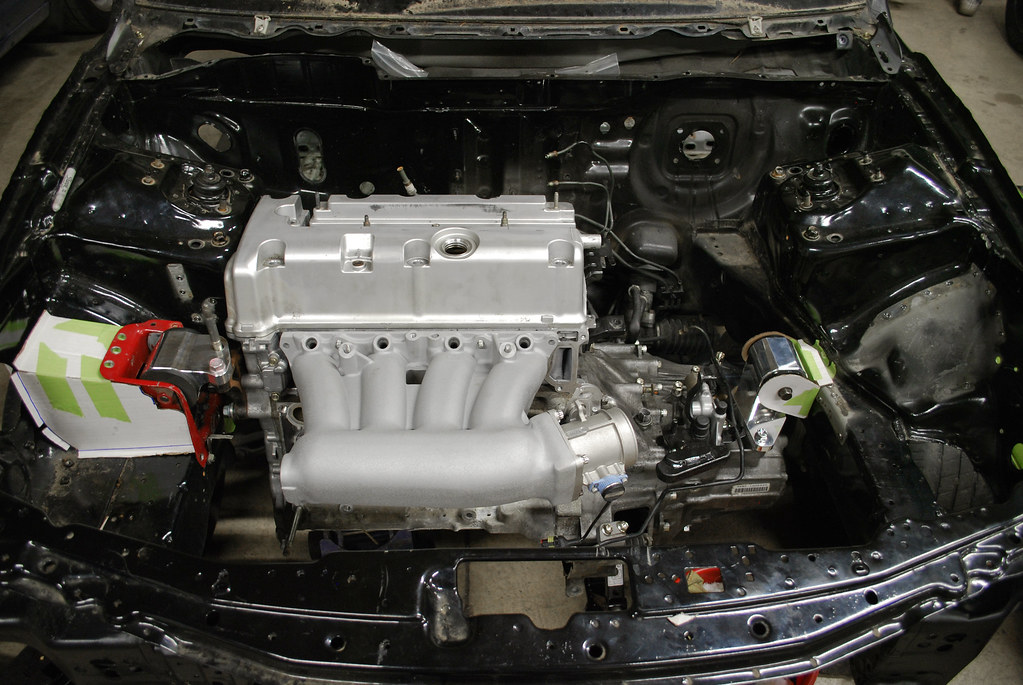
So I got started on what everyone else has already shown in their builds – the engine bay tear down.
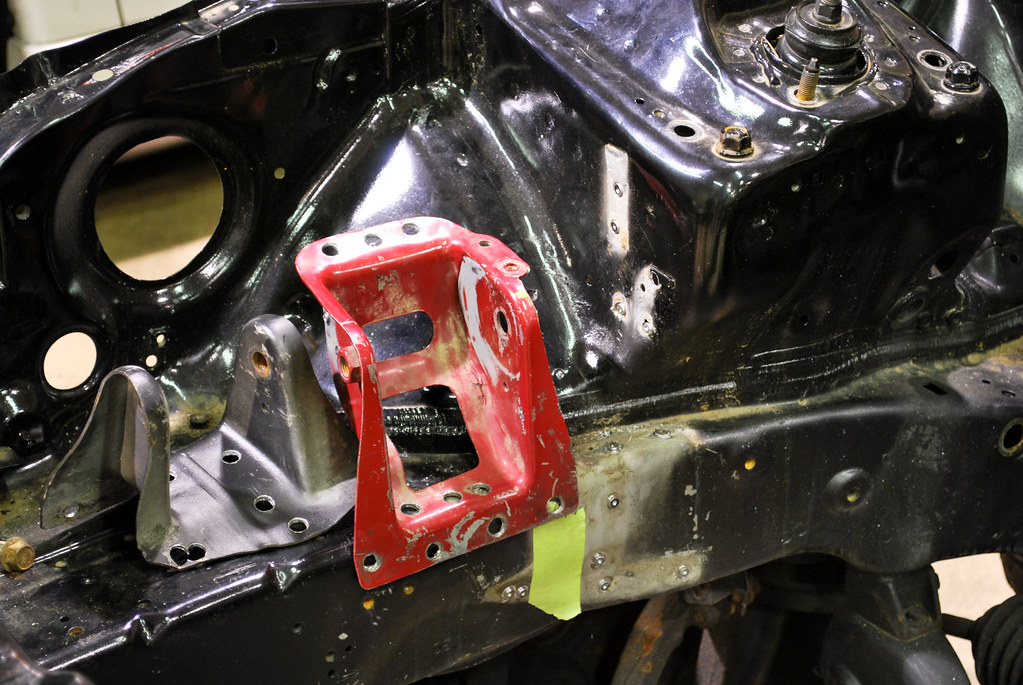
I’m not going to go as far as some with the engine bay work. I do want to clean things up but I don’t want to lose the OEM feeling to it. Unnecessary brackets however were bound for the trash!
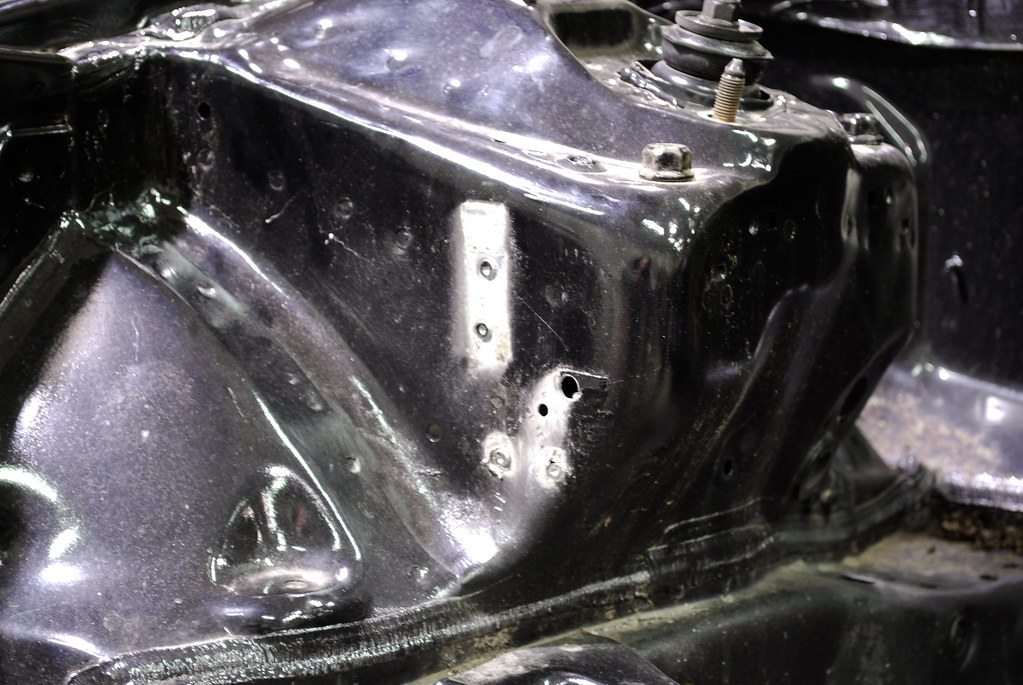
One last look at the stock bay. I wanted to have this picture as a comparison for the “after” shots.
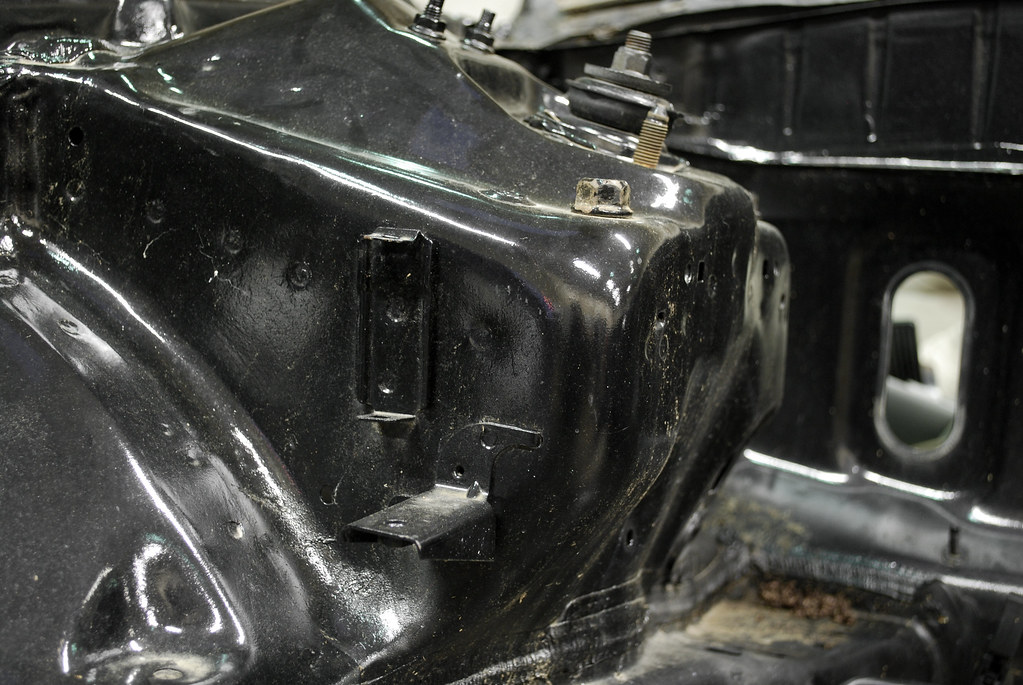
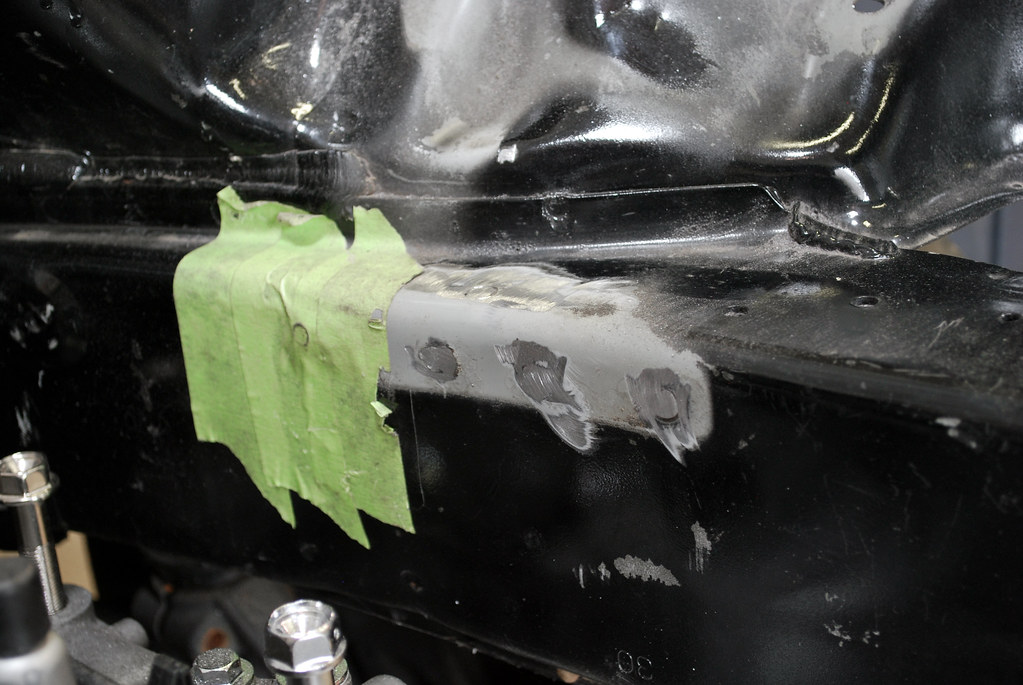
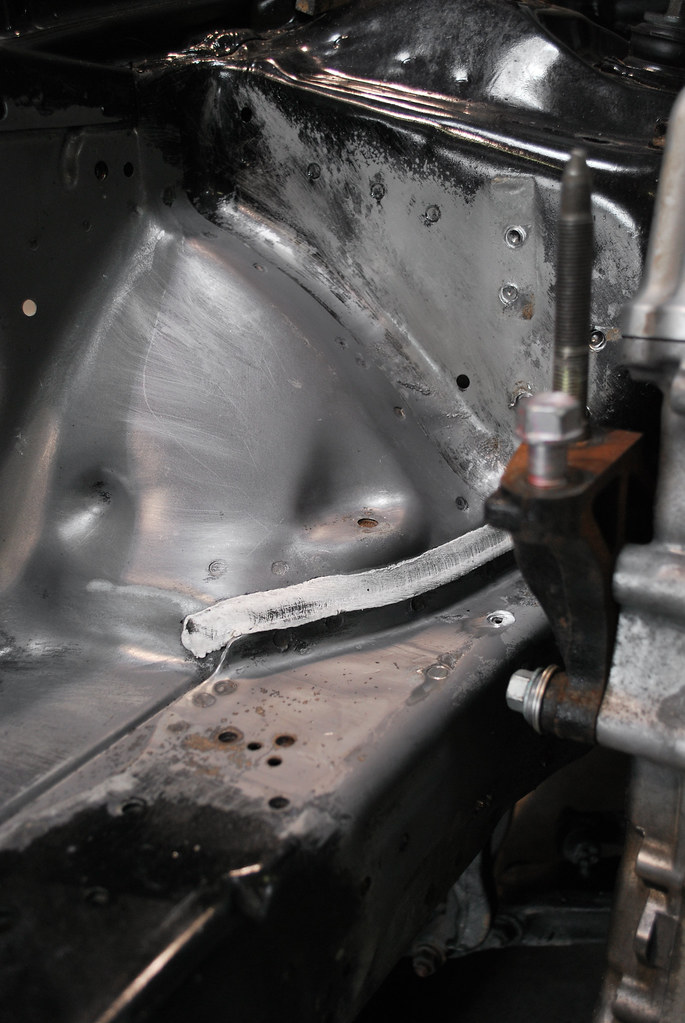
I love drilling spot welds. I don’t know why but I love taking things apart.
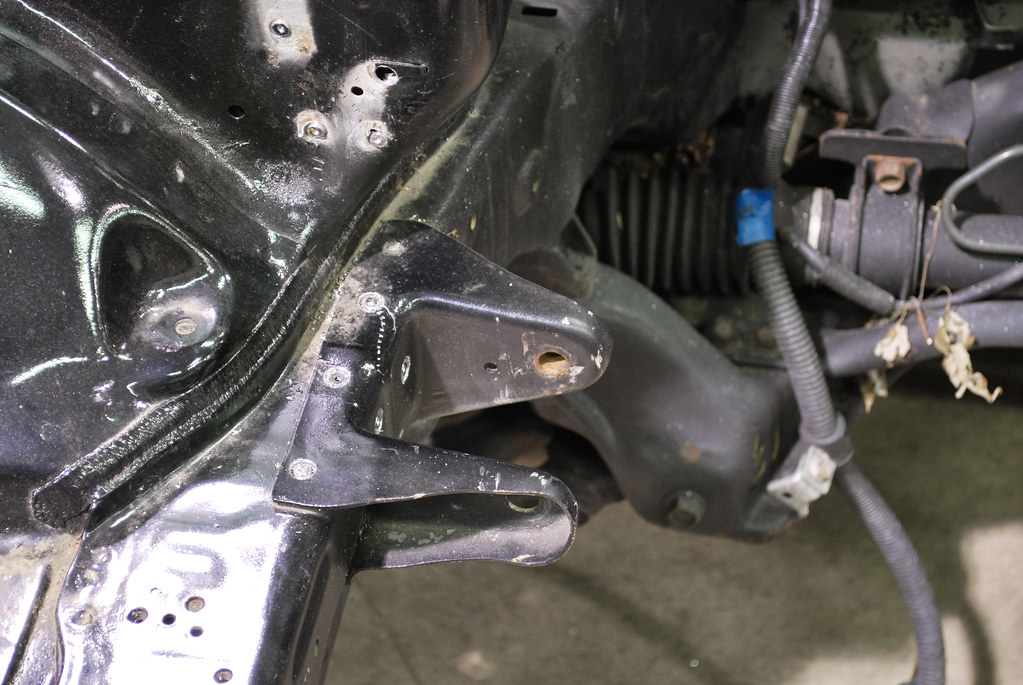
Once this bracket is gone there’s no turning back! Well, not really. The last car I did was supposed to be K swapped so when I got it the bracket had already been drilled out. No bother, the guys at Suja 1 welded a new one in and I was still able to put a B series into it.
This was not to be the case with this car thanks to HASport and a stockpile of K series parts already in my possession.
So I got started on what everyone else has already shown in their builds – the engine bay tear down.
I’m not going to go as far as some with the engine bay work. I do want to clean things up but I don’t want to lose the OEM feeling to it. Unnecessary brackets however were bound for the trash!
One last look at the stock bay. I wanted to have this picture as a comparison for the “after” shots.
I love drilling spot welds. I don’t know why but I love taking things apart.
Once this bracket is gone there’s no turning back! Well, not really. The last car I did was supposed to be K swapped so when I got it the bracket had already been drilled out. No bother, the guys at Suja 1 welded a new one in and I was still able to put a B series into it.
This was not to be the case with this car thanks to HASport and a stockpile of K series parts already in my possession.
09-04-2012, 11:04 AM
#3
Honda-Tech Member
Thread Starter
As stated before, I had been planning this build for a little over five years. Yes, five years. I had a prior shell I was going to use but time and space didn’t allow for it as I already had two projects going on – an EG and EK. The Integra went to the back burner and eventually got donated to someone else. He got as far as caging it before selling it. Maybe it was cursed and forever fated to not get finished. . .
In any case, the guys at HASport were kind enough to help me out some years in between with a set of mounts specifically for this project. I remember calling them up in 2009 and asking some insane questions to satisfy my ridiculous ideas.
Brian isn’t one to leave crazy alone and that’s meant to be a compliment. They’ve made a name for themselves putting engines into car they’re not supposed to so I thought they would be ideal agents for my own undertaking. What could be so weird about putting a K20 into a DC2 chassis at this point? Well, I wasn’t going to be using their kit entirely. In fact, I had to add a little clearance to this piece donated from another car years before.

In order to achieve an OEM look and quell all the haters that say a K looks too foreign in an Integra I wanted to make the swap look as OE a possible and that means NOT using the HASport mounts but working with them to find a way to utilize more OE-looking brackets. More on that in a little bit.
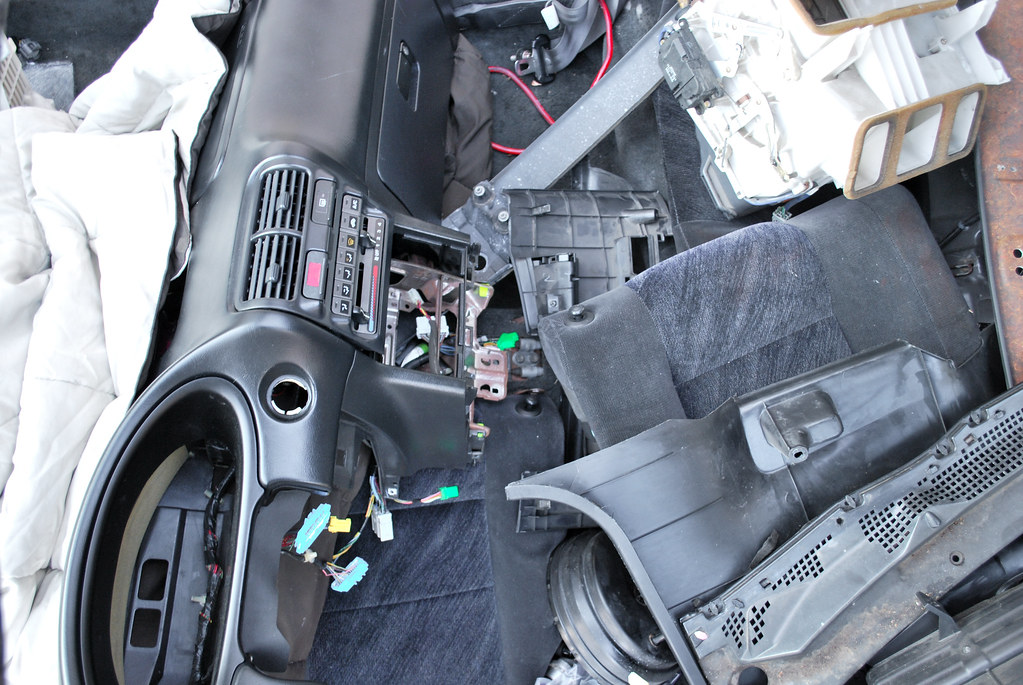
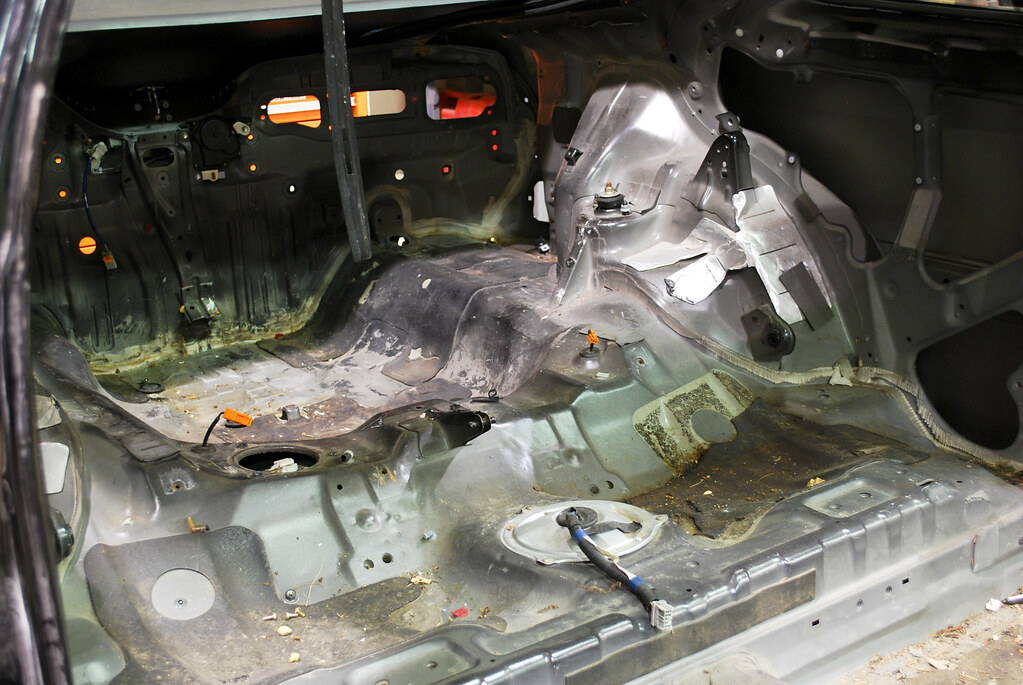
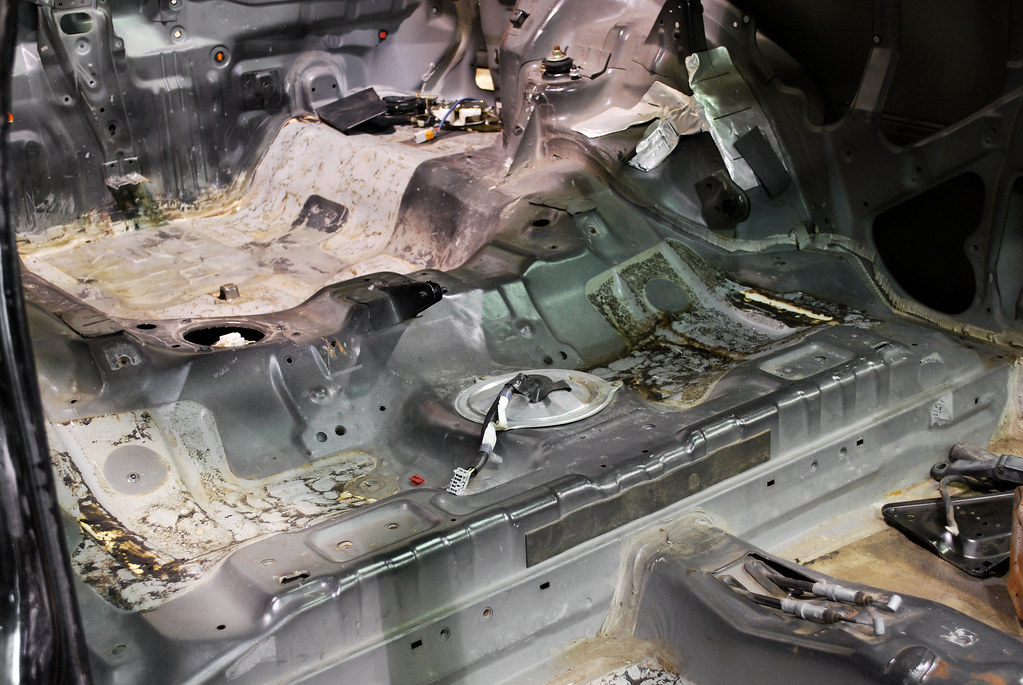
Since I didn’t have a mock-up engine I started on a little interior work.
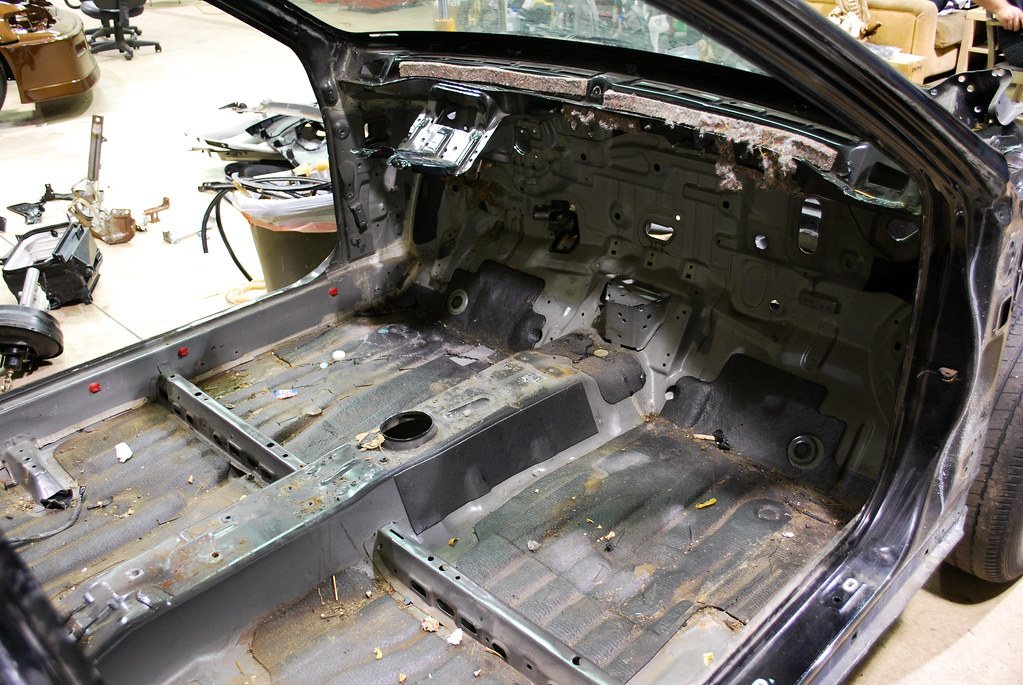
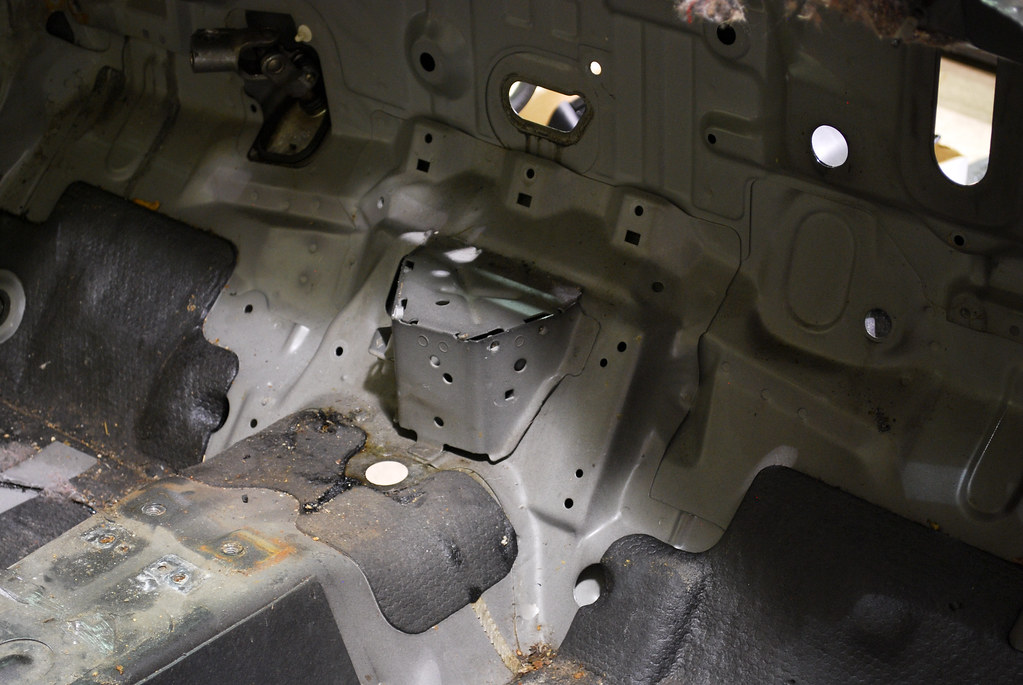
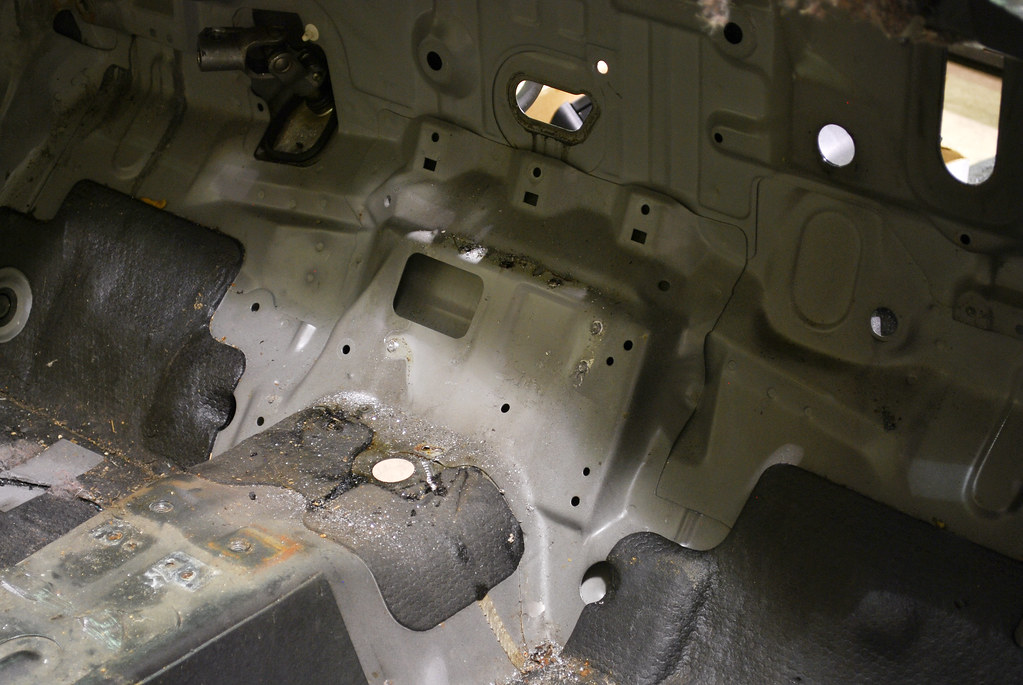
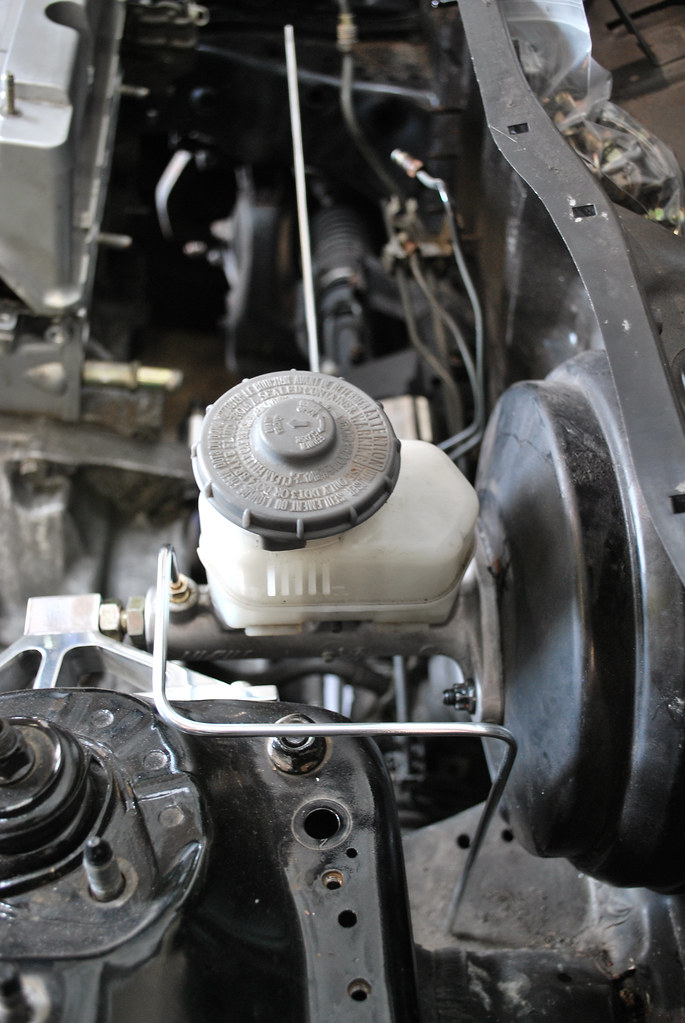
As stated before I was keeping heat and A/C so a brake tuck would have to go under the heater core. This meant out with the SRS control box mount so the proportioning valve could live there.
For all you wondering how to get a brake tuck to work with heat, here you go.
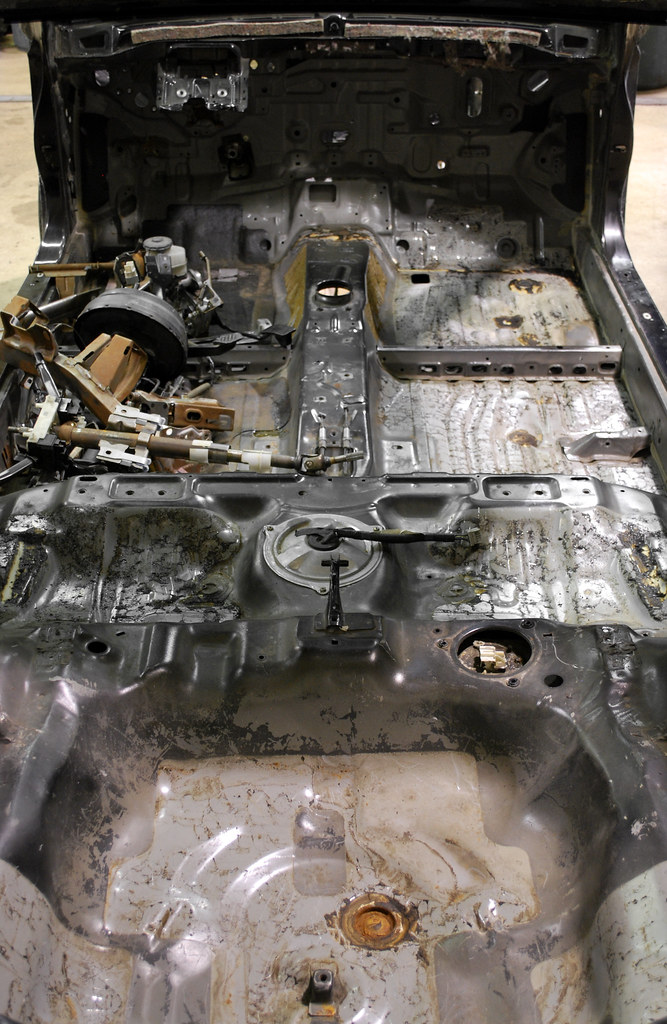
Then I got started on the sound deadening and tar. This is where I made my fortune, peeling and digging coins out of their resting places.
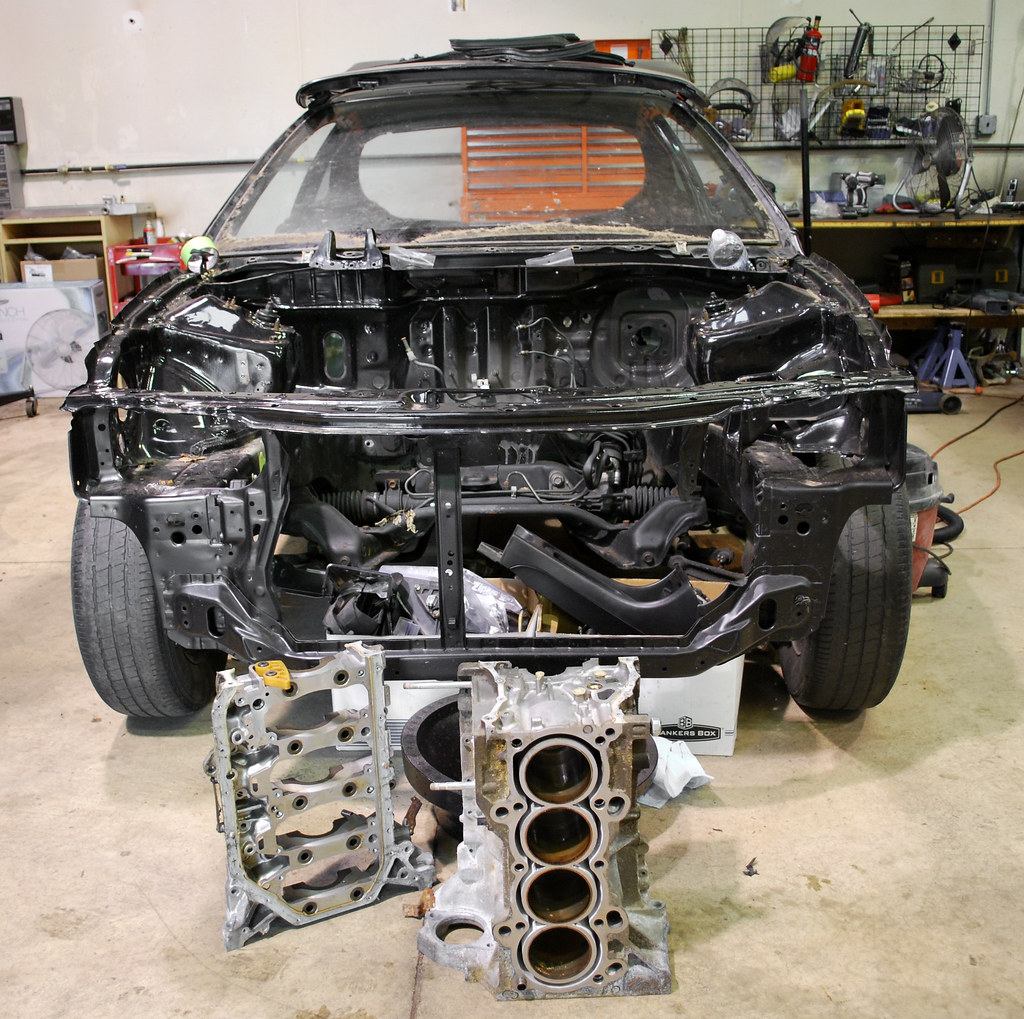
Later that same night a friend and local engine builder dropped off a mock-up block for me to use. Look out for his car soon. It’s quite possibly the only K swap that’s taken longer than mine and that’s a feat!
In any case, the guys at HASport were kind enough to help me out some years in between with a set of mounts specifically for this project. I remember calling them up in 2009 and asking some insane questions to satisfy my ridiculous ideas.
Brian isn’t one to leave crazy alone and that’s meant to be a compliment. They’ve made a name for themselves putting engines into car they’re not supposed to so I thought they would be ideal agents for my own undertaking. What could be so weird about putting a K20 into a DC2 chassis at this point? Well, I wasn’t going to be using their kit entirely. In fact, I had to add a little clearance to this piece donated from another car years before.
In order to achieve an OEM look and quell all the haters that say a K looks too foreign in an Integra I wanted to make the swap look as OE a possible and that means NOT using the HASport mounts but working with them to find a way to utilize more OE-looking brackets. More on that in a little bit.
Since I didn’t have a mock-up engine I started on a little interior work.
As stated before I was keeping heat and A/C so a brake tuck would have to go under the heater core. This meant out with the SRS control box mount so the proportioning valve could live there.
For all you wondering how to get a brake tuck to work with heat, here you go.
Then I got started on the sound deadening and tar. This is where I made my fortune, peeling and digging coins out of their resting places.
Later that same night a friend and local engine builder dropped off a mock-up block for me to use. Look out for his car soon. It’s quite possibly the only K swap that’s taken longer than mine and that’s a feat!
09-04-2012, 01:11 PM
#4
Honda-Tech Member
Thread Starter
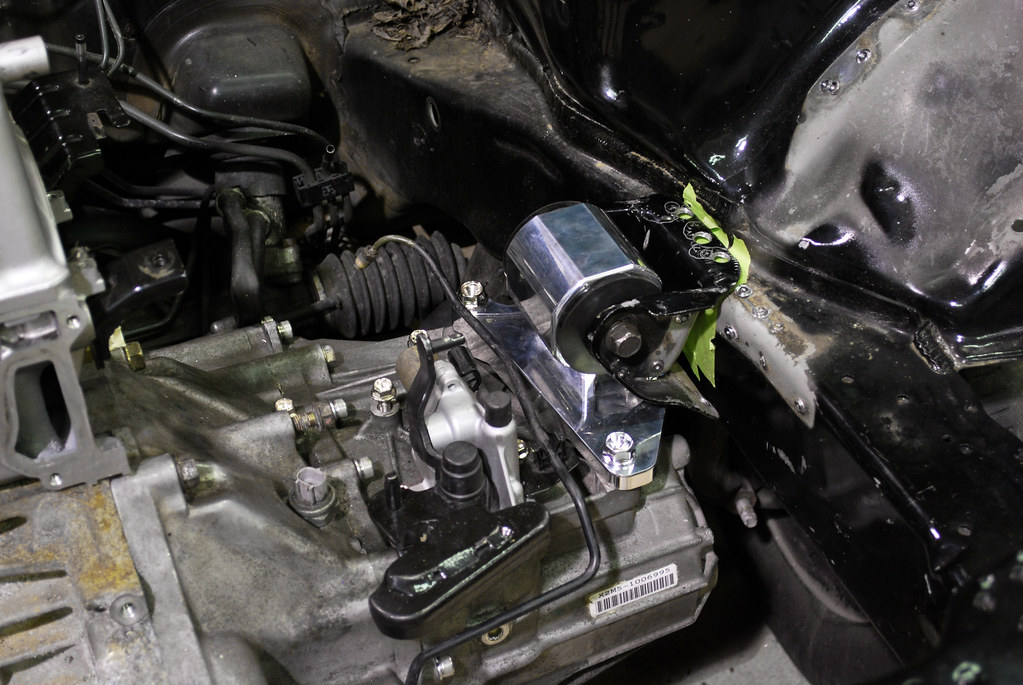
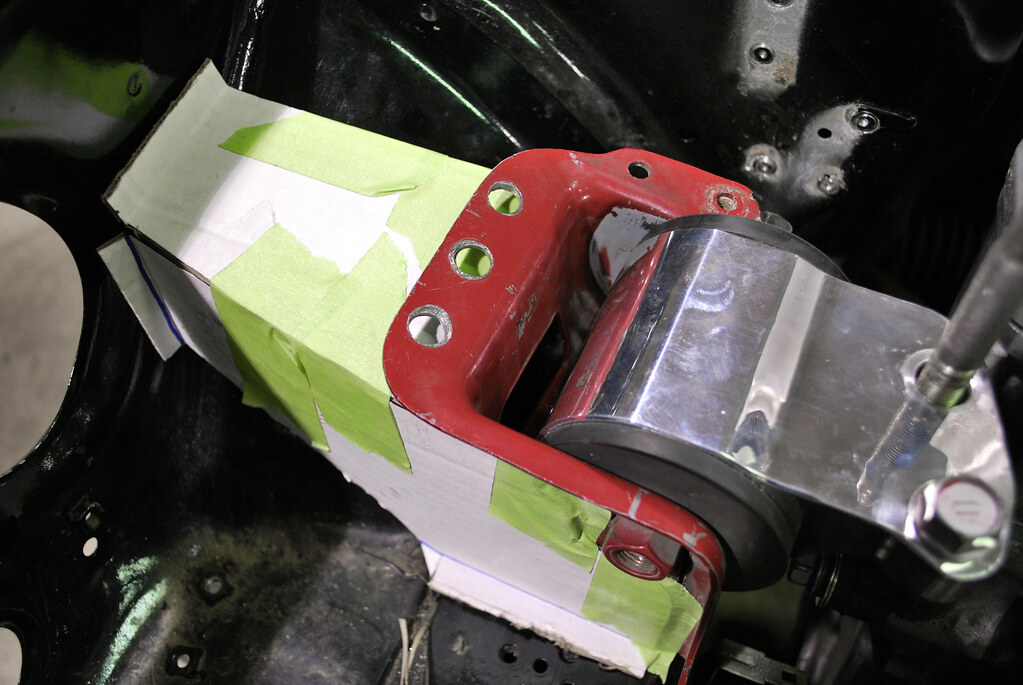
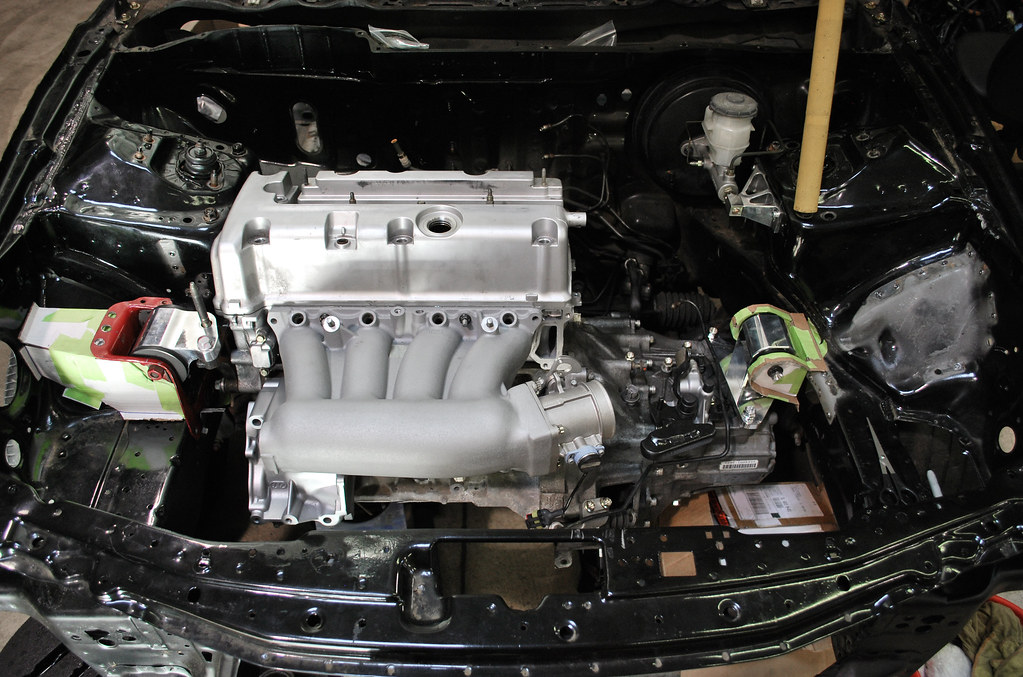
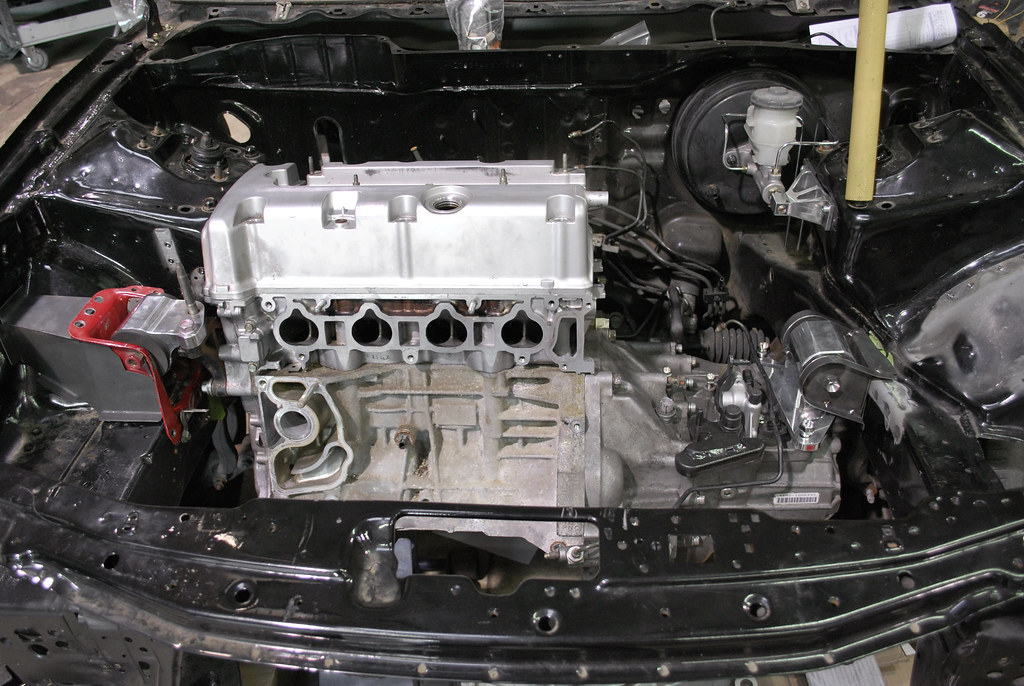
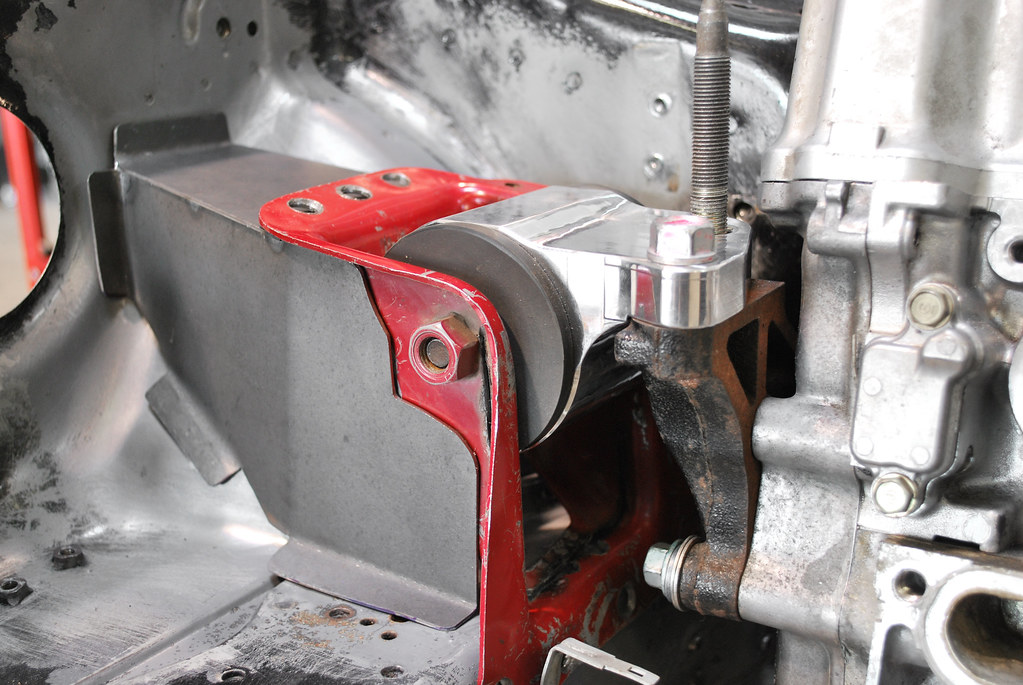
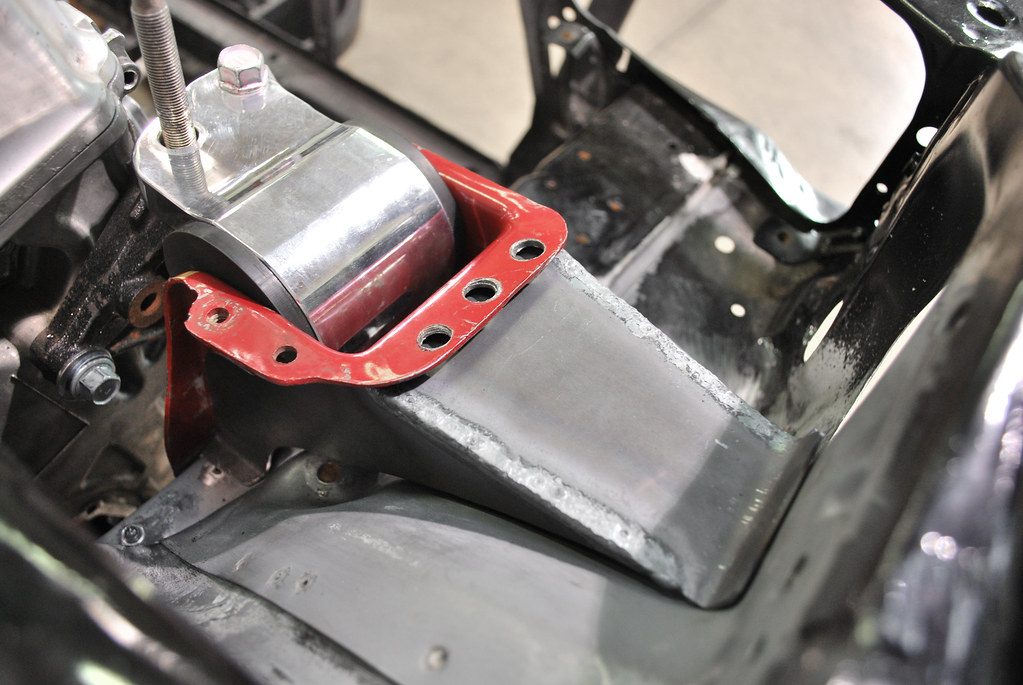
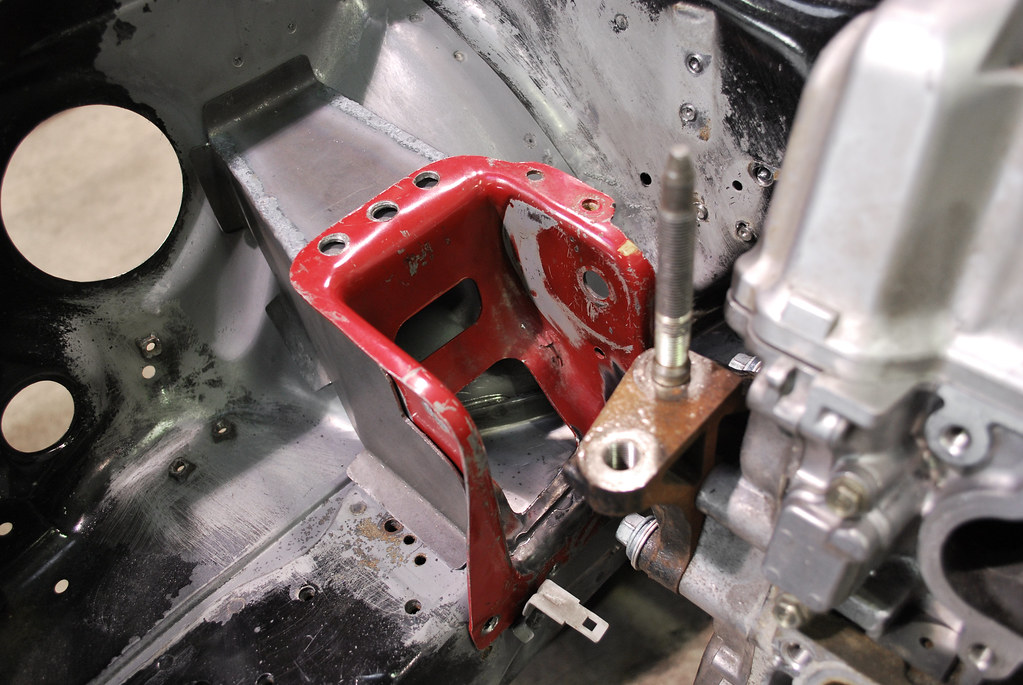
Using my transmission (RSX Type S with an ATS/Carbonetic differential and micronited treated gears courtesy of PB16B from Suja 1) I bolted Charlie’s K20A3 block to KON’s spare K20A2 head and lowered the assembly onto the HASport mounts. This was to ensure proper “stock” clearances and “stock” positioning, These brackets – specifically the driver’s side – are what I was trying to avoid. I know it’s a matter of function over form but damn are they hideously obtrusive!
I then used jacks to support the engine in its conventional location to be able to swap the mounts out and start the task of “guess and check.”

It's hard to tell by the pictures but the front of the engine has been lowered by about half an inch compared to the conventional location. The rear is still bolted in with the HASport billet mount on the HASport subframe bracket. That I wasn't able to change so first I had to check axle clearance.
PB seemed to think this will allow for better axle geometry since they’re shifted up and back slightly. If this was to work out then maybe I’ll use that as my excuse!
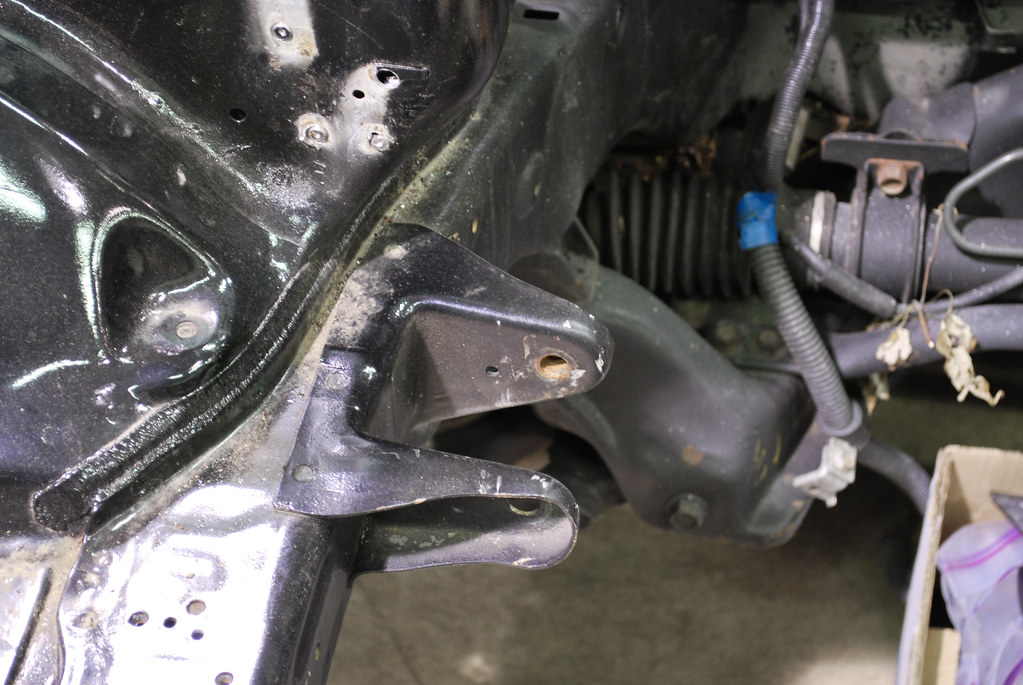
To really reach the point of no return I had to drill out the stock driver’s side mount bracket. I couldn’t work around this and fabricate a replacement mount for the EKK2 transmission mount. The existing bracket interfered with where the replacement had to sit.
In a perfect world, all I would have had to do was move the stock transmission bracket from the passenger frame rail to the driver’s side. This isn’t a perfect world. There was no way to make it work. It wouldn’t even accept the HASport mount.

Then I tried reshaping the bracket I had just removed. It fit the HASport mount but didn’t even come close to lining up with the frame rail. I had to cut a lot of it out to clear the lower part of the billet mount and what remained wasn’t enough.
But seeing it like that gave me hope and another opportunity for a comparison shot. Believe it or not, I thought this idea might actually work!
I then used jacks to support the engine in its conventional location to be able to swap the mounts out and start the task of “guess and check.”
It's hard to tell by the pictures but the front of the engine has been lowered by about half an inch compared to the conventional location. The rear is still bolted in with the HASport billet mount on the HASport subframe bracket. That I wasn't able to change so first I had to check axle clearance.
PB seemed to think this will allow for better axle geometry since they’re shifted up and back slightly. If this was to work out then maybe I’ll use that as my excuse!
To really reach the point of no return I had to drill out the stock driver’s side mount bracket. I couldn’t work around this and fabricate a replacement mount for the EKK2 transmission mount. The existing bracket interfered with where the replacement had to sit.
In a perfect world, all I would have had to do was move the stock transmission bracket from the passenger frame rail to the driver’s side. This isn’t a perfect world. There was no way to make it work. It wouldn’t even accept the HASport mount.
Then I tried reshaping the bracket I had just removed. It fit the HASport mount but didn’t even come close to lining up with the frame rail. I had to cut a lot of it out to clear the lower part of the billet mount and what remained wasn’t enough.
But seeing it like that gave me hope and another opportunity for a comparison shot. Believe it or not, I thought this idea might actually work!
09-04-2012, 02:37 PM
#5
Honda-Tech Member
Thread Starter
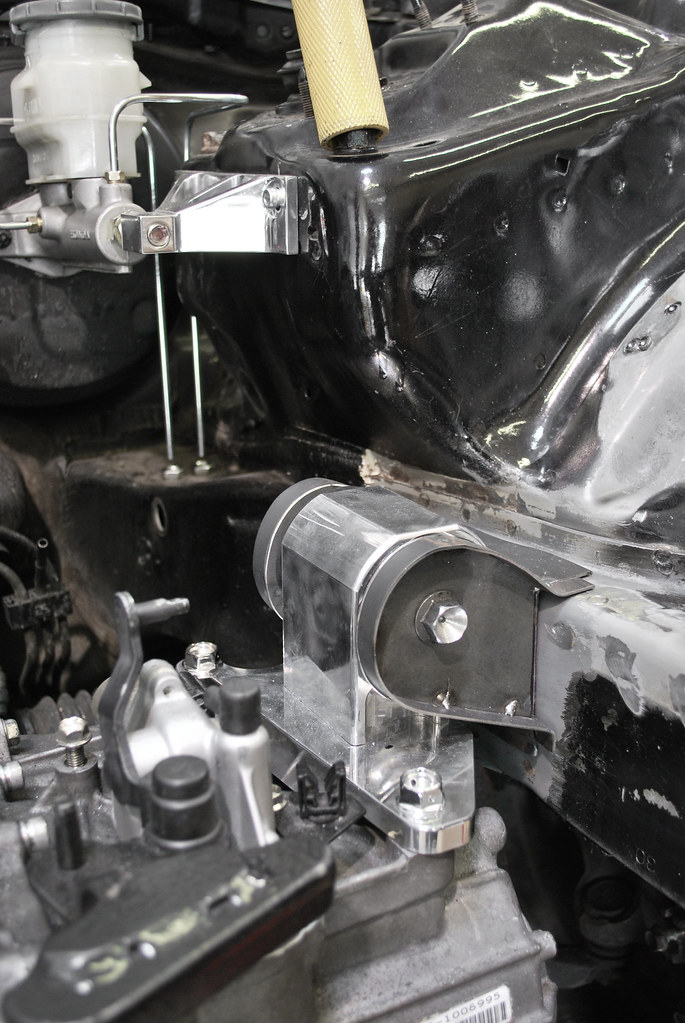
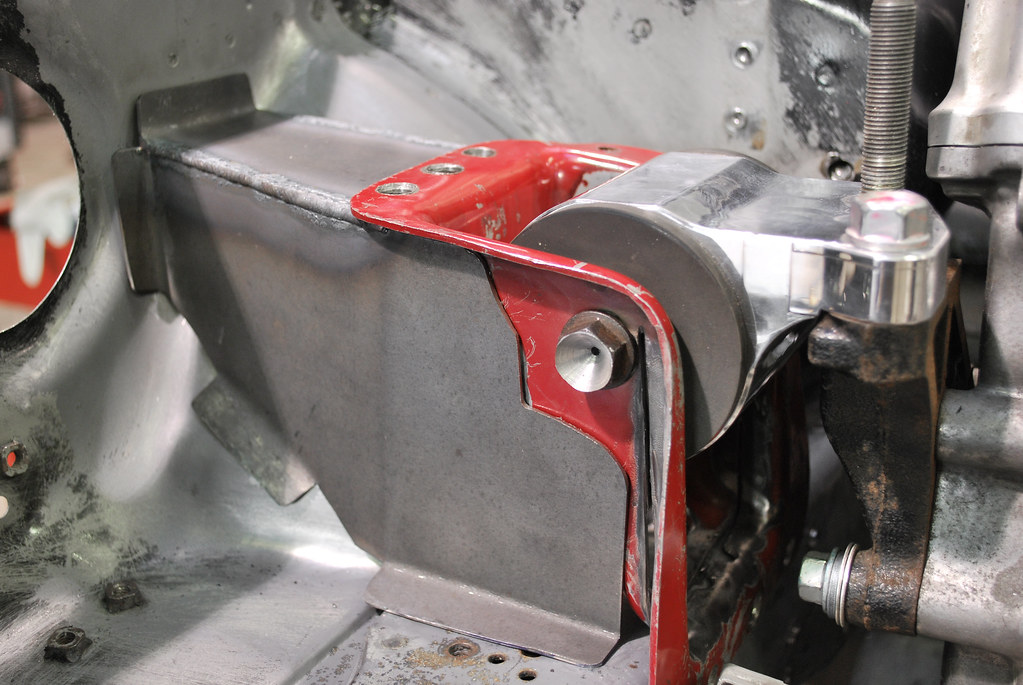
So, seeing as the factory sheet metal wouldn’t be able to be repurposed it was time to get started with some templates for what would work. I began with a cardboard template so that everyone hovering around the project would finally see what I saw in my head all these years.
For positioning’s sake, I used a 6mm bolt with a scrap bracket to help hold the passenger bracket into place. Even though it looks crude it’s strong enough to support the empty engine case and head. I only needed one jack under the transmission at this point.

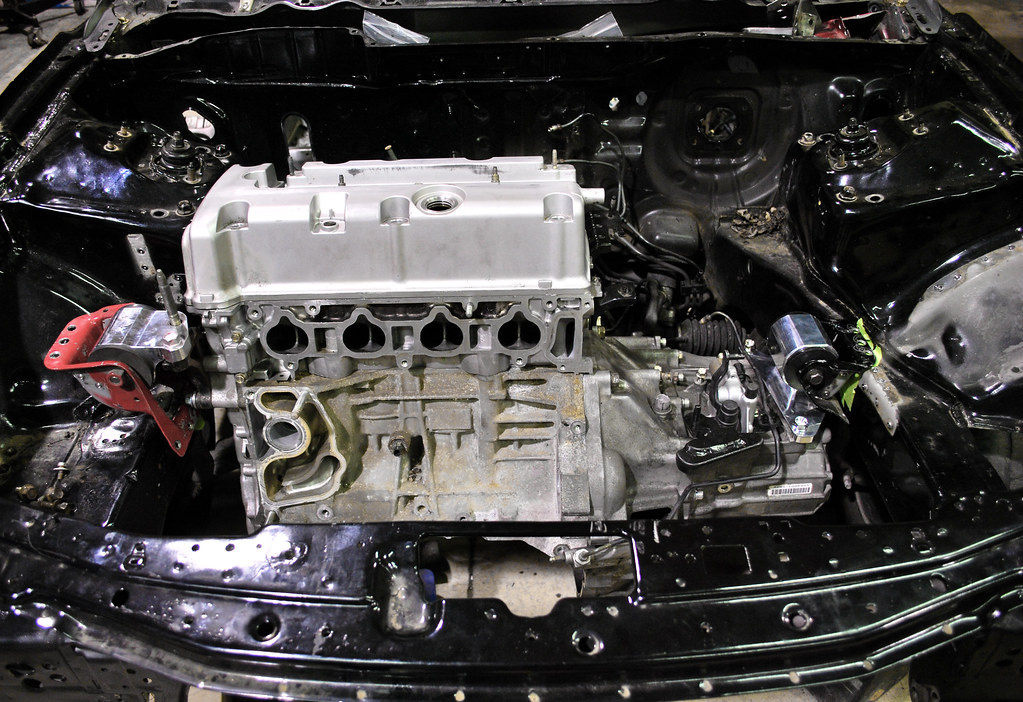
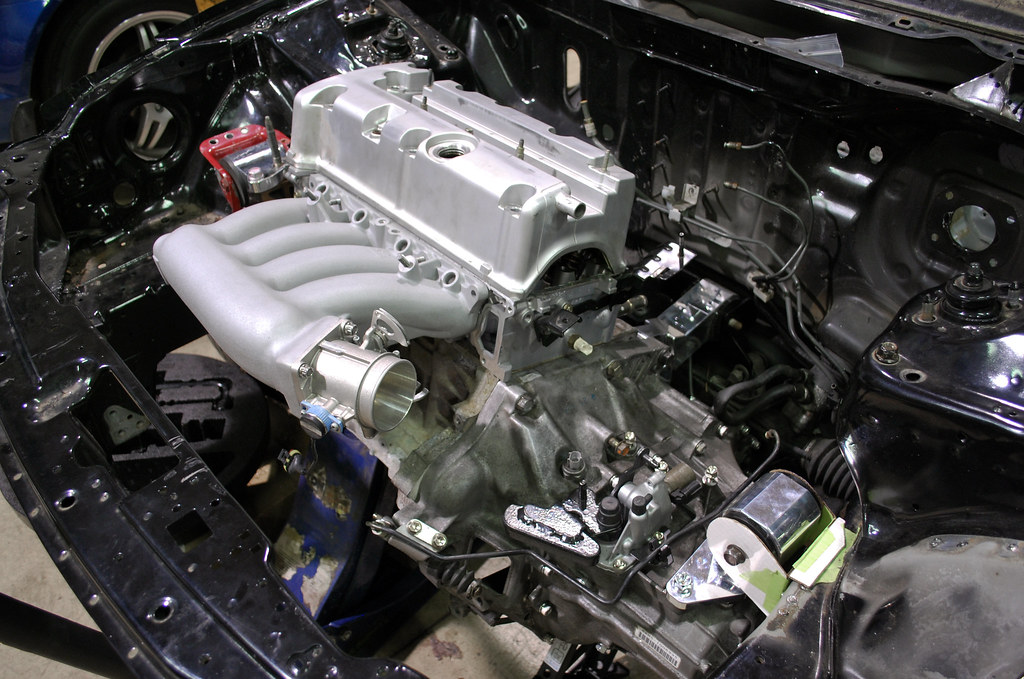
I threw on the intake manifold to make sure the hood would close and there was enough clearance for the radiator. Well, I knew the hood would close because the front was lower but I wanted to make sure a change in the pitch wouldn’t interfere with the radiator. All looked good!
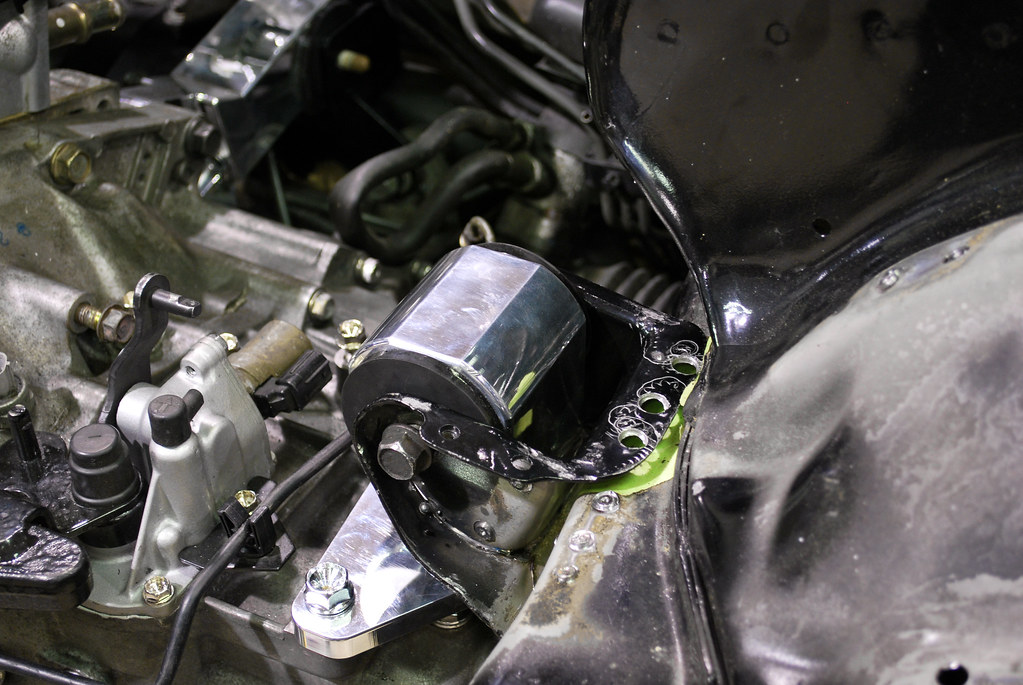
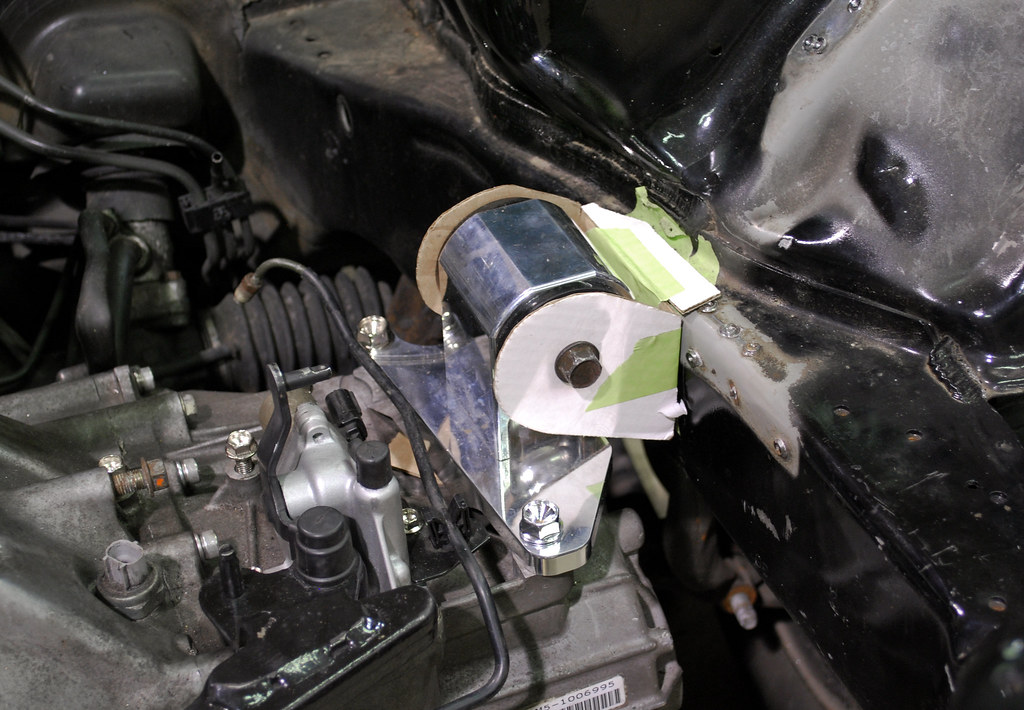
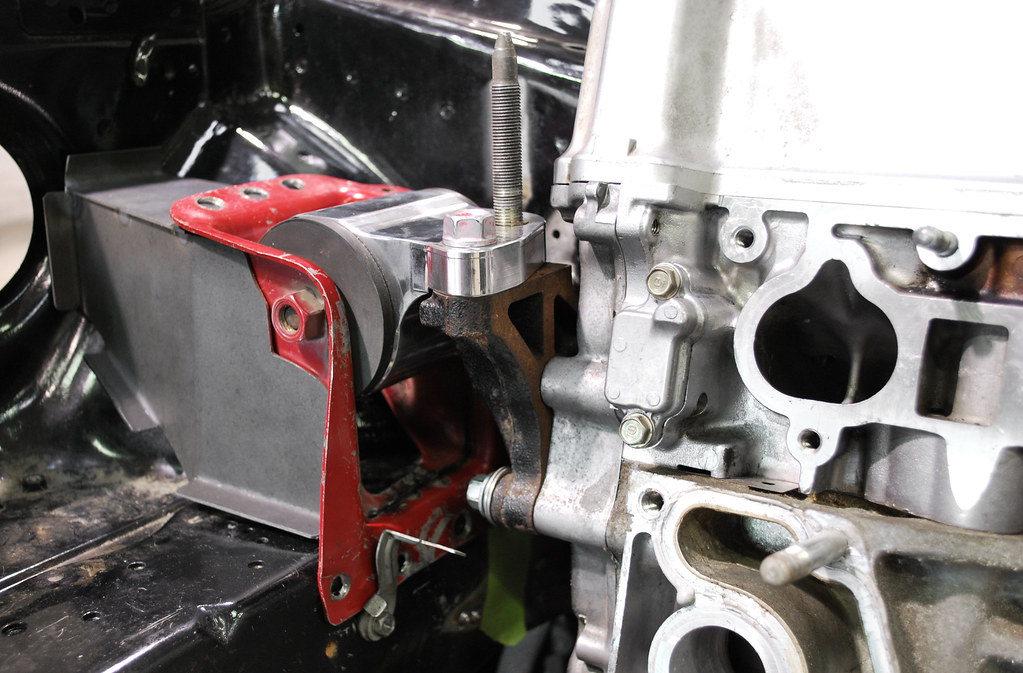
I then got started with boxing in the passenger side mount. Originally I wanted to reverse the shape of the original bracket base from the driver’s side but that wouldn’t work because of slight differences in the fender aprons from left to right.
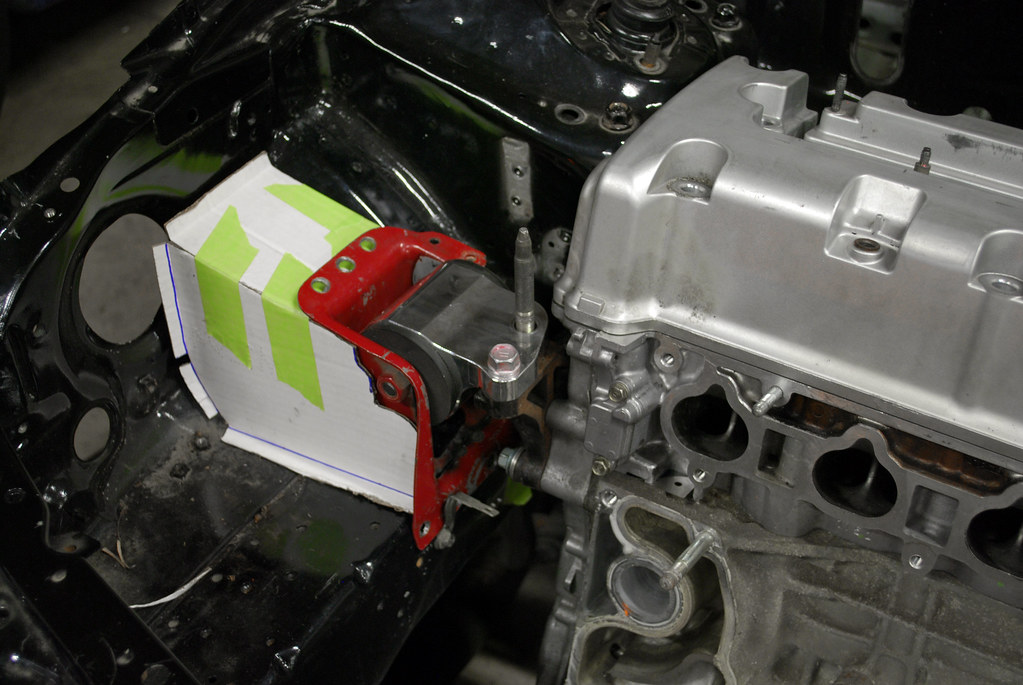
A step back and I was evaluating the box with another in-progress shot.

It didn’t seem OE-enough for me but that might only have been because I had never seen it on that side. After all, that’s pretty much what you see on the driver’s side stock, right? I thought adding the intake manifold to make it look more complete would help placate my growing reservations.
Nothing helped. It was gnawing at me that it was too bulky and hideously unattractive. Sadly, this was worse that the aftermarket brackets to me.
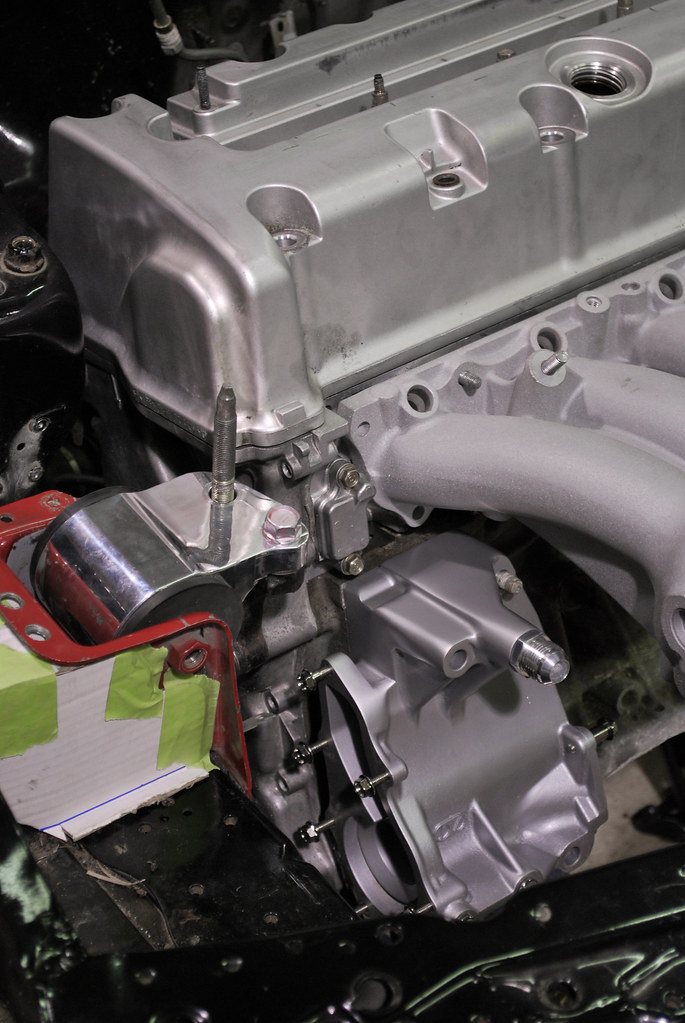
I added the water pump housing I’ve been working on for a couple of years to the mix to try to convince myself it was going to disappear into the background the more I filled the space up.
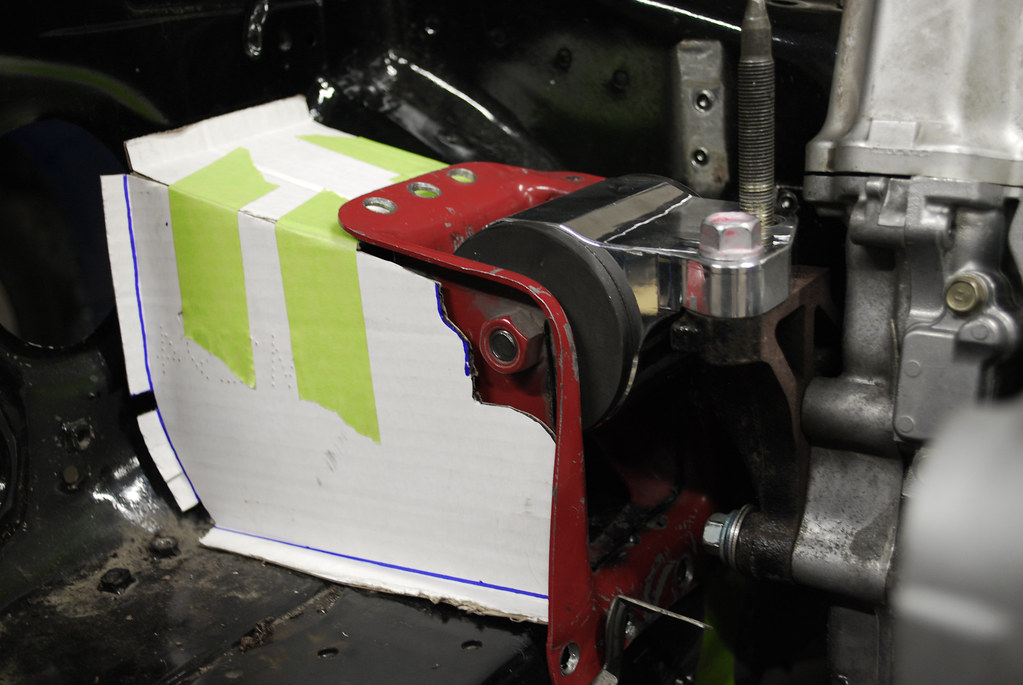
Eventually I decided to modify it by tapering the top and kicking back the front with a slight break. This is what was missing! As I re-evaluated the stock piece it does have a slight bend going back just over two planes so it’s difficult to zero-in on.
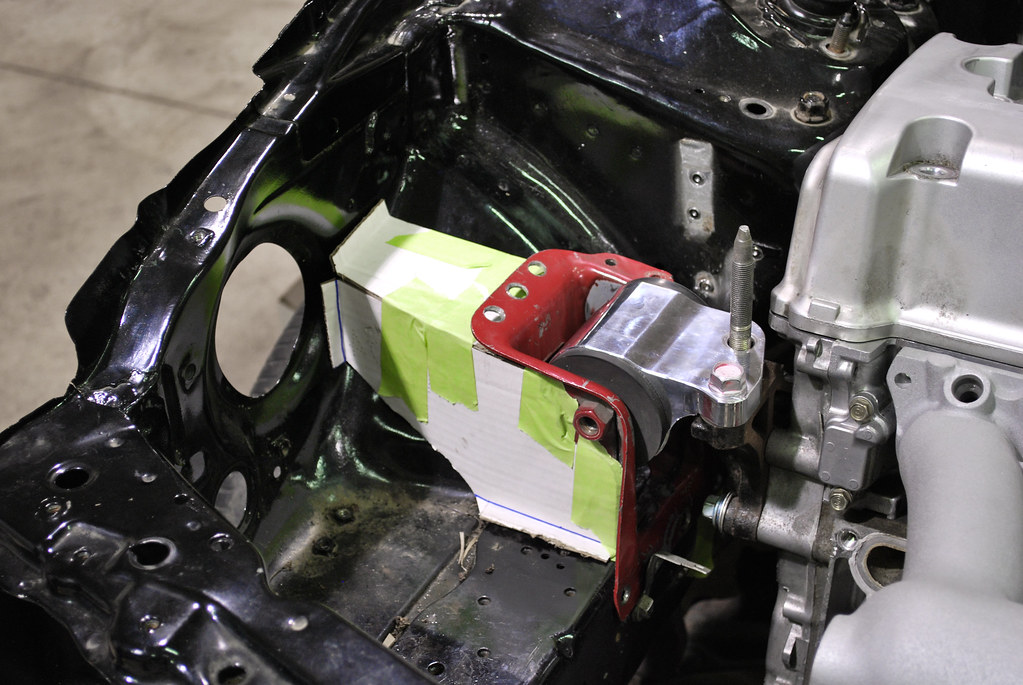
I addressed my concerns with this small revision and now it looked like it should have been there from the factory!
For positioning’s sake, I used a 6mm bolt with a scrap bracket to help hold the passenger bracket into place. Even though it looks crude it’s strong enough to support the empty engine case and head. I only needed one jack under the transmission at this point.
I threw on the intake manifold to make sure the hood would close and there was enough clearance for the radiator. Well, I knew the hood would close because the front was lower but I wanted to make sure a change in the pitch wouldn’t interfere with the radiator. All looked good!
I then got started with boxing in the passenger side mount. Originally I wanted to reverse the shape of the original bracket base from the driver’s side but that wouldn’t work because of slight differences in the fender aprons from left to right.
A step back and I was evaluating the box with another in-progress shot.
It didn’t seem OE-enough for me but that might only have been because I had never seen it on that side. After all, that’s pretty much what you see on the driver’s side stock, right? I thought adding the intake manifold to make it look more complete would help placate my growing reservations.
Nothing helped. It was gnawing at me that it was too bulky and hideously unattractive. Sadly, this was worse that the aftermarket brackets to me.
I added the water pump housing I’ve been working on for a couple of years to the mix to try to convince myself it was going to disappear into the background the more I filled the space up.
Eventually I decided to modify it by tapering the top and kicking back the front with a slight break. This is what was missing! As I re-evaluated the stock piece it does have a slight bend going back just over two planes so it’s difficult to zero-in on.
I addressed my concerns with this small revision and now it looked like it should have been there from the factory!
09-04-2012, 08:05 PM
#7
Honda-Tech Member
Join Date: Dec 2005
Location: NE Washington, USA
Posts: 312
Likes: 0
Received 0 Likes
on
0 Posts
Are you going to have the hole on the side like the stock drivers side mount does? Little things like that are what's going to make it appear even more OE. 
Love the way you're going about it though.
Love the way you're going about it though.
Trending Topics
09-04-2012, 10:25 PM
#8
Honda-Tech Member
WOW, very nice so far. I like all the attention to detail. Good luck with everything. Will be checking back.
09-04-2012, 10:47 PM
#9
Honda-Tech Member

nice man good luck with this sounds like me i thought about it like 5 years ago and now im building it
09-05-2012, 07:34 AM
#10
Honda-Tech Member
Join Date: Jun 2011
Posts: 81
Likes: 0
Received 0 Likes
on
0 Posts
I love the name, I never thought about the green pennies, but now that I look back on my last few cars it makes me hella lol. I can not wait to see more on this car, stuff like this makes me very excited to start the rebuild on my current car.
09-05-2012, 08:10 AM
#11
Better late than never. 
Half an inch isn't that much of a difference height wise; the ekk2 mounts with top and bottom hole adjustments probably amount to about that and I haven't heard of any axle issues with those. I would say the ekk1 kit angles the axle a bit more with the height and forward position in the bay and even that held up for me for a good amount of time without any issues. I would honestly worry about the strength of the oem brackets more, specially that of the driver's side, but I'm sure it'll all do just fine with you at the helm.
I'm loving the water pump housing and I'm sure the same will apply for most if not all of this build. As far as holding attention goes, this car will probably put 99% of the integras to shame if not all honda/acuras and I'm looking forward to it. And, Street cars ftw!!
09-05-2012, 08:21 AM
#12
Honda-Tech Member
Thread Starter
Thanks guys. It's quite possible this thread won't see much attention as no one wants to look at a "low budget Integra build" and that's ok! I don't think it will overshadow anyone else's car with how quickly everything is changing. Cars like yours set the "baller-benchmark" so this is going in the other direction - handmade and eyeball-engineered. I'm hoping that this car will have an "OEModified" look with repurposed and modified OEM components instead of all the bolt-in swap options. Gone are the days when people had to MAKE stuff for their Hondas...
As far as the water pump goes, that's a big insight to one of my thoughts about the car. Make everything as light as possible in ways no one ever thinks about. With that water pump housing I think I shaved off two pounds compared to a K20A2 pump housing and a pound over a K20A3 pump housing. Everything is adding up!

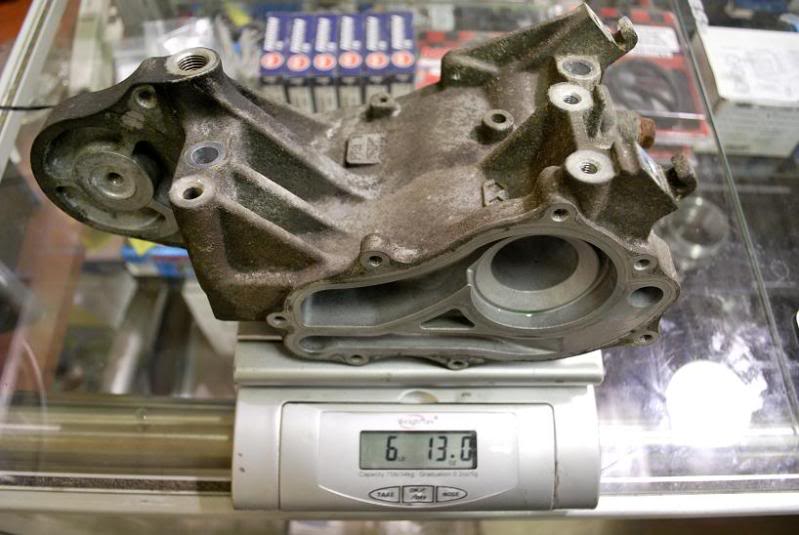
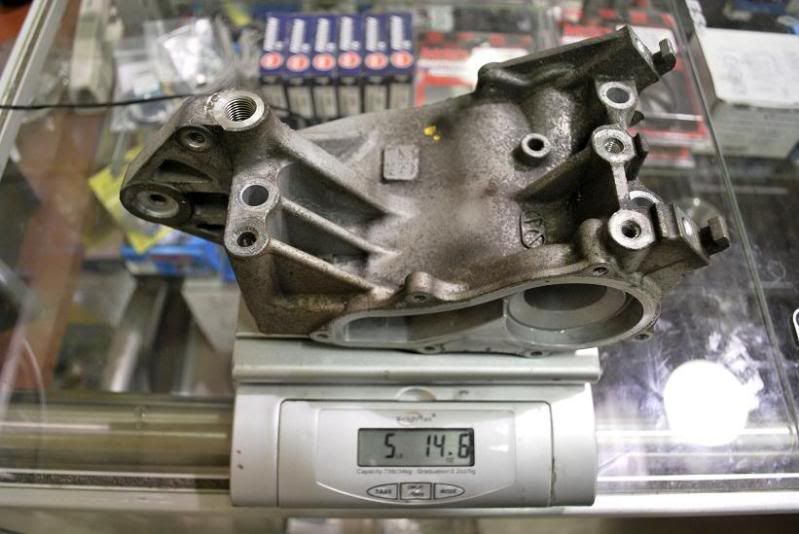
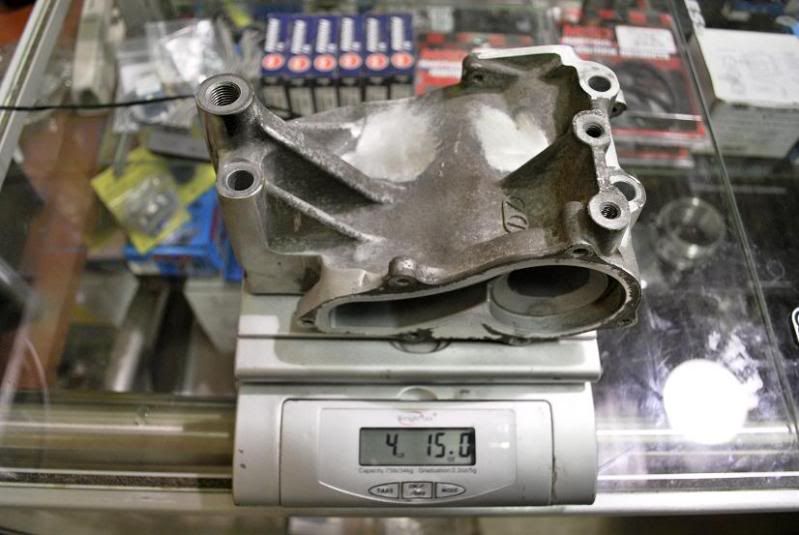
As far as the water pump goes, that's a big insight to one of my thoughts about the car. Make everything as light as possible in ways no one ever thinks about. With that water pump housing I think I shaved off two pounds compared to a K20A2 pump housing and a pound over a K20A3 pump housing. Everything is adding up!
09-05-2012, 09:57 AM
#13
That must've been a long time ago, haha. Speaking of making things and light weight, I see people are putting, or I should say 'making', holes or gussets of sorts in their rad supports now. 
Water pump housing looks great btw; nice savings there, for sure.
Water pump housing looks great btw; nice savings there, for sure.
09-05-2012, 10:19 AM
#14
Honda-Tech Member
Thread Starter
Yeah, I guess you can tell by the quality of the pictures!
Nothing crazy like Danny's car. This will still have the OEM lines for the engine bay. I don't even want to take this as far as my old EG. this car will hopefully fall somewhere between that one and my EK which still has all the holes, brackets, and stock wiring.
Nothing crazy like Danny's car. This will still have the OEM lines for the engine bay. I don't even want to take this as far as my old EG. this car will hopefully fall somewhere between that one and my EK which still has all the holes, brackets, and stock wiring.
09-05-2012, 10:24 AM
#15
Honda-Tech Member
Thread Starter
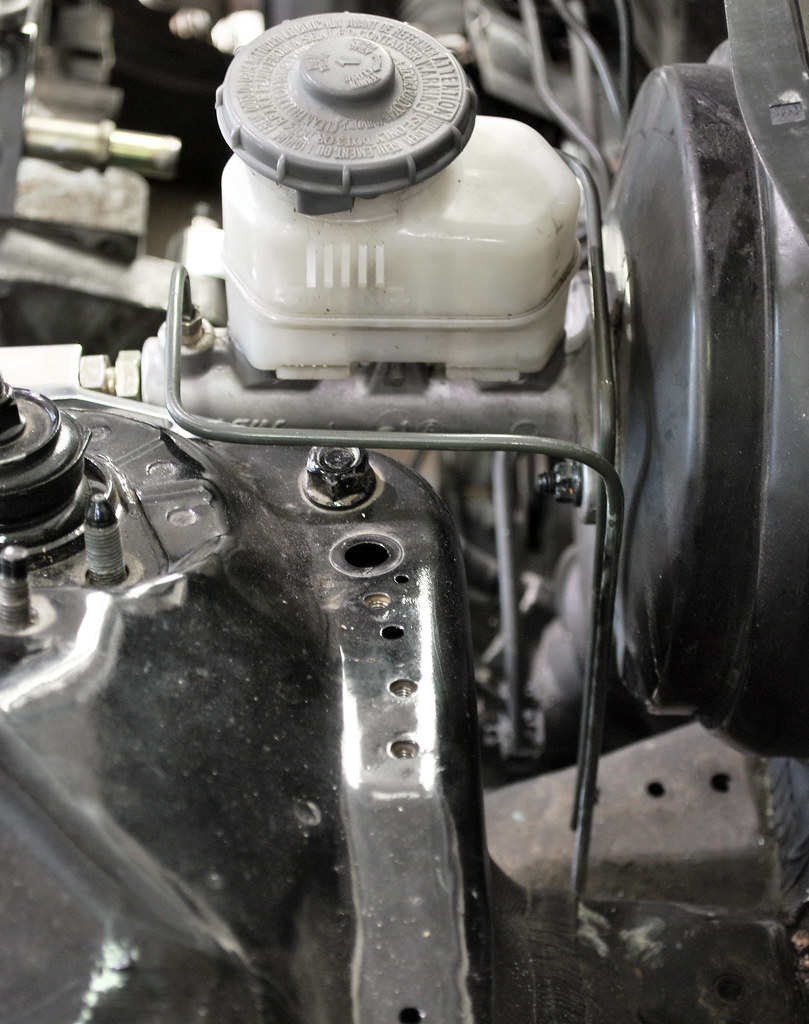
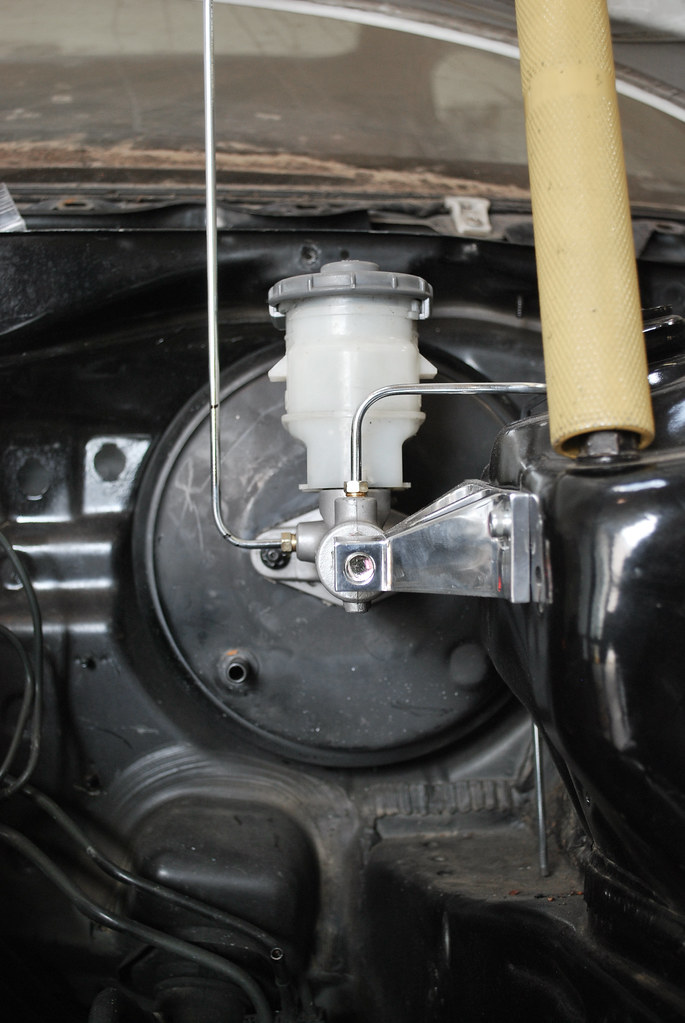
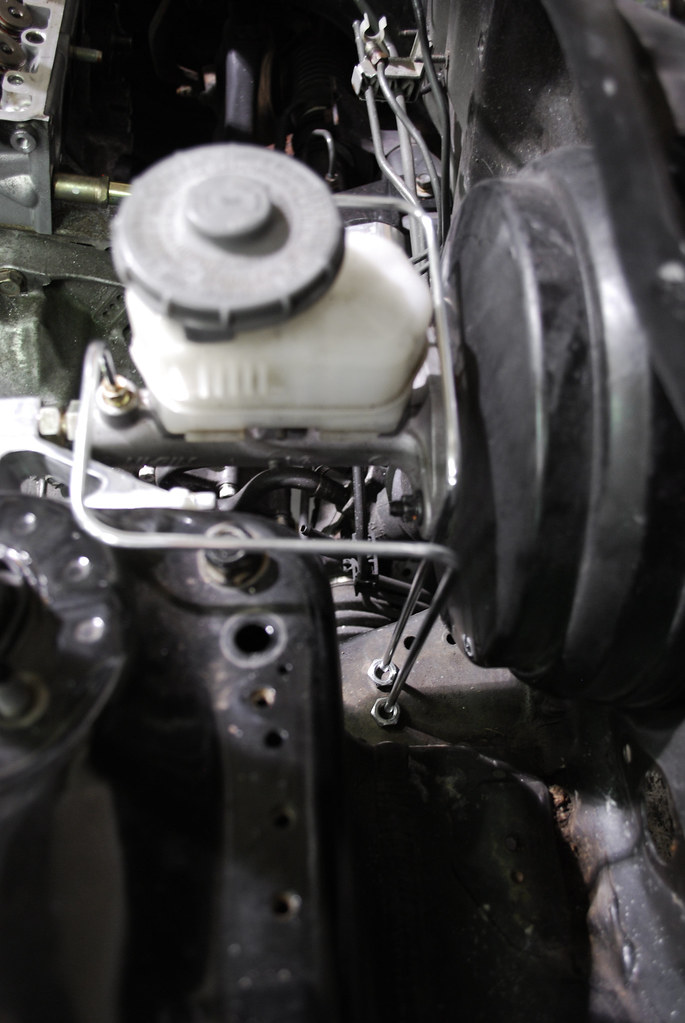
I took a break from the mounts in order to sit and stir on the looks ad placement of the brackets. If I leave them alone and glance at them occasionally I might make slight revisions. If inspiration doesn’t drive me to change them then I know I got it right. That’s usually how I do things. I won’t set it in stone but after looking at it a dozen separate times then I’ll finally be at peace with it. So I instead diverted my focus to the brake lines.
I had this brake line from a previous mock-up on an EK in the traditional Suja 1 fashion of bringing them in through the frame rail. It was a close enough fit to get the idea of placement going.
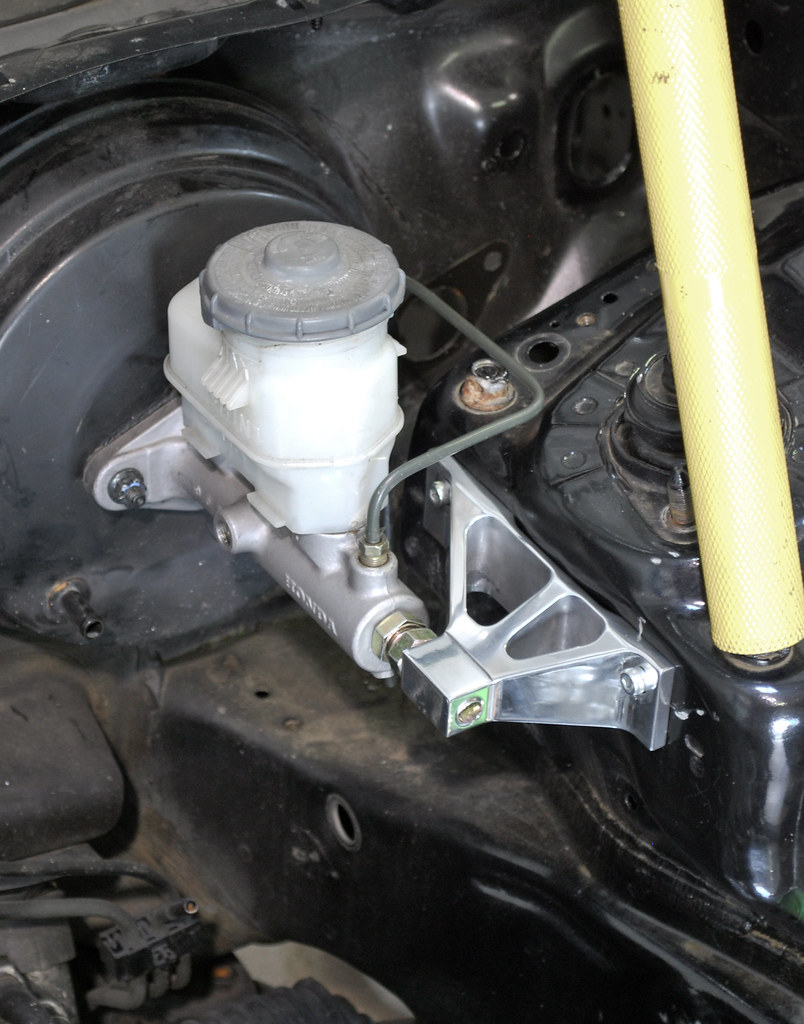
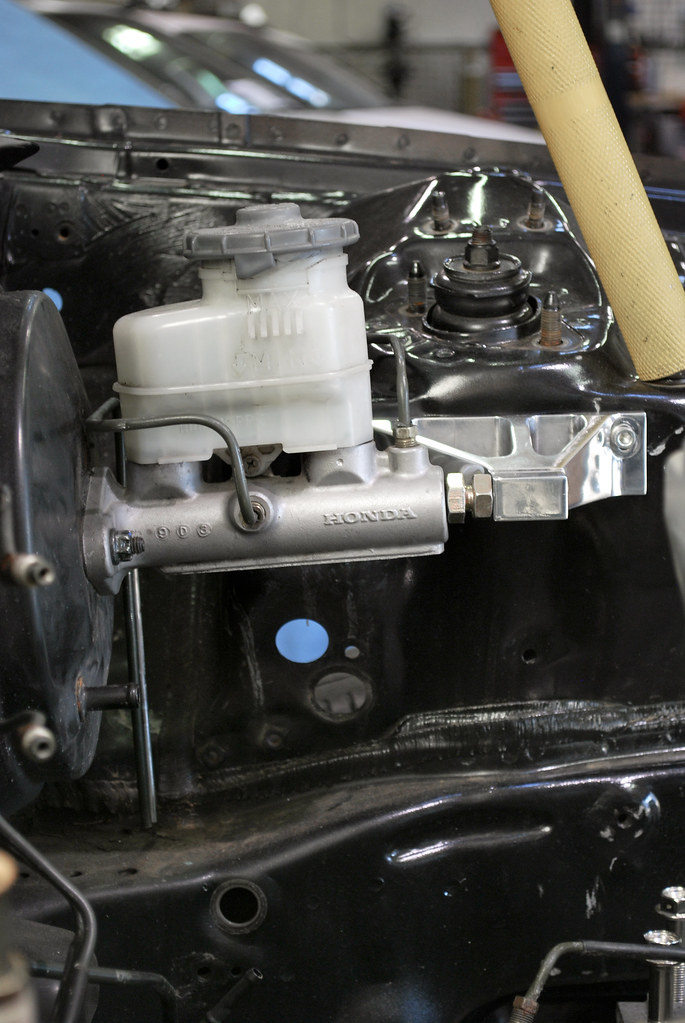
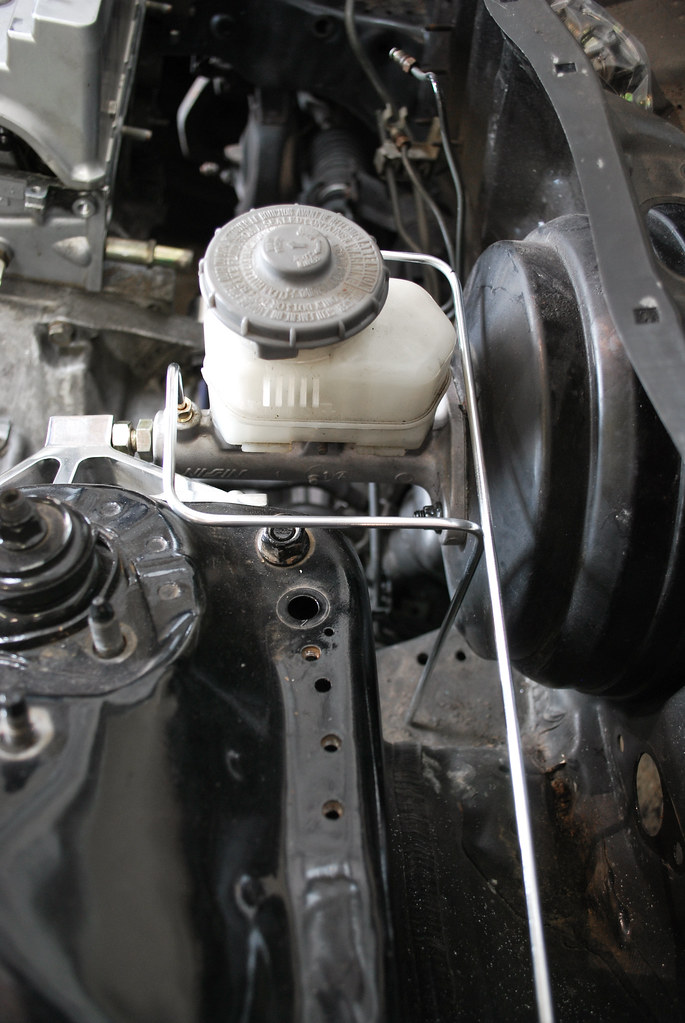
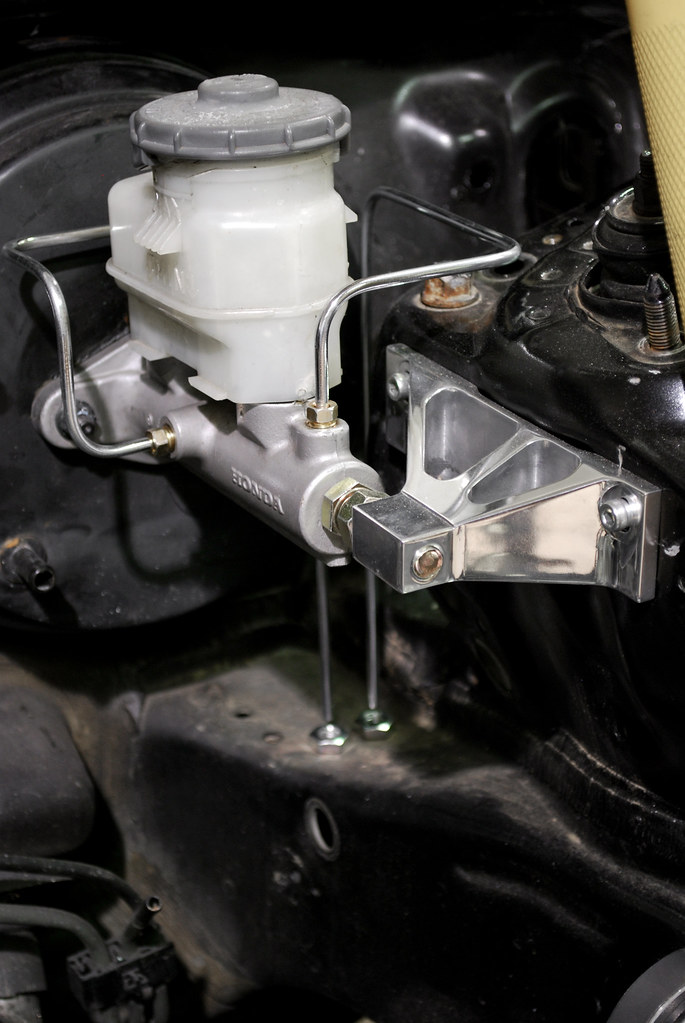
Also pictured is my DOHC Garage master cylinder stopper. Although I’m not expecting any performance benefits it’s a cool trinket for me personally. It’s also a small piece of history from Jon Tanji (R.I.P.) that I was able to pick up from Jimi Harris (AGESONE).

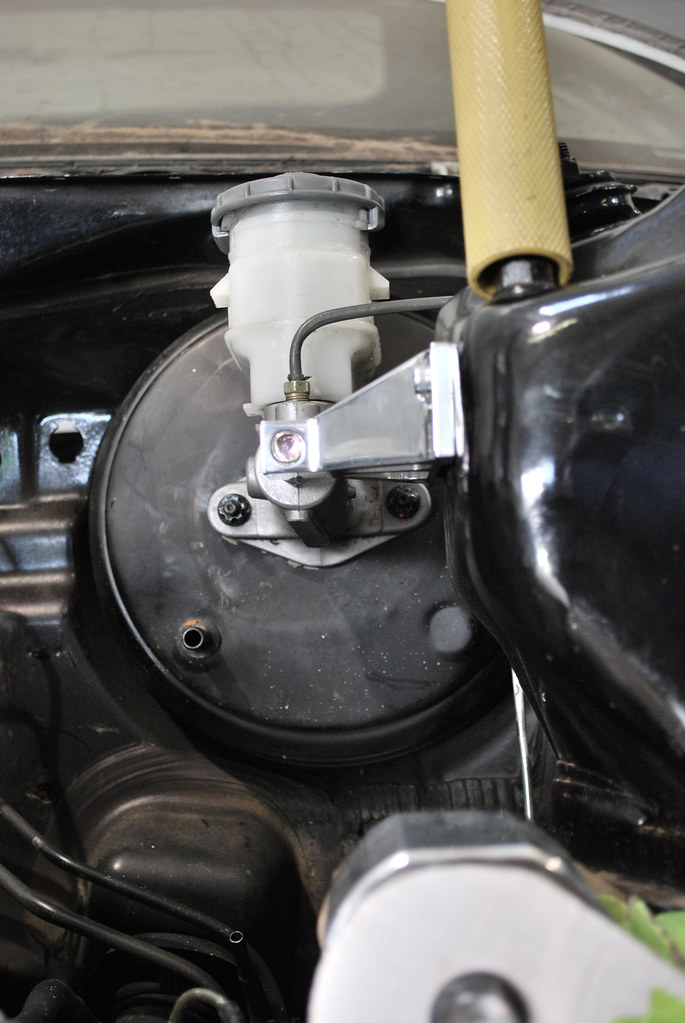
The last brake tuck I did was on my EG and a little different as that was right hand drive and the lines swept under the brake master to get to the rail. I always try to do things differently as I never want to build the same car twice so I decided to go over the master cylinder and build a “cage” around the reservoir.
Please excuse the coat hanger but I’ve found that’s the best way to start with a mock-up. If I don’t like the routing with that I start over and haven’t invested any time or materials.
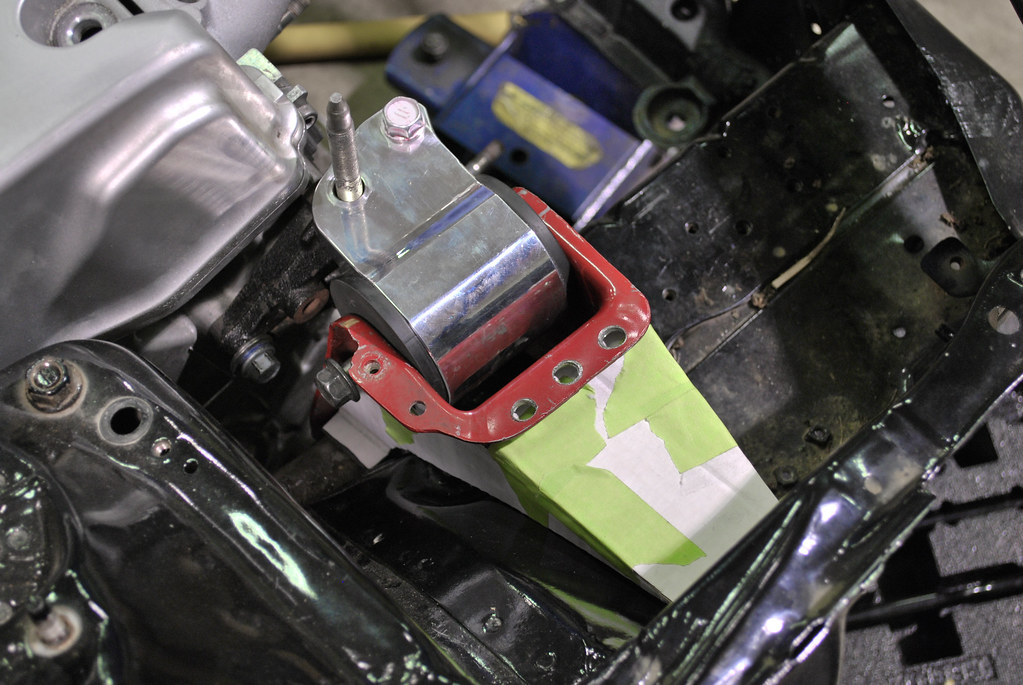
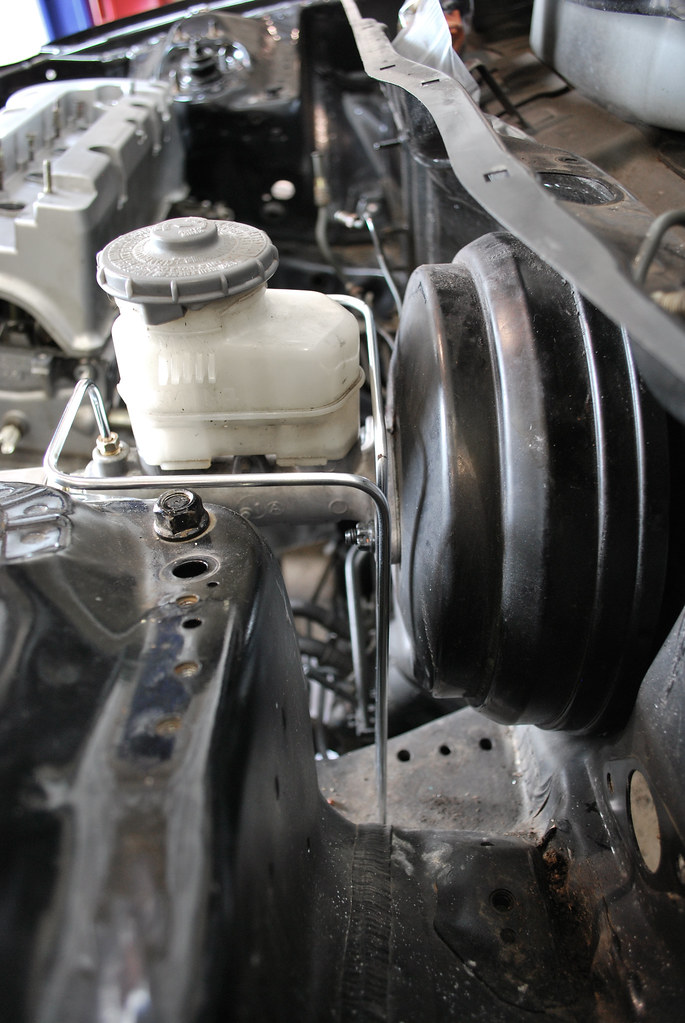
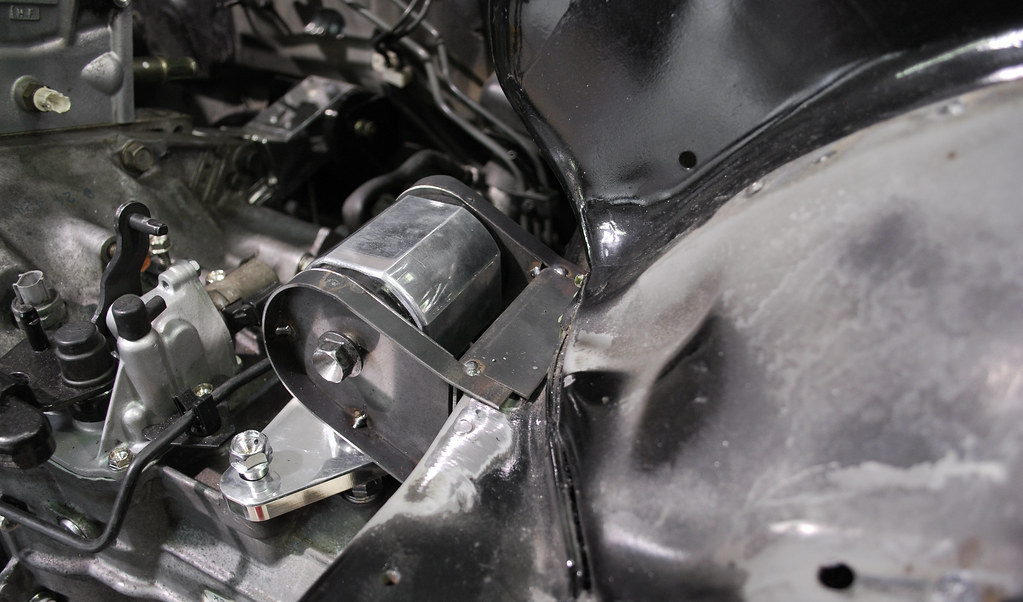
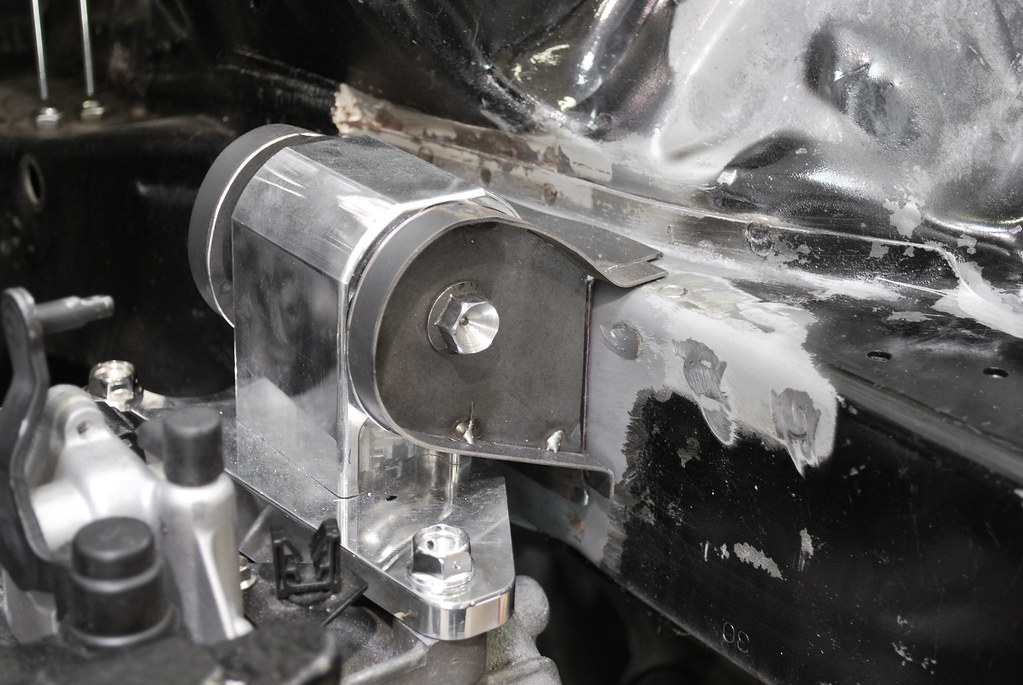
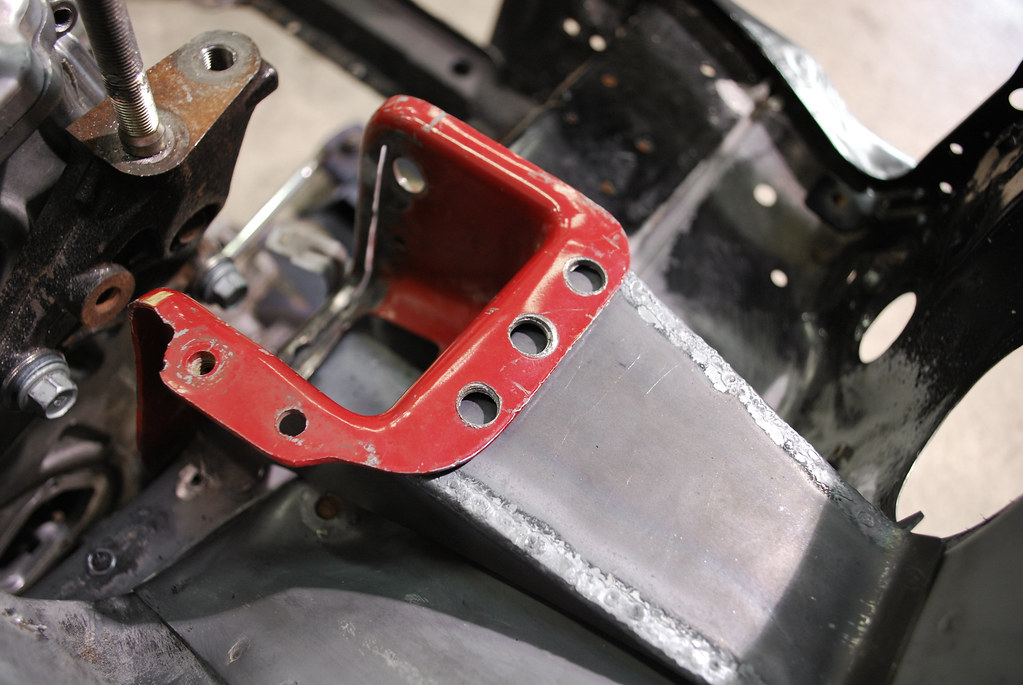
As I was working on the lines I kept contemplating the mounts. I added the side supports to the transmission bracket as I always planned to do. This would give it strength enough to prevent it from folding in on itself. The stock ones are stamped from a single piece but I don’t have access to anything like that.
The engine side got a single addition. The front face that pitches back now had an additional tab to be welded to the fender apron / wheel house structure. This satisfied my quest for OE-looking and gave it (hopefully) a little more strength. I thought the void was too far for comfort.
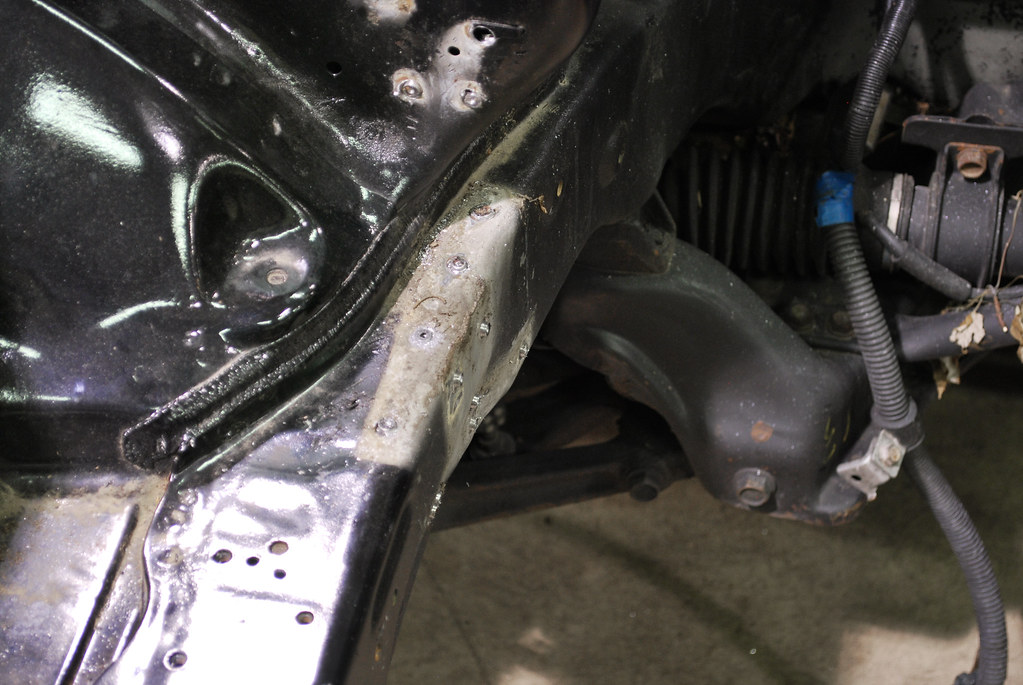
Since I was finally happy with the mount brackets it was time to send them off to a friend of a friend that would make a rough cut version of each. This meant I had the time and need to clean up the spot weld remains on the rail. Once the second stage mock up came back I wanted to see it squarely against the rail. The protrusions left from removing the bracket would have to be ground down.
I had this brake line from a previous mock-up on an EK in the traditional Suja 1 fashion of bringing them in through the frame rail. It was a close enough fit to get the idea of placement going.
Also pictured is my DOHC Garage master cylinder stopper. Although I’m not expecting any performance benefits it’s a cool trinket for me personally. It’s also a small piece of history from Jon Tanji (R.I.P.) that I was able to pick up from Jimi Harris (AGESONE).
The last brake tuck I did was on my EG and a little different as that was right hand drive and the lines swept under the brake master to get to the rail. I always try to do things differently as I never want to build the same car twice so I decided to go over the master cylinder and build a “cage” around the reservoir.
Please excuse the coat hanger but I’ve found that’s the best way to start with a mock-up. If I don’t like the routing with that I start over and haven’t invested any time or materials.
As I was working on the lines I kept contemplating the mounts. I added the side supports to the transmission bracket as I always planned to do. This would give it strength enough to prevent it from folding in on itself. The stock ones are stamped from a single piece but I don’t have access to anything like that.
The engine side got a single addition. The front face that pitches back now had an additional tab to be welded to the fender apron / wheel house structure. This satisfied my quest for OE-looking and gave it (hopefully) a little more strength. I thought the void was too far for comfort.
Since I was finally happy with the mount brackets it was time to send them off to a friend of a friend that would make a rough cut version of each. This meant I had the time and need to clean up the spot weld remains on the rail. Once the second stage mock up came back I wanted to see it squarely against the rail. The protrusions left from removing the bracket would have to be ground down.
09-05-2012, 12:51 PM
#16
Honda-Tech Member
Thread Starter
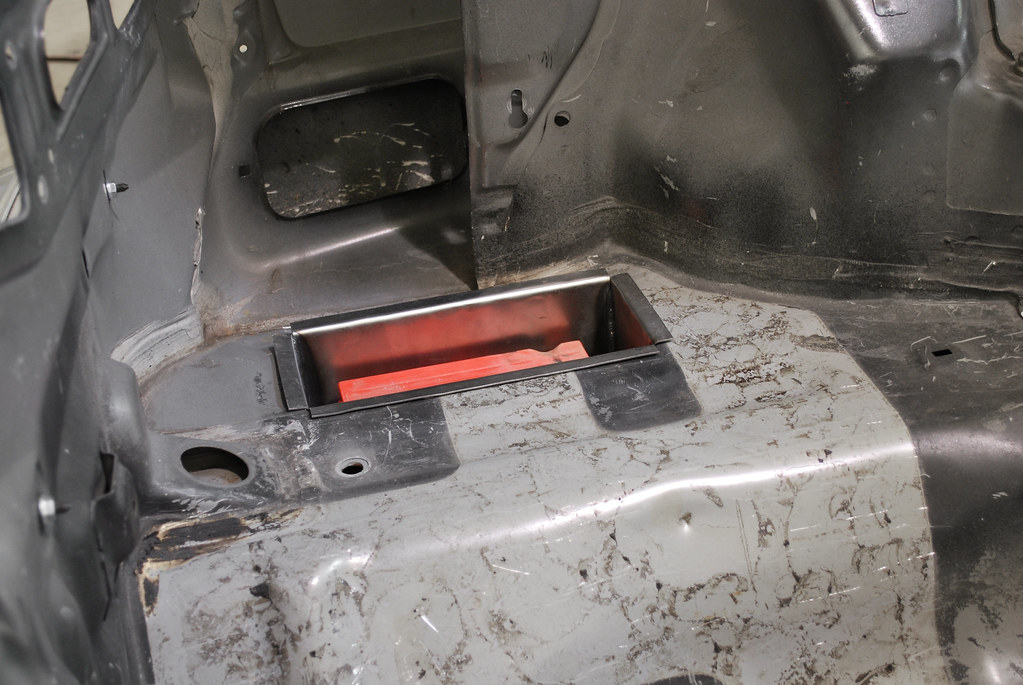
As with the engine bay brackets, I made a complete mock-up of the brake lines and let them sit in the engine bay. I wanted to see if there was any reason to redo them or if they passed by “time will tell” test. This meant I had an opportunity to start on the battery relocation. On my EG I moved the battery behind the passenger seat for weight distribution. For this car I wanted to move it further back and lower – positioning it outside of the passenger compartment. What I came up with was something I couldn’t do in a hatch because of the lack of any rear-overhang.

First I traced out the size of the Buddy Club battery I planned to use and then gave a larger perimeter for the box footprint.
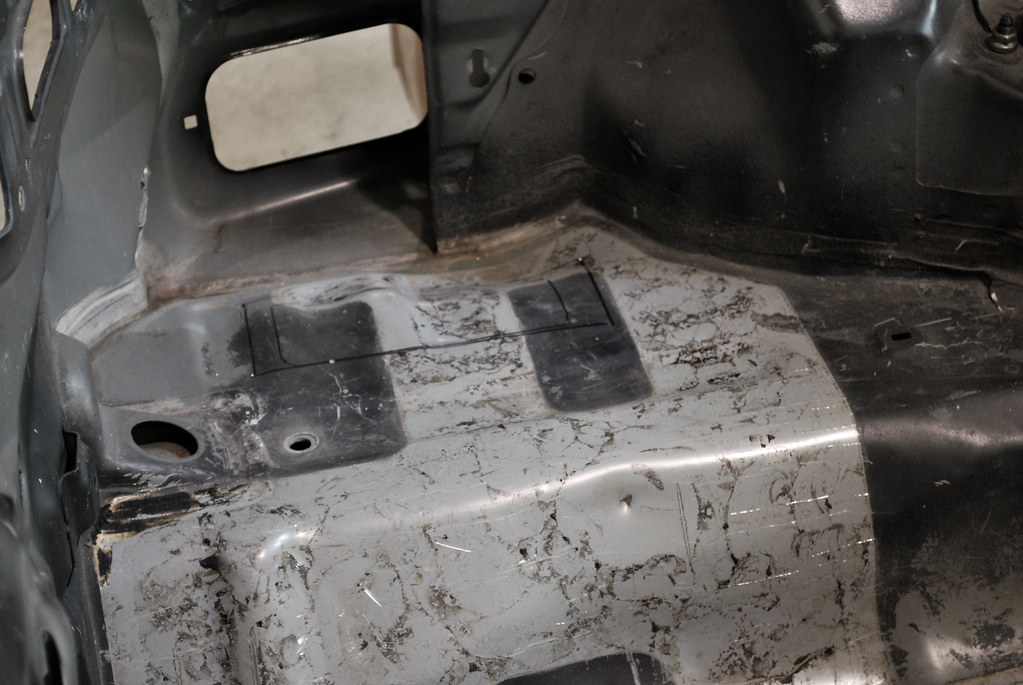
Personally I’ve never been a fan of battery relocations where they just sit the battery in the trunk or in a plastic box bolted to the floor somewhere. I decided I wanted the battery to sit in the floor opposite the muffler. Since that area isn’t used for anything it seemed like a perfect location.
Having the battery sit outside the hatch/trunk area means I’d have the most useable room for storage, allow me to keep the spare tire, won’t restrict access to anything by having a bulky plastic box in the way, and would be totally out of sight.
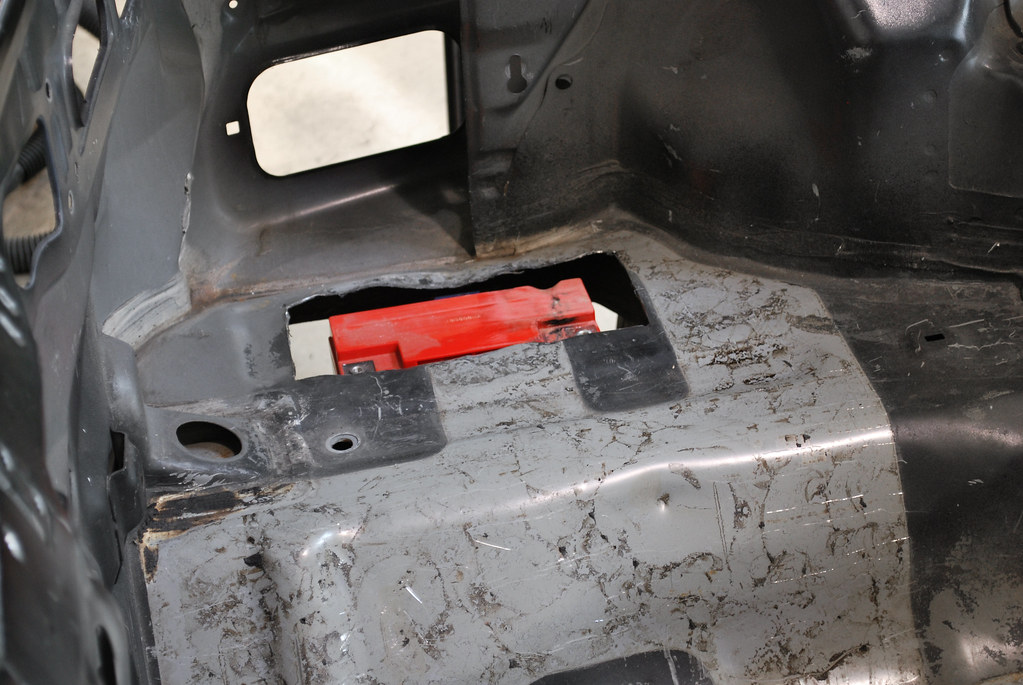
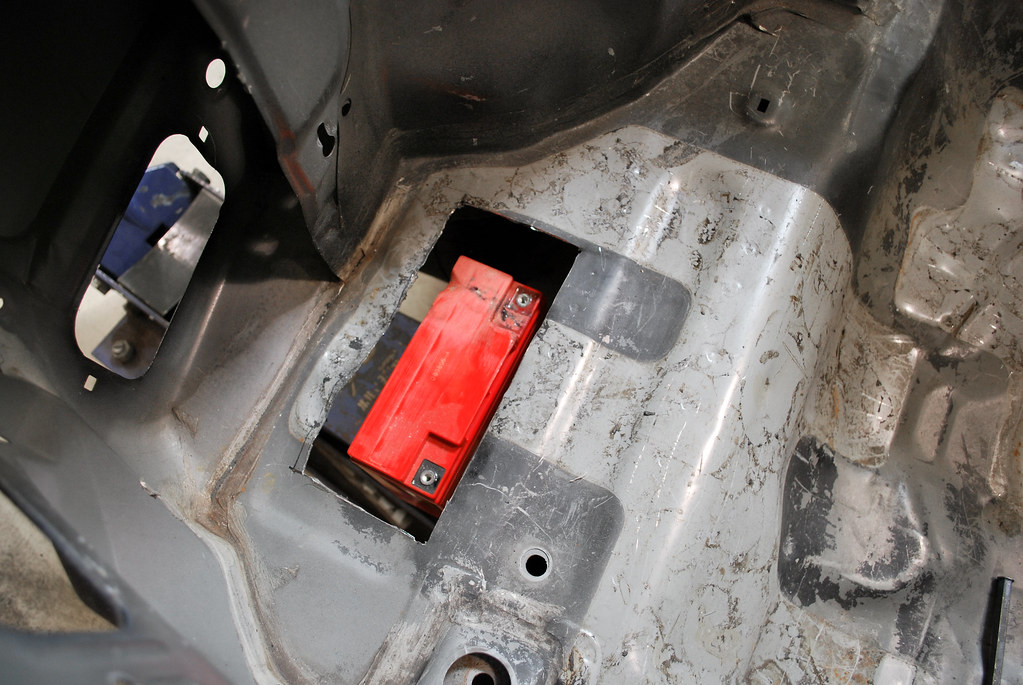
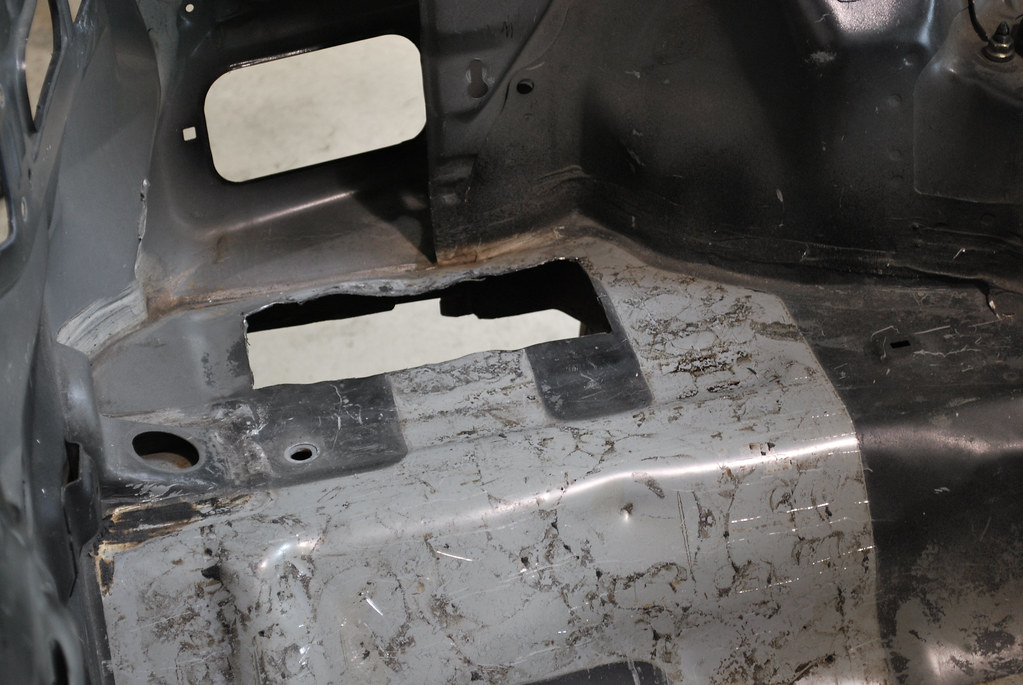
While I was cutting away, Kyle (Tallkyle) chopped me up some box components to the perfect size. I drilled holes for the battery cables even though I had yet to finalize how I was going to route them into the car.
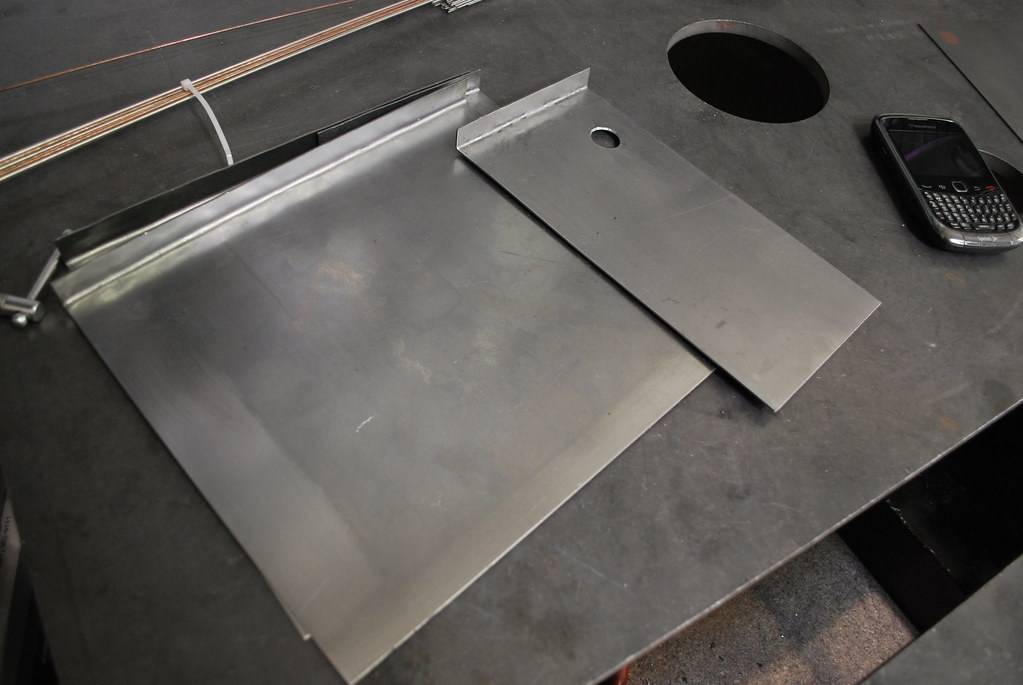
From there Kyle welded up the sides and bottom and the assembled box dropped right in.
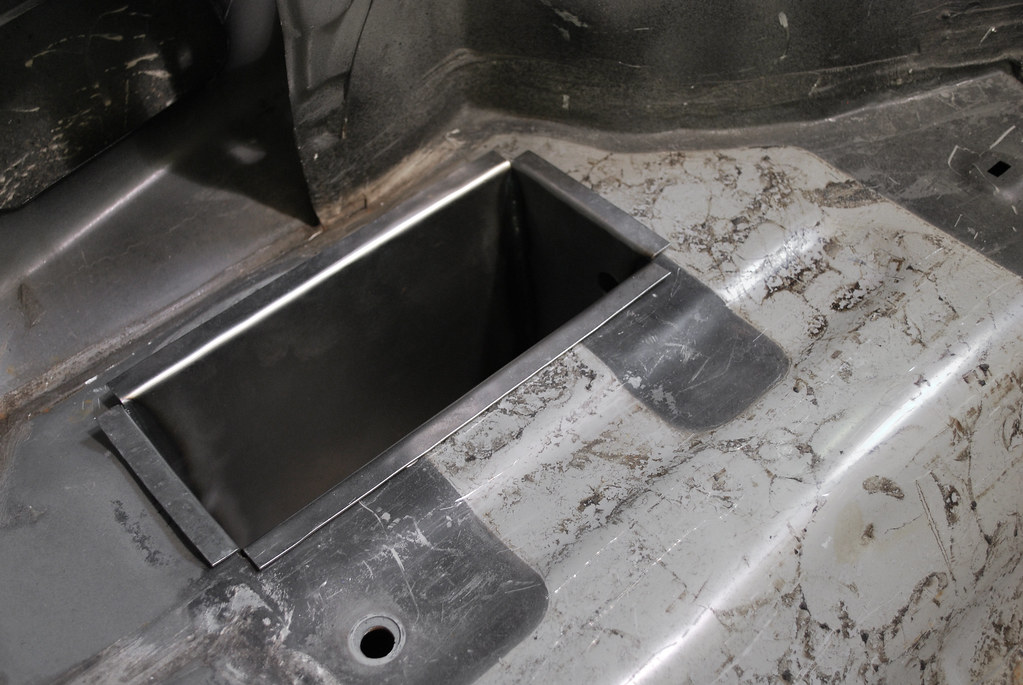
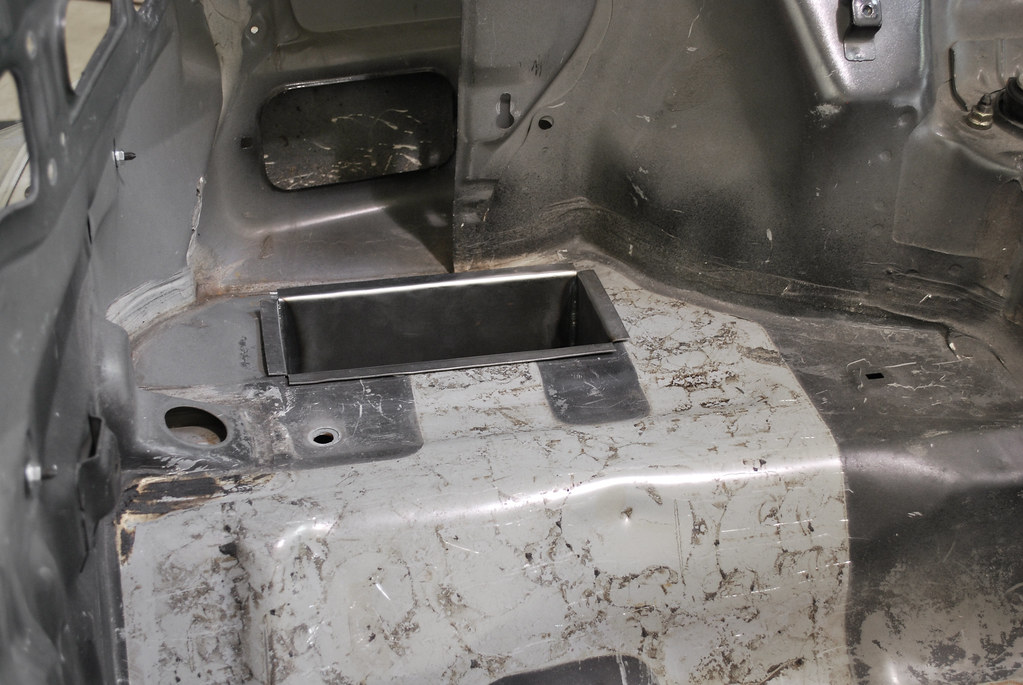
The box is large enough so that installing and removing the battery is easy.
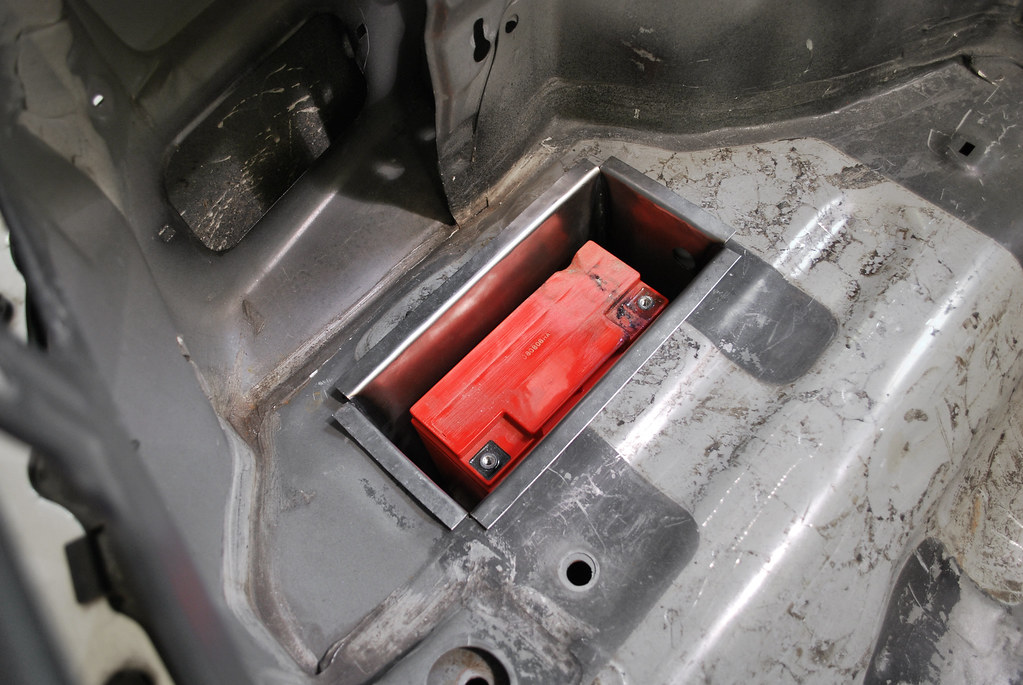
I accounted for enough room above the battery for posts and live wires to be far enough away from the metal top. That helped alleviate my fears of a random short going over a speed bump or something stupid.
Pardon the crudeness of the mock up lines but I wanted a rough idea of what it would look like with the reservoir caged in.
First I traced out the size of the Buddy Club battery I planned to use and then gave a larger perimeter for the box footprint.
Personally I’ve never been a fan of battery relocations where they just sit the battery in the trunk or in a plastic box bolted to the floor somewhere. I decided I wanted the battery to sit in the floor opposite the muffler. Since that area isn’t used for anything it seemed like a perfect location.
Having the battery sit outside the hatch/trunk area means I’d have the most useable room for storage, allow me to keep the spare tire, won’t restrict access to anything by having a bulky plastic box in the way, and would be totally out of sight.
While I was cutting away, Kyle (Tallkyle) chopped me up some box components to the perfect size. I drilled holes for the battery cables even though I had yet to finalize how I was going to route them into the car.
From there Kyle welded up the sides and bottom and the assembled box dropped right in.
The box is large enough so that installing and removing the battery is easy.
I accounted for enough room above the battery for posts and live wires to be far enough away from the metal top. That helped alleviate my fears of a random short going over a speed bump or something stupid.
Pardon the crudeness of the mock up lines but I wanted a rough idea of what it would look like with the reservoir caged in.
09-05-2012, 01:41 PM
#17
Honda-Tech Member
Thread Starter
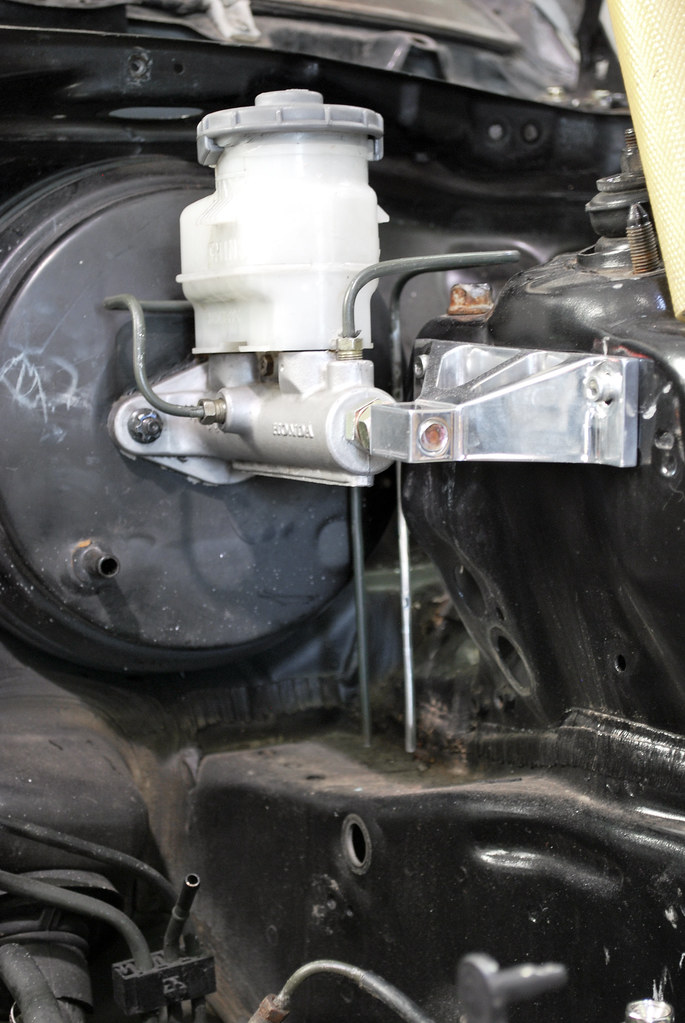
Once I was satisfied with the idea and general placement I started making the permanent lines. The first one was easy as I spent a decent amount of time on the previous line. I did raise it slightly by comparison. The first time through I thought I would want it to follow the line molded into the reservoir but as I kept looking at the lines I wanted them to be more centered vertically.
The next line took a little more of my time as I was changing a lot more of the dimensions. Please keep in mind these were done by hand with nothing more than tools available to anyone in any garage. The line is even your run-of-the-mill straight bulk line.
All I did was mark where I want the bends to be and carefully checked after each small adjustment. If you take your time and plan it out you can expect some good results.
Some areas were trickier than others. This one where it had to bend back towards the firewall meant I didn’t have enough room to install the flared end into the master cylinder for a true check. This is where a little of my infamous eyeball engineering came in.
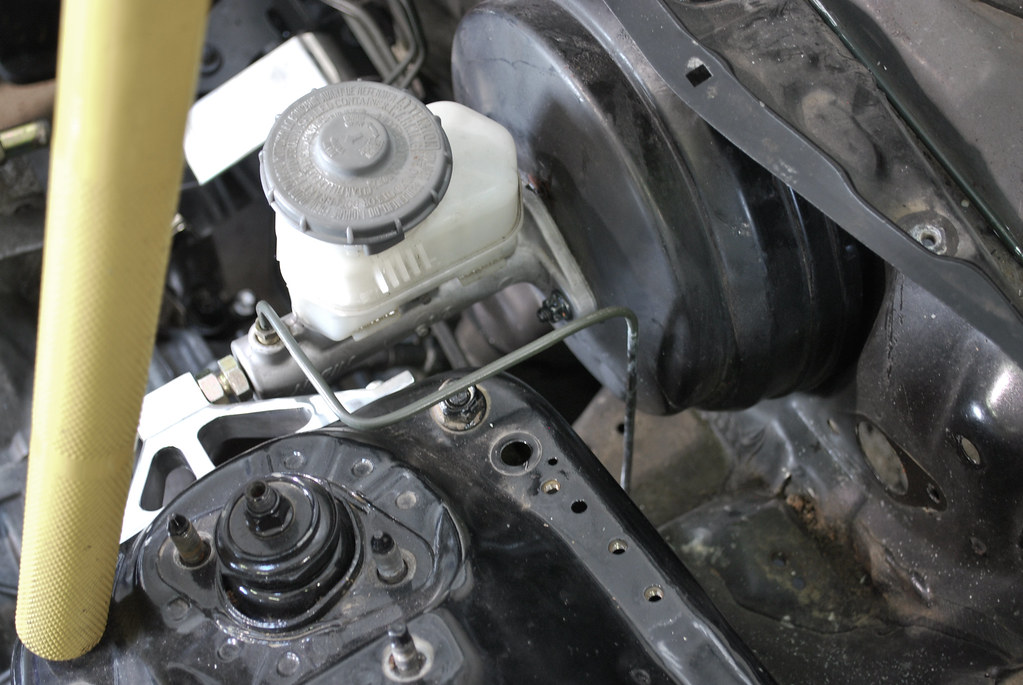
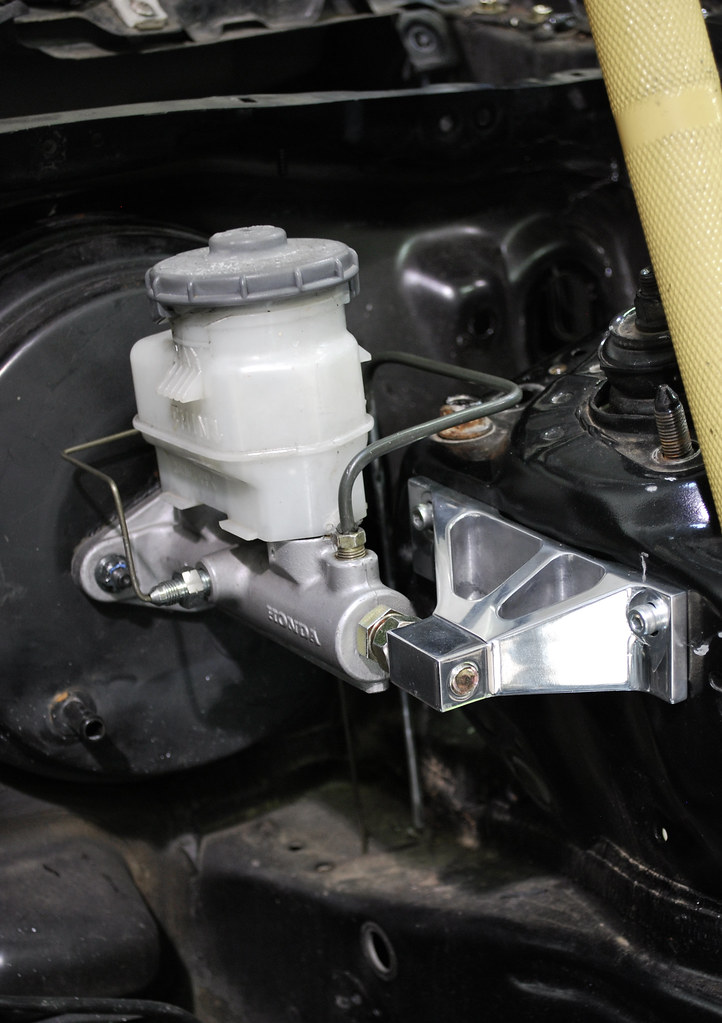
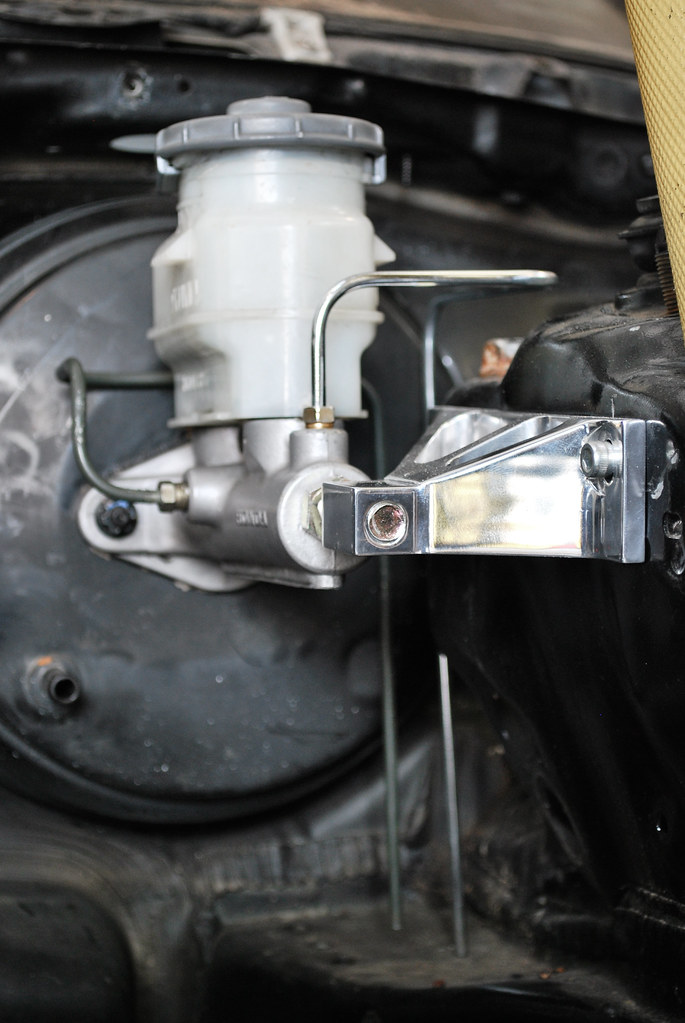
Once all was said and done, the outcome was what I hoped for. To the casual observer, they might not even realize everything runs on the same plane when looking directly at the center of the master cylinder reservoir. The rear line disappearing behind the front line is exactly what I was going for. Additionally, the rear line frames the master cylinder brace with its two vertical sections. Look carefully and you’ll see they are equidistant from either edge of the base.
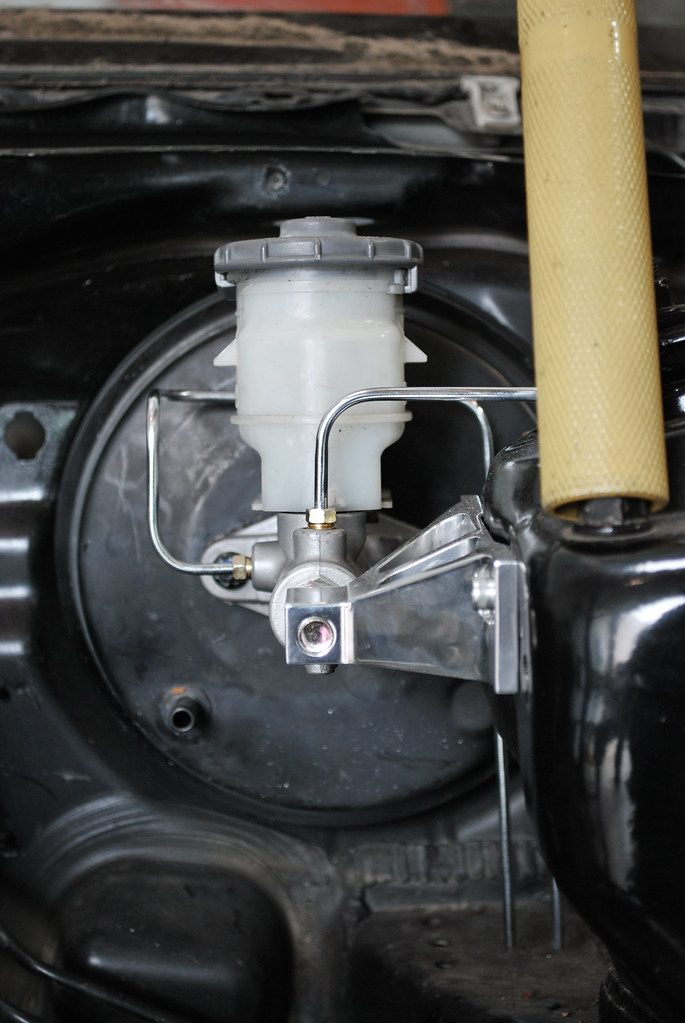
From the side you can see that again they exist on the same plane. The rear line disappears behind the front line as they both bend downward. Although this took some time to do – almost five hours one summer afternoon – it only took one shot. This means you don’t have to spend a whole lot to get a good looking result. Time, patience, and planning will do better than throwing money around. Cost of these brake lines? $12.
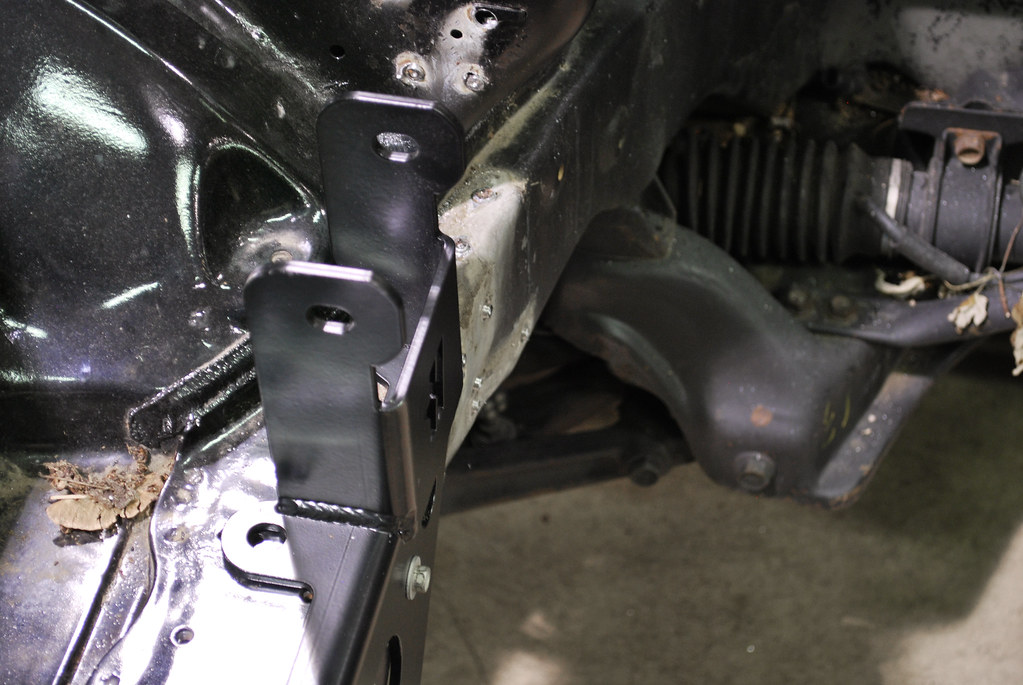
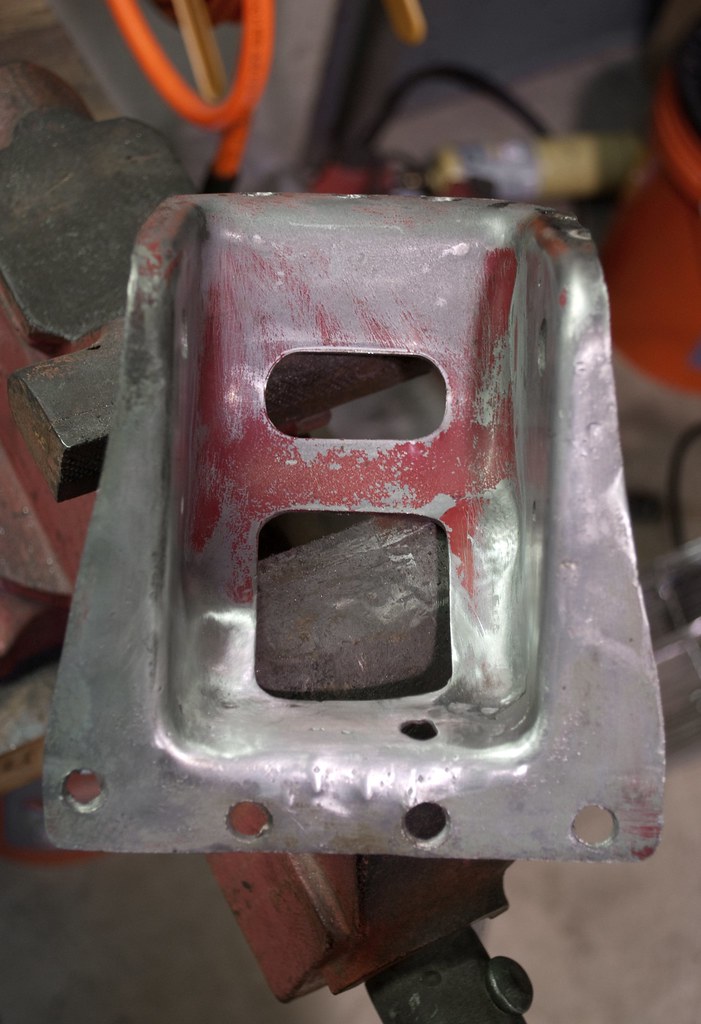
With the brake lines routed it was time to check the second stage mock up brackets. These were made directly off my cardboard versions and tack welded together.
What’s slightly concealed here is the slice I made in the factory metal piece. Because of the frame rail differences and their slight tapers I had to take some material out of the bracket. The slice is actually two “V” shapes something like this: “<>” with the wide point at the front corner. After the cut I was able to force the gap closed and allow the bracket to make good square contact with the inside of the rail.
The transmission mount came out a little taller than I planned. That’s entirely my fault as the top flap on the cardboard version had too much play. This allowed me to fool myself into thinking it was a perfect fit while in reality I was overextending it. I would have to compensate between now and the final version
The next line took a little more of my time as I was changing a lot more of the dimensions. Please keep in mind these were done by hand with nothing more than tools available to anyone in any garage. The line is even your run-of-the-mill straight bulk line.
All I did was mark where I want the bends to be and carefully checked after each small adjustment. If you take your time and plan it out you can expect some good results.
Some areas were trickier than others. This one where it had to bend back towards the firewall meant I didn’t have enough room to install the flared end into the master cylinder for a true check. This is where a little of my infamous eyeball engineering came in.
Once all was said and done, the outcome was what I hoped for. To the casual observer, they might not even realize everything runs on the same plane when looking directly at the center of the master cylinder reservoir. The rear line disappearing behind the front line is exactly what I was going for. Additionally, the rear line frames the master cylinder brace with its two vertical sections. Look carefully and you’ll see they are equidistant from either edge of the base.
From the side you can see that again they exist on the same plane. The rear line disappears behind the front line as they both bend downward. Although this took some time to do – almost five hours one summer afternoon – it only took one shot. This means you don’t have to spend a whole lot to get a good looking result. Time, patience, and planning will do better than throwing money around. Cost of these brake lines? $12.
With the brake lines routed it was time to check the second stage mock up brackets. These were made directly off my cardboard versions and tack welded together.
What’s slightly concealed here is the slice I made in the factory metal piece. Because of the frame rail differences and their slight tapers I had to take some material out of the bracket. The slice is actually two “V” shapes something like this: “<>” with the wide point at the front corner. After the cut I was able to force the gap closed and allow the bracket to make good square contact with the inside of the rail.
The transmission mount came out a little taller than I planned. That’s entirely my fault as the top flap on the cardboard version had too much play. This allowed me to fool myself into thinking it was a perfect fit while in reality I was overextending it. I would have to compensate between now and the final version
09-05-2012, 08:25 PM
#18
Honda-Tech Member
Join Date: Dec 2005
Location: NE Washington, USA
Posts: 312
Likes: 0
Received 0 Likes
on
0 Posts
On the passengers side mount, as I mentioned in an earlier post... Are you keeping the front piece of metal solid? Or might you have some sort of dimpled hole in it as the original drivers side mount has?
Aside from that, loving how you're going about this. Ingenuity & Self Made over store bought any day of the week.
Keep it up.
Aside from that, loving how you're going about this. Ingenuity & Self Made over store bought any day of the week.
Keep it up.
09-05-2012, 09:21 PM
#19
Honda-Tech Member
Join Date: Apr 2008
Location: In The Sticks, PA, America
Posts: 8,958
Likes: 0
Received 0 Likes
on
0 Posts
wow i love the effort being put into the mount process! i'm def. going to follow along with the rest of this build. awesome work so far!
09-06-2012, 09:08 AM
#20
Honda-Tech Member
Thread Starter
Sorry, to not address it earlier but the mount bracket will be solid. Even if I was to use the factory piece I'm sure I would have done something about plating in the hole.
Thanks for following along so far, guys. Sorry about the photo dumps! I'm writing these updates out and throwing pictures together as I can.
Thanks for following along so far, guys. Sorry about the photo dumps! I'm writing these updates out and throwing pictures together as I can.
09-06-2012, 10:32 AM
#21
Honda-Tech Member
Thread Starter
As parts started to trickle in for the brake tuck I set up placement of the bulkhead nuts to make sure I’d have enough room between the lines to be able to tighten them as needed.
All seemed to be a go. These lines are 3/16” meaning the bulkhead fittings are -3AN into the cabin.
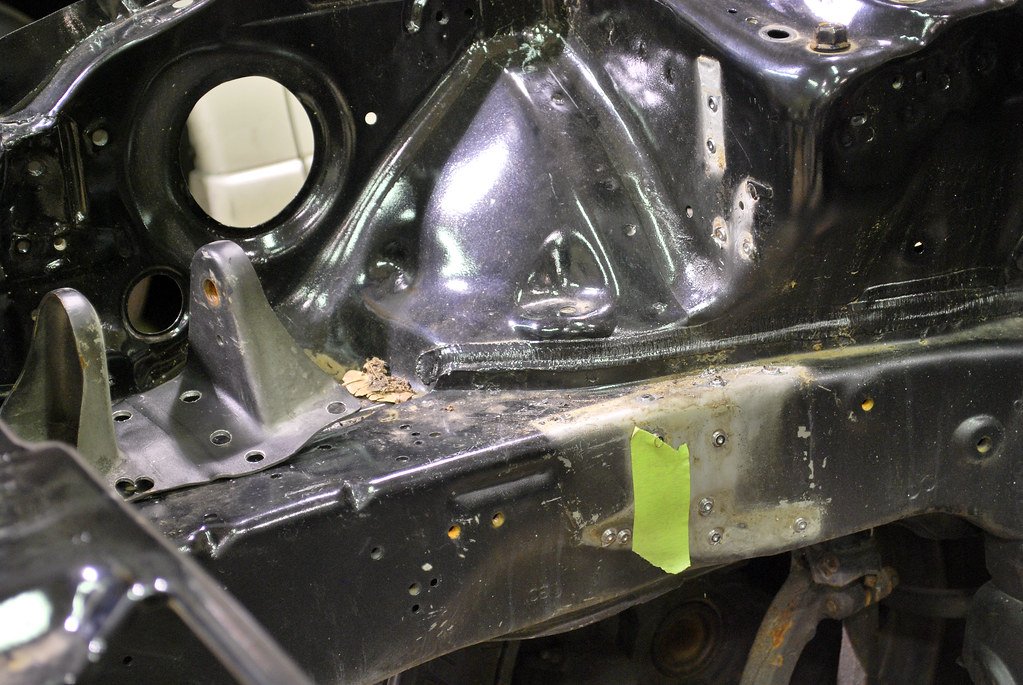
In preparation of welding in the passenger mount bracket I sprayed a paint stripper on the fender apron to eat away the paint.

This means no scraping or sanding so no marks left behind. As a side benefit, it also softened up the seam sealer allow it to fall away pretty easily. Certain sections of the mount bracket still showed some of the fender apron so unnecessary holes would have to be filled and smoothed.
Everything went back in for more mock up. I kept installing and removing this to make sure it is easy enough to realign the mount time and again. I didn’t want to weld it in without triple checking everything so that the mount would be difficult to line up as the engine went in and out for whatever reason down the road.
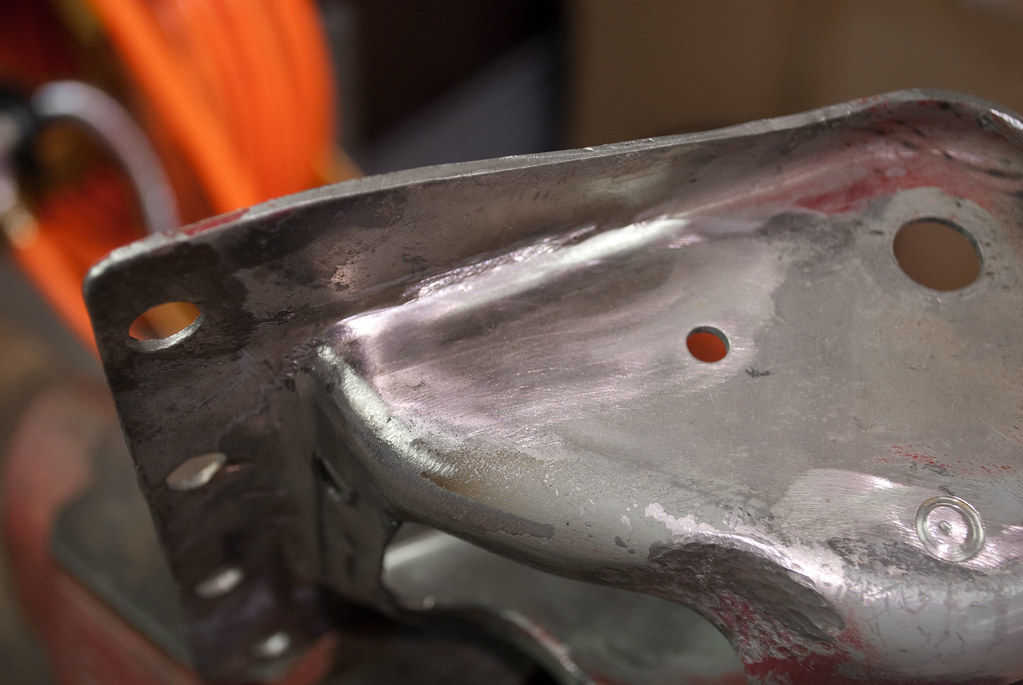
I did make some minor adjustment to the second stage of the transmission bracket.
I took some material off the top of the mount which allowed me to bring the rear flap and side braces further down. This made the entire bracket line up better with the rail.
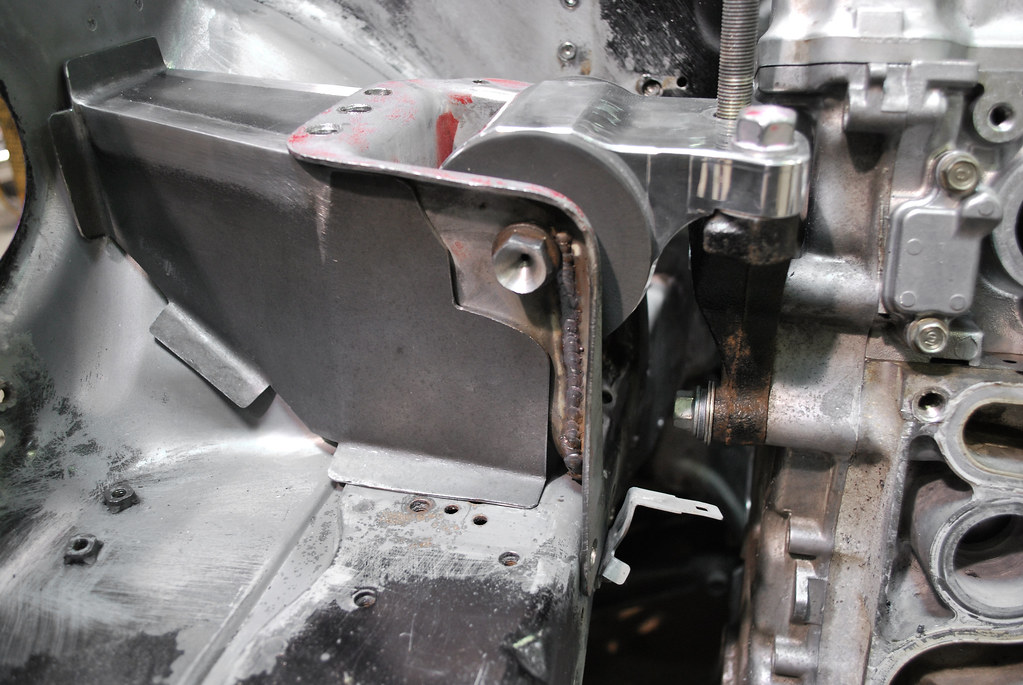
With this stage nearing a more completed state I asked Brandon (Type_Rs) to weld the engine side bracket to complete everything visually.
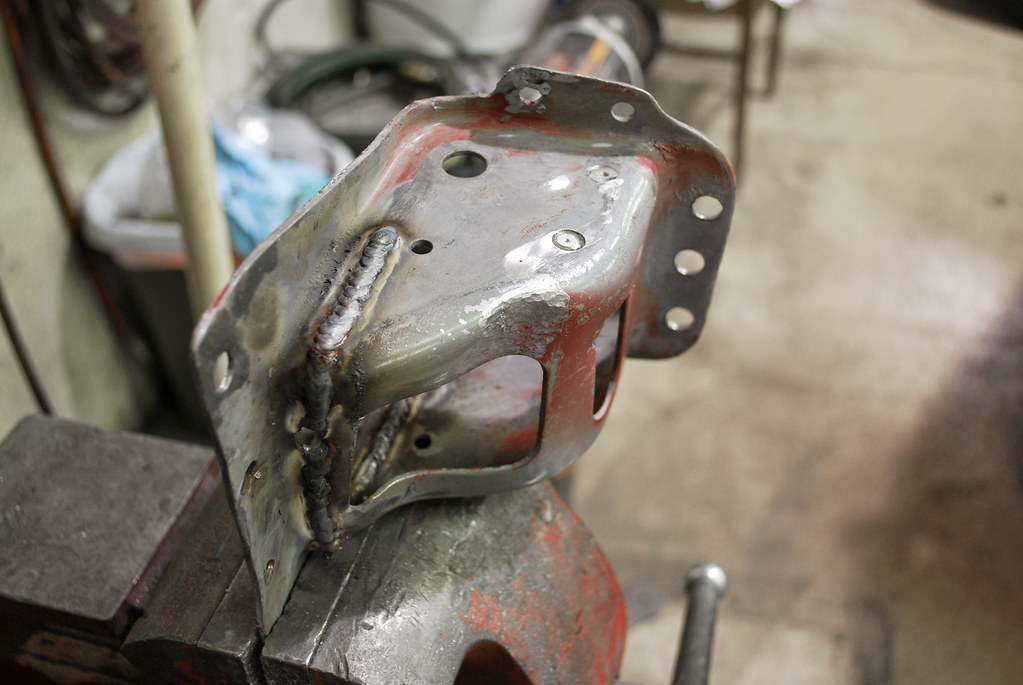
In the following pictures you can see the gash I had to put in the factory metal to help line it up in its new home.
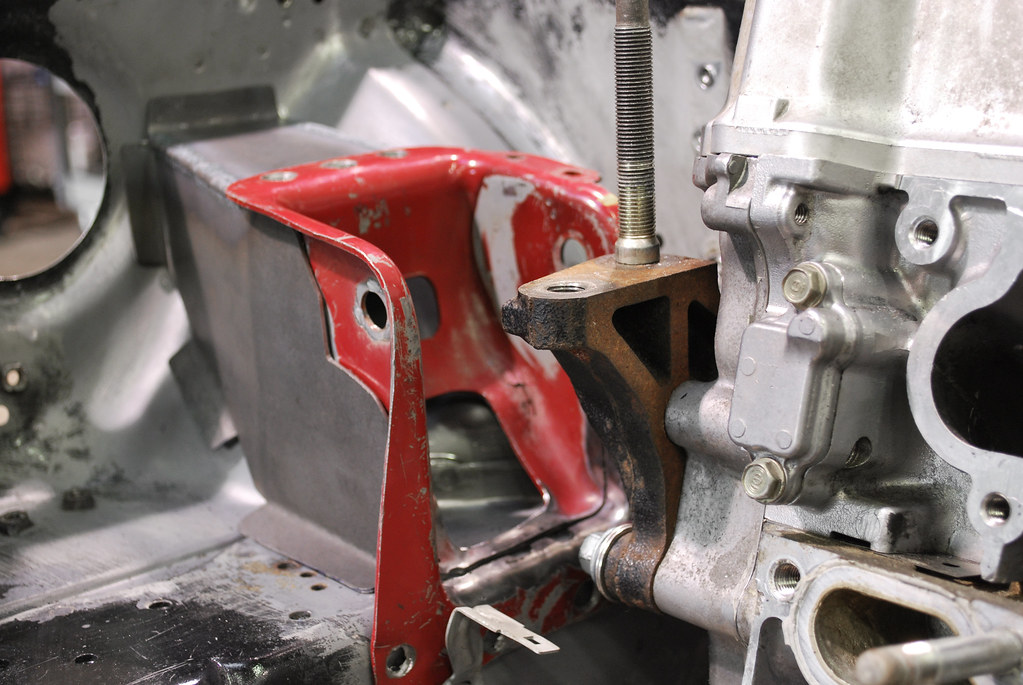
And then I moved the engine around a little bit up down and left right to make sure the engine mount would still go in the bracket easily. I knew there was some give at this point because nothing was permanently welded but since it all dropped back in smoothly I thought this was a good position.
All seemed to be a go. These lines are 3/16” meaning the bulkhead fittings are -3AN into the cabin.
In preparation of welding in the passenger mount bracket I sprayed a paint stripper on the fender apron to eat away the paint.
This means no scraping or sanding so no marks left behind. As a side benefit, it also softened up the seam sealer allow it to fall away pretty easily. Certain sections of the mount bracket still showed some of the fender apron so unnecessary holes would have to be filled and smoothed.
Everything went back in for more mock up. I kept installing and removing this to make sure it is easy enough to realign the mount time and again. I didn’t want to weld it in without triple checking everything so that the mount would be difficult to line up as the engine went in and out for whatever reason down the road.
I did make some minor adjustment to the second stage of the transmission bracket.
I took some material off the top of the mount which allowed me to bring the rear flap and side braces further down. This made the entire bracket line up better with the rail.
With this stage nearing a more completed state I asked Brandon (Type_Rs) to weld the engine side bracket to complete everything visually.
In the following pictures you can see the gash I had to put in the factory metal to help line it up in its new home.
And then I moved the engine around a little bit up down and left right to make sure the engine mount would still go in the bracket easily. I knew there was some give at this point because nothing was permanently welded but since it all dropped back in smoothly I thought this was a good position.
09-06-2012, 10:36 AM
#22
Honda-Tech Member
Thread Starter
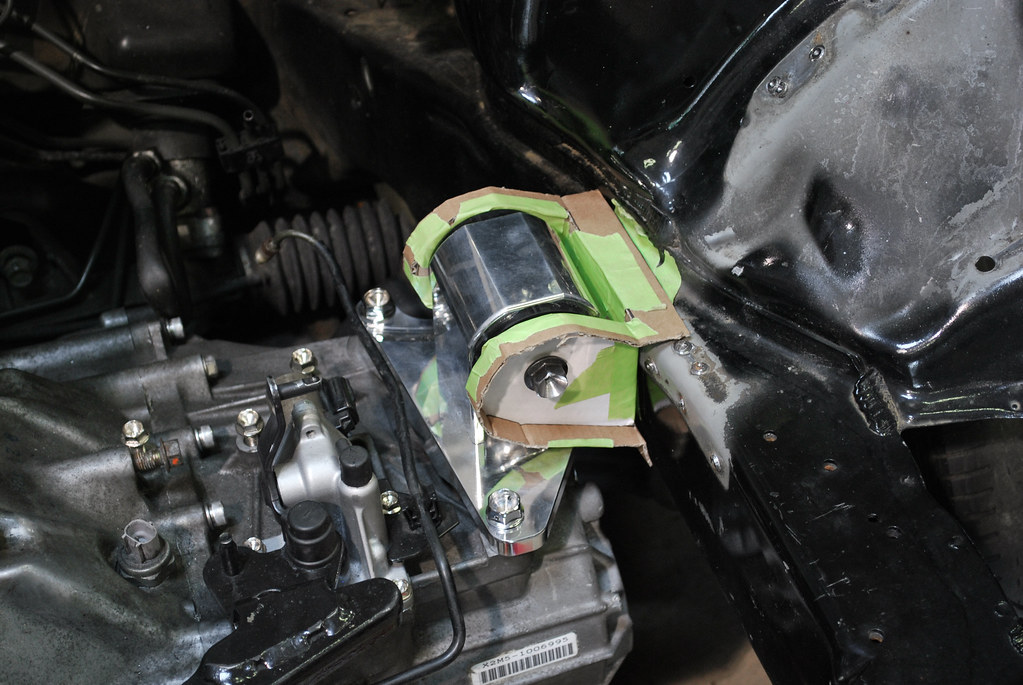
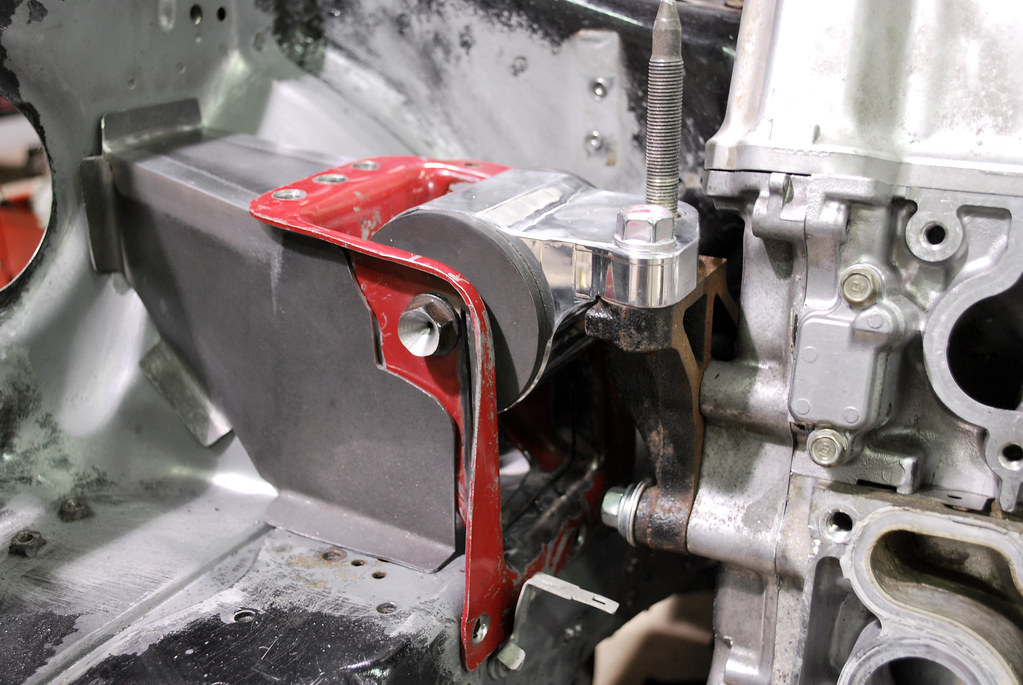
Again with letting the mounts in place while I stewed on them. This means I had time to ask Brandon to weld up the perimeter of the battery box.
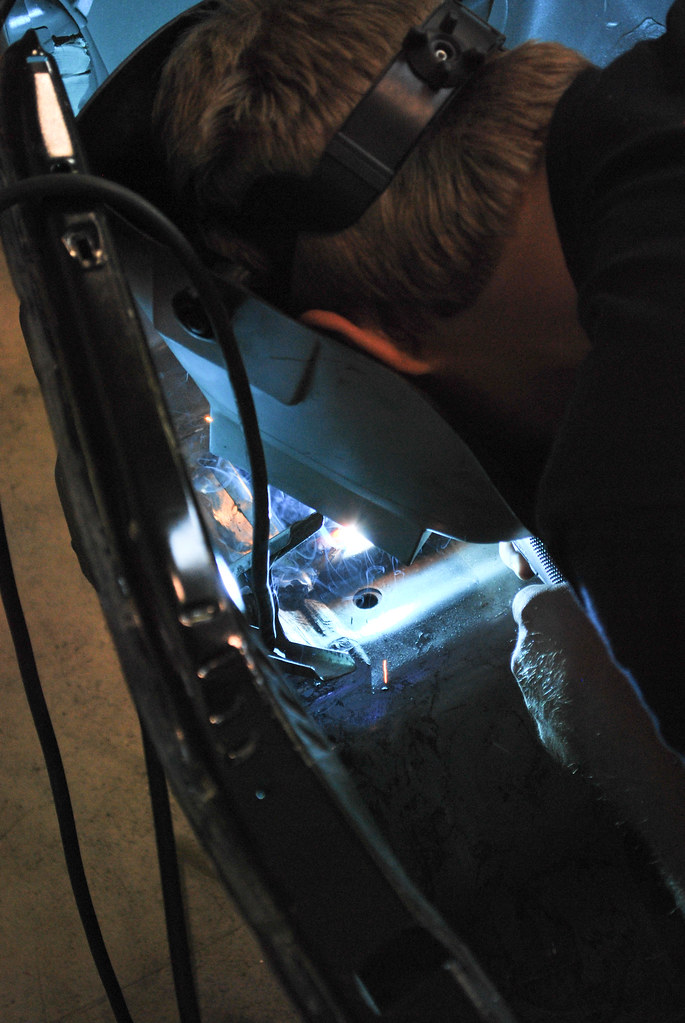
The car was too far from the TIG welding station so he had to do with MIG. I love asking him to MIG weld because he always complains about it. More on that later, I assure you.

He also closed up the gash in the mount. I had to squeeze it together in the vice so it would close almost fully and then he welded it. Pretty good job or at least a lot better than I could do!
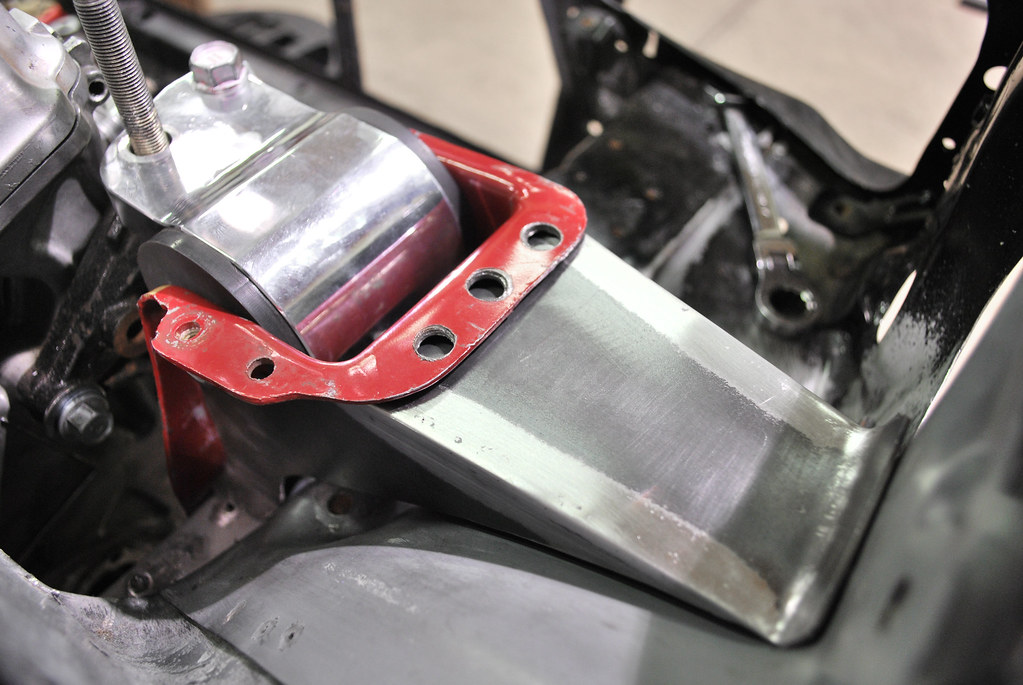
After it cooled I dropped it back into place to make sure the front flange would sit flush with the rail. It was about as perfect as I could have asked for.
Everyone has their little niche when it comes to group projects. I can’t weld for the life of me, but I am a perfectionist when it comes to fit and finish. The guys will often leave me to make smaller things which require a precise eye or an exact cut. Sometimes that only means grinding welds smooth.

Eh, I take pride in the little things so it’s something I try to make it as perfect as I can. Trust me when I tell you that this is only the first day of the grinding/sanding/smoothing. I worked on this bracket on and off for three weeks or more just tweaking it whenever I had down time.
The car was too far from the TIG welding station so he had to do with MIG. I love asking him to MIG weld because he always complains about it. More on that later, I assure you.
He also closed up the gash in the mount. I had to squeeze it together in the vice so it would close almost fully and then he welded it. Pretty good job or at least a lot better than I could do!
After it cooled I dropped it back into place to make sure the front flange would sit flush with the rail. It was about as perfect as I could have asked for.
Everyone has their little niche when it comes to group projects. I can’t weld for the life of me, but I am a perfectionist when it comes to fit and finish. The guys will often leave me to make smaller things which require a precise eye or an exact cut. Sometimes that only means grinding welds smooth.
Eh, I take pride in the little things so it’s something I try to make it as perfect as I can. Trust me when I tell you that this is only the first day of the grinding/sanding/smoothing. I worked on this bracket on and off for three weeks or more just tweaking it whenever I had down time.