

resistor box install for dummies w/pics
 02-21-2012, 06:25 AM
#1
Honda-Tech Member
Thread Starter
Join Date: May 2010
Location: ny, south of buffalo
Posts: 346
Likes: 0
Received 0 Likes
on
0 Posts
well when i was first researching how to do the resistor box install for my h22 swap i just could not find an easy write up that i understood easily. so once i finally understood what was needed to get the job done and how easy it actually is i decided to do a write up. no stupid diagrams drawn in paint and half assed explanations. just easy to follow pics and a quick description.
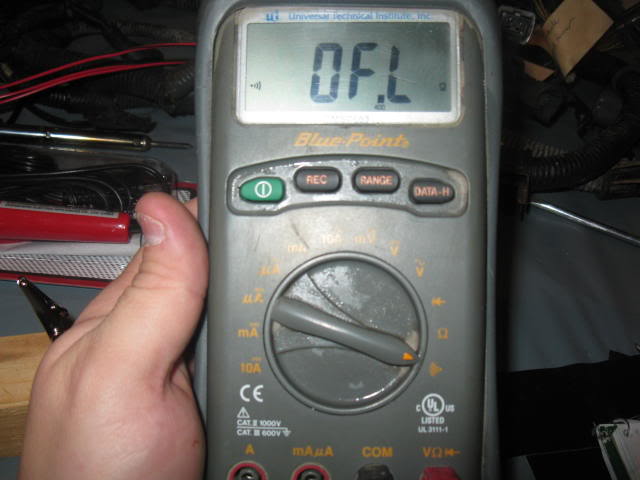
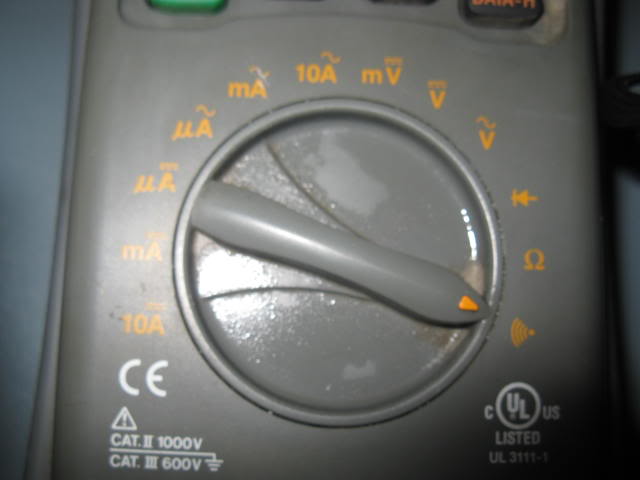
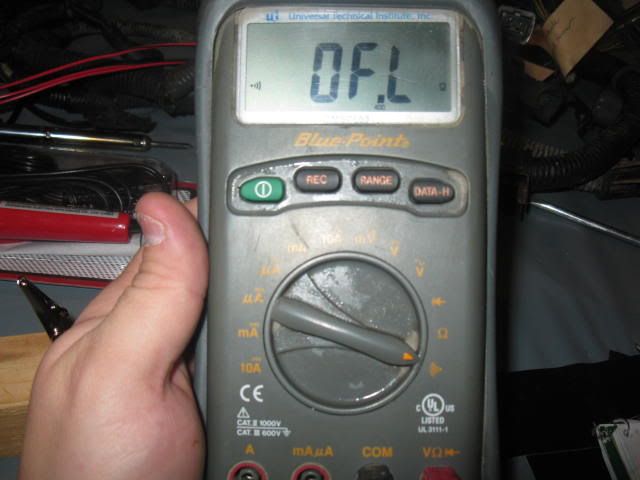
first you will need a volt/ohm meter and set it to continuity. the arrow on the dial is pointed to where it needs to be on my model volt/ohm meter.
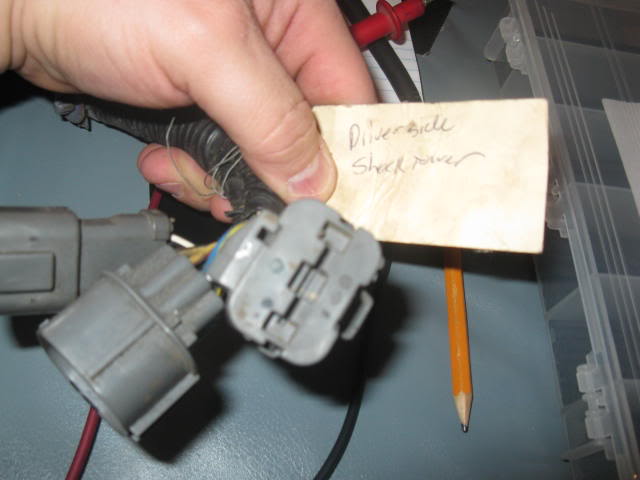
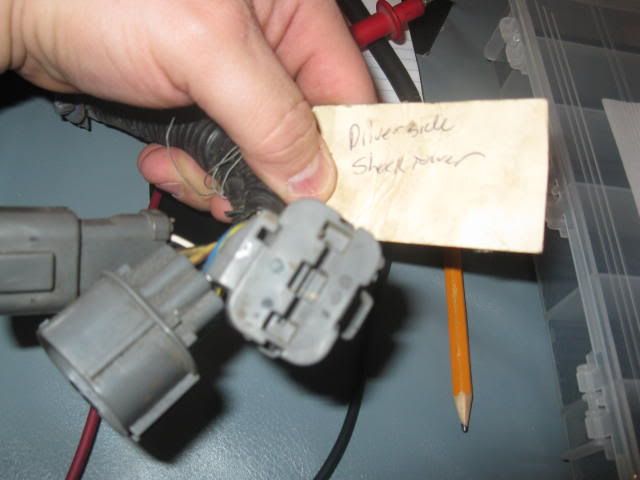
next you will have to locate this group of connectors and identify the one with plug. located on the driver side shock tower.
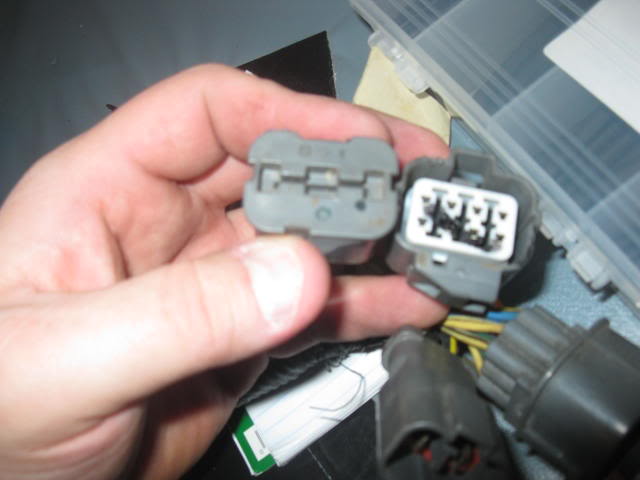
remove the plug, push in the button on the side and use a screw driver to pry the plug out.
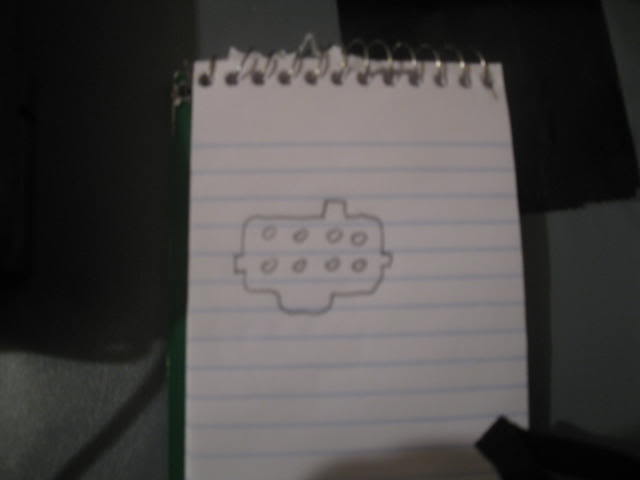
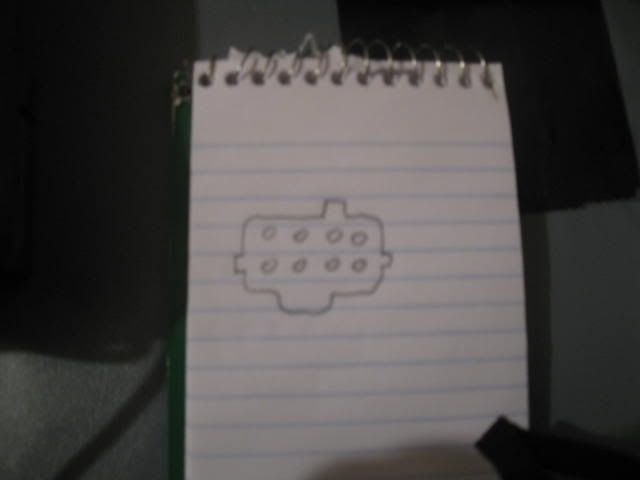
take your awesome drawing skills and make a sketch of the connector.
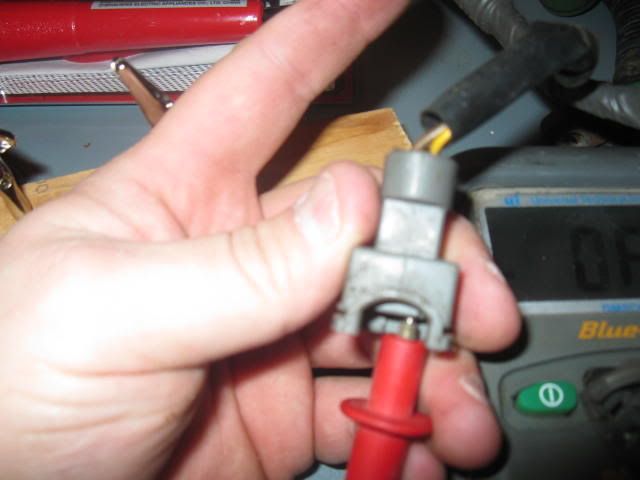
now unplug your injector connectors. go back to the plug with the block off plate and take note of what color wires are there. mine where all yellow. look for that color wire on the injector pigtail and insert 1 probe lead into that side of the connector.
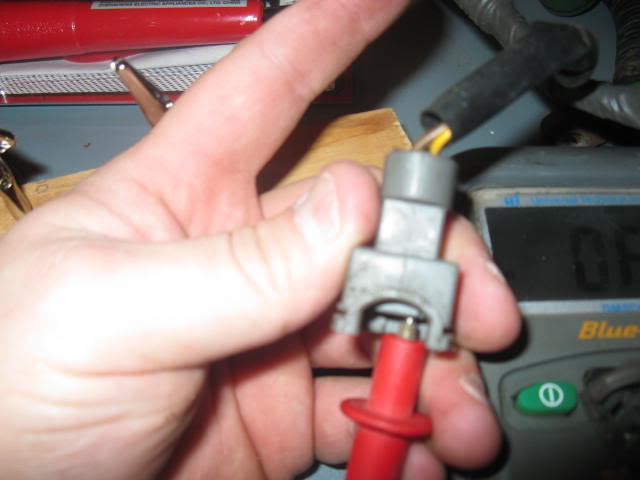
now take your other lead and start probing the plug that had the block off.
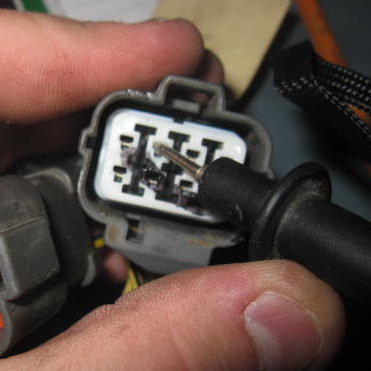
once your volt/ohm meter makes an audible sound(like mine) or lights up like some, mark that pin on your sketch that you drew with your mad art skillz.
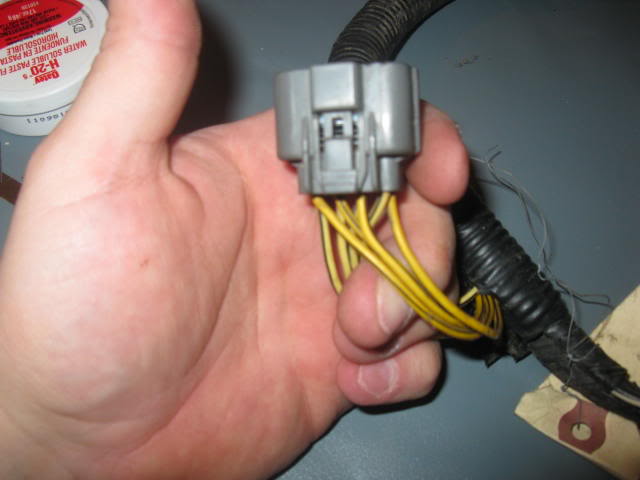
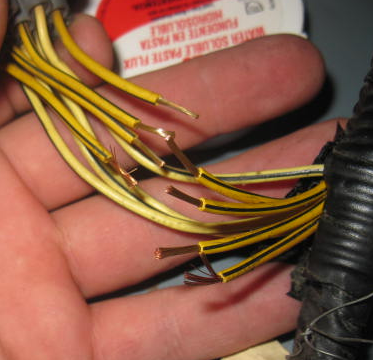
once you have identified those 4 wires that go to your injectors, cut and strip them.

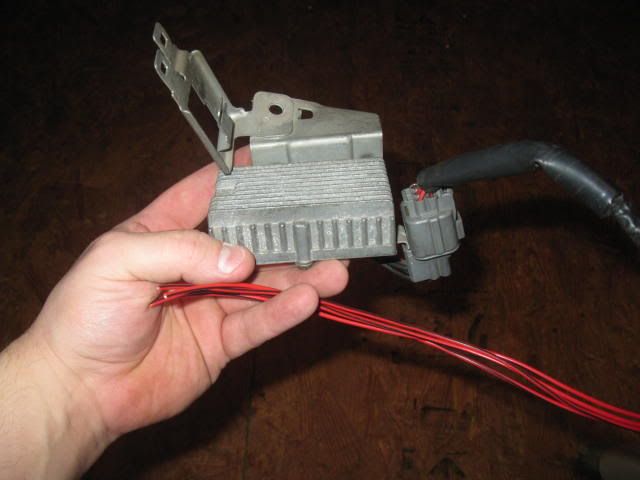
now get your resistor box

i was lucky enough to have both connectors to mine so i decided to make mine removable. here you see just the one side of the plug.
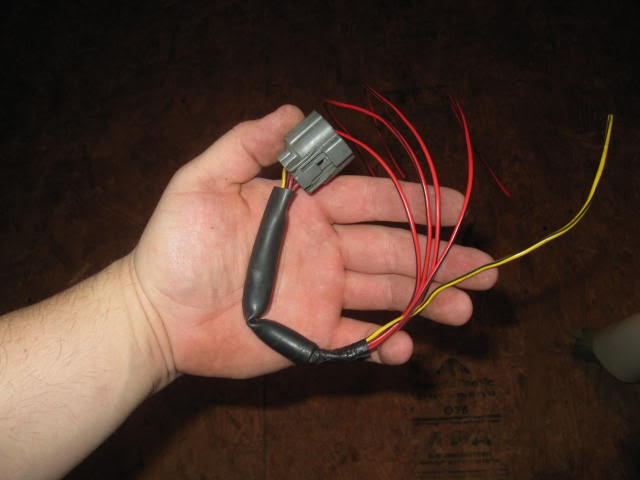
you can hard wire just the box in if you like.
cut and strip the 4 red wires and the one yellow wire to what ever length you want(dependent upon where you want to place it).
take the yellow wire from the resistor box connector and the 4 yellow wires on the plug side of the harness connector and twist them together and solder.
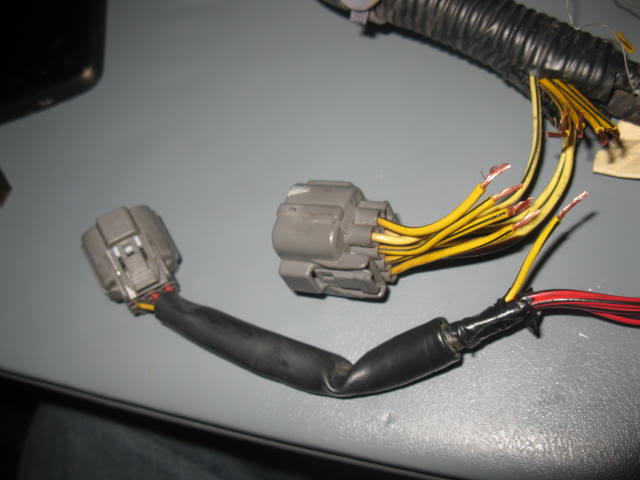
seen in the lower right of this picture.
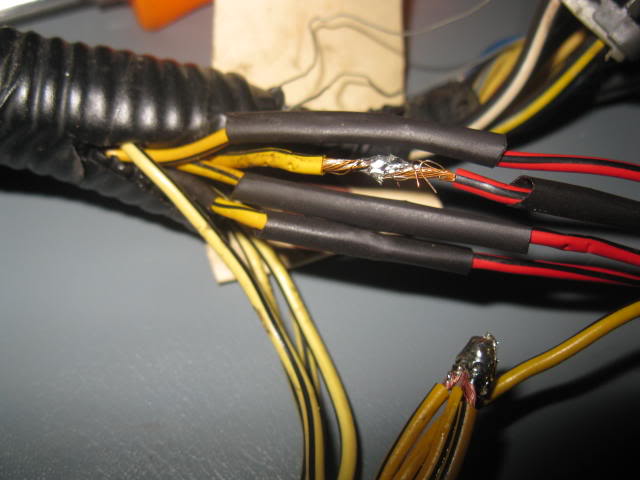
now take the remaining red wires from the resistor box and solder them individually to each remaining yellow wire on the harness. dont forget to add your heat shrink to the wire BEFORE you solder. also the order does not matter as far as which red wire goes to which yellow wire.
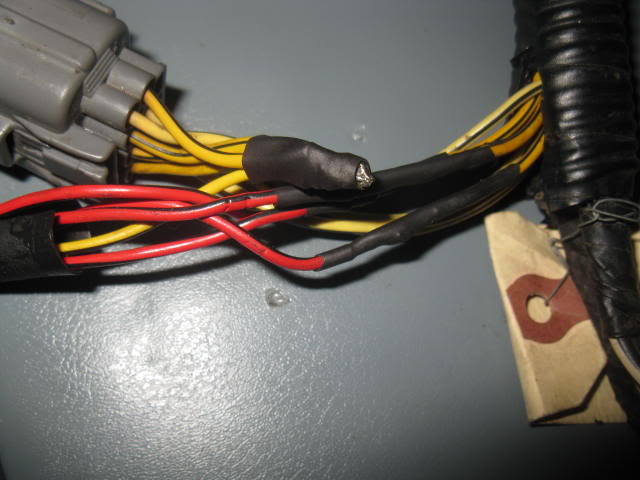
now just take electrical tape and make it all pretty and dont forget to reinstall the plug on the harness connector.
you are now done and your resistor box is installed.
adam jeffery
first you will need a volt/ohm meter and set it to continuity. the arrow on the dial is pointed to where it needs to be on my model volt/ohm meter.
next you will have to locate this group of connectors and identify the one with plug. located on the driver side shock tower.
remove the plug, push in the button on the side and use a screw driver to pry the plug out.
take your awesome drawing skills and make a sketch of the connector.
now unplug your injector connectors. go back to the plug with the block off plate and take note of what color wires are there. mine where all yellow. look for that color wire on the injector pigtail and insert 1 probe lead into that side of the connector.
now take your other lead and start probing the plug that had the block off.
once your volt/ohm meter makes an audible sound(like mine) or lights up like some, mark that pin on your sketch that you drew with your mad art skillz.
once you have identified those 4 wires that go to your injectors, cut and strip them.
now get your resistor box
i was lucky enough to have both connectors to mine so i decided to make mine removable. here you see just the one side of the plug.
you can hard wire just the box in if you like.
cut and strip the 4 red wires and the one yellow wire to what ever length you want(dependent upon where you want to place it).
take the yellow wire from the resistor box connector and the 4 yellow wires on the plug side of the harness connector and twist them together and solder.
seen in the lower right of this picture.
now take the remaining red wires from the resistor box and solder them individually to each remaining yellow wire on the harness. dont forget to add your heat shrink to the wire BEFORE you solder. also the order does not matter as far as which red wire goes to which yellow wire.
now just take electrical tape and make it all pretty and dont forget to reinstall the plug on the harness connector.
you are now done and your resistor box is installed.
adam jeffery
Last edited by farfrumugen; 02-21-2012 at 07:31 AM.
 02-21-2012, 06:32 AM
#2
The Grumpiest
iTrader: (4)
Join Date: May 2008
Location: Oak Ridge, TN, USA
Posts: 28,333
Likes: 0
Received 16 Likes
on
15 Posts
From an electrical dummy I'll have to say sticky this one! One thing to add, you should show the pic of the drawing you made of the plug AFTER you mapped each wire. Maybe even label/mark the wires at the plug so you can uninstall the box and return it to a stock condition later.
02-21-2012, 06:53 AM
#3
Honda-Tech Member
Thread Starter
Join Date: May 2010
Location: ny, south of buffalo
Posts: 346
Likes: 0
Received 0 Likes
on
0 Posts
yeah i must have forgotten a couple pics and will update this thread in a day or 2 when i have time to take a couple more. i didnt take a pic of the finished job either...bummer. well at least the harness is here at the house to take more pics of it...lol
adam jeffery
adam jeffery
02-21-2012, 07:18 AM
#4
Seagull Management
Join Date: Jun 2008
Location: Miramichi, NB, Canada
Posts: 15,150
Likes: 0
Received 24 Likes
on
22 Posts
You can use an old plug cut off an old distributor or A/C harness to make this whole thing plug and play (plugs in where that cap is) I made up a harness like this for someone one time.
02-21-2012, 07:20 AM
#5
Honda-Tech Member
Join Date: Feb 2009
Location: Long Beach, CA
Posts: 1,042
Likes: 0
Received 0 Likes
on
0 Posts
my question is, what is the job of a resistor box? is it for n/a, turbo, etc?
are you feeling significant improvement on the engine?
how do you know if you have low or high impedance fuel injectors?
please explain, i am clueless as to what it does
are you feeling significant improvement on the engine?
how do you know if you have low or high impedance fuel injectors?
please explain, i am clueless as to what it does
02-21-2012, 07:29 AM
#6
Honda-Tech Member
Thread Starter
Join Date: May 2010
Location: ny, south of buffalo
Posts: 346
Likes: 0
Received 0 Likes
on
0 Posts
you need the resistor box for an h22 swap. the injectors are diff than that of a civic. if you dont do this on an h22 swap you will fry your ecu.
adam jeffery
adam jeffery
Trending Topics
02-21-2012, 08:10 AM
#8
Seagull Management
Join Date: Jun 2008
Location: Miramichi, NB, Canada
Posts: 15,150
Likes: 0
Received 24 Likes
on
22 Posts
You need to run a resistor box of you're running peak and hold injectors. Most H-series preludes, F-series Accords and older OBD0 Civics and Integras used this type of injectors. Also most of the larger injectors used for turbos are peak and hold as well. Most other OBD1 & OBD2 Hondas use saturated injectors which do not use an injector box. Using peak and hold injectors without a resistor box will burn up the injector drivers in the ECU.
02-21-2012, 08:26 AM
#9
Honda-Tech Member
Thread Starter
Join Date: May 2010
Location: ny, south of buffalo
Posts: 346
Likes: 0
Received 0 Likes
on
0 Posts
thanks for the tip
adam jeffery
02-21-2012, 09:06 AM
#10
Honda-Tech Member
Join Date: Feb 2009
Location: Long Beach, CA
Posts: 1,042
Likes: 0
Received 0 Likes
on
0 Posts
You need to run a resistor box of you're running peak and hold injectors. Most H-series preludes, F-series Accords and older OBD0 Civics and Integras used this type of injectors. Also most of the larger injectors used for turbos are peak and hold as well. Most other OBD1 & OBD2 Hondas use saturated injectors which do not use an injector box. Using peak and hold injectors without a resistor box will burn up the injector drivers in the ECU.
02-21-2012, 07:17 PM
#11
Honda-Tech Member
Thread Starter
Join Date: May 2010
Location: ny, south of buffalo
Posts: 346
Likes: 0
Received 0 Likes
on
0 Posts
06-04-2012, 03:35 PM
#12
Honda-Tech Member
Join Date: Apr 2008
Location: stamford, CT, United States
Posts: 354
Likes: 0
Received 0 Likes
on
0 Posts
I installed a resistor box into my 1994 honda del dol via the blocked off plug on the shock D/s tower. I made all my injector connections. but i cut the plug off not thinking like a ****ing idiot!! re reading all the directions thinking i did something wrong and it was to late.... i cut the plug off thinking i didnt need it. what do i do now!!! please help! i come bearing pictures!

Last edited by Former User; 06-04-2012 at 04:35 PM.
11-03-2013, 06:57 AM
#14
Honda-Tech Member

Join Date: Nov 2013
Posts: 5
Likes: 0
Received 0 Likes
on
0 Posts
well when i was first researching how to do the resistor box install for my h22 swap i just could not find an easy write up that i understood easily. so once i finally understood what was needed to get the job done and how easy it actually is i decided to do a write up. no stupid diagrams drawn in paint and half assed explanations. just easy to follow pics and a quick description.
first you will need a volt/ohm meter and set it to continuity. the arrow on the dial is pointed to where it needs to be on my model volt/ohm meter.

next you will have to locate this group of connectors and identify the one with plug. located on the driver side shock tower.
remove the plug, push in the button on the side and use a screw driver to pry the plug out.

take your awesome drawing skills and make a sketch of the connector.
now unplug your injector connectors. go back to the plug with the block off plate and take note of what color wires are there. mine where all yellow. look for that color wire on the injector pigtail and insert 1 probe lead into that side of the connector.
now take your other lead and start probing the plug that had the block off.

once your volt/ohm meter makes an audible sound(like mine) or lights up like some, mark that pin on your sketch that you drew with your mad art skillz.
once you have identified those 4 wires that go to your injectors, cut and strip them.

now get your resistor box
i was lucky enough to have both connectors to mine so i decided to make mine removable. here you see just the one side of the plug.

you can hard wire just the box in if you like.
cut and strip the 4 red wires and the one yellow wire to what ever length you want(dependent upon where you want to place it).
take the yellow wire from the resistor box connector and the 4 yellow wires on the plug side of the harness connector and twist them together and solder.

seen in the lower right of this picture.

now take the remaining red wires from the resistor box and solder them individually to each remaining yellow wire on the harness. dont forget to add your heat shrink to the wire BEFORE you solder. also the order does not matter as far as which red wire goes to which yellow wire.

now just take electrical tape and make it all pretty and dont forget to reinstall the plug on the harness connector.
you are now done and your resistor box is installed.
adam jeffery
first you will need a volt/ohm meter and set it to continuity. the arrow on the dial is pointed to where it needs to be on my model volt/ohm meter.
next you will have to locate this group of connectors and identify the one with plug. located on the driver side shock tower.
remove the plug, push in the button on the side and use a screw driver to pry the plug out.
take your awesome drawing skills and make a sketch of the connector.
now unplug your injector connectors. go back to the plug with the block off plate and take note of what color wires are there. mine where all yellow. look for that color wire on the injector pigtail and insert 1 probe lead into that side of the connector.
now take your other lead and start probing the plug that had the block off.
once your volt/ohm meter makes an audible sound(like mine) or lights up like some, mark that pin on your sketch that you drew with your mad art skillz.
once you have identified those 4 wires that go to your injectors, cut and strip them.
now get your resistor box
i was lucky enough to have both connectors to mine so i decided to make mine removable. here you see just the one side of the plug.
you can hard wire just the box in if you like.
cut and strip the 4 red wires and the one yellow wire to what ever length you want(dependent upon where you want to place it).
take the yellow wire from the resistor box connector and the 4 yellow wires on the plug side of the harness connector and twist them together and solder.
seen in the lower right of this picture.
now take the remaining red wires from the resistor box and solder them individually to each remaining yellow wire on the harness. dont forget to add your heat shrink to the wire BEFORE you solder. also the order does not matter as far as which red wire goes to which yellow wire.
now just take electrical tape and make it all pretty and dont forget to reinstall the plug on the harness connector.
you are now done and your resistor box is installed.
adam jeffery
11-10-2013, 07:04 AM
#15
Honda-Tech Member
Join Date: Nov 2013
Posts: 5
Likes: 0
Received 0 Likes
on
0 Posts
well when i was first researching how to do the resistor box install for my h22 swap i just could not find an easy write up that i understood easily. so once i finally understood what was needed to get the job done and how easy it actually is i decided to do a write up. no stupid diagrams drawn in paint and half assed explanations. just easy to follow pics and a quick description.
first you will need a volt/ohm meter and set it to continuity. the arrow on the dial is pointed to where it needs to be on my model volt/ohm meter.
next you will have to locate this group of connectors and identify the one with plug. located on the driver side shock tower.
remove the plug, push in the button on the side and use a screw driver to pry the plug out.
take your awesome drawing skills and make a sketch of the connector.
now unplug your injector connectors. go back to the plug with the block off plate and take note of what color wires are there. mine where all yellow. look for that color wire on the injector pigtail and insert 1 probe lead into that side of the connector.
now take your other lead and start probing the plug that had the block off.
once your volt/ohm meter makes an audible sound(like mine) or lights up like some, mark that pin on your sketch that you drew with your mad art skillz.
once you have identified those 4 wires that go to your injectors, cut and strip them.
now get your resistor box
i was lucky enough to have both connectors to mine so i decided to make mine removable. here you see just the one side of the plug.
you can hard wire just the box in if you like.
cut and strip the 4 red wires and the one yellow wire to what ever length you want(dependent upon where you want to place it).
take the yellow wire from the resistor box connector and the 4 yellow wires on the plug side of the harness connector and twist them together and solder.
seen in the lower right of this picture.
now take the remaining red wires from the resistor box and solder them individually to each remaining yellow wire on the harness. dont forget to add your heat shrink to the wire BEFORE you solder. also the order does not matter as far as which red wire goes to which yellow wire.
now just take electrical tape and make it all pretty and dont forget to reinstall the plug on the harness connector.
you are now done and your resistor box is installed.
adam jeffery

Thread
Thread Starter
Forum
Replies
Last Post
Snail Tuning
Forced Induction
9
02-03-2005 07:17 PM
caliprelude3087
Honda Prelude
1
07-14-2004 12:56 AM
tvrsir
Honda Civic / Del Sol (1992 - 2000)
2
10-09-2003 06:52 PM