

H2B Integra - H23A VTEC
 05-30-2013, 03:30 PM
#1
Honda-Tech Member
Thread Starter
Join Date: Jan 2005
Location: b00sting my D16s, SoWis, USA
Posts: 7,015
Likes: 0
Received 7 Likes
on
5 Posts
I just finished an F2B in my winter beater (stock F22B2), now I'm getting my 94 Integra ready for the same treatment. It won't be anything crazy since it's for my DD, although I do plan to adapt the Integra A/C compressor onto the H-series block. My goal is to get it done before June 8th.
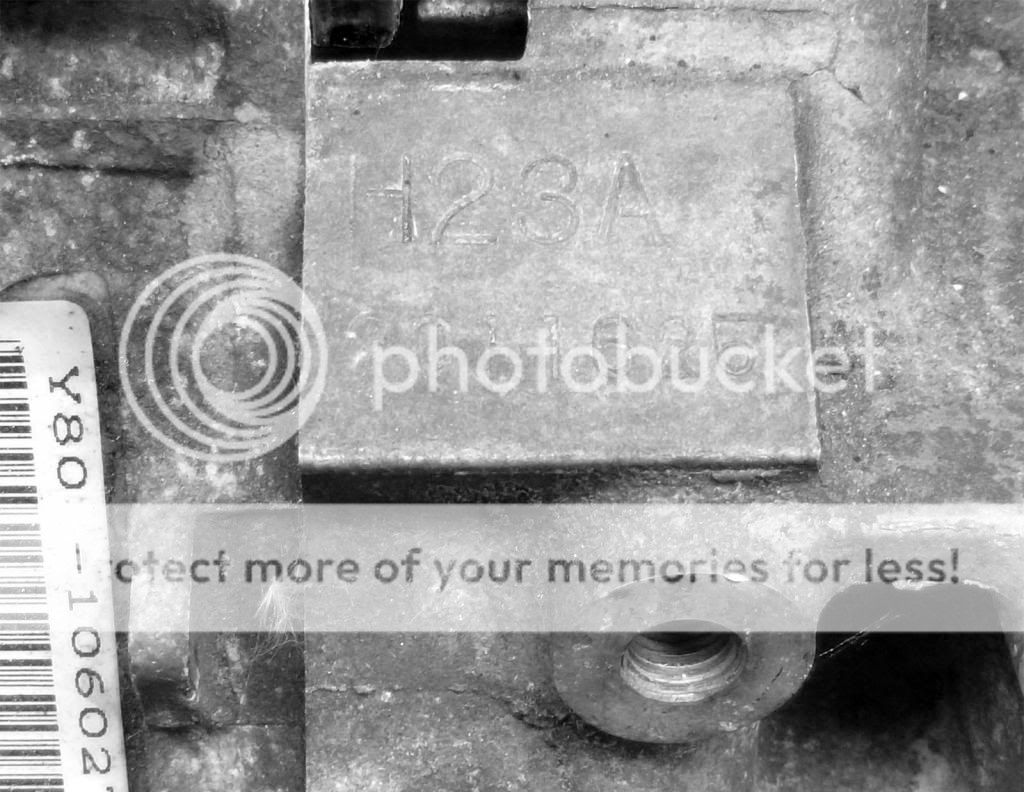
It will be an OEM H23A dohc vtec "bluetop" from an ebay importer I scored for half price. A bolt near the autotensioner broke on the cargo ship, and they didn't want to try putting it back together. $50 later (Gates t-belt, oem bolt, misc little stuff) and it was ready to go.
Parts list:
H23A vtec w/manual timing tensioner (similar to Kaizenspeed's)
eCtune in a P28 w/custom harness
Omni 4bar (limited edition in Pink)
370cc Bosch EV14 injectors from InjectorNation.com
62mm throttle body (stock for H23A)
3" short ram w/K&N cone filter
noname ebay header w/2.5" collector
noname 60mm exhaust w/06+ Si muffler
ACT HDSS clutch & 12lb flywheel
LS trans (since it's a DD)
Raxles axles with just a few thousand miles
Stock mounts w/Prothane inserts
H2B adapter plate: none. Plateless!
It will be done just like my Del Sol's F2B, w/o a plate. It uses brackets I made and centers the input shaft & crank similar to SpeedFactory's D2B kit. All of the additional bolts are 1/2" Grade 8, same strength as the OEM 12mm Grade 10.8 bolts. The header in my Del Sol bolted right up to the stock exhaust, so the H22 header should pose no problem.


 <---- Look at the engraving!
Thanks for looking,

It will be an OEM H23A dohc vtec "bluetop" from an ebay importer I scored for half price. A bolt near the autotensioner broke on the cargo ship, and they didn't want to try putting it back together. $50 later (Gates t-belt, oem bolt, misc little stuff) and it was ready to go.
Parts list:
H23A vtec w/manual timing tensioner (similar to Kaizenspeed's)
eCtune in a P28 w/custom harness
Omni 4bar (limited edition in Pink)
370cc Bosch EV14 injectors from InjectorNation.com
62mm throttle body (stock for H23A)
3" short ram w/K&N cone filter
noname ebay header w/2.5" collector
noname 60mm exhaust w/06+ Si muffler
ACT HDSS clutch & 12lb flywheel
LS trans (since it's a DD)
Raxles axles with just a few thousand miles
Stock mounts w/Prothane inserts
H2B adapter plate: none. Plateless!
It will be done just like my Del Sol's F2B, w/o a plate. It uses brackets I made and centers the input shaft & crank similar to SpeedFactory's D2B kit. All of the additional bolts are 1/2" Grade 8, same strength as the OEM 12mm Grade 10.8 bolts. The header in my Del Sol bolted right up to the stock exhaust, so the H22 header should pose no problem.
<---- Look at the engraving!Thanks for looking,
 05-31-2013, 07:54 PM
#5
Honda-Tech Member
Thread Starter
Join Date: Jan 2005
Location: b00sting my D16s, SoWis, USA
Posts: 7,015
Likes: 0
Received 7 Likes
on
5 Posts
I got my countersink & flathead bolts, so the timing belt is all taken care of. I also got the IACV adapter drilled & tapped. The plate is sealed to the plenum with Hondabond, and the p28-style IACV bolts on like normal. The IACV wire has been extended to reach already.


06-07-2013, 05:39 PM
#6
Honda-Tech Member
Thread Starter
Join Date: Jan 2005
Location: b00sting my D16s, SoWis, USA
Posts: 7,015
Likes: 0
Received 7 Likes
on
5 Posts

Still lots to do before tomorrow, and then a lot after that.
I have 13hrs into it today, and I expect another 5-6hr before it's road-ready. At least the hardest stuff is over.

Trending Topics
06-09-2013, 07:59 AM
#8

Why so many injectors and map sensors? That grinding on the block and oil pan looks like an oil leak waiting to happen, you most likely damaged the oil pan gasket so I hop you at the least replaced it.
06-09-2013, 04:42 PM
#10
Honda-Tech Member
Thread Starter
Join Date: Jan 2005
Location: b00sting my D16s, SoWis, USA
Posts: 7,015
Likes: 0
Received 7 Likes
on
5 Posts
Correct, it looks like the factory ran a bead of hondabond all the way around.
I went at least 1/4" deeper than I really needed, since my Raxles axle boot uses the pinch-style boot band. I can assure you the Evo & QSD kits require much more grinding, here's a picture: http://i1110.photobucket.com/albums/...10218-1805.jpg
I used to build & sell the MAP sensors (2.5/3/4 BAR sensor inside), and now sell injectors.
06-11-2013, 10:21 AM
#11
Honda-Tech Member
Thread Starter
Join Date: Jan 2005
Location: b00sting my D16s, SoWis, USA
Posts: 7,015
Likes: 0
Received 7 Likes
on
5 Posts
I ran into an issue with the brake prop valve, it touches the manifold. It can be bent out of the way (1" down & towards the passenger side), but I'm planning on putting on all new lines. The last owner did a poor job with new lines when he deleted the ABS module, and my neighbor is letting me borrow his hydraulic double-flare tool.
The nice thing is the header fits, even though it's just a cheap ebay unit for a prelude. If my old exhaust wasn't shot, I'd have no issue adding the triangular flange to the test pipe, or changing it to the conical seat style used on the Integra.
The nice thing is the header fits, even though it's just a cheap ebay unit for a prelude. If my old exhaust wasn't shot, I'd have no issue adding the triangular flange to the test pipe, or changing it to the conical seat style used on the Integra.
 06-12-2013, 10:43 PM
#13
Honda-Tech Member
Thread Starter
Join Date: Jan 2005
Location: b00sting my D16s, SoWis, USA
Posts: 7,015
Likes: 0
Received 7 Likes
on
5 Posts
Yes, here's the basic run-down pictorial:
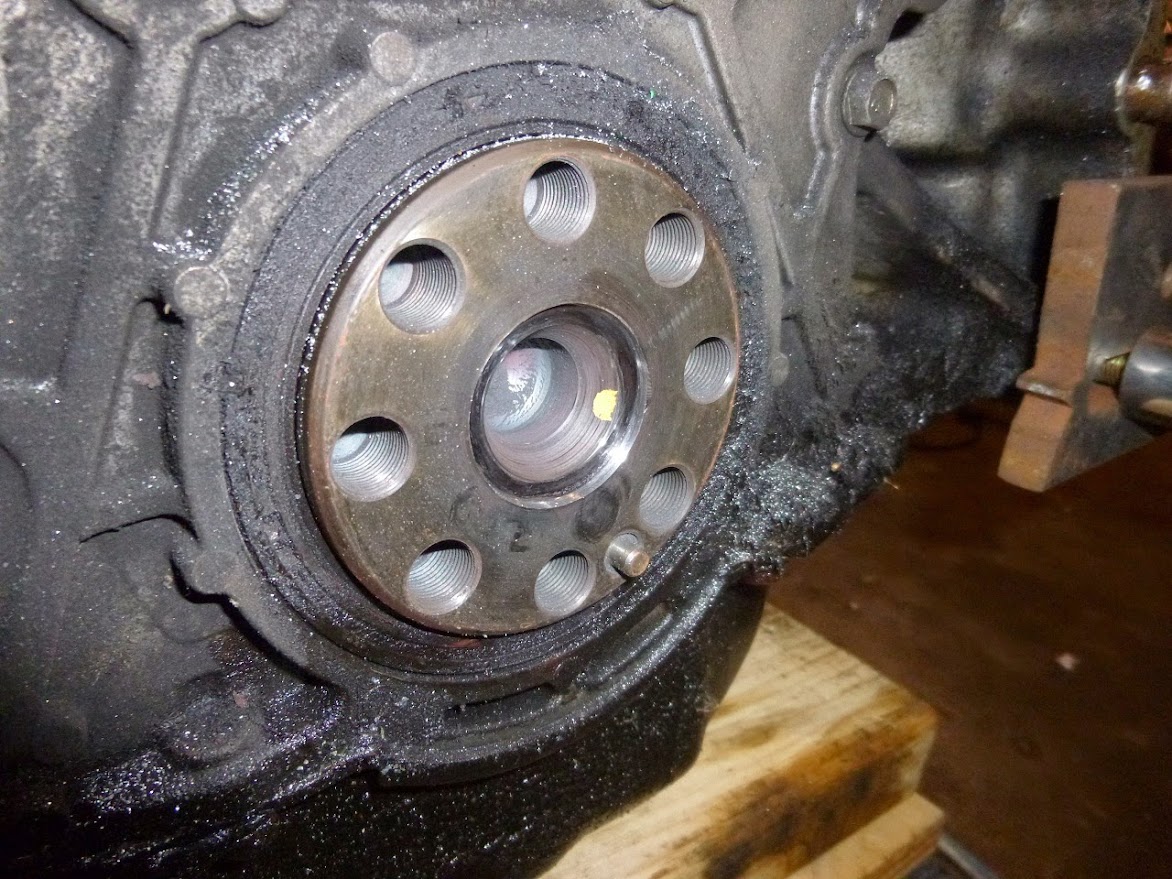
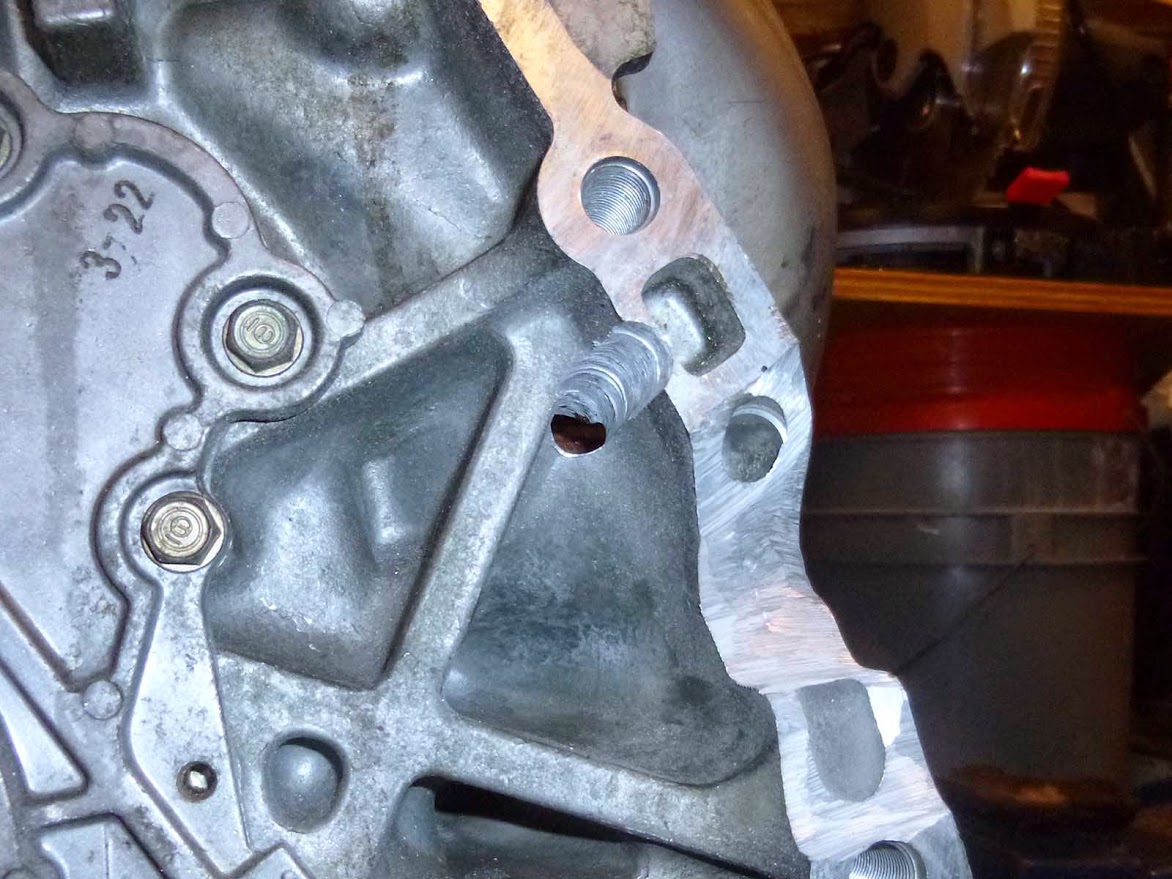
The first thing is to get the crankshaft ground out for a b-series pilot bearing. It needs to be at least 32mm wide and over 2mm deep. I used a stubby grinding bit in a rotozip.

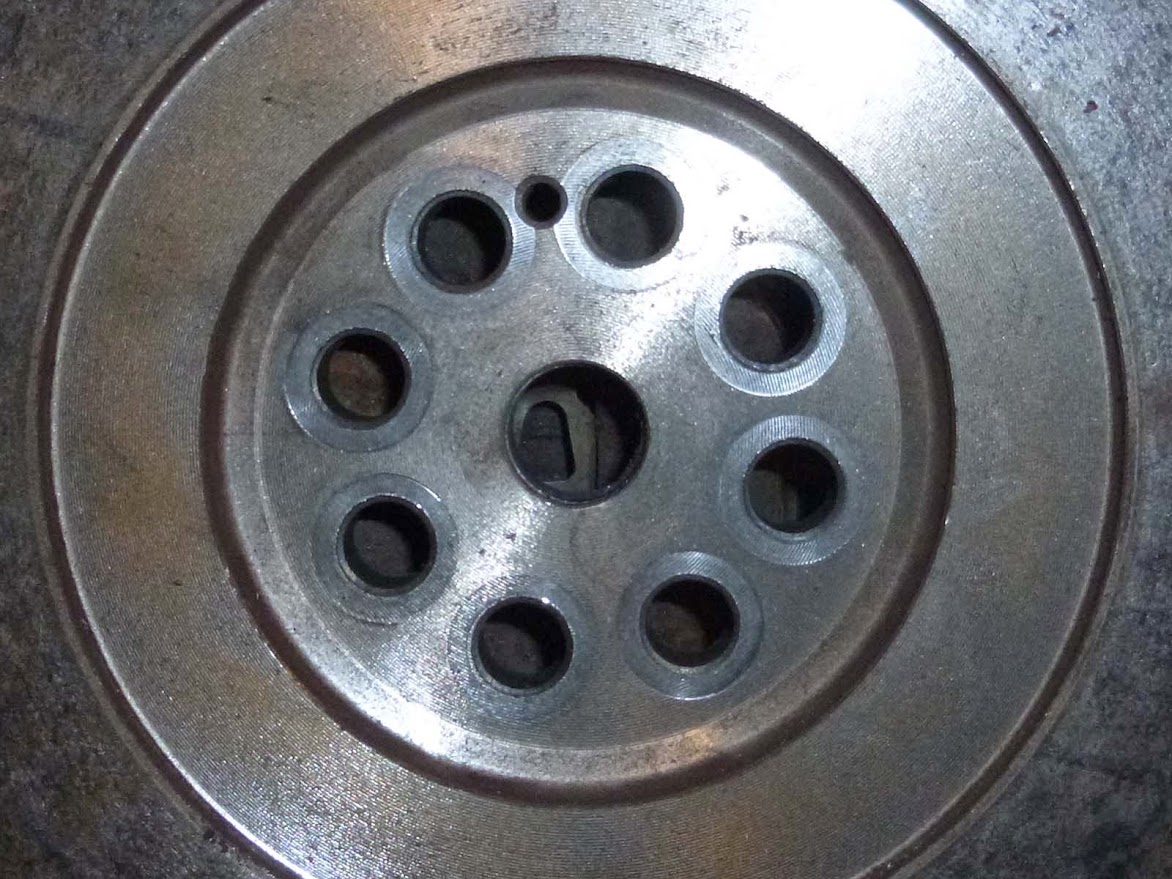
Next you have to drill the flywheel for the pin in the flywheel. You can also grind it off the crank.

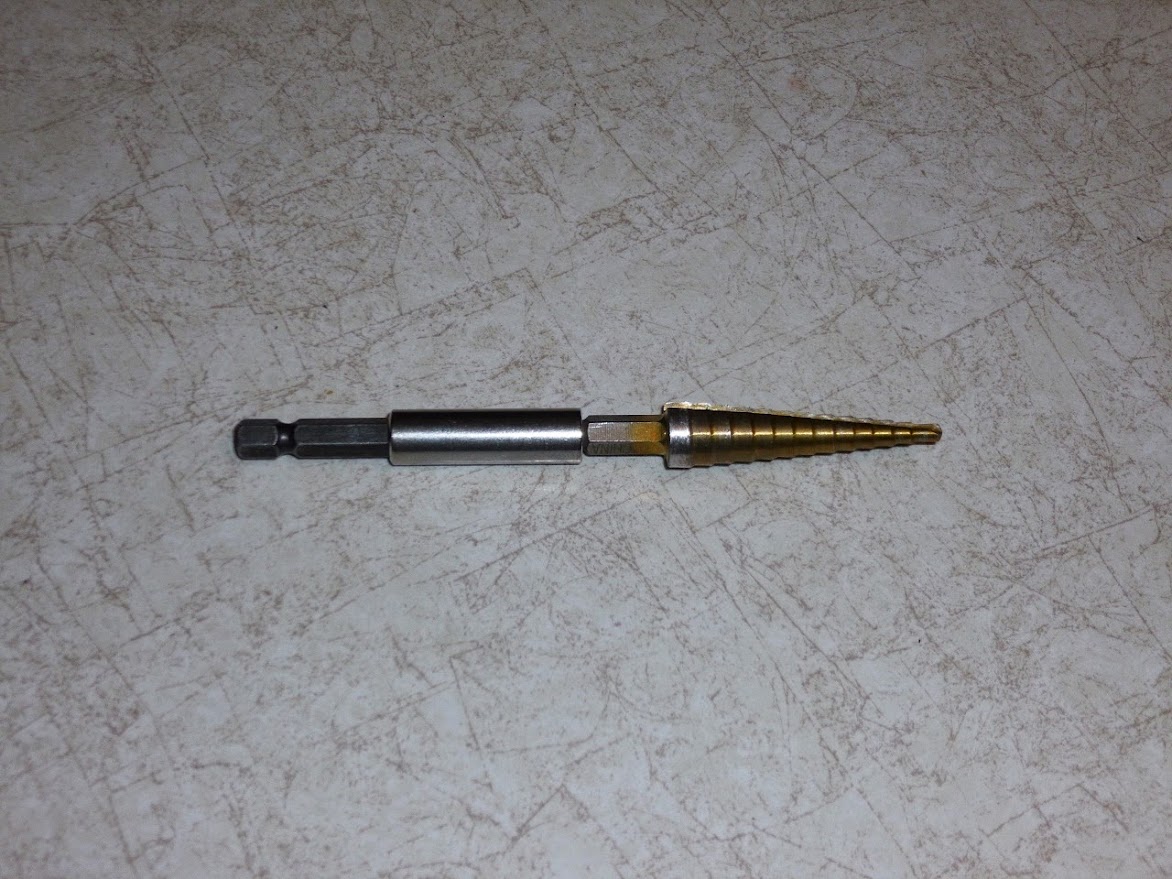
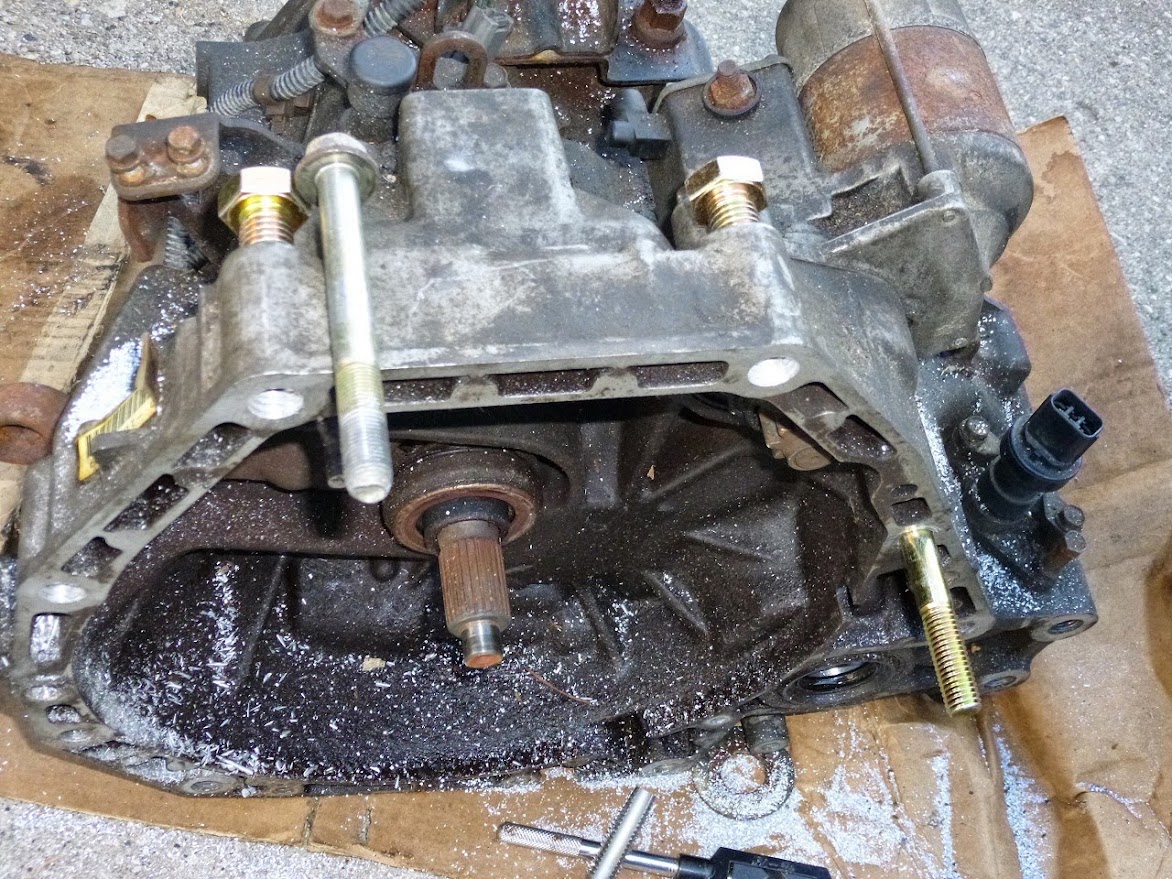
After that you enlarge the rear starter hole to 1/2". I used a step drill bit and a 1/4" hex bit extension to reach it all - make sure you start from the block side of the trans. Get creative with the bit (angle it) to slip the 1/2"x6" bolt through, or get a oversized 3-flute drill bit designed for enlarging holes in castings.

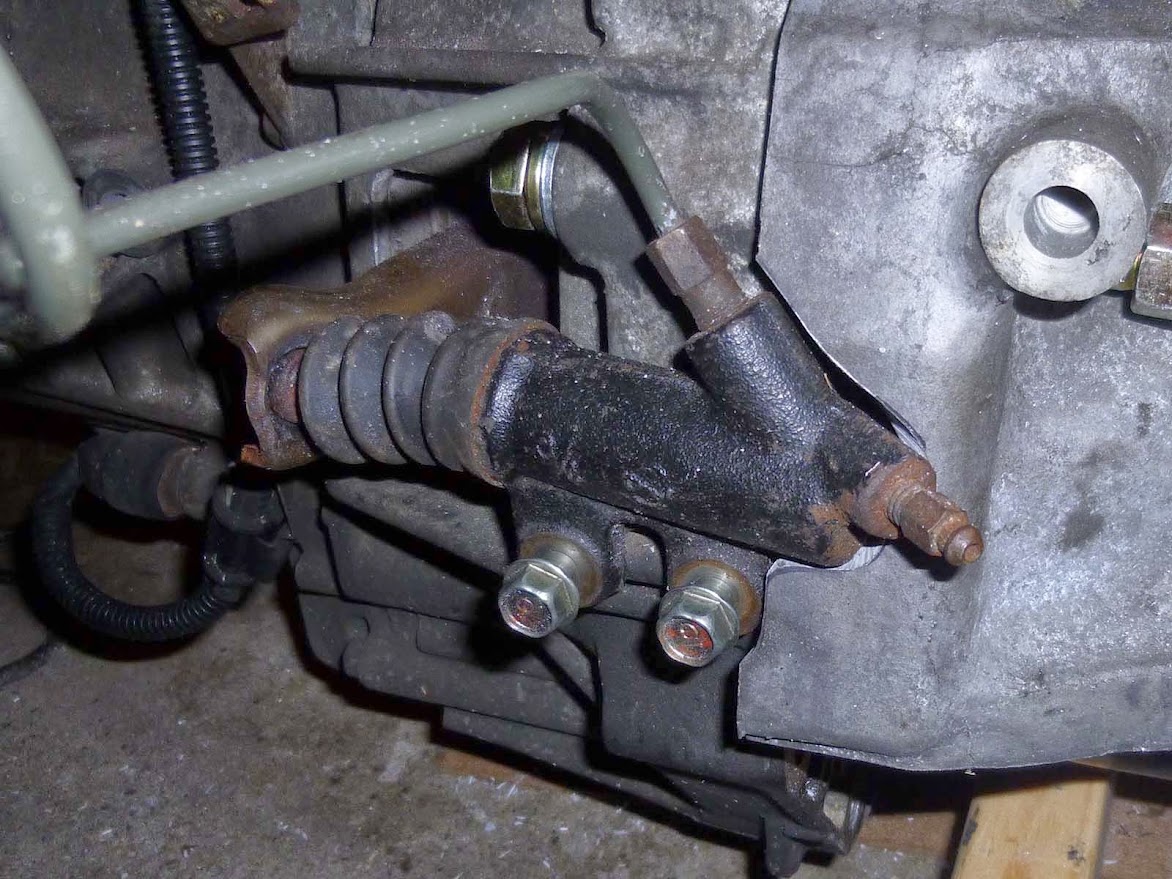
Now you can hang the trans from the block via the starter hole & pilot bearing. Drill a 1/2" hole for a 1/2"x5" bolt through the trans hole just above the clutch slave cylinder.

You can also work on that area to get the slave cylinder to fit. It will take some time, but the pics should give you a good start.


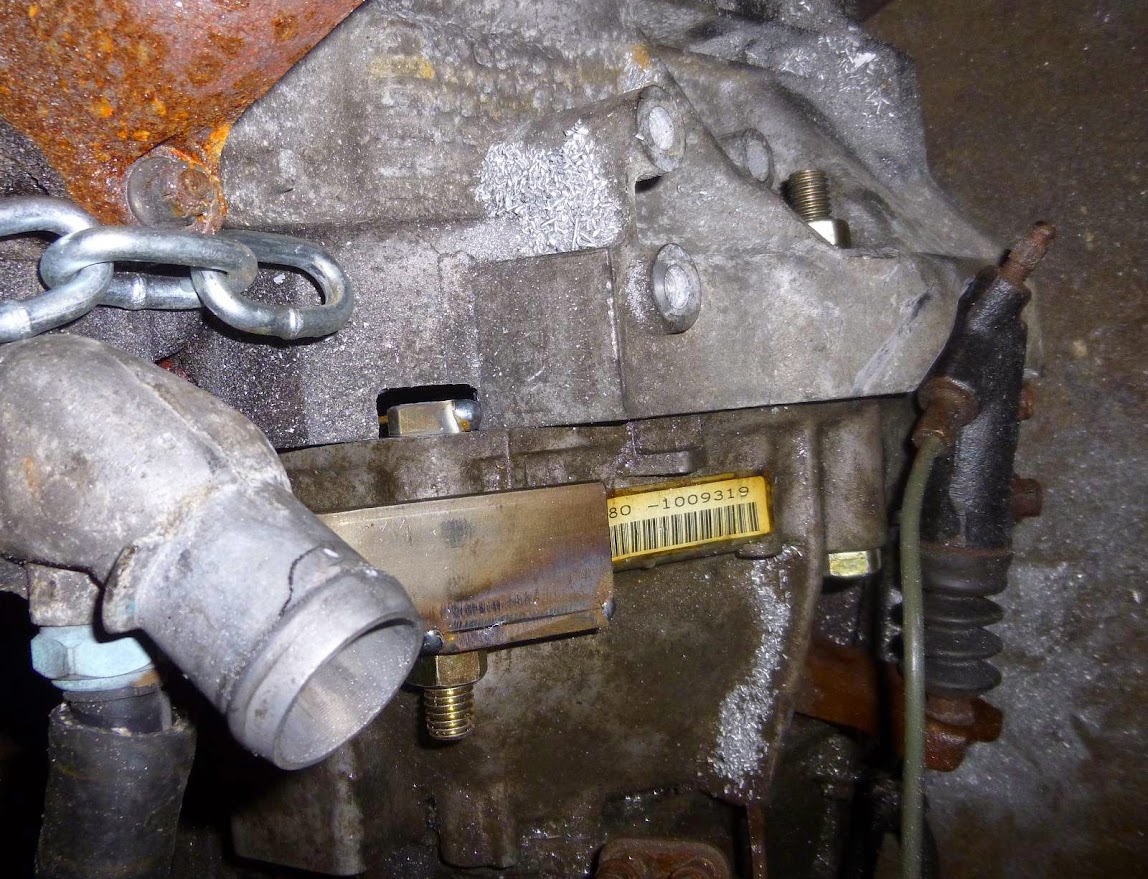
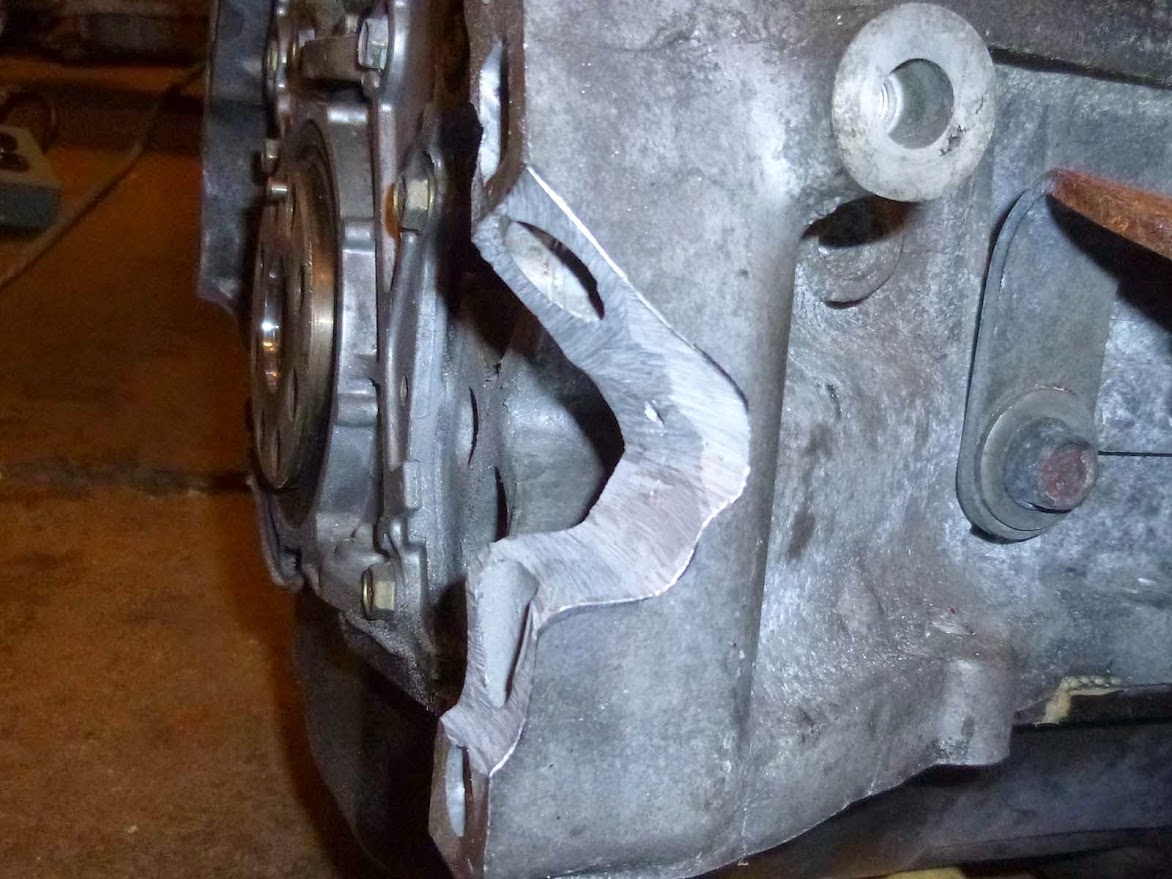
You can move up to the block stamp. You need to cut the window a bit longer (downwards) by 1/4". If it's a newer F-series, it may not even have a timing window. Cut it large enough to fit the open tip of a 3/4" box wrench into it.

You need to do some more grinding behind the window. There is a pin that sticks out and needs to be shaved. Beyond that the block webbing between the two top holes needs to be removed a bit. This gives the bolt through the trans a place to sit. If done right it also keeps it from spinning.

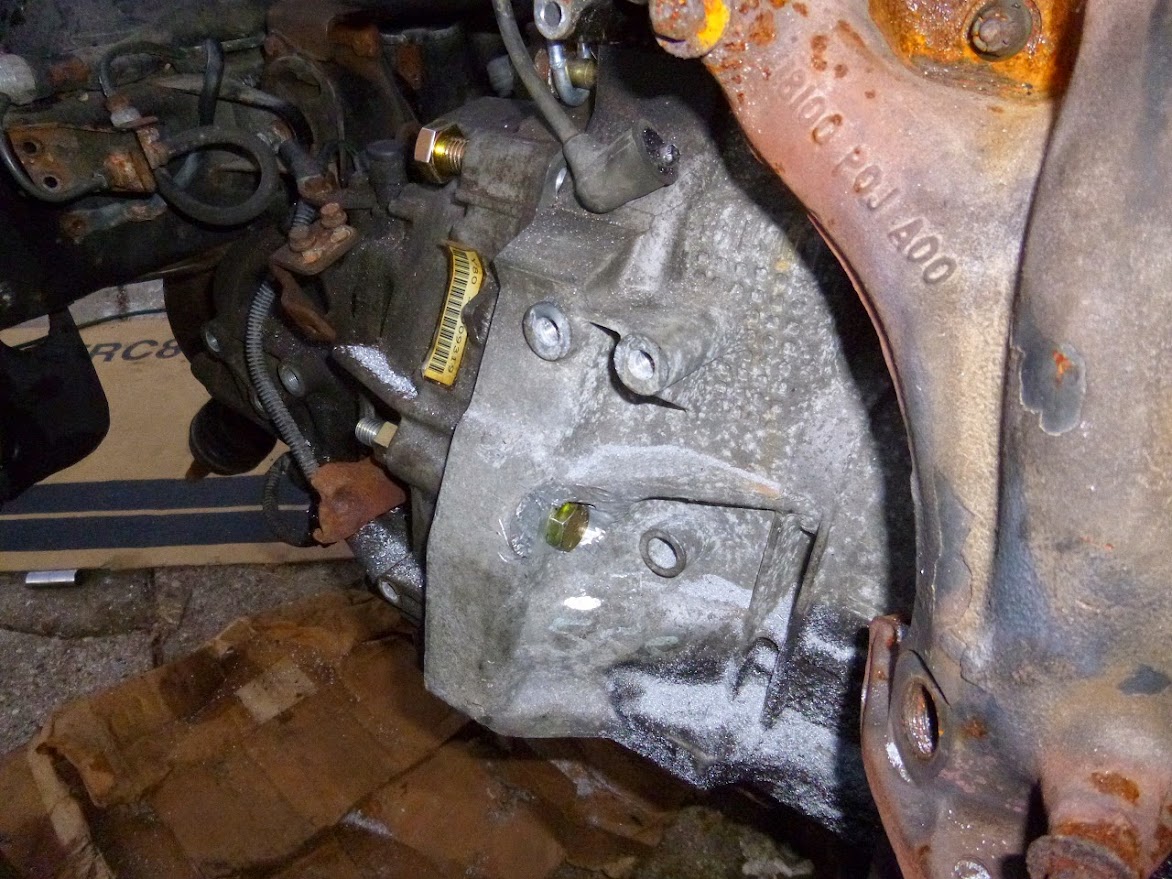
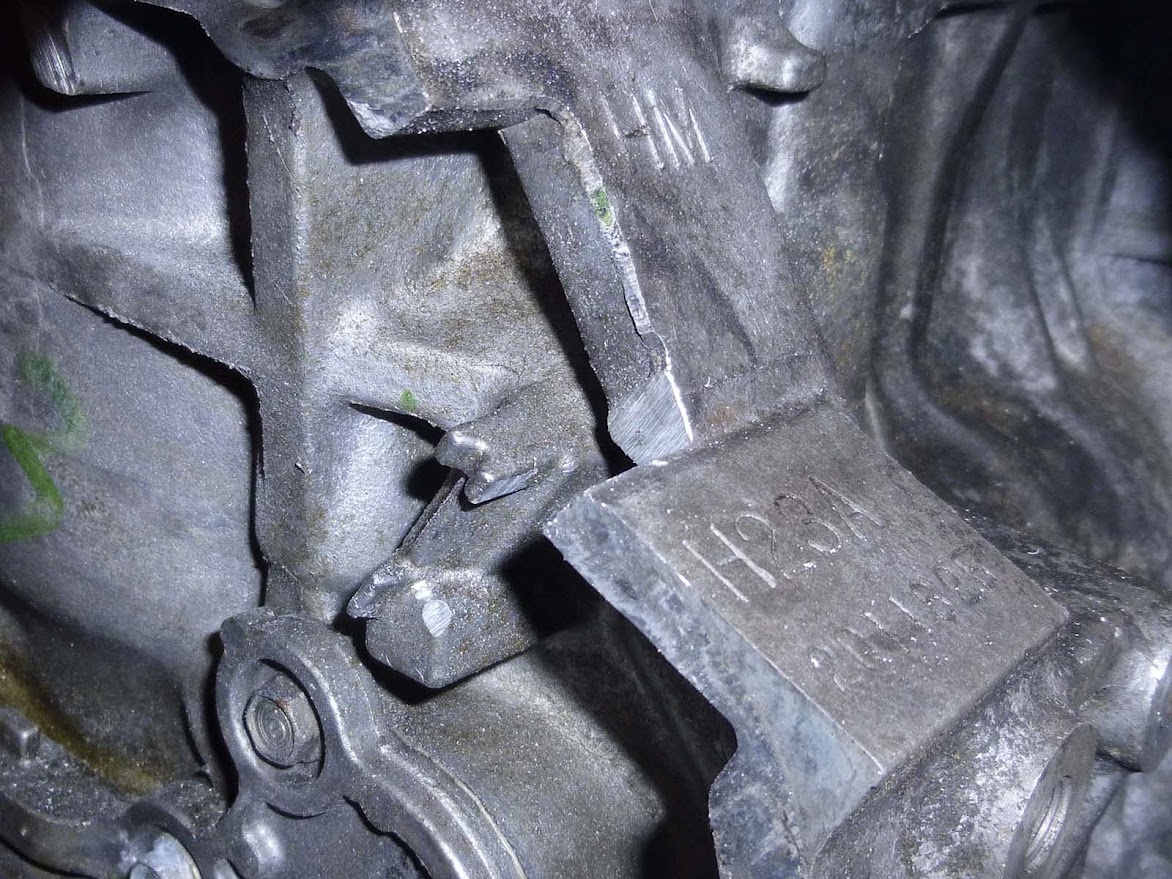
Moving back & down you need to cut off the rear lower mounting ear off the block. This makes room for the trans. When you have the trans hooked up, you can trace out where to cut by looking at the halfshaft seal.

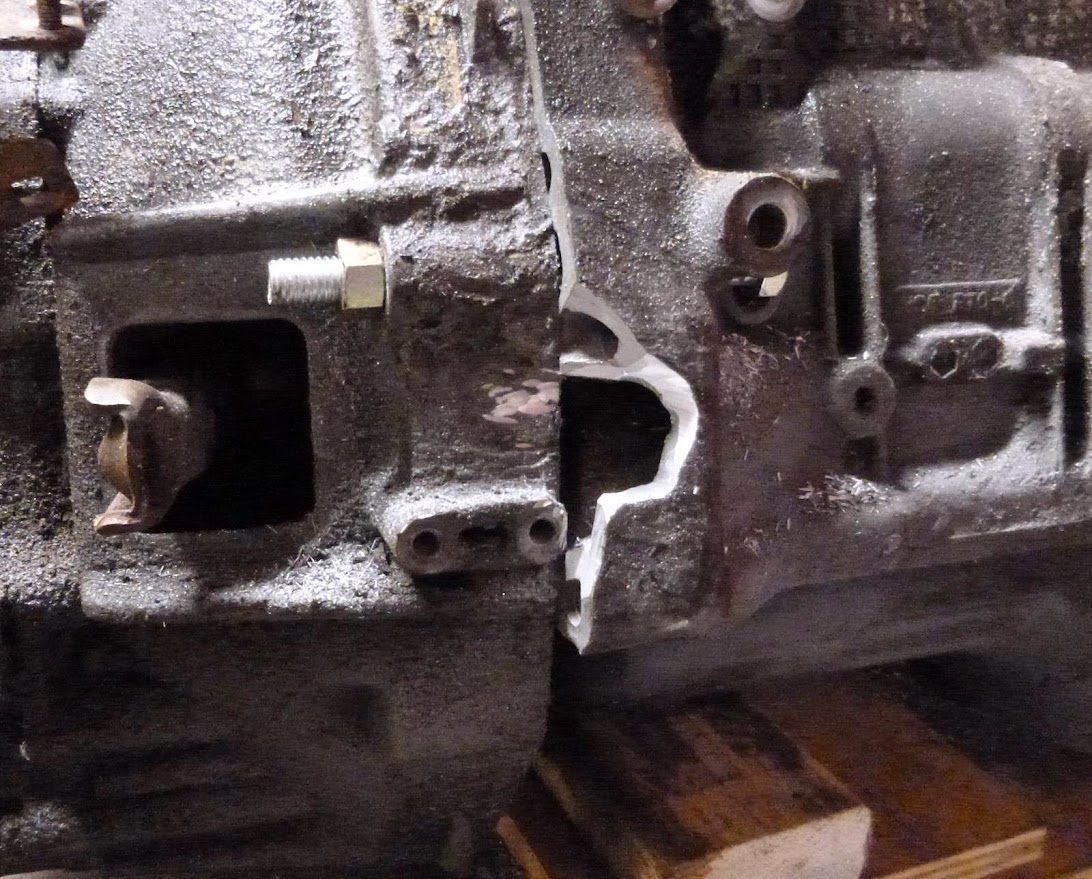
The back of the block needs the most work, but isn't that hard. It's less grinding than a normal H2B kit. The most important is clearance for the axle boot band. I cut it just into the blind bolt hole that holds the oil pump on. Cut it like you see here and you'll have tons of block material left.


Another spot needs some grinding to avoid hitting the halfshaft bearing carrier. Grind it flush to the block.

The 3rd spot to grind for the halfshaft is one of the VIN mount points. People who need to keep the VIN could probably keep it by using a single bolt on the halfshaft.

The halfshaft adapter plate is relatively easy to make, but easy to mess up too. You start with a 3"x10"x3/8" plate, drill holes for the 3 block holes (below left side of VIN and the 2 that hold the exhaust bracket), then mark & drill holes for the halfshaft. A 1.25" hole can be drilled for the oil dummy light sender. F22's usually just have a plug here, so you doon't have to cut the halfshaft ear off. I was going to convert the H23A to a plug, but figured I'd try it this way. You won't have to grind as much, if any, in the previous step if you use a 1/4" plate with 1/8" spacers. How to align the halfshaft: push the flange flush to the plate, then mark the maximum upward and downward movement; the spot in the middle is the center. If in doubt, the HS should spin smoothly. When it's crooked, it will be very stiff.

The main difference between mine and most of the other plateless swaps is the upper block/transmission brace I made. Most people just use 2 bars of steel and a shitload of washers. I cut tubes a hair thinner than the transmission through-hole thickness, welded them behind the steel bars, then tied the 2 bars together with another chunk of steel bar. The stuff you see is 3/16"x1.25" - in the future I plan to forgo bending that bar and instead use a 3/16"x1.5" bar welded flat (less work, same strength).

My F22 swap was able to use the stock Accord driver's side block bracket & motor mount, with some modding. I had to grind the bolt tube through the rubber on the rear side to fit into the Civic mount holder on the frame. It's just a few MM's too long. For the H23A I didn't have anything, plus I wanted to use the Civic/Integra 3-post mount, so I just made my own bracket. I will eventually add 3 more mounting spots - the block, the head, and the timing cover. Two things to note: I have 2 gussets below the flat plate, and I also put 1/8" of washers between the under the passenger trans mount to drop down & angle the motor slightly. It sits level side to side but has 3/4" clearance from the hood in the tightest spot.


All hardware is either OEM metric 10.8 or SAE Grade 8. So far it's survived lots of abuse with my F22B2 that has 149lb/ft peak and >130lb/ft from 2200rpm to 5500rpm. When I finish the H23A, it will be tested even more...
The first thing is to get the crankshaft ground out for a b-series pilot bearing. It needs to be at least 32mm wide and over 2mm deep. I used a stubby grinding bit in a rotozip.
Next you have to drill the flywheel for the pin in the flywheel. You can also grind it off the crank.
After that you enlarge the rear starter hole to 1/2". I used a step drill bit and a 1/4" hex bit extension to reach it all - make sure you start from the block side of the trans. Get creative with the bit (angle it) to slip the 1/2"x6" bolt through, or get a oversized 3-flute drill bit designed for enlarging holes in castings.
Now you can hang the trans from the block via the starter hole & pilot bearing. Drill a 1/2" hole for a 1/2"x5" bolt through the trans hole just above the clutch slave cylinder.
You can also work on that area to get the slave cylinder to fit. It will take some time, but the pics should give you a good start.
You can move up to the block stamp. You need to cut the window a bit longer (downwards) by 1/4". If it's a newer F-series, it may not even have a timing window. Cut it large enough to fit the open tip of a 3/4" box wrench into it.
You need to do some more grinding behind the window. There is a pin that sticks out and needs to be shaved. Beyond that the block webbing between the two top holes needs to be removed a bit. This gives the bolt through the trans a place to sit. If done right it also keeps it from spinning.
Moving back & down you need to cut off the rear lower mounting ear off the block. This makes room for the trans. When you have the trans hooked up, you can trace out where to cut by looking at the halfshaft seal.
The back of the block needs the most work, but isn't that hard. It's less grinding than a normal H2B kit. The most important is clearance for the axle boot band. I cut it just into the blind bolt hole that holds the oil pump on. Cut it like you see here and you'll have tons of block material left.
Another spot needs some grinding to avoid hitting the halfshaft bearing carrier. Grind it flush to the block.
The 3rd spot to grind for the halfshaft is one of the VIN mount points. People who need to keep the VIN could probably keep it by using a single bolt on the halfshaft.
The halfshaft adapter plate is relatively easy to make, but easy to mess up too. You start with a 3"x10"x3/8" plate, drill holes for the 3 block holes (below left side of VIN and the 2 that hold the exhaust bracket), then mark & drill holes for the halfshaft. A 1.25" hole can be drilled for the oil dummy light sender. F22's usually just have a plug here, so you doon't have to cut the halfshaft ear off. I was going to convert the H23A to a plug, but figured I'd try it this way. You won't have to grind as much, if any, in the previous step if you use a 1/4" plate with 1/8" spacers. How to align the halfshaft: push the flange flush to the plate, then mark the maximum upward and downward movement; the spot in the middle is the center. If in doubt, the HS should spin smoothly. When it's crooked, it will be very stiff.
The main difference between mine and most of the other plateless swaps is the upper block/transmission brace I made. Most people just use 2 bars of steel and a shitload of washers. I cut tubes a hair thinner than the transmission through-hole thickness, welded them behind the steel bars, then tied the 2 bars together with another chunk of steel bar. The stuff you see is 3/16"x1.25" - in the future I plan to forgo bending that bar and instead use a 3/16"x1.5" bar welded flat (less work, same strength).
My F22 swap was able to use the stock Accord driver's side block bracket & motor mount, with some modding. I had to grind the bolt tube through the rubber on the rear side to fit into the Civic mount holder on the frame. It's just a few MM's too long. For the H23A I didn't have anything, plus I wanted to use the Civic/Integra 3-post mount, so I just made my own bracket. I will eventually add 3 more mounting spots - the block, the head, and the timing cover. Two things to note: I have 2 gussets below the flat plate, and I also put 1/8" of washers between the under the passenger trans mount to drop down & angle the motor slightly. It sits level side to side but has 3/4" clearance from the hood in the tightest spot.
All hardware is either OEM metric 10.8 or SAE Grade 8. So far it's survived lots of abuse with my F22B2 that has 149lb/ft peak and >130lb/ft from 2200rpm to 5500rpm. When I finish the H23A, it will be tested even more...
Last edited by HiProfile; 06-14-2013 at 05:30 AM.
06-13-2013, 07:04 AM
#14
Honda-Tech Member
Thread Starter
Join Date: Jan 2005
Location: b00sting my D16s, SoWis, USA
Posts: 7,015
Likes: 0
Received 7 Likes
on
5 Posts
I almost forgot the rear t-bracket modding. You have to cut the top ears off both sides & weld on steel that's an inch or so higher. I keep it b-series compatible by using a 1/32" spacer between the block & ear on the driver's side. B-series are a little thicker here.

This was made for the F22, but the H23A model looks a little better. I got the plate to cover the original hole so I can drill a hole for a b-series block if I ever want to revert back.
This was made for the F22, but the H23A model looks a little better. I got the plate to cover the original hole so I can drill a hole for a b-series block if I ever want to revert back.
07-02-2013, 03:23 PM
#15
Honda-Tech Member
Join Date: May 2006
Location: CA
Posts: 963
Likes: 0
Received 0 Likes
on
0 Posts
This thread is awesome!
I'm doing a H23A VTEC plateless h2b in my eg soon and this is a great help. I knew the general idea and was going to figure it out myself, but this is a damn instruction manual!
Thanks for putting in the time to document your work man!
I'm doing a H23A VTEC plateless h2b in my eg soon and this is a great help. I knew the general idea and was going to figure it out myself, but this is a damn instruction manual!
Thanks for putting in the time to document your work man!
07-03-2013, 08:51 PM
#16
Honda-Tech Member
Thread Starter
Join Date: Jan 2005
Location: b00sting my D16s, SoWis, USA
Posts: 7,015
Likes: 0
Received 7 Likes
on
5 Posts
Thanks, it's as much for myself as it is for others. This is the 2nd I've done, and plan yet a 3rd (then sell/junk/part the 1st).
One thing I wish I had done was bang the driver's shock tower just below where the valve cover almost touches it. At the moment the upper timing cover touches it, and I really want to use both covers.
Another change I'm making is to use 1/4" plate for the halfshaft along with 1/8" brass spacers behind it. This allows for much more space for the bolt heads, meaning less block grinding.
The last thing I'll do is run a brace under the front of the motor behind the header pipes. This will be in the same spot the b16 & GSR have their "stiffener" (11960-P30-000), and will tie the front of the block & trans together that much tighter. F-series will require an intented section tapped & threaded, while H-series have a threaded bolt hole ready to use.
I need to fix the brake line from the rear MC to the prop valve, since the previous owner routed it weird. I was still able to move the prop valve out of the way of the manifold. I also discovered that most b16/itr/ls motors use a different throttle cable than d16's. The d16 cable has a few inches less cable after the mount bracket, and fits the H22/H23 almost perfect. The b16/itr/ls cable fit the F22B2 perfectly. I'll need either a 95-96 Prelude H22/H23 cable or a 92-95 EX cable for my Integra.
07-06-2013, 05:29 PM
#18
Honda-Tech Member
Thread Starter
Join Date: Jan 2005
Location: b00sting my D16s, SoWis, USA
Posts: 7,015
Likes: 0
Received 7 Likes
on
5 Posts
Correct. However if you get a kit you still have to do wiring, exhaust work (expensive header or header modding), block grinding, IACV plate, and throttle bracket.
07-10-2013, 06:18 PM
#19

THe bar up top of the trans, does that just fill the bolt holes and does the trans bolt to the motor on the top bolt holes? Also how did you make sure the input shaft and crank line up? Im sure you have done this enuff times you just know.
04-11-2014, 05:37 PM
#20
Honda-Tech Member
Thread Starter
Join Date: Jan 2005
Location: b00sting my D16s, SoWis, USA
Posts: 7,015
Likes: 0
Received 7 Likes
on
5 Posts
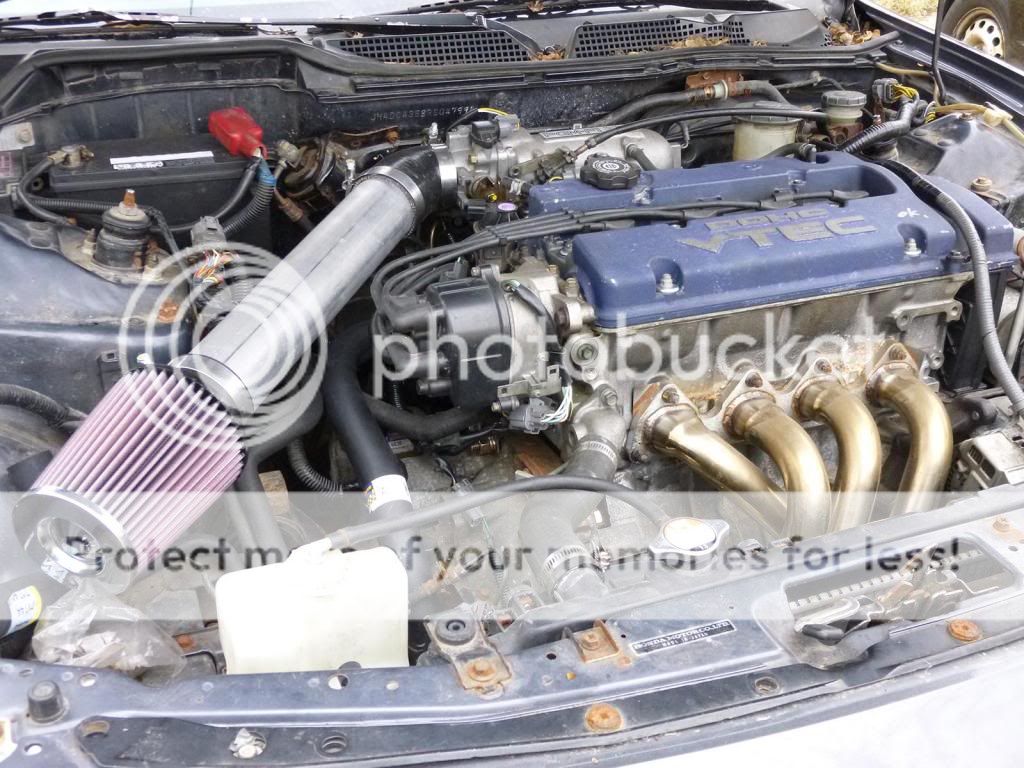
Nearly done!! (FYI this is a daily beater, so it's rustier than a rat rod's hood. Deal with it!)
I started this last year, busted my *** for two stints of 36 hours in a row to get it going, then...gave up. Well, I had a lot of other things to due last summer & already had my plateless F2B Del Sol beater working great with a 134whp/149wtq F22B2. Anyways, the weather finally broke & the teg is damn near done now.
I recently re-made the IACV adapter plate. The 98-ish H23A motors use a plenum with a 3-wire IACV on the front. It's similar to the Euro-R, but the bolt pattern is mirrored so I can't use the Rosko adapter. What's guy to do? Make his own:
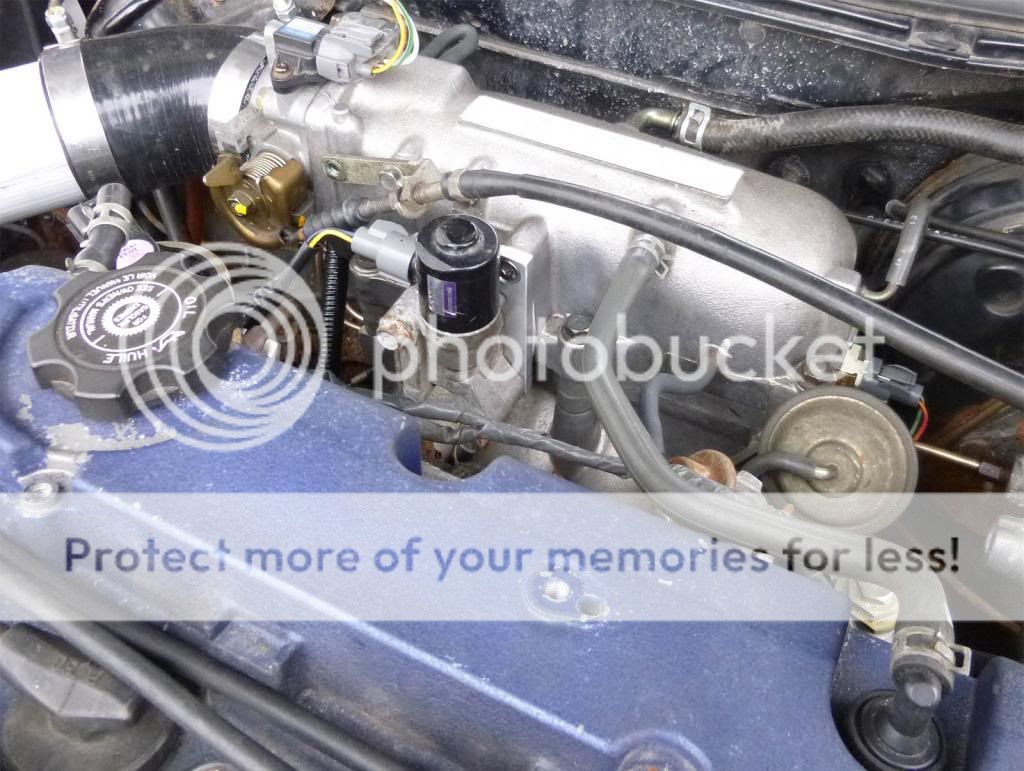
You can see in the pic above one of the new brake lines I ran. It's the nickel-copper line that's easy as hell to bend & flare, but holds pressure like it's steel. The previous owner did a crappy ABS delete, so I'm not sure how much changes are actually needed for EG/DC brakes.
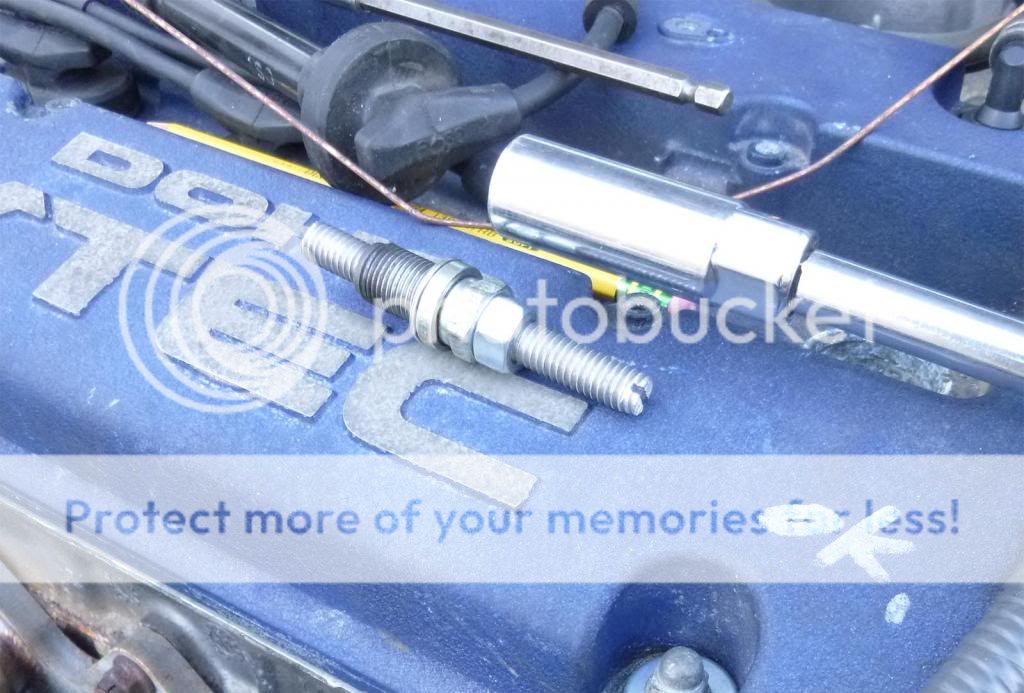
Next improvement is due to the fact the H23A has no crank timing marks like most H-series. The first motors I ever worked had TDC marked because the aftermarket **** was always off a bit, so I had an idea what I was doing.
First, make a TDC tool from an old NGK spark plug & 3/8" aluminum threaded rod that won't dent the piston. Use a jamb nut on top & notch the top of the rod:
Decide on where your timing pointer will be - bend a welding rod to nearly touch the pulley rim in that spot. Then set the motor near TDC (slight after TDC), insert the tool w/o jamb nut, then use a long screwdriver so the rod lightly touches the piston. Turn the motor in reverse til the piston locks, mark the pulley at the welding rod, then turn forward nearly a full revolution til it locks again, mark. Take pulley off, notch TDC (0 degrees) which is exactly in the middle of your 2 marks. If you're lazy, you can use an adjustable timing light to flash the TDC mark at 16 degrees. Otherwise do some math (diameter * 3.1416 / 360 * 16) to get the 16 degree mark, notch. Do the same math to get the 14 and 18 degree marks:
The rib for TDC is behind the 0 degree mark in this picture - it's easy to see with white paint added while using a timing light:

Here's a picture of the room around the crank pulley & alternator:

More clearance shots - shock tower to timing cover and header/oil pan ground clearance:


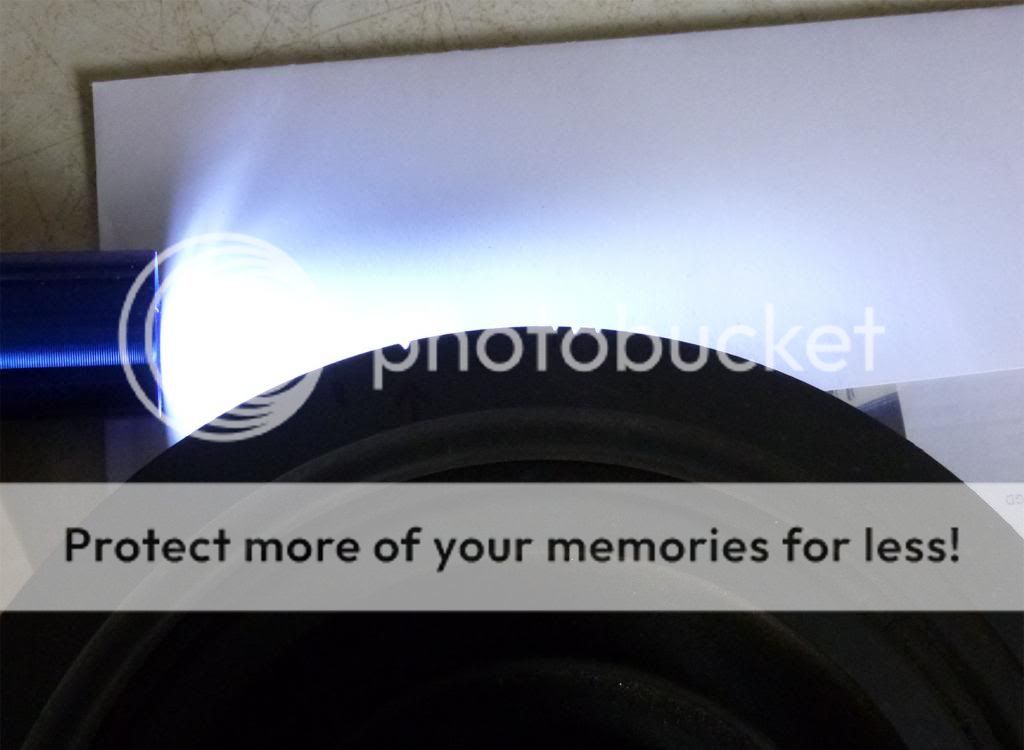
I've run shortram intakes from being lazy, so I wanted a nice intake for a change - but nobody makes one for this combination. I bought some 3"x0.065" aluminum tube from ebay for ~$13 per tube (36" for two tubes at $26, cut with a killer Diablo non-ferrous blade), a 45 degree coupler that's 2.75" to 3" for ~$9, and a K&N filter for ~$35 off amazon. Add some free 3.5" t-bolt clamps I've had since forever and this is what you get:
I'll do the same thing with my other car I just bought (a 92 hatch with show-quality paint & zero rust), so that's under $60 each for two 3" intakes. I was planning on painting them with wrinkle paint, but I kinda like the raw look now.
The next step is to finish the exhaust, which is some cheap ebay 97-01 Prelude header and a DC/EG ebay exhaust. I got a Prelude test pipe, which only needs ~3" removed to make it work. The exhaust & header line up so perfectly it's hard to believe! Then I'll toss in the wideband so I can finally get the latency values for a new type of 363cc injector I'm working on. They'll be called Injector Nation IN390's, flowing ~360cc with Heptane from a 6-hole vector plate in a cone the same size/shape as stock injectors. I'm hoping for at least 185whp/155wtq on a dynojet with this cheap setup on mild street tuning.
Unless I get a bug up my *** and install the skunk2 K2H adapter I got for cheap along with the K20A2 PRB intake manifold...
I started this last year, busted my *** for two stints of 36 hours in a row to get it going, then...gave up. Well, I had a lot of other things to due last summer & already had my plateless F2B Del Sol beater working great with a 134whp/149wtq F22B2. Anyways, the weather finally broke & the teg is damn near done now.
I recently re-made the IACV adapter plate. The 98-ish H23A motors use a plenum with a 3-wire IACV on the front. It's similar to the Euro-R, but the bolt pattern is mirrored so I can't use the Rosko adapter. What's guy to do? Make his own:
You can see in the pic above one of the new brake lines I ran. It's the nickel-copper line that's easy as hell to bend & flare, but holds pressure like it's steel. The previous owner did a crappy ABS delete, so I'm not sure how much changes are actually needed for EG/DC brakes.
Next improvement is due to the fact the H23A has no crank timing marks like most H-series. The first motors I ever worked had TDC marked because the aftermarket **** was always off a bit, so I had an idea what I was doing.
First, make a TDC tool from an old NGK spark plug & 3/8" aluminum threaded rod that won't dent the piston. Use a jamb nut on top & notch the top of the rod:
Decide on where your timing pointer will be - bend a welding rod to nearly touch the pulley rim in that spot. Then set the motor near TDC (slight after TDC), insert the tool w/o jamb nut, then use a long screwdriver so the rod lightly touches the piston. Turn the motor in reverse til the piston locks, mark the pulley at the welding rod, then turn forward nearly a full revolution til it locks again, mark. Take pulley off, notch TDC (0 degrees) which is exactly in the middle of your 2 marks. If you're lazy, you can use an adjustable timing light to flash the TDC mark at 16 degrees. Otherwise do some math (diameter * 3.1416 / 360 * 16) to get the 16 degree mark, notch. Do the same math to get the 14 and 18 degree marks:
The rib for TDC is behind the 0 degree mark in this picture - it's easy to see with white paint added while using a timing light:
Here's a picture of the room around the crank pulley & alternator:
More clearance shots - shock tower to timing cover and header/oil pan ground clearance:
I've run shortram intakes from being lazy, so I wanted a nice intake for a change - but nobody makes one for this combination. I bought some 3"x0.065" aluminum tube from ebay for ~$13 per tube (36" for two tubes at $26, cut with a killer Diablo non-ferrous blade), a 45 degree coupler that's 2.75" to 3" for ~$9, and a K&N filter for ~$35 off amazon. Add some free 3.5" t-bolt clamps I've had since forever and this is what you get:
I'll do the same thing with my other car I just bought (a 92 hatch with show-quality paint & zero rust), so that's under $60 each for two 3" intakes. I was planning on painting them with wrinkle paint, but I kinda like the raw look now.
The next step is to finish the exhaust, which is some cheap ebay 97-01 Prelude header and a DC/EG ebay exhaust. I got a Prelude test pipe, which only needs ~3" removed to make it work. The exhaust & header line up so perfectly it's hard to believe! Then I'll toss in the wideband so I can finally get the latency values for a new type of 363cc injector I'm working on. They'll be called Injector Nation IN390's, flowing ~360cc with Heptane from a 6-hole vector plate in a cone the same size/shape as stock injectors. I'm hoping for at least 185whp/155wtq on a dynojet with this cheap setup on mild street tuning.
Unless I get a bug up my *** and install the skunk2 K2H adapter I got for cheap along with the K20A2 PRB intake manifold...
05-30-2014, 06:57 PM
#21
Honda-Tech Member
Thread Starter
Join Date: Jan 2005
Location: b00sting my D16s, SoWis, USA
Posts: 7,015
Likes: 0
Received 7 Likes
on
5 Posts
The water pump started leaking right on the last start-up before taking it onto the road. I put in a decent NPW pump to replace the crappy non-OEM GMB. The tensioner I made works great, and it got a workout with the water pump swap. It definitely made the job easier. The timing was still dead-on with the mark on the timing cover, so all that works well too. My IN390 injectors work great and are only at ~70% duty cycle at 7k. The stock 290cc injectors would have been around 90%, much too small. I'm getting better gas milage than the B18B & B16A3, which makes me extra happy.
I'd guestimate 175whp with the GSR axle-back and stock H22 ignition timing. It moves like my EF at 10psi (d16z6), just without the lag. I can get a lot more by adding some timing. AFR's are already tuned. So far I have less than $1000 into the entire engine/trans/parts side of things and $1000 for the chassis. It was complete but had a hydrolocked motor. The rest was mostly from new eibach shocks & springs, so $2500 total at the most.
I didn't try to smoke the tires, it was actually the 1st burnout I've done in the car. I feathered til it caught but it has a lot of torque, especially when you consider it's stock! The "music" you hear is all intake noise, since I still have the oem GSR axle-back on it. It has an annoying buzz to it, my guess is a baffle is loose.
06-04-2014, 06:14 AM
#22
Honda-Tech Member
Thread Starter
Join Date: Jan 2005
Location: b00sting my D16s, SoWis, USA
Posts: 7,015
Likes: 0
Received 7 Likes
on
5 Posts
Looks like I may have to rehost all the imageshack pictures. Those dicks said they'd still be online if I didn't switch to a paid account, but it doesn't look like it!
06-07-2014, 04:58 AM
#23
Honda-Tech Member

Join Date: Sep 2009
Location: fl
Posts: 98
Likes: 0
Received 0 Likes
on
0 Posts
06-09-2014, 09:12 AM
#24
Honda-Tech Member
Thread Starter
Join Date: Jan 2005
Location: b00sting my D16s, SoWis, USA
Posts: 7,015
Likes: 0
Received 7 Likes
on
5 Posts
Advantages over a kit using a plate: great hood clearance, better motor angle (better weight distribution), can use unmodded headers (some F's bolt right to your stock cat!), more "meat" left where you grind the oil pan seal for the halfshaft, more clearance for a turbo (1" more than a b-series), more clearance between the frame & crank pulley - uses stock alternator brackets, no extra-long flywheel bolts that sometimes back out, unchanged angle for slave cylinder - works just like stock.
Disadvantages: if you use OEM Accord/Prelude driver's mounts the motor will be lower on the driver's side; IAB intake manifolds may require relocating the brake proportioning valve; H/F motors with the IACV on the firewall side will require relocating or deleting the IACV. Not much else.
This can be done with just a few simple hand tools. A dremel is about the most expensive tool you'll need, but that's something no self-respecting car hobbyist should be without anyways.
Tool list:
Demel or rotozip w/barrel type grinding wheels (have spares!)
hacksaw, sawzall, or bandsaw
1/2" drill bit w/hand drill or drill press
1/2" step-bit drill bit aka Unibit (HF has a 3-pc kit)
1/2" Grade 8 bolts: 6", 5", 4.5", 3.5"
1/2" Grade 8 washers (narrow SAE), lock washers, nuts
4"-6" extension bit for the step-bit
Standard tools for swaping an engine
The first thing is to get the crankshaft ground out for a b-series pilot bearing. It needs to be at least 32mm wide and over 2mm deep. I used a stubby grinding bit in a rotozip from Vermon American (from Homeboy Depot).
Next you have to drill the flywheel for the pin in the flywheel. You can also grind it off the crank. Beware the OEM flywheels are very hard in that area, I burned 2 bit before notching with a grinder to start the hole.
After that you enlarge the rear starter hole to 1/2". I used a step drill bit and a 1/4" hex bit extension to reach it all - make sure you start from the block side of the trans. Get creative with the bit (angle it) to slip the 1/2"x6" bolt through, or get a oversized 3-flute drill bit designed for enlarging holes in castings.

Now you can hang the trans from the block via the starter hole & pilot bearing. Drill a 1/2" hole for a 1/2"x5" bolt through the trans hole just above the clutch slave cylinder.

You can also work on that area to get the slave cylinder to fit. It will take some time, but the pics should give you a good start.
Disadvantages: if you use OEM Accord/Prelude driver's mounts the motor will be lower on the driver's side; IAB intake manifolds may require relocating the brake proportioning valve; H/F motors with the IACV on the firewall side will require relocating or deleting the IACV. Not much else.
This can be done with just a few simple hand tools. A dremel is about the most expensive tool you'll need, but that's something no self-respecting car hobbyist should be without anyways.
Tool list:
Demel or rotozip w/barrel type grinding wheels (have spares!)
hacksaw, sawzall, or bandsaw
1/2" drill bit w/hand drill or drill press
1/2" step-bit drill bit aka Unibit (HF has a 3-pc kit)
1/2" Grade 8 bolts: 6", 5", 4.5", 3.5"
1/2" Grade 8 washers (narrow SAE), lock washers, nuts
4"-6" extension bit for the step-bit
Standard tools for swaping an engine
The first thing is to get the crankshaft ground out for a b-series pilot bearing. It needs to be at least 32mm wide and over 2mm deep. I used a stubby grinding bit in a rotozip from Vermon American (from Homeboy Depot).
Next you have to drill the flywheel for the pin in the flywheel. You can also grind it off the crank. Beware the OEM flywheels are very hard in that area, I burned 2 bit before notching with a grinder to start the hole.
After that you enlarge the rear starter hole to 1/2". I used a step drill bit and a 1/4" hex bit extension to reach it all - make sure you start from the block side of the trans. Get creative with the bit (angle it) to slip the 1/2"x6" bolt through, or get a oversized 3-flute drill bit designed for enlarging holes in castings.
Now you can hang the trans from the block via the starter hole & pilot bearing. Drill a 1/2" hole for a 1/2"x5" bolt through the trans hole just above the clutch slave cylinder.
You can also work on that area to get the slave cylinder to fit. It will take some time, but the pics should give you a good start.
06-09-2014, 10:12 AM
#25
Honda-Tech Member
Thread Starter
Join Date: Jan 2005
Location: b00sting my D16s, SoWis, USA
Posts: 7,015
Likes: 0
Received 7 Likes
on
5 Posts
You can move up to the block stamp. You need to cut the window a bit longer (downwards) by 1/4". If it's a newer F-series, it may not even have a timing window. Cut it large enough to fit the open tip of a 3/4" box wrench into it.
You need to do some more grinding behind the window. There is a ****/pin that sticks out and needs to be shaved. Beyond that the block webbing between the two top holes needs to be removed a bit, especially on H22/H23/F23 blocks. This gives the bolt through the trans a place to sit. If done right it also keeps it from spinning.


Moving back & down you need to cut off the rear lower mounting ear off the block. This makes room for the trans. When you have the trans hooked up, you can trace out where to cut by looking at the halfshaft seal.


The back of the block needs the most work, but isn't that hard. It's less grinding than a normal H2B kit. The most important is clearance for the axle boot band. I cut it just into the blind bolt hole that holds the oil pump on. Cut it like you see here and you'll have tons of block material left.


Another spot needs some grinding to avoid hitting the halfshaft bearing carrier. Grind it flush to the block.


You need to do some more grinding behind the window. There is a ****/pin that sticks out and needs to be shaved. Beyond that the block webbing between the two top holes needs to be removed a bit, especially on H22/H23/F23 blocks. This gives the bolt through the trans a place to sit. If done right it also keeps it from spinning.
Moving back & down you need to cut off the rear lower mounting ear off the block. This makes room for the trans. When you have the trans hooked up, you can trace out where to cut by looking at the halfshaft seal.
The back of the block needs the most work, but isn't that hard. It's less grinding than a normal H2B kit. The most important is clearance for the axle boot band. I cut it just into the blind bolt hole that holds the oil pump on. Cut it like you see here and you'll have tons of block material left.
Another spot needs some grinding to avoid hitting the halfshaft bearing carrier. Grind it flush to the block.