
Sleeper gauges behind 4G dash glass install---
 06-15-2006, 10:59 AM
#1
Honda-Tech Member
Thread Starter
Join Date: Jan 2004
Location: Further down the spiral, TX, usa
Posts: 10,629
Likes: 0
Received 1 Like
on
1 Post
EDIT: Finished pics on page 3!
PICS ARE FIXED
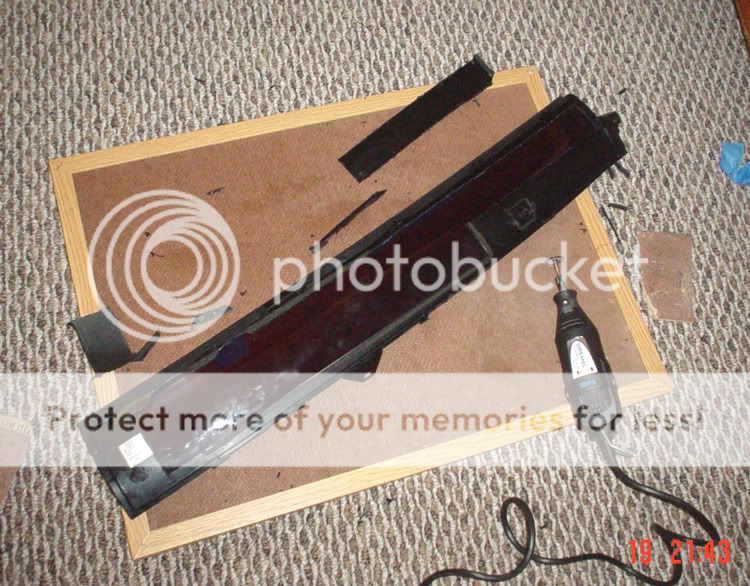
Well, I'm finally getting close to getting this done the right way. I took the whole dash out and apart and trimmed and trimmed all the parts that needed it with a Dremel....lots of little details that wouldn't really make sense in pictures, but I'll post some of the bigger stuff.
The gauges I'm using are Defi BF gauges that are black until the ignition is turned on and they'll be mounted behind the dash glass so they're totally invisible until they're on....no crappy pillar gauge pods for me.
The glass piece and the center OEM gauge section mount to this white piece on the right side only so you need to trim off the end of it--
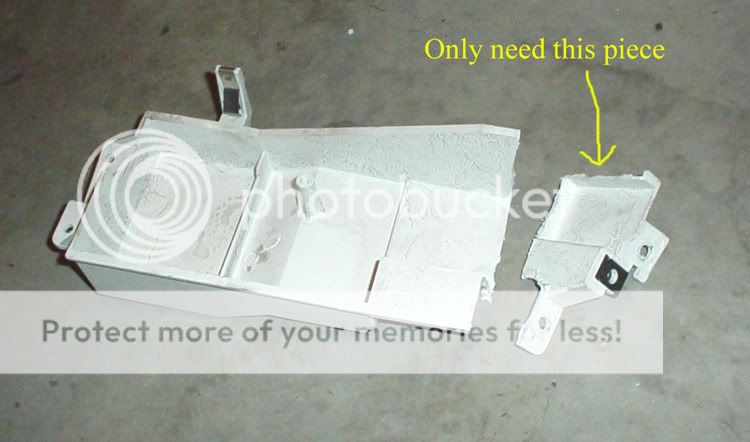
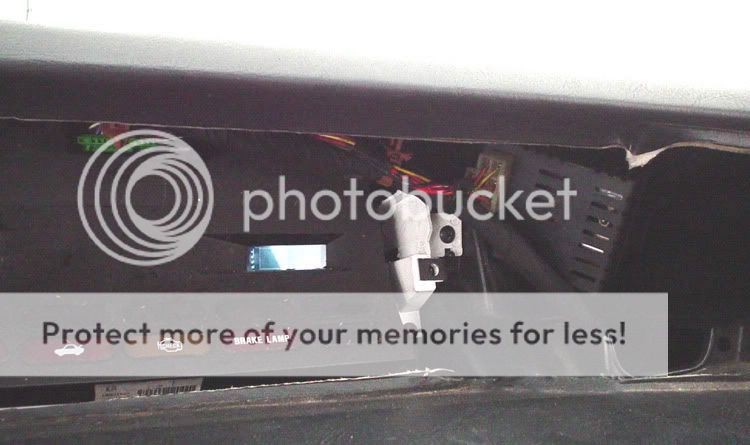
I had to cut off the lefthand mount for the center gauge section and bolt it in a foot or so over on the dash in order to mount the gauges like stock. I can easily screw and unscrew them just like usual, but they're moved over to make space for the Defi's--
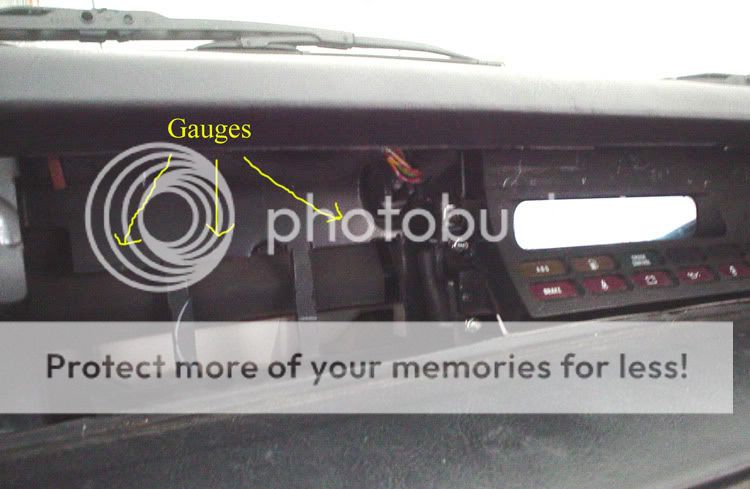
So far driving it there is no vibration or rattles anything and the gauges are n there very solid just like stock.
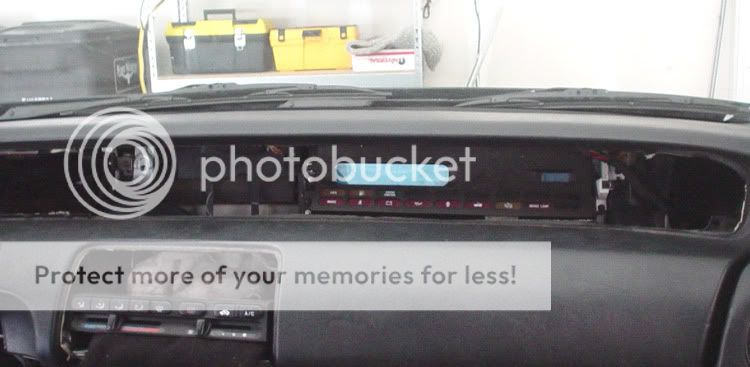
Now I just need to go get some small hardware to mount the Defi gauges, wire them up and then install all of my dash trim. Then I'll update with finished pics.
Modified by Hawkze_2.3 at 10:20 PM 2/22/2008
PICS ARE FIXED
Well, I'm finally getting close to getting this done the right way. I took the whole dash out and apart and trimmed and trimmed all the parts that needed it with a Dremel....lots of little details that wouldn't really make sense in pictures, but I'll post some of the bigger stuff.
The gauges I'm using are Defi BF gauges that are black until the ignition is turned on and they'll be mounted behind the dash glass so they're totally invisible until they're on....no crappy pillar gauge pods for me.
The glass piece and the center OEM gauge section mount to this white piece on the right side only so you need to trim off the end of it--
I had to cut off the lefthand mount for the center gauge section and bolt it in a foot or so over on the dash in order to mount the gauges like stock. I can easily screw and unscrew them just like usual, but they're moved over to make space for the Defi's--
So far driving it there is no vibration or rattles anything and the gauges are n there very solid just like stock.
Now I just need to go get some small hardware to mount the Defi gauges, wire them up and then install all of my dash trim. Then I'll update with finished pics.
Modified by Hawkze_2.3 at 10:20 PM 2/22/2008
 06-15-2006, 11:13 AM
#3
Honda-Tech Member
Thread Starter
Join Date: Jan 2004
Location: Further down the spiral, TX, usa
Posts: 10,629
Likes: 0
Received 1 Like
on
1 Post
<TABLE WIDTH="90%" CELLSPACING=0 CELLPADDING=0 ALIGN=CENTER><TR><TD>Quote, originally posted by syntax. »</TD></TR><TR><TD CLASS="quote">very cool
What gauges are you planning on running? Where did you get them from?
In for finished pics.</TD></TR></TABLE>
Thanks, I have oil pressure and water temp for now.....once the car is boosted I'll get a vacuum gauge. I got them from evasivemotorsports.com.
Another thing to mention is the way the glass piece is you can cut it just right and the stock temp gauge is totally covered up exposing only the fuel gauge.
The clock has to go bye-bye, though.
06-15-2006, 04:37 PM
#7
Join Date: May 2006
Location: Irvine, CA, USA
Posts: 138
Likes: 0
Received 0 Likes
on
0 Posts
<TABLE WIDTH="90%" CELLSPACING=0 CELLPADDING=0 ALIGN=CENTER><TR><TD>Quote, originally posted by md23vtec »</TD></TR><TR><TD CLASS="quote"> for originality and a great idea </TD></TR></TABLE>
for originality and a great idea </TD></TR></TABLE>
Trending Topics
06-15-2006, 04:43 PM
#8
Honda-Tech Member
iTrader: (1)
Join Date: Jul 2005
Location: reppin jerzey, USA
Posts: 2,301
Likes: 0
Received 0 Likes
on
0 Posts
<TABLE WIDTH="90%" CELLSPACING=0 CELLPADDING=0 ALIGN=CENTER><TR><TD>Quote, originally posted by md23vtec »</TD></TR><TR><TD CLASS="quote"> for originality and a great idea </TD></TR></TABLE>
x2
x2
06-15-2006, 05:01 PM
#9
Honda-Tech Member
(what they said) Wish I had cash for nice gauges, i've wanted to do exactly what you are doing.. then I moved out into my own house, and blew a transmission.. no cashola...
06-15-2006, 06:11 PM
#11
Join Date: Nov 2005
Location: Somewhere in Rocket Land, NC, UsS of A
Posts: 176
Likes: 0
Received 0 Likes
on
0 Posts
Nice on installing gauges behind the dash, Im probably going to have to run Different speedo/tach in my car and Plan on removing the old guages and replacing them with electronic ones also that are all black when not on.
06-15-2006, 07:03 PM
#12
Join Date: Jan 2006
Location: Concord, NH
Posts: 195
Likes: 0
Received 0 Likes
on
0 Posts
<TABLE WIDTH="90%" CELLSPACING=0 CELLPADDING=0 ALIGN=CENTER><TR><TD>Quote, originally posted by Greg H »</TD></TR><TR><TD CLASS="quote">Very nice! cant wait to see it finished.</TD></TR></TABLE>
x2 sweeeeeeeeeeeet!
x2 sweeeeeeeeeeeet!
06-15-2006, 09:06 PM
#14
Honda-Tech Member
Thread Starter
Join Date: Jan 2004
Location: Further down the spiral, TX, usa
Posts: 10,629
Likes: 0
Received 1 Like
on
1 Post
<TABLE WIDTH="90%" CELLSPACING=0 CELLPADDING=0 ALIGN=CENTER><TR><TD>Quote, originally posted by soundbomber »</TD></TR><TR><TD CLASS="quote">please please please tell me u went with the defi bf rather than the d gauges </TD></TR></TABLE>
Of course. That was my whole motivation to do this...some great quality black face gauges and the stock dash is black? Score!
</TD></TR></TABLE>Of course. That was my whole motivation to do this...some great quality black face gauges and the stock dash is black? Score!
06-15-2006, 09:14 PM
#15
Join Date: Apr 2003
Location: In the Garage building a monster
Posts: 173
Likes: 0
Received 0 Likes
on
0 Posts
awesome! I did the same conversion but then threw in a 7inch lcd for my navi.. Before I put the screen in I mounted up some gauges and they looks soo good. Cant wait to see some pics when your done.
Cheers:
Cheers:
06-15-2006, 10:04 PM
#16
Honda-Tech Member
Thread Starter
Join Date: Jan 2004
Location: Further down the spiral, TX, usa
Posts: 10,629
Likes: 0
Received 1 Like
on
1 Post
<TABLE WIDTH="90%" CELLSPACING=0 CELLPADDING=0 ALIGN=CENTER><TR><TD>Quote, originally posted by -NA-H22A »</TD></TR><TR><TD CLASS="quote">awesome! I did the same conversion but then threw in a 7inch lcd for my navi.. Before I put the screen in I mounted up some gauges and they looks soo good. Cant wait to see some pics when your done.
Cheers:</TD></TR></TABLE>
What gauges did you end up using? Could you see them pretty well?
Cheers:</TD></TR></TABLE>
What gauges did you end up using? Could you see them pretty well?
06-15-2006, 10:43 PM
#17
Join Date: Apr 2003
Location: In the Garage building a monster
Posts: 173
Likes: 0
Received 0 Likes
on
0 Posts
I put apexi el's in there, durring the day they went that great but when it got dark out they looked fine. then again they were crappy apexi el's. Defi gauges are definantly going to be nice and bright. I dont think you will have any worries.
 06-16-2006, 12:41 AM
#19
Junior Member
Join Date: Nov 2003
Location: Melbourne, Victoria, Australia
Posts: 362
Likes: 0
Received 0 Likes
on
0 Posts
awesome work, i'm doing the same thing but using the DEFI VSD Headup display to replace speedo and tacho, with additional Defi Oil Pressure, Water Temp and the controller. Can't wait to see your setup though.
Modified by skinnyboy at 8:55 PM 6/16/2006
Modified by skinnyboy at 8:55 PM 6/16/2006
06-16-2006, 08:16 AM
#20
Honda-Tech Member
Thread Starter
Join Date: Jan 2004
Location: Further down the spiral, TX, usa
Posts: 10,629
Likes: 0
Received 1 Like
on
1 Post
<TABLE WIDTH="90%" CELLSPACING=0 CELLPADDING=0 ALIGN=CENTER><TR><TD>Quote, originally posted by skinnyboy »</TD></TR><TR><TD CLASS="quote">awesome work, i'm doing the same thing but using the DEFI VSD Headup display to replace speedo and tacho, with additional Defi Oil Pressure, Water Temp and the controller. Can't wait to see your setup though.
</TD></TR></TABLE>
That would be nice to replace the tach and speedo with Defi stuff.....hell you might as well just have Defi gauges all the way across the dash!
Anyhow, today before work I trimmed what I needed to off of the back of the glass piece---
...and now I can see everything in it's new position through the glass.
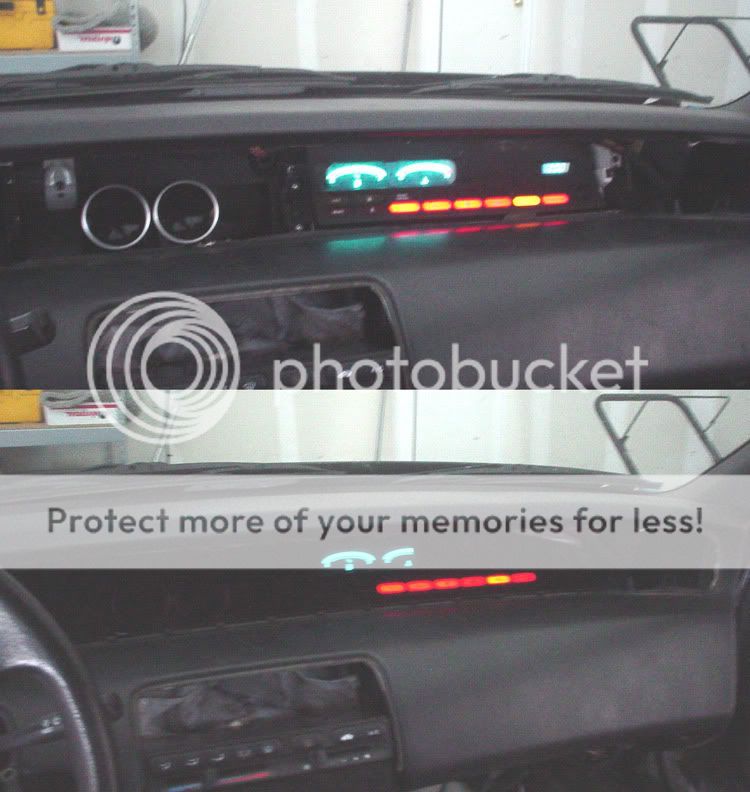
Now I'm debating on leaving the ring around the gauges silver or painting it black... 
Modified by Hawkze_2.3 at 10:23 PM 2/22/2008
</TD></TR></TABLE>
That would be nice to replace the tach and speedo with Defi stuff.....hell you might as well just have Defi gauges all the way across the dash!
Anyhow, today before work I trimmed what I needed to off of the back of the glass piece---
...and now I can see everything in it's new position through the glass.
Now I'm debating on leaving the ring around the gauges silver or painting it black...
Modified by Hawkze_2.3 at 10:23 PM 2/22/2008
06-16-2006, 08:54 AM
#23
Junior Member
Join Date: Jun 2003
Location: bay, ca
Posts: 199
Likes: 0
Received 0 Likes
on
0 Posts
Wow. Not to steal your thunder or anything, but I JUST did this two weeks ago. As for painting the ring around the gauges, I'm thinking of pulling them off completely. The gauges are bright as hell at night, but I can hardly see the little red needle in daylight..


06-16-2006, 09:32 AM
#25
Honda-Tech Member
Thread Starter
Join Date: Jan 2004
Location: Further down the spiral, TX, usa
Posts: 10,629
Likes: 0
Received 1 Like
on
1 Post
<TABLE WIDTH="90%" CELLSPACING=0 CELLPADDING=0 ALIGN=CENTER><TR><TD>Quote, originally posted by puffxy »</TD></TR><TR><TD CLASS="quote">Wow. Not to steal your thunder or anything, but I JUST did this two weeks ago. As for painting the ring around the gauges, I'm thinking of pulling them off completely. The gauges are bright as hell at night, but I can hardly see the little red needle in daylight.. </TD></TR></TABLE>
Cool Did you put the glass piece back on over the gauges or leave it off? How di you end up mounting the stock cluster after you moved it over??
Also, if you want to be nice and save me some time , how did you wire up the control unit (wire colors, etc)??
Cool
Did you put the glass piece back on over the gauges or leave it off? How di you end up mounting the stock cluster after you moved it over??Also, if you want to be nice and save me some time
, how did you wire up the control unit (wire colors, etc)??