
DIY: H22A VALVE ADJUSTMENT
 04-08-2004, 12:41 PM
#26
Member
Join Date: Apr 2003
Location: Windsor, PA
Posts: 2,289
Likes: 0
Received 0 Likes
on
0 Posts
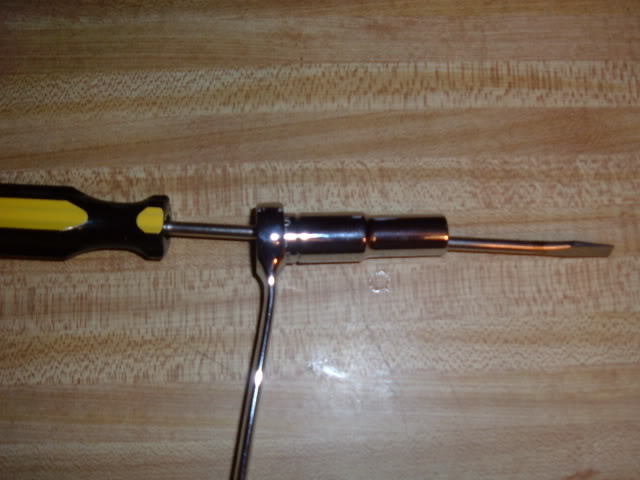
i found an alternative to the vice grip/socket valve adjustment tool. i didn't like using the vice grips because i had to change the angle of the socket when adjusting the intake valves. i found this thread awhile back and decided to try it.
https://honda-tech.com/zerothread?id=557944
<TABLE WIDTH="90%" CELLSPACING=0 CELLPADDING=0 ALIGN=CENTER><TR><TD>Quote, originally posted by UncleBen'sRacing »</TD></TR><TR><TD CLASS="quote">well i didnt want to pay $40 for a Snap On Honda Valve Adjustment Tool, so i made my own, total cost was $3 you will need the following:
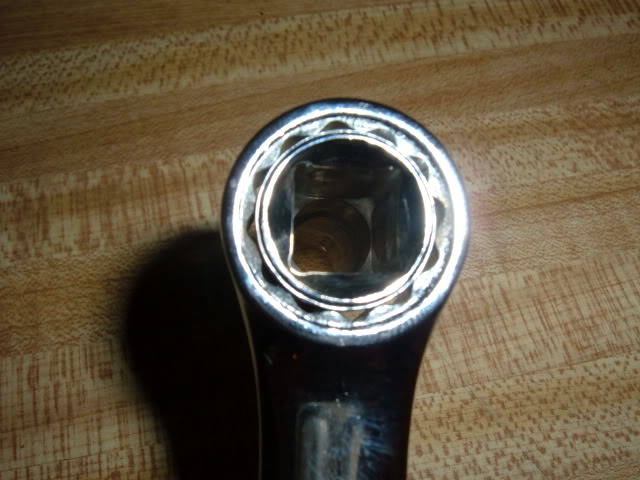
a 10mm 3/8" drive deep socket .69
a 5/8" wrench .99
a flathead screw driver .99
take the 10mm socket and hammer it into the 5/8" wrench (it will be a tight but not too tight fit) will work perfectly, then slide the screw driver in through the hole in the socket, i used a slightly larger screw driver and hammered it into the socket so it would all be one piece, but thats up to you.


</TD></TR></TABLE>
Compared to the vice grip method this is much easier and definetly saved me a good bit of time when i did my valve adj. yesterday. I opted not to make the screwdriver a permanent piece of the tool, but i don't think that would affect the ease of use that much. I had planned on heating the wrench and bending the shank to give better clearance. I didn't get around too it before the valve adj. and found that it wasn't neccesary.
https://honda-tech.com/zerothread?id=557944
<TABLE WIDTH="90%" CELLSPACING=0 CELLPADDING=0 ALIGN=CENTER><TR><TD>Quote, originally posted by UncleBen'sRacing »</TD></TR><TR><TD CLASS="quote">well i didnt want to pay $40 for a Snap On Honda Valve Adjustment Tool, so i made my own, total cost was $3 you will need the following:
a 10mm 3/8" drive deep socket .69
a 5/8" wrench .99
a flathead screw driver .99
take the 10mm socket and hammer it into the 5/8" wrench (it will be a tight but not too tight fit) will work perfectly, then slide the screw driver in through the hole in the socket, i used a slightly larger screw driver and hammered it into the socket so it would all be one piece, but thats up to you.
</TD></TR></TABLE>
Compared to the vice grip method this is much easier and definetly saved me a good bit of time when i did my valve adj. yesterday. I opted not to make the screwdriver a permanent piece of the tool, but i don't think that would affect the ease of use that much. I had planned on heating the wrench and bending the shank to give better clearance. I didn't get around too it before the valve adj. and found that it wasn't neccesary.
 04-08-2004, 05:43 PM
#27
Honda-Tech Member
Nice write up better than the Service manual, BTW do you really need the gloves they look bulky and uncomfortable, on every pic you're not using them except for the last step. 
04-09-2004, 06:55 AM
#28
space cadet
Thread Starter
Join Date: Nov 2002
Location: Spec Shakesland
Posts: 6,091
Likes: 0
Received 0 Likes
on
0 Posts
<TABLE WIDTH="90%" CELLSPACING=0 CELLPADDING=0 ALIGN=CENTER><TR><TD>Quote, originally posted by danmanh22 »</TD></TR><TR><TD CLASS="quote">tip:
another alternative to the crazy-but-effective custom valve adjustment tool, another writeup i read suggested bending both ends of a box-end wrench (combination wrench) so that it forms a sort of "z" shape, only with 90 degree angles. this also allows for locknut supression, while allowing access with a screwdriver. if more force is needed in the tool, then another box-end wrench (the boxed end) can be used againsed the open end of the z-shaped wrench for some extra leverage.</TD></TR></TABLE>
i didnt want to ruin a tool. im poor and spend what i do have on my car. not trying to ruin any more tools.
<TABLE WIDTH="90%" CELLSPACING=0 CELLPADDING=0 ALIGN=CENTER><TR><TD>Quote, originally posted by Behan »</TD></TR><TR><TD CLASS="quote">i found an alternative to the vice grip/socket valve adjustment tool. i didn't like using the vice grips because i had to change the angle of the socket when adjusting the intake valves. i found this thread awhile back and decided to try it.
https://honda-tech.com/zerothread?id=557944
Compared to the vice grip method this is much easier and definetly saved me a good bit of time when i did my valve adj. yesterday. I opted not to make the screwdriver a permanent piece of the tool, but i don't think that would affect the ease of use that much. I had planned on heating the wrench and bending the shank to give better clearance. I didn't get around too it before the valve adj. and found that it wasn't neccesary. </TD></TR></TABLE>
i see how it is steve deviant bastage!!!!
<TABLE WIDTH="90%" CELLSPACING=0 CELLPADDING=0 ALIGN=CENTER><TR><TD>Quote, originally posted by Qfactor »</TD></TR><TR><TD CLASS="quote">Nice write up better than the Service manual, BTW do you really need the gloves they look bulky and uncomfortable, on every pic you're not using them except for the last step. </TD></TR></TABLE>
i didnt use them all the time. sometimes i had em on and sometimes not. but it helps keep mass ammounts of oil off your hands.
Modified by shakes at 12:03 AM 4/10/2004
another alternative to the crazy-but-effective custom valve adjustment tool, another writeup i read suggested bending both ends of a box-end wrench (combination wrench) so that it forms a sort of "z" shape, only with 90 degree angles. this also allows for locknut supression, while allowing access with a screwdriver. if more force is needed in the tool, then another box-end wrench (the boxed end) can be used againsed the open end of the z-shaped wrench for some extra leverage.</TD></TR></TABLE>
i didnt want to ruin a tool. im poor and spend what i do have on my car. not trying to ruin any more tools.
<TABLE WIDTH="90%" CELLSPACING=0 CELLPADDING=0 ALIGN=CENTER><TR><TD>Quote, originally posted by Behan »</TD></TR><TR><TD CLASS="quote">i found an alternative to the vice grip/socket valve adjustment tool. i didn't like using the vice grips because i had to change the angle of the socket when adjusting the intake valves. i found this thread awhile back and decided to try it.
https://honda-tech.com/zerothread?id=557944
Compared to the vice grip method this is much easier and definetly saved me a good bit of time when i did my valve adj. yesterday. I opted not to make the screwdriver a permanent piece of the tool, but i don't think that would affect the ease of use that much. I had planned on heating the wrench and bending the shank to give better clearance. I didn't get around too it before the valve adj. and found that it wasn't neccesary. </TD></TR></TABLE>
i see how it is steve
deviant bastage!!!!<TABLE WIDTH="90%" CELLSPACING=0 CELLPADDING=0 ALIGN=CENTER><TR><TD>Quote, originally posted by Qfactor »</TD></TR><TR><TD CLASS="quote">Nice write up better than the Service manual, BTW do you really need the gloves they look bulky and uncomfortable, on every pic you're not using them except for the last step. </TD></TR></TABLE>
i didnt use them all the time. sometimes i had em on and sometimes not. but it helps keep mass ammounts of oil off your hands.
Modified by shakes at 12:03 AM 4/10/2004
04-09-2004, 06:29 PM
#29
Member
Join Date: Apr 2003
Location: Windsor, PA
Posts: 2,289
Likes: 0
Received 0 Likes
on
0 Posts
<TABLE WIDTH="90%" CELLSPACING=0 CELLPADDING=0 ALIGN=CENTER><TR><TD>Quote, originally posted by shakes »</TD></TR><TR><TD CLASS="quote">
i see how it is steve deviant bastage!!!!
</TD></TR></TABLE>
Try it and even you will see the light.
i see how it is steve
deviant bastage!!!!</TD></TR></TABLE>
Try it and even you will see the light.
04-24-2004, 01:00 AM
#30
Honda-Tech Member
Join Date: Oct 2003
Location: smyrna, tn, usa
Posts: 2,814
Likes: 0
Received 0 Likes
on
0 Posts
OK check this....info would be helpful here....my h22a is a 93 model so i was told (is there a way to check that with the block serial number?) and the chilton manual says the valve clearance is IN: .006-.007in. and EX: .007-.008in. but on ALLDATA it says IN:.009-.011in. and EX: .011-.013 and i know these are the settings for the sohc not the dohc....so if i set mine to the sohc i would be totally screwed right? its all good i redid em anyhow after i saw that **** i was pissed i had to pull it all apart again but hey better while i had all the tools out right!!! oh yeah and i made me a special tool exactly like hybrid_KJ did works very well ive also used it for quite a few years i prefer it over snap-ons $50 tool
04-24-2004, 02:21 PM
#31
Ok, I'm overdue for a valve adjustment, but I've got a question. If you've got adjustable cam gears tuned already, do you have to re-set to 0,0 before you adjust the valves to be able to set the cams for TDC? Do the valve adjustment at 0,0 (intake and exhaust cam gears) then re-set the cam gears after valve adjustment?
04-24-2004, 03:48 PM
#32
Honda-Tech Member
Join Date: Feb 2002
Location: land of the sheep, home of the hypocrite
Posts: 2,072
Likes: 0
Received 0 Likes
on
0 Posts
Thanks for the write up and pictures!
<TABLE WIDTH="90%" CELLSPACING=0 CELLPADDING=0 ALIGN=CENTER><TR><TD>Quote, originally posted by Shakes »</TD></TR><TR><TD CLASS="quote">- go to each valve and loosen the lock nuts. Use a 10mm socket for this.</TD></TR></TABLE>
If you want, you can check the clearance before loosening the lock nuts. The lash might not be out of spec... Also, it doesn't hurt to push down the middle rocker arms while doing a valve adjustment. Make sure they move smoothly and the LMA's don't stick down as you let up. In place of the diagram showing the arrows on the cam sprockets, I just turn them so they are pointing at a 90 deg interval (up, down, right or left), and the cylinder at TDC is the one with the lobes of the exhaust cam sticking out towards you (assuming you are standing in front of the car). hth...
04-24-2004, 04:45 PM
#33
space cadet
Thread Starter
Join Date: Nov 2002
Location: Spec Shakesland
Posts: 6,091
Likes: 0
Received 0 Likes
on
0 Posts
<TABLE WIDTH="90%" CELLSPACING=0 CELLPADDING=0 ALIGN=CENTER><TR><TD>Quote, originally posted by wannabe »</TD></TR><TR><TD CLASS="quote">Ok, I'm overdue for a valve adjustment, but I've got a question. If you've got adjustable cam gears tuned already, do you have to re-set to 0,0 before you adjust the valves to be able to set the cams for TDC? Do the valve adjustment at 0,0 (intake and exhaust cam gears) then re-set the cam gears after valve adjustment?</TD></TR></TABLE>
just make sure that the lobes are not touching and you will be ok.
just make sure that the lobes are not touching and you will be ok.
07-28-2004, 10:29 AM
#34
Join Date: Oct 2003
Location: Queens, NY, U.S.
Posts: 318
Likes: 0
Received 0 Likes
on
0 Posts
Ummm I'm kind of newb, so someone tell me what exactly are you doing when you adjust your valves? What's that $40 dollar tool from Honda everyone's talking about? Why does your car run smoother after adjustment? Should this be done regularly/certain amount of miles? Will this be beneficial for the motor in long run?
08-05-2004, 08:36 PM
#35
space cadet
Thread Starter
Join Date: Nov 2002
Location: Spec Shakesland
Posts: 6,091
Likes: 0
Received 0 Likes
on
0 Posts
<TABLE WIDTH="90%" CELLSPACING=0 CELLPADDING=0 ALIGN=CENTER><TR><TD>Quote, originally posted by wongf22b2 »</TD></TR><TR><TD CLASS="quote">Ummm I'm kind of newb, so someone tell me what exactly are you doing when you adjust your valves? </TD></TR></TABLE>
you are adjusting how far the vavle moves during its cycle.
<TABLE WIDTH="90%" CELLSPACING=0 CELLPADDING=0 ALIGN=CENTER><TR><TD>Quote, originally posted by wongf22b2 »</TD></TR><TR><TD CLASS="quote">What's that $40 dollar tool from Honda everyone's talking about? </TD></TR></TABLE>
its a special tool made by snap-on. it is the same thing as the one i made, just all in one piece with snap-on quality.
<TABLE WIDTH="90%" CELLSPACING=0 CELLPADDING=0 ALIGN=CENTER><TR><TD>Quote, originally posted by wongf22b2 »</TD></TR><TR><TD CLASS="quote">Why does your car run smoother after adjustment? </TD></TR></TABLE>
the engine is designed to such tight specs that when it gets out of whack your performance, gas milage and life expectancy goes down.[/QUOTE]
<TABLE WIDTH="90%" CELLSPACING=0 CELLPADDING=0 ALIGN=CENTER><TR><TD>Quote, originally posted by wongf22b2 »</TD></TR><TR><TD CLASS="quote">Should this be done regularly/certain amount of miles? </TD></TR></TABLE>
the owners manual suggests once every 30,000 miles.
<TABLE WIDTH="90%" CELLSPACING=0 CELLPADDING=0 ALIGN=CENTER><TR><TD>Quote, originally posted by wongf22b2 »</TD></TR><TR><TD CLASS="quote">Will this be beneficial for the motor in long run?</TD></TR></TABLE>
very! it will help to ensure a long healthy life for your lude.
08-07-2004, 04:29 AM
#36
Join Date: Aug 2004
Location: Manchester, UK
Posts: 2
Likes: 0
Received 0 Likes
on
0 Posts
Hi there !! I have got 1997 Prelude 2.2 DOHC VTEC and have installed a 70mm TB a few weeks ago. This TB had no provision for choke so what I did is instead of joining the two water pipes which were going into the choke system I cut the choke body from underneath the stock TB sealed it from the top with a plate and sealent and screwed nicely underneath the intake manifold in the upright position so that the water keeps circulating in the temperature sensor and the choke keeps working but all in vain....the choke still does not comes in the morning and after I warm up the car by holding down the pedal and driving the idle speed goes down too much that the engine almost dies.....the new TB is sooo good but this choke and idle problem is letting my car down......before the installation of the new TB every thying was fine...if anybody helps I will appreciate...thanks.
 03-19-2005, 08:01 PM
#40
space cadet
Thread Starter
Join Date: Nov 2002
Location: Spec Shakesland
Posts: 6,091
Likes: 0
Received 0 Likes
on
0 Posts
<TABLE WIDTH="90%" CELLSPACING=0 CELLPADDING=0 ALIGN=CENTER><TR><TD>Quote, originally posted by ekay_jeremy »</TD></TR><TR><TD CLASS="quote">great writeup!</TD></TR></TABLE>
thanks jeremy
<TABLE WIDTH="90%" CELLSPACING=0 CELLPADDING=0 ALIGN=CENTER><TR><TD>Quote, originally posted by steveobb4 »</TD></TR><TR><TD CLASS="quote">Tip: remove all of the spark plugs, this will make it easy to turn the engine by hand.</TD></TR></TABLE>
yes, if i did not mention that it should be done to relieve pressure from the engine.
10-16-2005, 05:36 PM
#41
Join Date: Feb 2004
Location: catawba, nc, usa
Posts: 176
Likes: 0
Received 0 Likes
on
0 Posts
ok time for a stupid questoin....where exactly do u stick the tip of the feeler guage? the last motor that i did the valve lashings on was a d15b, and u put it directly between the vavle retainer and the screw that presses down on it, but on these pictures it seems like he's sticking the feeler gauge between the cam shaft and the rocker arm and measureing it there, not at the screw like on the d15b? i went to work on my lude today to redo the valves and i was all dazed n confused about how i could ever possibly fit a afeeler gauge to where the screw and retainer/valve spring meet without removing the rocker arm assembly, but then that would be a waste of time to measure since id removed the main that that needs clearincing if that makes since at all lol....hopefully yall can clear up this for me, thanks
10-18-2005, 12:22 PM
#42
Honda-Tech Member
Join Date: Oct 2004
Location: VEGAS BABY, VEGAS, usa
Posts: 323
Likes: 0
Received 0 Likes
on
0 Posts
<TABLE WIDTH="90%" CELLSPACING=0 CELLPADDING=0 ALIGN=CENTER><TR><TD>Quote, originally posted by importlegions »</TD></TR><TR><TD CLASS="quote">ok time for a stupid questoin....where exactly do u stick the tip of the feeler guage? </TD></TR></TABLE>
I just did mine today for the first time based on this write up and didnt have any porbs. Youre right in assuming the feeler goes between the cam lobe and rocker(if thats whats right below the lobe). Youll see how the feeler will fit in there right around what specs should be. It was mostly the intake side that needed adjustment for me.
OT- When I removed the spark plugs (mainly # 3 an 4) there was a fair amount of oil drippin from the threads. Anybody got any ideas as to what that prob may be??
Modified by djbrandonr at 6:31 AM 10/23/2005
10-18-2005, 03:21 PM
#43
Honda-Tech Member
Join Date: Feb 2002
Location: land of the sheep, home of the hypocrite
Posts: 2,072
Likes: 0
Received 0 Likes
on
0 Posts
<TABLE WIDTH="90%" CELLSPACING=0 CELLPADDING=0 ALIGN=CENTER><TR><TD>Quote, originally posted by djbrandonr »</TD></TR><TR><TD CLASS="quote">OT- When I removed the spark plugs (mainly # 3 an 4) there was a fair amount of oil drippin from the threads. Anybody got any ideas as to what that prob may be??</TD></TR></TABLE>
That O-rings between the head and valve cover on those sparkplugs.
That O-rings between the head and valve cover on those sparkplugs.
10-18-2005, 08:38 PM
#44
Honda-Tech Member
Join Date: Oct 2004
Location: VEGAS BABY, VEGAS, usa
Posts: 323
Likes: 0
Received 0 Likes
on
0 Posts
yea I noticed it a while back, but wasnt till today that I was able to put new o-rings in. So I guess I'll find out next time I pull the plugs. Someone else said it possibly could be the rings. Whatcha think about that. If thats the case no big deal. I got a block Im gonna build here soon so maybe an excuse to start spending and building sooner than expected...
03-31-2006, 11:05 PM
#45
Honda-Tech Member
Join Date: Dec 2005
Location: Sacto, CA, USA
Posts: 321
Likes: 0
Received 0 Likes
on
0 Posts
so how do u know if the valve is closed? make sure the lob is facing the front of the car? how do u know if the lob is facing the front of the car? wut do i look for?

 05-31-2006, 01:33 PM
#48
Honda-Tech Member
Join Date: Dec 2005
Location: Sacto, CA, USA
Posts: 321
Likes: 0
Received 0 Likes
on
0 Posts
<TABLE WIDTH="90%" CELLSPACING=0 CELLPADDING=0 ALIGN=CENTER><TR><TD>Quote, originally posted by poison »</TD></TR><TR><TD CLASS="quote">Very nice write up!
I don't remember off hand, what what is the exaact feeler gauge measure ment for the exhaust and the intake. I believe it.s .006" for the exhaust (which you stated above), and .007 or or .008 but I am not sure.
Another thing as well to point out....
INSTEAD of checking the cam to see if that specific cylinder, just simply look at the cam gears to ensure you do the valve adjustment in order..
You want to adjust Cylinder 1, then 3, then 4, then 2 in firing order.
Here is a ghetto diagram I just made:

HTH </TD></TR></TABLE>so can i still follow this?
p.s. why is ur picture from top to bottom 1,3,4,2? I thought it was 1,2,3,4 from front of the engine to rear?
I don't remember off hand, what what is the exaact feeler gauge measure ment for the exhaust and the intake. I believe it.s .006" for the exhaust (which you stated above), and .007 or or .008 but I am not sure.
Another thing as well to point out....
INSTEAD of checking the cam to see if that specific cylinder, just simply look at the cam gears to ensure you do the valve adjustment in order..
You want to adjust Cylinder 1, then 3, then 4, then 2 in firing order.
Here is a ghetto diagram I just made:
HTH
</TD></TR></TABLE>so can i still follow this?p.s. why is ur picture from top to bottom 1,3,4,2? I thought it was 1,2,3,4 from front of the engine to rear?
 05-31-2006, 02:22 PM
#50
Honda-Tech Member
Join Date: Dec 2005
Location: Sacto, CA, USA
Posts: 321
Likes: 0
Received 0 Likes
on
0 Posts
<TABLE WIDTH="90%" CELLSPACING=0 CELLPADDING=0 ALIGN=CENTER><TR><TD>Quote, originally posted by 98vtec »</TD></TR><TR><TD CLASS="quote">because that is the sequence of TDC while turning the crank counterclockwise</TD></TR></TABLE> yea but i thought that front front to rear the cylinders were labled
Cylinder (1)
Cylinder (2)
Cylinder (3)
Cylinder (4)
So from his picture we would adjust
Cylinder 1 <--First
Cylinder 2 <--Forth
Cylinder 3 <--Second
Cylinder 4 <--Third
???
Cylinder (1)
Cylinder (2)
Cylinder (3)
Cylinder (4)
So from his picture we would adjust
Cylinder 1 <--First
Cylinder 2 <--Forth
Cylinder 3 <--Second
Cylinder 4 <--Third
???