When you click on links to various merchants on this site and make a purchase, this can result in this site earning a commission. Affiliate programs and affiliations include, but are not limited to, the eBay Partner Network.
After getting the car back from the headgasket and radiator job, in August of 2013 I decided to give it somewhat of a tune-up and replace the PCV valve and a few other items. Unfortunately for me, the PCV valve snapped off in the intake manifold:
I think this was the defining moment when I decided to start doing more work for myself and embarked on a mission to fix the broken PCV valve. I couldn't figure out how to get the broken PCV valve out without removing the intake manifold because the vacuum hose underneath is blocked by stuff on the back side of the engine. My solution was to remove everything related to the intake manifold:
Intake manifold
Throttle body
Fuel rail + injectors
Breather chamber on the back side of the engine block
Bracket for intake manifold on the back side of the engine block
Here's most of the stuff removed:
Here's a picture of my IACV that I took off:
And a pic of the throttle body after I separated it from the intake manifold (probably first time it had ever been apart):
Here's a complete list of what got done during this project:
Intake manifold gasket
Throttle body gasket
TPS Sensor + gasket
Breather chamber O-ring
De-carbon throttle body and intake manifold
Fuel injector cleaning and flow matching by Witchhunter Performance
New IACV (Duralast from Autozone, but had the "Keihin" markings on it)
New FITV (OEM)
New PCV (OEM)
New fuel line from filter --> rail (OEM)
Every single rubber vacuum and coolant line connected to the PCV/FITV/IACV and all clamps were replaced with OEM
Intake Air Temperature (IAT) sensor (OEM)
Turns out, the breather chamber O-ring was the cause of my oil leak, which I was able to locate and fix during this project. This was a huge project for me at the time and a major step toward improving my mechanical abilities. I was thrilled when the car actually started once I got it all hooked back up. I found it to be somewhat of a miracle at the time actually
Oh, and here's a picture of that nice and shiny new PCV valve and hose:
Last edited by wxman94ej1; 06-09-2017 at 05:28 AM.
This was a huge project for me at the time and a major step toward improving my mechanical abilities. I was thrilled when the car actually started once I got it all hooked back up. I found it to be somewhat of a miracle at the time actually
Good job taking that on! And I know the feeling of "I can't believe it started again!" I don't let on with that feeling in front of my woman, I'm all like "Of course it started baby..."
In the fall of 2013 I was having some problems with debris blowing out of the heater vents (think leaves, fuzz, etc...). I removed the glove box and then the heater duct (where the a/c evaporator is on a/c equipped cars) to inspect things:
After removing the heater duct, I was able to get a clear view into the heater box near the heater core. Unfortunately, I found a mouse nest!
Remember the car basically sat in a barn at my parents house for 2-3 years, occasionally driven by my dad but I'm sure the mice took up residence during that time. The other oops was that I broke off the passenger vent cover for the HVAC duct because I didn't know how to properly remove them at the time.
I also took a look at my front suspension. The shop that did the work on the headgasket also provided one of those "inspection" reports and noted my front lower control arm bushings needed replacement. So I crawled under there to investigate what everything looked like. What I found wasn't great. The bushings were worn on the front lower control arms, so I began looking at how to remove the front lower control arms, which led me to this-
PASSENGER:
DRIVER:
Now, based on what I could figure out the easiest way is to just drop the exhaust, remove the sway bar, and then just remove the mounting bolts for the compliance bushing so that the compliance bushing just comes out with the control arm, because I don't think there's any way those compliance bushing nuts holding it in are coming out. Then again, the sway bar bushing mounting bolts don't look any better. Based on this, I have avoided this up until this day because I am just too worried about breaking bolts.
Really, what I'd like to do is just remove the entire front subframe as one piece, replace it with a non-rusted one and overhaul the steering rack/control arms/sway bar at the same time. That being said, does anyone know which bolts need to come out to drop the subframe? I know there's one in the front of the subframe on each side but at the rear of the subframe, which of these bolts have to come out?
Sway bar bushing bolts: A,B
Compliance bushing bolts: C,D,E
Other: F
...does anyone know which bolts need to come out to drop the subframe? I know there's one in the front of the subframe on each side but at the rear of the subframe, which of these bolts have to come out?
Sway bar bushing bolts: A,B
Compliance bushing bolts: C,D,E
Other: F
Good question Mate! I have been thinking about this ever since you told me about the additional reinforcement to the subframe from the DC2.
It would be a great opportunity to replace all the front end bushings.
Also, it would be a heck of a lot easier to swap out charcoal canisters with that subframe out...
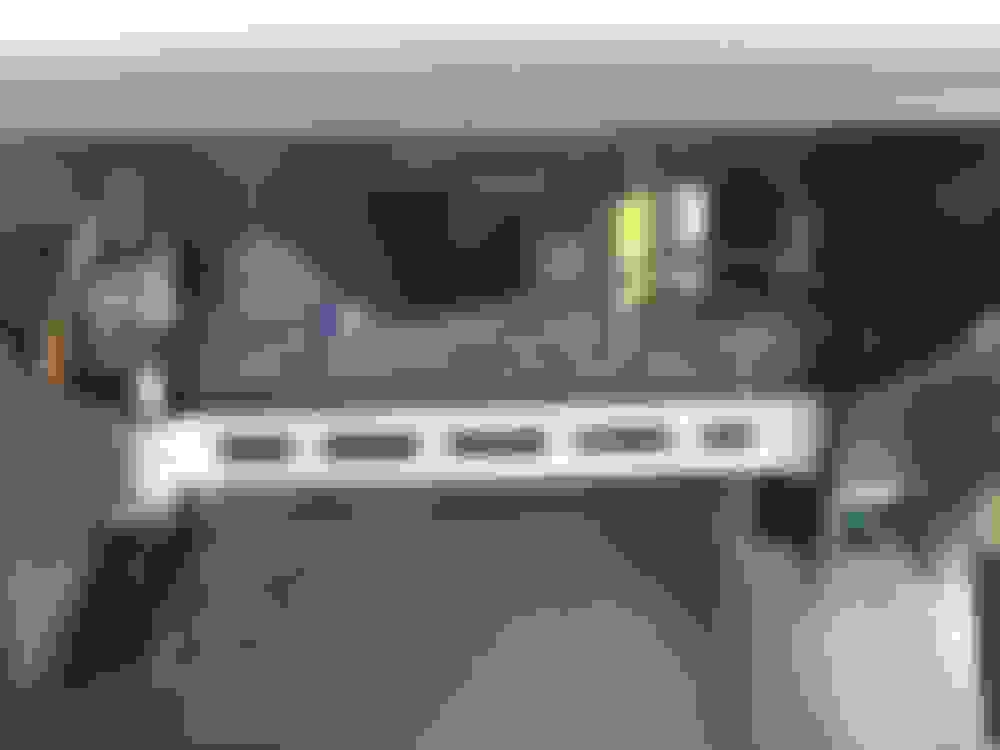
Part of me just wants to go for it and part of me says don't mess with it because if something goes wrong the car is basically rendered useless until I can get someone to do fabrication work! The other problem I face is that if I pull the subframe I am going to want to replace all the hardlines going to the rear with new and all new hardware and brackets too, making it a much bigger project. You can see that crusty bracket holding the 5 hardlines in place in the picture above. Nasty! Someday...
Last edited by wxman94ej1; 06-12-2017 at 07:35 AM.
In 2014 I took on a few different projects. The first was to completely overhaul/restore my shift linkage. When I was under the car inspecting the control arms I noticed that the shift linkage was starting to develop some rust as well. Unlike the subframe, I had confidence I could remove the shift linkage without breaking any bolts. I researched various options for the shift linkage and given it's exposure ultimately decided to give POR-15 a try. This is pretty tough stuff, and probably more suitable for rustier applications but figured it would provide the ultimate in lasting protection that I could do myself. Powdercoating would have been possibly a better option but decided to try POR-15 myself. I removed the shift linkage and prepped it for sandblasting by one of my friends:
After blasting they came out looking great and honestly probably would have been fine with some epoxy paint and primer:
This is one of the only pictures I have of both pieces finished- apparently I didn't take any before re-installing the completely overhauled linkage. The POR-15 turned out really well. It's like a hard clear-coat shell that looks really tough up close. Since this was three years ago now, I can report that it's held up well underneath the car. Here's the finished product:
All bushings, hardware, collars, and rubber pieces were replaced as well as the washers at the transmission with OEM Honda parts.
At the same time the shift linkage was off, I replaced some exhaust heat shielding under the car that was also crusty. I was able to source virtually rust-free parts from a donor car at the local pick-a-part:
All the mounting hardware for these shields was also replaced with OEM Honda hardware.
In 2014 I also decided to change out my exhaust. I was running some sort of fart canister (Tenzo-R I think) from that red donor car shown early on in this thread where we took sheet metal to replace my quarters. Here's a picture of the setup after I removed it from the car to sell it:
After much research I ended up going with the Apexi World Sport II (WS2) catback exhaust system with a Magnaflow high-flow direct fit catalytic converter. Part numbers were:
Apexi: 116-KH01
Magnaflow: 22636
Here's a picture of the exhaust in the box, no pictures of the installation process that I could find but it was fairly straightforward:
A few notes about this exhaust setup. It is orders of magnitude quieter than what I removed. Some people would even say it's too quiet but I absolutely love it. When I was shopping, I started another thread asking about the collector pipe diameter on my OEM JDM B16A header. You can read a summary of my installation here: https://honda-tech.com/forums/honda-.../#post49823537
I'll also note that I either have an exhaust leak or the Magnaflow catalytic converter is garbage and some of the honeycomb is loose because I have a horrible buzzing noise at cruising speed in 5th gear between 3700-4000 RPM. It's awful and it's currently on my list of things to investigate. I'm 99% sure it's exhaust related but need to get under there and look.
Around this time I also replaced my Walbro 255 L/H fuel pump that was installed at the time of the motor swap. It was overkill for my stock setup, and whined when it got warm out. I replaced this with a Bosch fuel pump p/n 69544. No more whining!
Are you sure it is not your shift linkage that is buzzing in 5th?
That's something I'll definitely be checking for when I crawl my lazy self under there one day to investigate. For some reason my gut is telling me exhaust but can't rule anything out yet.
Originally when the motor swap was performed in 2010 we tried using the JDM P30 ECU that came with the motor from HMO. When it was hooked up, it was throwing a code 10 for knock sensor. At the time I didn't really feel like running the P30 because I didn't want to have to pay someone to diagnose the problem so I had someone "chip" my USDM P28 ECU instead. Chipping ECU's in New York at least where the car was in 2010, was somewhat of a word of mouth thing. There weren't really any shops that I knew of so a friend of a friend did the work. I didn't know anything about ECU chipping but basically it seems like it loads in some basemap to work with the motor, deactivates sensors that aren't a match to the ECU and that's about it. We got the ECU back and no codes, so that's all that mattered at the time to me. I still to this day don't know what software is loaded on my P28. Does anyone know how to find this out? Would I need a laptop with some software and a jumper cable to connect to the laptop?
Sometime in 2014 or 2015 I decided I wanted to try and get the P30 ECU working. I plugged it in and it still threw code 10, knock sensor. I located the sensor and verified it was there but turns out when the swap was done nobody properly wired it into the ECU, so of course it was throwing a code! Much research ensued. First, I located a factory service manual from an OBD1 Del Sol VTEC for the wiring diagram:
Notice the dashed line next the the line marked RED/BLU? Initially I didn't understand this but turns out that signifies a ground shielding that is wrapped around another single insulated wire. Here's an example picture:
The gray sheathing is the insulation for the silver wiring, which is wrapped around the white/red insulation jacket of the actual signal wire inside. This silver wiring that is the shield is then grounded at the ECU with several other shielded wires mainly coming from the distributor. Because the knock sensor is sensitive to interference, Honda decided it needed to have shielded wire from the factory. Well, I didn't have any of this shielded wire and turns out it's really difficult to source only 10 feet or so of the stuff locally and online it was hard to tell what I would get. I also wasn't about to wire everything up with a new knock sensor and then figure out I still had a code because I didn't use shielded wire. Some people claim you can get away without it but I didn't want to risk it.
I decided the best route would be to find any car that came with a knock sensor from the factory and pull the wiring off of one at the pick-a-part yard. I determined some newer EK chassis (96-00) models had knock sensors so I found one of those and harvested the wiring, which was also a single wire with shielding. Then I spliced this into the knock sensor pigtail I had, de-pinned the passenger shock tower connector and added the knock sensor to that connector on both sides, ran it through the firewall and to the ECU. I purchased a new knock sensor (not OEM, Standard Motor Products I think) and installed that and then fired the engine up and no more code 10! Success! While I can't tell whether the shielded wiring contributed to my success, I can say that using it can't hurt.
One last thing- I also purchased this sensor socket set to remove the knock sensor:
I don't remember which one of those worked but one of them worked perfectly.
Around this time I was also fighting a passenger door speaker/tweeter that wasn't working. Turns out some of the wiring pins in the connector that goes from the cabin to the passenger door had some corrosion on them. I de-pinned a few of those wires and scuffed up the connectors and everything is working again. I highly recommend learning how to de-pin Honda electrical connectors. It's tricky the first 1-5 times you try but once you get it you'll wonder why it seemed so hard. Get some spare connectors and practice. It's worth it to have the skill, and to be able to do wiring that looks factory.
After much research I ended up going with the Apexi World Sport II (WS2) catback exhaust system with a Magnaflow high-flow direct fit catalytic converter. Part numbers were:
Apexi: 116-KH01
Trying to figure out what muffler you got with your system. I think it might be this one?
Interesting. No, I do not believe that is what I have. I tried finding WS-II components or even complete catback systems for my chassis this morning and I cannot find it anymore!
I was able to locate a picture of something similar to mine here:
Notice how the black pipe (inlet to muffler) comes out --> up --> down? That's because it has to clear the rear control arm. Sometimes this is referred to as an "axle-back" system or "axle-back" muffler. Note the picture I posted is the entire cat-back system but the axle-back muffler would be from the first point where it bolts to the mid-pipe back to the exhaist tip. I think what you posted is just a "universal muffler" that would need to be adapted to your existing piping via welding or clamps. But, you did post a WS-II universal muffler and I do have the WS-II cat-back system so theoretically maybe the muffler is the same but the inlet piping is a little different?
That is interesting! That muffler you have pictured is definitely different that the one I linked. The one you show is much rounder. The one I found is listed as universal on the Summit page, but I believe it was Civic specific on the A'PEXi site.
Originally when the motor swap was performed in 2010 we tried using the JDM P30 ECU that came with the motor from HMO. When it was hooked up, it was throwing a code 10 for knock sensor. At the time I didn't really feel like running the P30 because I didn't want to have to pay someone to diagnose the problem so I had someone "chip" my USDM P28 ECU instead. Chipping ECU's in New York at least where the car was in 2010, was somewhat of a word of mouth thing. There weren't really any shops that I knew of so a friend of a friend did the work. I didn't know anything about ECU chipping but basically it seems like it loads in some basemap to work with the motor, deactivates sensors that aren't a match to the ECU and that's about it. We got the ECU back and no codes, so that's all that mattered at the time to me. I still to this day don't know what software is loaded on my P28. Does anyone know how to find this out? Would I need a laptop with some software and a jumper cable to connect to the laptop?
Sometime in 2014 or 2015 I decided I wanted to try and get the P30 ECU working. I plugged it in and it still threw code 10, knock sensor. I located the sensor and verified it was there but turns out when the swap was done nobody properly wired it into the ECU, so of course it was throwing a code! Much research ensued. First, I located a factory service manual from an OBD1 Del Sol VTEC for the wiring diagram:
Notice the dashed line next the the line marked RED/BLU? Initially I didn't understand this but turns out that signifies a ground shielding that is wrapped around another single insulated wire. Here's an example picture:
The gray sheathing is the insulation for the silver wiring, which is wrapped around the white/red insulation jacket of the actual signal wire inside. This silver wiring that is the shield is then grounded at the ECU with several other shielded wires mainly coming from the distributor. Because the knock sensor is sensitive to interference, Honda decided it needed to have shielded wire from the factory. Well, I didn't have any of this shielded wire and turns out it's really difficult to source only 10 feet or so of the stuff locally and online it was hard to tell what I would get. I also wasn't about to wire everything up with a new knock sensor and then figure out I still had a code because I didn't use shielded wire. Some people claim you can get away without it but I didn't want to risk it.
I decided the best route would be to find any car that came with a knock sensor from the factory and pull the wiring off of one at the pick-a-part yard. I determined some newer EK chassis (96-00) models had knock sensors so I found one of those and harvested the wiring, which was also a single wire with shielding. Then I spliced this into the knock sensor pigtail I had, de-pinned the passenger shock tower connector and added the knock sensor to that connector on both sides, ran it through the firewall and to the ECU. I purchased a new knock sensor (not OEM, Standard Motor Products I think) and installed that and then fired the engine up and no more code 10! Success! While I can't tell whether the shielded wiring contributed to my success, I can say that using it can't hurt.
One last thing- I also purchased this sensor socket set to remove the knock sensor: https://www.amazon.com/gp/product/B0...?ie=UTF8&psc=1
I don't remember which one of those worked but one of them worked perfectly.
Around this time I was also fighting a passenger door speaker/tweeter that wasn't working. Turns out some of the wiring pins in the connector that goes from the cabin to the passenger door had some corrosion on them. I de-pinned a few of those wires and scuffed up the connectors and everything is working again. I highly recommend learning how to de-pin Honda electrical connectors. It's tricky the first 1-5 times you try but once you get it you'll wonder why it seemed so hard. Get some spare connectors and practice. It's worth it to have the skill, and to be able to do wiring that looks factory.
Just re-reading this as I referenced this for someone else who was having knock sensor issues. You say the shielding is grounded at the ECU? I would like to see how this is connected... Is the shielding connected to anything at the sensor end?
Just re-reading this as I referenced this for someone else who was having knock sensor issues. You say the shielding is grounded at the ECU? I would like to see how this is connected... Is the shielding connected to anything at the sensor end?
Thanks for documenting this!
Ah excellent question! I will have to look at my wiring job inside the cabin to confirm, but I am fairly certain that the knock sensor wire was connected directly to D3 on the ECU (P30 ECU in my case), and I stripped off the outer shielding and collected the strands of shield wiring and spliced them into the wire going into the "logic ground" pin on whatever ECU you're using. This "logic ground" ECU pin provides a constant 0V signal, effectively stripping out any "interference" or "noise" in the shielding so that it doesn't affect the voltage being received by the actual knock sensor itself via the signal wire that the shielding is wrapped around. Nifty, huh? ***NOTE: I am not an electrical engineer, I pieced this information together from reading the internet so take it for what it's worth!
It is also important to note, that the distributor wires are also shielded, and the shielding for those wires is also spliced into the wire going into the "logic ground" pin on the ECU.
I will try and respond later with a few more pictures and some more info related to what I did.
Interesting. No, I do not believe that is what I have. I tried finding WS-II components or even complete catback systems for my chassis this morning and I cannot find it anymore!
I was able to locate a picture of something similar to mine here:
Notice how the black pipe (inlet to muffler) comes out --> up --> down? That's because it has to clear the rear control arm. Sometimes this is referred to as an "axle-back" system or "axle-back" muffler. Note the picture I posted is the entire cat-back system but the axle-back muffler would be from the first point where it bolts to the mid-pipe back to the exhaist tip. I think what you posted is just a "universal muffler" that would need to be adapted to your existing piping via welding or clamps. But, you did post a WS-II universal muffler and I do have the WS-II cat-back system so theoretically maybe the muffler is the same but the inlet piping is a little different?
Were you ever able to determine if your muffler has an offset inlet? I am really wanting to get one, now that I am driving my Civic more. My Aero Turbine is not to my liking any longer.
Apexi sells a 60mm inlet NA muffler that has no offset, offset left, or offset right. They also have a 70mm inlet WS2 NA muffler.
Funny, 60mm is ~2.3" and 70mm is ~2.7", but they don't say if that is ID or OD. I have 2.5" exhaust.
In case anyone else is interested in the answer, my muffler does not have an offset inlet L-->R, but it is offset toward the top center of the muffler.
In case anyone else is interested in the answer, my muffler does not have an offset inlet L-->R, but it is offset toward the top center of the muffler.
Just re-reading this as I referenced this for someone else who was having knock sensor issues. You say the shielding is grounded at the ECU? I would like to see how this is connected... Is the shielding connected to anything at the sensor end?
Thanks for documenting this!
Originally Posted by wxman94ej1
Ah excellent question! I will have to look at my wiring job inside the cabin to confirm, but I am fairly certain that the knock sensor wire was connected directly to D3 on the ECU (P30 ECU in my case), and I stripped off the outer shielding and collected the strands of shield wiring and spliced them into the wire going into the "logic ground" pin on whatever ECU you're using. This "logic ground" ECU pin provides a constant 0V signal, effectively stripping out any "interference" or "noise" in the shielding so that it doesn't affect the voltage being received by the actual knock sensor itself via the signal wire that the shielding is wrapped around. Nifty, huh? ***NOTE: I am not an electrical engineer, I pieced this information together from reading the internet so take it for what it's worth!
It is also important to note, that the distributor wires are also shielded, and the shielding for those wires is also spliced into the wire going into the "logic ground" pin on the ECU.
I will try and respond later with a few more pictures and some more info related to what I did.
OK I dug out my Factory Service Manual (FSM) for a 1995 Del Sol VTEC which comes equipped with a knock sensor and my factory 1994 EJ1 FSM and took a few more pictures and sorted out how the wiring specs are from the factory. I adhered to this as strictly as possible when wiring in my knock sensor.
First, here's the path of the knock sensor signal wire (RED/BLU), for a P30 ECU and a JDM B16A engine in a 1994 EJ1 using the factory D16Z6 wire harness. All connector numbers (except ECM) reference the factory service manual from the 1994 EJ1 since that's the harness I am using.
Overview: Knock sensor --> C102/C213 position 8 --> ECM position D3
Details:
1. Knock sensor --> C102/C213. C102 refers to engine bay/sensor side, C213 refers to ECM side on the R shock tower connector. On this connector pair, position number 8 was empty from the factory, allowing for the knock sensor wiring using OEM Honda wiring with pins on the end. I pulled apart the C102 and C213 sides of the connectors and added pins on both sides to position number 8.
2. C102/C213 --> ECM. Continuing from the C213 side of the connector, wiring was run inside the cabin to ECM pin number D3, which is the pin number shown in the Del Sol service manual for the knock sensor when using a P30 ECU.
As mentioned, the knock sensor uses a shielded wire. Some interesting additional unrelated info, here are a list of other sensors that use shielded wiring:
1. Heated O2 sensor (WHT)
2. Crankshaft Position Sensor* (ORN)
3. Top Dead Center Sensor* (ORN/BLU)
4. Cylinder Position Sensor* (BLU/GRN)
The sensors with a * share the same shielding, meaning that the three signal wires from these sensors are wrapped in the same shielding. All of these wires with a * come from the distributor.
To handle the shielding, the wire harness has two "Logic Grounds", LG1 and LG2. The path of these wires is from the ECM --> C102/C213 --> G101. G101 is the ground at the thermostat housing.
1. LG1 = BLK/RED = ECM Pin A26
2. LG2 = BRN/BLK = ECM Pin B2
At C102/C213 (R shock tower connector), LG2 passes through pin position 3, and LG1 passes through pin position 1.
Going off of the ground distribution wiring diagram in the Del Sol VTEC FSM, I connected the shielding for the knock sensor wiring to the logic ground wiring via a splice at the following locations:
1. Splice 1 was made just prior to C102/C213 on the engine bay side of the connector between the LG2 signal wire and knock sensor signal wire shielding. This way the shielding picks up the LG2 signal coming out of the C102/C213 connector and the knock sensor signal wire is shielded from C102/C213 to the sensor with the LG2 signal.
2. Splice 2 was made in the cabin passenger footwell just prior to the connection with ECM pin A26 between the LG2 signal wire and knock sensor signal wire shielding. This way the shielding picks up the signal coming out of the ECM from LG2 and the knock sensor signal wire is shielded from the ECM to C102/C213.
To splice the shielding, I stripped the outermost wire sheathing away to reveal the shielding and collected the strands of shielding into a single core that I spliced with the LG2 wire.
**NOTE: The shielding itself does NOT pass through C102/C213. It doesn't need to, because as long as the shielding is connected somewhere on either side of C102/C213 to the LG2 signal, then there is low chance that interference would be picked up by the knock sensor signal wire at the C102/C213 pass-through itself which is a run of only 1-2".
You say you did take more pictures? I would like to see pictures, especially of your splices. I feel like this is something I need to do for my knock sensor (KS).
Good question! I am not sure whether the factory D16Z6 shroud/fan would have fit on this radiator, and I did not keep it when they put in the new radiator. However, I currently have in my possession a used OEM JDM B16A radiator, fan, and shroud. My intention one day is to see if either the OEM B16A shroud fits the Blox radiator or get an OEM replacement radiator and install the OEM fan shroud. Problem is, I'm not sure the DOHC B16A3 radiator was the same spec as the SOHC D16Z6 radiator (I think the DOHC one might have been dual core or twice as thick?), and I don't know whether any aftermarket manufacturers make one to the DOHC spec. So I may stick with the Blox and try and attach the OEM shroud.
For reference later, some part numbers for OEM radiators:
1995 Del Sol VTEC w/B16A3: 19010-P30-505
1994 Civic EX w/D16Z6: 19010-P03-505
1999 Civic SI w/B16A2: 19010-P2T-A01
Note the 1 number difference between the 1994/1995 radiators: P30 vs. P03. Interestingly, the price of the 1999 Civic SI and the 1994 Civic EX radiators is identical, while the Del Sol radiator is $100 more expensive ($222 vs. $322 at the time of this post). All three part numbers are available.
Endless project ideas...
I was going through here looking for your current suspension set-up and stopped here. I thought I would check on the OEM del Sol rad and was disappointed at what I found:
1995 Del Sol VTEC w/B16A3: 19010-P30-505 - Discontinued Part - No Longer Available For Purchase, and then
1999 Civic SI w/B16A2: 19010-P2T-A01 - Not For Sale (what?) - No Longer Available For Purchase

 06-07-2017, 05:04 AM