
Tech Article: B-Series Cam Seal Replacement
 10-22-2008, 08:53 PM
#1
Honda-Tech Member
Thread Starter
Join Date: Aug 2002
Location: Westslope, CO, United States
Posts: 3,048
Likes: 0
Received 0 Likes
on
0 Posts
Have oil leaking down the passenger side front of the engine block? It's more than likely your exhaust cam seal. This is known to be a culprit for a lot of leaks and a lot of aftermarket companies make replacements that utalize o-rings for a more effective seal. This is pretty simple and easy so save yourself a few bucks and do it yourself.
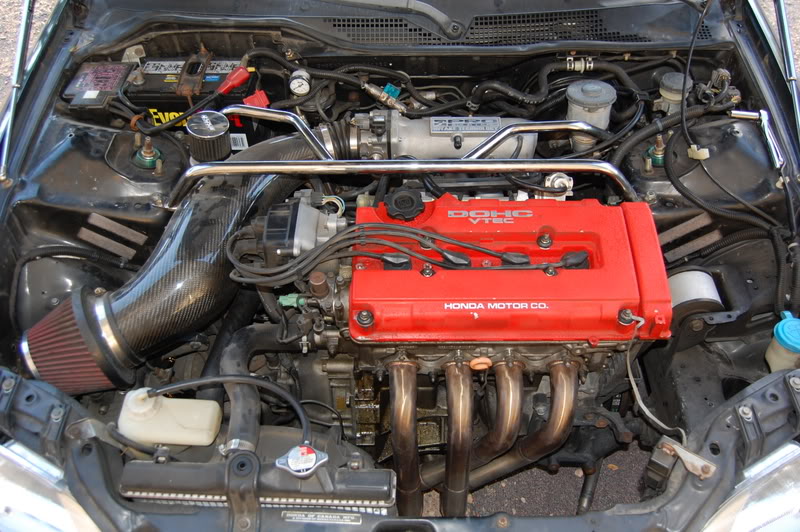
First pop your hood and this is what you should see. See how the front of my block is all nasty and covered in oil. We are going to fix that!
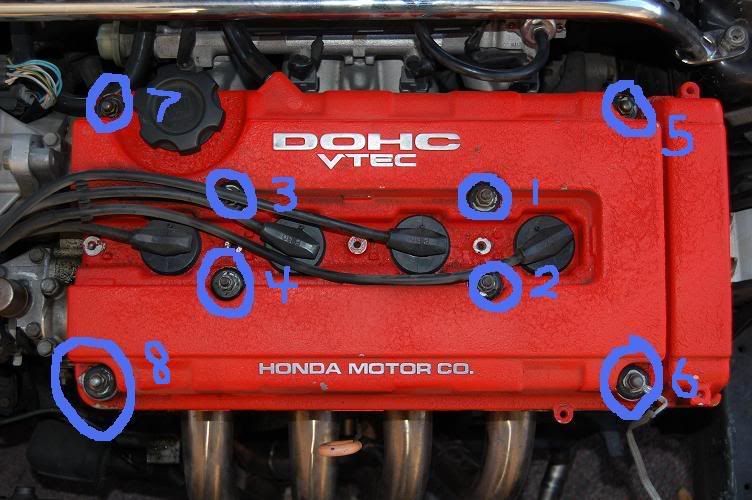
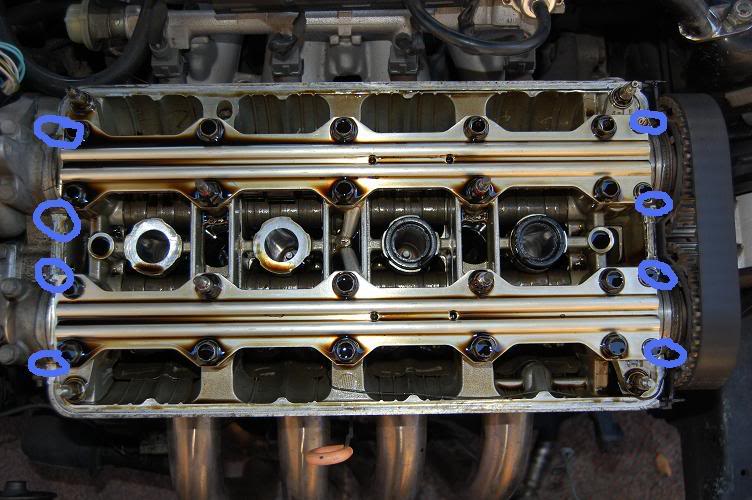
Next remove all spark plug wires and the nuts circled in blue. After the nuts are removed there will still be a washer stuck to the valve cover. Use a screwdriver or needle nose pliers to pull them off. You don't need to keep track of the order of the wires. The length is pretty self explanatory on install. When installed torque in numeric order to 7.2lb/ft
Next remove the breather line from the valve cover. You might need needle nose pliers to remove a clamp that holds this line onto some valve covers

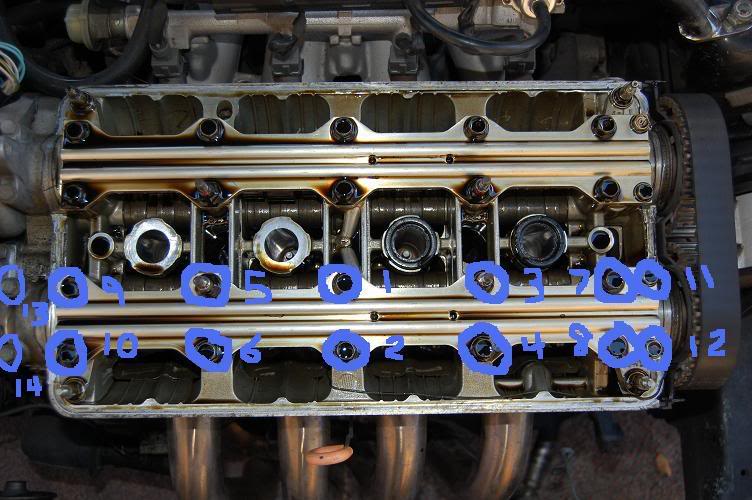
Now the valve cover is ready to come off, just wiggle it a little bit and it should pop right off. Then you should see this. Remove the bolts circled in blue to remove the oil rail. When installing, torque bolts 1-10 in numeric order to 19 lb/ft and 11-14 to 7.2 lb/ft
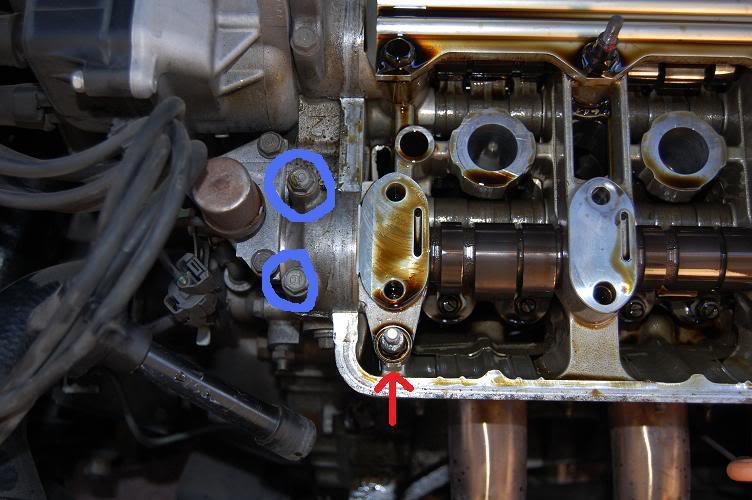
After the oil rail is off, simply remove the very last cam cap. If you are looking at the engine is on the exhaust side on your left hand side. Remove the two bolts that hold it. You don't need to remove the stud. After the bolts are out, pry with a flat screwdriver against the head VERY LIGHTLY where the red arrow is to un-stick the cap from dowels in the head. It doesn't take much so be gentle.
Underneath it is the cam seal. My car happens to have a golden eagle aftermarket seal and as you can see the o-rings have seen better days. I took it to a local Carquest auto parts store and found replacements. I'd suggest an aftermarket one if you are going to tear into it this far. They are much better than the OEM ones in this case

Install is just the opposite of removal. Install the cam seal. I've always been told to use some type of lubricant on o-rings so I used a little grease. Put the cam cap and the two bolts back in. Install the oil rail and bolts. Torque those bolts. Clean off the mating surface of the cylinder head and Honda suggests to use a new valve cover gasket but as long as the seal is soft I usually reuse them. Never had any issues. Honda also suggests to apply Honda-Bond to the four corners of the head shown in this pic to help against leaks.
Install the washers and nuts for the valve cover. The longer studded nuts go in the middle for your spark plug cover. Install your breather line and you are done. Remember to ALWAYS torque internal bolts. You might get away with hand tightening some bolts but I've seen tons of these bolts snapped so take the extra time and torque them.
-Kris
Copyright 2008 IpbRacing Productions
Modified by HeikDiesel at 11:03 PM 10/22/2008
First pop your hood and this is what you should see. See how the front of my block is all nasty and covered in oil. We are going to fix that!
Next remove all spark plug wires and the nuts circled in blue. After the nuts are removed there will still be a washer stuck to the valve cover. Use a screwdriver or needle nose pliers to pull them off. You don't need to keep track of the order of the wires. The length is pretty self explanatory on install. When installed torque in numeric order to 7.2lb/ft
Next remove the breather line from the valve cover. You might need needle nose pliers to remove a clamp that holds this line onto some valve covers
Now the valve cover is ready to come off, just wiggle it a little bit and it should pop right off. Then you should see this. Remove the bolts circled in blue to remove the oil rail. When installing, torque bolts 1-10 in numeric order to 19 lb/ft and 11-14 to 7.2 lb/ft
After the oil rail is off, simply remove the very last cam cap. If you are looking at the engine is on the exhaust side on your left hand side. Remove the two bolts that hold it. You don't need to remove the stud. After the bolts are out, pry with a flat screwdriver against the head VERY LIGHTLY where the red arrow is to un-stick the cap from dowels in the head. It doesn't take much so be gentle.
Underneath it is the cam seal. My car happens to have a golden eagle aftermarket seal and as you can see the o-rings have seen better days. I took it to a local Carquest auto parts store and found replacements. I'd suggest an aftermarket one if you are going to tear into it this far. They are much better than the OEM ones in this case
Install is just the opposite of removal. Install the cam seal. I've always been told to use some type of lubricant on o-rings so I used a little grease. Put the cam cap and the two bolts back in. Install the oil rail and bolts. Torque those bolts. Clean off the mating surface of the cylinder head and Honda suggests to use a new valve cover gasket but as long as the seal is soft I usually reuse them. Never had any issues. Honda also suggests to apply Honda-Bond to the four corners of the head shown in this pic to help against leaks.
Install the washers and nuts for the valve cover. The longer studded nuts go in the middle for your spark plug cover. Install your breather line and you are done. Remember to ALWAYS torque internal bolts. You might get away with hand tightening some bolts but I've seen tons of these bolts snapped so take the extra time and torque them.
-Kris
Copyright 2008 IpbRacing Productions
Modified by HeikDiesel at 11:03 PM 10/22/2008
 10-22-2008, 09:11 PM
#2
Honda-Tech Member
So would this work just the same for a b18b as well? a different writeup i was looking through showed them removing all the cam caps and the cam in order to replace that seal. but by the looks of it i should be able to just remove that one cam cap correct? nice writeup btw 
10-22-2008, 09:20 PM
#3
Honda-Tech Member
Thread Starter
Join Date: Aug 2002
Location: Westslope, CO, United States
Posts: 3,048
Likes: 0
Received 0 Likes
on
0 Posts
<TABLE WIDTH="90%" CELLSPACING=0 CELLPADDING=0 ALIGN=CENTER><TR><TD>Quote, originally posted by D16SiHatch »</TD></TR><TR><TD CLASS="quote">So would this work just the same for a b18b as well? a different writeup i was looking through showed them removing all the cam caps and the cam in order to replace that seal. but by the looks of it i should be able to just remove that one cam cap correct? nice writeup btw </TD></TR></TABLE>
I haven't been into a LS but I don't think they run those oil rails, so you should just be able to pop your valve cover off and remove that one cap
</TD></TR></TABLE>I haven't been into a LS but I don't think they run those oil rails, so you should just be able to pop your valve cover off and remove that one cap
 01-17-2014, 02:26 PM
#7
No, the distributor is there, not a cap. Put a small mark on the top mounting point for the distributor (so you can re-install without having to set timing). Remove the distributor, replace the o-ring, re-install, done.
Trending Topics
01-18-2014, 11:39 AM
#8
Honda-Tech Member

Join Date: Jan 2014
Posts: 19
Likes: 0
Received 0 Likes
on
0 Posts
Thank you is honda the onley place to get the distributor O RING cause my local parts stores cant seam to get the cam seal or the O RING for the distribtor??
01-30-2015, 07:28 AM
#10
Honda-Tech Member
Join Date: Dec 2000
Location: Northwest, IN, USA
Posts: 442
Likes: 0
Received 0 Likes
on
0 Posts
Just for visuals, Here is my write-up for the cam seal replacement.
B-Series Cam Seal Install | Importnut.net
B-Series Cam Seal Install | Importnut.net
12-12-2017, 05:58 PM
#11
Honda-Tech Member

Join Date: Jan 2012
Posts: 4
Likes: 0
Received 0 Likes
on
0 Posts
Rockauto also has a good supply in stock, fast shipping too. AJUSA 16019000 {#30110PA1732, 80024} O-Ring Type w/TEC Ign. Dist
11-29-2020, 02:53 AM
#12
Honda-Tech Member
Do you use any sealant between the cam cap cap and its mating surface on the the head (especially outside of the valvve cover). I cannot get Hondabond at . Whic ther product will suffice ?
11-29-2020, 09:22 AM
#13
You could, would just mean more clean up later when it needs to be done again.
Most people recommend Permatex Ultra Grey. I personally like, Permatex "The Right Stuff" either grey or black.
Most people recommend Permatex Ultra Grey. I personally like, Permatex "The Right Stuff" either grey or black.
11-29-2020, 01:36 PM
#14
Fish Twig
Join Date: Nov 2005
Location: Still hunting that foo up there
Posts: 15,555
Received 309 Likes
on
285 Posts
Before I didn't but now I do. I would clean up the mating surface and ensure its not oily. Then I apply a thin bead and spread it. Incase the mating surface is uneven the hondabond will catch it.
11-29-2020, 09:06 PM
#15
Honda-Tech Member
HeikDiesel haven't seen you here in a while! great Article!
11-29-2020, 10:02 PM
#16
HeikDiesel haven't seen you here in a while! great Article!
 12-02-2020, 04:30 PM
#17
Honda-Tech Member

The following users liked this post:

Thread
Thread Starter
Forum
Replies
Last Post