
Swapguide: 00-01 B18C1 into 99-00 Civic. LOTS OF PICS
 07-01-2008, 07:21 PM
#1
318 Curves, 11 miles
Thread Starter
This is my first major mod attempt, and also my first major howto.
This is the target. A 2000 Civic EX with a stock d16y8 and 187,xxx on the clock:

And this is the engine. An iron block Ford 302:
Just kidding. Actually, I'm swapping in a B18C1 from a 2001 Integra GSR. The transmission is from a 99 Si. The reason I'm writing this guide is because in prepping for this swap, I found that no one had written a guide on a completely legal OBD2B swap for this engine into a non B-series Civic.
Here is the motor in the back of my CRV as I originally bought it. Thanks to myhatch98 for a great deal. He's truly a good seller:
Note to self: St. Louis to Chicago and back in 1 day is more driving than I ever want to do again. Also, CRVs don't like having motors in the back.
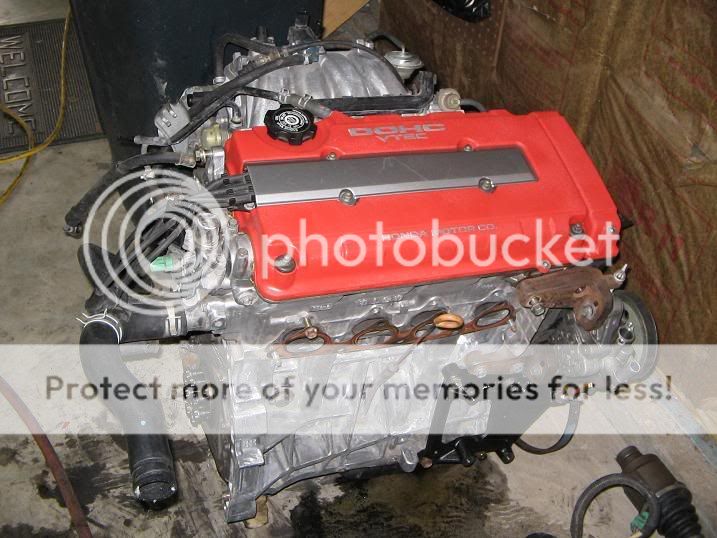
The first goal was cleanup. I used a die grinder with a wire wheel on the block, and a dremel with a wire wheel for the tight spots. The tranny, I just pressure washed. I also took the time to paint the valve cover using wrinkle red Rustoleum. It looks good in person, but if I do it again, I'll spend the $$ and get VHT because I think the color is a little better. Here's the result:
Next is to inspect the timing belt area. To do this, you have to remove the crank pulley, which is fairly easy if you have a 650 ft lb impact. Otherwise, keep trying, and it should come off. On my motor, I found that the timing belt was brand new, so I didn't touch it. While you have the timing cover off, you need to replace the motor mount on that side with a B series Civic mount. Luis provided me one from an Si. The top part should look just like the top part of the d series mount, but it is different inside the timing cover.
Time to look at the clutch, flywheel, and pressure plate. I found that the clutch and pressure plate were completely toast, as seen below:
Before installing the clutch, make sure to grease the throwout bearing, shaft, and fork to avoid the notorious Honda clutch squeak:

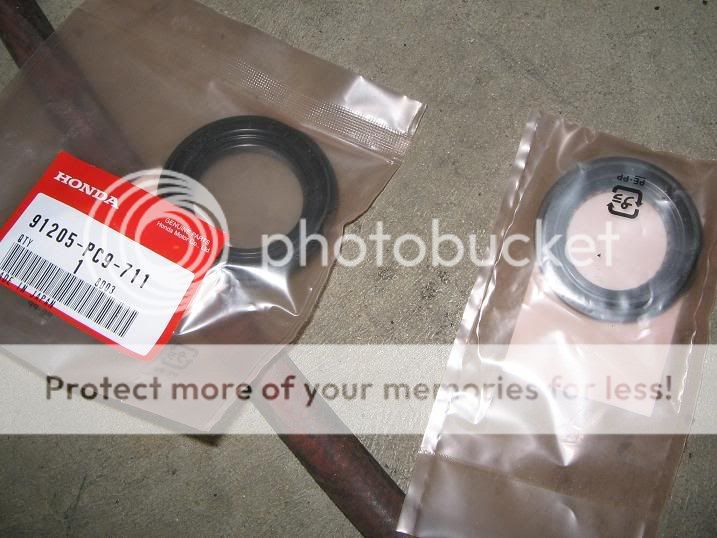
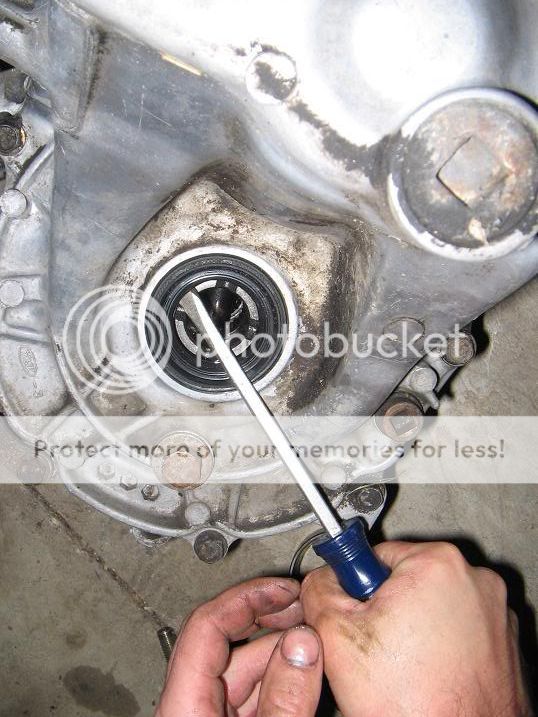
Also, while I had the tranny off, I replaced the axle seals. They pry out with a screwdriver, and you can press them back in carefully with a large socket and a hammer. They come impregnated with grease, but I greased them again to keep them from overheating and leaking on first drive before the oil starts to cycle through the transmission:
The flywheel was good, so I had a machine shop resurface it for $55, and it looks great. Remember to install the pilot bearing before you install it - if you're replacing the clutch, this should be provided. When you bolt it on, use a cross pattern. I believe the proper torque is 70lbs, but someone can correct me on that:

Then, put on the clutch using the (hopefully) provided clutch tool. I used an OEM replacement Exedy clutch kit. The pressure plate goes on next, and came with the clutch. Make sure to clock it right and torque it down. I don't remember the proper torque for this, but it should be in the manual.

Next, onto the AC bracket, assuming that you're keeping air conditioning. You could probably use the Integra AC compressor, but I wouldn't recommend it because the hoses are clocked differently, and look like they would be a pain to install. Instead, I purchased a CRV AC bracket from Majestic Honda. The CRV is a B series engine that uses a D series AC compressor, so this bracket is perfect, and also cheaper than a DelSol bracket:
Next, put the engine and transmission together. I highly recommend having help. Also, it's much easier to get lined up if you remove the intermediate shaft first. Before you do this, make sure that the dowel pins are in the correct locations. In my case, I had 2 dowel pins trying to share the same hole - 1 stuck in the engine, and 1 in the tranny. It was a bitch to get out, but I sprayed it with PB, threaded a big bolt onto a big strip of steel, and drove it into the center of the dowel pin. Then I could hammer on the steel until it came out. Here's the whole thing together:

Now is a good time to plan. Go over everything that's coming from the Integra, and everything you're keeping from the Civic. I went through my Civic and labeled every plug and vacuum hose I could find with masking tape, and this made it much easier later.
Now, you start taking the Civic apart. Jack it way up and support it on sturdy jackstands. Remove the wheels and splash shields. You will likely break a great deal of the clips. I recommend replacing them with GM clips, as they look identical to the Honda ones, but are way easier to get out later.
Next, remove the cotter key and castle nut from under the lower control arm. Then remove the bolt that holds the bottom of the fork together (don't remember what that's called). The proper way to remove a balljoint is with a pickle fork, but we found that you can pound the hell out of the lower control arm with a hammer, and it will come apart:

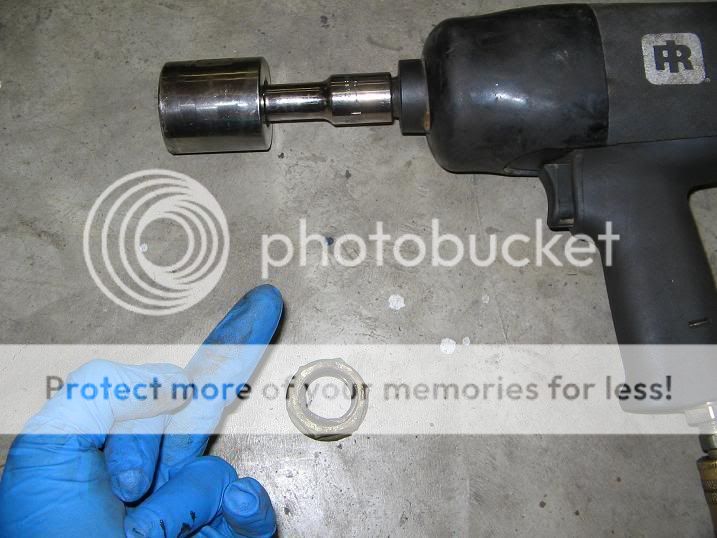
Next, remove the axle nuts. Remember to pry out the lock crimp. We still could not get them off with the 300ftlb impact, but they were no match for the Hammer of Thor:
Now, you can move under the car. Undo the shift linkage and header. We ground the bolts off of the header because they were rusty. Drain the oil, transmission fluid, and coolant.
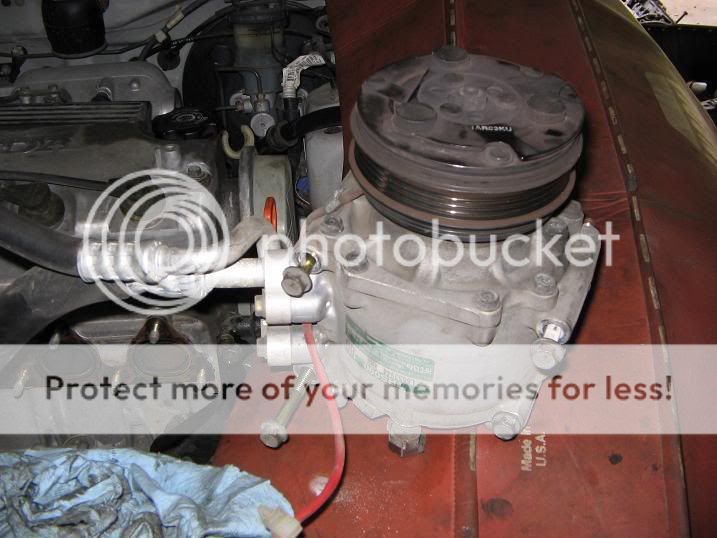
While that's going on, someone else can work on top, removing the top header bolts, airbox, vacuum hoses, plugs, and misc. Power steering pump needs to come out, but you don't have to drain it if you're careful with the hose and jam it behind the reservoir. Then, undo the AC compressor. You don't have to vent it, just lay it to the side on a fender guard like so:
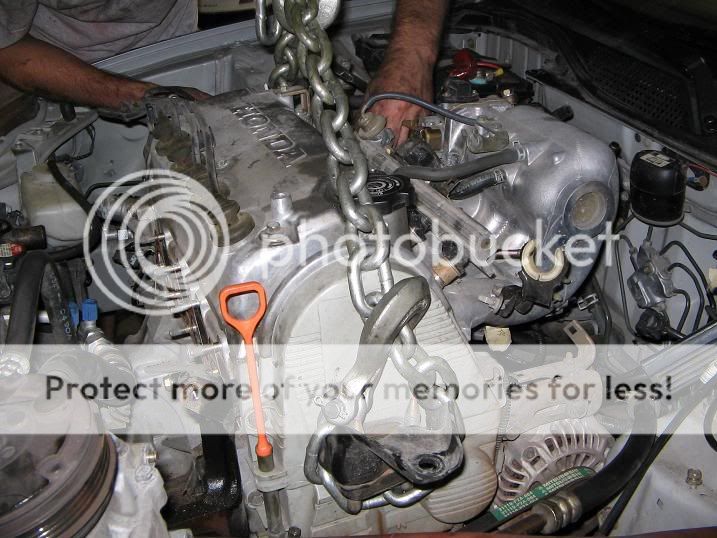
Eventually, you'll have everything done but motor mounts. Now is a good time to support the engine with a jack under the oil pan. Then, you can undo the motor mounts. We did the far front vibration mounts first, then rear, then engine side. Then we hooked up the chain as we removed tranny side mounts. After that, then engine should come right out:

Note: it is easier to get it out with the hood removed, but not necessary if you have someone hold it straight up which you're removing the engine. Now, we install the d16y8 in the Mustang:

just kidding.
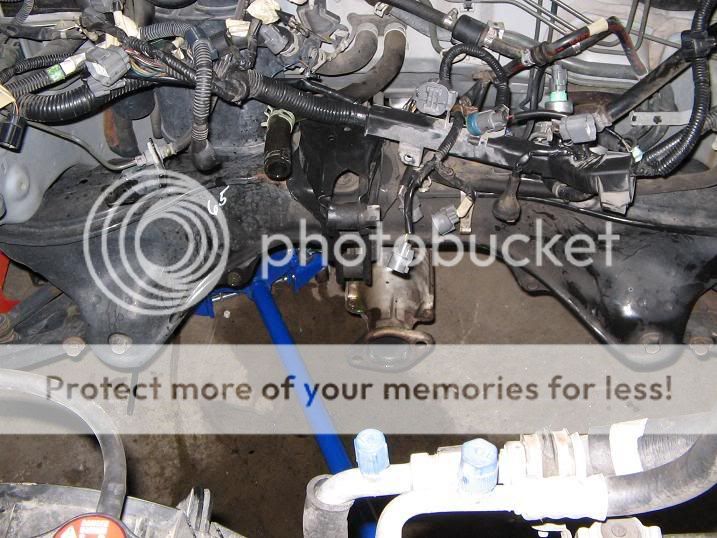
Obligatory empty engine bay pics:

Now, take inventory again. while you have the engine out, swap the FPR hose in the car with one that's approximately 8" longer. Believe me, it's much easier with it out, and will need to be extended. Now's also a good time to remove the plastic wire loom that routes under the intake manifold and replace it with plastic tube/high temp tape, as there's no good place to put it on the back on the B18C1. While we were here, I also ground off a small spot of rust from my crossmember and sprayed it
over with Rustoleum.
Time to rock. Since the B18C1 with tranny is wider than the d16, it will not clear if it's level. So, chain it up with the engine side about 6" higher than the tranny side. It should slide right in, at which time, you can catch it on the jack and shift the chain so it's level, which makes it much easier to line up with the mount points:

I highly recommend bolting up the rear mount first, as it's an absolute bitch to get lined up when the others are bolted down, as we found out. Make sure that your bolt is not going through the rubber on the mount. Then line up the holes on the other major mounts and bolt them down. Finally, do the vibration mounts on either side.
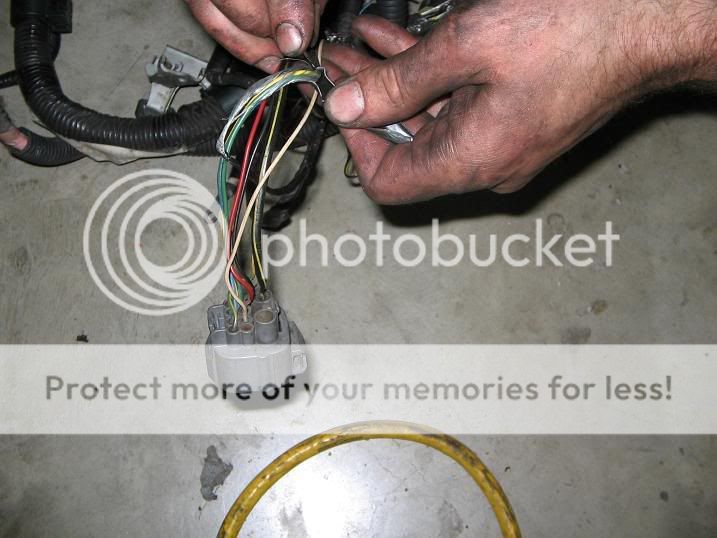
Next, you'll need to do some wiring. Contrary to what a lot of people told me, you DO have to swap the dizzy plug over on at 99-00 Civic because the Civic has an 8 pin plug and the teg has an 10 pin. Luckily, the wires are the same color, and the 10 pin teg plug only uses 8 of the wires, so just connect the civic wires to the same color wires on the integra plug. You will also have to extend the two plugs under the dizzy (I believe they're both vtec). You'll have to extend the Evap purge valve plug, which was on the fuel rail on the Civic, but is on top of the IM on the teg.
To do all wiring, we used butt connectors with heatshrink tubing, then plastic conduit, then automotive tape over it.
The 10-pin Integra dizzy plug:
I believe we also had to swap the CKF sensor from a 3 wire to a 2 wire,
or vice versa. I honestly don't remember.
An example of Nick's badass wire wrapping skills:
You'll also have to run a wire to run the secondary butterflies in the IM. This is described a little better further below, but you just run the right side to B16 on the ECU, and the left side to switched 12V. If you want to skip this, you can - the butterflies stay open if they don't get any power, so if you don't wire them up, the IM will flow fine at high RPM, but you'll lose some torque below 5800. If you're going to leave them undone, I'd recommend replacing the GSR manifold with an aftermarket manifold like a Skunk2 or Edelbrock (EDIT- Didn't know at the time I wrote this that you can't use non-GSR B series manifolds on the GSR head). They don't have the butterflies and I believe they flow a little better at high rpm, at the expense of low end torque.
You may have to extend other plugs and things depending on your setup. If you're lucky, you can get an entire Integra engine harness to work with (which I had) and makes it a lot easier.
Bolt up shift linkage, and then look at header. The header is going to be about 2" short, and the flanges are clocked backwards from the ones in the car. Nick came up with an ingenious ghetto solution that doesn't leak and works surprisingly well, but I'm going to have an exhaust shop fix it when I get the chance.
The problem is that the civic flange goes from lower left to upper right, and the teg flange goes from upper right to lower left, so the bolt holes don't line up. I used 2 4" strips of steel with holes drilled where the flange hole were and bolted everything together.
EDIT: Added pretty MSpaint diagram of the problem and how I temporarily fixed it, since I've gotten a few questions on it.
I didn't get the holes to line up. I ghetto-rigged something temporarily until I could get it fixed right.

Here's Nick screwing with it:

Next comes the really tough part of this swap. The OBD2b Integra ECU has
a built in immobilizer that disables the injectors, and the car will not start. You have a few options: you can convert to OBD2a or OBD1, which would make it illegal in many places if you have to pass emissions. You can remove the immobilizer, which will cause a CEL for Internal ECU Malfunction, but doesn't cause limp mode, and the car will run fine. This will also not pass emissions in most places, but will run fine.
That's what I've done for now, but I'm not going to detail it here because of potential for abuse by thieves. The only legal option is to remove the immobilizer and solder in a dummy chip that makes it run normally. I don't have a source for the chips, but they're around, and there is someone on H-T who will do this fix for like $100. This will be my long term solution, I just haven't done it yet.
Another strange side effect of removing the immobilizer and not replacing it with a dummy is that you HAVE to prime the fuel pump everytime you start the car, or it will not start. When you turn the key over, you just have to wait like 4 seconds before turning it to start. Other than that, it runs fine.
Got cruise control working. On the Civic intake manifold, there's a nipple for it, but not one on the teg manifold. Very simple fix: cut vacuum line to Fuel Pressure Regulator and put a T fitting in there. Run one side to the FPR, and one side to the cruise control.
Swap over pins A15 and A16 on the ECU plug for the fuel pump. You should have about everything done now. Add fluids, put together anything you haven't done yet, and start 'er up!


Impressions:
It's like night and day compared to a d16y8. It will burp second, and sometimes third. Much easier to drive in traffic, and needs much less shifting. Clutch is much lighter, and shifter is notchier. The b16 transmission is almost comically short, and cruises just above 4000 rpm at 70 mph. Definitely worth the cost IMO.
Problems so far (other than already mentioned):
So far unable to get an OEM intake that fits acceptibly. Currently using cut LS arm with d16 airbox and dropin K&N.
I'm not really happy with the teg throttle cable - just doesn't seem like it fits quite right, and the gas pedal is a little sloppy, even when it's tightened all the way. I'm probably going to throw some washers on the pedal end of it to get a bit more adjustment out of it.
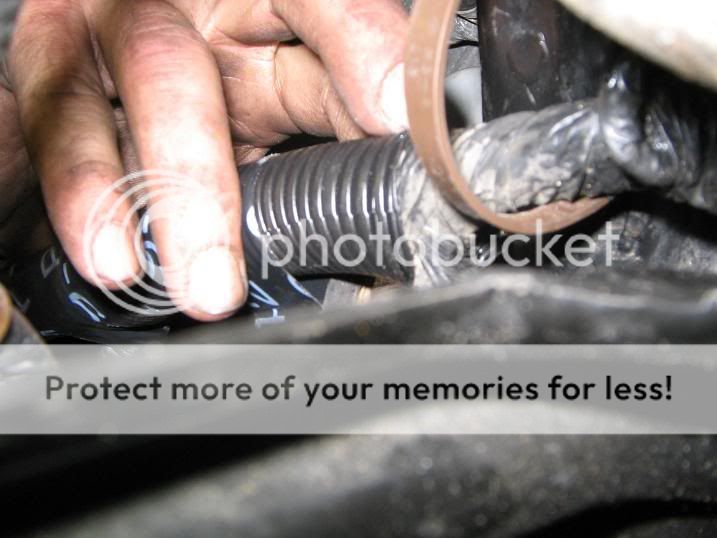
Problems with coolant leaks from using teg hoses on d16y8 radiator. Use GOOD hose clamps, and tighten them as much as possible.
Finally got IAB secondaries working, and despite what a lot of people say, I feel that they're totally worth it - there's definitely a difference in torque at low RPM. None of the writeups I read said anything about how to wire this, they all just said "now wire up IABs." Here's how to do it:
1. Hopefully you have the round 2 pin IAB connector from the teg harness. If not, stop and get one.
2. The right wire on the connector (normally blue/red) goes to pin B16 on the OBD2b ecu. You'll also need an ECU pin connector to put in the harness. I found that OBD1 harness female pins will not fit in an OBD2 harness. I got an entire B ECU harness cut from a junkyard Civic for $1, so I can pull all the pins out that I need. I ran the wire through the firewall at the conduit under the battery tray.
3. The left wire on the connector (normally yellow/black) goes to a 12V power source. I ran mine to + terminal on the battery.
4. plug connector into vacuum tank suspended under IM. To check if it's working, at iidle pull the vacuum hose from the diaphragm hanging off the IM. It should have vacuum at idle and no vacuum above about 5800 rpm.
Prices (so you'll know what to expect):
70K mile B18C1 with Si tranny, plus mounts/P72 ECU/bad axles: $2080 picked up from an H-T member.
Exedy OEM clutch kit: $90 shipped from Ebay
Resurfaced flywheel: $55 from a local machine shop.
Remanufactured axles: $100 from orly's with core return
Fluids/oil filter: $40
CRV AC Bracket: $75-ish from Majestic Honda
Tranny seals: $15 from Majestic Honda
Assorted vacuum lines/heatshrink/wireloom/solder/butt connectors/: $20
Total: $2485
Thanks to Luis (user myhatch98) for giving me a great deal on a swap, and Nick for providing all of the real know-how and ingenuity when we ran into trouble, plus doing a hell of a lot of the tough wrenching.
When you're all done,
Modified by Vindicator9000 at 8:34 AM 7/18/2008
Modified by Vindicator9000 at 9:34 AM 7/18/2008
Modified by Vindicator9000 at 9:38 AM 7/18/2008
Modified by Vindicator9000 at 8:27 AM 9/14/2008
This is the target. A 2000 Civic EX with a stock d16y8 and 187,xxx on the clock:
And this is the engine. An iron block Ford 302:
Just kidding. Actually, I'm swapping in a B18C1 from a 2001 Integra GSR. The transmission is from a 99 Si. The reason I'm writing this guide is because in prepping for this swap, I found that no one had written a guide on a completely legal OBD2B swap for this engine into a non B-series Civic.
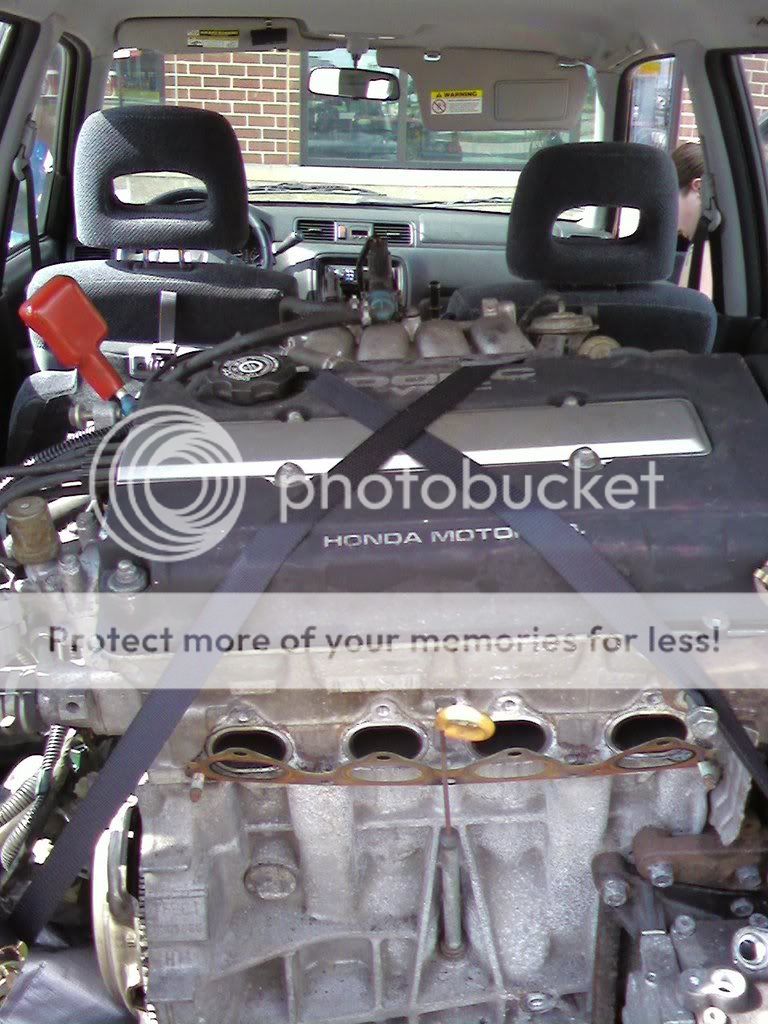
Here is the motor in the back of my CRV as I originally bought it. Thanks to myhatch98 for a great deal. He's truly a good seller:
Note to self: St. Louis to Chicago and back in 1 day is more driving than I ever want to do again. Also, CRVs don't like having motors in the back.
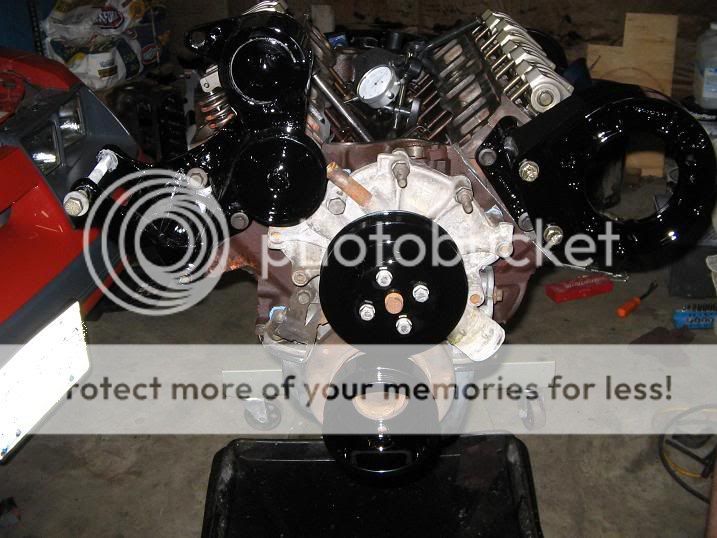
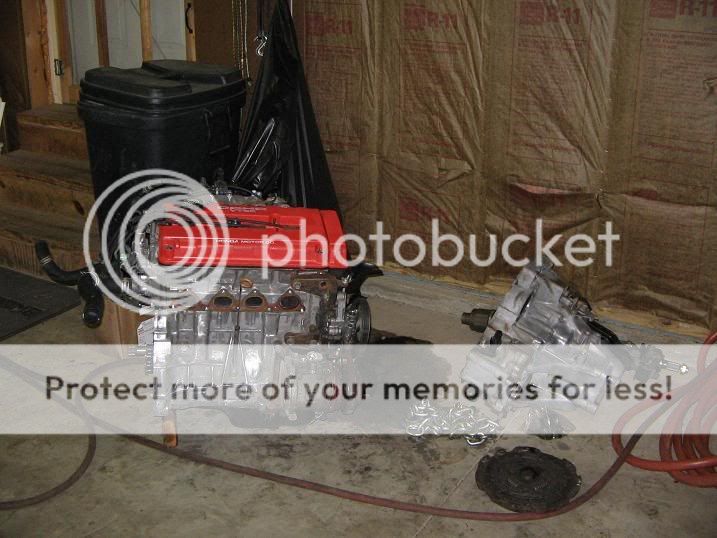
The first goal was cleanup. I used a die grinder with a wire wheel on the block, and a dremel with a wire wheel for the tight spots. The tranny, I just pressure washed. I also took the time to paint the valve cover using wrinkle red Rustoleum. It looks good in person, but if I do it again, I'll spend the $$ and get VHT because I think the color is a little better. Here's the result:
Next is to inspect the timing belt area. To do this, you have to remove the crank pulley, which is fairly easy if you have a 650 ft lb impact. Otherwise, keep trying, and it should come off. On my motor, I found that the timing belt was brand new, so I didn't touch it. While you have the timing cover off, you need to replace the motor mount on that side with a B series Civic mount. Luis provided me one from an Si. The top part should look just like the top part of the d series mount, but it is different inside the timing cover.
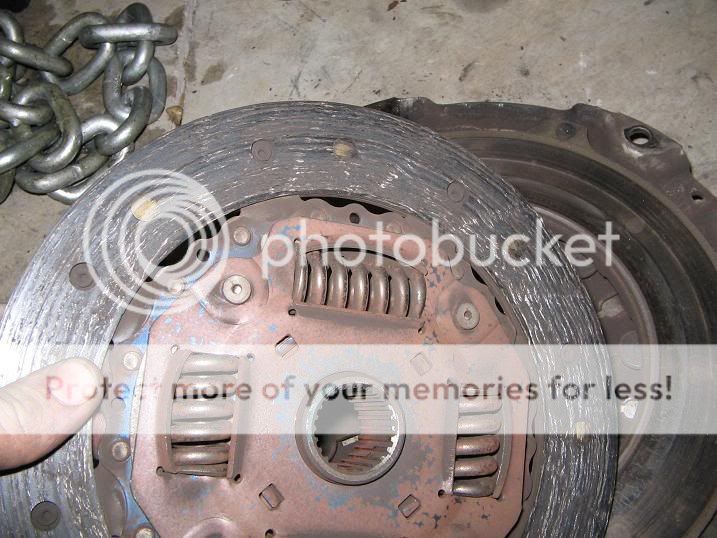
Time to look at the clutch, flywheel, and pressure plate. I found that the clutch and pressure plate were completely toast, as seen below:
Before installing the clutch, make sure to grease the throwout bearing, shaft, and fork to avoid the notorious Honda clutch squeak:
Also, while I had the tranny off, I replaced the axle seals. They pry out with a screwdriver, and you can press them back in carefully with a large socket and a hammer. They come impregnated with grease, but I greased them again to keep them from overheating and leaking on first drive before the oil starts to cycle through the transmission:
The flywheel was good, so I had a machine shop resurface it for $55, and it looks great. Remember to install the pilot bearing before you install it - if you're replacing the clutch, this should be provided. When you bolt it on, use a cross pattern. I believe the proper torque is 70lbs, but someone can correct me on that:
Then, put on the clutch using the (hopefully) provided clutch tool. I used an OEM replacement Exedy clutch kit. The pressure plate goes on next, and came with the clutch. Make sure to clock it right and torque it down. I don't remember the proper torque for this, but it should be in the manual.
Next, onto the AC bracket, assuming that you're keeping air conditioning. You could probably use the Integra AC compressor, but I wouldn't recommend it because the hoses are clocked differently, and look like they would be a pain to install. Instead, I purchased a CRV AC bracket from Majestic Honda. The CRV is a B series engine that uses a D series AC compressor, so this bracket is perfect, and also cheaper than a DelSol bracket:
Next, put the engine and transmission together. I highly recommend having help. Also, it's much easier to get lined up if you remove the intermediate shaft first. Before you do this, make sure that the dowel pins are in the correct locations. In my case, I had 2 dowel pins trying to share the same hole - 1 stuck in the engine, and 1 in the tranny. It was a bitch to get out, but I sprayed it with PB, threaded a big bolt onto a big strip of steel, and drove it into the center of the dowel pin. Then I could hammer on the steel until it came out. Here's the whole thing together:
Now is a good time to plan. Go over everything that's coming from the Integra, and everything you're keeping from the Civic. I went through my Civic and labeled every plug and vacuum hose I could find with masking tape, and this made it much easier later.
Now, you start taking the Civic apart. Jack it way up and support it on sturdy jackstands. Remove the wheels and splash shields. You will likely break a great deal of the clips. I recommend replacing them with GM clips, as they look identical to the Honda ones, but are way easier to get out later.
Next, remove the cotter key and castle nut from under the lower control arm. Then remove the bolt that holds the bottom of the fork together (don't remember what that's called). The proper way to remove a balljoint is with a pickle fork, but we found that you can pound the hell out of the lower control arm with a hammer, and it will come apart:
Next, remove the axle nuts. Remember to pry out the lock crimp. We still could not get them off with the 300ftlb impact, but they were no match for the Hammer of Thor:
Now, you can move under the car. Undo the shift linkage and header. We ground the bolts off of the header because they were rusty. Drain the oil, transmission fluid, and coolant.
While that's going on, someone else can work on top, removing the top header bolts, airbox, vacuum hoses, plugs, and misc. Power steering pump needs to come out, but you don't have to drain it if you're careful with the hose and jam it behind the reservoir. Then, undo the AC compressor. You don't have to vent it, just lay it to the side on a fender guard like so:
Eventually, you'll have everything done but motor mounts. Now is a good time to support the engine with a jack under the oil pan. Then, you can undo the motor mounts. We did the far front vibration mounts first, then rear, then engine side. Then we hooked up the chain as we removed tranny side mounts. After that, then engine should come right out:
Note: it is easier to get it out with the hood removed, but not necessary if you have someone hold it straight up which you're removing the engine. Now, we install the d16y8 in the Mustang:
just kidding.
Obligatory empty engine bay pics:
Now, take inventory again. while you have the engine out, swap the FPR hose in the car with one that's approximately 8" longer. Believe me, it's much easier with it out, and will need to be extended. Now's also a good time to remove the plastic wire loom that routes under the intake manifold and replace it with plastic tube/high temp tape, as there's no good place to put it on the back on the B18C1. While we were here, I also ground off a small spot of rust from my crossmember and sprayed it
over with Rustoleum.
Time to rock. Since the B18C1 with tranny is wider than the d16, it will not clear if it's level. So, chain it up with the engine side about 6" higher than the tranny side. It should slide right in, at which time, you can catch it on the jack and shift the chain so it's level, which makes it much easier to line up with the mount points:
I highly recommend bolting up the rear mount first, as it's an absolute bitch to get lined up when the others are bolted down, as we found out. Make sure that your bolt is not going through the rubber on the mount. Then line up the holes on the other major mounts and bolt them down. Finally, do the vibration mounts on either side.
Next, you'll need to do some wiring. Contrary to what a lot of people told me, you DO have to swap the dizzy plug over on at 99-00 Civic because the Civic has an 8 pin plug and the teg has an 10 pin. Luckily, the wires are the same color, and the 10 pin teg plug only uses 8 of the wires, so just connect the civic wires to the same color wires on the integra plug. You will also have to extend the two plugs under the dizzy (I believe they're both vtec). You'll have to extend the Evap purge valve plug, which was on the fuel rail on the Civic, but is on top of the IM on the teg.
To do all wiring, we used butt connectors with heatshrink tubing, then plastic conduit, then automotive tape over it.
The 10-pin Integra dizzy plug:
I believe we also had to swap the CKF sensor from a 3 wire to a 2 wire,
or vice versa. I honestly don't remember.
An example of Nick's badass wire wrapping skills:
You'll also have to run a wire to run the secondary butterflies in the IM. This is described a little better further below, but you just run the right side to B16 on the ECU, and the left side to switched 12V. If you want to skip this, you can - the butterflies stay open if they don't get any power, so if you don't wire them up, the IM will flow fine at high RPM, but you'll lose some torque below 5800. If you're going to leave them undone, I'd recommend replacing the GSR manifold with an aftermarket manifold like a Skunk2 or Edelbrock (EDIT- Didn't know at the time I wrote this that you can't use non-GSR B series manifolds on the GSR head). They don't have the butterflies and I believe they flow a little better at high rpm, at the expense of low end torque.
You may have to extend other plugs and things depending on your setup. If you're lucky, you can get an entire Integra engine harness to work with (which I had) and makes it a lot easier.
Bolt up shift linkage, and then look at header. The header is going to be about 2" short, and the flanges are clocked backwards from the ones in the car. Nick came up with an ingenious ghetto solution that doesn't leak and works surprisingly well, but I'm going to have an exhaust shop fix it when I get the chance.
The problem is that the civic flange goes from lower left to upper right, and the teg flange goes from upper right to lower left, so the bolt holes don't line up. I used 2 4" strips of steel with holes drilled where the flange hole were and bolted everything together.
EDIT: Added pretty MSpaint diagram of the problem and how I temporarily fixed it, since I've gotten a few questions on it.
I didn't get the holes to line up. I ghetto-rigged something temporarily until I could get it fixed right.
Here's Nick screwing with it:
Next comes the really tough part of this swap. The OBD2b Integra ECU has
a built in immobilizer that disables the injectors, and the car will not start. You have a few options: you can convert to OBD2a or OBD1, which would make it illegal in many places if you have to pass emissions. You can remove the immobilizer, which will cause a CEL for Internal ECU Malfunction, but doesn't cause limp mode, and the car will run fine. This will also not pass emissions in most places, but will run fine.
That's what I've done for now, but I'm not going to detail it here because of potential for abuse by thieves. The only legal option is to remove the immobilizer and solder in a dummy chip that makes it run normally. I don't have a source for the chips, but they're around, and there is someone on H-T who will do this fix for like $100. This will be my long term solution, I just haven't done it yet.
Another strange side effect of removing the immobilizer and not replacing it with a dummy is that you HAVE to prime the fuel pump everytime you start the car, or it will not start. When you turn the key over, you just have to wait like 4 seconds before turning it to start. Other than that, it runs fine.
Got cruise control working. On the Civic intake manifold, there's a nipple for it, but not one on the teg manifold. Very simple fix: cut vacuum line to Fuel Pressure Regulator and put a T fitting in there. Run one side to the FPR, and one side to the cruise control.
Swap over pins A15 and A16 on the ECU plug for the fuel pump. You should have about everything done now. Add fluids, put together anything you haven't done yet, and start 'er up!
Impressions:
It's like night and day compared to a d16y8. It will burp second, and sometimes third. Much easier to drive in traffic, and needs much less shifting. Clutch is much lighter, and shifter is notchier. The b16 transmission is almost comically short, and cruises just above 4000 rpm at 70 mph. Definitely worth the cost IMO.
Problems so far (other than already mentioned):
So far unable to get an OEM intake that fits acceptibly. Currently using cut LS arm with d16 airbox and dropin K&N.
I'm not really happy with the teg throttle cable - just doesn't seem like it fits quite right, and the gas pedal is a little sloppy, even when it's tightened all the way. I'm probably going to throw some washers on the pedal end of it to get a bit more adjustment out of it.
Problems with coolant leaks from using teg hoses on d16y8 radiator. Use GOOD hose clamps, and tighten them as much as possible.
Finally got IAB secondaries working, and despite what a lot of people say, I feel that they're totally worth it - there's definitely a difference in torque at low RPM. None of the writeups I read said anything about how to wire this, they all just said "now wire up IABs." Here's how to do it:
1. Hopefully you have the round 2 pin IAB connector from the teg harness. If not, stop and get one.
2. The right wire on the connector (normally blue/red) goes to pin B16 on the OBD2b ecu. You'll also need an ECU pin connector to put in the harness. I found that OBD1 harness female pins will not fit in an OBD2 harness. I got an entire B ECU harness cut from a junkyard Civic for $1, so I can pull all the pins out that I need. I ran the wire through the firewall at the conduit under the battery tray.
3. The left wire on the connector (normally yellow/black) goes to a 12V power source. I ran mine to + terminal on the battery.
4. plug connector into vacuum tank suspended under IM. To check if it's working, at iidle pull the vacuum hose from the diaphragm hanging off the IM. It should have vacuum at idle and no vacuum above about 5800 rpm.
Prices (so you'll know what to expect):
70K mile B18C1 with Si tranny, plus mounts/P72 ECU/bad axles: $2080 picked up from an H-T member.
Exedy OEM clutch kit: $90 shipped from Ebay
Resurfaced flywheel: $55 from a local machine shop.
Remanufactured axles: $100 from orly's with core return
Fluids/oil filter: $40
CRV AC Bracket: $75-ish from Majestic Honda
Tranny seals: $15 from Majestic Honda
Assorted vacuum lines/heatshrink/wireloom/solder/butt connectors/: $20
Total: $2485
Thanks to Luis (user myhatch98) for giving me a great deal on a swap, and Nick for providing all of the real know-how and ingenuity when we ran into trouble, plus doing a hell of a lot of the tough wrenching.
When you're all done,
Modified by Vindicator9000 at 8:34 AM 7/18/2008
Modified by Vindicator9000 at 9:34 AM 7/18/2008
Modified by Vindicator9000 at 9:38 AM 7/18/2008
Modified by Vindicator9000 at 8:27 AM 9/14/2008
Last edited by Vindicator9000; 12-17-2009 at 05:44 AM.
 07-01-2008, 09:44 PM
#7
* B A N N E D *

Join Date: Feb 2008
Location: lol, lol
Posts: 319
Likes: 0
Received 0 Likes
on
0 Posts
<TABLE WIDTH="90%" CELLSPACING=0 CELLPADDING=0 ALIGN=CENTER><TR><TD>Quote, originally posted by JDM EJ2 »</TD></TR><TR><TD CLASS="quote">Chrome socket is a no-no on that "Hammer of Thor".</TD></TR></TABLE>
the kids doing a motor swap, not working in a shop.
good write up.
the kids doing a motor swap, not working in a shop.
good write up.
Trending Topics
07-02-2008, 04:57 AM
#8
318 Curves, 11 miles
Thread Starter
<TABLE WIDTH="90%" CELLSPACING=0 CELLPADDING=0 ALIGN=CENTER><TR><TD>Quote, originally posted by JDM EJ2 »</TD></TR><TR><TD CLASS="quote">Chrome socket is a no-no on that "Hammer of Thor".</TD></TR></TABLE>
In this case, we didn't really have impact sockets and didn't really care to pick any up, since we only had 3 things we were using the 650ftlb impact on - 2 axle nuts and the crank pulley. But you're right, it is generally not recommended to use a non impact socket on an impact gun, especially one that big. If you have to, make sure that it's at least not a 12 point socket.
Besides, it was Craftsman... they'll take back just about anything.
07-02-2008, 09:07 AM
#11
Honda-Tech Member
Join Date: Jun 2007
Location: san antonio, TEXAS, UNITED STATES
Posts: 1,113
Likes: 0
Received 0 Likes
on
0 Posts
great writup. im sure it will answer alot of noob questions in the future. 
07-02-2008, 06:08 PM
#12
Honda-Tech Member
lol, I can care less about it breaking, I would just be worried about it exploding, considering thats what happens to chrome sockets when mass amounts of torque is put on them. Really though, chances of that happening are slim to nil and I was just busting ***** 
Nice post btw
Nice post btw
07-10-2008, 06:30 PM
#13
318 Curves, 11 miles
Thread Starter
Now I'm having problems getting IABs to work. Has anyone had any experience with this? To recap, here's relevent info and things I've tried.
1. OBD2B p72 ecu
2. have red/blue IAB wire going to correct ECU pin (don't remember what it is, but I'm sure it's right
3. have black/yellow IAB wire going to solid body ground - same one that engine grounds to.
4. have voltage across the 2 IAB pins in the connector plug at the IAB tank... not much, but multimeter shows like .014 consistent. Not sure if this is the problem, but Helms doesn't say how much is needed... just says to check for voltage.
5. have continuity on signal wire and ground wire.
6. have vacuum going into IAB tank.
7. no vacuum at hose coming out of tank going to IAB diaphragm. This should have vacuum at idle.
So, indications say I might have a bad IAB solenoid, but I'm still wondering if I have something wired badly. Has anyone seen this before?
07-10-2008, 06:57 PM
#14
Honda-Tech Member
iTrader: (3)
Join Date: Mar 2008
Location: New York in the summer, South Carolina in the winter
Posts: 2,266
Likes: 0
Received 0 Likes
on
0 Posts
<TABLE WIDTH="90%" CELLSPACING=0 CELLPADDING=0 ALIGN=CENTER><TR><TD>Quote, originally posted by JDM EJ2 »</TD></TR><TR><TD CLASS="quote">Chrome socket is a no-no on that "Hammer of Thor".</TD></TR></TABLE>
"Ok dad" lol reminds me of my dad when I was in highschool using his tools-
Now that I have my own, I always use the proper socket
Props on teh swap though!!
"Ok dad" lol reminds me of my dad when I was in highschool using his tools-
Now that I have my own, I always use the proper socket
Props on teh swap though!!
07-10-2008, 09:07 PM
#15
Honda-Tech Member
Join Date: Oct 2004
Location: CA
Posts: 1,068
Likes: 0
Received 0 Likes
on
0 Posts
<TABLE WIDTH="90%" CELLSPACING=0 CELLPADDING=0 ALIGN=CENTER><TR><TD>Quote, originally posted by JDM EJ2 »</TD></TR><TR><TD CLASS="quote">Chrome socket is a no-no on that "Hammer of Thor".</TD></TR></TABLE>\\
Haha yeah right... I have used chrome sockets with impact so many times. Mechanic that used to work next to me always used chrome sockets and had one break every once in awhile after abusing them for years and still get them replace for free by craftsman. imo its really not that big of a deal. I have never personally broken a chrome socket with my impact and is a high end matco impact.
OP. Good writeup. Looks like you got a great deal on that engine swap.
07-11-2008, 06:02 AM
#17
318 Curves, 11 miles
Thread Starter
Thanks for the nice comments everyone
Wish I could figure out why my IABs are not working
Wish I could figure out why my IABs are not working
07-11-2008, 10:08 AM
#18
Honda-Tech Member
iTrader: (3)
Join Date: Mar 2008
Location: New York in the summer, South Carolina in the winter
Posts: 2,266
Likes: 0
Received 0 Likes
on
0 Posts
<TABLE WIDTH="90%" CELLSPACING=0 CELLPADDING=0 ALIGN=CENTER><TR><TD>Quote, originally posted by JeffBro »</TD></TR><TR><TD CLASS="quote">\\
Mechanic that used to work next to me always used chrome sockets and had one break every once in awhile after abusing them for years and still get them replace for free by craftsman. </TD></TR></TABLE>
I don't know many professional mechanics that use craftsmen sockets, but anyways its not the sockets breaking that you should be worried about-
The chrome finish begins to flake off.
and when they crack, they explode instead of just split like a impact socket
07-18-2008, 07:27 AM
#19
318 Curves, 11 miles
Thread Starter
Added information about wiring up IABs since I couldn't figure it out for 3 weeks and couldn't find it in any other howto.
Basically right side of IAB connector goes to B26 on ecu. left side goes to 12V power source, like the battery.
Basically right side of IAB connector goes to B26 on ecu. left side goes to 12V power source, like the battery.
07-18-2008, 08:10 AM
#21
Honda-Tech Member
Glad you got the IAB's up and going. I'd recommend putting the power to a switched source. that way, if it ever shorts out, you can turn the key off to stop the smoke.
07-18-2008, 08:22 AM
#22
318 Curves, 11 miles
Thread Starter
Yeah, that would probably be a better idea.
I don't have it permanently in yet - I'm going to solder and heatshrink all the connectors - hadn't done it yet because I wanted to make sure it was working first. I'll probably find a better 12v location when I do that.
I don't have it permanently in yet - I'm going to solder and heatshrink all the connectors - hadn't done it yet because I wanted to make sure it was working first. I'll probably find a better 12v location when I do that.
07-18-2008, 10:21 AM
#23
Honda-Tech Member
Join Date: Jun 2005
Location: WORKING for MY stuff in, CA, United States
Posts: 3,281
Likes: 0
Received 0 Likes
on
0 Posts
Nice writeup. Where were you a year ago when I did this and had no clue what I was doing? Haha. You did get one hell of a deal on that swap though man.
07-18-2008, 11:26 AM
#24
Honda-Tech Member
Since the solenoid uses a very small amount of current, the fuel injector power in the engine harness would be a good place to get your power. Otherwise, the Charcoal Cannister purge solenoid is another place you could get your power. That way, if you ever pull the engine again, it will be integrated into the harness.
