My 95 Civic CX hatch build

 02-11-2013, 05:35 AM
#202
talks to himself
Thread Starter
Replaced a few seals and gaskets this weekend (VTEC Solenoid pressure switch gasket, FPR o-ring, and water pump gasket).
Bought a Vice-Grip and removed the stripped phillips screw retaining my IAT sensor seized to my old SK2 intake manifold. Installed the sensor on my JRSC manifold.
Popped the output shaft seal out of my trans-case. Haven't installed the new one yet.
Replaced my cam-shaft seals.
Installed various JRSC manifold plugs and fittings.
Replaced the 2" idler pulley and fixed the alignment.
I was going to replace the oil pump but the GD crank pulley bolt somehow got torqued on and I need an impact to pop it loose. Scraped up my knuckles pretty good trying to pop it loose with a regular wrench and just slapping the end. The head isn't buttoned up so there's no compression preventing the crankshaft from turning... Actually, now that I think out it... I could probably just install the spark plugs temporarily and stuff rags in the other openings and that should provide enough compression to pop the bolt loose. Stand by, I'll try that tonight.
I've got a bunch of seals and gaskets to install still. I just didn't have much time this weekend.
Need to change the oil on my DD today. My DD also needs a new OEM exhaust. The muffler is completely shot. The mid pipe is probably OK but I'm not going to waste my time f'cking with rusted bolts. I'll spend the money to replace the whole thing rather than waste 30 minutes to salvage something that's going to rot away in an couple of years anyways. We'll see what the verdict is after I get under it tonight.
Also, if anyone needs a f23 head with a burnt valve (hole about the size of a pen-cap) on the distributor side, let me know. I've got one. Everything else on the head is probably fine.
02-13-2013, 05:17 AM
#203
talks to himself
Thread Starter
Well, after two days of searching I still can't find my spark plugs... I'm pretty sure they were NGK Iridiums, too... So much for tagging and bagging everything. I can't find one of the more obvious parts that came off the car... FML...
On a side note, I setup my old 1st Gen. Xbox on a 13" TV last night in front of a stationary bike trainer with my brother's road bike locked in. Started KOTOR2. Nothing like pedaling while playing a semi-turn based RPG.
On a side note, I setup my old 1st Gen. Xbox on a 13" TV last night in front of a stationary bike trainer with my brother's road bike locked in. Started KOTOR2. Nothing like pedaling while playing a semi-turn based RPG.
02-14-2013, 05:56 AM
#204
talks to himself
Thread Starter
Not much of an update. I really don't get a lot of time on week nights to work on anything.

I rented a 5lbs slide hammer and bearing removal tool from Pep Boys and FINALLY pulled the counter shaft and main shaft bearings from my transmission case. Cleaned the oil ports with brake cleaner (I didn't have any carb. cleaner) and installed my new bearings and seals. All OEM. To install the new bearings, I placed a couple of large washers on the bearings and tapped them in with a hammer. I still need to clean up the mating surfaces on the two halves of the transmission case before reassembling. I need to assemble my new limited slip differential with the new final drive gear as well. I should be able to get to it this weekend. This transmission will be beefy as f'ck and definitely built to autocross. Stronger syncros, fresh bearings, larger final drive, and a limited slip differential mated to an engine that makes more power and torque, and drive shaft shop level 2.9 axles connecting everything to lighter wheels, stickier tires, and bigger brakes.

I also bought new NGK Iridium spark plugs and installed them in the head. Unfortunately, they didn't provide enough back pressure to break the crank pulley bolt loose. The head isn't torqued on so there’s not much of a seal, yet. So, I had to thread a few of the fly wheel bolts into the crank and wedge my breaker bar between them and the engine stand arms. That locked the crank up enough to break the bolt loose. I’ll be able to replace the oil pump now. I’ll probably replace the oil pickup gasket and install my new oil pan gasket at this time as well. Then button it up for the last time.
If you're wondering how to rebuild a transmission, use this article Import Tuner Y80 Rebuild WITH your Helms manual. The article shows you how everything comes apart. The Helms manual tells you what measurements to take to ensure everything is within spec.
I rented a 5lbs slide hammer and bearing removal tool from Pep Boys and FINALLY pulled the counter shaft and main shaft bearings from my transmission case. Cleaned the oil ports with brake cleaner (I didn't have any carb. cleaner) and installed my new bearings and seals. All OEM. To install the new bearings, I placed a couple of large washers on the bearings and tapped them in with a hammer. I still need to clean up the mating surfaces on the two halves of the transmission case before reassembling. I need to assemble my new limited slip differential with the new final drive gear as well. I should be able to get to it this weekend. This transmission will be beefy as f'ck and definitely built to autocross. Stronger syncros, fresh bearings, larger final drive, and a limited slip differential mated to an engine that makes more power and torque, and drive shaft shop level 2.9 axles connecting everything to lighter wheels, stickier tires, and bigger brakes.
I also bought new NGK Iridium spark plugs and installed them in the head. Unfortunately, they didn't provide enough back pressure to break the crank pulley bolt loose. The head isn't torqued on so there’s not much of a seal, yet. So, I had to thread a few of the fly wheel bolts into the crank and wedge my breaker bar between them and the engine stand arms. That locked the crank up enough to break the bolt loose. I’ll be able to replace the oil pump now. I’ll probably replace the oil pickup gasket and install my new oil pan gasket at this time as well. Then button it up for the last time.
If you're wondering how to rebuild a transmission, use this article Import Tuner Y80 Rebuild WITH your Helms manual. The article shows you how everything comes apart. The Helms manual tells you what measurements to take to ensure everything is within spec.
 02-14-2013, 10:08 AM
#207
talks to himself
Thread Starter
02-14-2013, 10:15 AM
#208
R.I.P. Mark
iTrader: (1)
Join Date: Jan 2008
Location: Melbourne, Australia
Posts: 1,377
Likes: 0
Received 2 Likes
on
2 Posts
if you did you will have the 2 bearings and 2 washers and a circlip
circlip goes on the clutch side housing and the washers go on before you press on the bearings
circlip goes on the clutch side housing and the washers go on before you press on the bearings
02-15-2013, 06:14 AM
#209
talks to himself
Thread Starter
I only had half an hour last night before my lady got home so I wasn�t able to get much done. Flipped the engine over in the engine stand, removed the oil pan, removed the oil pick-up, removed the oil pump, installed a new OEM oil pump, replaced the oil pick-up gasket, re-installed the oil-pick-up, installed a new oil pan gasket, buttoned it all back up.
Why does the new oil pump (top) have a different casting? The part number is correct.

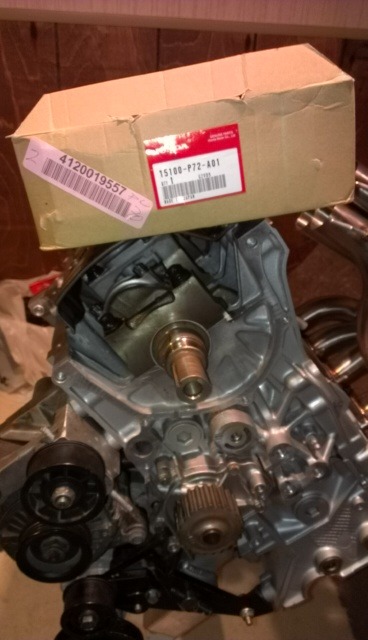
Why does the new oil pump (top) have a different casting? The part number is correct.
02-15-2013, 06:17 AM
#210
talks to himself
Thread Starter
I looked around briefly this morning, maybe I didn't buy the bearing upgrade. I'll look more tonight and check my receipts as well. I've got parts EVERYWHERE and it's getting hard to find stuff... 90% of my nuts, bolts, and washers are tagged and bagged in three shoe boxes. Everything else is spread all over the place...
02-15-2013, 10:40 AM
#211
02-15-2013, 10:57 AM
#212
talks to himself
Thread Starter
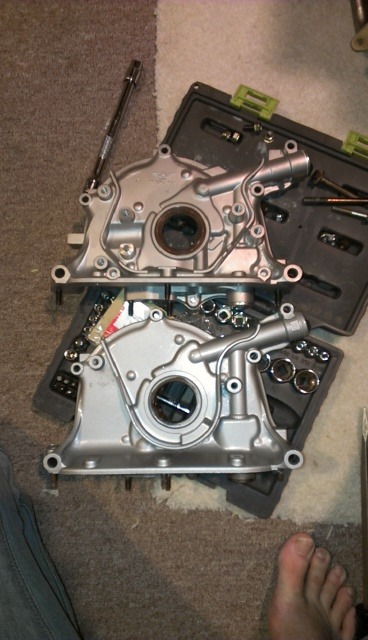
A quick Google search points to me maybe having an OBD1 oil pump? http://www.team-integra.net/forum/14...mparisons.html Maybe a "non-VTEC" pump per the linked website? F'ck... I've got some stuff to look at when I get home. I thought I had a '98 motor...
02-15-2013, 11:02 AM
#213
talks to himself
Thread Starter
92 GSR Oil Pump...
I'm going to really kick myself if I get home and my old pump has "15100-PR4-A03" stamped in it...
I'm going to really kick myself if I get home and my old pump has "15100-PR4-A03" stamped in it...
02-15-2013, 02:42 PM
#214
talks to himself
Thread Starter
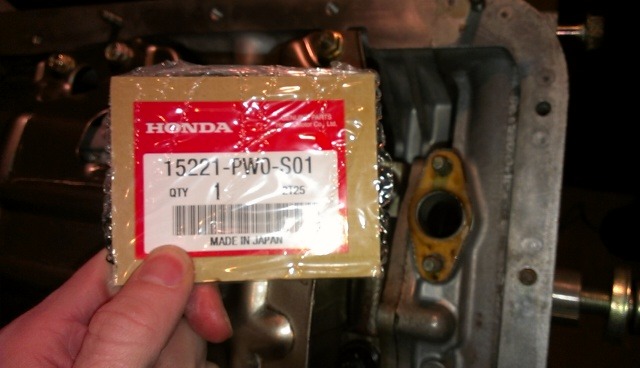
It looks like I can just buy the correct timing belt cover and lower seal. It sucks that I'll need to spend another $67 but... being stupid isn't cheap...
I guess the good thing that will come out of this is that I now KNOW I will have higher oil pressure because I won't have a washer limiting the relief spring's compression.
I guess the good thing that will come out of this is that I now KNOW I will have higher oil pressure because I won't have a washer limiting the relief spring's compression.
02-17-2013, 11:38 AM
#216
talks to himself
Thread Starter
Another day, another f'ck up.
While awaiting for parts to arrive to correct my mistakes mentioned in previous posts, I realized something I could do.
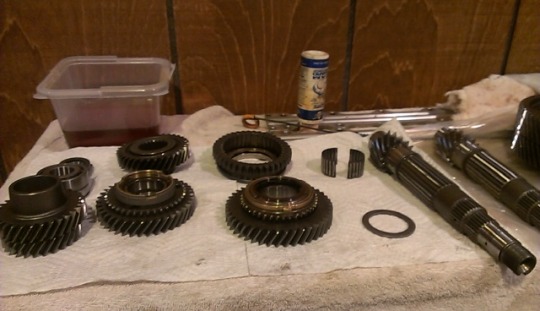
So, remember how I said that the counter shaft was already assembled? Well, that was only partially true. You see, in my infinite retardation, I had forgotten to reassemble it on the new main shaft so that I can utilize my new final drive ratio. (4.785 vs 4.40). The first picture shows the new 67 tooth final drive resting on top of the old 66 tooth final drive that’s still attached to the OEM Open Differential. So, I was sort of happy to have something to do but, in the process of disassembling the shaft, I realized that during the first re-assembly I f'cked up the 1st gear synchronizer… So, I’ll need to replace that, too. Also, the new synchros are scoring the bearing surfaces. I’m not sure if this is a problem.
4.785 FD (67 tooth) on top of 4.40 FD (66 tooth)
Disassembled
F'ck'd up 1st gear synchro...
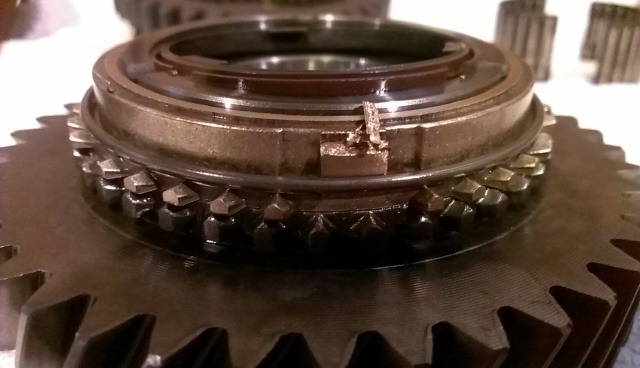
How I think I did this: While pressing the bearings on, the synchro, friction damper, and synchro hub became misaligned when I turned the shaft over to press the shaft into the bearings causing the synchro hub to crush the brass syncro.
Scoring on 1st gear synchro. bearing surface. Is this bad?
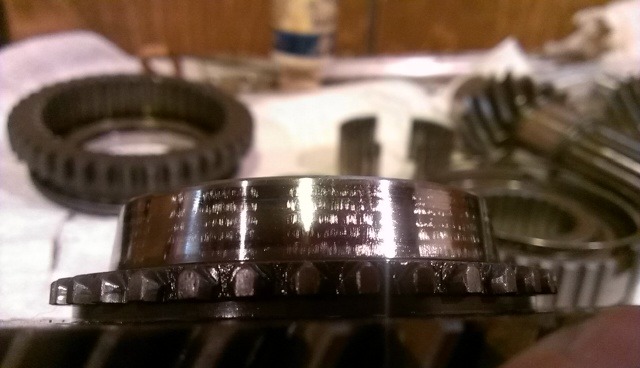
This post: Honda Bull B-Series Trans. Rebuild recommends scuffing the gear cone surface. I wonder if this is what I should do?
While awaiting for parts to arrive to correct my mistakes mentioned in previous posts, I realized something I could do.
So, remember how I said that the counter shaft was already assembled? Well, that was only partially true. You see, in my infinite retardation, I had forgotten to reassemble it on the new main shaft so that I can utilize my new final drive ratio. (4.785 vs 4.40). The first picture shows the new 67 tooth final drive resting on top of the old 66 tooth final drive that’s still attached to the OEM Open Differential. So, I was sort of happy to have something to do but, in the process of disassembling the shaft, I realized that during the first re-assembly I f'cked up the 1st gear synchronizer… So, I’ll need to replace that, too. Also, the new synchros are scoring the bearing surfaces. I’m not sure if this is a problem.
4.785 FD (67 tooth) on top of 4.40 FD (66 tooth)
Disassembled
F'ck'd up 1st gear synchro...
How I think I did this: While pressing the bearings on, the synchro, friction damper, and synchro hub became misaligned when I turned the shaft over to press the shaft into the bearings causing the synchro hub to crush the brass syncro.
Scoring on 1st gear synchro. bearing surface. Is this bad?
This post: Honda Bull B-Series Trans. Rebuild recommends scuffing the gear cone surface. I wonder if this is what I should do?
Last edited by CX-Adam; 06-12-2015 at 07:35 PM. Reason: fix dead image links
02-17-2013, 07:52 PM
#217
R.I.P. Mark
iTrader: (1)
Join Date: Jan 2008
Location: Melbourne, Australia
Posts: 1,377
Likes: 0
Received 2 Likes
on
2 Posts
the scoring will rub off
its just looks bad cos it brass on steel
and re press on the bearing you should only have to litely tap it on as i did
P.S I subed long time ago
its just looks bad cos it brass on steel
and re press on the bearing you should only have to litely tap it on as i did
P.S I subed long time ago
Last edited by MRGRIM; 02-17-2013 at 08:20 PM.
02-20-2013, 06:51 PM
#219
talks to himself
Thread Starter
Updated the initial post with a Table of Contents and revised the post order. I've been told it was confusing the way it was before.
Lessons Learned and Reference Links to come.
Lessons Learned and Reference Links to come.
Last edited by CX-Adam; 02-20-2013 at 07:30 PM.
02-23-2013, 05:32 PM
#220
talks to himself
Thread Starter
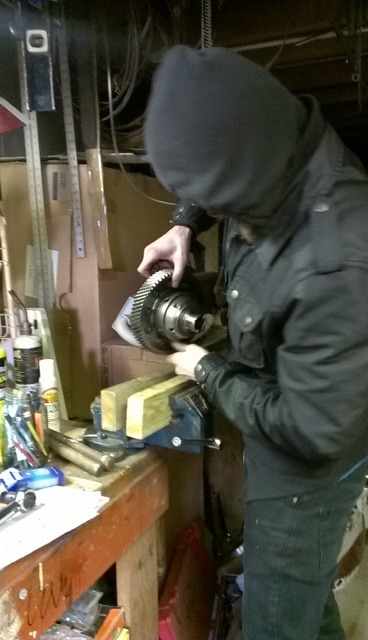
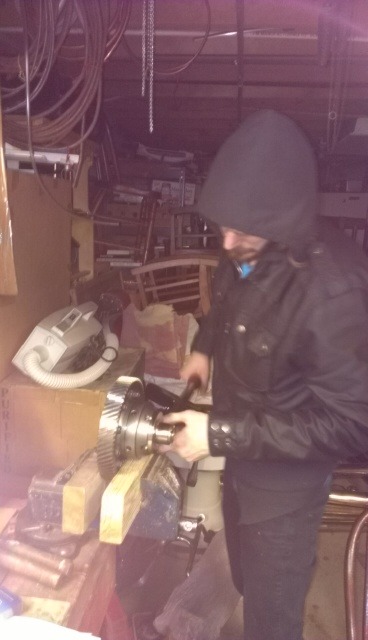
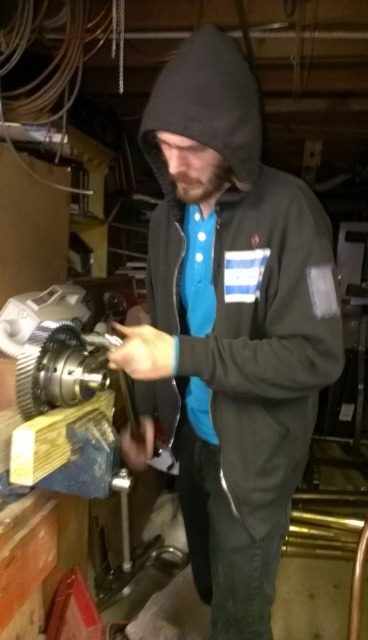
My replacement synchro from Gearspeed (click for link to their website) arrived and I was able to rebuild my counter shaft. This time, on the appropriate counter shaft. The one that mates with the 4.875 Final drive gear. Here it is in a vice so that I can torque the retaining nut to 80 ft-lbs.

02-23-2013, 05:37 PM
#221
talks to himself
Thread Starter
Reading the FTLRacing website regarding shimming of the alternator, I decided to take another look at the pulley alignment. I ended up adding another washer. I lines up nicely now.
Without the extra washer (only two)
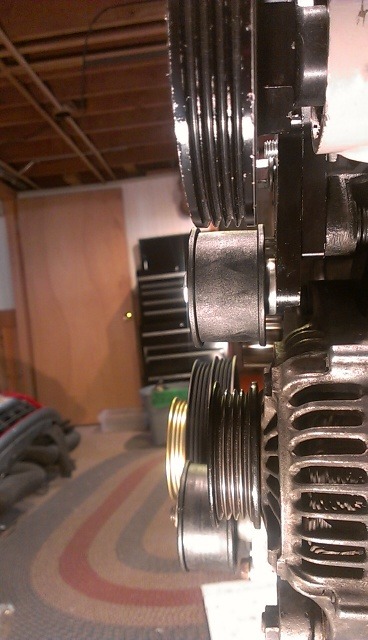
Recommended two washers
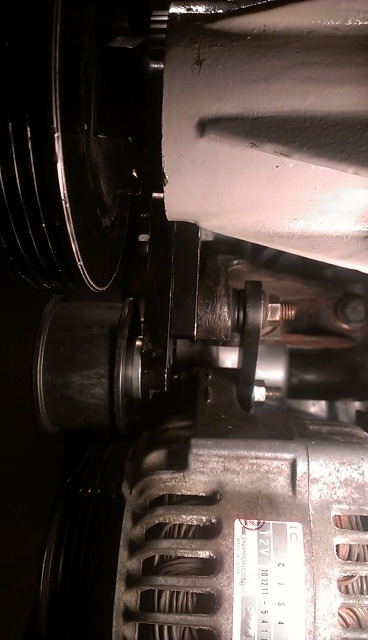
Additional washer

Alignment
Without the extra washer (only two)
Recommended two washers
Additional washer
Alignment
Last edited by CX-Adam; 06-12-2015 at 07:04 PM. Reason: fix dead image links
02-23-2013, 05:40 PM
#222
talks to himself
Thread Starter
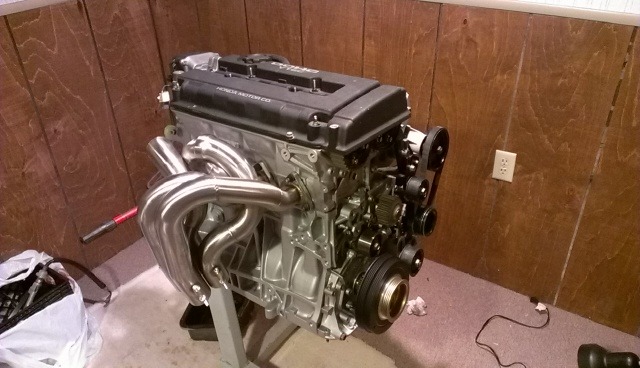
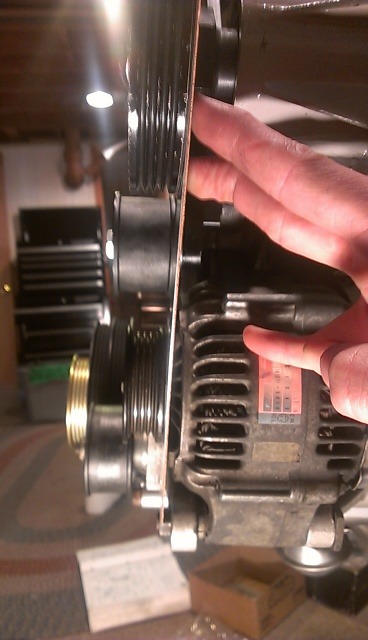
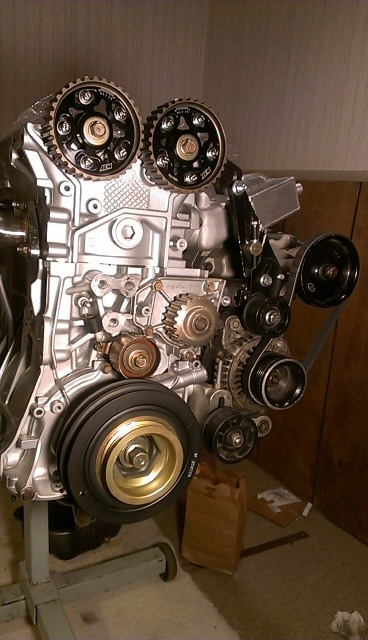
Replaced the OEM alternator pulley with the JRSC pulley. Mocked up the new belt. I don't have the correct belt for the CRV crank pulley so it's not shown here. I don't know where the key is for the crank pulley... Found the timing belt tensioner so I threw it on the engine. It's not tight or adjusted or anything.
02-23-2013, 05:44 PM
#223
talks to himself
Thread Starter
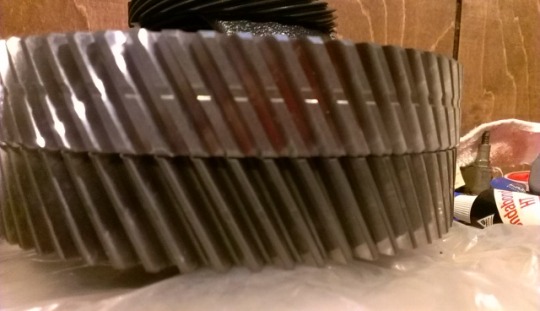
Disassembled my OEM GSR differential to salvage the bolts.
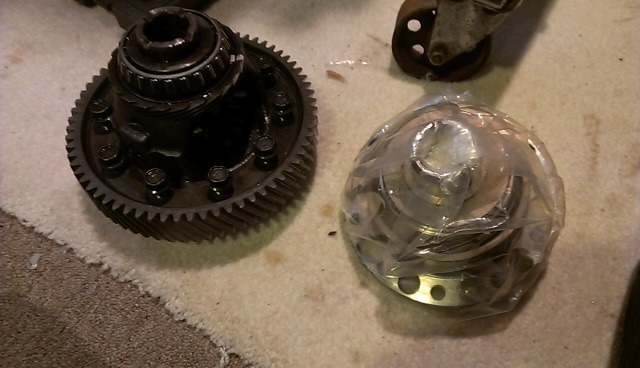
Hand tightened the bolts, after cleaning them, then placed my new MFactory Helical LSD differential with my new 4.875 Final Drive gear in a vice to torque the bolts. Torqued them to 30, 50 and then 74 ft-lbs in a crisscross pattern.
Hand tightened the bolts, after cleaning them, then placed my new MFactory Helical LSD differential with my new 4.875 Final Drive gear in a vice to torque the bolts. Torqued them to 30, 50 and then 74 ft-lbs in a crisscross pattern.
Last edited by CX-Adam; 06-12-2015 at 07:01 PM. Reason: fix dead image links