
My 95 Civic CX hatch build
 11-19-2012, 10:35 AM
#151
talks to himself
Thread Starter
I almost got excited because I thought you might be able to help me source one 
The double plenum manifold is just a thought I occasionally toss around in my head for a ITB/turbo build. Instead of just having one inlet for the charge piping, run two diametrically opposed, allowing for more even airflow into the ITBs. Mathematically, that more even airflow would allow for better throttle response, but it would be one of those things that even the best drivers in the world could never feel.
I just think it would look as **** under the hood.
I'm pretty sure with what you've proposed, you'd end up with a slightly higher volumetric flow rate due to the decrease in frictional losses in piping but the velocity of the flow will be greatly reduced. I'm just wondering if the valve opening event will be of too short a duration to allow for a sufficient quantity of the slower moving air to enter cylinder. I'm sure there's got to be a relation between pipe size and potential power that's somewhat parabolic. There are gains to a certain point that will depend upon the turbo's ability to supply air. All motor cars have cams that stay open for longer to allow the slower moving air sufficient time to enter the cylinder. The valve opening events overlap more to take advantage of the momentum of the exhaust gases to create a vacuum in the cylinders and suck more intake air in. That's how they can get away with using ITBs. Long duration cams aren't good for turbo/sc cars because our charges typically have a higher velocity. We'll blow our charge right out the cylinder with long duration cams.

 11-19-2012, 11:02 AM
#153
talks to himself
Thread Starter
Question ---> ANSWER
So, my B18C1 has the OEM oil cooler (not numbered in the picture, below but it's what hoses 2 and 3 connect to)

Reading the C-Speed Racing Install Guide, I can clock the Oil Cooler from the 12 o'clock position to the 9 o'clock position. http://www.c-speedr.com/howto/jrsc/jrsc3.php
But, what if I want to use the hex plug location on the driver side of oil filter to connect my catch can? (shown in the left corner of the picture, below [stolen from Gooch's-JDM B18C w/ JRSC+LHT build/issue thread]). I was hoping to use both plugs.
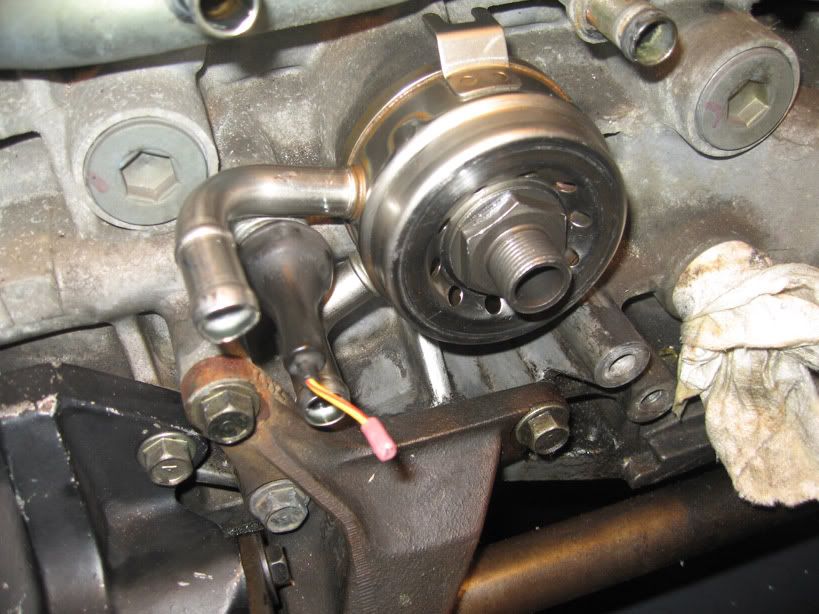
Has anyone done this? Did you bend the oil cooler neck or did the plug for the catch can hose connection fit?
Oil cooler line connection: HERE
So, my B18C1 has the OEM oil cooler (not numbered in the picture, below but it's what hoses 2 and 3 connect to)
Reading the C-Speed Racing Install Guide, I can clock the Oil Cooler from the 12 o'clock position to the 9 o'clock position. http://www.c-speedr.com/howto/jrsc/jrsc3.php
But, what if I want to use the hex plug location on the driver side of oil filter to connect my catch can? (shown in the left corner of the picture, below [stolen from Gooch's-JDM B18C w/ JRSC+LHT build/issue thread]). I was hoping to use both plugs.
Has anyone done this? Did you bend the oil cooler neck or did the plug for the catch can hose connection fit?
Oil cooler line connection: HERE
Last edited by CX-Adam; 11-20-2012 at 06:23 PM. Reason: Linking to Answer
11-19-2012, 11:04 AM
#154
B*a*n*n*e*d

Join Date: Feb 2008
Location: Charlottesville, VA, USA
Posts: 6,420
Likes: 0
Received 5 Likes
on
5 Posts
I'm pretty sure with what you've proposed, you'd end up with a slightly higher volumetric flow rate due to the decrease in frictional losses in piping but the velocity of the flow will be greatly reduced. I'm just wondering if the valve opening event will be of too short a duration to allow for a sufficient quantity of the slower moving air to enter cylinder. I'm sure there's got to be a relation between pipe size and potential power that's somewhat parabolic. There are gains to a certain point that will depend upon the turbo's ability to supply air. All motor cars have cams that stay open for longer to allow the slower moving air sufficient time to enter the cylinder. The valve opening events overlap more to take advantage of the momentum of the exhaust gases to create a vacuum in the cylinders and suck more intake air in. That's how they can get away with using ITBs. Long duration cams aren't good for turbo/sc cars because our charges typically have a higher velocity. We'll blow our charge right out the cylinder with long duration cams.
I hadn't thought about the cams involved. There's so much interesting **** that would make this possible, if I could just find one of my old professor's e-mail addresses to throw ideas at him.
11-19-2012, 11:38 AM
#155
talks to himself
Thread Starter
Too much to think about. It's obviously been done before on twin turbo V-6 through V-12 cars but it's complicated. You should go for it! I'm having enough trouble with this build and it's already been done before.
 11-20-2012, 04:14 AM
#158
talks to himself
Thread Starter
Last night I installed the water pump, the AEM Cam Gears, and the other JRSC brackets.
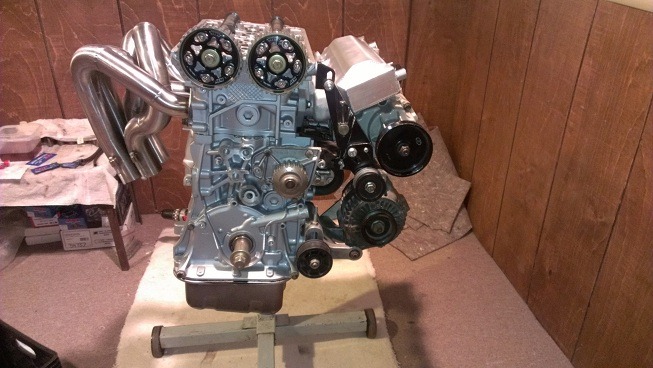
This is great because I'm finding all sorts of stuff I need like: Oil pump, Oil pick-up gasket, O-Ring for water line, Cam Seals, Water Pump Gasket, and the 2" idler pulley for the JRSC. Mocking the engine build will allow me to continue to compile this list and save a boat load on shipping costs.
Still no answer to my question posted in #153.
11-20-2012, 06:57 AM
#159
Honda-Tech Member
Car looks great! I can't believe how much work you've put into saving it, very impressive! Now I just wish I knew someone as good at bodywork as your dad...
11-20-2012, 02:41 PM
#160
R.I.P. Mark
iTrader: (1)
Join Date: Jan 2008
Location: Melbourne, Australia
Posts: 1,377
Likes: 0
Received 2 Likes
on
2 Posts
Last night I installed the water pump, the AEM Cam Gears, and the other JRSC brackets.
This is great because I'm finding all sorts of stuff I need like: Oil pump, Oil pick-up gasket, O-Ring for water line, Cam Seals, Water Pump Gasket, and the 2" idler pulley for the JRSC. Mocking the engine build will allow me to continue to compile this list and save a boat load on shipping costs.
Still no answer to my question posted in #153.
 slow help reply as im being lazy on holidays
 ok 1st in the pic where you have the ALT is wrong it mounts almost hard against the block
yes i know it looks good there but dont work for 2 reasons "bay clearance" hits subframe
"belt to long causing belt flap/harmoic's"
have a look at the install instructions for integra type r
if you dont have a copy pm me your email its missing from Veris FLT site
Ill get him to update the list when he has time
2nd your unanswered question .. as you know i run a B16B @above10psi same setup as you just diffrent internals..
Im using a catch can with 2 inputs 1 output "no drain back"
inputs valve cover + hose from black breather box
output to intake tube similar to stock
reason .. a little oil vapor that get past the gause stainless filter doesnt hurt
with regard to your question .. you can get a replacement bung that fills the hole the black
box goes into that has a barb / AN fitting on it to use as a vent point, cant remmber the brand
3rd question oil cooler hose connections
please look at page 657 on JRSC thread there is a pic with explanation posts
hope all the long read is helpful
Cheers
MrGrim
11-20-2012, 06:19 PM
#161
talks to himself
Thread Starter
Thanks so much for the reply MRGRIM. I'm in no rush. I've got until spring!
Oh wow. I didn't notice that. Veris has both the GSR and ITR hosted but thanks for the offer. I had a printed out copy of the GSR instructions when I was putting it all together but I obviously wasn't following them closely enough. I'm mainly checking that I have all the parts. Still, good catch!
ITR: http://ftlracing.com/instructions/Ty...structions.pdf
GSR: http://ftlracing.com/instructions/gsr_instructions.pdf
2nd your unanswered question .. as you know i run a B16B @above10psi same setup as you just diffrent internals..
Im using a catch can with 2 inputs 1 output "no drain back"
inputs valve cover + hose from black breather box
output to intake tube similar to stock
reason .. a little oil vapor that get past the gause stainless filter doesnt hurt
with regard to your question .. you can get a replacement bung that fills the hole the black
box goes into that has a barb / AN fitting on it to use as a vent point, cant remmber the brand
Ok, I figured that'd be the response I'd get. I did read your post about your setup. Not sure why I decided to waste the collective time of our fellow Honda-Tech members with the question. Thanks for the reply though. I know you get a lot of these questions...
Thanks, already saw that! It's also described in the GSR installation instructions that Veris has hosted.
Very. Thanks! Happy holidays to you as well.
ok 1st in the pic where you have the ALT is wrong it mounts almost hard against the block
yes i know it looks good there but dont work for 2 reasons "bay clearance" hits subframe
"belt to long causing belt flap/harmoic's"
have a look at the install instructions for integra type r
if you dont have a copy pm me your email its missing from Veris FLT site
Ill get him to update the list when he has time
ITR: http://ftlracing.com/instructions/Ty...structions.pdf
GSR: http://ftlracing.com/instructions/gsr_instructions.pdf
2nd your unanswered question .. as you know i run a B16B @above10psi same setup as you just diffrent internals..
Im using a catch can with 2 inputs 1 output "no drain back"
inputs valve cover + hose from black breather box
output to intake tube similar to stock
reason .. a little oil vapor that get past the gause stainless filter doesnt hurt
with regard to your question .. you can get a replacement bung that fills the hole the black
box goes into that has a barb / AN fitting on it to use as a vent point, cant remmber the brand
Very. Thanks! Happy holidays to you as well.
 11-20-2012, 06:33 PM
#163
talks to himself
Thread Starter
Thanks! Water sanding and buffing makes a HUGE difference after a fresh paint job. I didn't believe it until I saw it. It's well worth the day or two it takes to do.
11-21-2012, 03:49 AM
#164
R.I.P. Mark
iTrader: (1)
Join Date: Jan 2008
Location: Melbourne, Australia
Posts: 1,377
Likes: 0
Received 2 Likes
on
2 Posts
glad to help you
and re the instructions
Veris posted it up on his site befotre you got to it ..LOL
as i emailed him a copy
Never think your wasting anyones time with questions
this is how as a small JRSC community we all learn and share our knowledge
and also new ways to do things
and re the instructions
Veris posted it up on his site befotre you got to it ..LOL
as i emailed him a copy
Never think your wasting anyones time with questions
this is how as a small JRSC community we all learn and share our knowledge
and also new ways to do things
 12-16-2012, 07:17 PM
#167
talks to himself
Thread Starter
Hey everyone. Sorry for the lack of updates. I ate s'h'i't while mountain biking on Thanksgiving morning and broke my collarbone... I then had surgery on Dec. 4 to install a plate and screws. D'oh.
Anyways, I was futzing around tonight in my sling mocking a few more things up. I was trying to see if i had all the plugs and sensors for my LHT intake manifold but, apparently, my Skunk 2 intake and throttle body are at my uncle's house. It was abducted by my dad... Now my car is in three houses at the same time... The sk2 manifold has my throttle body and a bunch of other stuff.
I did, however, have my fuel rail so I thought I'd see how it fits up.
The short answer, it doesn't. The welding on the LHT manifold creates about an 1/8" offset. My plan is to grind down the mounts on the fuel rail. Seeing as they're only there to retain the fuel rail and that there's no load on it, I don't anticipate this being a problem.
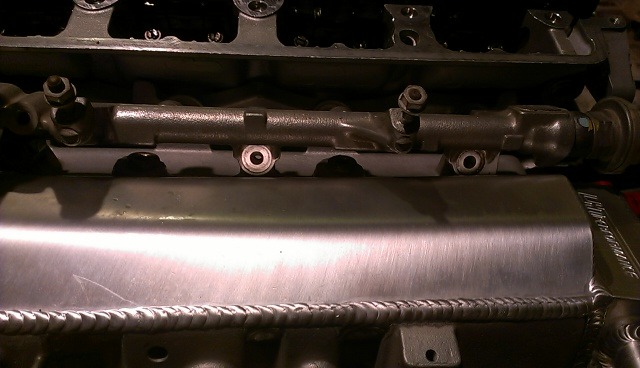
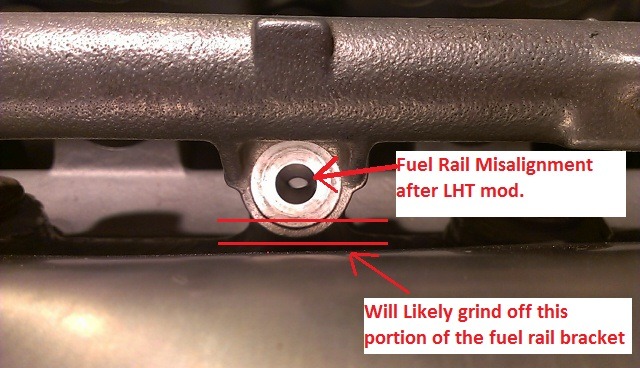
I'm so glad I'm doing this with the engine out of the car.
Here's a thread with a similar problem: https://honda-tech.com/forums/forced-induction-16/help-lht-jrsc-fuel-rail-fitment-issues-2784597/. Another: https://honda-tech.com/forums/showpo...ostcount=13221. And, another: https://honda-tech.com/forums/showpo...postcount=9676. And, another: https://honda-tech.com/forums/showpo...postcount=9675. Seems pretty common.
Anyways, I was futzing around tonight in my sling mocking a few more things up. I was trying to see if i had all the plugs and sensors for my LHT intake manifold but, apparently, my Skunk 2 intake and throttle body are at my uncle's house. It was abducted by my dad... Now my car is in three houses at the same time... The sk2 manifold has my throttle body and a bunch of other stuff.
I did, however, have my fuel rail so I thought I'd see how it fits up.
The short answer, it doesn't. The welding on the LHT manifold creates about an 1/8" offset. My plan is to grind down the mounts on the fuel rail. Seeing as they're only there to retain the fuel rail and that there's no load on it, I don't anticipate this being a problem.
I'm so glad I'm doing this with the engine out of the car.
Here's a thread with a similar problem: https://honda-tech.com/forums/forced-induction-16/help-lht-jrsc-fuel-rail-fitment-issues-2784597/. Another: https://honda-tech.com/forums/showpo...ostcount=13221. And, another: https://honda-tech.com/forums/showpo...postcount=9676. And, another: https://honda-tech.com/forums/showpo...postcount=9675. Seems pretty common.
Last edited by CX-Adam; 12-16-2012 at 07:50 PM.
12-16-2012, 07:20 PM
#168
talks to himself
Thread Starter
No, the LHT header is WAY too expensive. No doubt it's worth it but, I'm not that serious. It's the PLM V2. I love the look and it's one of the few 4-1s out there.
12-17-2012, 06:11 PM
#169
Honda-Tech Member
Join Date: Sep 2004
Location: far EAST SIDE, NY, USA
Posts: 307
Received 0 Likes
on
0 Posts
Thanks! I've been reading your thread a lot. It's helping me identify problems BEFORE they're real problems.
No, the LHT header is WAY too expensive. No doubt it's worth it but, I'm not that serious. It's the PLM V2. I love the look and it's one of the few 4-1s out there.
No, the LHT header is WAY too expensive. No doubt it's worth it but, I'm not that serious. It's the PLM V2. I love the look and it's one of the few 4-1s out there.
12-18-2012, 06:31 AM
#170
Honda-Tech Member

Join Date: Aug 2010
Location: Toronto, Canada
Posts: 5
Likes: 0
Received 0 Likes
on
0 Posts
Great write up and fantastic work on the hatch. I picked up a hatch a year ago here in Toronto with a little rust on the rear quarters and just did a quick fix to get it to pass DOT, looking at doing the repair panels and get my civic back to original. I am in the process of doing a b18c1 swap and am getting more inspired by your post to get my civic up and looking half as good as yours.
Keep up the great work.
Keep up the great work.
12-19-2012, 07:09 AM
#171
talks to himself
Thread Starter
Great write up and fantastic work on the hatch. I picked up a hatch a year ago here in Toronto with a little rust on the rear quarters and just did a quick fix to get it to pass DOT, looking at doing the repair panels and get my civic back to original. I am in the process of doing a b18c1 swap and am getting more inspired by your post to get my civic up and looking half as good as yours.
Keep up the great work.
Keep up the great work.
Good luck on the swap. Just remember to tag and bag as you remove parts.
12-30-2012, 01:54 PM
#172
talks to himself
Thread Starter
Whelp, my shoulder is healed enough for me to sorta work on stuff.
Should I bother painting my VTEC solenoid, Distributor (aluminum part), Starter motor housing, and thermostat housing?
Pictures of progress will be up later this evening / tomorrow.
Also, this: Poison the Well - Opposite of December on Myspace
Best hardcore/metalcore album, ever.
Should I bother painting my VTEC solenoid, Distributor (aluminum part), Starter motor housing, and thermostat housing?
Pictures of progress will be up later this evening / tomorrow.
Also, this: Poison the Well - Opposite of December on Myspace
Best hardcore/metalcore album, ever.
12-30-2012, 07:26 PM
#174
talks to himself
Thread Starter
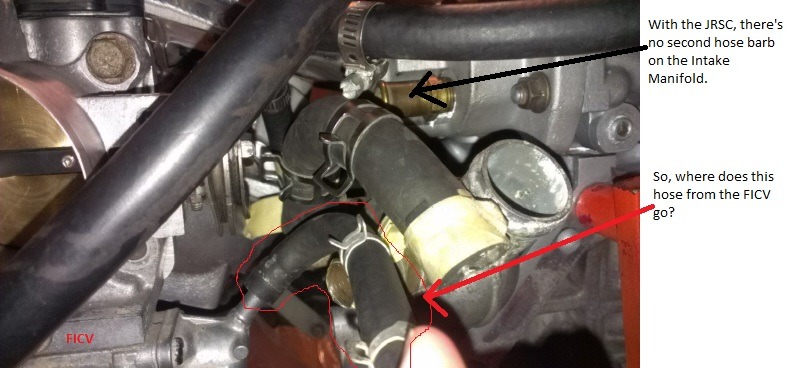
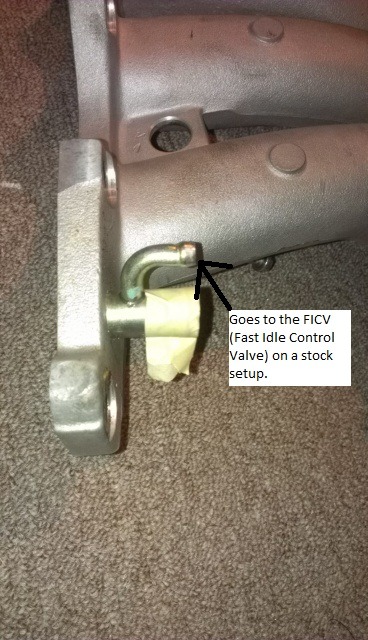
Progress Pic:
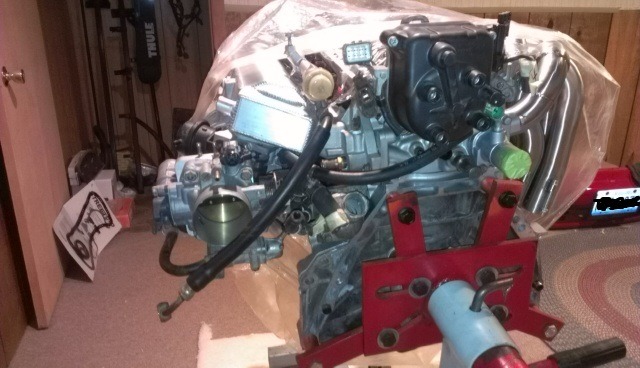
I think I did a really good job labeling things when I took the engine apart. So far I've been able to identify the hoses and connections fairly easily. I am, however, having trouble with the connections the JRSC replaced. Like, where the heck the second hose for the FICV (Fast Idle Control Valve) goes? I know one of them goes to the IAC. It's the other one I can't figure out. The other hose used to connect to the intake manifold on both the Skunk 2 IM and on the OEM IM but, there's no second hose nipple on the barb'd fitting that works with the JRSC. The install instructions talk about some fitting near the distributor but I have NO idea what it's talking about. (See quote at the end of this post.)
Current Arrangement:
Old, OEM style arrangement that my JRSC unit is replacing:
Quote from "Jackson Racing Installation Instructions Supercharger System 94-01 Acura Integra GS-R B18C1." The instructions are hosted by Honda-Tech member Veris here: Instructions Strike'd text is text that shouldn't apply to my engine.
116. Take the 12-inch long by 5/16� diameter coolant hose supplied with the kit and connect the hose from the vacant fitting on the intake manifold near the #4 cylinder. Connect the other end to the fast idle valve mounted on the bottom of throttle body. On 98-01 models, disregard this operation. Instead, install an 1/8� NPT plug above the #4 cylinder. On the
98-01 models, reconnect the original hose from the cylinder head, near the distributor, back onto the bottom of the throttle body�s Fast Idle Valve.
98-01 models, reconnect the original hose from the cylinder head, near the distributor, back onto the bottom of the throttle body�s Fast Idle Valve.
12-30-2012, 08:17 PM
#175
R.I.P. Mark
iTrader: (1)
Join Date: Jan 2008
Location: Melbourne, Australia
Posts: 1,377
Likes: 0
Received 2 Likes
on
2 Posts
there should be a hole above the heater hose outlet on top
when looking from above 1/8npt
if you look at the pic of my engine right above the blue hose behind the TB you can see a blue fitting pointing straight up
also you dont have to use the 2foot long heater hose as they did in the instructions
to connect the inlet to thermo housing
you can reuse the U shape hose just has to be cut right down ..but does fit
and you could get rid of the FICV TB and go to a larger TB like 69mm
then no problems with the FICV
IACV will do all the work of idle with out problems