
My 92 CX HB story/build with some GSR/ITR goodies
 02-11-2013, 01:10 PM
#1
Honda-Tech Member
Thread Starter

Join Date: Jan 2013
Posts: 40
Likes: 0
Received 0 Likes
on
0 Posts
Hi all,
I currently have a an 92 Civic CX HB. I got the car back in 2005 and have done quite a few things to it over the years. I am starting this thread to document what I am doing currently and to get advice as I go. I will also start with how the car sits prior to the latest work.
I am currently in process of rebuilding the motor since it was burning a lot of oil and grossly polluted the sniffer machine here in Cali. I bought it used when I got the car. I bought this motor before I bought the car, knowing I wanted a swapped HB Civic. The motor was supposedly rebuilt with 5k miles with some upgraded parts, but it wasn't a true rebuild as I found out later and probably had some problems to begin with.
My plans are to get the car running good with out motor issues and I would like to get on the track with it. I believe this would be a great platform to get going with as it is cheaper on the wear items compared to my 89 Supra I have. Some details of my intended use would be to drive semi-daily and at first do track days and possibly get into some racing events for fun, I am not planning on competitive racing.
Details of the car:
92 Civic CX hb stock bodied and interior - integra seats.
5-lug ITR conversion
front and rear itr swaybars added with asr rear brace
integra ground control with tokico illumina 5 way adjustable
gsr trans with itr lsd
Engine and rebuild details:
b18c jdm block
ctr cams with itr valve springs and ti retainers (put in when I had the motor swapped)
usdm itr pistons .25mm over are going in
older S2 intake manifold (came with motor)
some chipped p28 with unknown tune (came with motor, assuming for a gsr or itr done by J's racing)
ARP headbolts (purchased when I redid the head)
new oem main bolts going in
new oem bearings going in
new oem water and oil pumps
new gates racing timing belt
jdm itr exhaust manifold (came with motor) or DC 4-1 header that is not carb legal
rebuild the trans to get rid of 3rd gear grind.
Stuff I am still considering:
Replacing the flywheel with a lighter one. This will be driven semi-daily and possibly in stop and go traffic. If I do the flywheel I would like to keep it street-able. Thinking of going exedy stage 1 clutch and a ~12lb flywheel
After some comments in other threads I will have to address my ecu/tuning issues.
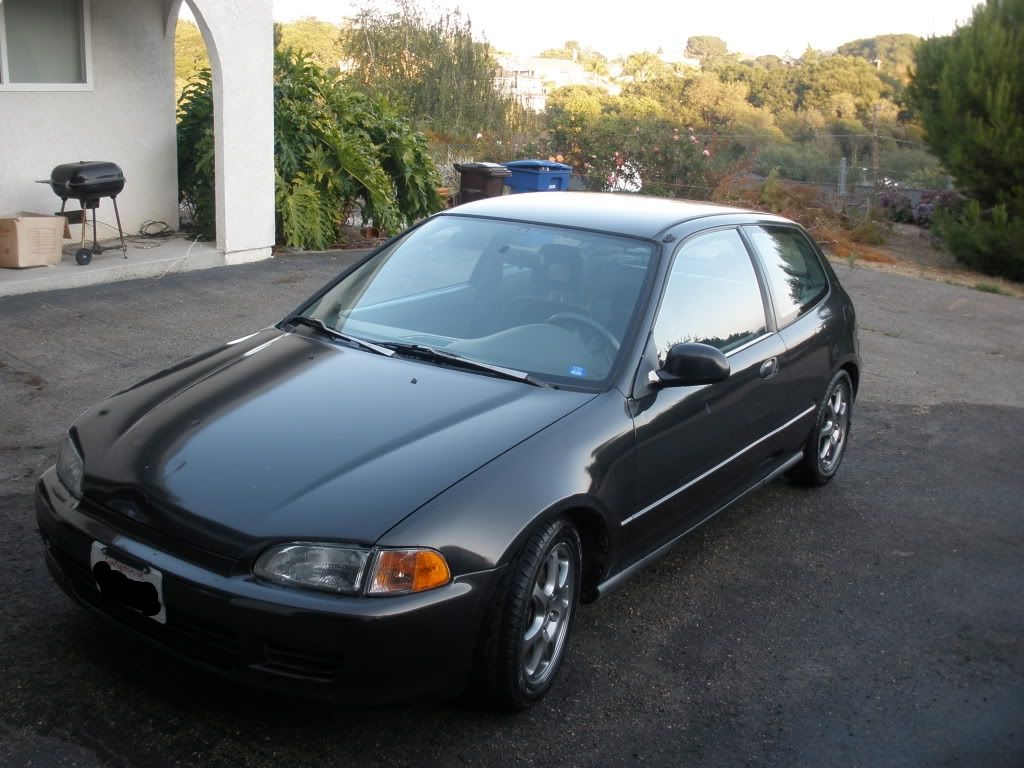
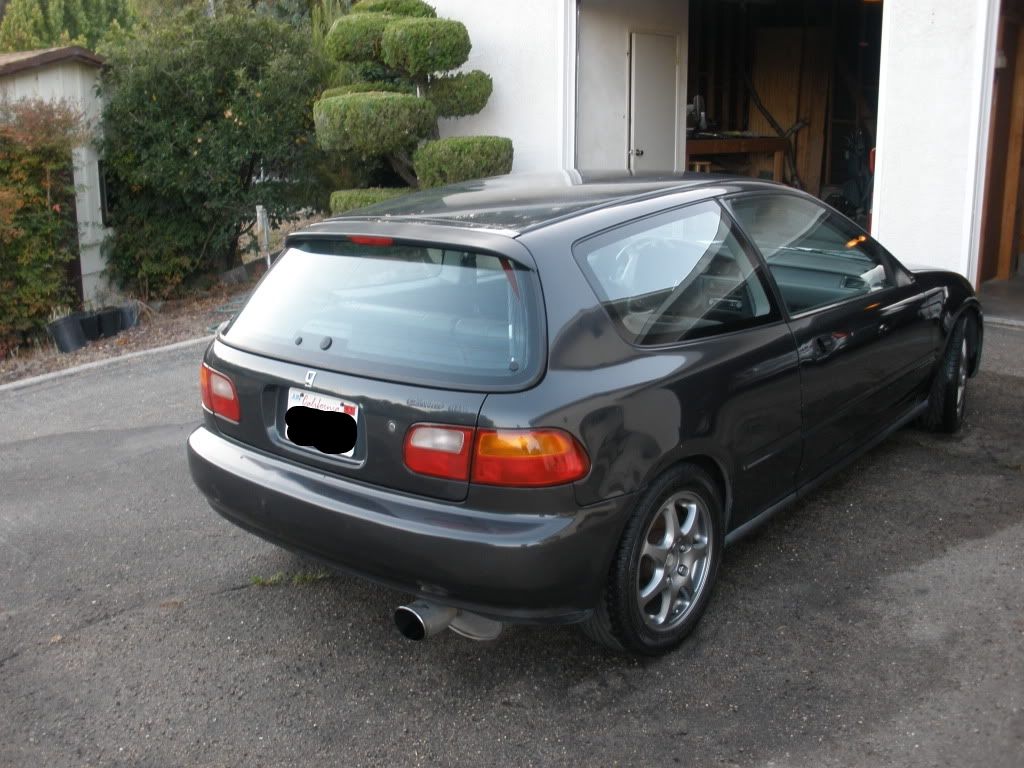
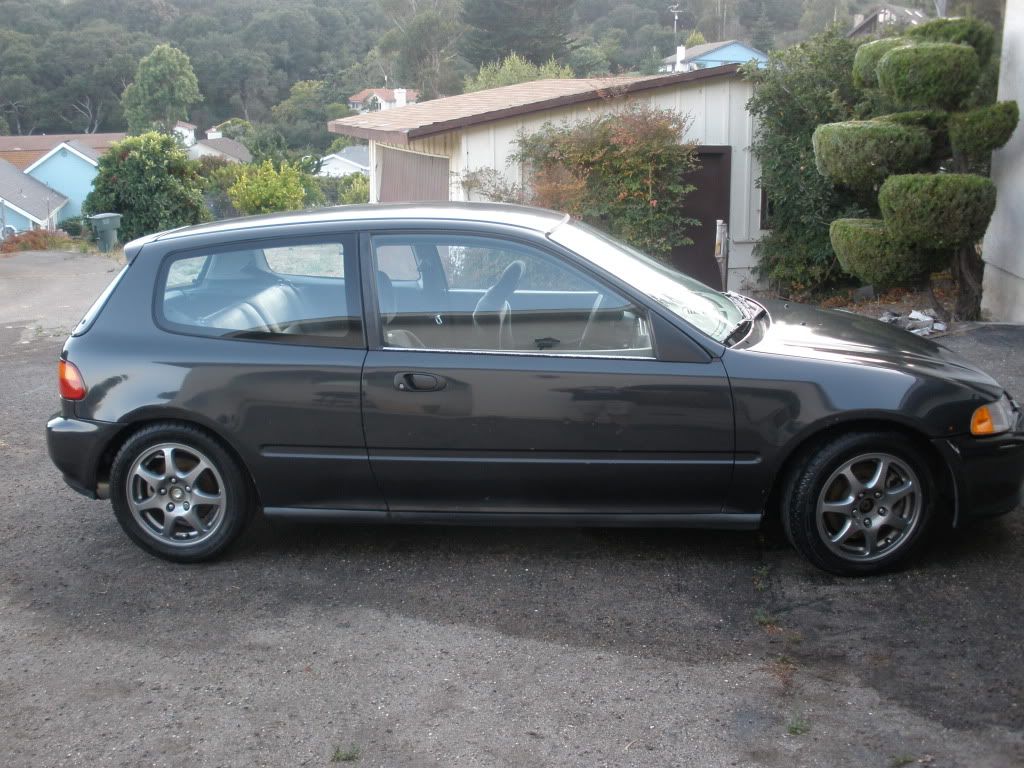
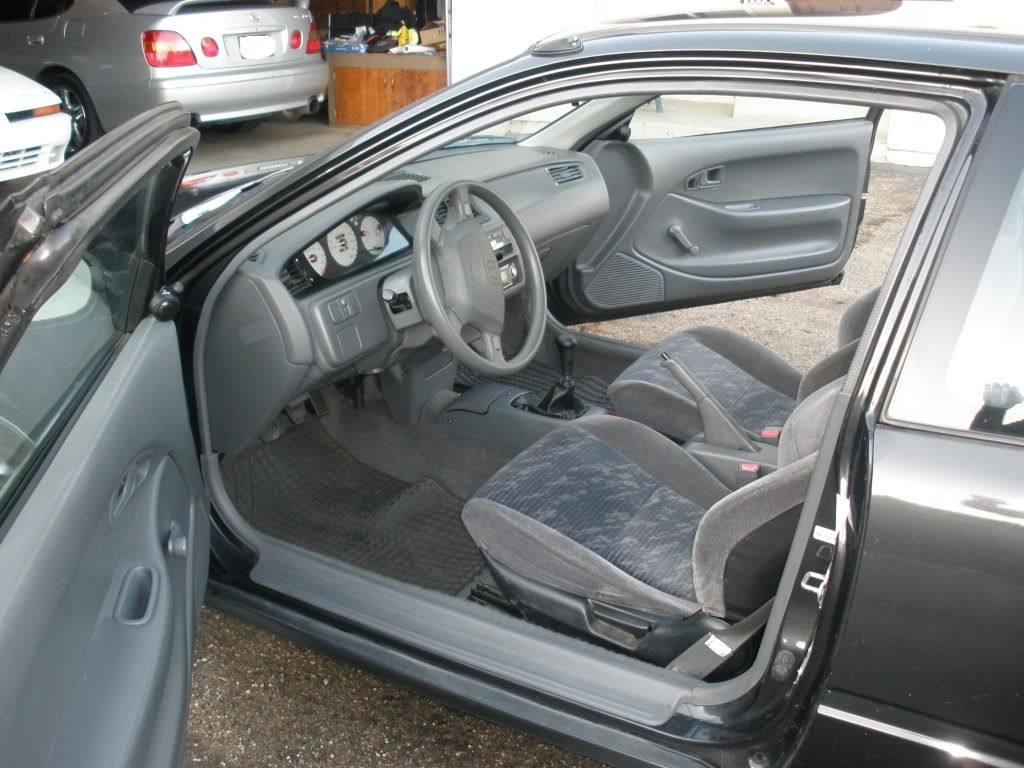
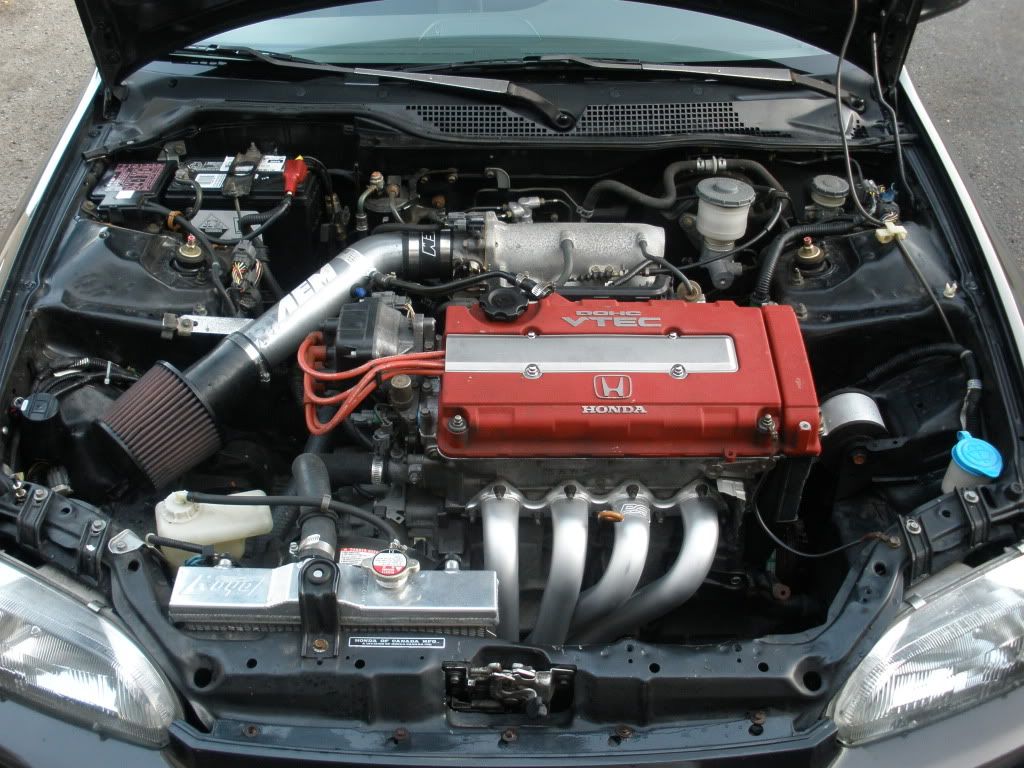
Baseline pictures: Pictures make the car look better than it is. It's not bad but does have some scars.
I currently have a an 92 Civic CX HB. I got the car back in 2005 and have done quite a few things to it over the years. I am starting this thread to document what I am doing currently and to get advice as I go. I will also start with how the car sits prior to the latest work.
I am currently in process of rebuilding the motor since it was burning a lot of oil and grossly polluted the sniffer machine here in Cali. I bought it used when I got the car. I bought this motor before I bought the car, knowing I wanted a swapped HB Civic. The motor was supposedly rebuilt with 5k miles with some upgraded parts, but it wasn't a true rebuild as I found out later and probably had some problems to begin with.
My plans are to get the car running good with out motor issues and I would like to get on the track with it. I believe this would be a great platform to get going with as it is cheaper on the wear items compared to my 89 Supra I have. Some details of my intended use would be to drive semi-daily and at first do track days and possibly get into some racing events for fun, I am not planning on competitive racing.
Details of the car:
92 Civic CX hb stock bodied and interior - integra seats.
5-lug ITR conversion
front and rear itr swaybars added with asr rear brace
integra ground control with tokico illumina 5 way adjustable
gsr trans with itr lsd
Engine and rebuild details:
b18c jdm block
ctr cams with itr valve springs and ti retainers (put in when I had the motor swapped)
usdm itr pistons .25mm over are going in
older S2 intake manifold (came with motor)
some chipped p28 with unknown tune (came with motor, assuming for a gsr or itr done by J's racing)
ARP headbolts (purchased when I redid the head)
new oem main bolts going in
new oem bearings going in
new oem water and oil pumps
new gates racing timing belt
jdm itr exhaust manifold (came with motor) or DC 4-1 header that is not carb legal
rebuild the trans to get rid of 3rd gear grind.
Stuff I am still considering:
Replacing the flywheel with a lighter one. This will be driven semi-daily and possibly in stop and go traffic. If I do the flywheel I would like to keep it street-able. Thinking of going exedy stage 1 clutch and a ~12lb flywheel
After some comments in other threads I will have to address my ecu/tuning issues.
Baseline pictures: Pictures make the car look better than it is. It's not bad but does have some scars.
 02-11-2013, 01:29 PM
#3
Honda-Tech Member
Thread Starter
Join Date: Jan 2013
Posts: 40
Likes: 0
Received 0 Likes
on
0 Posts
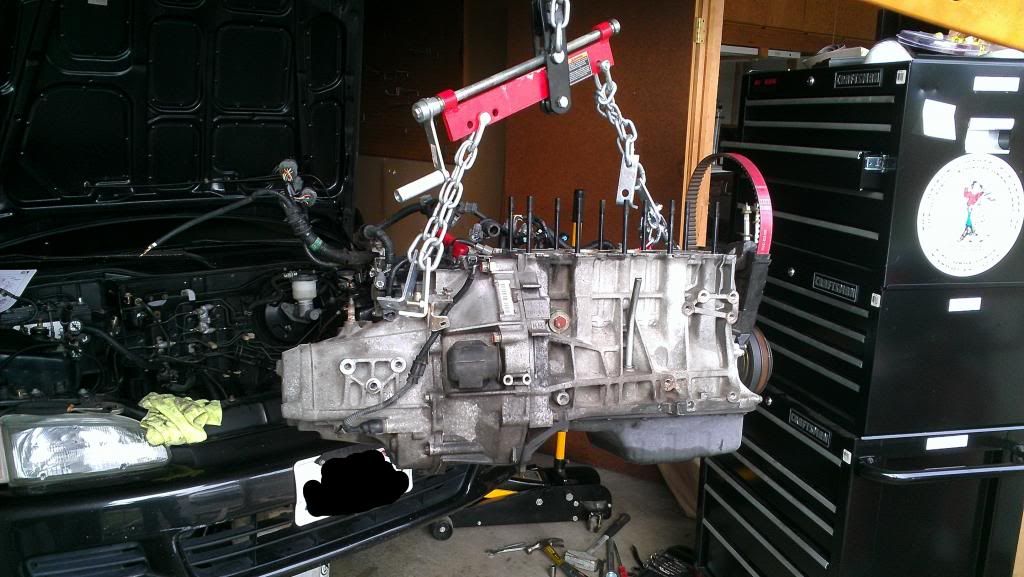
First thing I did was pull the head. I wanted to check the valve stem seals again. I had the head rebuilt last year due to low compression on 2 of the cylinders. Found out it had like 3 minor bent valves and 1 bad one. I can't pinpoint when the valves got bent but I believe it was from the previous owner mentioned in the 1st post. I started noticing the smoke after the head was put back on so I thought it was something wrong with the head. Everything looked ok and machinist said it was most likely the rings. I didn't take many pictures of the tear down but the few I have are below. I didn't take any pics of the head coming off.
? Would having higher compression from fixing the head cause more oil burn, that could be noticed more after than before?
Engine coming out.
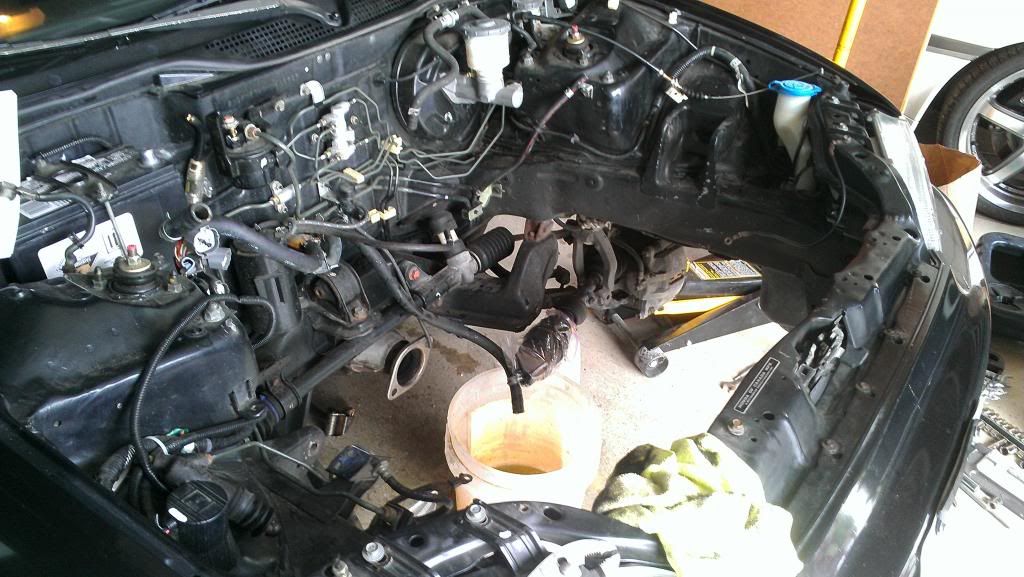
Empty engine bay.
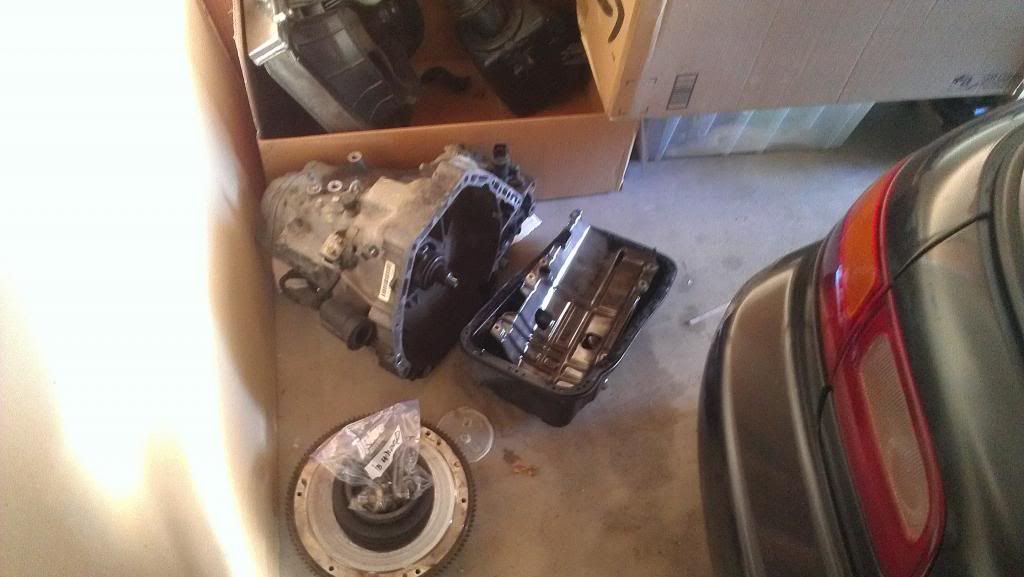
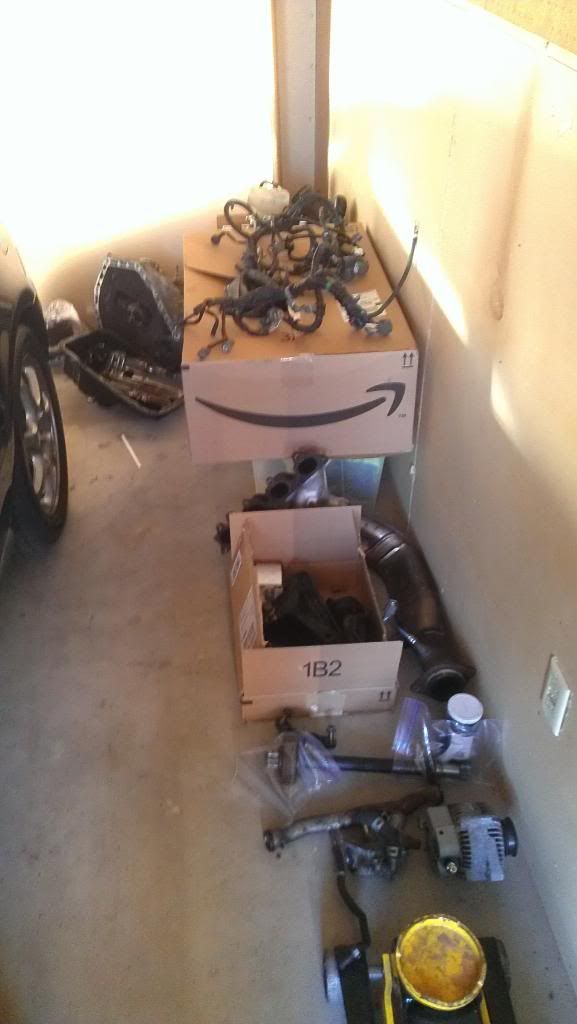
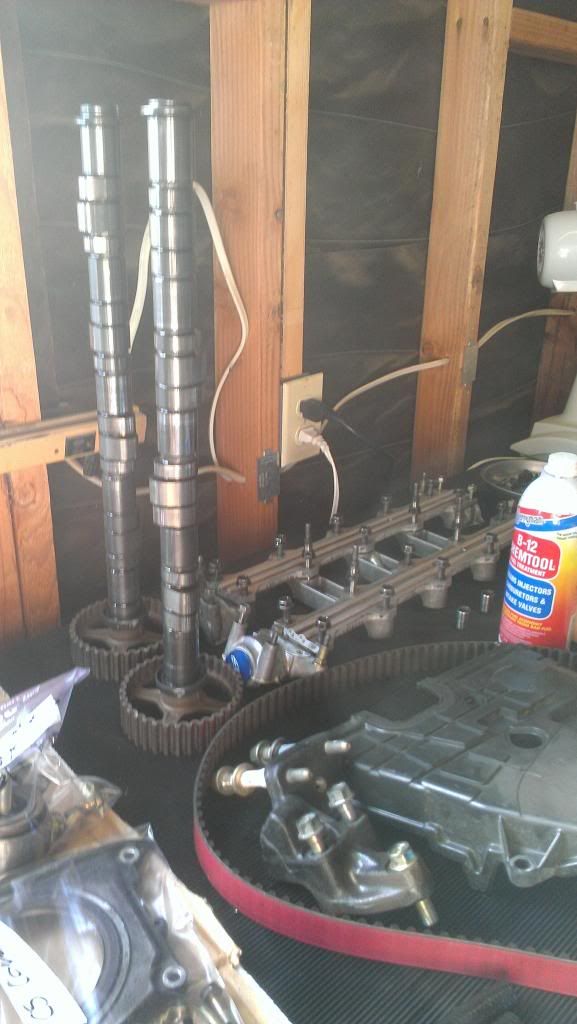
Parts around the garage from tear down.
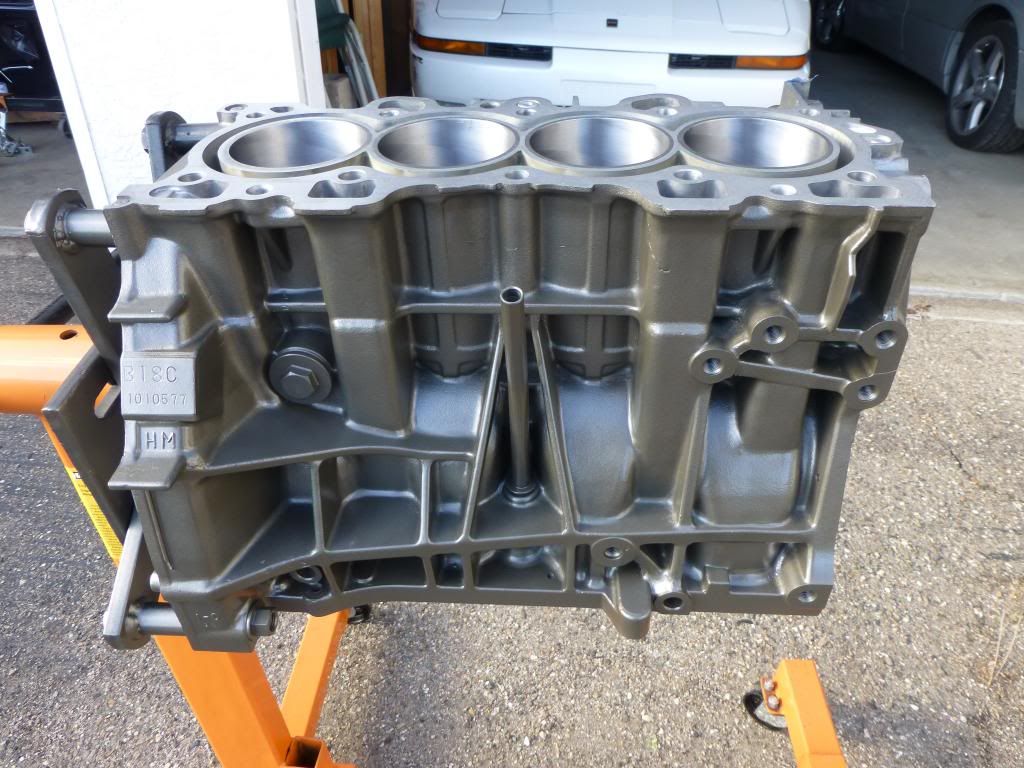
At this point I measured all the critical surfaces to make sure everything was ok. Then took the block to the machine shop and had the cylinders bored and honed to the next size up piston.
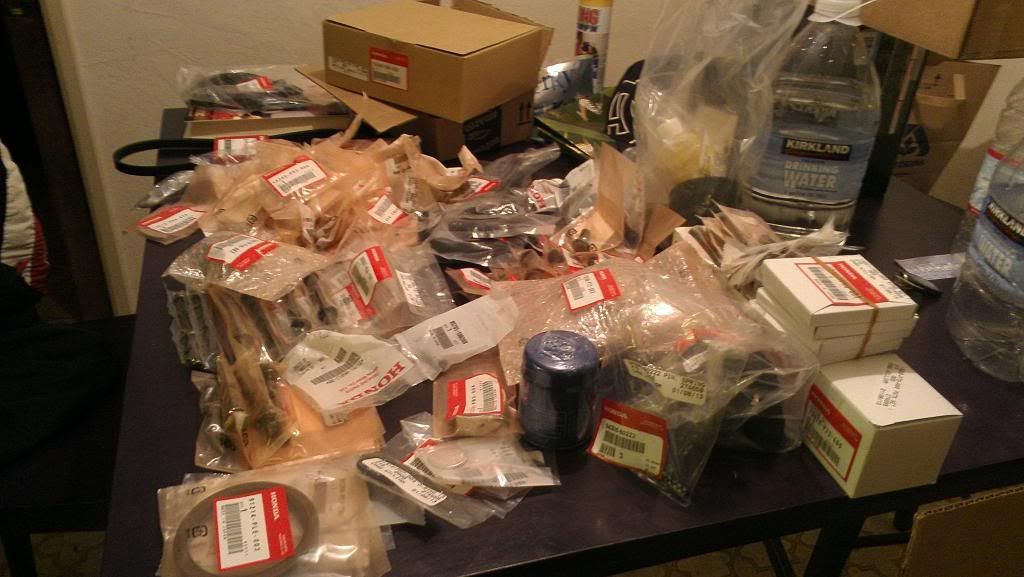
$1200 in new parts from Honda. Addressing a few maintenance issues also.
? Would having higher compression from fixing the head cause more oil burn, that could be noticed more after than before?
Engine coming out.
Empty engine bay.
Parts around the garage from tear down.
At this point I measured all the critical surfaces to make sure everything was ok. Then took the block to the machine shop and had the cylinders bored and honed to the next size up piston.
$1200 in new parts from Honda. Addressing a few maintenance issues also.
Last edited by Trbodynamx; 02-11-2013 at 01:44 PM.
02-11-2013, 02:04 PM
#4
Honda-Tech Member
Thread Starter
Join Date: Jan 2013
Posts: 40
Likes: 0
Received 0 Likes
on
0 Posts
Thanks Evo.
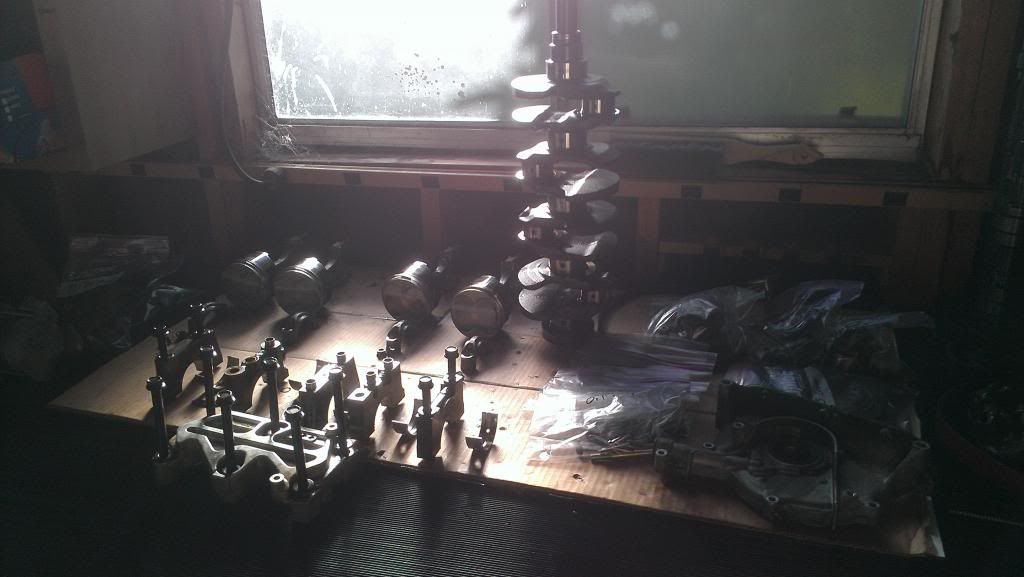
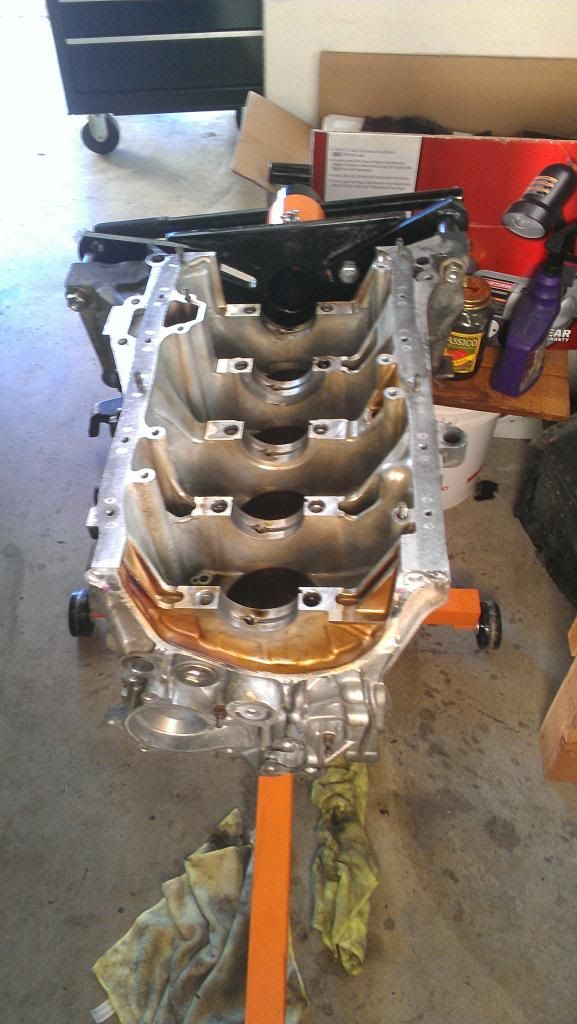
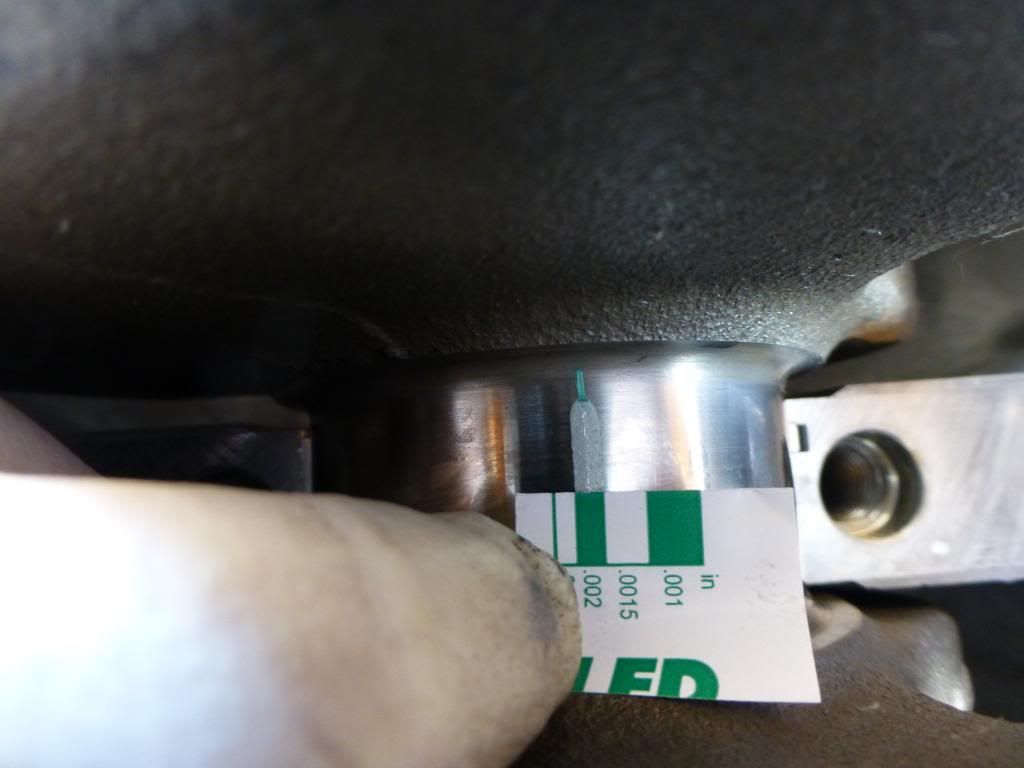
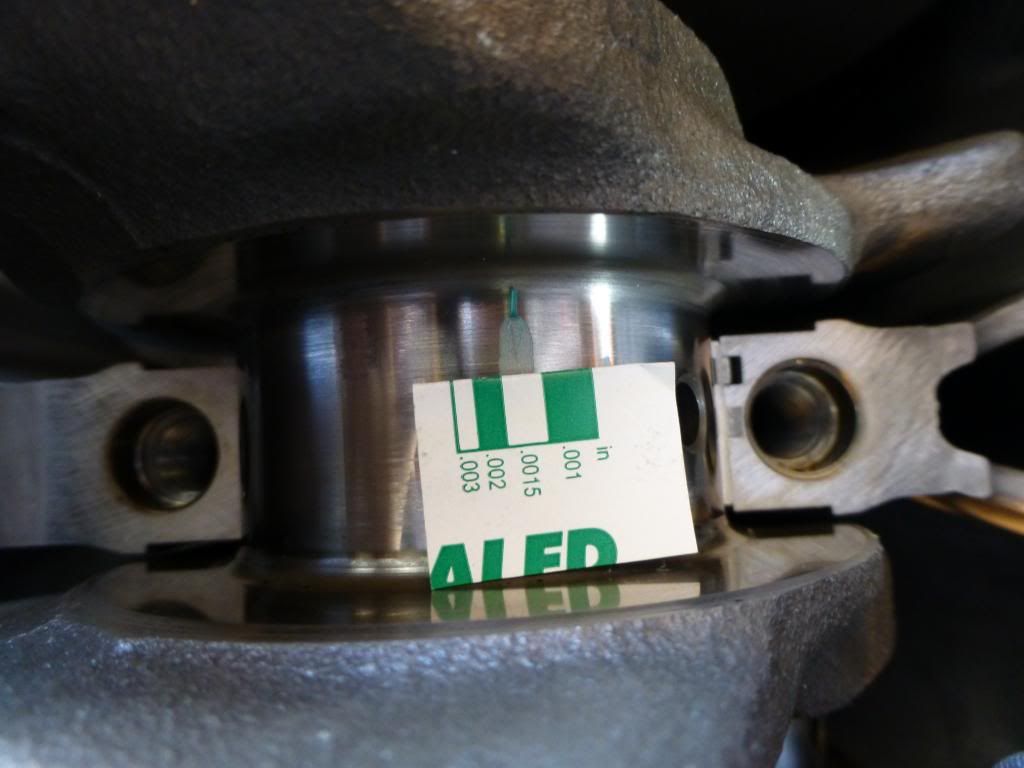
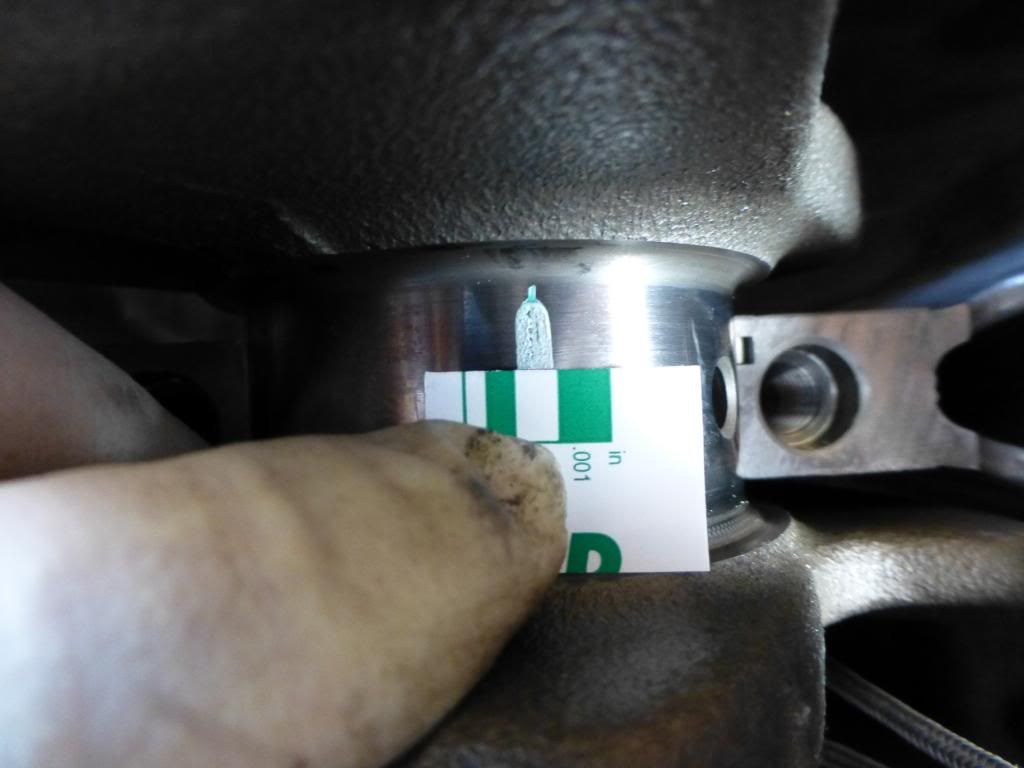
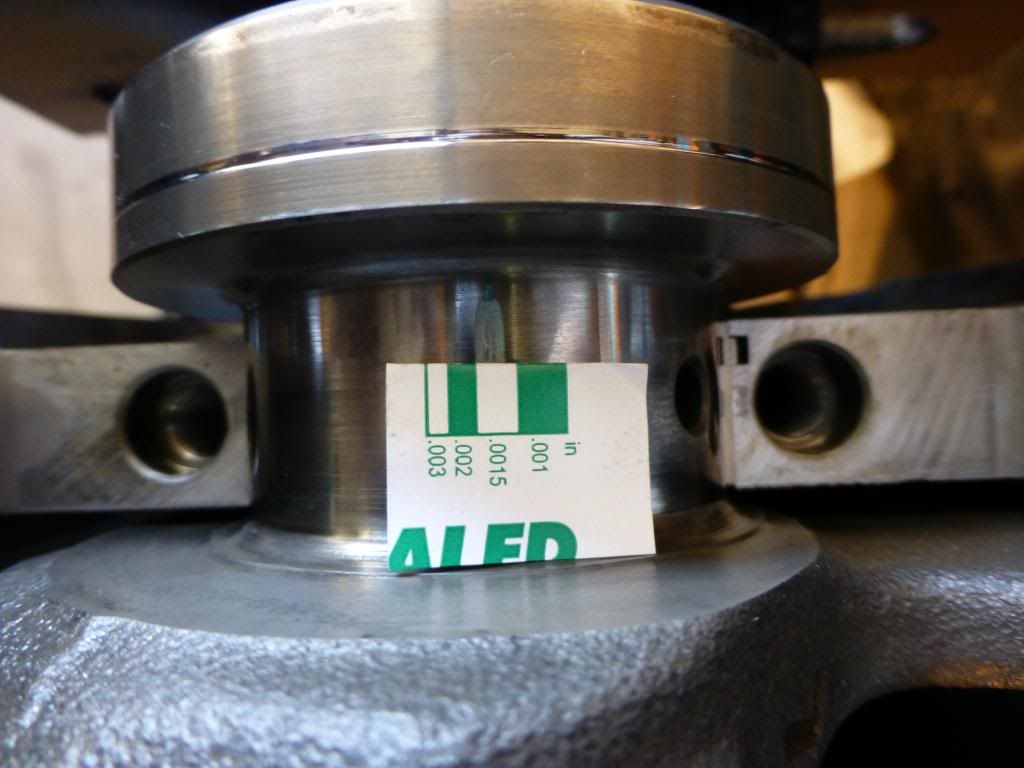
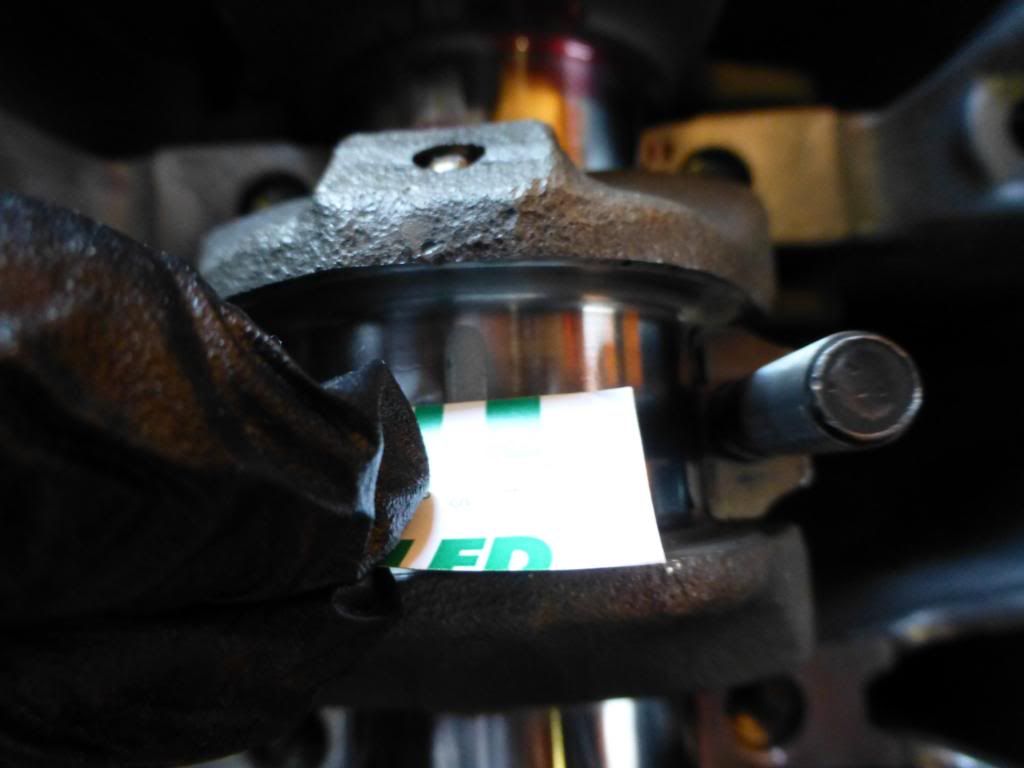
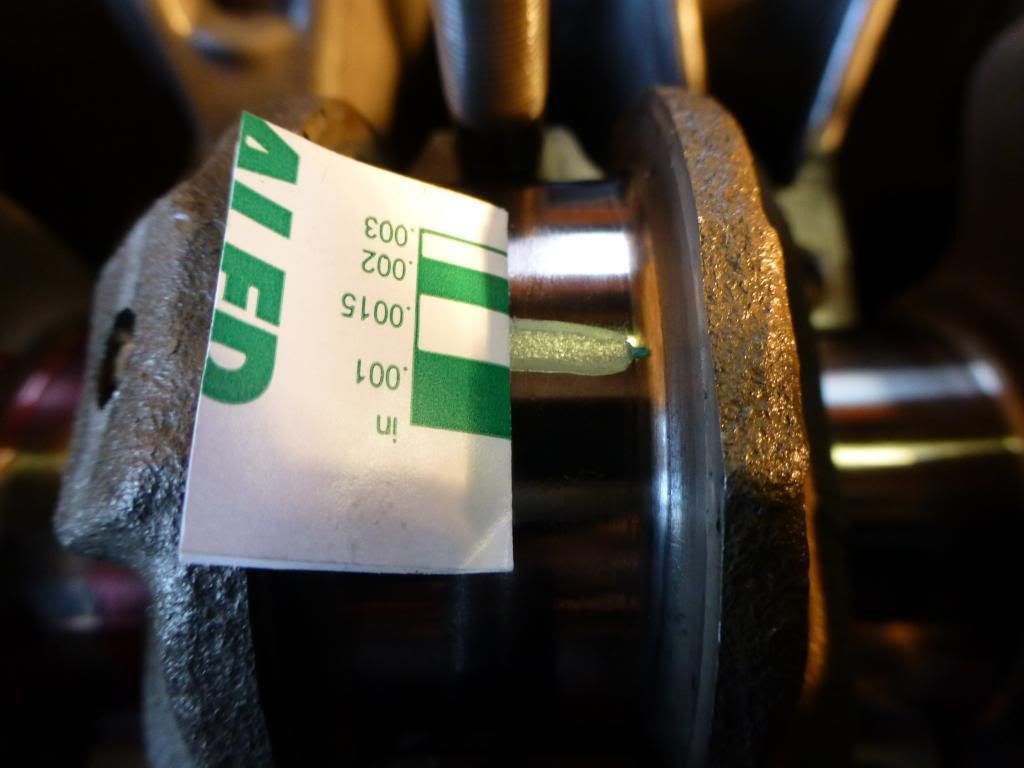
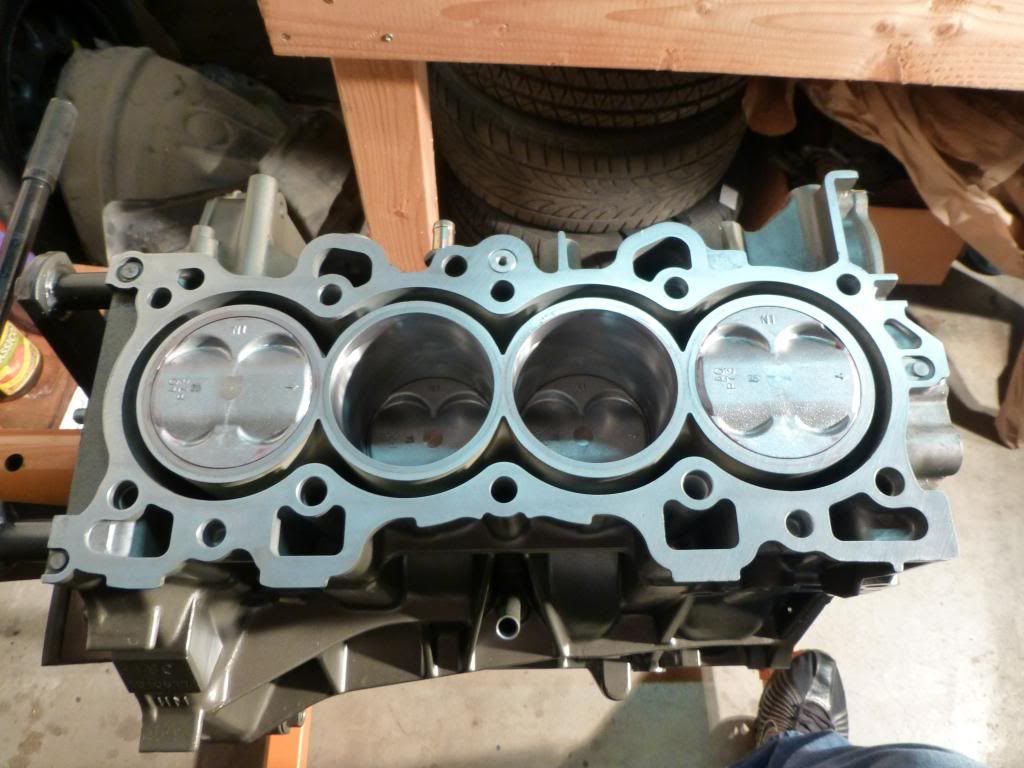
So this last weekend I got the pistons and main caps in after remeasuring everything. I wasn't happy about the honing as I measured a slight taper down the cylinder of about .0005", but I decided to press on. Also, after measuring the main journals and calculating my clearance I still get results of too tight of clearance for all the journals. I have confidence on the crankshaft part of things but the bore mics I borrowed from work I don't quite trust. Our calibration guy has been spotty and I didn't have ring gauges to check the accuracy. I got some plastiguage and used that to double check and make sure I will be ok. The main journal clearances were ~.0015 for 1,2,4,5 and <.002 for 3. The rod journals were all ~.0015. Here are some pics from the weekend. I also painted the block. I chose this dark grey / silver color since I didn't want black in a blackish engine bay. I like contrast.

There is a little crack in the engine block near the top. It seems to go through but there has never been any fluids on the out side. Hopefully it is still ok.
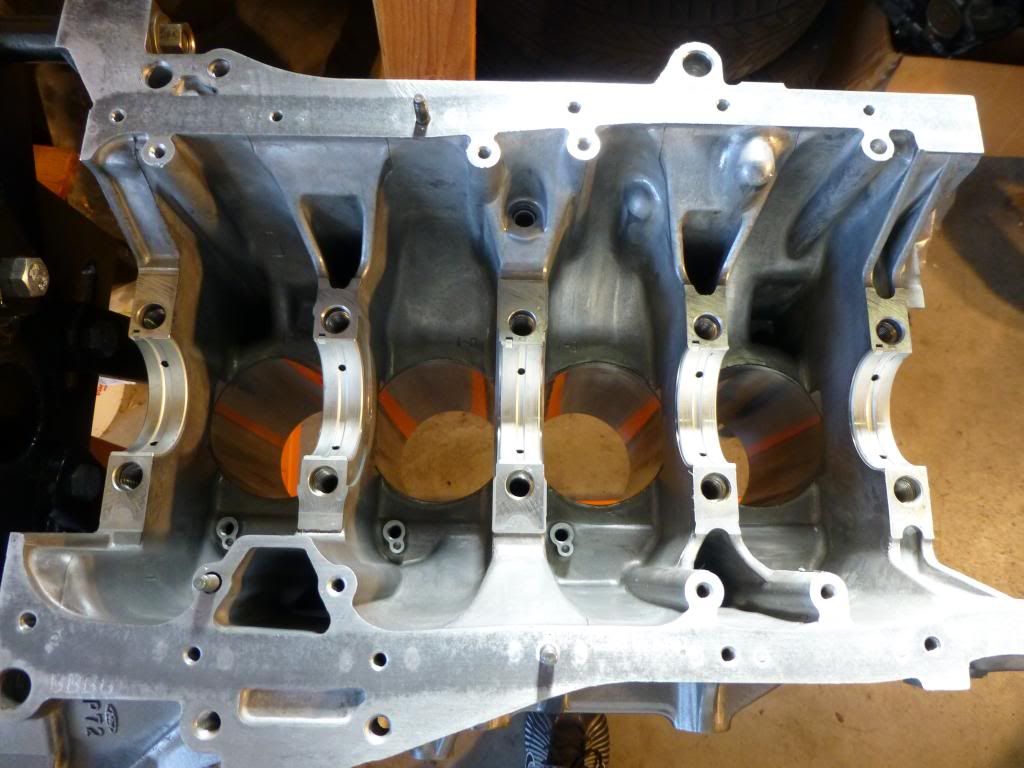
Main 3
Others

Connecting rods


Top side:
This is as far as I got. I will update more hopefully next weekend. I would like to get the rest of the bottom end put back together. It will be slow since I also like to clean everything up as it goes back together. I welcome any comments or discussions.
So this last weekend I got the pistons and main caps in after remeasuring everything. I wasn't happy about the honing as I measured a slight taper down the cylinder of about .0005", but I decided to press on. Also, after measuring the main journals and calculating my clearance I still get results of too tight of clearance for all the journals. I have confidence on the crankshaft part of things but the bore mics I borrowed from work I don't quite trust. Our calibration guy has been spotty and I didn't have ring gauges to check the accuracy. I got some plastiguage and used that to double check and make sure I will be ok. The main journal clearances were ~.0015 for 1,2,4,5 and <.002 for 3. The rod journals were all ~.0015. Here are some pics from the weekend. I also painted the block. I chose this dark grey / silver color since I didn't want black in a blackish engine bay. I like contrast.
There is a little crack in the engine block near the top. It seems to go through but there has never been any fluids on the out side. Hopefully it is still ok.
Main 3
Others
Connecting rods
Top side:
This is as far as I got. I will update more hopefully next weekend. I would like to get the rest of the bottom end put back together. It will be slow since I also like to clean everything up as it goes back together. I welcome any comments or discussions.
 02-13-2013, 08:09 AM
#7
Honda-Tech Member
Thread Starter
Join Date: Jan 2013
Posts: 40
Likes: 0
Received 0 Likes
on
0 Posts
Thanks for the compliments. I have a question about my master cylinder for my brakes. When the 5 lug conversion was done I had a really soft brake pedal and the car didn't stop so well. I was in a rush to get the car moving and didn't have time to find/research the optimum setup which I know is to go with the 15/16 or 1" MC and the brake booster to go with it as needed and the proportioning valve. We just went to the part store with the old MC and dove through a few different ones until we found one that was bigger and had the same bolt holes as my booster. The Prop valve is still the 30/30. I was thinking since the motor is out I will address the prop valve and get the 40/40 one now, although my brakes feel good with what I had.
Can anyone tell what MC I ended up with from the pics above? My friend recalls that it could have been for a prelude. I know it is bigger than the stock CX since it worked a hell of a lot better and we didn't need to change any brake lines (perhaps just nudge it over some but they were in the same spots for the most part). Also bolts up to stock CX brake booster. There are no part numbers that I could look up and it came from a local car parts place and not Honda unfortunately.
Can anyone tell what MC I ended up with from the pics above? My friend recalls that it could have been for a prelude. I know it is bigger than the stock CX since it worked a hell of a lot better and we didn't need to change any brake lines (perhaps just nudge it over some but they were in the same spots for the most part). Also bolts up to stock CX brake booster. There are no part numbers that I could look up and it came from a local car parts place and not Honda unfortunately.
Trending Topics
02-19-2013, 10:11 AM
#11
Honda-Tech Member
Thread Starter
Join Date: Jan 2013
Posts: 40
Likes: 0
Received 0 Likes
on
0 Posts
Well, Unfortunately little progress was made this weekend. I started to work on it Friday and discovered I did not have the O-ring for the new oil pump. It does not come with it (which it should) and I had to order it from my local Honda dealer. They said it would show up Saturday but it did not. So I was unable to get the oil pan back on as I did not want to reuse my old O-ring. I started to put the water pump on then stripped the threads out on one of the bolt holes. So I had to take the pump off and install a heli-coil and then put the pump back on. I did install the sensors, pcv chamber and water pipe. I took a couple of pictures but haven't uploaded them yet. I suppose I could have went on to installing the head, but for some reason I stopped as I wanted to have the oil pan on before I went to the head. Silly but true.
02-28-2013, 12:20 PM
#12
Honda-Tech Member
Thread Starter
Join Date: Jan 2013
Posts: 40
Likes: 0
Received 0 Likes
on
0 Posts
Update for the last two weeks.
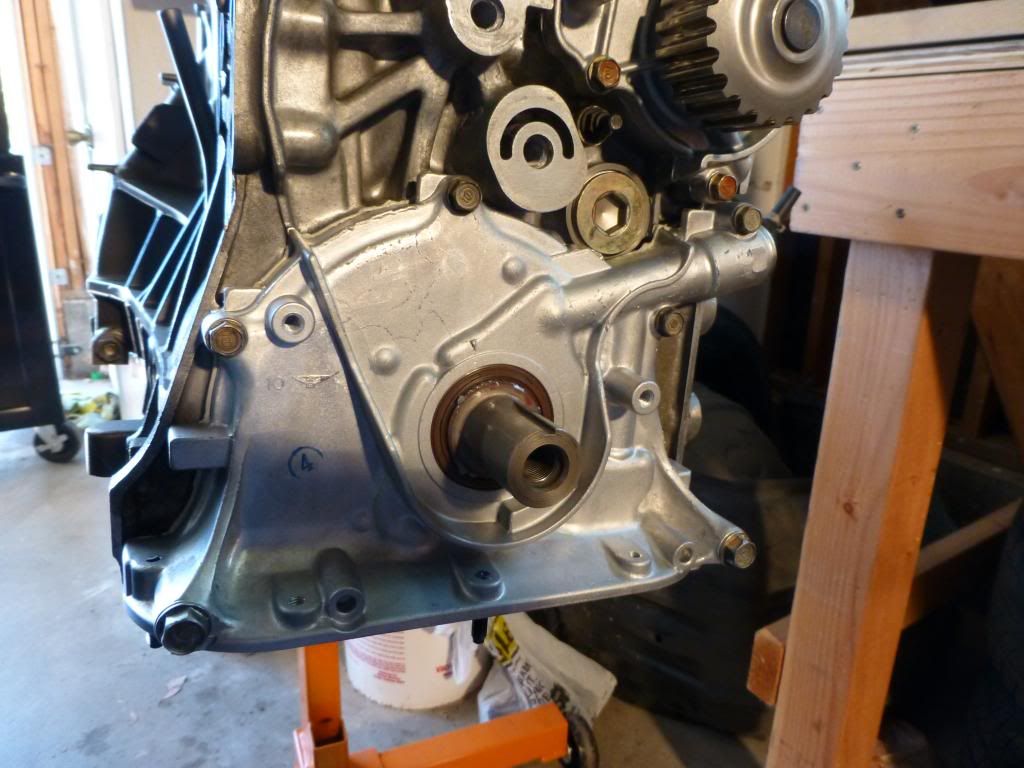
So I have been continuing to work on the motor and get it back together. I still have not got the oil pan on but decided to push through and get the top put back together. I do have the oil pump and rear seal on though. When I went to clean up the oil pick up I picked it up and heard some rattling inside of it. Figured this wasn't good so I shook it and out came a retainer from the top end. Its also a little bit chewed up and the screen is gunked up. I decided to buy a new oil pick up so I am waiting for that to button up the bottom end.
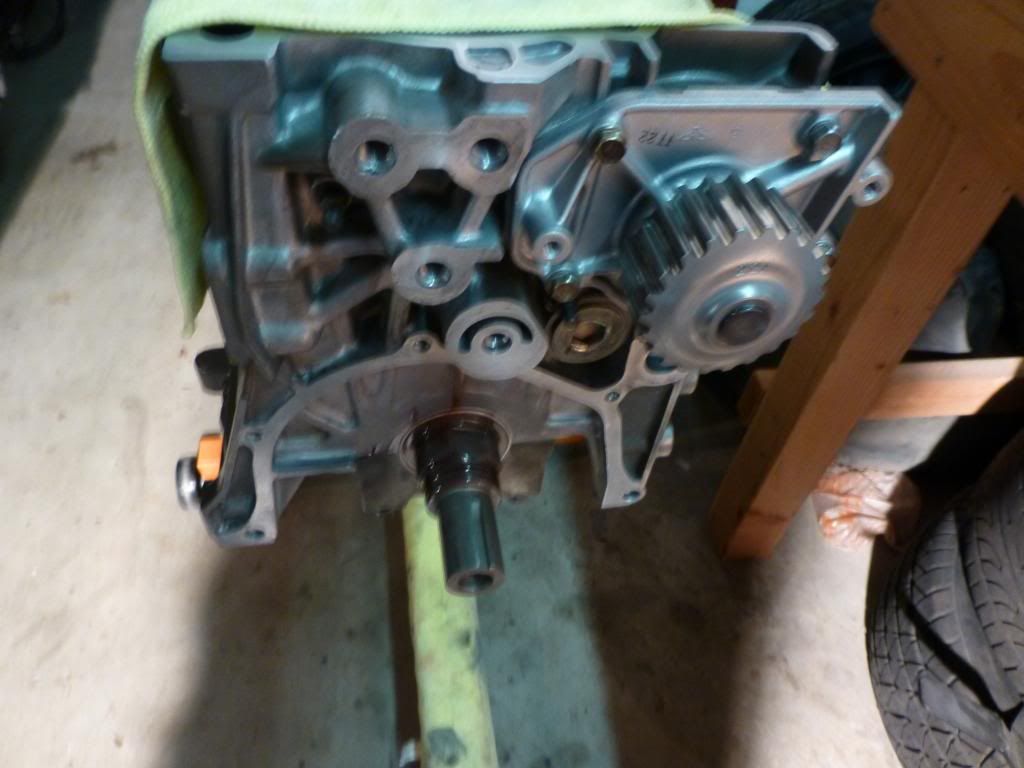
Decided to put the water pump on, install the head, cams and timing belt and do the valve adjustment.
Retainer from oil pickup
Some pics from the last few weekends.
Oil Pump
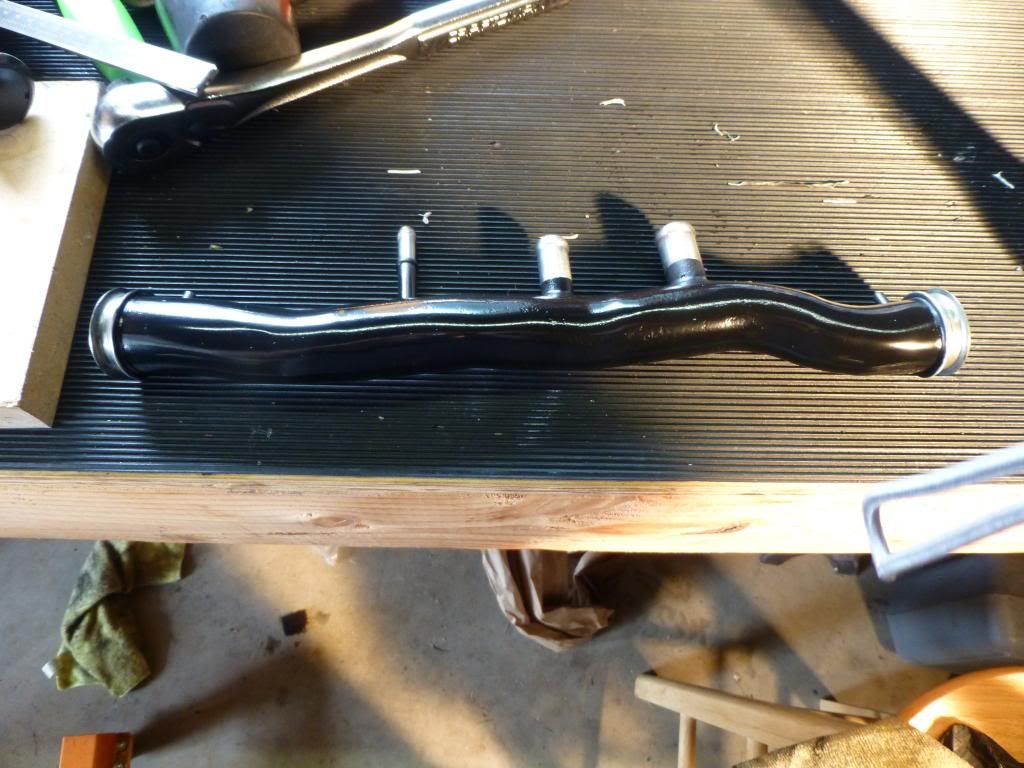
water pump
Waterpipe all crusted.
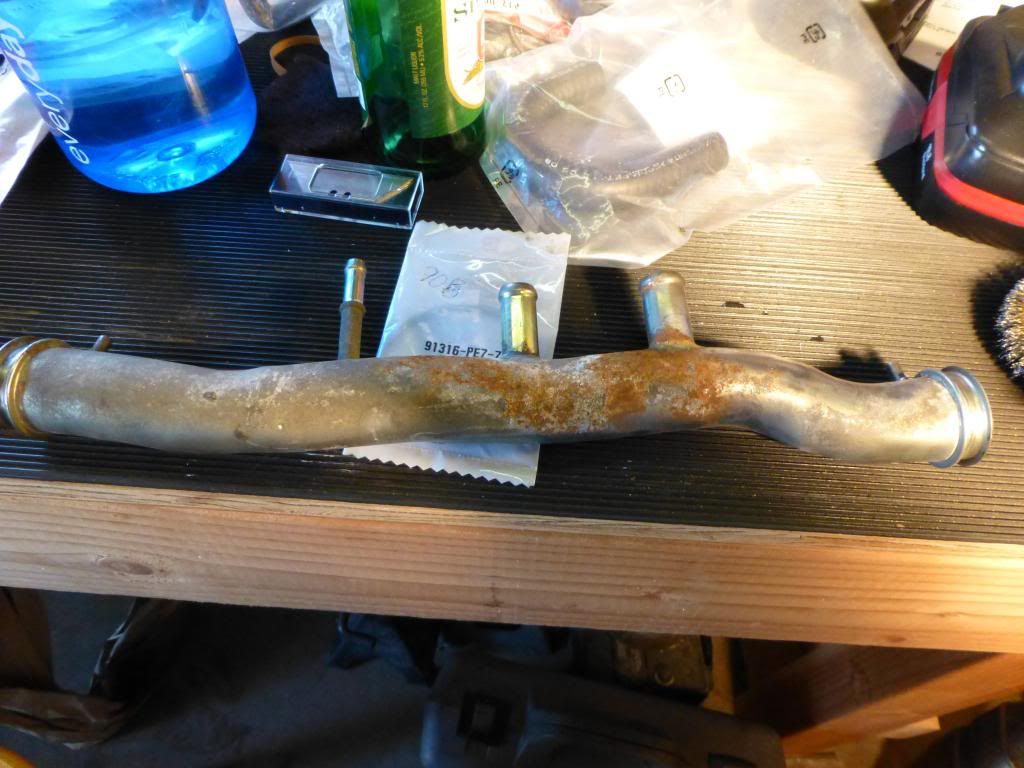
Cleaned and painted.
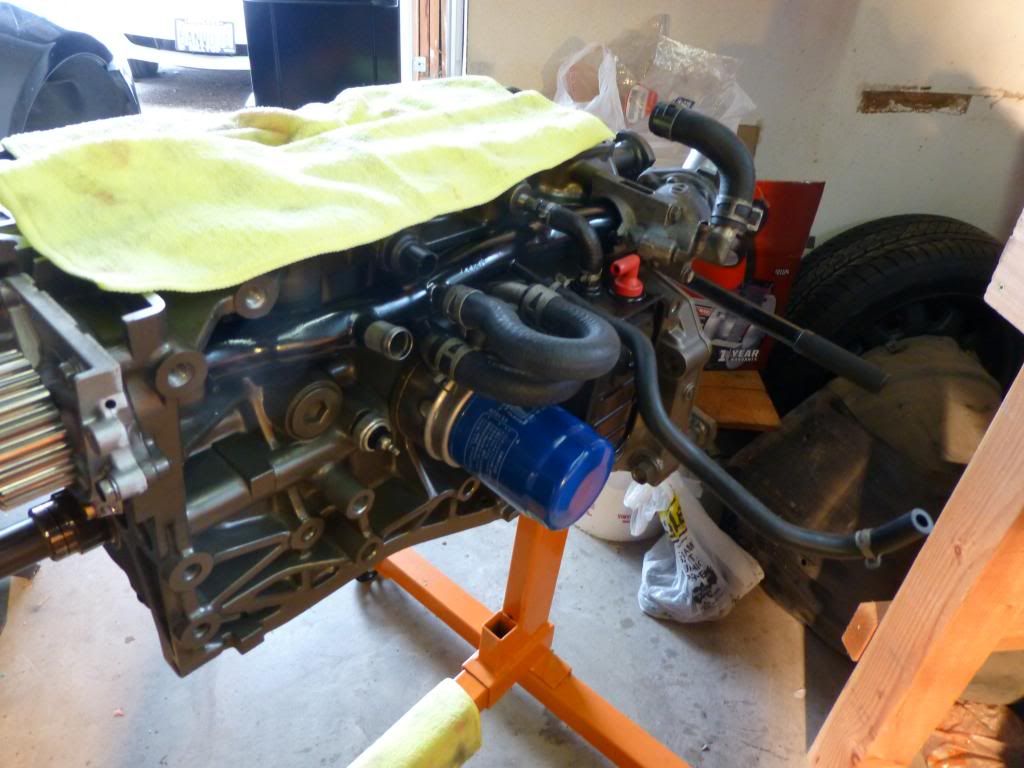
Head put back on

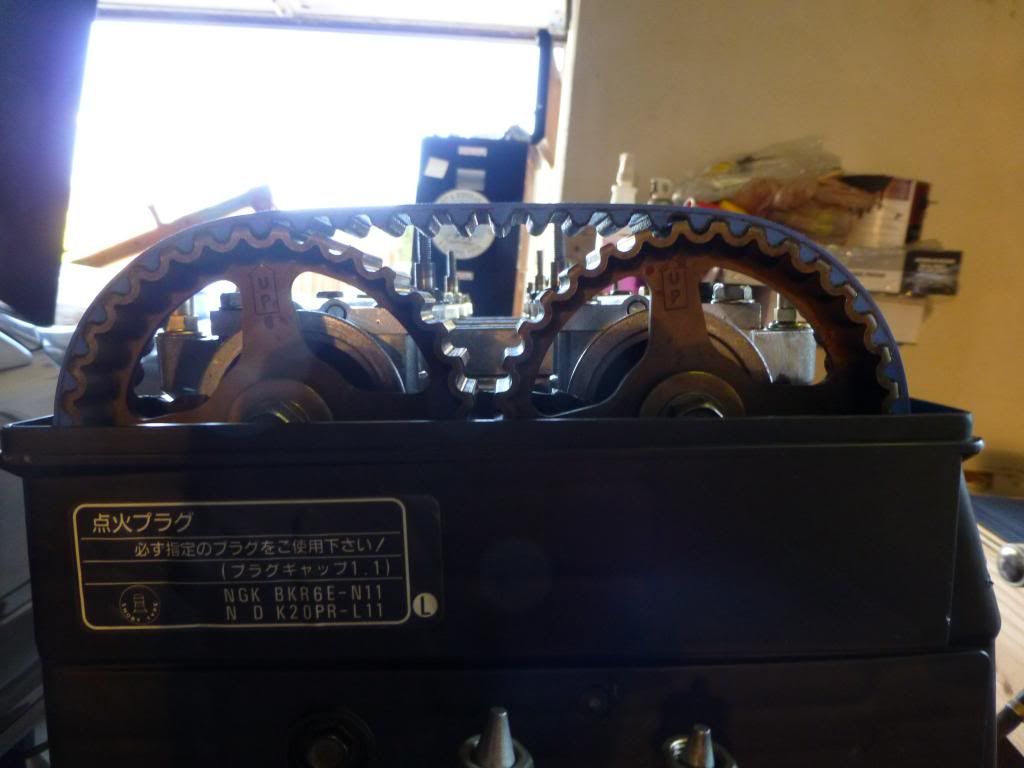
Cams installed
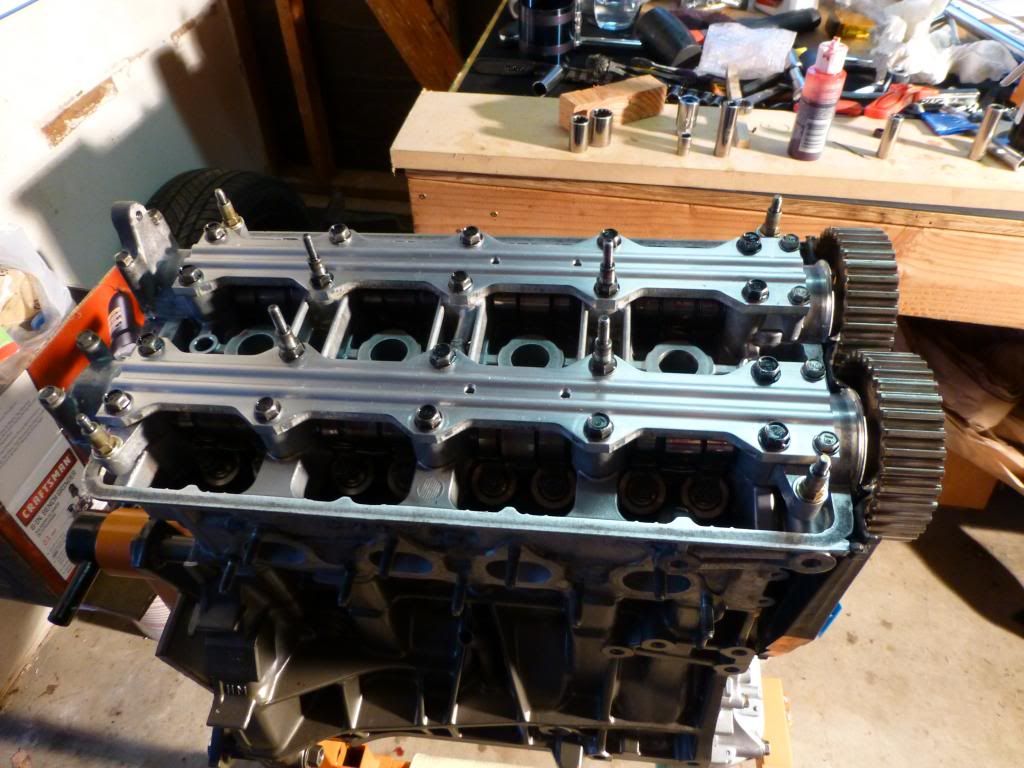
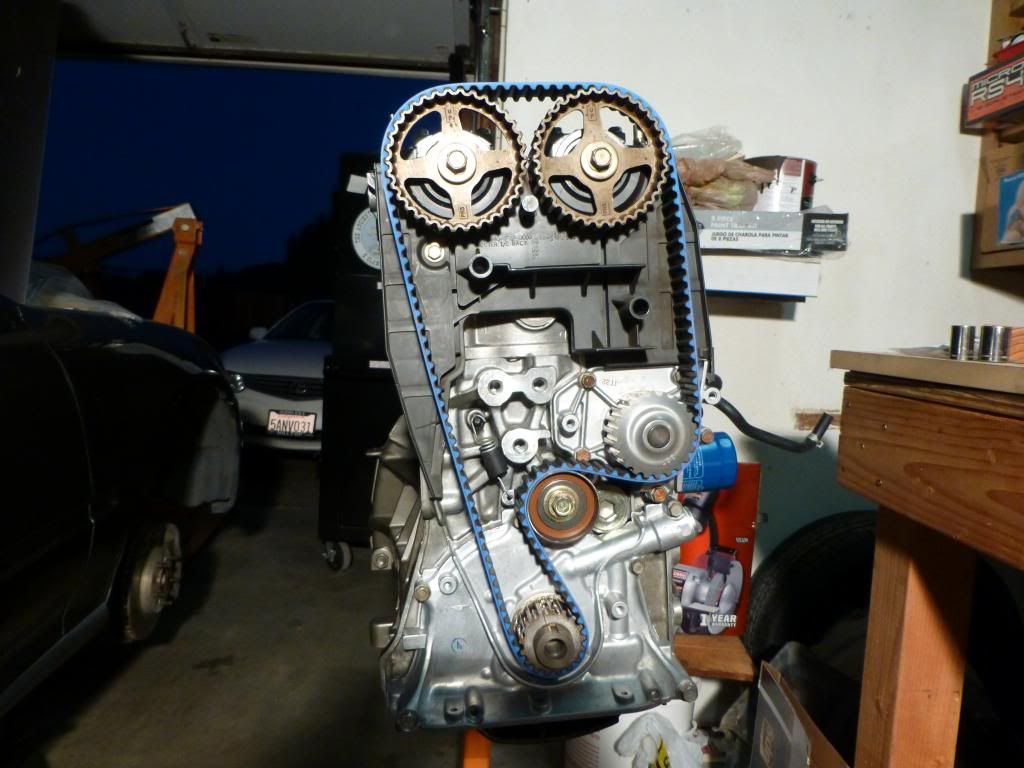
Gates TB installed
Valve Cover and distributor back on (decided to get new cap and rotor as well)

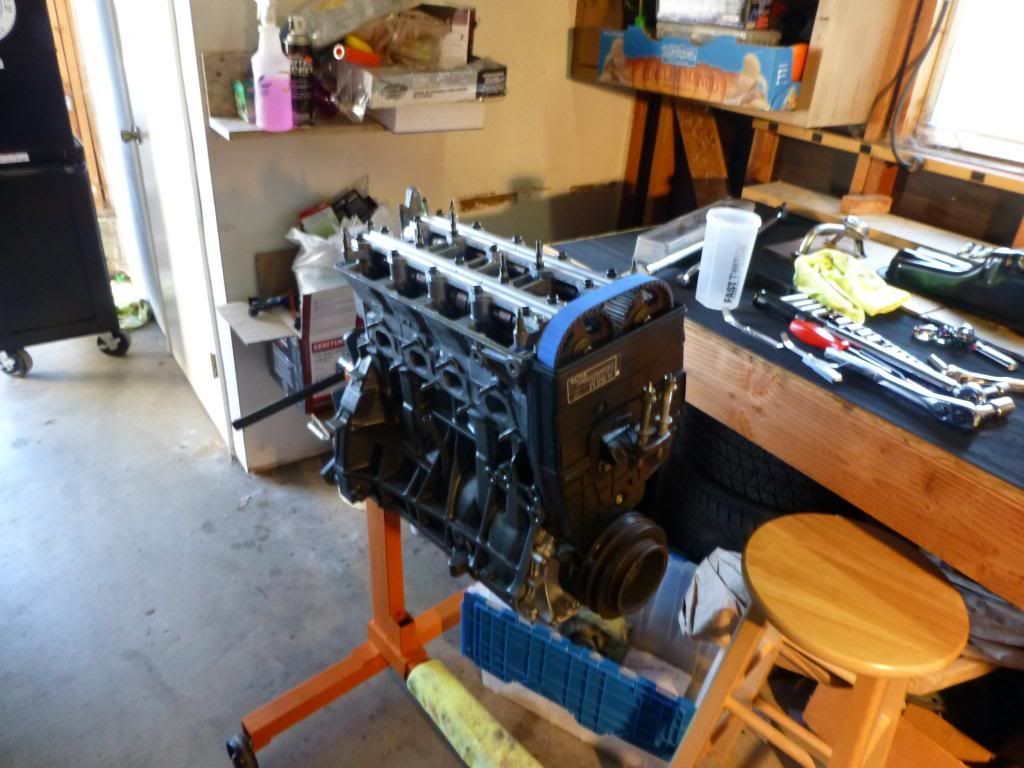
Intake manifold on. I think I will spend some time cleaning it up also.

So I have been continuing to work on the motor and get it back together. I still have not got the oil pan on but decided to push through and get the top put back together. I do have the oil pump and rear seal on though. When I went to clean up the oil pick up I picked it up and heard some rattling inside of it. Figured this wasn't good so I shook it and out came a retainer from the top end. Its also a little bit chewed up and the screen is gunked up. I decided to buy a new oil pick up so I am waiting for that to button up the bottom end.
Decided to put the water pump on, install the head, cams and timing belt and do the valve adjustment.
Retainer from oil pickup
Some pics from the last few weekends.
Oil Pump
water pump
Waterpipe all crusted.
Cleaned and painted.
Head put back on
Cams installed
Gates TB installed
Valve Cover and distributor back on (decided to get new cap and rotor as well)
Intake manifold on. I think I will spend some time cleaning it up also.
02-28-2013, 12:30 PM
#13
Honda-Tech Member
Thread Starter
Join Date: Jan 2013
Posts: 40
Likes: 0
Received 0 Likes
on
0 Posts
Also some questions:
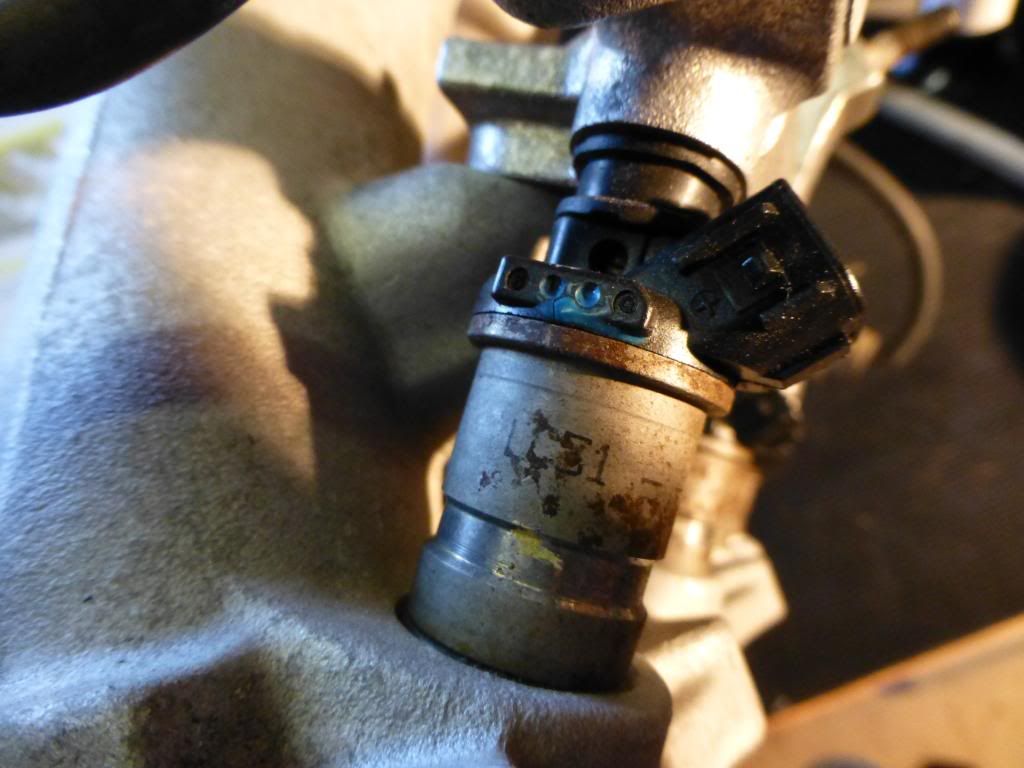
1: Are these the stock injectors for a 94-95 b18c gsr motor? They are marked with LC31--0 and have light blue dots on the top of them. Pic for reference.
2: Here are my timing marks. They have been like this for a while but the bottom mark is a little offset when the cams are matching. Is this typical? The head was shaved once.
Plans for this weekend put oil pan back on if parts arrive and take transmission apart to send shafts to synchro-tech for service to get rid of third gear grind. go to junkyard for 40/40 proportioning valve and maybe a master cylinder and anything else I might find.
03-19-2013, 06:06 PM
#14
Honda-Tech Member
Join Date: Oct 2002
Location: ca, usa
Posts: 1,550
Likes: 0
Received 0 Likes
on
0 Posts
looks good so far. Are you going to dyno it? I'm planning a similar setup, so I'm curious what numbers yours makes.
03-22-2013, 03:53 PM
#15
Honda-Tech Member
Thread Starter
Join Date: Jan 2013
Posts: 40
Likes: 0
Received 0 Likes
on
0 Posts
I would like to dyno it, but I am not sure there is one nearby. If I go to a shop in NorCal or SoCal I will. I would hope to put down somewhere near a stock ITR. I have also have more work done that I will update soon. Just seemed like no one was really responding to the thread so I stopped updating.
03-23-2013, 01:07 AM
#16
Honda-Tech Member

Join Date: Nov 2012
Posts: 139
Likes: 0
Received 0 Likes
on
0 Posts
Subscribed for the OEM parts!
Ps. Would be nice to If you left the block at 81.0mm, a straight OEM (mix and match) build would be nice. )
)
Ps. Would be nice to If you left the block at 81.0mm, a straight OEM (mix and match) build would be nice.
)
03-23-2013, 06:31 PM
#18
Honda-Tech Member

Thanks for the compliments. I have a question about my master cylinder for my brakes. When the 5 lug conversion was done I had a really soft brake pedal and the car didn't stop so well. I was in a rush to get the car moving and didn't have time to find/research the optimum setup which I know is to go with the 15/16 or 1" MC and the brake booster to go with it as needed and the proportioning valve. We just went to the part store with the old MC and dove through a few different ones until we found one that was bigger and had the same bolt holes as my booster. The Prop valve is still the 30/30. I was thinking since the motor is out I will address the prop valve and get the 40/40 one now, although my brakes feel good with what I had.
Can anyone tell what MC I ended up with from the pics above? My friend recalls that it could have been for a prelude. I know it is bigger than the stock CX since it worked a hell of a lot better and we didn't need to change any brake lines (perhaps just nudge it over some but they were in the same spots for the most part). Also bolts up to stock CX brake booster. There are no part numbers that I could look up and it came from a local car parts place and not Honda unfortunately.
Can anyone tell what MC I ended up with from the pics above? My friend recalls that it could have been for a prelude. I know it is bigger than the stock CX since it worked a hell of a lot better and we didn't need to change any brake lines (perhaps just nudge it over some but they were in the same spots for the most part). Also bolts up to stock CX brake booster. There are no part numbers that I could look up and it came from a local car parts place and not Honda unfortunately.
03-23-2013, 06:47 PM
#19
B*a*n*n*e*d

Join Date: Feb 2008
Location: Charlottesville, VA, USA
Posts: 6,420
Likes: 0
Received 5 Likes
on
5 Posts
your miss informed about the master cylinder. a bigger master cylinder will give u LESS clampping pressure at the caliper. the 7/8" is the right size master cylinder for most hondna's. you can research for yourself which google is a click away or take my word. I would recomend putting the 40/40 prob valve in and see if that helps. are you running the brakes with the brake booster or without the booster?
TL;DR - too small of a master means no pedal pressure (soft/no brakes), too large of a master means too much pressure (early lock).
I would have to know what 5 lug conversion the OP used to accurately show the math to find the correct master cylinder.
03-24-2013, 11:23 AM
#20
Honda-Tech Member
Thread Starter
Join Date: Jan 2013
Posts: 40
Likes: 0
Received 0 Likes
on
0 Posts
Um, what? Do you understand how a brake master cylinder works, or even the basic concepts of fluid dynamics involved in the braking system? You have that completely backwards. A larger master cylinder will displace more fluid for the same travel distance, which in turn puts more pressure on calipers of equal piston size. When you switch to a larger piston caliper (for example, replacing rear drums with rear discs), you should swap to a larger sized master cylinder to displace the proper amount of fluid to fill the new amount of space behind the piston.
TL;DR - too small of a master means no pedal pressure (soft/no brakes), too large of a master means too much pressure (early lock).
I would have to know what 5 lug conversion the OP used to accurately show the math to find the correct master cylinder.
TL;DR - too small of a master means no pedal pressure (soft/no brakes), too large of a master means too much pressure (early lock).
I would have to know what 5 lug conversion the OP used to accurately show the math to find the correct master cylinder.
As far as which 5-lug I have, my belief it is the ctr or early ITR set-up. I would have to measure the axles to be sure. This was new info to me. I did some research and found the newer ITR ones are 36mm vs. 32mm.
Thanks for the discussions. I will post some updates later as I am about to go work on my car right now. Going to swap my valve, clean the engine bay and trans and replace my inner axle boot.
03-24-2013, 11:36 PM
#21
Honda-Tech Member
Um, what? Do you understand how a brake master cylinder works, or even the basic concepts of fluid dynamics involved in the braking system? You have that completely backwards. A larger master cylinder will displace more fluid for the same travel distance, which in turn puts more pressure on calipers of equal piston size. When you switch to a larger piston caliper (for example, replacing rear drums with rear discs), you should swap to a larger sized master cylinder to displace the proper amount of fluid to fill the new amount of space behind the piston.
MORE INFO on how brakes work, since this is such a debated product...
1) If you increase the diameter of the master cylinder you will REDUCE LINE PRESSURE WHICH REDUCES CLAMPING FORCE.
Example: Switching from stock 7/8" brake master cylinder w/ booster to a larger one, IE; 1" BMC, this yields into having to use a lot more leg effort to stop the vehicle and doesn't have that bite the 7/8" BMC has when it engages. Hence why we use the 7/8" Wilwood with our booster-less setup (explained above 2 or 3 times)
2) If you decrease the diameter of the master cylinder you will INCREASE CLAMPING FORCE, which is the ONLY part of braking that will make you stop quicker.
Example: If you have already upgraded to a larger brake master cylinder such as 1" over the stock 7/8" you probably noted a lot firmer pedal but more leg effort to come to a stop quickly, if you were to switch back to the smaller 7/8" you will feel that when the brakes engage they do so with a lot more bite then the larger BMC.
So you ask where�s the happy medium? Where is the sweet spot? For us and seemingly all other 500+ customers, we like the 7/8" BMC. Over any size we have tried. We've tested every size Wilwood sells. The pedal travel is absolutely perfect. This is subject to change with different pedal ratio's.
03-25-2013, 12:02 AM
#22
B*a*n*n*e*d
Join Date: Feb 2008
Location: Charlottesville, VA, USA
Posts: 6,420
Likes: 0
Received 5 Likes
on
5 Posts
And I'm going from mechanical engineering and fluid dynamics, which I actually studied in college. I don't need to read someone's PR sheet to understand how a braking system works. Larger piston displaces more fluid for the same distance of travel, period. Brake fluid is specially formulated not to compress, so you can assume for the sake of the argument that it doesn't. Brake lines are mostly hard, and the lines that aren't flex based on pressure, which we're aiming to maintain as a constant in the system, so once again we can ignore that. You're also talking about the Willwood booster-less system, which is different than the standard hydraulic system the rest of us are talking about.
To fill a larger receiving body (in this case, the brake caliper pistons) with the equal amount of fluid without modifying pressure you must increase the size of the donating body (in this case, the brake master cylinder piston). Too big a donating body, and you lose fine range of motion in the receiving body (brakes lock up too easily). Too small a donating body, and you don't have enough pressure to fully move the receiving body (brakes don't work).
Do I need to go over physics 101 with you, or can you trust that I'm not lying to you about stuff you can go look up in a book?
03-25-2013, 03:32 PM
#23
Honda-Tech Member
Thread Starter
Join Date: Jan 2013
Posts: 40
Likes: 0
Received 0 Likes
on
0 Posts
I take my advice from people that have research and experience. I am currently running the Chase Bay's boosterless wilwood 7/8" set up which is recomended. Read From thier site: http://www.chasebays.com/product/acu...ter-eliminator
MORE INFO on how brakes work, since this is such a debated product...
1) If you increase the diameter of the master cylinder you will REDUCE LINE PRESSURE WHICH REDUCES CLAMPING FORCE.
Example: Switching from stock 7/8" brake master cylinder w/ booster to a larger one, IE; 1" BMC, this yields into having to use a lot more leg effort to stop the vehicle and doesn't have that bite the 7/8" BMC has when it engages. Hence why we use the 7/8" Wilwood with our booster-less setup (explained above 2 or 3 times)
2) If you decrease the diameter of the master cylinder you will INCREASE CLAMPING FORCE, which is the ONLY part of braking that will make you stop quicker.
Example: If you have already upgraded to a larger brake master cylinder such as 1" over the stock 7/8" you probably noted a lot firmer pedal but more leg effort to come to a stop quickly, if you were to switch back to the smaller 7/8" you will feel that when the brakes engage they do so with a lot more bite then the larger BMC.
So you ask where�s the happy medium? Where is the sweet spot? For us and seemingly all other 500+ customers, we like the 7/8" BMC. Over any size we have tried. We've tested every size Wilwood sells. The pedal travel is absolutely perfect. This is subject to change with different pedal ratio's.
And I'm going from mechanical engineering and fluid dynamics, which I actually studied in college. I don't need to read someone's PR sheet to understand how a braking system works. Larger piston displaces more fluid for the same distance of travel, period. Brake fluid is specially formulated not to compress, so you can assume for the sake of the argument that it doesn't. Brake lines are mostly hard, and the lines that aren't flex based on pressure, which we're aiming to maintain as a constant in the system, so once again we can ignore that. You're also talking about the Willwood booster-less system, which is different than the standard hydraulic system the rest of us are talking about.
To fill a larger receiving body (in this case, the brake caliper pistons) with the equal amount of fluid without modifying pressure you must increase the size of the donating body (in this case, the brake master cylinder piston). Too big a donating body, and you lose fine range of motion in the receiving body (brakes lock up too easily). Too small a donating body, and you don't have enough pressure to fully move the receiving body (brakes don't work).
Do I need to go over physics 101 with you, or can you trust that I'm not lying to you about stuff you can go look up in a book?
To fill a larger receiving body (in this case, the brake caliper pistons) with the equal amount of fluid without modifying pressure you must increase the size of the donating body (in this case, the brake master cylinder piston). Too big a donating body, and you lose fine range of motion in the receiving body (brakes lock up too easily). Too small a donating body, and you don't have enough pressure to fully move the receiving body (brakes don't work).
Do I need to go over physics 101 with you, or can you trust that I'm not lying to you about stuff you can go look up in a book?
^ I agree. Since I changed the whole system I had to accommodate it in up sizing the MC. When I had the stock MC my pedal went to the floor. Assuming that the swap was bled correctly(may not have been since the shop ended up sucking) I displaced the max amount of fluid with out filling the calipers and thus was never able to achieve max braking force. Going from 7/8 to 15/16 to 1" would be my belief that it changes 2 aspects and is mostly accommodating preference at that point. 1st would be pedal range and 2nd how hard you wish to press to achieve max threshold. In my case I just needed something that worked and got lucky that I ended up with a usable MC that I am ok with. I am still trying to figure out what the numbers truly mean on the proportioning valve.
03-25-2013, 03:50 PM
#24
Honda-Tech Member
Thread Starter
Join Date: Jan 2013
Posts: 40
Likes: 0
Received 0 Likes
on
0 Posts
Oh yah, as far as updates go. I took apart my trans and sent the shafts to Synchrotech. They are damned fast and I had my shafts back in 4 days including shipping time. Although I am in the same state so that helped. It took me a while to put it back together since I didn't have a bearing puller so I got one the following weekend and put it back together the next weekend following. Only thing that I had a question on was the needle bearing they provide did not have holes in the side like the stock one did. After some searching I found that people had the same exact same part from Honda and it did not have the holes (perhaps a manufacturing change). I decided to put it in and get the trans back together. This weekend I went to the junkyard finally and got the 40/40 valve to put in. I had one that the bracket was different so I had to take the old bracket off. I wrestled with it since it had the security torx bits and I didn't have the right tool. after wrestling with it and destroying the old bolts I went to the store got some new bolts and the right bit. So when I pull the stock one off it will be much easier. One thing to note also is when you back the bolts out I believe the screw is designed to destroy the threads. I gave up after this and went to drink beer. I am at work now put will post some pics later. I also picked up an EK center console and armrest to fit into my hatch. I know that it may not line up right and have some fitment issues but I am going to have a go with it. I just like the pocket and cup holder from the EK. The armrest isn't a big deal since I know that i could have just picked up one out of an EG. I also didn't want to spend $150+ or however much that the bolt in EG center is. I paid $30 for all the pieces and $20 for the 40/40 valve.
To do list:
install clutch and flywheel (aem streetlite and exedy stage 1)
change the prop valve.
change the inner boot on my driveshaft
clean engine bay
finish assembling the misc items on engine and trans
torque CS pulley before install
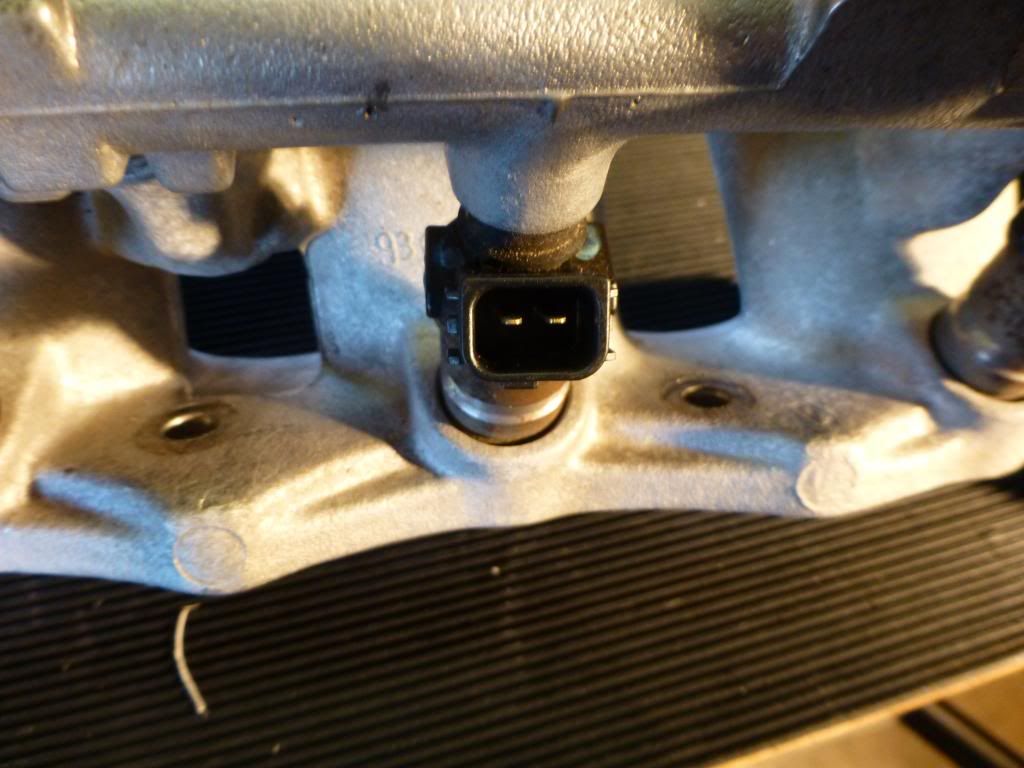
fix my O2 sensor plug since I forgot to disconnect when I dropped the exh. manifold
install brake lines I ordered today and bleed brakes
drop in motor fill fluids and do start up and break in procedures.
To do list:
install clutch and flywheel (aem streetlite and exedy stage 1)
change the prop valve.
change the inner boot on my driveshaft
clean engine bay
finish assembling the misc items on engine and trans
torque CS pulley before install
fix my O2 sensor plug since I forgot to disconnect when I dropped the exh. manifold
install brake lines I ordered today and bleed brakes
drop in motor fill fluids and do start up and break in procedures.