
Jackal's DIY: S2K Push Button Engine Start Switch in EJ1/EG
 12-26-2009, 11:43 PM
#1
Honda-Tech Member
Thread Starter
Join Date: Apr 2009
Location: San Diego, CA
Posts: 434
Likes: 0
Received 0 Likes
on
0 Posts
I'm just going crazy with the DIY threads tonight; my Saturday has been dedicated to drinking beer, doing a few projects on my EJ1 and posting these DIY threads so you all can do the same projects with ease. So here it is...
How to install an S2K push button engine start switch in your EJ1/EG... The LEGIT way!
**Materials Required**
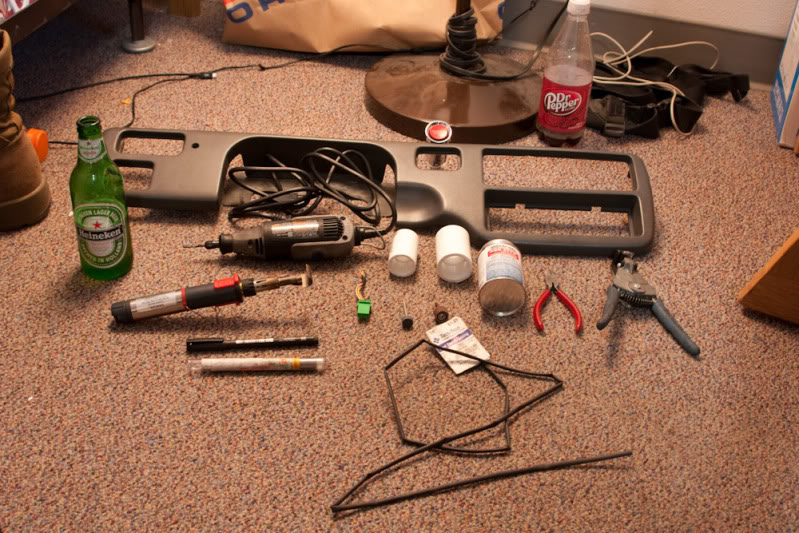
-BEER! The most important "material" for any project like this, my preference is Heineken but any beer will do I guess.
-The center panel from your dash, we'll go over removal of this in the first step.
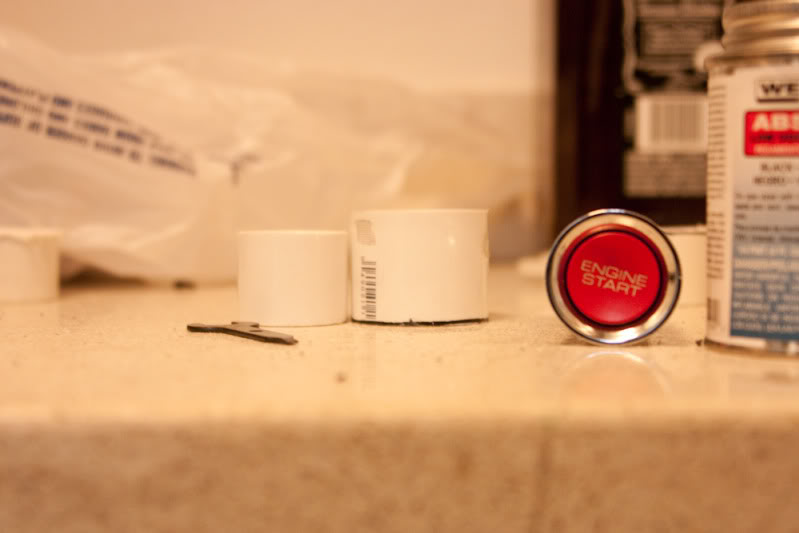
-S2K push button engine start switch, Honda PN: 35881-S2A-911 MSRP of $52.45, I think I paid like $38 for mine at the dealer. I buy tons of parts and worked for Honda for over 5 years so I get a good deal.
-You'll need a 5P switch connector for this DIY, they are pretty common but you can't just order these from the dealer. I have a ton of these so if you need one PM me and we can work something out.
-Dremel rotary tool with misc bits.
-Soldering iron, solder, heatshrink and some 20AWG or 22AWG wire.
-Wire cutters and wire strippers
-PVC Cement... The stuff I used is "Weld On" brand ABS 2773 plastic cement. DO NOT use super glue, epoxy etc. That **** will not hold as well and your hard work will go to waste. You can get this stuff at Home Depot in the plumbing section.
-One 1" PVC straight union and one 1-1/4" PVC straight union. We will make our switch housing out of this.
-Fine point felt tip marker
-Paper clip
-Basic hand tools required to remove dash
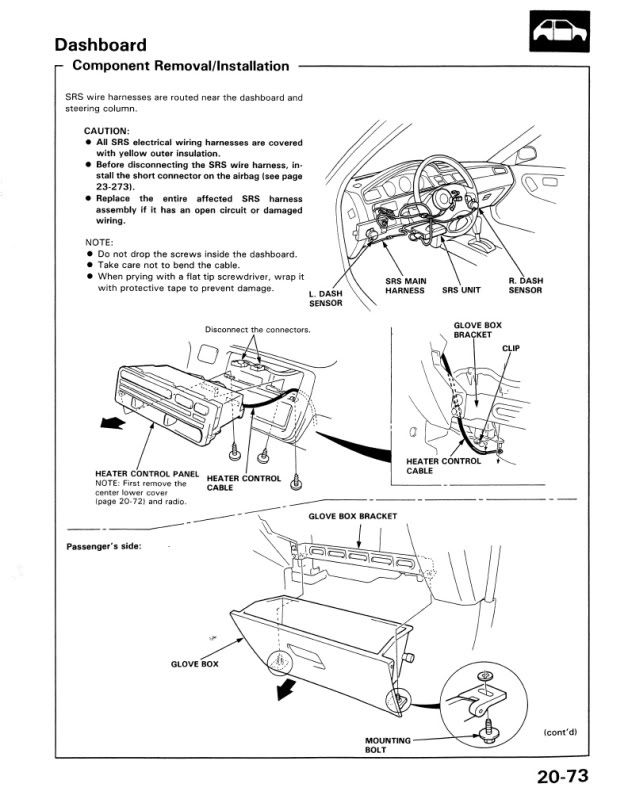
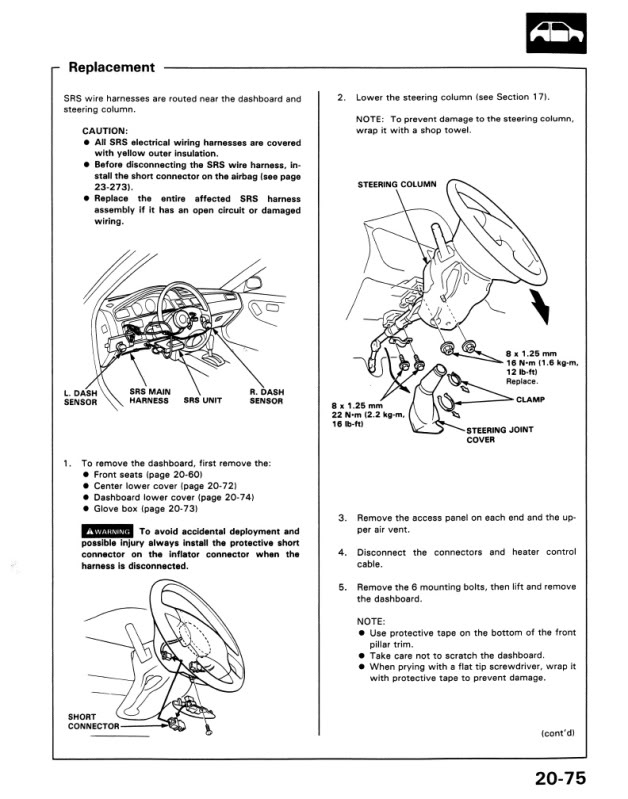
(1.) - Remove the dashboard and center panel. Follow the steps outlined in the Factory Service Manual...
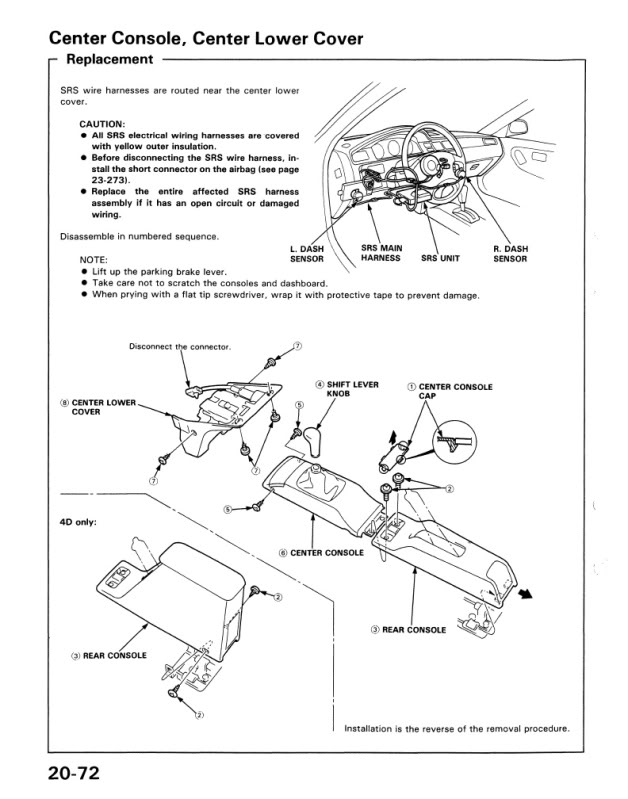
-Remove the center console (so you don't scratch it when removing the dash) and the center lower cover.

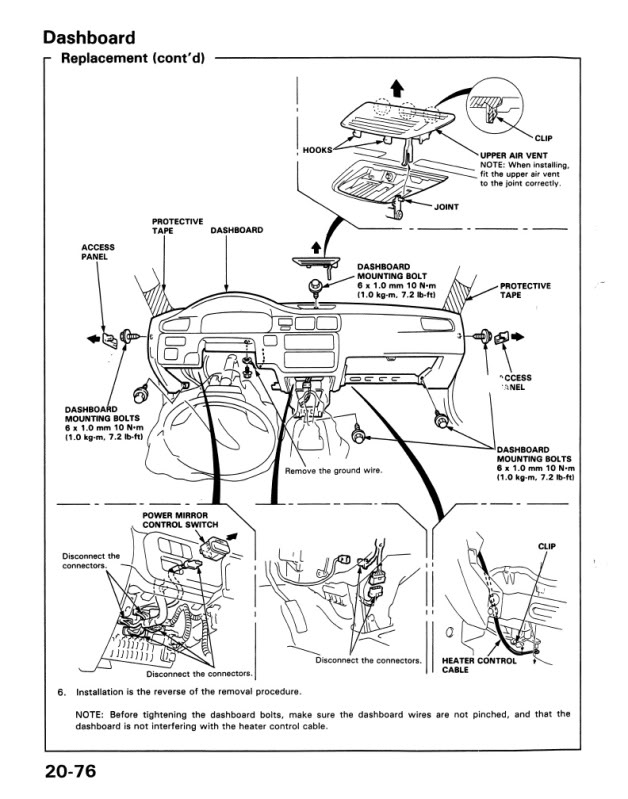
-Once you get the main dash out of the vehicle flip it over and you'll see all the screws that hold the center panel to the dash. Sorry but I didn't take any pictures of where all the screws are located. I may be pulling my dash again here shortly and I will update this DIY with images of these screws and their locations.
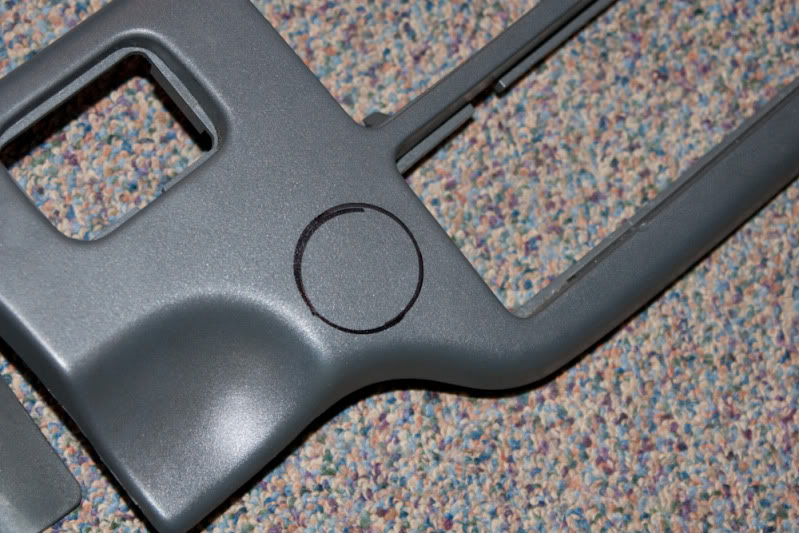
(2.) - Lay the switch over the installation location and trace the outside diameter.
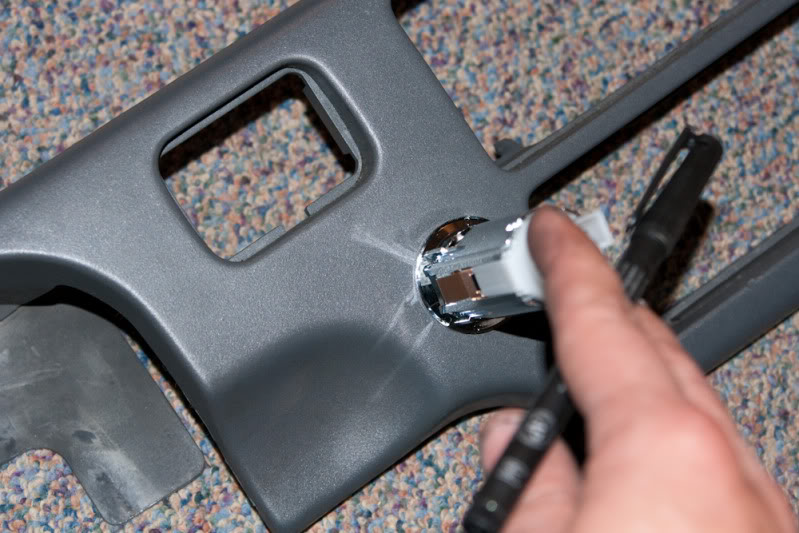
(3.) - Use a bit like this on your dremel and CAREFULLY begin to remove the material. Remember, you can't put the plastic back once its gone so cut a circle smaller than you traced. Be sure to test fit A LOT!!! See how the switch sits in the center panel and remove a little material at a time until it fits perfectly.
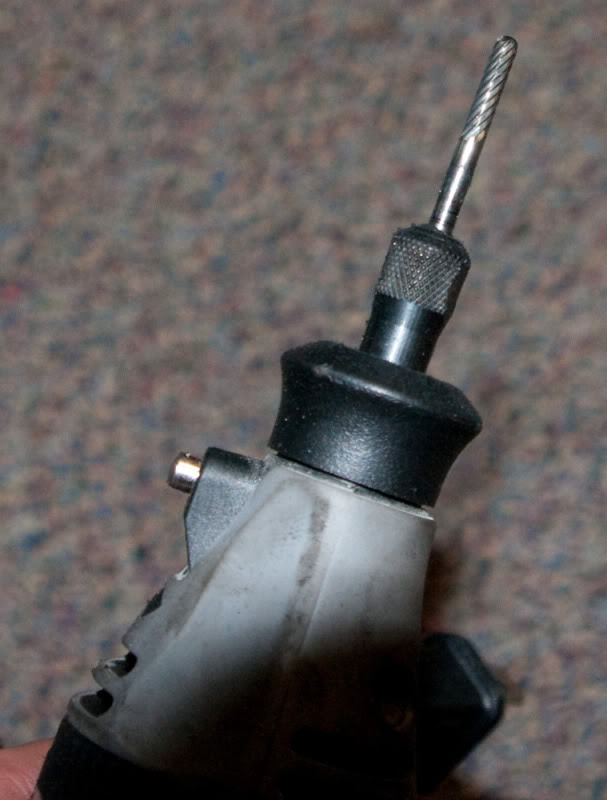
-A tungsten carbine straight cutting bit in the dremel, this it what I used here. Not a bit offered by Dremel but anything with a 1/8" shank will fit.
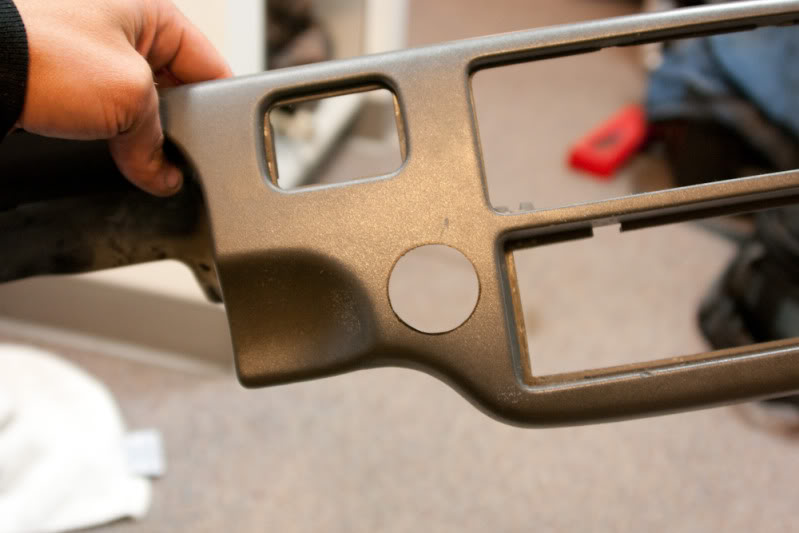
After many test fits and slight modifications the whole is prefect for the switch. You want the diameter of the hole to be the same as the outside diameter of the switch. The switch should have no major gaps but you should be able to send the switch straight through the center panel. The PVC unions will hold the switch in place. The reason for this is so the switch sits flush with the center panel.
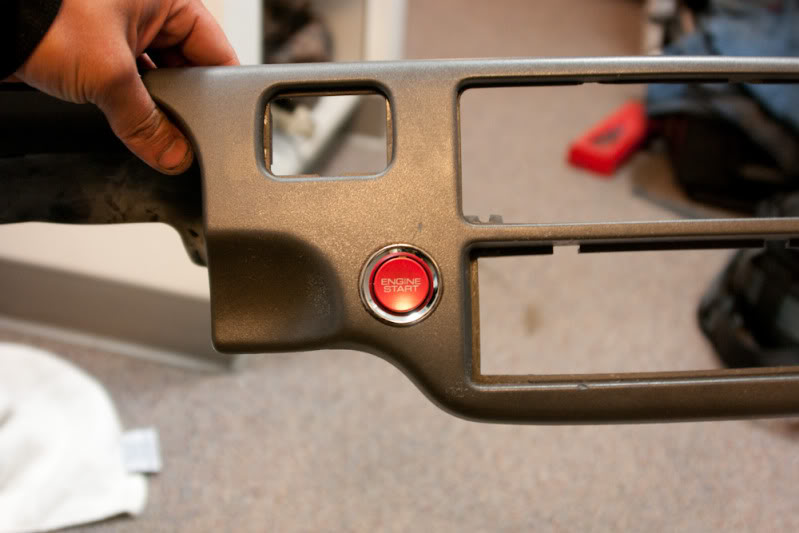
Here is the last test fit before building the shroud out of the PVC unions.
(4.) - Create the shroud to house the switch...
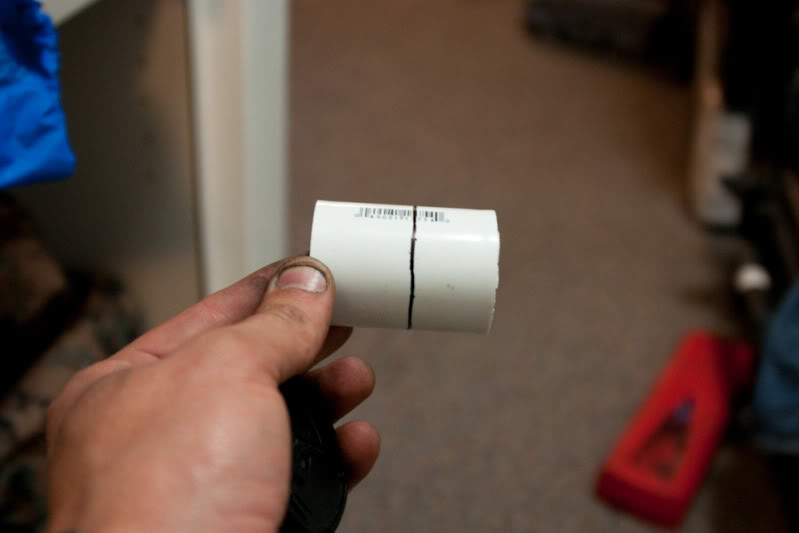
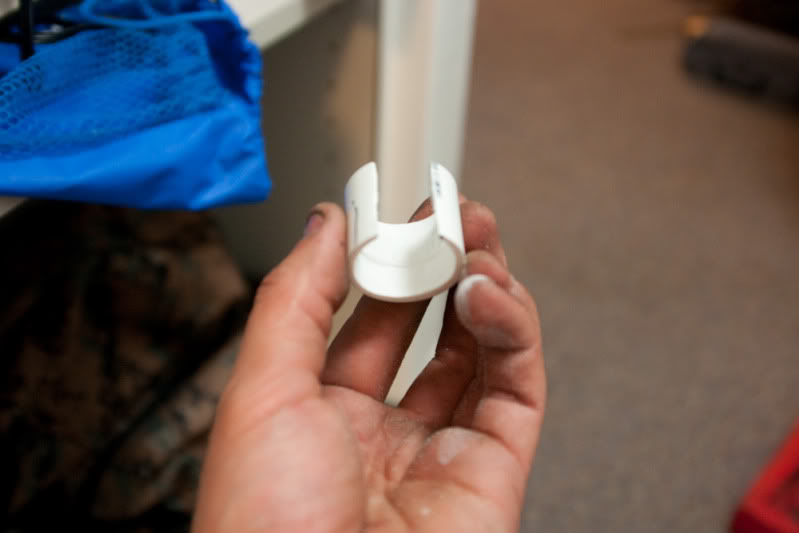
Cut the 1-1/4" PVC union "almost" in half. The reason I say almost is because there is a little lip in the center that we want to keep, this lip will hold the 1" union piece in place for when we cement the sections together and will provide better rigidity to the shroud.
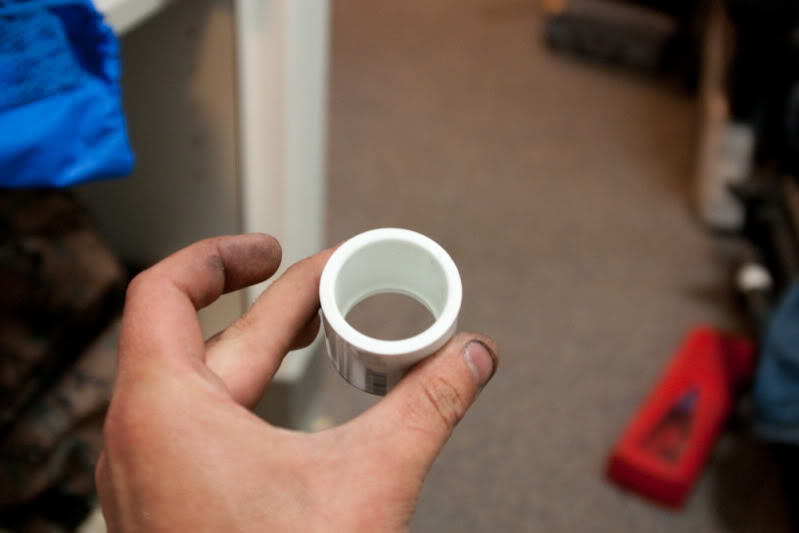
The 1-1/4" union cut down, if you look closely on the inside surface you will see the lip I'm talking about.
You'll want to cut the 1" union a little shorter than the 1-1/4" union. This way it will sit on the lip in the 1-1/4" union and will still allow the switch to sit flush to the top of the 1-1/4" union when we've completed making the shroud.
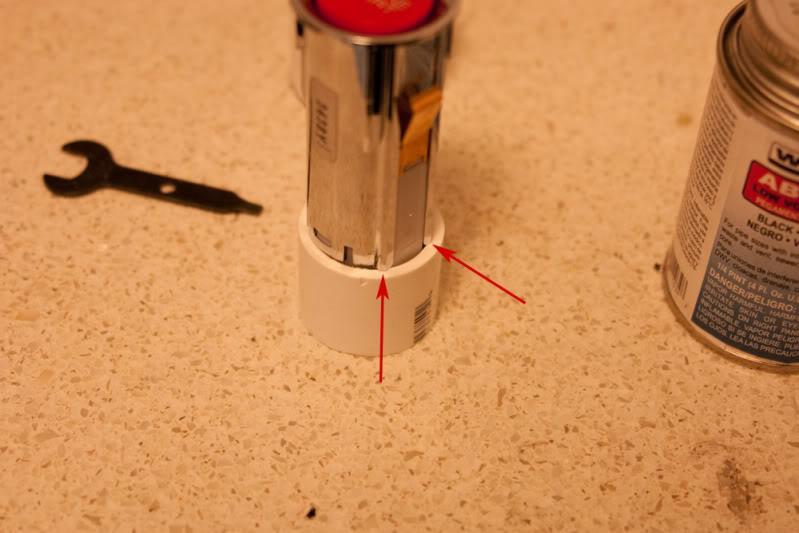
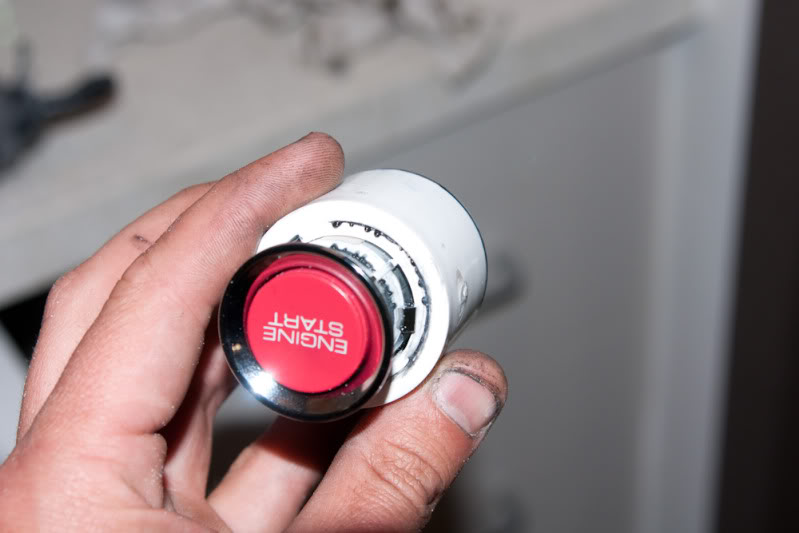
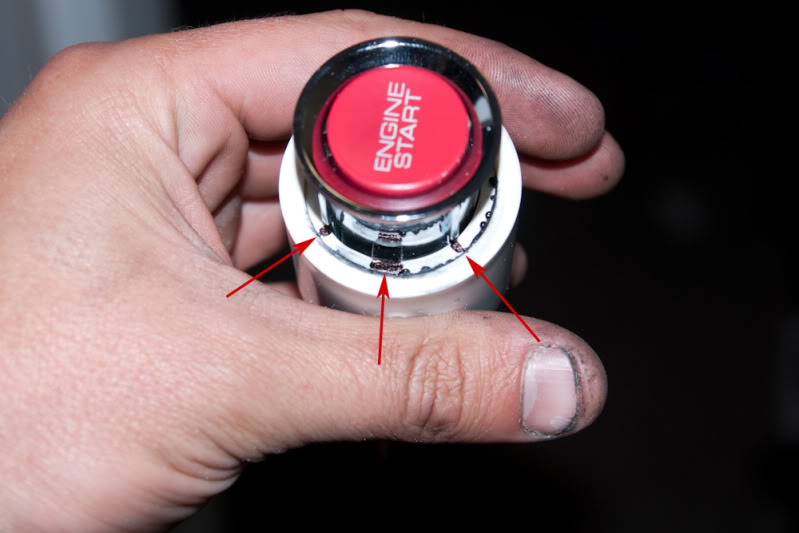
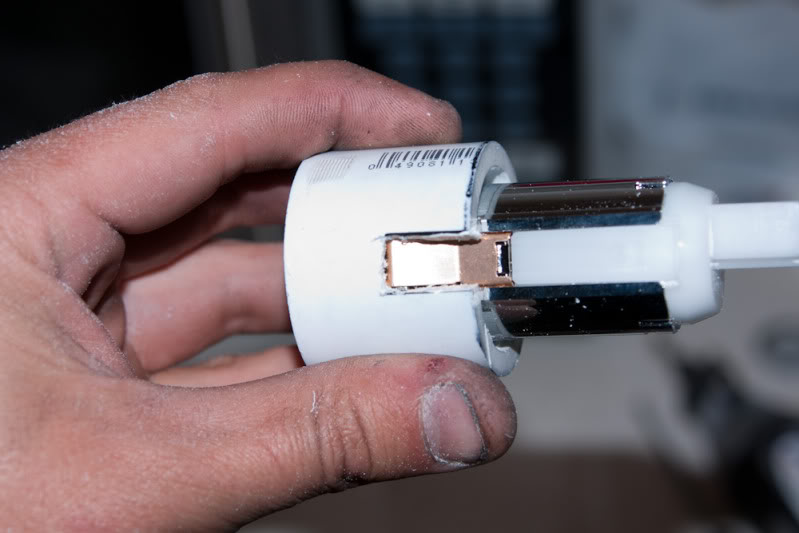
Set the bottom side of the switch in the cut section of the 1" union. Look on the side of the switch where the spring type locking tab is. The switch housing has sort of a guide section as noted with the arrows in the image below. Mark this area with the marker and remove it using a cut-off wheel on the dremel or a cutting bit like I used before.
The section has been removed from the 1" union. Please note that the angle of the cut is horizontal to the center line of the circles diameter. This will insure a more snug fit for the switch.
Slide the 1" union section in the 1-1/4" union for a test fit. Make sure when the switch expands the smaller union that it wont hit the guide lines we just cut out for.

Once the test fit is perfect, apply a thin layer of the PVC cement to the outside of the 1" union then slide it into the 1-1/4 union for bonding.
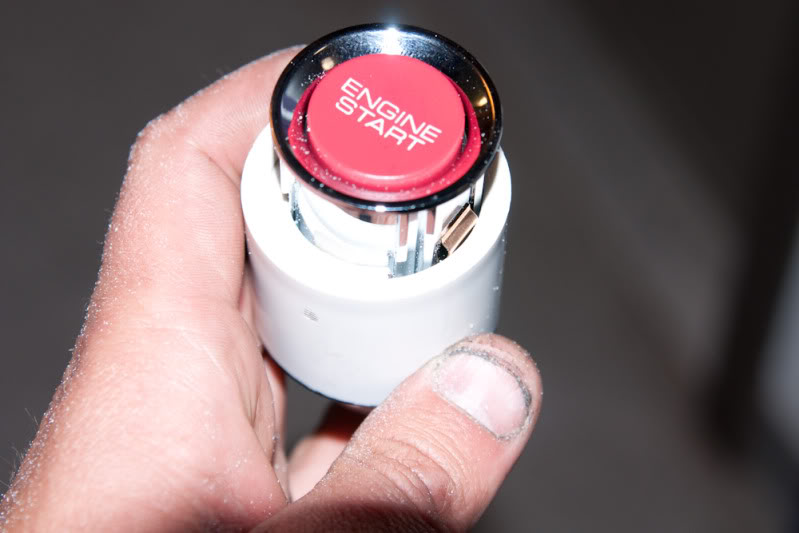
Slide the switch in to expand the smaller union and allow the whole assembly to cure for about 30 minutes.
Oh you thought we were done? Not yet... Once the assembly has cured, mark the guide points on the side of the switch opposite the spring locking tab.
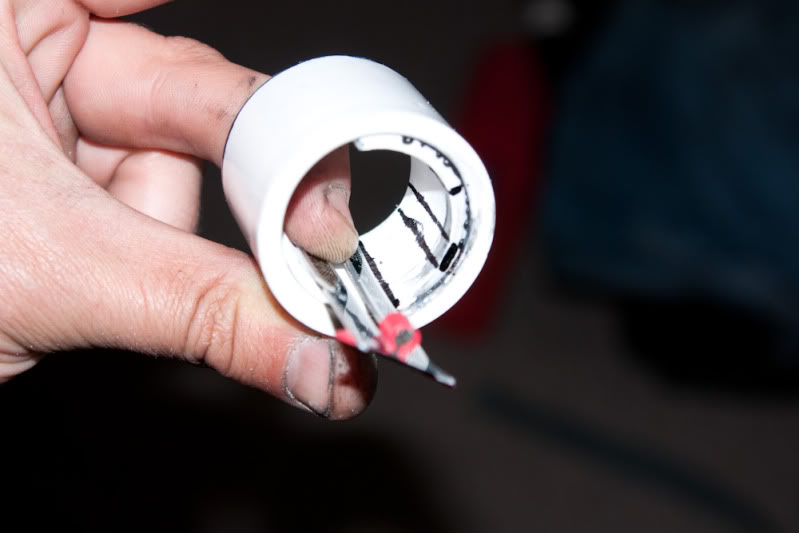
Use a small straight edge to trace these lines down the inside diameter of the assembly. Then grind out grooves for these guides on the switch to slide into.
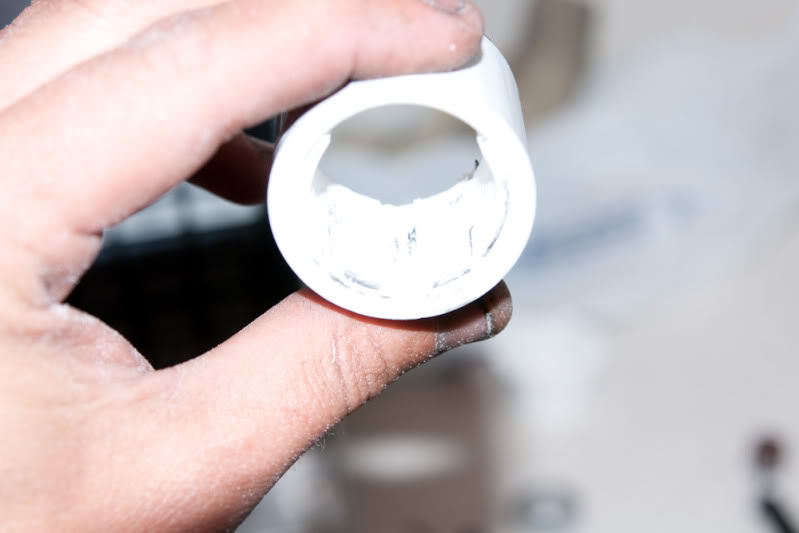
I know its hard to see, but this is where I cut those guide grooves.
Turn the assembly around and cut a nice notch for the spring tab to secure the switch into the assembly. Again I can't stress the importance of test fitting too much!!

Scuff the mating surfaces with some sand paper, clean with rubbing alcohol and then bond the surfaces together. Here I put a bunch of the cement on the back side. Yeah it may look a little nasty but you'll never see this side. The cement works VERY well for bonding plastics as it literally penetrates the surfaces. Thats why I said not to use epoxy or super glue. This cement will give you a permanent bond. BTW the slot for the spring retaining clip will be on the right side if you are looking at the center panel from the front.
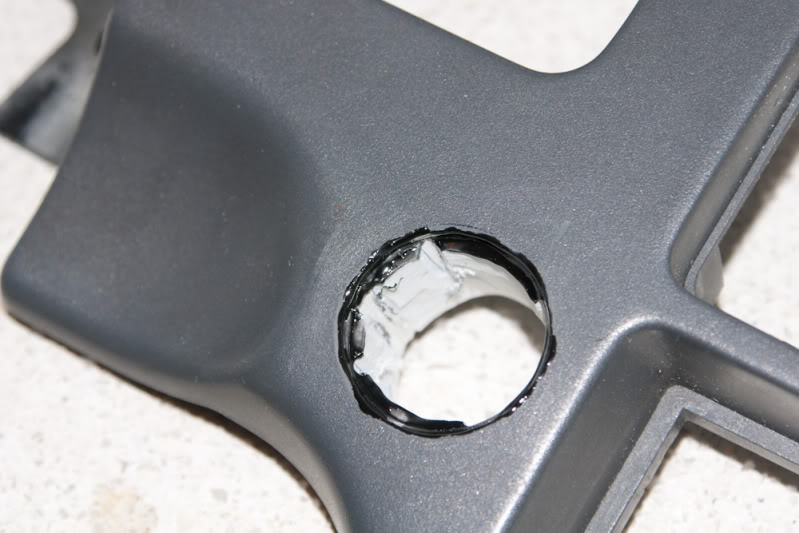
Make sure your assembly is perfectly aligned and centered on your hole.
I don't have pics of this next step, but after it all cured I sanded and recolored the center panel to black using SEM Color Coat (the best **** there is!!)
(5.) - Wiring. Now for the fun part... I LOVE wiring BTW.
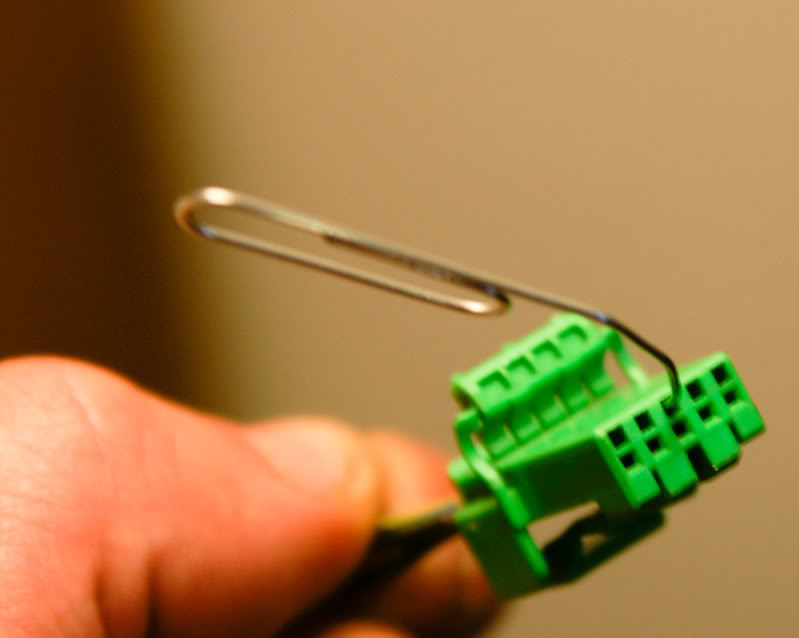
You'll take that 5P switch connector (again if you need one PM me) and remove all the wires from it. Use a paper clip as pictured below. On these clips put the paper clip in that top hole until it bottoms out. You'll even feel a sort of click. Then pull the wire out from the back side.
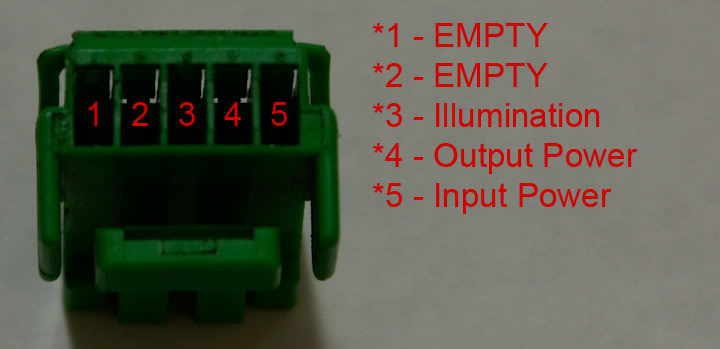
Here is the back side of the 5P clip. Please note this is viewed from the wire side with the locking tab facing down. You can even see there are numbers 1-5 molded into the plastic. Thanks for that Honda!!!
Pin positions 1 and 2 are left empty, 3 is your illumination, 4 output power and 5 input power.
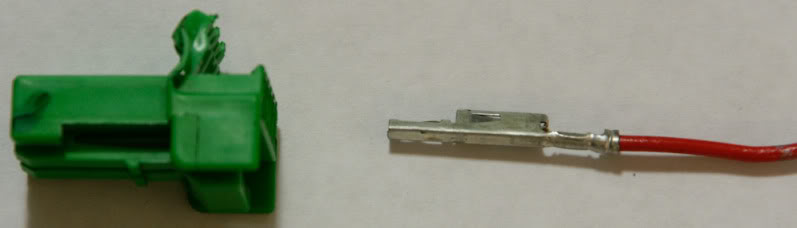
The pins for this type of clip are inserted in this manner. Again locking tab of the clip is down.
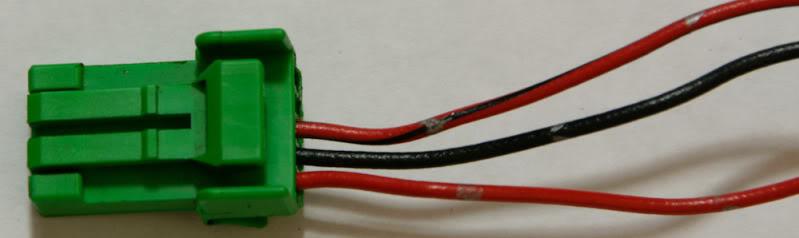
With the three wires installed (locking tab up in this picture) RED is in the #5 position and will be out input power, BLK is output power in the #4 position and RED/BLK is our illumination in the #3 position.
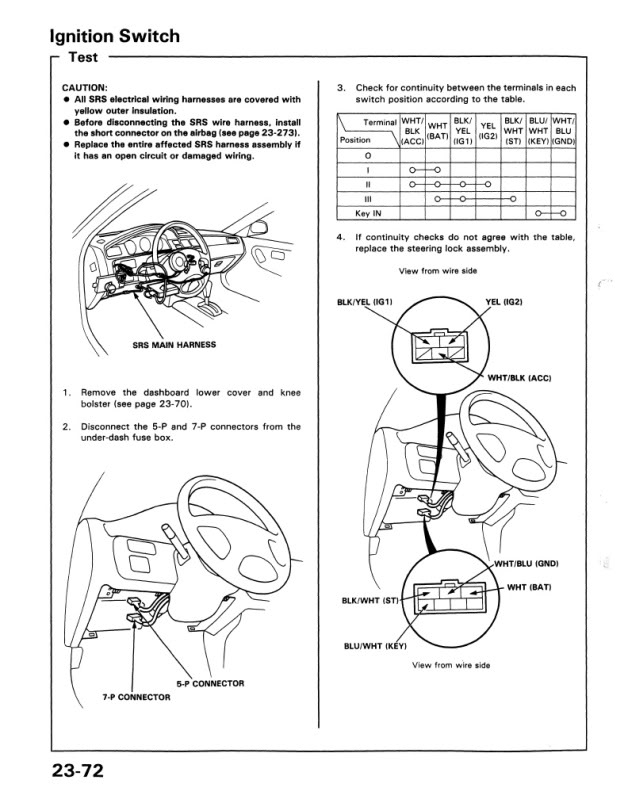
To wire this up in an OE manner you will want to do the following...
-First, solder a few feet of wire to your pigtail leads on the 5P connector. Use different color wire or somehow mark it so you know where to hook it up.
-Splice your RED/BLK illumination wire to the BLU/WHT wire. This way the switch will illuminate whenever the key is in, good for night time.
-Splice your RED input power wire with the BLK/YEL wire. The reason I say this is because this wire provides 12V power when the key is in position II and the clutch is depressed.
-Splice your BLK output power wire to the BLK/WHT starter wire. Self explanatory here.
-Zip tie these three wires to make them part of the OE under dash harness. A little extra slack is always a good idea.
(6.) - Re-install the center panel in the dash. Look at where your hole is, you will likely have to remove a little plastic from the inside section of the dash that will get in the way when the switch is installed in this location.
(7.) - Re-install the dash by reversing the removal steps per the Factory Service Manual.
(8.) - Show off your S2K push button engine start to all your friends!!
If there are any questions please let me know via PM on here or email me, jackal6042@yahoo.com
How to install an S2K push button engine start switch in your EJ1/EG... The LEGIT way!
**Materials Required**
-BEER! The most important "material" for any project like this, my preference is Heineken but any beer will do I guess.
-The center panel from your dash, we'll go over removal of this in the first step.
-S2K push button engine start switch, Honda PN: 35881-S2A-911 MSRP of $52.45, I think I paid like $38 for mine at the dealer. I buy tons of parts and worked for Honda for over 5 years so I get a good deal.
-You'll need a 5P switch connector for this DIY, they are pretty common but you can't just order these from the dealer. I have a ton of these so if you need one PM me and we can work something out.
-Dremel rotary tool with misc bits.
-Soldering iron, solder, heatshrink and some 20AWG or 22AWG wire.
-Wire cutters and wire strippers
-PVC Cement... The stuff I used is "Weld On" brand ABS 2773 plastic cement. DO NOT use super glue, epoxy etc. That **** will not hold as well and your hard work will go to waste. You can get this stuff at Home Depot in the plumbing section.
-One 1" PVC straight union and one 1-1/4" PVC straight union. We will make our switch housing out of this.
-Fine point felt tip marker
-Paper clip
-Basic hand tools required to remove dash
(1.) - Remove the dashboard and center panel. Follow the steps outlined in the Factory Service Manual...
-Remove the center console (so you don't scratch it when removing the dash) and the center lower cover.
-Once you get the main dash out of the vehicle flip it over and you'll see all the screws that hold the center panel to the dash. Sorry but I didn't take any pictures of where all the screws are located. I may be pulling my dash again here shortly and I will update this DIY with images of these screws and their locations.
(2.) - Lay the switch over the installation location and trace the outside diameter.
(3.) - Use a bit like this on your dremel and CAREFULLY begin to remove the material. Remember, you can't put the plastic back once its gone so cut a circle smaller than you traced. Be sure to test fit A LOT!!! See how the switch sits in the center panel and remove a little material at a time until it fits perfectly.
-A tungsten carbine straight cutting bit in the dremel, this it what I used here. Not a bit offered by Dremel but anything with a 1/8" shank will fit.
After many test fits and slight modifications the whole is prefect for the switch. You want the diameter of the hole to be the same as the outside diameter of the switch. The switch should have no major gaps but you should be able to send the switch straight through the center panel. The PVC unions will hold the switch in place. The reason for this is so the switch sits flush with the center panel.
Here is the last test fit before building the shroud out of the PVC unions.
(4.) - Create the shroud to house the switch...
Cut the 1-1/4" PVC union "almost" in half. The reason I say almost is because there is a little lip in the center that we want to keep, this lip will hold the 1" union piece in place for when we cement the sections together and will provide better rigidity to the shroud.
The 1-1/4" union cut down, if you look closely on the inside surface you will see the lip I'm talking about.
You'll want to cut the 1" union a little shorter than the 1-1/4" union. This way it will sit on the lip in the 1-1/4" union and will still allow the switch to sit flush to the top of the 1-1/4" union when we've completed making the shroud.
Set the bottom side of the switch in the cut section of the 1" union. Look on the side of the switch where the spring type locking tab is. The switch housing has sort of a guide section as noted with the arrows in the image below. Mark this area with the marker and remove it using a cut-off wheel on the dremel or a cutting bit like I used before.
The section has been removed from the 1" union. Please note that the angle of the cut is horizontal to the center line of the circles diameter. This will insure a more snug fit for the switch.
Slide the 1" union section in the 1-1/4" union for a test fit. Make sure when the switch expands the smaller union that it wont hit the guide lines we just cut out for.
Once the test fit is perfect, apply a thin layer of the PVC cement to the outside of the 1" union then slide it into the 1-1/4 union for bonding.
Slide the switch in to expand the smaller union and allow the whole assembly to cure for about 30 minutes.
Oh you thought we were done? Not yet... Once the assembly has cured, mark the guide points on the side of the switch opposite the spring locking tab.
Use a small straight edge to trace these lines down the inside diameter of the assembly. Then grind out grooves for these guides on the switch to slide into.
I know its hard to see, but this is where I cut those guide grooves.
Turn the assembly around and cut a nice notch for the spring tab to secure the switch into the assembly. Again I can't stress the importance of test fitting too much!!
Scuff the mating surfaces with some sand paper, clean with rubbing alcohol and then bond the surfaces together. Here I put a bunch of the cement on the back side. Yeah it may look a little nasty but you'll never see this side. The cement works VERY well for bonding plastics as it literally penetrates the surfaces. Thats why I said not to use epoxy or super glue. This cement will give you a permanent bond. BTW the slot for the spring retaining clip will be on the right side if you are looking at the center panel from the front.
Make sure your assembly is perfectly aligned and centered on your hole.
I don't have pics of this next step, but after it all cured I sanded and recolored the center panel to black using SEM Color Coat (the best **** there is!!)
(5.) - Wiring. Now for the fun part... I LOVE wiring BTW.
You'll take that 5P switch connector (again if you need one PM me) and remove all the wires from it. Use a paper clip as pictured below. On these clips put the paper clip in that top hole until it bottoms out. You'll even feel a sort of click. Then pull the wire out from the back side.
Here is the back side of the 5P clip. Please note this is viewed from the wire side with the locking tab facing down. You can even see there are numbers 1-5 molded into the plastic. Thanks for that Honda!!!
Pin positions 1 and 2 are left empty, 3 is your illumination, 4 output power and 5 input power.
The pins for this type of clip are inserted in this manner. Again locking tab of the clip is down.
With the three wires installed (locking tab up in this picture) RED is in the #5 position and will be out input power, BLK is output power in the #4 position and RED/BLK is our illumination in the #3 position.
To wire this up in an OE manner you will want to do the following...
-First, solder a few feet of wire to your pigtail leads on the 5P connector. Use different color wire or somehow mark it so you know where to hook it up.
-Splice your RED/BLK illumination wire to the BLU/WHT wire. This way the switch will illuminate whenever the key is in, good for night time.
-Splice your RED input power wire with the BLK/YEL wire. The reason I say this is because this wire provides 12V power when the key is in position II and the clutch is depressed.
-Splice your BLK output power wire to the BLK/WHT starter wire. Self explanatory here.
-Zip tie these three wires to make them part of the OE under dash harness. A little extra slack is always a good idea.
(6.) - Re-install the center panel in the dash. Look at where your hole is, you will likely have to remove a little plastic from the inside section of the dash that will get in the way when the switch is installed in this location.
(7.) - Re-install the dash by reversing the removal steps per the Factory Service Manual.
(8.) - Show off your S2K push button engine start to all your friends!!
If there are any questions please let me know via PM on here or email me, jackal6042@yahoo.com
 12-26-2009, 11:52 PM
#2
Honda-Tech Member

You really need to get laid dude.
I cant wiat till someone does a write up on wiring up an S2000 button to where you dont need to insert the key to turn on your car. Its more of a hassle to insert key, turn it, then push the button.
I cant wiat till someone does a write up on wiring up an S2000 button to where you dont need to insert the key to turn on your car. Its more of a hassle to insert key, turn it, then push the button.
12-27-2009, 12:00 AM
#3
Honda-Tech Member
Thread Starter
Join Date: Apr 2009
Location: San Diego, CA
Posts: 434
Likes: 0
Received 0 Likes
on
0 Posts
If you even knew **** about cars you would realize what you're talking about is A. unwanted and B. unrealistic. You want someone to be able to start your car without a key? Pretty stupid if you ask me. First, you would have to disable the steering wheel lock. Then you would have to wire everything to turn on and stay on once the button was pushed without the key in the "run" position. Good luck, I'm looking forward to your write-up then your subsequent post about how somebody jacked your ride.
12-27-2009, 12:11 AM
#4
Honda-Tech Member
calm down guys,
does the s2000 itself needs a key inserted to be able to press the engine start button?
my dad's lexus has proximity sensors and can detect when the key is near or inside the car, allowing the car engine to start with a press of a button (with brake applied, without turns on ACC)
does the s2000 itself needs a key inserted to be able to press the engine start button?
my dad's lexus has proximity sensors and can detect when the key is near or inside the car, allowing the car engine to start with a press of a button (with brake applied, without turns on ACC)
12-27-2009, 12:17 AM
#5
Honda-Tech Member
Thread Starter
Join Date: Apr 2009
Location: San Diego, CA
Posts: 434
Likes: 0
Received 0 Likes
on
0 Posts
calm down guys,
does the s2000 itself needs a key inserted to be able to press the engine start button?
my dad's lexus has proximity sensors and can detect when the key is near or inside the car, allowing the car engine to start with a press of a button (with brake applied, without turns on ACC)
does the s2000 itself needs a key inserted to be able to press the engine start button?
my dad's lexus has proximity sensors and can detect when the key is near or inside the car, allowing the car engine to start with a press of a button (with brake applied, without turns on ACC)
Your dad's Lexus has an RF chip in the key... The vehicle senses this chip and while it is within a certain proximity of the vehicle it is pretty much as if the key is in the ignition. The presence of the RF chipped key is what makes the circuit complete. Intelligent electronics will do things such as unlock the drivers door when the RF chip is first sensed and consequently as long as the chip is present will allow the push button to start the car or initiate accessory mode.
12-27-2009, 12:31 AM
#6
Honda-Tech Member
Yes, the S2K does require the key to be in the ignition for the push button to work.
Your dad's Lexus has an RF chip in the key... The vehicle senses this chip and while it is within a certain proximity of the vehicle it is pretty much as if the key is in the ignition. The presence of the RF chipped key is what makes the circuit complete. Intelligent electronics will do things such as unlock the drivers door when the RF chip is first sensed and consequently as long as the chip is present will allow the push button to start the car or initiate accessory mode.
Your dad's Lexus has an RF chip in the key... The vehicle senses this chip and while it is within a certain proximity of the vehicle it is pretty much as if the key is in the ignition. The presence of the RF chipped key is what makes the circuit complete. Intelligent electronics will do things such as unlock the drivers door when the RF chip is first sensed and consequently as long as the chip is present will allow the push button to start the car or initiate accessory mode.
with that being said, is there any such thing as an aftermarket proximity sensor?
maybe can be wired up to the ignition to activate ACC mode when the chip(Tx) is found in the proximity of the sensor(Rx)
12-27-2009, 12:46 AM
#7
Honda-Tech Member
Thread Starter
Join Date: Apr 2009
Location: San Diego, CA
Posts: 434
Likes: 0
Received 0 Likes
on
0 Posts
The imobilizer for instance is a similar ship. Though it is not an RFID (radio frequency identification) the technology is somewhat similar.
The RFID chip is not in fact a transmitter, but simply hub for the transmission of a signal. The "reader" sends a signal to the RFID chip then the return is the identifying data.
In the case of the Lexus you dad drives I'm sure the RFID is embedded with some data such as the VIN and I'm sure another sort of code that has to be programmed into the receiver for it to accept the key as valid.
I have not done any research on aftermarket RFID for automotive use, I'm sure for the general consumer it might be a little expensive.
I tend to be an uber nerd and I have plans of including RFID technology into a vehicle to the extreme. Imagine, each driver of the vehicle has a special RFID chip in their key or keyfob that would tell the car who is about to drive the vehicle. It would then setup everything from seat position to music playlists to any other electronically controlled setting. The possibilities are endless.
This EJ1 will be my sort of test subject on this. Eventually the gauge cluster, heater and radio etc will be replaced with touch screens or LCD screens. Everything will be fully customizable and RFID will allow preferences to be stored for each driver. Every possible aspect will be covered. Gauge layout, color schemes or themes, address books for navigation or bluetooth calling, tuning maps (don't want the wife being able to drive at the max boost setting for the turbo or on a track only setup).
Think of RFID as a fingerprint, for instance the employees of the Capital building in Mexico City all have an RFID chip implanted in their skin to track their movement and identity. The chip is smaller than a grain of rice BTW.
The technology has been used in Germany for grocery stores. You upload a shopping list before you go to the store. Your cart will tell you where to stop in each aisle and where on the shelf to look to fulfill your shopping list.
Its used to tag animals too. Ranchers use it, Marine biologists use it. Eventually RFID will become as common as the CD is today. Just wait.
Trending Topics
12-27-2009, 01:13 AM
#8
Honda-Tech Member
nice thesis lol,
didnt know what RFID meant and now that i have that basic knowledge i thank you a bunch
but i do wonder, instead of having RF identification to bridge a transmitted signal.
my proximity sensor idea i got from my iphone (when the proximity sensor senses an object close to the face of the iphone (it shuts off the screen during a call, no RFID in this event)
theoretically, this same idea could be implemented to activate the ignition relay and activate the ACC position, not with identification but simply a Tx signal and Rx recieve
its hard to sound smart and make sense when im not good at it lol
12-27-2009, 01:25 AM
#9
Honda-Tech Member
Thread Starter
Join Date: Apr 2009
Location: San Diego, CA
Posts: 434
Likes: 0
Received 0 Likes
on
0 Posts
nice thesis lol,
didnt know what RFID meant and now that i have that basic knowledge i thank you a bunch
but i do wonder, instead of having RF identification to bridge a transmitted signal.
my proximity sensor idea i got from my iphone (when the proximity sensor senses an object close to the face of the iphone (it shuts off the screen during a call, no RFID in this event)
theoretically, this same idea could be implemented to activate the ignition relay and activate the ACC position, not with identification but simply a Tx signal and Rx recieve
its hard to sound smart and make sense when im not good at it lol
didnt know what RFID meant and now that i have that basic knowledge i thank you a bunch
but i do wonder, instead of having RF identification to bridge a transmitted signal.
my proximity sensor idea i got from my iphone (when the proximity sensor senses an object close to the face of the iphone (it shuts off the screen during a call, no RFID in this event)
theoretically, this same idea could be implemented to activate the ignition relay and activate the ACC position, not with identification but simply a Tx signal and Rx recieve
its hard to sound smart and make sense when im not good at it lol
12-27-2009, 01:38 AM
#10
Honda-Tech Member
You're iPhone will use something such as infrared reflection to perform such a function. Using a technology such as that in the case discussed would be like wiring up a switch to start the car whenever the button is pressed, as long as there is a person sitting in the drivers seat. RFID would be the way to go in a case like this.
could pressure sensors (used in some newer cars) be used to close the relay in the ignition and turn it into ACC position?
but then there could be flaws such as getting up fromt he chair temporarily mimics taking the keys out the ignition
but your right, the possibilities are endless!
12-27-2009, 01:47 AM
#11
Honda-Tech Member
Thread Starter
Join Date: Apr 2009
Location: San Diego, CA
Posts: 434
Likes: 0
Received 0 Likes
on
0 Posts
or that!!!
could pressure sensors (used in some newer cars) be used to close the relay in the ignition and turn it into ACC position?
but then there could be flaws such as getting up fromt he chair temporarily mimics taking the keys out the ignition
but your right, the possibilities are endless!
could pressure sensors (used in some newer cars) be used to close the relay in the ignition and turn it into ACC position?
but then there could be flaws such as getting up fromt he chair temporarily mimics taking the keys out the ignition
but your right, the possibilities are endless!
I do feel RFID would be the basis for functionality. Lets look at a scenario where we combine RFID with other technologies; in this example we'll use infrared reflection.
OK, so lets say the "driver" with the RFID equipped "key" gets withing range of the vehicle. The doors unlock. But lets say he/she is carrying bags from a shopping trip and isn't about to enter the passenger cabin. He/she needs to put their **** in the trunk so they walk towards the trunk. On the trunk lid or surrounding area there are infrared sensors. So IF the RFID chip is present AND these trunk area sensors are triggered, then the trunk will pop and open (linear actuator driven or even simple hydraulic lift arms).
Moving on, again using infrared reflection combined with RFID, the "driver" enters the vehicle. The infrared reflection detects the presence of a person in the driver seat so it turn on accessory mode and cues a voice activation system and waits for a "start" voice command before firing up the engine.
12-27-2009, 01:49 AM
#12
Honda-Tech Member
Thread Starter
Join Date: Apr 2009
Location: San Diego, CA
Posts: 434
Likes: 0
Received 0 Likes
on
0 Posts
BTW, where in Chicago are you from? I was born and raised in Chi-Town, lived on 55th and Cicero for ever, right by Midway. I sold cars at Joe Rizza Acura in Orland Park for a while. Sold Honda's up in Milwaukee for about 4 years before that.
12-27-2009, 01:54 AM
#13
Honda-Tech Member
i just wanna start my engine without a key lol,
but your theories with RFID seem genious, alot of those things are implemented into my dad's car (mostly with pressure sensors +RFID). when you insert your hand intot he door handle touch the handle, it senses the pressure and key and unlocks specifically that door, same for the trunk.
your idea IR implemented into the vehicle sounds simple yet ingeniously composed
12-27-2009, 02:18 AM
#14
Honda-Tech Member
Thread Starter
Join Date: Apr 2009
Location: San Diego, CA
Posts: 434
Likes: 0
Received 0 Likes
on
0 Posts
The eventual plan for me is to start a shop that does swaps and all the typical tuner ****. But our flagship service will be full vehicle automation. Not just for the "tuner" world but for the consumer market.
Imagine a vehicle that fits you absolutely perfectly... Again themes and layouts of screens but things as far as monitoring your driving characteristics and sending EDF signals to stepper motors to tighten up the damper on the suspension when you're driving more aggressively. Or active downforce systems that will adjust things like splitter angles, spoiler height and pitch based on vehicle speed and wind velocity.
Or something more commercial such as a company vehicle downloading the daily planner from an employees PDA and loading events into the navigation so your employees never get lost.
The possibilities are endless, dream it up and if technology permits, we'll make your vehicle do it!
12-27-2009, 02:23 AM
#15
Honda-Tech Member
Thread Starter
Join Date: Apr 2009
Location: San Diego, CA
Posts: 434
Likes: 0
Received 0 Likes
on
0 Posts
 03-26-2013, 03:38 PM
#18
Trial User

Join Date: Mar 2013
Posts: 1
Likes: 0
Received 0 Likes
on
0 Posts
Hey I was wondering if you are still selling the Honda s2000 push button start 5 pin connector? I am considering buying the s2k start button but need the connector for it. Let me know ASAP.
03-26-2013, 04:23 PM
#19
B*a*n*n*e*d

Join Date: Feb 2008
Location: Charlottesville, VA, USA
Posts: 6,420
Likes: 0
Received 5 Likes
on
5 Posts
Four years later. Maybe you should do like he said and PM him, instead of bumping an ancient thread.


Thread
Thread Starter
Forum
Replies
Last Post
h2oiamwater
Honda Civic / Del Sol (1992 - 2000)
1
11-26-2016 12:48 AM
ELFviper
Honda Civic / Del Sol (1992 - 2000)
4
12-21-2011 05:44 PM
Mike"IAMSLOW"Myers
Honda Civic / Del Sol (1992 - 2000)
4
08-08-2007 01:30 AM