
How To: Tuck the driver's side harness for EG/EJ
 01-12-2011, 07:33 PM
#1
Honda-Tech Member
Thread Starter
Join Date: Nov 2006
Posts: 353
Likes: 0
Received 0 Likes
on
0 Posts
First and foremost this is the way I tucked my driver's side harness. It is not the only way to do it, just one way. Remember, just be creative and take your time! I did not plan on making a how-to on this I just happened to take quite a few pics so I can look back at if I needed to for any reason and decided this might be helpful for someone else...
Materials/Tools
*Soldering Iron
*60/40 Rosin-core Solder (.062" diam.)
*Heat Shrink Tubing (1/8" + 3/16")
*Heat Gun
*Electrical Tape
*Wire Stripper
*Picking Tool/Micro-tip Screwdriver
*Wire Clothes-hanger
This was my starting point:


--------------------------------------------------------------------------------------------------------------------
1.) Remove driver's-side side skirt, fender, front bumper, windshield wipers and windshield wiper cowl (sorry I have no pics of this process). Here is what you end up with:

2.) Unplug/remove harness from the engine bay. Then, pull it through to the inside of the car.


Note: Do not cut/rip the rubber grommet where the harness enters the cabin because you will be re-using it.
3.) Here is the harness pulled out of the car:

Notice how there are two plugs at the end of it (one brown, one grey)? Well, after you completely unwrap the harness you can separate it into two separate harnesses; one harness for each plug. Here is a pic of the grey plug's harness after it has been separated/wrapped. This harness is for the three big plugs inside the bay mounted to the shock tower and it was pulled in (tucked) completely inside of the car. The brown plug's harness has all the wires for the headlights/corners, cruise control/sidemarkers if apl., windshield squirters + wiper motor.

After tucking the harness pictured above, I re-connected it inside and re-used the rubber grommet to seal it up. Note: I cut a slit at the bottom of the rubber grommet and shaved off a piece of it in order for the "now-larger" harness to fit through it.

4.) Now, you should be left with only the brown plug's harness (headlight harness). This is when you have to decide what wires you want to keep. For example, I removed the wires for my windshield squirters, brake master cylinder cap and extra wire for fog lights (I have a DX model so mine does not come with cruise control). After having all of this figured out, I pulled my harness through a hole beside where the hood cable runs through. It was covered by a plastic plug but I cut the center part of it out and ran my harness through it and pressed it back in. I also tucked/pulled my hood latch cable through the fender. Next I taped it all up. The taped up wires on the left are for the wiper motor and the wires on the right are for everything else. You will find out that the headlight wires (red/yellow) are extra long and will need to be shortened in a later step...

Note: The reason I took off my front bumper was because I had problems with the hood closing all the way after tucking my hood cable. To fix this, I had to remove the first plastic clip that follows right after the hood latch. I did not take a pic of this but it would be around this general area:

Removing this first plastic clip will relieve some of the tension in the cable and allow the hood latch to function properly.
5.) Tuck the wiper motor wires. I would have liked to de-pin the wires from the plug but it was being stubborn so I ended up cutting off the plug and soldering the wires after I had ran them through the fender.


To "tuck" the wiper motor wires I simply reached my finger down from the inside of the bay inside the cowl while stuffing the wires through the fender and pulled them through once I felt them. It's a pain... but you'll get it.

6.) Pull the harness through the fender. I cut a wire hanger and used it to aid me in pulling it through:

7.) Plug in everything and decide how much of the wire excess you want to cut. Then, you prep it all up for soldering. (Note: remember to slide your heat shrink tubing in over the wires before you solder them together!) I used the 1/8" heat shrink tubing to cover single wires attached to each other and the 3/16" tubing to cover two wires together after they each have been soldered/heat shrunk.

8.) Tape and Loom. Looking back at these pics I really wish I would've extended that ground wire (for the headlights) and taped it up with the rest of the harness to have it come out with/beside the other two ground wires:


9.)Finished product:


--------------------------------------------------------------------------------------------------------------------
*Here are some links that I found helpful while doing this:
http://civic-eg.com/viewtopic.php?t=92&highlight=
https://honda-tech.com/forums/showth...741857&page=10
Materials/Tools
*Soldering Iron
*60/40 Rosin-core Solder (.062" diam.)
*Heat Shrink Tubing (1/8" + 3/16")
*Heat Gun
*Electrical Tape
*Wire Stripper
*Picking Tool/Micro-tip Screwdriver
*Wire Clothes-hanger
This was my starting point:
--------------------------------------------------------------------------------------------------------------------
1.) Remove driver's-side side skirt, fender, front bumper, windshield wipers and windshield wiper cowl (sorry I have no pics of this process). Here is what you end up with:
2.) Unplug/remove harness from the engine bay. Then, pull it through to the inside of the car.
Note: Do not cut/rip the rubber grommet where the harness enters the cabin because you will be re-using it.
3.) Here is the harness pulled out of the car:
Notice how there are two plugs at the end of it (one brown, one grey)? Well, after you completely unwrap the harness you can separate it into two separate harnesses; one harness for each plug. Here is a pic of the grey plug's harness after it has been separated/wrapped. This harness is for the three big plugs inside the bay mounted to the shock tower and it was pulled in (tucked) completely inside of the car. The brown plug's harness has all the wires for the headlights/corners, cruise control/sidemarkers if apl., windshield squirters + wiper motor.
After tucking the harness pictured above, I re-connected it inside and re-used the rubber grommet to seal it up. Note: I cut a slit at the bottom of the rubber grommet and shaved off a piece of it in order for the "now-larger" harness to fit through it.
4.) Now, you should be left with only the brown plug's harness (headlight harness). This is when you have to decide what wires you want to keep. For example, I removed the wires for my windshield squirters, brake master cylinder cap and extra wire for fog lights (I have a DX model so mine does not come with cruise control). After having all of this figured out, I pulled my harness through a hole beside where the hood cable runs through. It was covered by a plastic plug but I cut the center part of it out and ran my harness through it and pressed it back in. I also tucked/pulled my hood latch cable through the fender. Next I taped it all up. The taped up wires on the left are for the wiper motor and the wires on the right are for everything else. You will find out that the headlight wires (red/yellow) are extra long and will need to be shortened in a later step...
Note: The reason I took off my front bumper was because I had problems with the hood closing all the way after tucking my hood cable. To fix this, I had to remove the first plastic clip that follows right after the hood latch. I did not take a pic of this but it would be around this general area:
Removing this first plastic clip will relieve some of the tension in the cable and allow the hood latch to function properly.
5.) Tuck the wiper motor wires. I would have liked to de-pin the wires from the plug but it was being stubborn so I ended up cutting off the plug and soldering the wires after I had ran them through the fender.
To "tuck" the wiper motor wires I simply reached my finger down from the inside of the bay inside the cowl while stuffing the wires through the fender and pulled them through once I felt them. It's a pain... but you'll get it.
6.) Pull the harness through the fender. I cut a wire hanger and used it to aid me in pulling it through:
7.) Plug in everything and decide how much of the wire excess you want to cut. Then, you prep it all up for soldering. (Note: remember to slide your heat shrink tubing in over the wires before you solder them together!) I used the 1/8" heat shrink tubing to cover single wires attached to each other and the 3/16" tubing to cover two wires together after they each have been soldered/heat shrunk.
8.) Tape and Loom. Looking back at these pics I really wish I would've extended that ground wire (for the headlights) and taped it up with the rest of the harness to have it come out with/beside the other two ground wires:
9.)Finished product:
--------------------------------------------------------------------------------------------------------------------
*Here are some links that I found helpful while doing this:
http://civic-eg.com/viewtopic.php?t=92&highlight=
https://honda-tech.com/forums/showth...741857&page=10


 01-13-2011, 06:48 AM
#6

Good job. Now get rid of the spark plug wires and go wireless.

Trending Topics
01-13-2011, 09:09 AM
#9
Honda-Tech Member
 01-13-2011, 02:37 PM
#12
Honda-Tech Member
shiiitt. didnt know you could tuck the wiper motor wire like that.. i drilled a hole into the bottom of the metal where the motor is and used a grommet 8[
03-21-2011, 07:53 AM
#18
The Grumpiest
iTrader: (4)
Join Date: May 2008
Location: Oak Ridge, TN, USA
Posts: 28,333
Likes: 0
Received 16 Likes
on
15 Posts
I see you didn't read the whole thread. He gave a link to a build that that also shows how to do the passenger side.
*Here are some links that I found helpful while doing this:
http://civic-eg.com/viewtopic.php?t=92&highlight=
https://honda-tech.com/forums/showth...741857&page=10
http://civic-eg.com/viewtopic.php?t=92&highlight=
https://honda-tech.com/forums/showth...741857&page=10
03-26-2011, 06:46 PM
#20
Honda-Tech Member
Thread Starter
Join Date: Nov 2006
Posts: 353
Likes: 0
Received 0 Likes
on
0 Posts


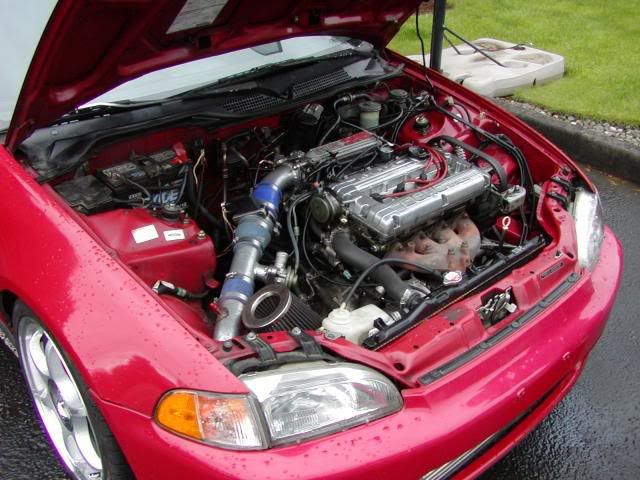
I've done a few things under my hood since I've made this thread. Here is a recent pic, as in I just went outside and took it for ya'll

 03-26-2011, 08:53 PM
#22
Honda-Tech Member
Thread Starter
Join Date: Nov 2006
Posts: 353
Likes: 0
Received 0 Likes
on
0 Posts
It's a Comptech Icebox. I bought it off of Weksos. Here's the link:
http://www.weaksauceparts.com/store/...cat=752&page=1
http://www.weaksauceparts.com/store/...cat=752&page=1
 03-27-2011, 10:39 AM
#24
Honda-Tech Member
Did that air filter box come w/ a filter? If so, is it drop in ?? And does it look like a SPOON one ???
03-27-2011, 10:43 AM
#25
The Grumpiest
iTrader: (4)
Join Date: May 2008
Location: Oak Ridge, TN, USA
Posts: 28,333
Likes: 0
Received 16 Likes
on
15 Posts
It's a Comptech Icebox. I bought it off of Weksos. Here's the link:
http://www.weaksauceparts.com/store/...cat=752&page=1
http://www.weaksauceparts.com/store/...cat=752&page=1