
HOW TO: Install New Lost Motion Assemblies in a Vtec head (LMA)
 03-29-2009, 08:29 AM
#1
Honda-Tech Member
Thread Starter

Join Date: Sep 2008
Location: WV
Posts: 589
Likes: 0
Received 0 Likes
on
0 Posts
After swapping a LS/Vtec into my hatch, I noticed the engine had a rattle to it. Inspecting the head and bottom end, I pinpointed the noise with a stethoscope coming from the intake cam side of cylinders 1 & 2. I found that LMA's in B16 heads are prone to wear causing the noise. If you don't know what LMA's are, they are simply a spring mechanism that gives tension for the rocker arm that the Vtec lobe of the cam rides on. Over time, with a combination of poor design, they loose their spring tension, and result in that rocker arm smacking the lobe upon rotation. Honda redesigned the LMA's for the B16's, realizing it was a common problem.
I read through many threads, and decided to replace them. I wanted to do a write-up on this to help others who may have this issue. I want to add that I used the FSM and I recommend looking at it also as a reference. I listed the part number of the LMA's below. This is for a B16A2 head. I recommend confirming the part number for your engine before buying. You can also look them up on www.hondapartsdeals.com. Enjoy!
Tools:
Torque wrench
A good socket & wrench set
10mm Allen wrench socket
12mm bolt fine threads
2mm bolt fine threads
Clean work area, such as a bench or table
Parts
8 new LMA's part# 14820-PCB-305
Pack of rubber bands
Torque Specs
12mm cam cover bolts - 20 ftlbs.
10mm end bolts - 7.8 ftllbs.
Rocker shaft plugs (allen socket) - 46 ftlbs.
Timing belt tensioner bolt - 40 ftlbs.
HOW TO:
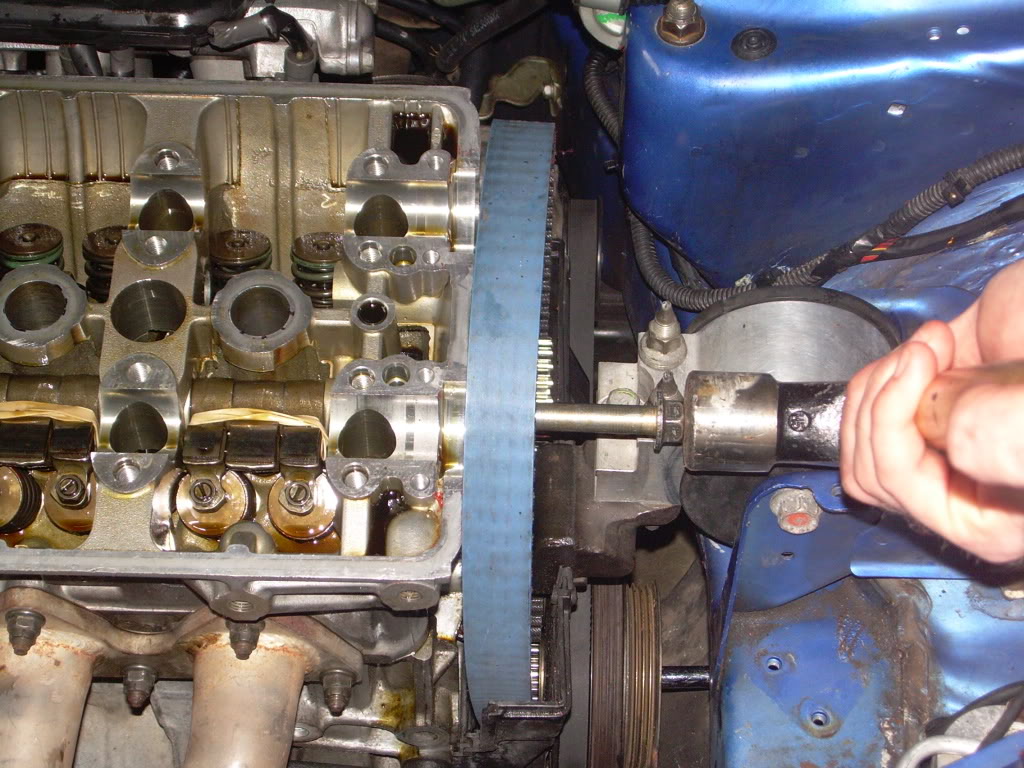
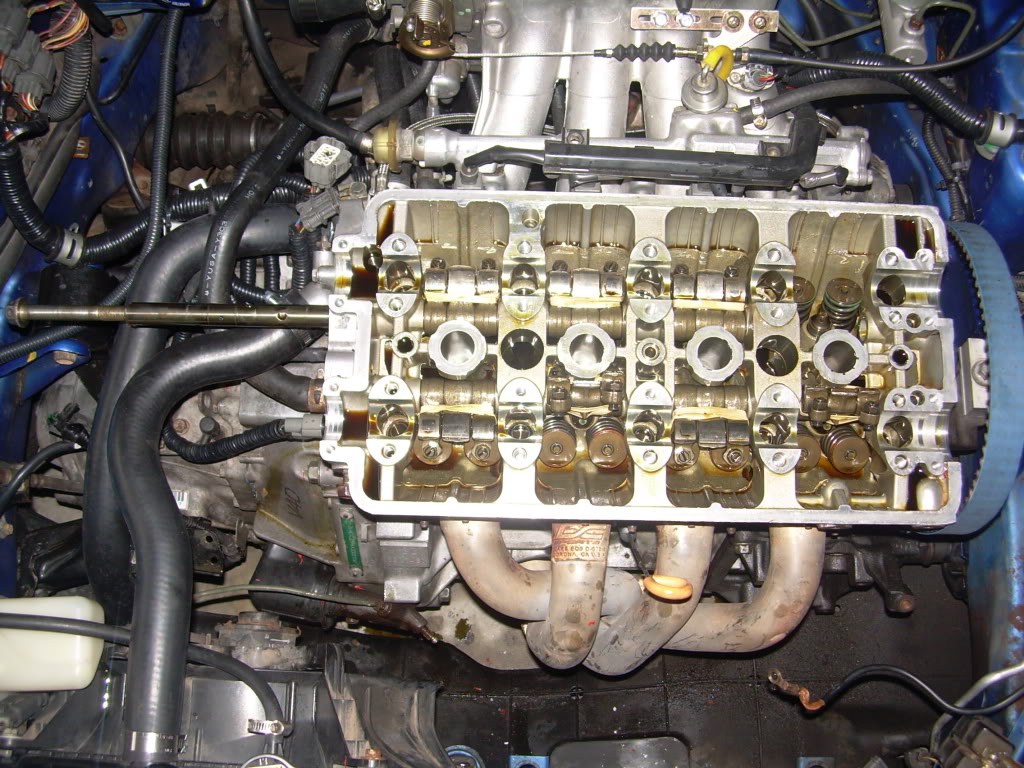
1. This is your basic DOHC Vtec motor. Set the engine to TDC by lining up the white mark on the crank pulley with the indicator arrow. Remove the spark plug wires. And loosen the timing belt tensioner bolt. The tensioner bolt is a 14mm bolt on the outside of the timing guard. Only loosen it a few turns. DO NOT remove or over loosen.
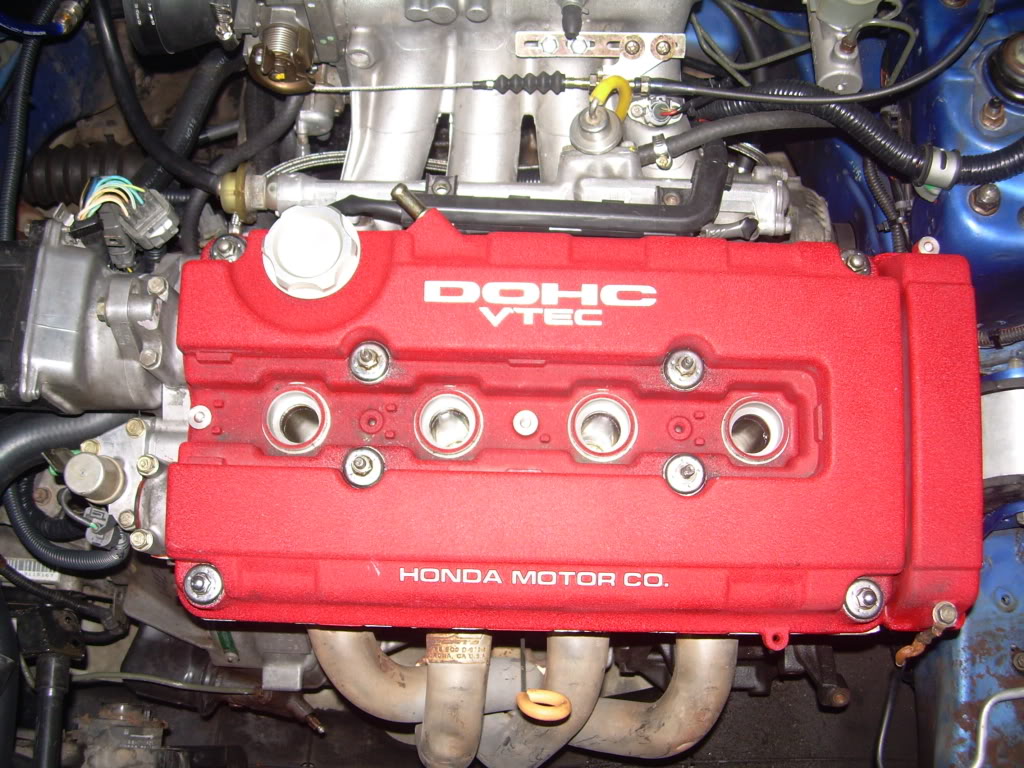
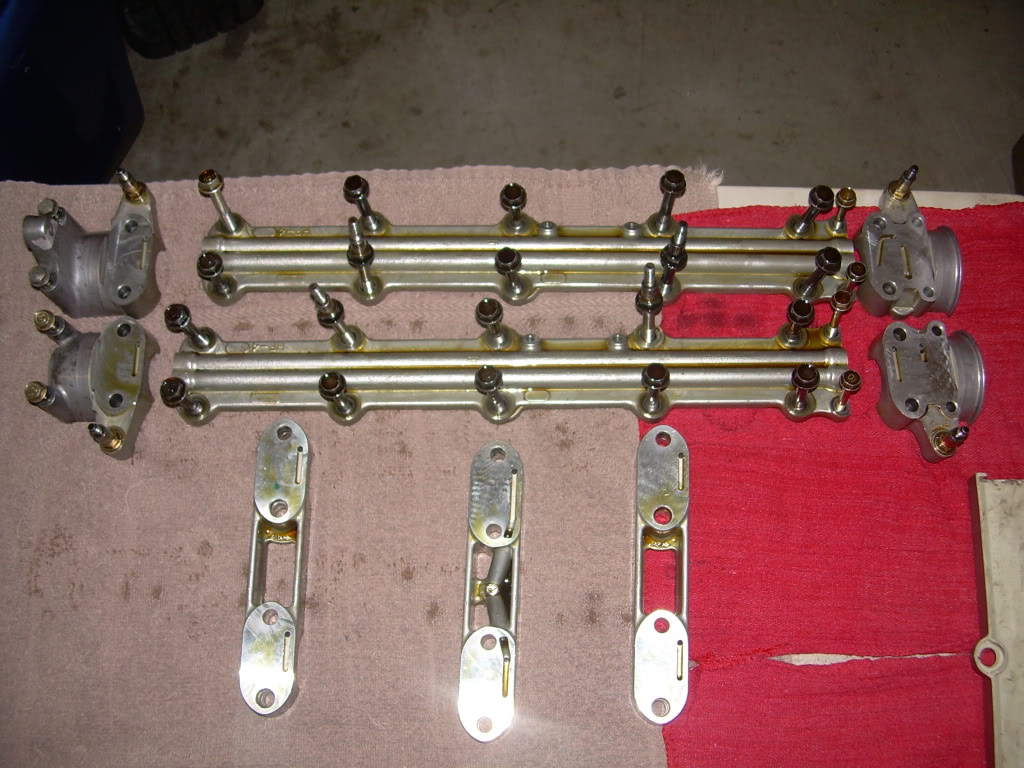
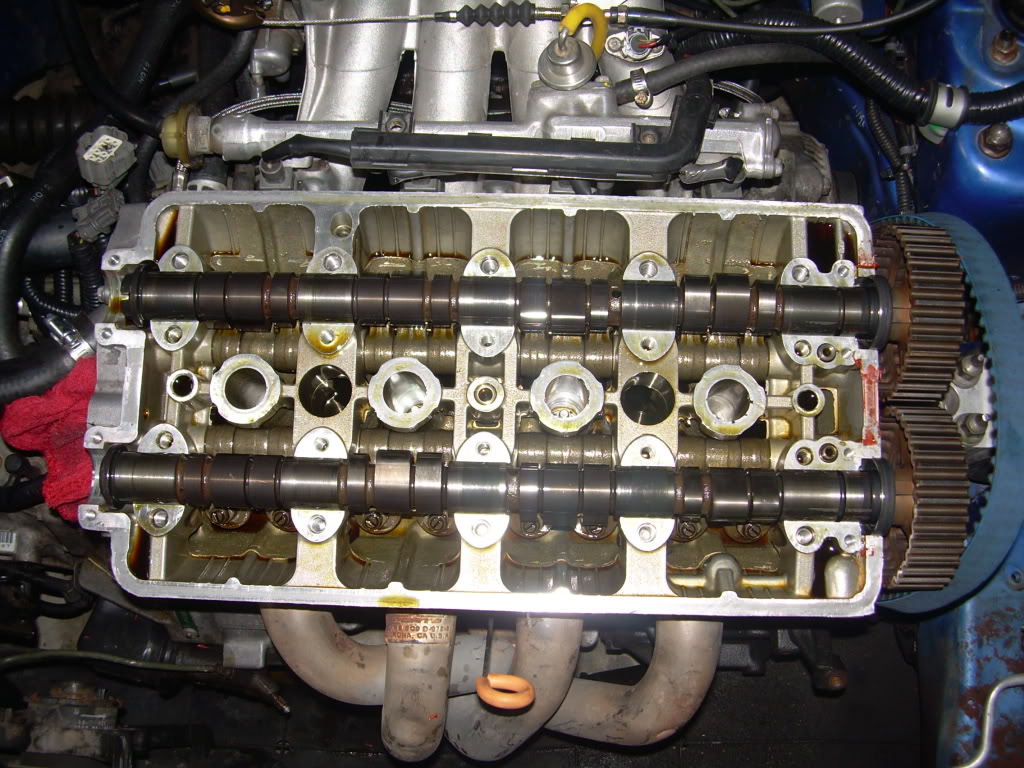
2. Remove the valve cover to reveal the cam covers. Remove each bolt of both cam covers, they are 12mm. Keep them in order! I simply loosened the bolts and pulled the covers off, leaving the bolts in each cover. Also remove the 10mm bolts on the end, and each end piece. At this time you can remove the distributor & Vtec solenoid also.
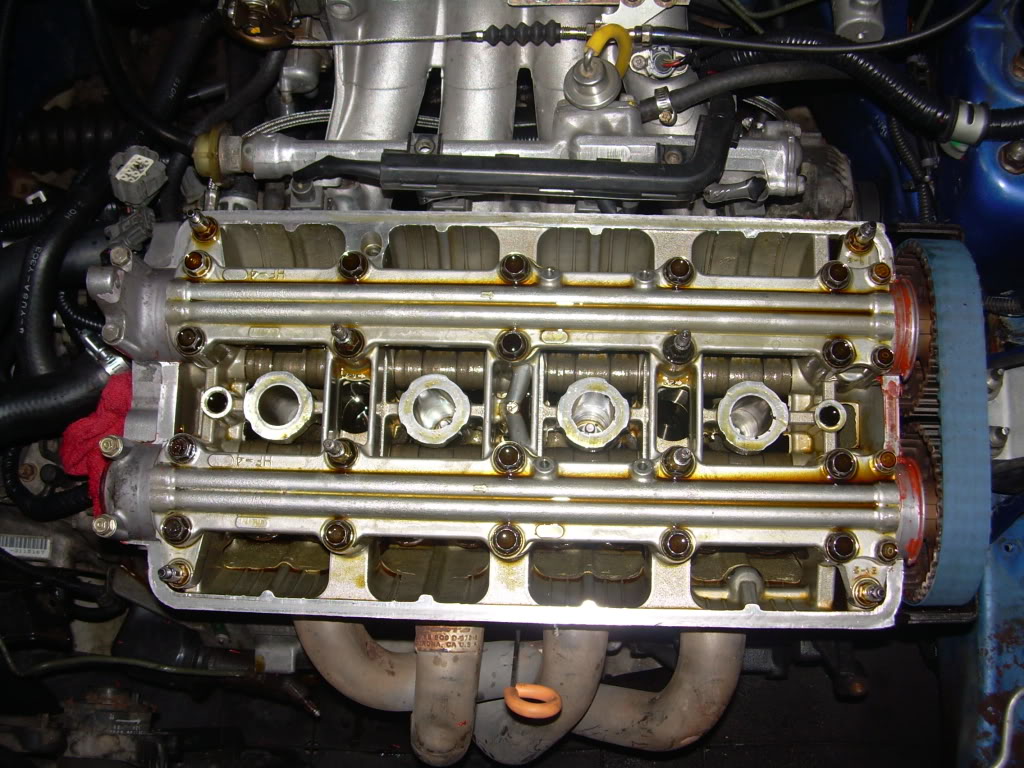
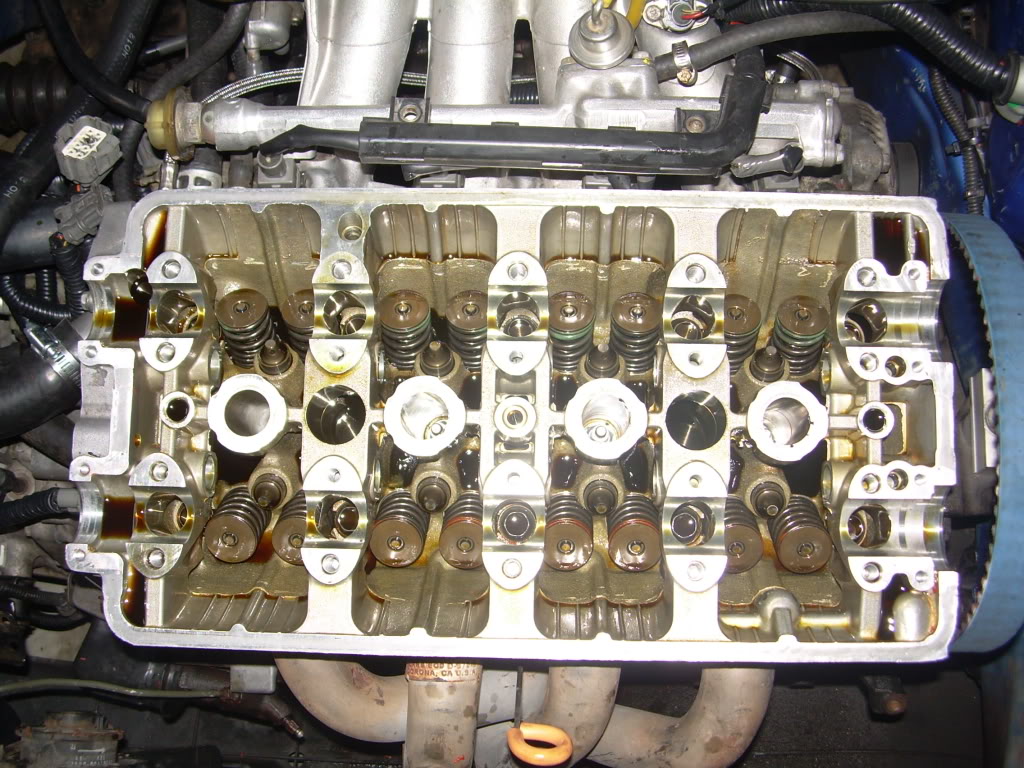
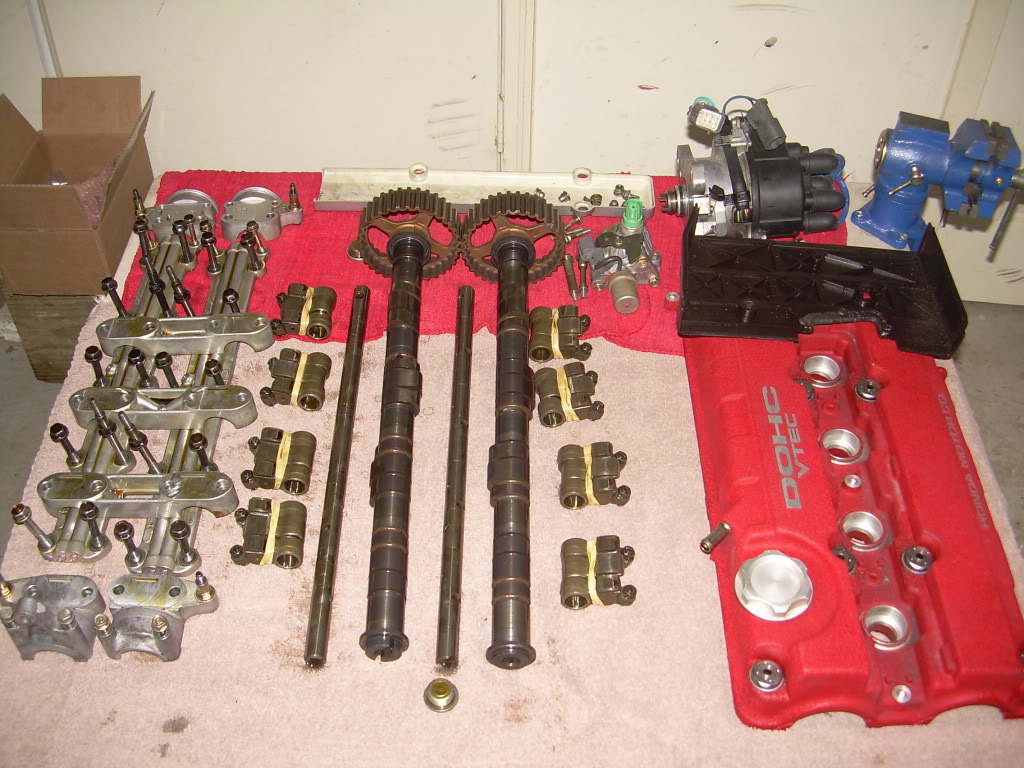
3. With the cam covers off, you can remove the 3 cam spacers to reveal the cams. Use a clean table or bench to lay out everything in order.
4. Before removing the cam shafts, take a pen or sharpie and mark the cam gear and timing belt. This will make it much easier to line them back up when you assemble them. Remove cam shafts.
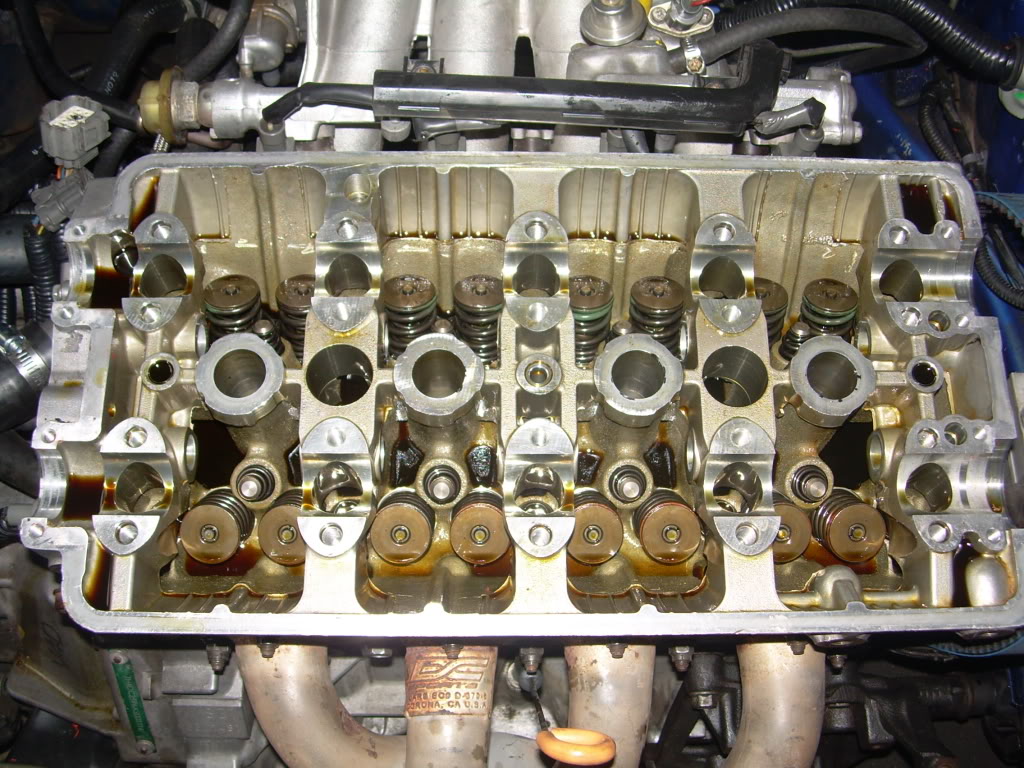
5. With the camshafts removed, you can see each rocker arm. Now take your rubber bands and slide them around each set of rocker arms. If the bands are loose, double them over so they are tight enough to hold them together. This makes removing the arms easier, and keeps the Vtec pins from falling out upon removal.
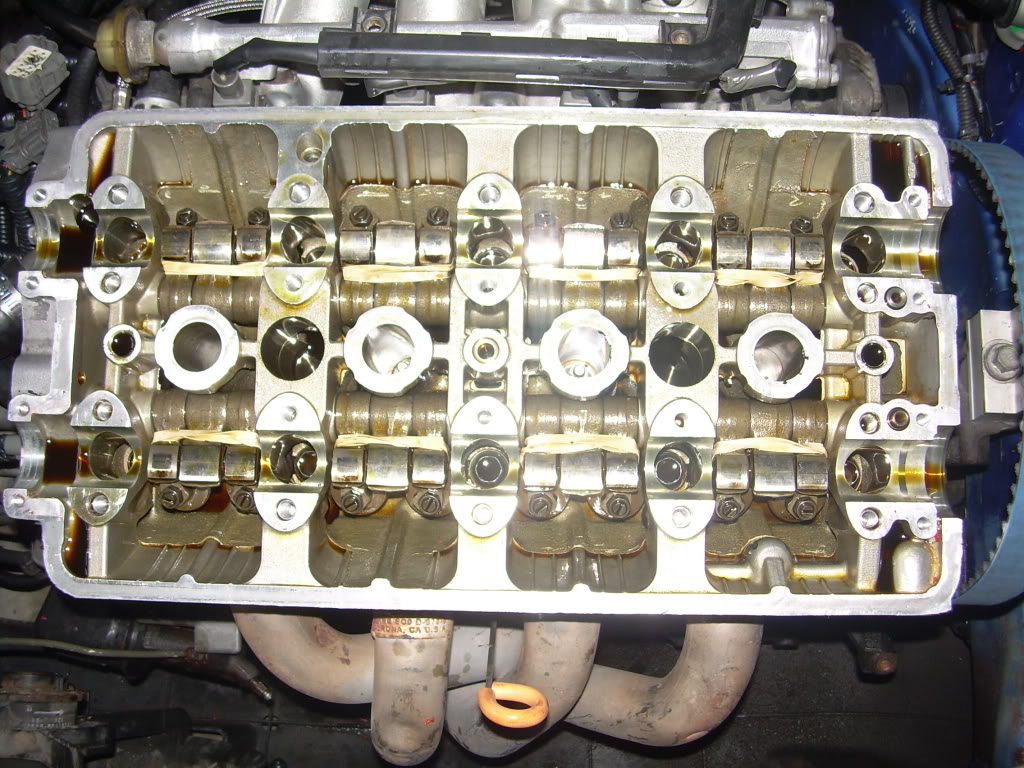
6. Use the 10mm allen key socket to remove the rocker shaft plugs from the end of the head. You can see that there is only one plug on this side because of the Vtec solenoid. Remove the other 2 on the drivers side.

7. There are two orifices that hold the rocker shafts in place. Take a 2mm screw and thread them into each one and pull them out. Keep them separate as they are different and need to go back to their coordinating place.
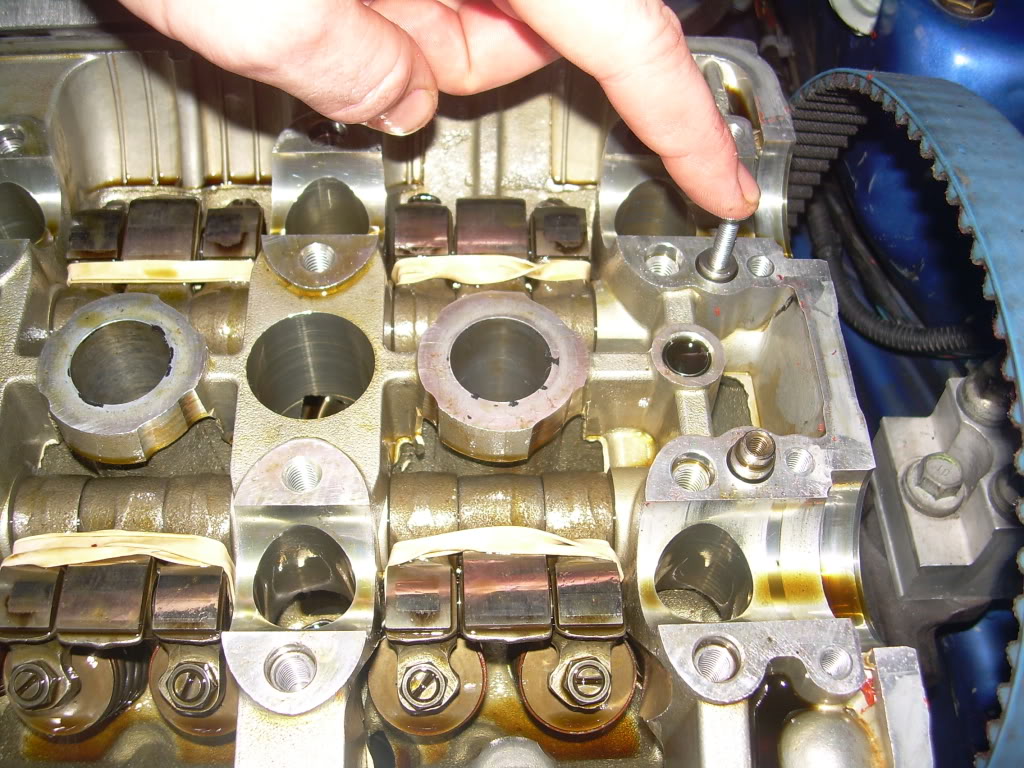
8. We want to remove the shafts from the passenger side. This keeps us from jacking up the engine. If your air intake is in the way, remove it now. Now take the 12mm bolt and screw it into the rocker shaft. The manual says you should be able to pull them out. I was not able to pull them out with my hands so I screwed the bolt in the drivers side and lightly tapped it with a hammer. The shaft started to slide out immediately, once started the shaft could be pulled from the passenger side. As the shaft slides out, remove each set of rocker arms and place them on your bench in ORDER!
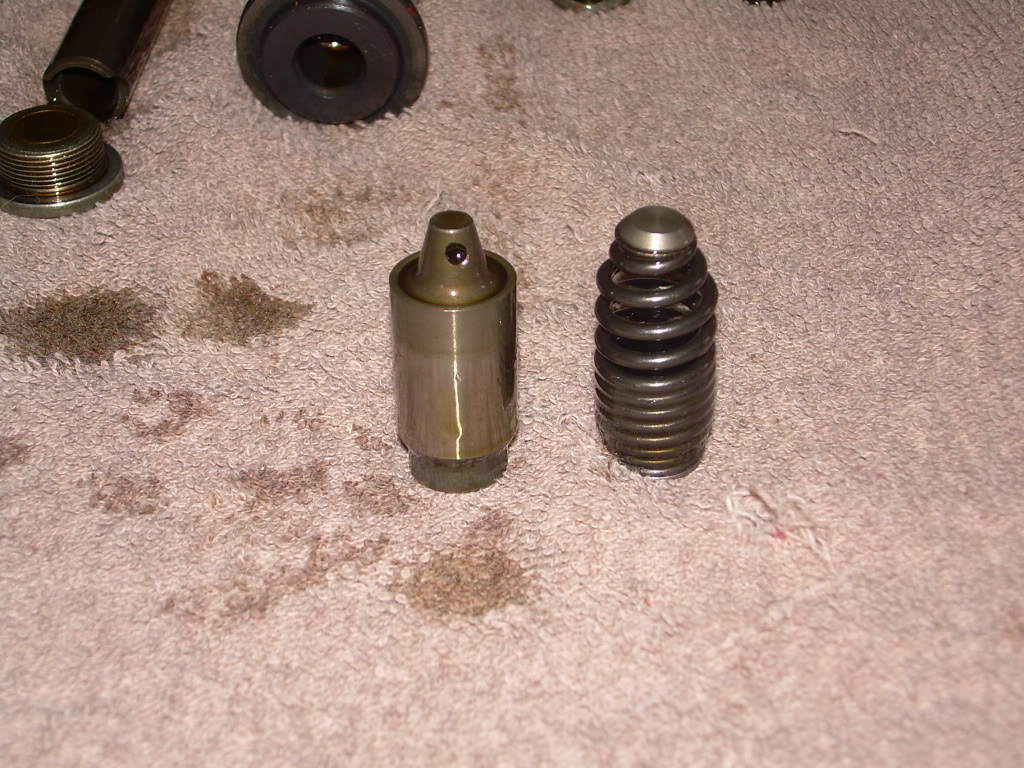
9. You should now be able to see and remove your LMA's. A few of mine were in there pretty good so I had to put pliers on them. Be careful not to hit the valve springs or nick the head when removing.
10. Lube the new LMA's with oil and place them in the head.
11. Reassemble everything in reverse order. Rub oil on the parts when you reassemble. I want to add that organization is key. Laying all the parts out in their coordinating location will help you a lot. Take your time. Refer to the FSM on the order of torquing the cam cover bolts, THIS IS IMPORTANT!!
Impressions
The new LMA's made the engine so smooth. Not only was the tapping noise gone, but the engine reved smoother. I am very pleased with the results. If anyone has questions, please feel free to PM me.
-XLR8
I read through many threads, and decided to replace them. I wanted to do a write-up on this to help others who may have this issue. I want to add that I used the FSM and I recommend looking at it also as a reference. I listed the part number of the LMA's below. This is for a B16A2 head. I recommend confirming the part number for your engine before buying. You can also look them up on www.hondapartsdeals.com. Enjoy!
Tools:
Torque wrench
A good socket & wrench set
10mm Allen wrench socket
12mm bolt fine threads
2mm bolt fine threads
Clean work area, such as a bench or table
Parts
8 new LMA's part# 14820-PCB-305
Pack of rubber bands
Torque Specs
12mm cam cover bolts - 20 ftlbs.
10mm end bolts - 7.8 ftllbs.
Rocker shaft plugs (allen socket) - 46 ftlbs.
Timing belt tensioner bolt - 40 ftlbs.
HOW TO:
1. This is your basic DOHC Vtec motor. Set the engine to TDC by lining up the white mark on the crank pulley with the indicator arrow. Remove the spark plug wires. And loosen the timing belt tensioner bolt. The tensioner bolt is a 14mm bolt on the outside of the timing guard. Only loosen it a few turns. DO NOT remove or over loosen.
2. Remove the valve cover to reveal the cam covers. Remove each bolt of both cam covers, they are 12mm. Keep them in order! I simply loosened the bolts and pulled the covers off, leaving the bolts in each cover. Also remove the 10mm bolts on the end, and each end piece. At this time you can remove the distributor & Vtec solenoid also.
3. With the cam covers off, you can remove the 3 cam spacers to reveal the cams. Use a clean table or bench to lay out everything in order.
4. Before removing the cam shafts, take a pen or sharpie and mark the cam gear and timing belt. This will make it much easier to line them back up when you assemble them. Remove cam shafts.
5. With the camshafts removed, you can see each rocker arm. Now take your rubber bands and slide them around each set of rocker arms. If the bands are loose, double them over so they are tight enough to hold them together. This makes removing the arms easier, and keeps the Vtec pins from falling out upon removal.
6. Use the 10mm allen key socket to remove the rocker shaft plugs from the end of the head. You can see that there is only one plug on this side because of the Vtec solenoid. Remove the other 2 on the drivers side.
7. There are two orifices that hold the rocker shafts in place. Take a 2mm screw and thread them into each one and pull them out. Keep them separate as they are different and need to go back to their coordinating place.
8. We want to remove the shafts from the passenger side. This keeps us from jacking up the engine. If your air intake is in the way, remove it now. Now take the 12mm bolt and screw it into the rocker shaft. The manual says you should be able to pull them out. I was not able to pull them out with my hands so I screwed the bolt in the drivers side and lightly tapped it with a hammer. The shaft started to slide out immediately, once started the shaft could be pulled from the passenger side. As the shaft slides out, remove each set of rocker arms and place them on your bench in ORDER!
9. You should now be able to see and remove your LMA's. A few of mine were in there pretty good so I had to put pliers on them. Be careful not to hit the valve springs or nick the head when removing.
10. Lube the new LMA's with oil and place them in the head.
11. Reassemble everything in reverse order. Rub oil on the parts when you reassemble. I want to add that organization is key. Laying all the parts out in their coordinating location will help you a lot. Take your time. Refer to the FSM on the order of torquing the cam cover bolts, THIS IS IMPORTANT!!
Impressions
The new LMA's made the engine so smooth. Not only was the tapping noise gone, but the engine reved smoother. I am very pleased with the results. If anyone has questions, please feel free to PM me.
-XLR8
Last edited by iliv2xlr8; 03-29-2009 at 10:48 AM.
 03-29-2009, 08:44 AM
#2
Honda-Tech Member
Join Date: Apr 2008
Location: Fontana, Ca, United States
Posts: 3,163
Likes: 0
Received 3 Likes
on
3 Posts
VERY nice thread
made VERY well!
this should help us all since it is pretty detailed
EDIT: by the way, what happened with your engine that UPS lost?
https://honda-tech.com/forums/showthread.php?t=2536305
made VERY well!
this should help us all since it is pretty detailed
EDIT: by the way, what happened with your engine that UPS lost?
https://honda-tech.com/forums/showthread.php?t=2536305
03-29-2009, 08:50 AM
#3
Honda-Tech Member
Join Date: Dec 2007
Location: 615
Posts: 147
Likes: 0
Received 0 Likes
on
0 Posts
great info! my b16 has been making a lot more noise in the past year and i was thinking i needs a valve adjustment but it could quite possibly be the LMA's after reading this. thankssss
03-29-2009, 09:23 AM
#4
Honda-Tech Member
Thread Starter
Join Date: Sep 2008
Location: WV
Posts: 589
Likes: 0
Received 0 Likes
on
0 Posts
VERY nice thread
made VERY well!
this should help us all since it is pretty detailed
EDIT: by the way, what happened with your engine that UPS lost?
https://honda-tech.com/forums/showthread.php?t=2536305
made VERY well!
this should help us all since it is pretty detailed
EDIT: by the way, what happened with your engine that UPS lost?
https://honda-tech.com/forums/showthread.php?t=2536305
03-29-2009, 09:52 AM
#5
Honda-Tech Member

this is a very nice write up. i love the quality of the pics too!! "cough" STICKY "cough" 
03-29-2009, 10:19 AM
#6
Honda-Tech Member
Join Date: Apr 2008
Location: baltimore, MD, USA
Posts: 281
Likes: 0
Received 0 Likes
on
0 Posts
yea very nice write up the only thing i think you could have added was the torque specs on the bolts for re assembly but none the less great write up.
Trending Topics
03-29-2009, 11:15 AM
#8
Nice, I'm glad to see it's not that hard to do. I did not know the old LMAs come out that easily.
My B16 sounds like a pissed-off typewriter, I'm going to have to do this.
How much were the new LMAs?
My B16 sounds like a pissed-off typewriter, I'm going to have to do this.
How much were the new LMAs?
03-29-2009, 01:15 PM
#9
Honda-Tech Member
Thread Starter
Join Date: Sep 2008
Location: WV
Posts: 589
Likes: 0
Received 0 Likes
on
0 Posts
It really made a world of difference.
I chose to get the stock replacement instead of messing with the Prelude LMA's that require a spacer.
05-05-2009, 07:02 PM
#10
subscribed to this for later...
quick question, would i use a 2000 Civic Si part # for my B16b?
quick question, would i use a 2000 Civic Si part # for my B16b?
Last edited by BLU CIVIC; 05-05-2009 at 08:10 PM.
06-29-2009, 10:07 AM
#13
Honda-Tech Member
Thread Starter
Join Date: Sep 2008
Location: WV
Posts: 589
Likes: 0
Received 0 Likes
on
0 Posts
As far as the part number goes, I just looked it up based on the year and head of my LS/Vtec which was a 98 B16A2.
Use www.hondapartsdeals.com to cross reference the numbers. If you are in doubt, just call them, they are very helpful.
Thanks
Use www.hondapartsdeals.com to cross reference the numbers. If you are in doubt, just call them, they are very helpful.
Thanks
12-12-2009, 10:38 AM
#14
thanks a lot for this thread...in the middle of doing mine right now. i used the same part # for my B16b and ended up using zip ties instead of rubber bands.
02-01-2010, 08:45 PM
#15
Honda-Tech Member
Join Date: Jan 2009
Location: sparks, nv
Posts: 124
Likes: 0
Received 0 Likes
on
0 Posts
thanks for the info i've never had to remove those before and just couldn't figure it out...... but thanks to your detailed post i was able to do the job in 25 mins.
02-01-2010, 11:18 PM
#16
Honda-Tech Member
Join Date: May 2008
Location: Mars Duuuuuude
Posts: 861
Likes: 0
Received 0 Likes
on
0 Posts
sweet i saw the spring type lost motion assemblys on inlinefour.com it gained my interests since then
02-02-2010, 04:31 AM
#17
Crazy Honda Guy
The one thing in this thread that is over looked and been covered in past threads are the different types of LMA's. You can upgrade with gsr models that have a wider tip, or better yet ITR LMA's that have more surface area yet, and may have a different spring tension.
I'll dig that info up again for everyone shortly
I'll dig that info up again for everyone shortly
02-02-2010, 05:48 AM
#19
Crazy Honda Guy
It is too bad the old school pics don't show up anymore, they showed a night and day difference side by side
https://honda-tech.com/forums/showth...=571523&page=4
https://honda-tech.com/forums/showth...&highlight=lma
https://honda-tech.com/forums/showth...=571523&page=4
https://honda-tech.com/forums/showth...&highlight=lma
04-30-2010, 07:55 AM
#20
Honda-Tech Member
Join Date: Jul 2007
Location: Riverside, CA, Riverside
Posts: 9
Likes: 0
Received 0 Likes
on
0 Posts
I am newbie... does anyone know what LMA's ill need for my 95 teg?
b16a/b18b ls vtec...
14820-PCB-305
or
418-P73-J01
help very much appreciated
b16a/b18b ls vtec...
14820-PCB-305
or
418-P73-J01
help very much appreciated
06-22-2010, 10:29 AM
#21
Honda-Tech Member

Join Date: Nov 2009
Location: Gainesville Florida
Posts: 46
Likes: 0
Received 0 Likes
on
0 Posts
the spring type 14820-pcb-305 is the new design replacing the old hydraulic type. this part number covers the b series heads, correct me if im wrong. You can use prelude LMA's for the h22 but you would need a .04" shim.
Im not entirely sure, but i think the 418-P73-J01 is the jap type r version, which allows for the use of bigger cams (hydraulic), again correct me if im wrong. Hope this helps!
06-22-2010, 11:11 AM
#22
Honda-Tech Member
Join Date: Oct 2004
Location: Bay in CA
Posts: 557
Likes: 0
Received 0 Likes
on
0 Posts
This is a really good write up and pretty common problem on the older B series thanks for your time to document your method of doing it. I have to do this this fall on my 95' B18C1. I think they changed the shape of the LMA's in 96 to a better design. Would be curious to see what the old LMA's looked like after you pulled them out. Could you see they were worn out?
06-22-2010, 03:38 PM
#24
Honda-Tech Member
Nice writeup.
Someone sticky this.
I'll be doing mine soon, thanks to this informative guide. I'll append some pics of my own if anyone needs to see anything else.
Someone sticky this.
I'll be doing mine soon, thanks to this informative guide. I'll append some pics of my own if anyone needs to see anything else.
07-20-2010, 09:31 PM
#25
Honda-Tech Member
Join Date: Oct 2004
Location: Bay in CA
Posts: 557
Likes: 0
Received 0 Likes
on
0 Posts
One question for you. on Step 9 you show your old LMA's, but I do NOT see any springs on them till step 10 (new ones installed). Were there old springs before? did they look different if you replaced them? I don't even see those springs listed.